Call for Papers - Educational Administration: Theory and Practice, E-ISSN: 21...
15 mold common problem solutions -dgmf mold clamps co., ltd
1. www.moldclamps.net info@moldclamps.net 0086-17322110281
DGMF Mold Clamps Co., Ltd
mingfeng425@gmail.com
Please browse our website or contact us for more articles, thank you.
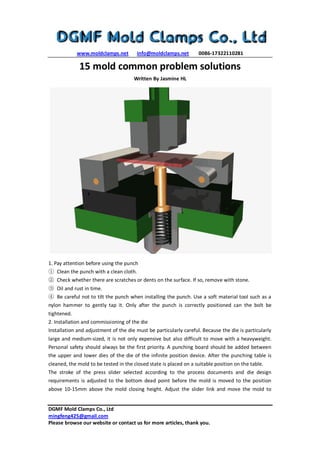
15 mold common problem solutions
Written By Jasmine HL
1. Pay attention before using the punch
① Clean the punch with a clean cloth.
② Check whether there are scratches or dents on the surface. If so, remove with stone.
③ Oil and rust in time.
④ Be careful not to tilt the punch when installing the punch. Use a soft material tool such as a
nylon hammer to gently tap it. Only after the punch is correctly positioned can the bolt be
tightened.
2. Installation and commissioning of the die
Installation and adjustment of the die must be particularly careful. Because the die is particularly
large and medium-sized, it is not only expensive but also difficult to move with a heavyweight.
Personal safety should always be the first priority. A punching board should be added between
the upper and lower dies of the die of the infinite position device. After the punching table is
cleaned, the mold to be tested in the closed state is placed on a suitable position on the table.
The stroke of the press slider selected according to the process documents and die design
requirements is adjusted to the bottom dead point before the mold is moved to the position
above 10-15mm above the mold closing height. Adjust the slider link and move the mold to
2. www.moldclamps.net info@moldclamps.net 0086-17322110281
DGMF Mold Clamps Co., Ltd
mingfeng425@gmail.com
Please browse our website or contact us for more articles, thank you.
ensure that the mold handles Precise the mold shank hole and reach the appropriate mold height.
Generally, the lower die is fixed first (not tightened) and then the upper die is fixed (tightened).
The T-bolts of the pressure plate should be tightened with a suitable torque wrench (lower die)
to ensure that the same bolts have a consistent and ideal pre-clamping. force. It can effectively
prevent manual tightening threads from being too large or too small due to physical strength,
gender, and hand feel errors, and the same thread preloading forces are not the same, which will
cause the upper and lower molds to shift during the stamping process, change the clearance, and
peel the blade. Mouth and other failures occur.
Lubricate the mold completely and prepare the materials for normal production before the test.
Start the punch 3 to 5 times during the empty stroke to confirm that the mold is operating
normally and then try the punch. Adjust and control the depth of the punch into the die, check
and verify the performance and operational flexibility of the mechanisms and devices such as die
guidance, feeding, pushing, side pressing and spring pressing, and then make appropriate
adjustments to achieve the best technical state. 3, 5, and 10 punches of large, medium and small
dies were tested for suspension of production, and 10, 15, 30 punches were retested after
passing. Only after the scribing test, punching surface, and burr inspection, all the dimensions,
shape and position accuracy meet the requirements of the drawing, can it be delivered to
production.
3. Stamping glitches
① If the mold gap is too large or uneven, readjust the mold gap.
② If the mold material and heat treatment are improper, the concave cone of the concave mold
or the cutting edge is not sharp, the material should be reasonably selected, and the working
part of the mold should be made of hard alloy. The heat treatment method is reasonable.
③ Punching wear, grinding punch or insert.
④ The punch enters the die too deeply. Adjust the depth of the punch into the die.
⑤ The guide structure is imprecise or improperly operated, the guide pillar guide sleeve of the
mold and the guide precision of the punch are overhauled to standardize the punch operation.
4. Hop waste
Large die clearance, short punch, material impact (hardness, brittleness), too high stamping
speed, excessive adhesion of stamping oil or too fast oil droplets, stamping vibration produces
chip to spread, vacuum adsorption and mold core Insufficient degaussing can cause waste to be
brought to the die surface.
① The sharpness of the cutting edge. The larger the fillet of the cutting edge, the easier it is to
cause the waste material to rebound. For stainless steel with a relatively thin material, an inclined
cutting edge can be used.
② For more regular waste, you can increase the complexity of the waste or add a polyurethane
ejector on the punch to prevent skipping of the waste and increase scratches on the edge of the
die.
③ Whether the clearance of the mold is reasonable. Unreasonable die clearances can easily
cause scrap rebound. For small diameter holes, the gap is reduced by 10%, and the diameter is
3. www.moldclamps.net info@moldclamps.net 0086-17322110281
DGMF Mold Clamps Co., Ltd
mingfeng425@gmail.com
Please browse our website or contact us for more articles, thank you.
larger than 50.00 mm. The gap is enlarged.
④ Increase the depth of the mold. When the die of each station is punched, the requirements
for the input modules are fixed, and the input modulus is small, which will easily cause the
rebound of the waste.
⑤ Whether the surface of the material to be processed is oily.
⑥ Adjust stamping speed and stamping oil concentration.
⑦ Vacuum adsorption.
Demagnetize the punch, insert, and material.
5. Crush injury, scratch
① The tape or mold has oil stains and waste chips, which can cause pressure injury. Wipe the oil
stains and install an automatic air gun to remove the waste chips.
② The surface of the mold is not smooth. The surface finish of the mold should be improved.
③ The surface hardness of the parts is not enough. The surface needs to be treated with chrome
plating, carburizing, boronizing, etc.
④ Material strain and instability, reduce lubrication, increase compressive stress, and adjust
spring force.
⑤ Process the mold for skipping waste.
⑥ The product is scratched to the mold positioning or other places during operation, causing
scratches. The mold positioning needs to be modified or lowered. Educate the operator to handle
it gently during operation.
6. Scratches on the outer surface of the workpiece after bending
① The surface of the raw material is not smooth, clean, and plain.
② There is waste material in the molding block, and the waste debris between the blocks is
removed.
③ The molding block is not smooth. The molding block is electroplated and polished to improve
the finish of the convex and concave molds.
④The bending radius R of the punch is too small, increase the bending radius of the punch
⑤ The mold bending gap is too small. Adjust the upper and lower mold bending fit gaps.
⑥ Roll forming is installed on the die forming block.
7. Missing punching
Missing punching is usually caused by factors such as failure to find the punch, missing punch
after punching, and sinking of the punch. After the mold is repaired, the first confirmation is
required. Compare with the sample to check whether there is any missing phenomenon. If the
heat sinks, the hardness of the upper die pad should be improved.
8. Discharge is abnormal
① The stripper plate is too tightly fitted with the punch, the stripper plate is tilted, the height of
the screw is not uniform, or the other stripper pieces are improperly installed.
② The mold gap is too small, and the punch needs a large demolding force when it is detached
from the material, causing the punch to be bitten by the material, and the lower die clearance
needs to be increased.
4. www.moldclamps.net info@moldclamps.net 0086-17322110281
DGMF Mold Clamps Co., Ltd
mingfeng425@gmail.com
Please browse our website or contact us for more articles, thank you.
③ The die has an inverted cone, and the die is trimmed.
④ The blanking hole of the die is not aligned with the leaking hole of the lower die seat. Trim
the leaking hole.
⑤ Check the condition of the processed materials. The material is contaminated on the mold,
making the punch bite and unable to process. After punching the deformed material, the punch
will be clamped. It is found that the warped material needs to be leveled before processing.
⑥ The passivation of the punch and lower die should be sharpened in time. The sharp cutting
edge of the die can produce a beautiful cutting surface. If the cutting edge is blunt, additional
punching pressure is required, and the workpiece has a rough cross-section, which generates
great resistance, causing the punch to be bitten by the material.
⑦ Appropriate use of oblique blade punches.
⑧ Minimize wear and tear, improve lubrication conditions, and lubricate plates and punches.
⑨Insufficient spring or rubber elasticity or fatigue loss, replace the spring in time.
⑩The gap between the guidepost and the guide sleeve is too large. Rework or replace the
guidepost guide sleeve.
◎ Parallelism error accumulated re-sharpening assembly.
◎ The holes on the pusher block are not vertical so that the small punch is off-set, and the
pusher block is repaired or replaced.
◎ The installation of the punch or the guidepost is not vertical. Reassemble to ensure verticality.
9. The bent edge is not straight and the size is unstable
① Increase crimping or pre-bending process
② The material pressing force is not enough, increase the pressing force
③ The wear and tear of the convex and concave molds are asymmetrical and the bending force
is uneven.
④ The height dimension cannot be less than the minimum limit dimension
10. Thinned extrusions on curved surfaces
① The die fillet is too small, increase the die fillet radius
②. The gap between convex and concave dies is too small. Correct the clearance between convex
and concave dies.
11. The bottom of the concave part is not flat
① The material itself is uneven and needs to be leveled
② The contact area between the top plate and the material is small or the pushing force is not
enough. Adjust the pushing device to increase the pushing force.
③ If there is no top material device in the die, the top material device or correction should be
added.
④ Adding plastic procedures
12. Stainless steel flanging deformation
Applying a high-quality forming lubricant to the material before making the flanging allows the
material to better separate from the mold and smoothly move on the lower mold surface during
forming. In this way, the material is given a better chance to distribute the stress generated when
5. www.moldclamps.net info@moldclamps.net 0086-17322110281
DGMF Mold Clamps Co., Ltd
mingfeng425@gmail.com
Please browse our website or contact us for more articles, thank you.
it is bent and stretched, preventing the deformation that occurs on the edge of the forming
flange hole and the wear of the bottom of the flange hole.
13. Material distortion
Punching a large number of holes in the material results in the poor flatness of the material,
which may be caused by the accumulation of stamping stress. When a hole is punched, the
material around the hole is stretched downward, which increases the tensile stress on the upper
surface of the plate, and the downward punching motion also increases the compressive stress
on the lower surface of the plate. For punching a small number of holes, the result is not obvious,
but as the number of punching holes increases, the tensile stress and compressive stress also
double until the material is deformed.
One way to eliminate this distortion is to die cut every other hole and then return to the
remaining holes. Although this produces the same stress on the plate, it disintegrates the
tensile/compressive stress accumulation caused by continuous punching in the same direction
one after the other. This also caused the first batch of holes to share the part deformation effect
of the second batch of holes.
14.Severe mold wear
① Replace worn die guide components and punches in time.
② Check whether the die clearance is unreasonable (smaller) and increase the die clearance.
③ Minimize wear and tear, improve lubrication conditions, and lubricate plates and punches.
The amount of oil and the number of injections depend on the conditions of the material being
processed. For rust-free materials such as cold-rolled steel plates and corrosion-resistant steel
plates, the mold must be filled with oil. The oiling points are the guide bush, the oil injection port,
and the lower mold. Light machine oil. For rusty materials, fine rust powder will be sucked
between the punch and the guide sleeve during processing, and dirt will be generated, making
the punch unable to slide freely in the guide sleeve. In this case, if the oil is applied, the rust will
be more easily stained. Therefore, when punching this kind of material, you must wipe the oil
clean, and decompose it once a month. Use steam (diesel) oil to remove the dirt from the punch
and the lower mold, and wipe it again before reassembly. This will ensure that the mold has good
lubrication performance.
④ Improper sharpening method will cause the mold to anneal and increase the wear. Soft
abrasive wheels should be used, a small amount of knife should be used, a sufficient amount of
coolant and the wheels should be cleaned frequently.
15.Prevent stamping noise
The punch is the most critical necessary equipment in the sheet processing industry. The
punching machine will produce mechanical transmission noise, punching noise, and aerodynamic
noise during work. The highest value of this noise is 125dB (A), which greatly exceeds the noise
standard requirements of 85dB (A) and below specified by national standards. And the
surrounding environment (such as offices, residential areas, conference rooms, etc.) cause
extremely serious injury and pollution. Effectively managing this noise has become an urgent
issue. In particular, the implementation of China's first "Noise Law", the scale of environmental
6. www.moldclamps.net info@moldclamps.net 0086-17322110281
DGMF Mold Clamps Co., Ltd
mingfeng425@gmail.com
Please browse our website or contact us for more articles, thank you.
protection industrialization is increasing day by day, which has accelerated the urgency of this
noise control.
Starting from the noise source of the punch and the mold structure, to reduce the noise, pay
attention to the following points:
① Pay attention to mold maintenance and cleaning to keep the cutting edge sharp.
②The shape, quantity, material and punching line length of the die cutting edge, the contact
surface between the die cutting edge and the part should not be too large. Cut off instead of
squeeze out simultaneously.
③The cutting edge of the mold must be perpendicular to the installation surface, and the
clearance between the cutting edge of the convex and concave mold must be reasonable. When
the discharge is difficult, the clearance of the lower mold can be increased and the discharging
force can be increased.
④ The precision of the cooperation between each work template, processing some exhaust
grooves.
⑤ The stopper is changed to small pieces, and the stripper plate and lower template are
changed to insert type to reduce the attack area.
⑥ The source of the ejection plate is changed to a T-shaped ejector rod, the spring is installed in
the upper mold base, and the contoured sleeve is used with the ejector rod to ensure that the
ejection plate still has a certain amount of free movement when the mold is opened.
⑦ Keep good lubrication, no interference of mold, smooth.
The upper and lower die seats are cushioned with aluminum plates for impact cushioning.
⑨After the mold is debugged, install a sound insulation cover or sponge board for sound
insulation treatment on the punch.
⑩Improve the precision of the punch and reduce the structural noise. A buffering and noise
reduction cylinder is installed on the workbench, the gears are reinforced with helical gears and a
gear cover is installed, and a muffler is installed in the pneumatic system.