
Recommended
More Related Content
Similar to Quick Gift Cubes
Similar to Quick Gift Cubes (20)
Recently uploaded
Recently uploaded (20)
Quick Gift Cubes
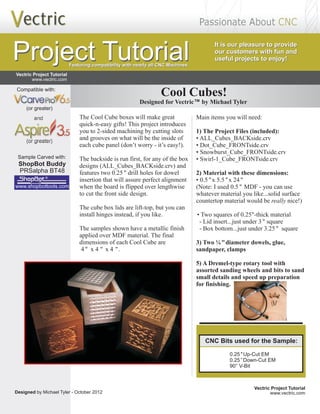
- 1. Cool Cubes! The Cool Cube boxes will make great quick-n-easy gifts! This project introduces you to 2-sided machining by cutting slots and grooves on what will be the inside of each cube panel (don’t worry - it’s easy!). The backside is run first, for any of the box designs ( and features two 0.25 The samples shown have a metallic finish applied over MDF material. ALL_Cubes_BACKside.crv) " drill holes for dowel insertion that will assure perfect alignment when the board is flipped over lengthwise to cut the front side design. The cube box lids are lift-top, but you can install hinges instead, if you like. The final dimensions of each Cool Cube are 4" x 4 " x 4 ". Vectric Project Tutorial Main items you will need: 1) The Project Files (included): • ALL_Cubes_BACKside.crv • Dot_Cube_FRONTside.crv • Snowburst_Cube_FRONTside.crv • Swirl-1_Cube_FRONTside.crv 0.5 " "- " square - Box bottom...just under 3.25" square 2) Material with these dimensions: • 0.5"x 5.5 x 24" " (Note: I used MDF - you can use whatever material you like...solid surface countertop material would be really nice!) • Two squares of 0.25 thick material - Lid insert...just under 3 3) Two ¼ "diameter dowels, glue, sandpaper, clamps 5) A Dremel-type rotary tool with assorted sanding wheels and bits to sand small details and speed up preparation for finishing. Designed for Vectric™ by Michael Tyler Designed by Michael Tyler - October 2012 www.vectric.com Vectric Project Tutorial www.vectric.com Project Tutorial Project Tutorial It is our pleasure to provide our customers with fun and useful projects to enjoy! It is our pleasure to provide our customers with fun and useful projects to enjoy! Featuring compatibility with nearly all CNC Machines Featuring compatibility with nearly all CNC Machines CNC Bits used for the Sample: 0.25 "Up-Cut EM ” 0.25 Down-Cut EM 90° V-Bit Sample Carved with: ShopBot Buddy www.shopbottools.com ® PRSalpha BT48 Compatible with: and (or greater) (or greater)
- 2. FRONT BACK STEP 1 - Open and Review the Project Files Start your or Aspire software and open the project files. (fig. 1) VCarve Pro (cont.) Page 2 (cont.) Carefully review all the toolpaths and make any necessary changes to suit your particular bits and machine. The toolpaths are currently set with feeds, speeds and pass depths that were used in creating the original sample. Please don’t use them directly until you review them for your own setup. You can edit the tools and change the settings to your own preferences and requirements. It is very important to recalculate all toolpaths after making any edits/changes. Once you have recalculated for your own machine and bits, reset the preview, then preview all toolpaths again to visually verify the project outcome on-screen. The project is designed with tabs to hold parts in place during the final part cut outs. You may delete the tabs if you use some other reliable hold-down method. STEP 2 - Run the Project When you are satisfied with your settings, save the toolpaths to the appropriate Post Processor for your machine, place your material on your machine bed and proceed to run the project. Run the (fig. 2a, 2b) ALL_Cubes_BACKside.crv first. Vectric Project Tutorial www.vectric.com Cool Cubes! fig. 1 fig. 2a fig. 2b ALL_Cubes_BACKside.crv Dot_Cube_FRONTside.crv Snowburst_Cube_FRONTside.crv Swirl-1_Cube_FRONTside.crv Always run this one first Flip the material, then run any of the FRONT files After the BACK is done, flip the material, then run the FRONT.
- 3. STEP 2 - Run the Project (cont.) After the Backside has finished, remove your hold downs and flip the material end-to-end lengthwise. Insert a couple dowels through the holes in the material and into your spoilboard. This yields perfect alignment between the back and front of the project. (fig. 2c, 2d) Trim the dowel lengths above the material to be less than your router’s safe-Z clearance. Reapply your hold downs, then proceed to run your choice of the FRONTside files. STEP 3 - Release and Sand Parts Separate the parts from the material, then sand off any tab remnants. (fig. 3a, 3b) Page 3 STEP 4 - Part Assembly Gather the seven box parts...four panels, the bottom square and the lid and lid insert square. (fig. 4a) Glue the box parts together. Clamp until dry. (fig. 4b) NOTE: I left the interior of my sample boxes unpainted, so I glued the lid square insert at this step. If you will be coating/painting/flocking the inside of the box, you may want to glue the insert as the last step so you can adjust the square’s size to allow for the thickness of the coating you use. Skip this step altogether if installing hinges. Glue the lid square insert under the lid...invert the box over the lid to aid in alignment of the insert. (fig. 4c, 4d) (cont.) (cont.) Vectric Project Tutorial www.vectric.com Cool Cubes! fig. 2c fig. 2d fig. 3b fig. 3a fig. 4a fig. 4b fig. 4d fig. 4c
- 4. Page 4 Vectric Project Tutorial www.vectric.com STEP 5 - Finish Application Apply your choice of finish. Here’s what I used on my Cool Cubes made from MDF: • One coat of Bullseye Sealcoat • Painted the parts with Sculpt Nouveau finishing products...Silver B, Copper B, Bronze B • Two light coats of Sculpt Nouveau Smart Coat clear IN CONCLUSION This project is an easy way to experience a simple and effective way to run two-sided projects. The principles learned here can be applied to any future two-sided projects. If you’ve never done a two-sided project, this is a great time to start! You will notice that the panel text labeling in the “back” crv file is reversed. This is intentional and helps serve as a reminder which way the project material will be flipped after running the Backside file. Hopefully, you will find this helpful. The Cool Cubes can easily be customized and personalized with designs you create yourself. Just modify any of the “front” crv files and save under a new filename so you don’t overwrite/lose the original file. Remember not to alter the positioning of the panel locations. This is essential for maintaining proper alignment of the back and front sides of the project. I hope you have fun with the Cool Cubes Project! Happy Carving! (cont.) Cool Cubes!
- 5. Page 5 Materials Source Page Vectric Project Tutorial www.vectric.com • 3M Radial Bristle Discs from (stack 3 discs at a time on your rotary tool mandrel) 80-grit: part # 4494A19 220-grit: part # 4494A18 www.mcmaster.com Krylon Clear Gloss Acrylic from WalMart™ Miscellaneous Items Purchased at Lowes™ • 1/4-inch Diameter Dowels • 1/2-inch and 1/4-inch MDF (medium density fiberboard) • Sandpaper • Disposable Brushes and Paint Rags • Bullseye SealCoat and Denatured Alcohol Miscellaneous Items Purchased at Home Depot™ Metallic Paint & Finishing supplies ordered from www.sculptnouveau.com
- 6. Page 6 Vectric Project Tutorial www.vectric.com The trademarks, service marks and logos used and displayed in this document are registered and unregistered Trademarks of Vectric and others. RESOURCES... There are numerous resources for Vectric software owners to make their experience with their products more enjoyable. The Vectric website includes video tutorials and more, to provide a good overview of the software products and how to use them. Please visit the Support page for a complete listing of available resources for you. Vectric Support: http://support.vectric.com/ Vectric User Forum Every owner should join the Vectric User Forum (http://www.vectric.com/forum/) where fellow users share their experience and knowledge on a daily basis. It is a FREE service that you will surely appreciate. A handy Search Feature helps you find answers to any questions you may have. There are Gallery sections as well, where you can post and view photos of projects created with Vectric software. Additional Resources