SlideShare a Scribd company logo
1 of 6
Download to read offline
Dutch Country Wall Clock
This month’s project was inspired by a
reminder/request from a Vectric customer
for a wall clock that both VCarve Pro and
Aspire owners could enjoy making. I
hadn’t created a v-carved wall clock before
and thought now was a good time to do it!
This project features front and back panels
with a Dutch “tole” painting
style.
I used to do a lot of tole
painting myself and the
Vectric software made it
fun and easy to adapt this
popular folk art style to a
CNC machinable v-carved
design.
I tried to
mimic that doctrine in this
clock design.
Pennsylvania
According to Wikipedia, tole
painting became most popular during the
18th century in New
England and “was
extensively carried on
among German immigrants
in Pennsylvania”.
Tole painting is
often referred to as ‘one
stroke painting’ because
each design element is
painted with a single stroke
of the brush.
The overall finished dimensions of the
Dutch Country Wall Clock are about
1.5" Dx 10.375 " W x 14" T.
Vectric Project Tutorial
Main items you will need:
1) The Project Files (included):
• Dutch_Clock_BACK_Panel.crv
• Dutch_Clock_FRONT_Panel.crv
"
2) Boards with these dimensions:
BACK Panel: 0.75"x 11.2 x 15"
FRONT Panel: 0.75"x 11.2"x 11.5"
3) Two small screw eyes, picture hanger
wire
4) Wood glue, clamps, sandpaper, wood
stain and/or paint and clear finish
7
5) Klockit 5 /8 "round clock insert
(I used model #15340 from www.klockit.com)
6) A Dremel-type rotary tool with
assorted sanding wheels and bits to sand
small details and speed up preparation
for finishing.
Designed for Vectric™ by Michael Tyler
Designed by Michael Tyler - December 2013 www.vectric.com
Vectric Project Tutorial
www.vectric.com
Project Tutorial
Project Tutorial It is our pleasure to provide
our customers with fun and
useful projects to enjoy!
It is our pleasure to provide
our customers with fun and
useful projects to enjoy!
Featuring compatibility with nearly all CNC Machines
CNC Bits used for the Sample:
0.5 "Ball Nose
"
0° V-Bit
0.25 Down-Cut EM
6
Sample Carved with:
ShopBot Buddy
www.shopbottools.com
®
PRSalpha BT48
and
(or greater)
Compatible with:
(or greater)
STEP 1 - Open and Review the Project Files
Start your or Aspire software and open the
project files. (fig. 1)
Dimensions for the clock insert cutout is based upon
the one purchased for the sample. Be sure to measure
your own clock insert to make certain the cutout is
suitably sized. If necessary, you can easily adjust the
circle cutout dimension(s) to fit your particular clock
insert. (Recalculate the toolpaths if any changes are
made!)
VCarve Pro
Carefully review all the toolpaths and make any
necessary changes to suit your particular bits and
machine. The toolpaths are currently set with feeds,
speeds and pass depths that were used in creating the
original sample. Please don’t use them directly until
you review them for your own setup.
(cont.)
Page 2
(cont.)
You can edit the tools and change the settings to your
own preferences and requirements. It is VERY
IMPORTANT to recalculate all toolpaths after
making any edits/changes. Once you have
recalculated for your own machine and bits, reset the
preview, then preview all toolpaths again to visually
verify the project outcome on-screen. The project is
designed with tabs to hold parts in place during the
final part cut outs. You may delete the tabs if you use
some other reliable hold-down method.
STEP 2 - Run the Project
When you are satisfied with your settings, save the
toolpaths to the appropriate Post Processor for your
machine, place your material on your machine bed and
proceed to run the project files. (fig. 2a, 2b, 2c)
Vectric Project Tutorial
www.vectric.com
fig. 1
fig. 2a
fig. 2c
Dutch Country Wall Clock
Dutch_Clock_BACK_Panel.crv
Dutch_Clock_FRONT_Panel.crv
fig. 2b
STEP 2 - Run the Project (cont.)
Your boards will look something like this: (fig. 2d, 2e)
STEP 3 - Release and Sand Parts
Separate all the parts from the boards with a utility
knife or small saw and sand off the tab remnants.
(fig. 3a)
Page 3
Glue the front and back panels together and clamp until
dry. (fig. 3b, 3c)
When dry, remove the clamps. Sand the edges to blend,
then sand overall to remove any undesirable tool marks
and prepare for finishing. Sand by hand or use a power
sander to make the job go faster. (fig. 3d)
(cont.)
(cont.)
Vectric Project Tutorial
www.vectric.com
fig. 3a
fig. 3c
A spindle sander is great
for sanding curved edges
fig. 3b
Dutch Country Wall Clock
Dutch_Clock_BACK_Panel.crv
Dutch_Clock_FRONT_Panel.crv
fig. 3d
fig. 2d
fig. 2e
Page 4
Vectric Project Tutorial
www.vectric.com
STEP 4 - Finish Application
Apply the finish of your choice. Here’s what I used on
the sample Dutch Country Clock made from Select
Pine:
(fig. 4a, 4b, 4c)
• Two light coats Zinnser Bulls Eye spray Shellac,
sanding between coats (slightly sealing the wood)
• Rust-Oleum Ultimate stain - American Walnut
(brushed on, wiped off, blew out excess stain from the
crevices with compressed air, then “stippled” the
stained surface and dry-brushed to even out the color)
• Several coats Zinnser Bulls Eye spray Shellac for
final topcoat
STEP 5 - Install Hanger and Clock Insert
After the finish is dry, insert the 2 screw eyes into the
top area of the center cavity on the back. Twist/fasten a
short length of picture wire to the screw eyes. (fig. 5a)
Push the clock insert into the front center hole - it’s a
friction fit. (fig. 5b)
IN CONCLUSION
I hope you enjoyed your Dutch Country Clock Project!
Happy Carving!
(cont.)
fig. 4b
Brushing on
the Stain
Spray Shellac
Clear Coat
Dutch Country Wall Clock
fig. 5a
fig. 5b
“Stippling” and
dry-brushing
the Stain
fig. 4a
fig. 4c
fig. 4b
Page 5
Materials Source Page
Vectric Project Tutorial
www.vectric.com
• 3M Radial Bristle Discs from
(stack 3 discs at a time on your rotary tool mandrel)
80-grit: part # 4494A19
220-grit: part # 4494A18
www.mcmaster.com
Miscellaneous Items Purchased at Lowes™
• Sandpaper
• Rust-Oleum Ultimate American Walnut Wood Stain
• Disposable Brushes and Paint Rags
• Zinsser Bullseye Spray Shellac (100% wax-free)
• Small Screw Eyes and Picture Hanger Wire
Miscellaneous Items Purchased at Home Depot™
• I used model #15340, but there are several styles to choose from
Clock Insert Purchased Online from www.Klockit.com
Page 6
Vectric Project Tutorial
www.vectric.com
The trademarks, service marks and logos used and displayed in this document are registered and unregistered Trademarks of Vectric and others.
Additional Resources
RESOURCES...
There are numerous resources for Vectric software owners to make their experience with their products more
enjoyable. The Vectric website includes video tutorials and more, to provide a good overview of the software
products and how to use them. Please visit the Support page for a complete listing of available resources for you.
Vectric Support: http://support.vectric.com/
Vectric User Forum
Every owner should join the Vectric User Forum (http://www.vectric.com/forum/) where fellow users share their
experience and knowledge on a daily basis. It is a FREE service that you will surely appreciate. A handy Search
Feature helps you find answers to any questions you may have. There are Gallery sections as well, where you can
post and view photos of projects created with Vectric software.
IMPORTANT: Before outputting any toolpaths you should carefully check all part sizes and the material setup to
make sure they are appropriate for your actual setup.You should also check and re-calculate all toolpaths with safe
and appropriate settings for your material, CNC machine and tooling.
Terms of Use: This Project and artwork is provided on the understanding that it will only be used with Vectric
software programs. You may use the designs to carve parts for sale but the Files and/or Vectors, Components or
Toolpaths within them (or any derivatives) may not be converted to other formats, sold to, or shared with anyone
else. This project is Copyright 2013 - Vectric Ltd.

More Related Content

Similar to Dutch country clock_tutorial

LabReport-Autodesk Inventor 2008-MasterCam X4
LabReport-Autodesk Inventor 2008-MasterCam X4LabReport-Autodesk Inventor 2008-MasterCam X4
LabReport-Autodesk Inventor 2008-MasterCam X4
Kienho Chan
 
Electrical Drawings and Schematics
Electrical Drawings and SchematicsElectrical Drawings and Schematics
Electrical Drawings and Schematics
Living Online
 
Assignment Brief 10.2
Assignment Brief 10.2Assignment Brief 10.2
Assignment Brief 10.2
NeilOw87
 
Civil 3 d 2011 tutorials
Civil 3 d 2011 tutorialsCivil 3 d 2011 tutorials
Civil 3 d 2011 tutorials
ocramr0111
 
1585848522Basic_Introduction_to_AUTOCAD.ppt
1585848522Basic_Introduction_to_AUTOCAD.ppt1585848522Basic_Introduction_to_AUTOCAD.ppt
1585848522Basic_Introduction_to_AUTOCAD.ppt
ssuser0d82cd
 
1585848522Basic_Introduction_to_AUTOCAD.ppt
1585848522Basic_Introduction_to_AUTOCAD.ppt1585848522Basic_Introduction_to_AUTOCAD.ppt
1585848522Basic_Introduction_to_AUTOCAD.ppt
pradeepdubey73
 

Similar to Dutch country clock_tutorial (20)

auto cad ppt.pptx
auto cad ppt.pptxauto cad ppt.pptx
auto cad ppt.pptx
 
LabReport-Autodesk Inventor 2008-MasterCam X4
LabReport-Autodesk Inventor 2008-MasterCam X4LabReport-Autodesk Inventor 2008-MasterCam X4
LabReport-Autodesk Inventor 2008-MasterCam X4
 
Infotechnogen autocad
Infotechnogen autocadInfotechnogen autocad
Infotechnogen autocad
 
Solidworks ppt
Solidworks pptSolidworks ppt
Solidworks ppt
 
PCB Design and Fabrication
PCB Design and FabricationPCB Design and Fabrication
PCB Design and Fabrication
 
Lab_2_2009
Lab_2_2009Lab_2_2009
Lab_2_2009
 
Lab_2_2009
Lab_2_2009Lab_2_2009
Lab_2_2009
 
Industrial training report
Industrial training report Industrial training report
Industrial training report
 
Can crusher file by Rohit Dhiman
Can crusher file by Rohit DhimanCan crusher file by Rohit Dhiman
Can crusher file by Rohit Dhiman
 
Electrical Drawings and Schematics
Electrical Drawings and SchematicsElectrical Drawings and Schematics
Electrical Drawings and Schematics
 
Assignment Brief 10.2
Assignment Brief 10.2Assignment Brief 10.2
Assignment Brief 10.2
 
Engineering Portfolio
Engineering PortfolioEngineering Portfolio
Engineering Portfolio
 
Civil 3 d 2011 tutorials
Civil 3 d 2011 tutorialsCivil 3 d 2011 tutorials
Civil 3 d 2011 tutorials
 
Portfolio-PDF
Portfolio-PDFPortfolio-PDF
Portfolio-PDF
 
SPULLOWS
SPULLOWSSPULLOWS
SPULLOWS
 
Introduction_to_AUTOCAD
Introduction_to_AUTOCADIntroduction_to_AUTOCAD
Introduction_to_AUTOCAD
 
1585848522Basic_Introduction_to_AUTOCAD.ppt
1585848522Basic_Introduction_to_AUTOCAD.ppt1585848522Basic_Introduction_to_AUTOCAD.ppt
1585848522Basic_Introduction_to_AUTOCAD.ppt
 
Introduction_to_AUTOCAD.ppt
Introduction_to_AUTOCAD.pptIntroduction_to_AUTOCAD.ppt
Introduction_to_AUTOCAD.ppt
 
1585848522Basic_Introduction_to_AUTOCAD.ppt
1585848522Basic_Introduction_to_AUTOCAD.ppt1585848522Basic_Introduction_to_AUTOCAD.ppt
1585848522Basic_Introduction_to_AUTOCAD.ppt
 
Stem Education - Screw
Stem Education - ScrewStem Education - Screw
Stem Education - Screw
 

Recently uploaded

DELHI NCR —@9711106444 Call Girls In Majnu Ka Tilla (MT)| Delhi
DELHI NCR —@9711106444 Call Girls In Majnu Ka Tilla (MT)| DelhiDELHI NCR —@9711106444 Call Girls In Majnu Ka Tilla (MT)| Delhi
DELHI NCR —@9711106444 Call Girls In Majnu Ka Tilla (MT)| Delhi
delhimunirka444
 
Dubai Call Girls Service # +971588046679 # Call Girls Service In Dubai # (UAE)
Dubai Call Girls Service # +971588046679 # Call Girls Service In Dubai # (UAE)Dubai Call Girls Service # +971588046679 # Call Girls Service In Dubai # (UAE)
Dubai Call Girls Service # +971588046679 # Call Girls Service In Dubai # (UAE)
Business Bay Call Girls || 0529877582 || Call Girls Service in Business Bay Dubai
 
FULL NIGHT — 9999894380 Call Girls In Delhi Cantt | Delhi
FULL NIGHT — 9999894380 Call Girls In Delhi Cantt | DelhiFULL NIGHT — 9999894380 Call Girls In Delhi Cantt | Delhi
FULL NIGHT — 9999894380 Call Girls In Delhi Cantt | Delhi
SaketCallGirlsCallUs
 
Authentic # 00971556872006 # Hot Call Girls Service in Dubai By International...
Authentic # 00971556872006 # Hot Call Girls Service in Dubai By International...Authentic # 00971556872006 # Hot Call Girls Service in Dubai By International...
Authentic # 00971556872006 # Hot Call Girls Service in Dubai By International...
home
 
Bobbie goods coloring book 81 pag_240127_163802.pdf
Bobbie goods coloring book 81 pag_240127_163802.pdfBobbie goods coloring book 81 pag_240127_163802.pdf
Bobbie goods coloring book 81 pag_240127_163802.pdf
MARIBEL442158
 
FULL NIGHT — 9999894380 Call Girls In Paschim Vihar | Delhi
FULL NIGHT — 9999894380 Call Girls In  Paschim Vihar | DelhiFULL NIGHT — 9999894380 Call Girls In  Paschim Vihar | Delhi
FULL NIGHT — 9999894380 Call Girls In Paschim Vihar | Delhi
SaketCallGirlsCallUs
 
FULL NIGHT — 9999894380 Call Girls In Ashok Vihar | Delhi
FULL NIGHT — 9999894380 Call Girls In Ashok Vihar | DelhiFULL NIGHT — 9999894380 Call Girls In Ashok Vihar | Delhi
FULL NIGHT — 9999894380 Call Girls In Ashok Vihar | Delhi
SaketCallGirlsCallUs
 
FULL NIGHT — 9999894380 Call Girls In Saket | Delhi
FULL NIGHT — 9999894380 Call Girls In Saket | DelhiFULL NIGHT — 9999894380 Call Girls In Saket | Delhi
FULL NIGHT — 9999894380 Call Girls In Saket | Delhi
SaketCallGirlsCallUs
 
FULL NIGHT — 9999894380 Call Girls In Najafgarh | Delhi
FULL NIGHT — 9999894380 Call Girls In Najafgarh | DelhiFULL NIGHT — 9999894380 Call Girls In Najafgarh | Delhi
FULL NIGHT — 9999894380 Call Girls In Najafgarh | Delhi
SaketCallGirlsCallUs
 
❤️Call girls in Chandigarh ☎️8264406502☎️ Call Girl service in Chandigarh☎️ C...
❤️Call girls in Chandigarh ☎️8264406502☎️ Call Girl service in Chandigarh☎️ C...❤️Call girls in Chandigarh ☎️8264406502☎️ Call Girl service in Chandigarh☎️ C...
❤️Call girls in Chandigarh ☎️8264406502☎️ Call Girl service in Chandigarh☎️ C...
Sheetaleventcompany
 
UAE Call Girls # 971526940039 # Independent Call Girls In Dubai # (UAE)
UAE Call Girls # 971526940039 # Independent Call Girls In Dubai # (UAE)UAE Call Girls # 971526940039 # Independent Call Girls In Dubai # (UAE)
UAE Call Girls # 971526940039 # Independent Call Girls In Dubai # (UAE)
Business Bay Call Girls || 0529877582 || Call Girls Service in Business Bay Dubai
 

Recently uploaded (20)

(NEHA) Call Girls Mumbai Call Now 8250077686 Mumbai Escorts 24x7
(NEHA) Call Girls Mumbai Call Now 8250077686 Mumbai Escorts 24x7(NEHA) Call Girls Mumbai Call Now 8250077686 Mumbai Escorts 24x7
(NEHA) Call Girls Mumbai Call Now 8250077686 Mumbai Escorts 24x7
 
DELHI NCR —@9711106444 Call Girls In Majnu Ka Tilla (MT)| Delhi
DELHI NCR —@9711106444 Call Girls In Majnu Ka Tilla (MT)| DelhiDELHI NCR —@9711106444 Call Girls In Majnu Ka Tilla (MT)| Delhi
DELHI NCR —@9711106444 Call Girls In Majnu Ka Tilla (MT)| Delhi
 
Dubai Call Girls Service # +971588046679 # Call Girls Service In Dubai # (UAE)
Dubai Call Girls Service # +971588046679 # Call Girls Service In Dubai # (UAE)Dubai Call Girls Service # +971588046679 # Call Girls Service In Dubai # (UAE)
Dubai Call Girls Service # +971588046679 # Call Girls Service In Dubai # (UAE)
 
Akbar Religious Policy and Sufism comparison.pptx
Akbar Religious Policy and Sufism comparison.pptxAkbar Religious Policy and Sufism comparison.pptx
Akbar Religious Policy and Sufism comparison.pptx
 
Barasat call girls 📞 8617697112 At Low Cost Cash Payment Booking
Barasat call girls 📞 8617697112 At Low Cost Cash Payment BookingBarasat call girls 📞 8617697112 At Low Cost Cash Payment Booking
Barasat call girls 📞 8617697112 At Low Cost Cash Payment Booking
 
AaliyahBell_themist_v01.pdf .
AaliyahBell_themist_v01.pdf             .AaliyahBell_themist_v01.pdf             .
AaliyahBell_themist_v01.pdf .
 
FULL NIGHT — 9999894380 Call Girls In Delhi Cantt | Delhi
FULL NIGHT — 9999894380 Call Girls In Delhi Cantt | DelhiFULL NIGHT — 9999894380 Call Girls In Delhi Cantt | Delhi
FULL NIGHT — 9999894380 Call Girls In Delhi Cantt | Delhi
 
Authentic # 00971556872006 # Hot Call Girls Service in Dubai By International...
Authentic # 00971556872006 # Hot Call Girls Service in Dubai By International...Authentic # 00971556872006 # Hot Call Girls Service in Dubai By International...
Authentic # 00971556872006 # Hot Call Girls Service in Dubai By International...
 
Bobbie goods coloring book 81 pag_240127_163802.pdf
Bobbie goods coloring book 81 pag_240127_163802.pdfBobbie goods coloring book 81 pag_240127_163802.pdf
Bobbie goods coloring book 81 pag_240127_163802.pdf
 
Editorial sephora annual report design project
Editorial sephora annual report design projectEditorial sephora annual report design project
Editorial sephora annual report design project
 
FULL NIGHT — 9999894380 Call Girls In Paschim Vihar | Delhi
FULL NIGHT — 9999894380 Call Girls In  Paschim Vihar | DelhiFULL NIGHT — 9999894380 Call Girls In  Paschim Vihar | Delhi
FULL NIGHT — 9999894380 Call Girls In Paschim Vihar | Delhi
 
FULL NIGHT — 9999894380 Call Girls In Ashok Vihar | Delhi
FULL NIGHT — 9999894380 Call Girls In Ashok Vihar | DelhiFULL NIGHT — 9999894380 Call Girls In Ashok Vihar | Delhi
FULL NIGHT — 9999894380 Call Girls In Ashok Vihar | Delhi
 
FULL NIGHT — 9999894380 Call Girls In Saket | Delhi
FULL NIGHT — 9999894380 Call Girls In Saket | DelhiFULL NIGHT — 9999894380 Call Girls In Saket | Delhi
FULL NIGHT — 9999894380 Call Girls In Saket | Delhi
 
FULL NIGHT — 9999894380 Call Girls In Najafgarh | Delhi
FULL NIGHT — 9999894380 Call Girls In Najafgarh | DelhiFULL NIGHT — 9999894380 Call Girls In Najafgarh | Delhi
FULL NIGHT — 9999894380 Call Girls In Najafgarh | Delhi
 
(INDIRA) Call Girl Dehradun Call Now 8617697112 Dehradun Escorts 24x7
(INDIRA) Call Girl Dehradun Call Now 8617697112 Dehradun Escorts 24x7(INDIRA) Call Girl Dehradun Call Now 8617697112 Dehradun Escorts 24x7
(INDIRA) Call Girl Dehradun Call Now 8617697112 Dehradun Escorts 24x7
 
Mayiladuthurai Call Girls 8617697112 Short 3000 Night 8000 Best call girls Se...
Mayiladuthurai Call Girls 8617697112 Short 3000 Night 8000 Best call girls Se...Mayiladuthurai Call Girls 8617697112 Short 3000 Night 8000 Best call girls Se...
Mayiladuthurai Call Girls 8617697112 Short 3000 Night 8000 Best call girls Se...
 
❤️Call girls in Chandigarh ☎️8264406502☎️ Call Girl service in Chandigarh☎️ C...
❤️Call girls in Chandigarh ☎️8264406502☎️ Call Girl service in Chandigarh☎️ C...❤️Call girls in Chandigarh ☎️8264406502☎️ Call Girl service in Chandigarh☎️ C...
❤️Call girls in Chandigarh ☎️8264406502☎️ Call Girl service in Chandigarh☎️ C...
 
UAE Call Girls # 971526940039 # Independent Call Girls In Dubai # (UAE)
UAE Call Girls # 971526940039 # Independent Call Girls In Dubai # (UAE)UAE Call Girls # 971526940039 # Independent Call Girls In Dubai # (UAE)
UAE Call Girls # 971526940039 # Independent Call Girls In Dubai # (UAE)
 
Sirmaur Call Girls Book Now 8617697112 Top Class Pondicherry Escort Service A...
Sirmaur Call Girls Book Now 8617697112 Top Class Pondicherry Escort Service A...Sirmaur Call Girls Book Now 8617697112 Top Class Pondicherry Escort Service A...
Sirmaur Call Girls Book Now 8617697112 Top Class Pondicherry Escort Service A...
 
Storyboard short: Ferrarius Tries to Sing
Storyboard short: Ferrarius Tries to SingStoryboard short: Ferrarius Tries to Sing
Storyboard short: Ferrarius Tries to Sing
 

Dutch country clock_tutorial

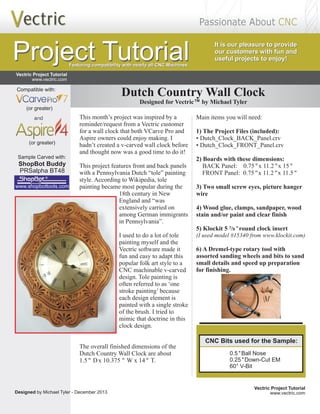
  • 1. Dutch Country Wall Clock This month’s project was inspired by a reminder/request from a Vectric customer for a wall clock that both VCarve Pro and Aspire owners could enjoy making. I hadn’t created a v-carved wall clock before and thought now was a good time to do it! This project features front and back panels with a Dutch “tole” painting style. I used to do a lot of tole painting myself and the Vectric software made it fun and easy to adapt this popular folk art style to a CNC machinable v-carved design. I tried to mimic that doctrine in this clock design. Pennsylvania According to Wikipedia, tole painting became most popular during the 18th century in New England and “was extensively carried on among German immigrants in Pennsylvania”. Tole painting is often referred to as ‘one stroke painting’ because each design element is painted with a single stroke of the brush. The overall finished dimensions of the Dutch Country Wall Clock are about 1.5" Dx 10.375 " W x 14" T. Vectric Project Tutorial Main items you will need: 1) The Project Files (included): • Dutch_Clock_BACK_Panel.crv • Dutch_Clock_FRONT_Panel.crv " 2) Boards with these dimensions: BACK Panel: 0.75"x 11.2 x 15" FRONT Panel: 0.75"x 11.2"x 11.5" 3) Two small screw eyes, picture hanger wire 4) Wood glue, clamps, sandpaper, wood stain and/or paint and clear finish 7 5) Klockit 5 /8 "round clock insert (I used model #15340 from www.klockit.com) 6) A Dremel-type rotary tool with assorted sanding wheels and bits to sand small details and speed up preparation for finishing. Designed for Vectric™ by Michael Tyler Designed by Michael Tyler - December 2013 www.vectric.com Vectric Project Tutorial www.vectric.com Project Tutorial Project Tutorial It is our pleasure to provide our customers with fun and useful projects to enjoy! It is our pleasure to provide our customers with fun and useful projects to enjoy! Featuring compatibility with nearly all CNC Machines Featuring compatibility with nearly all CNC Machines CNC Bits used for the Sample: 0.5 "Ball Nose " 0° V-Bit 0.25 Down-Cut EM 6 Sample Carved with: ShopBot Buddy www.shopbottools.com ® PRSalpha BT48 and (or greater) Compatible with: (or greater)
  • 2. STEP 1 - Open and Review the Project Files Start your or Aspire software and open the project files. (fig. 1) Dimensions for the clock insert cutout is based upon the one purchased for the sample. Be sure to measure your own clock insert to make certain the cutout is suitably sized. If necessary, you can easily adjust the circle cutout dimension(s) to fit your particular clock insert. (Recalculate the toolpaths if any changes are made!) VCarve Pro Carefully review all the toolpaths and make any necessary changes to suit your particular bits and machine. The toolpaths are currently set with feeds, speeds and pass depths that were used in creating the original sample. Please don’t use them directly until you review them for your own setup. (cont.) Page 2 (cont.) You can edit the tools and change the settings to your own preferences and requirements. It is VERY IMPORTANT to recalculate all toolpaths after making any edits/changes. Once you have recalculated for your own machine and bits, reset the preview, then preview all toolpaths again to visually verify the project outcome on-screen. The project is designed with tabs to hold parts in place during the final part cut outs. You may delete the tabs if you use some other reliable hold-down method. STEP 2 - Run the Project When you are satisfied with your settings, save the toolpaths to the appropriate Post Processor for your machine, place your material on your machine bed and proceed to run the project files. (fig. 2a, 2b, 2c) Vectric Project Tutorial www.vectric.com fig. 1 fig. 2a fig. 2c Dutch Country Wall Clock Dutch_Clock_BACK_Panel.crv Dutch_Clock_FRONT_Panel.crv fig. 2b
  • 3. STEP 2 - Run the Project (cont.) Your boards will look something like this: (fig. 2d, 2e) STEP 3 - Release and Sand Parts Separate all the parts from the boards with a utility knife or small saw and sand off the tab remnants. (fig. 3a) Page 3 Glue the front and back panels together and clamp until dry. (fig. 3b, 3c) When dry, remove the clamps. Sand the edges to blend, then sand overall to remove any undesirable tool marks and prepare for finishing. Sand by hand or use a power sander to make the job go faster. (fig. 3d) (cont.) (cont.) Vectric Project Tutorial www.vectric.com fig. 3a fig. 3c A spindle sander is great for sanding curved edges fig. 3b Dutch Country Wall Clock Dutch_Clock_BACK_Panel.crv Dutch_Clock_FRONT_Panel.crv fig. 3d fig. 2d fig. 2e
  • 4. Page 4 Vectric Project Tutorial www.vectric.com STEP 4 - Finish Application Apply the finish of your choice. Here’s what I used on the sample Dutch Country Clock made from Select Pine: (fig. 4a, 4b, 4c) • Two light coats Zinnser Bulls Eye spray Shellac, sanding between coats (slightly sealing the wood) • Rust-Oleum Ultimate stain - American Walnut (brushed on, wiped off, blew out excess stain from the crevices with compressed air, then “stippled” the stained surface and dry-brushed to even out the color) • Several coats Zinnser Bulls Eye spray Shellac for final topcoat STEP 5 - Install Hanger and Clock Insert After the finish is dry, insert the 2 screw eyes into the top area of the center cavity on the back. Twist/fasten a short length of picture wire to the screw eyes. (fig. 5a) Push the clock insert into the front center hole - it’s a friction fit. (fig. 5b) IN CONCLUSION I hope you enjoyed your Dutch Country Clock Project! Happy Carving! (cont.) fig. 4b Brushing on the Stain Spray Shellac Clear Coat Dutch Country Wall Clock fig. 5a fig. 5b “Stippling” and dry-brushing the Stain fig. 4a fig. 4c fig. 4b
  • 5. Page 5 Materials Source Page Vectric Project Tutorial www.vectric.com • 3M Radial Bristle Discs from (stack 3 discs at a time on your rotary tool mandrel) 80-grit: part # 4494A19 220-grit: part # 4494A18 www.mcmaster.com Miscellaneous Items Purchased at Lowes™ • Sandpaper • Rust-Oleum Ultimate American Walnut Wood Stain • Disposable Brushes and Paint Rags • Zinsser Bullseye Spray Shellac (100% wax-free) • Small Screw Eyes and Picture Hanger Wire Miscellaneous Items Purchased at Home Depot™ • I used model #15340, but there are several styles to choose from Clock Insert Purchased Online from www.Klockit.com
  • 6. Page 6 Vectric Project Tutorial www.vectric.com The trademarks, service marks and logos used and displayed in this document are registered and unregistered Trademarks of Vectric and others. Additional Resources RESOURCES... There are numerous resources for Vectric software owners to make their experience with their products more enjoyable. The Vectric website includes video tutorials and more, to provide a good overview of the software products and how to use them. Please visit the Support page for a complete listing of available resources for you. Vectric Support: http://support.vectric.com/ Vectric User Forum Every owner should join the Vectric User Forum (http://www.vectric.com/forum/) where fellow users share their experience and knowledge on a daily basis. It is a FREE service that you will surely appreciate. A handy Search Feature helps you find answers to any questions you may have. There are Gallery sections as well, where you can post and view photos of projects created with Vectric software. IMPORTANT: Before outputting any toolpaths you should carefully check all part sizes and the material setup to make sure they are appropriate for your actual setup.You should also check and re-calculate all toolpaths with safe and appropriate settings for your material, CNC machine and tooling. Terms of Use: This Project and artwork is provided on the understanding that it will only be used with Vectric software programs. You may use the designs to carve parts for sale but the Files and/or Vectors, Components or Toolpaths within them (or any derivatives) may not be converted to other formats, sold to, or shared with anyone else. This project is Copyright 2013 - Vectric Ltd.