SlideShare a Scribd company logo
1 of 92
AN-3220 Rev. B Holt Integrated Circuits
HI-3220 ARINC 429
DATA MANAGEMENT ENGINE
16 x RECEIVERS
8 x TRANSMITTERS
ADK-3220 Application Development Kit
Users Guide
January 3, 2022
AN-3220
AN-3220 Rev. B Holt Integrated Circuits 2
REVISION HISTORY
Revision Date Description of Change
AN-3220, Rev.
New
01-26-18 Initial Release
A 04-25-18
Correct Op Code typo on p. 31. 0xEE should be 0xE0.
Pins J7 and J9 were erroneously reversed in Mode Table
on p. 7.
B 01/03/2022
Add links to download board files. An alternate part
number for the MCU (64K Flash version) was also added
to the BOM.
AN-3220
AN-3220 Rev. B Holt Integrated Circuits 3
Introduction
The Holt ADK-3220 Evaluation board demonstrates the broad feature set of Holt’s ARINC 429 Data
Management Engine, with sixteen ARINC 429 Receivers and eight digital Transmitters integrated into a
single IC. The HI-3220 is the successor to the HI-3200 and HI-3210 with expanded channels and new
feature enhancements designed to increase host communication efficiency. The HI-3220 receiver
channels features DO-160G lightning protection. The HI-3200 has a maximum SPI rate of 40MHz.
This guide describes how to set up and run the board. Additional support material and all required project
software are found in the included Holt USB memory stick. A version of the demonstration software is
pre-programmed into the microcontroller flash; the board is operational right out of the box without
installing or running the provided software development tools.
ADK-3220 CTX Evaluation Board, mounted on the ARM Cortex M3 MCU Board
AN-3220
AN-3220 Rev. B Holt Integrated Circuits 4
Evaluation Kit Contents
• This User Guide.
• Holt HI-3220 Project Software and Documentation USB memory stick.
• IAR Systems Embedded Workbench® for ARM (32KB KickStart) on USB memory stick.
• Plug-in 5V DC power adapter.
• USB mini debug interface cable.
• RS-232 serial cable, DB-9M to DB-9F for console I/O using a connected computer.
• USB to serial dongle adapter.
• 2-board assembly comprised of:
Upper HI-3220 evaluation board. DIP switches configure board operation.
Lower MCU board with (Microchip/Atmel) ARM Cortex M3 16-/32-bit microprocessor, debug
interface and regulated 3.3VDC power supply
Hardware Block Diagram
Cortex M3
MCU board
HOLT
HI-3220
SPI (4) 40MHz Max.
RS-232 Console
USB Debug Port
LEDs
Debugger, Power
User Push Button
Switches SW1, SW2
SW1 DIPs
(4)
J11 12-pinl Host I/F Header
for standalone use
RESET Button
SW3
Sixteen ARINC 429 Receivers
nMR
50 MHz
OSC
5V to 3.3V
Reg
+3.3V
5V
HI-8597
EEPROM
(optional)
MODE
Jumpers
J7, J8, J9
SPI (4)
RUN
READY
ARINC TX0 – TX3 BUS
J1, J2
Header
Pins
Status LEDs:
TX amber
ERR red
RX green
User1 green
User2 green
RUN
LED
READY
LED
Integrated
DO-160G
Protected
J6
Header
Pins
DO-160G
Protected
Eight ARINC 429 Line Drivers
INTACK
INT
HI-8597 ARINC TX4 - TX7 BUS
DO-160G
Protected
J4
Header
Pins
*
*
*
Main host processor card
Holt HI-3220 daughter card
AN-3220
AN-3220 Rev. B Holt Integrated Circuits 5
HI-322x Highlighted Feature Differences Compared to HI-3200/3210 Family
● Increased SPI clock rate to 40MHz.
● Up to Sixteen integrated ARINC 429 Receiver channels (eight more than HI-3200/10 family)
with DO-160G level-3 lightning protection. Lighting protection available on parts with
integrated on-chip receivers (3220, 3221 and 3222).
● Up to Eight ARINC 429 Transmit channels (four more than HI-3200/10 family).
● Receiver 64 word deep FIFO’s increased from 32.
● Transmit 32 word deep FIFO’s.
● Transmit and Receive FIFO count registers enables efficient host reading.
● Transmit and Receive FIFO threshold count interrupt registers.
● ARINC Transmit and Receive 50KHz rate support in addition to standard ARINC 429 12.5 KHz
and 100 KHz rates.
● ARINC Transmit TRISTATE control bit for enabling Hi-Z mode in certain Line Drivers.
● Transmit scheduler feature improvements:
o Simplified Transmit scheduler Op Codes.
o Packet Timer period and offset control.
o Delay Op Code.
o Transmit scheduler 1ms prescaler option.
o Transmit Watch-Dog Timer function.
● Ability to read the Mode status bits [7:5] in register 0x807A indicating the state of the
Mode0-2 pins latched after a reset.
AN-3220
AN-3220 Rev. B Holt Integrated Circuits 6
Push-buttons
Push-button Switches
(on main CM3 board)
DESCRIPTION
SW1 Transmits a Test message on channels TX5, TX6 and TX7.
TX5 = Low Speed (12.5KHz)
TX6 = Mid Speed (50KHz)
TX7 = High Speed (100KHz)
SW2 Simple SPI sequence test sequence – useful for trouble
shooting the SPI interface. See section “HI-3220 SPI basics
for trouble shooting” near the end of this document.
DIP SWITCHES
SWITCH DEFAULT DESCRIPTION
SW 1 OFF SPI frequency select. OFF = 24MHz. ON = 16MHz.
Checked at power up.
SW 2 ON Open = Logs TX descriptor table values to the
console.
SW 3 ON Available to user
SW 4 ON Available to user.
AN-3220
AN-3220 Rev. B Holt Integrated Circuits 7
Jumper Settings for EEPROM auto-initialization (optional feature)
Factory default is Mode 0. See RESET and START-UP MODES in the data sheet for the list of self-checks
the HI-3220 performs in each mode.
MODE M2
J9
M1
J8
M0
J7
EEPROM
Init
0 0 0 0 NO
1 0 0 1 YES
2 0 1 0 No
3 0 1 1 YES
4 1 0 0 NO
5 1 0 1 NO
6 1 1 0 RAM BIST
ENA
HI-3220 supply current measurement test points TP13 and TP14
To measure the HI-3220 supply current remove R35 zero-ohm resistor and insert a current meter between
TP13 and TP14. When READY is high there is addition current through LED1 so remove R33 or subtract
the LED1 current (~3.6mA) from the measured current.
External Host interface to the HI-3220 daughter board.
The HI-3220 daughter board can be separated from the MCU board and connected to a user FPGA or MCU
host for quick prototyping purposes. All essential interface signals are provided on J11 12-pin header
connector. The Demo Mode switches and LEDs are not included, but they are accessible on J3 and J5
header connectors, if needed.
J11 Pin SIGNAL J11 Pin SIGNAL
1 nHCS (SPI) 7 RUN
2 HSCK (SPI) 8 INTn
3 HMOSI (SPI) 9 INTACK
4 HMISO (SPI) 10 SW1 -1 DIP
5 /MRST 11 GND
6 READY 12 3.3 VDD
LED indicators
LEDS FUNCTION TYPICAL USAGE
AN-3220
AN-3220 Rev. B Holt Integrated Circuits 8
LED1 READY On when READY is high (connected to READY pin)
LED2 RUN On when RUN is high (connected to the RUN pin)
LED3 RX Host controlled – Typically On when reading FIFO
messages.
LED4 USER2 Host controlled - Available to user
LED5 USER1 Host controlled - Flashes ONLY in main idle loop.
LED6 ERROR Host controlled - for flagging errors , like EEPROM write
errors
LED7 TX Host controlled - Typically On when transmitting
Getting Started
The first section of this user guide provides instructions how to set up the demo board and run the built-
in demo programs and utilities that are pre-programmed into the Microchip/Atmel ARM Cortex M3 MCU.
The next section instructs how to install the IAR EWARM IDE and the Holt demonstration program. The
supplied demo program on the USB memory stick is the same version already programmed in MCU flash
memory.
Hardware Design Overview
Refer to the end of this guide for separate schematic diagrams and bills of material for the upper daughter
board and lower MCU board.
The detachable daughter board can be separated from the lower MCU board for connection to a user-
supplied alternate MCU or FPGA board. The inter-board headers are located on 0.1” (2.54 mm) grid for
compatibility with generic prototyping boards. All host interface signals go through the inter-board
headers. See the External Host interface header pin description for the pin list in the previous section.
The lower ARM Cortex M3 board is based on the flash-programmable Microchip /Atmel AT91SAM3U-EK
MCU. A 4-signal Serial Peripheral Interface (SPI) connects to the HI-3220 DUT. A UART-based serial port
provides RS-232 console I/O (optional). An uncommitted USB 2.0 port is available for future expansion.
Two pushbuttons are available for software interaction. A RESET pushbutton resets the ARM
microprocessor, which in turn controls the DUT Master Reset signal.
The ARM Cortex M3 board includes “J-Link On Board” debug interface, licensed from www.segger.com,
providing out-of-box readiness without having to buy a costly JTAG debug cable. The kit includes a mini
USB cable for connecting the board’s debug interface to your computer. (For users already owning an
ARM debug interface with ribbon-cable connector, an ARM-standard 2x10 debug connector provides
AN-3220
AN-3220 Rev. B Holt Integrated Circuits 9
debug connectivity. In this case, jumper JP2 on the bottom of the lower board should be soldered closed
to disable “J-Link On Board”).
Initial Set Up
Before attempting to run the demo programs, a suitable PC is required with serial COM support so the
demo programs and utilities can be invoked by entering commands on the console menu. This demo
program is already flashed into the Cortex M3 MCU and operates out of the box – no IDE flash
programming is required to run the demo programs.
1. Your PC will need a serial (COM) port and a “terminal emulation” program like TeraTerm. Most
computers no longer have RS232 com ports so will require a serial-to-USB adapter, supplied with
the ADK. Connect this to the computer’s USB port and the 9 pin connector to the ADK board.
2. If using Windows 2000 or Windows XP, you can use HyperTerminal for terminal emulation. Open
HyperTerminal by clicking Start then All Programs; click the Windows Accessories then
Communications program group. Double-click HyperTerminal to run it. Skip the next paragraph.
If using Vista, Windows 7 or Windows 10…
HyperTerminal is not included with these versions of Windows. Install the free open-source
terminal emulation program, TeraTerm 4.71, by running the provided teraterm-4.71.exe installer
program from the Holt CD. Accept the license agreement stating redistribution is permitted
provided that copyright notice is retained. The notice can be displayed from the TeraTerm window
by clicking Help then clicking About TeraTerm. Continuing to install…
• Accept the default install destination and click Next.
• At the Select Components screen, unselect all options except Additional Plug-in =
TTXResizeMenu and click Next.
• Select the installed language, then click Next.
• Accept the default Start Menu folder, then click Next.
• Select any desired shortcuts, then click Next.
• At the Ready to Install screen, click Install.
Run the TeraTerm program. At the New Connection screen, select (x)Serial and choose the
selected COM port. Click Setup then Serial Port to open the serial port setup window. Choose
these settings: Baud Rate: 115200, Data: 8 bits, Parity: none, Stop: 1 bit, Flow Control: none.
AN-3220
AN-3220 Rev. B Holt Integrated Circuits 10
3. Plug-in the provided 5V DC power supply and connect the cable to the power input jack on the
lower circuit board. If TeraTerm is running and configured correctly, the command menu below
should appear in the console window. This menu appears whenever board power is applied, or
when the RESET pushbutton is pressed. After verifying correct TeraTerm communication with the
evaluation board, the terminal set up can be saved by clicking Setup then Save Setup.
4. At power up, all the LED’s will briefly flash. The READY LED should remain ON and the RUN LED
should be OFF. The green USER1 LED flashes at 1.2 Hz when the program is in the main idle loop.
Getting Started with Demos
After powering up the board the menu of commands are displayed on the console.
-------------------------------------------------
Holt Integrated Circuits HI-3220 Demo Program Ver. 1.0
Compiled: Jan 26 2018 08:27:43
-------------------------------------------------
DIP switches: 01
SPI 24MHz
Waiting for READY high after reset...
MSR = 20 Expected value is 20
READY OK
MODE Pins read: 0
MODES 1 or 3 auto-initializes from EEPROM - must have been programmed first or will fault
*************************************************
Holt Integrated Circuits HI-3220 Demo Program Ver. 1.0
Compiled: Jan 26 2018 08:27:42
*************************************************
------------- ADK-3220 DEMOS --------------
Press '0' - RX RAM RECEPTION LOOPBACK
Press '1' - RX RAM RECEPTION NO LOOPBACK
Press '2' - RX FIFO and TX FIFO Direct
Press '3' - TX FIFO Direct Immediate
Press '4' - TX0 Simple Transmit Scheduler-continuous
Press '5' - RX0 -> TX0 Repeater
Press '6' - RX0 + RX1 -> TX0 Concentrator
Press '7' - SUB MENU: 1-One Time Transmission, 2-PacketTimer, 3-RX&TXDemo
4- Transmit using all 8 schedulers
Press '8' - Enables RX0-RX15 receivers, use with command '9'
Press '9' - Reads and Displays all RX channels FIFOs
Press 'p' - Demo configuration for EEPROM demo
Press 'P' - Programs auto-initization EEPROM
Press 'k' - Transmit a message on TX2 and TX3
----------- UTILITIES -------------
Press 'a' - Enter Watch Window Address
Press 'c' - Clears most device memory 0-0x8088
Press 'd' - Display selected RX RAM Memory blocks 0-0x3FFF, q=quit
Press 'e' - Display Receiver FIFO look-up label and interrupt look-up tables Memory
Press 'h' - Display this help menu
Press 'i' - Set interrupts SUB-MENU
Press 'I' - Set Interrupt regs for testing
Press 'l' - Toggle the LOOPBACK register from 00 <-> 0xFF
Press 'L' - Demonstrate setting and clearing Label acceptance table memory
Press 'm' - Write byte to specified Address
AN-3220
AN-3220 Rev. B Holt Integrated Circuits 11
Press 'M' - Write byte(s) to memory Range
Press 'O and o' - WDT Demo, init and refresh
Press 'r' - Toggle RUN pin state
Press 'R' - 3220 Software Reset
Press 't' - Display ALL Transmit Tables 0x4000-0x67FF, q=quit
Press 'w' - Display Device Memory from MAP
Press 'x' - Transmits number of mesgs on given channel
Press 'Space Bar' - Display Selected Registers
===========================================================
Press 'H' for this help menu, or press any valid menu key. >>
Demonstration Programs and Utilities
It is highly recommended to first review the HI-3220 data sheet to gain basic understanding of the device
so you get the most benefit from the demos and utilities described in this document.
Nearly all menu commands entered on the console instruct the ARM MCU to issue SPI Op Codes to write
or read data in the HI-3220. The host configures the HI-3220 by writing to various Control Registers using
the SPI interface along with other related system registers in space 0x8000 - 0x8087. Access to resisters
or memory locations are enabled once the READY pin is asserted high after a master reset. Message data,
transmit schedulers, RX FIFO enable, RX interrupt enable tables reside from location 0x0000 to 0x8000.
See the HI-3220 Memory Map in page 11 of the data sheet. Once the host configures the device and loads
necessary data tables, the device is enabled to receive or transmit data when the RUN pin is set high. The
RUN input pin of the HI-3220 is controlled by the MCU GPIO pin and is toggled by the ‘r’ command. When
the RUN pin is high the green RUN status LED is ON. More about the RUN pin later.
In addition to the demos there is an assortment of SPI utilities which allow viewing and modification of
registers or memory ranges, and setting/clearing single bits in the RX interrupt and RX FIFO Enable MAP
tables. These are very useful debugging utilities and are provided since traditional IDE debuggers cannot
access memory through a SPI interface. Note: By default, all SPI utilities use hex format for display of
addresses or data without showing the traditional “0x” in front of the value.
Demonstrations and Examples
The first set of demo programs 0-6 are modeled by the Example diagrams 1-5 shown in the data sheet
on pages 3, 4 and 5. In the demo descriptions, the documentation will typically refer to these methods
shown in the 3rd column. The demos demonstrate one or two of these methods to transmit and receive
data. The key demos listed below demonstrate the essential features of the HI-3220. Entering a number
in the console menu executes the corresponding demo listed.
DEMO NUMBER DEMO DESCRIPTION NOTES
AN-3220
AN-3220 Rev. B Holt Integrated Circuits 12
Example 0 On-chip RAM reception – Loopback. The Transmitter by Direct FIFO
method is also used.
Example 1 On-chip RAM reception. The Transmitter by Direct FIFO
method is also used.
Example 2 Data reception using on-chip FIFO’s. RX FIFO Reception
Example 3 TX FIFO Data transmission direct from MCU. Transmit Direct by FIFO loading
Example 4 TX Simple Data transmission on-chip
schedulers.
Requires Descriptor table(s)
Transmit scheduler(s)
Example 5 RX0 –> TX0 Repeater Messages received on RX0 are
retransmitted on TX0
Example 6 RX0 + RX1 -> TX0 Concentrator Messages received on RX0 and
RX1 are both retransmitted on
TX0
Example 7 Sub Menu commands See descriptions below
Example 8 This is a Demo utility that enables all sixteen
receivers used in some the other demos.
Configures all 16 Receivers for
reception.
Example 9 This is a Demo utility reads any RX FIFO
messages and displays them on the console
used in some of the other demos.
AN-3220
AN-3220 Rev. B Holt Integrated Circuits 13
Two pushbutton switches on the bottom board provide two utility functions.
SW1 Push-button - Configures the MCR and TX5, TX6 and TX7 Control Registers and transmits a single
message on those three transmitter channels. TX5 transmits at Low-Speed, TX6 at 50K speed and TX
transmits at Hi-Speed. The green TX LED will briefly flash.
SW2 Push-button - Generates four essential SPI sequences that demonstrate proper SPI signaling to
communicate with the HI-3220. For a detailed look at the SPI signaling refer to the end of this document.
Read Register MSR (0x02) returns value 0x20, Write 0x8000 to the MAP register.
Write 0xC0 to the MAP address location (0x8000), Read byte at MAP location returns 0xC0.
AN-3220
AN-3220 Rev. B Holt Integrated Circuits 14
Demo Descriptions
Demo 0:
Press the ‘0’ key for RAM Reception - LOOPBACK.
Demo 0 programs the LOOPBACK register with 0xFF so all RX channels are configured in LOOPBACK
mode. Messages are loaded into Receive Data memory organized by label value. Each channel 0-15
has 256 4-byte locations for each message organized by label value. TX0 - TX7 transmitters are used
to transmit the test data using transmit direct method by loading the Transmit FIFO’s with message
data. All transmitters are configured in high-speed and Parity ON is enabled for RX0 and RX1. All
sixteen Receivers are similarly configured. Initially the transmit data is set for Label 00 and data 00 45
67. ARINC 429 data is transmitted to the eight channels using the Transmit Direct method (example
3). After each transmitter FIFO is loaded the label and byte 1 are incremented by one. In LOOPBACK
mode, each Transmitter is mapped to two consecutive Receivers as shown below.
For each ‘0’ key press, this output will be displayed on the console. Three interrupt flags and the
system registers are displayed before the messages for each channel 0-15 for debug information.
Quit> 0
ARINC RAM Reception LOOPBACK
Loop Back Mode
PIR REG 0x8004 = 0x04
RPIRl REG 0x8006 = 0xFF
RPIRH REG 0x8008 = 0xFF
0 1 2 3 4 5 6 7 8 9 A B C D E F
MAP:8000 C0 C0 30 00 00 00 00 00 00 00 00 00 00 FF FF FF
MAP:8010 00 00 01 01 02 02 03 03 04 04 05 05 06 06 07 07
MAP:8020 80 80 A0 A0 A0 A0 A0 A0 A0 A0 A0 A0 A0 A0 A0 A0 (RX Control Registers)
MAP:8030 80 80 80 80 80 80 80 80 00 00 00 00 00 00 00 00 (TX Control Registers)
MAP:8040 00 00 00 00 00 00 00 00 00 FF F8 FF FF 00 00 00 (LOOPBACK Reg 0x8049=0xFF)
MAP:8050 00 00 00 00 00 00 00 00 00 00 00 00 00 00 00 00
MAP:8060 00 00 00 00 00 00 00 00 01 01 01 01 01 01 01 01
MAP:8070 01 01 01 01 01 01 01 01 00 00 00 00 00 00 FF 00
AN-3220
AN-3220 Rev. B Holt Integrated Circuits 15
** RX messages by polling **
RX-CH0: Label:00 00 45 67
RX-CH1: Label:00 00 45 67
RX-CH2: Label:01 01 45 E7
RX-CH3: Label:01 01 45 E7
RX-CH4: Label:02 02 45 E7
RX-CH5: Label:02 02 45 E7
RX-CH6: Label:03 03 45 E7
RX-CH7: Label:03 03 45 E7
RX-CH8: Label:04 04 45 E7
RX-CH9: Label:04 04 45 E7
RX-CH10: Label:05 05 45 E7
RX-CH11: Label:05 05 45 E7
RX-CH12: Label:06 06 45 E7
RX-CH13: Label:06 06 45 E7
RX-CH14: Label:07 07 45 E7
RX-CH15: Label:07 07 45 E7
Quit>
Optionally, instead of reading the Receiver data by RAM access, the data can be read from a FIFO. This
is demonstrated in Demo 2.
By default, the C program is compiled for Polling using the macro INTERRUPT_MESG_ENA. A simple
interrupt method to read the message is provided by changing this macro to a 1 in the
3220_initialization.h file which then causes the messages to be read and displayed in the
interrupt handler.
Demo 1:
Press the ‘1’ key for RAM Reception - normal mode.
Demo 1 is the same demo as Demo 0 except the LOOPBACK feature is turned OFF (LOOPBACK register
0x8049 = 0x00). An oscilloscope can be used to view the ARINC transmissions on J4 or J6 header pins.
For example J6 pin 1 is TX0AOUT and pin 2 is TX0BOUT. Without jumper wires connected between a
Transmitter and a Receiver, only the register data is displayed on the console. Optionally connect an
external ARINC 429 high speed source to any of the Receiver input channels 0-15 on the header
connectors. RX channels 0-7 are available on J1 and channel 8-17 are on J2.
To set up a single Transmit channel to be received by a Receiver channel connect the following using
a pair of clip leads. Connect TX0 outputs to RX0 inputs and verify that data is displayed on the console
when the ‘1’ key is pressed. Optionally connect more channels or an external ARINC 429 source and
press the ‘1’ key again to see the data.
J6-1 TX0AOUT Jumper to J1-1 RIN0P
AN-3220
AN-3220 Rev. B Holt Integrated Circuits 16
J6-2 TX0BOUT Jumper to J1-2 RIN0N
> 1
ARINC RAM Reception NO LOOPBACK
Normal Mode
PIR REG 0x8004 = 0x04
RPIRl REG 0x8006 = 0x02
RPIRH REG 0x8008 = 0x75
0 1 2 3 4 5 6 7 8 9 A B C D E F
MAP:8000 C0 C0 30 00 00 00 00 00 00 00 00 00 00 02 75 FF
MAP:8010 00 03 00 00 00 00 00 00 04 00 05 00 06 06 07 00
MAP:8020 80 80 A0 A0 A0 A0 A0 A0 A0 A0 A0 A0 A0 A0 A0 A0
MAP:8030 80 80 80 80 80 80 80 80 00 00 00 00 00 00 00 00
MAP:8040 00 00 00 00 00 00 00 00 00 00 F8 FF FF 00 00 00
MAP:8050 00 00 00 00 00 00 00 00 00 00 00 00 00 00 00 00
MAP:8060 00 00 00 00 00 00 00 00 00 01 00 00 00 00 00 00
MAP:8070 01 00 01 00 01 01 01 00 00 00 00 00 00 00 FF 00
** RX messages by polling **
RX-CH0: Label:00 00 45 67
Quit>
Demo 2:
Press the ‘2’ key for RX FIFO Reception and TX Direct Transmit.
This demonstrates Receiver FIFO reception on all sixteen Receivers.
Each Transmit channel TX0-TX7 transmits 32 messages to supply message data to the RX0-RX15
Receivers. Since LOOPBACK was demonstrated in Demo 0 and 1 this demo relies on external clip-lead
connections. A pair of clip-leads is required for each channel. For example to connect TX0 to RX0 and
TX7 to RX15 make the following connections.
J6-1 TX0AOUT Jumper to J1-1 RIN0P
J6-2 TX0BOUT Jumper to J1-2 RIN0N
J4-7 TX7AOUT Jumper to J2-15 RIN15P
J4-8 TX7BOUT Jumper to J2-16 RIN15N
A data pattern function creates patterns as follows for 32 messages each which are loaded into the
Transmit FIFO’s. The first two bytes (label and Byte1) are loaded with the label. Byte2 is loaded with
increment data starting with value 0x00. Byte3 is the complement of Byte2.
AN-3220
AN-3220 Rev. B Holt Integrated Circuits 17
Each Receiver channel features a 64 message deep FIFO. The RX FIFO read section of the software
first reads the message count in each RX FIFO channel then it calls a function to read that many
messages. It repeats this for all sixteen Receiver channels. See the demo code for exact details.
The console display should look like this after the connections are made and the ‘2’ key is pressed.
RX 0:0 00 00 00 FF
RX 0:1 00 00 01 FE
*
*
*
RX 0:30 00 00 1E E1
RX 0:31 00 00 1F E0
RX 15:0 07 07 00 FF
RX 15:1 07 07 01 FE
*
*
*
RX 15:30 07 07 1E E1
RX 15:31 07 07 1F E0
Demo 3:
Press ‘3’ to transmit a message on TX2 and TX3 using transmission directly by CPU.
This method has already been demonstrated in the previous demos 0-2. Transmission by Direct
method is when the Transmit FIFO is loaded with data and the RUN pin is set high. This causes the
transmission of any data in the FIFO’s for that channel until the FIFO is empty. Pressing ‘SW3” push-
button also uses this method to transmit three messages, one message each on TX5, TX6 and TX7.
Demo ‘k’ also uses this method to transmit a message on TX2 and TX3.
Transmit Scheduler demos
The next set of Demos use the Transmit Scheduler features of the HI-3220 to accomplish a variety of
capabilities. Each Transmit channel TX0-TX7 has a transmit controller and supporting descriptor table
space in memory starting at address 0x4000. For channels 0 and 1 either 128 or 256 message descriptors
can be loaded into the descriptor memory space. Channels 2-7 are fixed at 128 messages. Each descriptor
consists of eight bytes for an Op Code, timer values and message data. See the data sheet for more details
for how the Transmit Scheduler works. Once the descriptors are initialized and Control Register bits are
properly set, the scheduler runs when the RUN pin is set high. To stop the scheduler set the RUN pin low.
Use command ‘r’ to toggle the RUN pin high or low in these demos.
Some examples what each a Transmit Scheduler can be used for:
1. Transmit up to 128 or 256 immediate messages.
AN-3220
AN-3220 Rev. B Holt Integrated Circuits 18
2. Transmit messages automatically conditionally or unconditionally if message is received from any
Receiver channel and by ARINC label value.
3. Transmit messages the same as item 2 above, but optionally reinsert ARINC SDI bits (ARINC bits 9
and 10).
4. Autonomous operation once the auto-initialization EEPROM is programmed.
5. One-shot or continuous transmission of the number of programmed message descriptors until
the end of the table is reached or the End of Sequence value 0x00 is encountered by the
Scheduler.
6. The Transmit Scheduler message auto routing capabilities allows the device to be configured as a
Data Concentrator or Repeater.
Demo 4:
Press ‘4’ for TX0 Simple Scheduler – continuous.
This demo initializes the Transmit TX0 descriptor table with 31 messages with the Immediate Op Code.
After the 3rd message transmits, a 10ms delay Op Code delays transmission before the remaining
messages transmit. All 31 messages are the same except byte3 that increments, Label 00, byte1: 0x00,
byte2 increment data, and byte3 =0x04.
After each message is loaded in the descriptor table, the label is incremented for the next descriptor. After
the program loads all 32 descriptors, an End of Sequence Op Code is written in the next address with 0x00.
The repetition rate is set for 40ms.
After pressing ‘4’, the demo quickly returns to the main console menu.
Press ‘r’ to set the RUN pin high to start the scheduler, the first three messages transmits followed by a
10ms delay then the remaining messages transmit. This occurs every 40ms. If ‘r’ is pressed again, RUN
goes low and transmission stops and if ‘r’ is pressed again the RUN pin is set high again and transmissions
resume.
View the ARINC TX0 channel transmissions on J6 pin 1 and 2 with an oscilloscope.
AN-3220
AN-3220 Rev. B Holt Integrated Circuits 19
To read back the data and display it on the console using the FIFO Reception method, first connect the
TX0 transmitter outputs to the RX0 Receiver inputs as follows.
J6-1 TXOAOUT Jumper to J2-1 RINOP
J6-2 TXOBOUT Jumper to J2-2 RINON
Press ‘8’ to initialize Receivers 0-15 then press ‘r’ to start transmission. Press ‘r’ again to stop transmission.
Press ‘9’ to display 64 messages on the console. There are 64 messages because that is the Receiver FIFO
depth. Probably several 64-message groups were transmitted between the first and second ‘r’ key
presses, and the FIFO overflowed. When the Receive FIFO fills, a subsequent message is loaded in the FIFO
overwriting the oldest stored message.
You can also leave RUN high and randomly press ‘9’ to display the FIFO messages in this case the first
displayed message will unlikely be the first message in the descriptor table.
Commands ‘8’ and ‘9’ from the console menu can be used anytime to configure the RX Receivers and
display the RX FIFO data.
AN-3220
AN-3220 Rev. B Holt Integrated Circuits 20
Repeater Demo
Press ‘5’ for RX0 -> TX0 Repeater.
This demo sets up a single descriptor in the TX0 scheduler table to perform a Repeater function and
returns control back to the console main loop. Pressing ‘r’ sets the RUN pin high to start the scheduler.
Any message received on Receiver 0 automatically re-transmits the message on TX0 without host
intervention. Optionally, the host can receive the message if desired, using RAM Reception or FIFO
Reception.
The descriptor is configured to reference RX0 channel, label 0 message in RAM memory (0x0000).
This example uses an IDC Op Code for byte-1, the re-transmitted message will have the label value stored
in Byte5. Bytes 2, 3 and 4 are indexed and come from RX0 channel where the label 0x00 message data is
stored, but actually the first byte is a Status Byte in this location. Review Demo 5 code in 3220Demo.c
to view the C code configuration steps.
Indexed Conditional Op Codes use NEWTX0 - NEWTX3 bits in the Received Data Status Bytes. This Status
Byte is the first byte in Received data memory (See page 19 of the data sheet) that is loaded for every
received message. When a message is received, all the bits in this Status Byte register are set. This is how
the scheduler detects when a new message is received. If a descriptor references any of the data from
this block, the corresponding NEWTXx bit is cleared depending on the Transmitter channel (TX0-TX7).
The single Transmit descriptor consisting of eight bytes shown below is loaded into starting location
0x4000 since that is the first location of the TX0 descriptor table. These values are set in arrays which
makes them easy to alter in C code for experimentation.
Descriptor Bytes 1-8
Byte1 Byte2 Byte3 Byte4 Byte5 Byte6 Byte7 Byte8
Op Code RX Label PTP/Delay PTO ARINC Label ARINC Byte1 ARINC Byte3 ARINC Byte3
IDC (0101) 0x02 0x00 0x00 0x02 N/A N/A N/A
For a repeater, PRESCALE bit 6 is set in the TX0 Control Register. This sets the repetition rate to 1ms to
minimize latency between message arrival on the RX0 Receiver to when the Scheduler retransmits the
message on TXO.
AN-3220
AN-3220 Rev. B Holt Integrated Circuits 21
To view the descriptor bytes in memory, use the ‘a’ command utility and enter address 4000. The
descriptor memory should appear with the following data (only partially shown):
0 1 2 3 4 5 6 7 8 9 A B C D E F
MAP:4000 50 02 00 00 02 00 00 00 00 00 00 00 00 00 00 00
^--- EOS
For example:
RX0 Incoming message: 00 02 34 56
TX0 Repeated message: 00 02 34 56
To change the transmitted label, simply change the label (Byte 5) to any desired value in the software. In
the demo program, descriptor bytes are stored in eight byte arrays[]. Experimentation can be performed
by changing the descriptor byte values in the array and rebuilding the project or by altering bytes by using
the SPI utility command ‘m’ which allows writing a byte to any address entered on the console. View the
result with the SPI utility command ‘a’ to set the starting address and display a block of addresses and
corresponding data values.
For this demonstration, connect two clip-leads to make an external connection between TX2 outputs and
RX0 inputs (similar to the previous demos). When the ‘k’ key is pressed, a message will transmit on TX2
so this will be the source or input message the Repeater retransmits on TX0.
Steps:
Press ‘5’ to execute the Repeater demo.
Press ‘r’ to run scheduler (RUN high)
Press ‘k’ to transmit test messages on TX2 and TX3 (TX3 is ignored for this demo.)
Press ‘9’ to display the message.
To see the repeated transmission, connect another pair of clip-leads from the TX0 output pins to the RX3
channel inputs. This allows read back and retransmitted message display on TX0 on the console.
Results:
> 5
Press ‘6’ for Repeater Demo
Press ‘8’ to enable Receivers
Press ‘r’ to set RUN high which runs the scheduler
Press ‘k’ to transmit TX2 TX3 test messages – Transmits message 0x02 0x02 0x34 0x56 on TX2
Press ‘9’ to read the FIFO data and display it on the console
Displayed result:
AN-3220
AN-3220 Rev. B Holt Integrated Circuits 22
mesgs: 1
RX 0:0 02 02 34 56
mesgs: 1
RX 3:0 02 02 34 56 Elapsed time 0.007210 >
Each time ‘k’ is pressed, a message is transmitted on TX2 and this is received by RX0 and the
scheduler retransmits the message on TX0.
The scope capture below shows the TX2 transmission on top and the retransmitted message on TX0
below. The Scheduler 1ms timer is asynchronous relative to messages, so the worst case latency is shown
below at 1ms in this case. Pressing ‘k’ several times will reveal delays anywhere between the two vertical
cursor lines.
Demo 6:
Press ‘6’ for RX0 + RX1 -> TX0 Concentrator Demo.
The concentrator demo receives messages on two Receiver channels (RX0 and RX1) and retransmits them
both on TX0 transmitter.
This demo sets up two descriptors in the TX0 scheduler table. The first descriptor references the RX0
channel message and the second one references the RX1 message (both Label 0). After pressing ‘6’,
control returns back to the main console menu. Press ‘r’ to set the RUN pin high, starting the scheduler.
Any new messages received on Receiver 0 or Receiver 1 will automatically re-transmit to TX0 with no host
intervention. Optionally, the host can receive the messages if desired, using either RAM access or FIFO
Reception. This is very similar to the Repeater demo except two descriptors are loaded into the TX0
descriptor table at location 0x4000.
View the descriptor table at location 0x4000 (using the ‘a’ command):
0 1 2 3 4 5 6 7 8 9 A B C D E F
MAP:4000 50 02 00 00 11 00 00 00 51 03 00 00 22 00 00 00
MAP:4010 00 (EOS)
AN-3220
AN-3220 Rev. B Holt Integrated Circuits 23
The ‘k’ command is again used here to transmit test messages on TX2 and TX3 outputs.
TX2 and TX3 outputs should be connected to RX0 and RX1 respectively. And finally, jumper TX0 to RX3 to
view TX0 output received by RX3 displayed on the console
TX2 transmits 00 02 34 56  Received by RX0
TX3 transmits 00 03 78 9A  Received by RX1
Results:
> 6
Concentrator Demo
Press 8 to enable the receivers
Press r to set RUN high to run scheduler
Press k to transmit TX2 TX3 test messages
Press 9 to read the FIFO data and display it on the console
mesgs: 1
RX 0:0 02 02 34 56
mesgs: 1
RX 1:0 03 03 78 9A
mesgs: 2
RX 3:0 11 02 34 D6
RX 3:1 22 03 78 9A
A few things to note here: The label values were changed to 0x11 and 0x22 in the descriptor tables for
this demo so those are the new transmitted label values the concentrator transmits. The RX3 receiver is
monitoring TX0 output and receives both messages from RX0 and RX1 and is displayed.
AN-3220
AN-3220 Rev. B Holt Integrated Circuits 24
A scope capture of the Concentrator Transmissions is shown:
A block diagram shows the paired connections for this demo.
RX0
RX1
RX3
TX0
TX2
TX3
RX0 + RX1 messages
TX0 routed to
RX3 for FIFO
capture and
display
Test Output Mesg
Test Output Mesg
Each line shown
is a pair
AN-3220
AN-3220 Rev. B Holt Integrated Circuits 25
A simplified implementation only requires the two RX0 and RX1 channel inputs, and one TX0 channel
output for this concentrator without all the looped-back connections.
RX0
RX1
TX0 RX0 + RX1 messages
Each line shown
is a pair
Demo 5 uses a single descriptor while Demo 6 used just two descriptors leaving the available descriptor
table memory largely unused; this unused descriptor space can be used for other messaging tasks.
TX0 One-Time transmission Demo. Press ‘7’ then from the sub-menu Press ‘1’.
This demo uses the same exact demo code function as Demo 3, except after a 10ms delay the TX0 Control
Register is written again to clear the RUN bit. This demonstrates One-Time transmission of all
programmed descriptor messages. After all the messages are sequenced and transmitted, the scheduler
stops. View the transmitted messages on a scope on TX0 outputs or make external connections to any
receivers and use the ‘8’ and ‘9’ commands to enable reception and display the messages on the console
similar to previous demos.
AN-3220
AN-3220 Rev. B Holt Integrated Circuits 26
TX0-TX3 Scheduler Packet-Timer Demo. Press ‘7’ then from the sub-menu Press ‘2’.
The Packet-Timer demo programs the descriptor tables for TX0, TX1, TX2 and TX3 to implement the
examples 1 -4 listed in the Packet Timer section of the HI-3220 data sheet. Each example uses different
values for PTP (byte3) and PTO (byte4) of the descriptor bytes to demonstrate the flexible timing
options of the Transmit Scheduler. In order to duplicate this scope plot, trigger positive on the RUN
signal on TP2 using the oscilloscope external trigger input and view TX0, TX1, TX2 and TX3 on a four
channel oscilloscope.
Press 7, then Press 2.
Press ‘r’ to start the scheduler which sets the RUN pin high.
TX0=Yellow, TX1=Green, TX2=Blue, TX3=Red.
Demo P: Both lower case ‘p’ and upper case ‘P’ are used in this demo.
Using the HI-3220 with a preprogrammed EEPROM allows auto-initialization and autonomous operation
without MCU or FPGA control. Once the configuration data is stored in the EEPROM, the HI-3220 will
automatically load all register and selected memory areas shown shaded in the memory map in the data
sheet from the EEPROM into the HI-3220 at RESET if the Mode [2:0] inputs are configured for Mode 1 or
Mode 3 according to the flow chart on page 27 of the data sheet.
The user must configure Control Registers, Descriptor Tables etc. in the device to achieve the desired
functionality before programming the EEPROM with the ‘P’ command. The ‘P’ command simply copies
the HI-3220 data and register space into the EEPROM.
AN-3220
AN-3220 Rev. B Holt Integrated Circuits 27
For this demo, the function autoInitEEPROMExample() is called first; this function configures all
sixteen Receivers and eight Transmitters for high speed operation in LOOPBACK mode. This configuration
is programmed in the EEPROM for this demo.
Demo steps:
1. Set the three Mode pins low, Mode0, Mode1 and Mode2 by placing the jumper shunts in the
down position on J7, J8 and J9. Note: This is only required if the EEPROM was never
programmed before.
2. Press ‘p’ to execute the autoInitEEPROMExample() function. To test this demo
configuration, follow the steps below. This exercise is run to verify that the configuration
operates as desired before programming the EEPROM.
a. Press ‘r’ to set RUN high.
b. Press ‘k’ to transmit a message on TX2 and TX3.
c. Press ‘9’ to read the received messages. Due to LOOPBACK, each Transmitter is
duplicated internally routed to two Receivers.
mesgs: 1
RX 4:0 02 02 34 56
mesgs: 1
RX 5:0 02 02 34 56
mesgs: 1
RX 6:0 03 03 78 9A
mesgs: 1
RX 7:0 03 03 78 9A
3. Press ‘P’ to program this configuration into the EEPROM. The red ERROR LED flashes briefly.
4. Change the Mode0-2 jumpers for Mode1 or Mode3 and power-cycle the board Off/On or
Press RESET. The HI-3220 should auto-initialize from EEPROM.
5. Repeat the sequence steps a-c above to see the demo work the same as before but this time
the autoInitEEPROMExample() function call is not needed because the configuration
was copied into the HI-3220 from the EEPROM by the auto-initialization sequence.
Auto-initialization from EEPROM is an optional feature; an EEPROM is not needed if this feature is not
used.
Demo x: Transmits a custom message.
Press ‘x’ to transmit a custom message on any TX0-TX7 transmitter channel. This utility prompts for a
channel number (0-7), message count (0-32), label value (byte), and the Transmit Control Register value
then transmits the message(s).
AN-3220
AN-3220 Rev. B Holt Integrated Circuits 28
Console Menu Utilities
A SPI peripheral presents some difficulty during development. Traditional bus-interfaced debug
environments use memory windows to display memory-mapped registers or memory contents. This
capability is not available using SPI, so various SPI utility functions are provided in the Holt demo for
writing and reading registers and memory space. These utilities are essential for debug during
development, but require a UART/serial port connected to a PC running terminal emulation such as
HyperTerminal or TeraTerm. Some of the provided functions write or display a single address location;
others access a range of addresses. All address and data values are hex by default.
Command ‘w’:
This command displays the 256 byte region beginning at location 0x8000. This is useful because 0x8000 is
the start address for the system registers. After power-up or RESET, nearly all memory contains zeros.
Notice the ‘2’ in the upper nibble at address 0x8002 shows the READY bit in the MSR is set high.
0 1 2 3 4 5 6 7 8 9 A B C D E F
MAP:8000 00 00 20 00 00 00 00 00 00 00 00 00 00 00 00 FF
MAP:8010 00 00 00 00 00 00 00 00 00 00 00 00 00 00 00 00
MAP:8020 00 00 00 00 00 00 00 00 00 00 00 00 00 00 00 00
MAP:8030 00 00 00 00 00 00 00 00 00 00 00 00 00 00 00 00
MAP:8040 00 00 00 00 00 00 00 00 00 00 F8 00 00 00 00 00
MAP:8050 00 00 00 00 00 00 00 00 00 00 00 00 00 00 00 00
MAP:8060 00 00 00 00 00 00 00 00 00 00 00 00 00 00 00 00
MAP:8070 00 00 00 00 00 00 00 00 00 00 00 00 00 00 FF 00
MAP:8080 00 00 00 00 00 00 00 00 00 00 00 00 00 00 00 00
===============================================================
Keys: 'W' Watch '<' Up '>' Down 'R' Refresh 'A' Address
0x8000-0x808F End MAP:8090
Pressing the < key subtracts 256 from the start address and pressing > adds 256 to the start address.
Command ‘a’:
This prompts for a 4-digit hex address and displays that 256 byte region.
a
Enter 16-bit hex address: 4000
0 1 2 3 4 5 6 7 8 9 A B C D E F
MAP:4000 00 00 00 00 00 00 00 00 00 00 00 00 00 00 00 00
MAP:4010 00 00 00 00 00 00 00 00 00 00 00 00 00 00 00 00
MAP:4020 00 00 00 00 00 00 00 00 00 00 00 00 00 00 00 00
MAP:4030 00 00 00 00 00 00 00 00 00 00 00 00 00 00 00 00
MAP:4040 00 00 00 00 00 00 00 00 00 00 00 00 00 00 00 00
MAP:4050 00 00 00 00 00 00 00 00 00 00 00 00 00 00 00 00
MAP:4060 00 00 00 00 00 00 00 00 00 00 00 00 00 00 00 00
MAP:4070 00 00 00 00 00 00 00 00 00 00 00 00 00 00 00 00
MAP:4080 00 00 00 00 00 00 00 00 00 00 00 00 00 00 00 00
MAP:4090 00 00 00 00 00 00 00 00 00 00 00 00 00 00 00 00
MAP:40A0 00 00 00 00 00 00 00 00 00 00 00 00 00 00 00 00
MAP:40B0 00 00 00 00 00 00 00 00 00 00 00 00 00 00 00 00
MAP:40C0 00 00 00 00 00 00 00 00 00 00 00 00 00 00 00 00
MAP:40D0 00 00 00 00 00 00 00 00 00 00 00 00 00 00 00 00
MAP:40E0 00 00 00 00 00 00 00 00 00 00 00 00 00 00 00 00
MAP:40F0 00 00 00 00 00 00 00 00 00 00 00 00 00 00 00 00
===============================================================
AN-3220
AN-3220 Rev. B Holt Integrated Circuits 29
Keys: 'W' Watch '<' Up '>' Down 'R' Refresh 'A' Address
0x4000-0x40FF End MAP:4100
Command ‘c’:
Sometimes it is useful to clear all device memory from the console instead of using reset or power cycling
the board. This guarantees fresh initialization values and device memory is cleared to zeros making it
easier to identify updated values later. Press ‘c’ to clear all memory.
Command ‘d’:
This command prompts for a channel value and expects 0-F to be entered. The corresponding RX RAM
message buffer is displayed for all 256 labels. The utility continuously prompts for another value to repeat
the process. Press ‘q’ to quit the utility.
Command ‘L’:
This command demonstrates two useful functions that set or clear ARINC Labels in the Received Data
Enable Look-Up table; refer to HI-3220 data sheet page 20. Functions setLabel(chx,label) and
clearLabel(chx,label) can be called by the user in their own C projects. The input parameters
for these functions are Receiver channel number (0-15) and label (0-255 dec). Setting the appropriate bit
manually in the table is otherwise a tedious process. A Data Enable Look-Up table diagram is provided in
the data sheet, showing how the label enable bits are arranged in the table memory.
Press ’L’ to set the labels called out in the demo.
The following sequence takes place.
1. Channel CH0 labels are set: 0, 16, 127, 128, 254.
2. Channel CH7 labels are set: 1, 17, 128, 255.
3. Channel CH15 label 255 is set.
4. The table memory is displayed on the console.
5. Channel CH15 label is cleared.
6. The table memory is displayed again on the console showing revealing CH15 label 255 is
now cleared.
Results
0 1 2 3 4 5 6 7 8 9 A B C D E F
MAP:6800 01 00 01 00 00 00 00 00 00 00 00 00 00 00 00 80 RX0 Labels 0, 16, 128 set
MAP:6810 01 00 00 00 00 00 00 00 00 00 00 00 00 00 00 40 RX0 Labels 128, 254 set
MAP:6820 00 00 00 00 00 00 00 00 00 00 00 00 00 00 00 00
MAP:6830 00 00 00 00 00 00 00 00 00 00 00 00 00 00 00 00
MAP:6840 00 00 00 00 00 00 00 00 00 00 00 00 00 00 00 00
MAP:6850 00 00 00 00 00 00 00 00 00 00 00 00 00 00 00 00
MAP:6860 00 00 00 00 00 00 00 00 00 00 00 00 00 00 00 00
MAP:6870 00 00 00 00 00 00 00 00 00 00 00 00 00 00 00 00
MAP:6880 00 00 00 00 00 00 00 00 00 00 00 00 00 00 00 00
MAP:6890 00 00 00 00 00 00 00 00 00 00 00 00 00 00 00 00
AN-3220
AN-3220 Rev. B Holt Integrated Circuits 30
MAP:68A0 00 00 00 00 00 00 00 00 00 00 00 00 00 00 00 00
MAP:68B0 00 00 00 00 00 00 00 00 00 00 00 00 00 00 00 00
MAP:68C0 00 00 00 00 00 00 00 00 00 00 00 00 00 00 00 00
MAP:68D0 00 00 00 00 00 00 00 00 00 00 00 00 00 00 00 00
MAP:68E0 02 00 02 00 00 00 00 00 00 00 00 00 00 00 00 00 RX7 Labels 1, 17 set
MAP:68F0 01 00 00 00 00 00 00 00 00 00 00 00 00 00 00 80 RX7 Labels 128, 255 set
MAP:6900 00 00 00 00 00 00 00 00 00 00 00 00 00 00 00 00
MAP:6910 00 00 00 00 00 00 00 00 00 00 00 00 00 00 00 00
MAP:6920 00 00 00 00 00 00 00 00 00 00 00 00 00 00 00 00
MAP:6930 00 00 00 00 00 00 00 00 00 00 00 00 00 00 00 00
MAP:6940 00 00 00 00 00 00 00 00 00 00 00 00 00 00 00 00
MAP:6950 00 00 00 00 00 00 00 00 00 00 00 00 00 00 00 00
MAP:6960 00 00 00 00 00 00 00 00 00 00 00 00 00 00 00 00
MAP:6970 00 00 00 00 00 00 00 00 00 00 00 00 00 00 00 00
MAP:6980 00 00 00 00 00 00 00 00 00 00 00 00 00 00 00 00
MAP:6990 00 00 00 00 00 00 00 00 00 00 00 00 00 00 00 00
MAP:69A0 00 00 00 00 00 00 00 00 00 00 00 00 00 00 00 00
MAP:69B0 00 00 00 00 00 00 00 00 00 00 00 00 00 00 00 00
MAP:69C0 00 00 00 00 00 00 00 00 00 00 00 00 00 00 00 00
MAP:69D0 00 00 00 00 00 00 00 00 00 00 00 00 00 00 00 00
MAP:69E0 00 00 00 00 00 00 00 00 00 00 00 00 00 00 00 00
MAP:69F0 00 00 00 00 00 00 00 00 00 00 00 00 00 00 00 80 RX15 label 255 set
0 1 2 3 4 5 6 7 8 9 A B C D E F
MAP:6800 01 00 01 00 00 00 00 00 00 00 00 00 00 00 00 80
MAP:6810 01 00 00 00 00 00 00 00 00 00 00 00 00 00 00 40
MAP:6820 00 00 00 00 00 00 00 00 00 00 00 00 00 00 00 00
MAP:6830 00 00 00 00 00 00 00 00 00 00 00 00 00 00 00 00
MAP:6840 00 00 00 00 00 00 00 00 00 00 00 00 00 00 00 00
MAP:6850 00 00 00 00 00 00 00 00 00 00 00 00 00 00 00 00
MAP:6860 00 00 00 00 00 00 00 00 00 00 00 00 00 00 00 00
MAP:6870 00 00 00 00 00 00 00 00 00 00 00 00 00 00 00 00
MAP:6880 00 00 00 00 00 00 00 00 00 00 00 00 00 00 00 00
MAP:6890 00 00 00 00 00 00 00 00 00 00 00 00 00 00 00 00
MAP:68A0 00 00 00 00 00 00 00 00 00 00 00 00 00 00 00 00
MAP:68B0 00 00 00 00 00 00 00 00 00 00 00 00 00 00 00 00
MAP:68C0 00 00 00 00 00 00 00 00 00 00 00 00 00 00 00 00
MAP:68D0 00 00 00 00 00 00 00 00 00 00 00 00 00 00 00 00
MAP:68E0 02 00 02 00 00 00 00 00 00 00 00 00 00 00 00 00
MAP:68F0 01 00 00 00 00 00 00 00 00 00 00 00 00 00 00 80
MAP:6900 00 00 00 00 00 00 00 00 00 00 00 00 00 00 00 00
MAP:6910 00 00 00 00 00 00 00 00 00 00 00 00 00 00 00 00
MAP:6920 00 00 00 00 00 00 00 00 00 00 00 00 00 00 00 00
MAP:6930 00 00 00 00 00 00 00 00 00 00 00 00 00 00 00 00
MAP:6940 00 00 00 00 00 00 00 00 00 00 00 00 00 00 00 00
MAP:6950 00 00 00 00 00 00 00 00 00 00 00 00 00 00 00 00
MAP:6960 00 00 00 00 00 00 00 00 00 00 00 00 00 00 00 00
MAP:6970 00 00 00 00 00 00 00 00 00 00 00 00 00 00 00 00
MAP:6980 00 00 00 00 00 00 00 00 00 00 00 00 00 00 00 00
MAP:6990 00 00 00 00 00 00 00 00 00 00 00 00 00 00 00 00
MAP:69A0 00 00 00 00 00 00 00 00 00 00 00 00 00 00 00 00
MAP:69B0 00 00 00 00 00 00 00 00 00 00 00 00 00 00 00 00
MAP:69C0 00 00 00 00 00 00 00 00 00 00 00 00 00 00 00 00
MAP:69D0 00 00 00 00 00 00 00 00 00 00 00 00 00 00 00 00
MAP:69E0 00 00 00 00 00 00 00 00 00 00 00 00 00 00 00 00
MAP:69F0 00 00 00 00 00 00 00 00 00 00 00 00 00 00 00 00 - CH15 label 255 cleared
Optionally use the ‘a’ or ‘e’ command to display this region of device memory.
Command ‘m’: (modify register/memory value)
This command is used to write a byte to any 16-bit address.
> m
AN-3220
AN-3220 Rev. B Holt Integrated Circuits 31
Enter 16-bit hex address: 69ff
Enter hex byte : 80 readback: 80 (This action just re enabled CH15 label 255 again from the
previous demo.
There are a few more utility commands that the user can explore and might find useful.
Application considerations
ARINC 429 Reception by RAM vs. Reception by FIFO (and host keeping pace with data)
There are two methods to read ARINC 429 messages. Reception by RAM access uses a single 4-byte buffer
location mapped in 16K device memory according to channel number (0-15) and Label value. See the data
sheet on page 18 for the memory organization. Reception by FIFO access uses a 64 message FIFO for each
Receiver channel (0-15).
The preferred method depends on user requirements, speed of host controller, software overhead and
ARINC 429 traffic. When using Reception by RAM access, the host must read a message on the same
channel and same Label before the next message arrives, or next message data will overwrite the previous
data. If the next message is on a different channel or different label, no overwrite occurs because that
channel or label maps into a different 4-byte buffer location. An INT interrupt could be used to achieve
fast response to reading these messages. In high speed, ARINC 429 messages could arrive about every
360µs.
Using FIFO access helps alleviate tight timing constraints by storing up to 64 messages before potential
overwrite occurs when the host fails to read messages fast enough to keep up with incoming traffic. RX
channel interrupts and a FIFO Threshold register provide flexibility for designing a solution that processes
messages fast enough to meet application requirements. Because of the FIFO’s ability to store up to 64
messages before a possible overwrite (or data loss) occurs, a polling strategy is often used instead of an
interrupt.
The easiest way to configure the device to receive ARINC 429 messages is using FIFO Reception method.
The easiest way to configure and transmit ARINC 429 data is to use the MCU Direct Transmit method.
Improved Host Receiver FIFO reading efficiency with the HI-322x family
A new feature in the HI-3220 family is the ability to read the current message count of either the Transmit
FIFOs or the Receiver FIFOs. This allows the host to read a channel’s FIFO count and pass that count to a
Read_FIFO16 function that reads all the messages in one shot. In addition a new C driver reads 16-bits at
a time. This feature is used in the demos in several places, but the two essential lines of code are.
AN-3220
AN-3220 Rev. B Holt Integrated Circuits 32
mesgCnt = ReadRegister(FCVOR, 0); Fetch message count of Receiver RX0 FIFO
Read_FIFO16(ch0, bufferRX, mesgCnt); Reads all FIFO messages into the buffer
EEPROM auto-initialization feature
The optional EEPROM auto-initialization feature allows the device to automatically copy register, Transmit
Scheduler tables, Interrupt Map and FIFO Enable Map values from a preprogrammed EEPROM into device
memory space after power-up or reset. This feature is useful if it’s necessary to initialize and run the
device before a host MCU or FPGA can perform initialization, or if the application is an autonomous Data
Concentrator or Repeater that operates autonomously, without a host MCU or FPGA. In most cases, if a
host is available, “initialize from EEPROM” is not typically needed.
When not using an EEPROM, the Mode0-2 pins must be tied either to VDD or GND through 1K to 3.3K
resistors, depending on the desired power-up mode. These pins do not have integrated pull-up or pull-
down resistors and 3-bit mode must be either 0, 1, 2 or 5 as indicated in Figure 1 of the data sheet.
HI-3220 SPI basics for troubleshooting
This is a brief tutorial on host SPI communication with the HI-3220. Four simple SPI sequences are
generated when the SW2 push-button switch is pressed, as explained below. The logic analyzer plots show
the waveforms for each of these. This information may be helpful when troubleshooting the Master SPI
interface.
The four separate SPI sequences that produce these waveforms are shown below.
retVal = ReadRegister(0x02, 0); // read MSR register 0x8002
Write_MAP (0x8000,0); // write 0x8000 address (MCR) to the MAP pointer
Write_MAP_Byte (0xC0,0); // write 0xC0 to MCR – MAP points to MCR register
retVal2 = Read_MAP_Byte(0); // read byte at existing MAP pointer
The values of retVal and retVal2 are displayed on the console when SW2 is pressed.
Simple SPI example
MSR = 20
MCR = C0
The simplest SPI operation that can be used to test the interface is the Read Register Op Code to read
the value of the Master Status Register(MSR) which should contain 0x20 with bit-5 READY set high.
When the HI-3220 becomes READY after RESET, the READY output pin is set high and bit-5 should also
be high in the MSR if when read by SPI. The Register Read two byte Op Code 0xE0 + 0x20 consists of an
Op Code byte followed by another byte for the lower portion of the 16-bit address. The AAA-AAAA field
is split between the first Op Code byte and the second Op Code byte. This Op Code automatically adds
0x80 for the upper address byte to the lower address byte provided by the AAA-AAAA field so the
address is 0x8002. The Master Status register location is 0x8002 so that is the register that is returned
with this Op Code. The SPI sequence is shown below and the user should verify the Master SPI signaling
AN-3220
AN-3220 Rev. B Holt Integrated Circuits 33
is similar to this waveform. Notice SO data is clocked out on the negative edge of SPI clock and the
Master should clock data on the rising edge. This is SPI mode 0.
Read the MSR (0x8002)
If the Read Register Op Code is working properly, the user can proceed to the next steps to verify the
following three SPI sequences which determines whether SPI writes are working. The MAP (memory
address pointer) register is used to write and read back a register (or memory) location. First an address
is written to the 16-bit MAP pointer then a byte value is written to this location using an Op Code that
uses the MAP pointer value for the write address. The value is then read back, also using the same MAP
pointer address. This should return the original byte value that was originally written. See the following
there SPI sequences for these examples.
Write address 0x8000 to the MAP pointer
AN-3220
AN-3220 Rev. B Holt Integrated Circuits 34
Write value 0xC0 to MAP address
Read value at MAP address (should be 0xC0)
Final Tips:
1. The READY output pin must be high in order to write to any Control Register or other memory
space. READY is asserted high after a qualifying negative reset pulse on the /MRST input.
2. When loading Transmitter Descriptor tables, always load an EOS (0x00) byte after the last
loaded descriptor to terminate the descriptors unless the table is fully loaded.
3. The RUN pin must be high in order for the Receivers or Transmitters to operate.
4. When using the EEPROM to auto-initialize, it must have been previously programmed. If the
HI-322x powers-up in Mode 1 or Mode 3 with an unprogrammed EEPROM, a fault will occur
and the red LED goes On.
5. When initializing RX Receiver channels for FIFO message reception remember to also initialize the
Received FIFO Enable Look-Up Table so the desired labels are enabled. Logic-1 enables a label and 0
disables the label. The device powers up with all the label entries cleared to 0x00 so by default all labels
are disabled. If a label is disabled, no message reception on that channel will occur. The demos typically
set all the label table memory to 0xFF.
AN-3220
AN-3220 Rev. B Holt Integrated Circuits 35
Getting Started with the Holt API demo software project and
installing IAR Systems Embedded Workbench for ARM Compiler
1. Installed IAR Systems Embedded Workbench for ARM (EWARM ) compiler is required BEFORE
adding the Holt demo project, so all Atmel board library files and the demo project folder are
created in the proper locations. Follow the “Holt HI-3220 Demo Project Installation Guide” found
in the Project folder on the Holt CD-ROM. Before proceeding to the next steps IAR must be
installed and the Holt project folder must be in the proper folder location, according to that
guide. Instructions beyond this point assume you have completed the above installation tasks.
The Holt demo project requires IAR EWARM version 7.1 or greater. If using IAR 8.x versions,
another technical note provided additional guidance.
2. Launch IAR Embedded Workbench from the Windows Start menu. A blank screen should appear.
Open the Holt HI-3220 Demo Project from the IAR File pull-down menu, click on
File/Open/Workspace and navigate to the project folder location and select “HI-3220
Demo.eww” and click the Open button.
3. Debug requires an interface between the computer running IAR Embedded Workbench® and the
HI-3220 Application Development Kit. Connect the small end of the provided USB cable to the
evaluation board USB connector marked DEBUG. Connect the other end of the USB cable to a free
computer USB port. The IAR C-SPY Debugger for ARM includes drivers for numerous target system
interfaces, including built in “J-link On Board”.
The first time the evaluation board USB cable is connected to the computer, the Windows “Found
New Hardware” message should appear for the J-Link device. After several seconds, Windows
should load the appropriate driver and advise, “Your hardware is ready for use”. If Windows fails
to find the J-Link driver, direct it to look in the Drivers directory the IAR Embedded Workbench®
installation CD.
If difficulties arise when initiating a debug session at step 5, click Project then Options. In the
window that opens, under Category = Debugger highlight J-Link/J-Trace. Click the tab labeled
Connection, then verify Communications = USB and Interface = SWD.
3. Open IAR Embedded Workbench®. Click File, then Open Workspace, then navigate to the project
subdirectory created in step 4. Select the project file with .eww extension, then click Open. (The
next time Embedded Workbench® opens, this project will appear in the Recent Workspaces list
when File is clicked.)
AN-3220
AN-3220 Rev. B Holt Integrated Circuits 36
4. If problems occur with IAR installation or with using the IAR debugger, two Holt technical notes
are provided to help resolve these issues included on the Holt CD ROM.
5. The demo project only uses unsigned integer variables. Optionally turn off the nuisance compiler
message that occurs when a variable’s most significant bit toggles. The message looks like this:
Remark[Pe068]: integer conversion resulted in a change of sign
To disable this diagnostic message, click Project then click Options
Category = C/C++ Compiler
Tab = Diagnostics
Suppress these diagnostics: add "Pe068" to list
6. RAM based projects are not supported due to the limited amount of RAM on the MCU. By
design the Cortex™-M3 runs slower in RAM than in Flash so there is little need for a RAM based
project.
Compile the project by clicking the Make button. See following illustration. If the Build messages
window in IAR Embedded Workbench® indicates no errors or warnings, you can continue. If
errors occurred, correct them and recompile the program.
11. Initiate a debug session by clicking the Restart Debugger button. This downloads the compiled
program into the MCU and readies the board for program execution. Click Go to start execution.
Click Break (normally displayed during execution as a red upheld hand) to stop execution.
Stop
Debug
Toggle
Brkpoint
Restart
Debugger
Make
Reset
Break
Step
Into
Run
to
Cursor
Go
Step
Over
Compile
IMPORTANT EMBEDDED WORKBENCH BUTTONS
AN-3220
AN-3220 Rev. B Holt Integrated Circuits 37
The IAR IDE screen with the Holt HI-3220 project loaded. Resized the IDE screens may be necessary.
AN-3220
AN-3220 Rev. B Holt Integrated Circuits 38
Project File List with Selected Descriptions
HEADER FILES WITHOUT CORRESPONDING C FILES
device_3220.h
Contains all macros for the HI-3220 including define statements
for registers, control register bits, Op Codes and selected table
start addresses.
3220_initialization.h
Definitions for a few configuration settings including the INTERRUP_MESG_ENA macro used to
disable or enable interrupts in the demo.
HI-322x Low-Level SPI drivers and other 3220 specific support functions
device_3220.h (same as above)
Contains all macros for the HI-3220 including define statements
for registers, control register bits, Op Codes and selected table
start addresses.
driver_3220.c/driver_3220.h
Host Cortex M3 SPI low-level SPI drivers and messaging
functions.
32xxSupport.c/32xxSupport.h
Host helper functions for configuring, table initialization
and transmitting and receiving ARINC messages.
Other main C FILES WITH CORRESPONDING HEADER FILES
Most of the function names are self-explanatory.
main.c
The primary program entry and main loop in main().
Board_3220.c
Contains macros for SPI initialization, LEDs and various I/Os.
Timer1 tick 1ms initialization supporting delay functions and host
timer interrupt handler. Board related to the host MCU.
AN-3220
AN-3220 Rev. B Holt Integrated Circuits 39
3220_Interrupts.c
Initialization and IRQ handler for message interrupts on the 3220 INT
pin. Functions to set or clear interrupt label enable table memory.
3220Demo.c ( these demos are called mostly from the console)
All demos are contained here. See the header file for a complete
listing.
console.c
Console functions used by all demos.
Show_menu(); displays the main menu
chk_key_input(); Key entry detect and demo execution handler.
Application Development Kit Notes
The HI-3220 was designed for compatibility with microcontrollers or FPGAs having a Serial Peripheral
Interface (SPI). Device RAM and register locations are written or read with the help of 8-bit SPI commands.
Most read or write operations use a Memory Address Pointer (MAP) to designate the address of the next
location accessed. To speed up multi-word transfers, the Memory Address Pointer automatically
increments to the next address after each word read or write is performed.
The HI-3220 data transfer speed depends on the SPI clock frequency provided by the MCU SPI interface.
The ARM Cortex M3 MCU master clock frequency is 96MHz, using an internal PLL. MCU peripherals divide
this clock by two for a 48MHz clock source. The SPI block divides this by three for a 16MHz SPI clock or
divides by 2 for 24MHz SPI clock. The HI-3220 has a maximum SPI clock frequency of 40MHz.
The demo board includes a fully featured high-end USB debugger port. No additional debug tools are
required to rebuild the demo project and re-flash the ARM Cortex M3 processor.
HI-3220 use with an external MCU or FPGA
Using the HI-3220 daughter card with an external MCU or FPGA is made easy because the 50MHz oscillator
is contained on this card and the essential interface signals are available on J11 header connector. See the
schematic and the header pin out description in a previous section of this document for those details.
AN-3220
AN-3220 Rev. B Holt Integrated Circuits 40
Summary
The HI-3220 is a powerful ARINC 429 multi-channel Transmitter and Receiver solution. Its high-speed 4-
wire SPI interface makes it easy to control. The maximum 40MHz SPI rate and new features in the HI-3220
increases the host communication efficiency. The HI-3220 can auto-initialize from EPPROM and operate
without a FPGA or MCU in some applications. The demo program demonstrates nearly all aspects of the
device and the low level C drivers make it easy to port to other platforms. A rich set of menu SPI access
utilities allow viewing/modifying device memory on the console.
Board Files and Schematic Links
BOM and Schematic Files: EV-CM3-64
BOM and Schematic Files: EV-3220
GENERALDESCRIPTION
The HI-3220 from Holt Integrated Circuits is a family of single
chip CMOS high density application data management ICs
capable of managing, storing and forwarding avionics data
messages between sixteen ARINC 429 receive channels and
eight ARINC 429 transmit channels. Options for eight receive
and four transmit channels are also available in a compact, cost
effective 7mm x 7mm QFN package footprint.
The ARINC 429 buses may operate independently - the IC can
be programmed to automatically re-format, re-label, re-packetize
and re-transmit data from ARINC 429 receive buses to ARINC
429 transmit buses. Alternatively, a host CPU can send and
receive data on multiple buses. 32KB of on-board memory allows
received data to be logically organized and automatically
updated as new ARINC 429 labels are received via ARINC 429
label mailboxes. A 64 message deep Receive FIFO is also
available for each receive channel. Each transmitter has the
option to independently enable a programmable scheduler on
the ARINC 429 bus, or to have the CPU directly send data. An
optional auto-initialization feature allows configuration informa-
tion to be up-loaded from an external EEPROM on reset to
facilitate rapid start-up or operation without a host CPU.
The HI-3220, HI-3221, HI-3222 and HI-3223 have integrated
ARINC 429 line receivers, capable of RTCA/DO-160 level 3
lightning compliance with external 40kΩ resistors. HI-3225 and
HI-3226 utilize external line receivers, for example Holt’s octal
HI-8458 family. The HI-3222 and HI-3223 are 8-channel receive,
4-channel transmit options available in smaller package
footprints, with HI-3223 having the same slope control feature as
HI-3220. Transmit outputs interface directly to external HI-8592,
HI-8596, or integrated lightning protected HI-8597 ARINC 429
line drivers. All parts use a 40 MHz 4-wire SPI (Serial Peripheral
Interface) host connection.
HI-3220 and HI-3225 are available in an 80-pin PQFP package,
whereas HI-3221 and HI-3226 are available in a 72-pin 10mm x
10mm QFN package. The HI-3222 (8-ch. Rx, 4-ch. Tx) is
available in a very compact 48-pin 7mm x 7mm QFN.
FEATURES
· Fully compliant to ARINC 429 Specification
· Sixteen ARINC 429 Receive channels with optional
integrated line Receivers
· Eight ARINC 429 Transmit channels
· 8-channel Rx, 4-channel Tx version available in
compact 48-pin 7mm x 7mm QFN
· 32 KB on chip user-configurable data storage
memory
· Programmable receive data filtering
· Option for programmable transmission schedulers
for periodic ARINC 429 broadcasting or CPU
directed transmission
· Auto-initialization feature allows power-on
configuration or independent operation without CPU
· 40 MHZ SPI CPU interface
· Transmitter rate and tri-state control outputs
· Supports 100kbs / 50kbs / 12.5kbs data rates
(DS3220 Rev. L) 04/22
High Density 16Rx / 8Tx or 8Rx / 4Tx ARINC 429
Protocol IC with optional Integrated Line Receivers
April 2022
HI-3220
PIN CONFIGURATION
APPLICATION
CPU
ARINC
429
16
x
Receive
ARINC
429
8
x
Transmit
HI-3220/3221
Controller
Memory
80 - Pin Plastic Quad Flat Pack (PQFP)
HI-3220PQx
SLP3 1
ARX8P-40 2
ARX8N-40 3
ARX0P-40 4
ARX0N-40 5
ARX9P-40 6
ARX9N-40 7
ARX1P-40 8
ARX1N-40 9
VDD 10
GND 11
ARX2P-40 12
ARX2N-40 13
ARX10P-40 14
ARX10N-40 15
ARX3P-40 16
ARX3N-40 17
ARX11P-40 18
ARX11N-40 19
SLP0 20
60 SLP2
59 ARX15N-40
58 ARX15P-40
57 ARX7N-40
56 ARX7P-40
55 ARX14N-40
54 ARX14P-40
53 ARX6N-40
52 ARX6P-40
51 GND
50 VDD
49 ARX5N-40
48 ARX5P-40
47 ARX13N-40
46 ARX13P-40
45 ARX4N-40
44 ARX4P-40
43 ARX12N-40
42 ARX12P-40
41 SLP1
80
SLP7
79
TX3N
78
TX3P
77
MODE0/ECS
76
EMISO
75
TX7N
74
TX7P
73
MODE1/EMOSI
72
MODE2/ESCLK
71
GND
70
VDD
69
MCLK
68
READY
67
TX6N
66
TX6P
65
SCANSHFT
64
SCANEN
63
TX2N
62
TX2P
61
SLP6
SLP4
21
TX0P
22
TX0N
23
HCS
24
HMOSI
25
TX4P
26
TX4N
27
HSCLK
28
HMISO
29
VDD
30
GND
31
MRST
32
RUN
33
TX5P
34
TX5N
35
INT
36
ACK
37
TX1P
38
TX1N
39
SLP5
40
DS3220 Rev. L HOLT INTEGRATED CIRCUITS
2
BLOCK DIAGRAM
ARINC 429
RECEIVE DATA
MEMORY 0
1K x 8
16
x
ARINC
429
Integrated
Line
Receivers
(HI-3220/3221
ONLY)
RECEIVER 0
Message
64
“
“
“
Message
2
Message
1
LABEL
FILTER
FILTER
TABLE 0
CHANNEL 0
CHANNEL 1
CHANNEL 2
CHANNEL 3
CHANNEL 4
CHANNEL 5
.............
CHANNEL 15
64 x 32 FIFO
SPI
HCS
HSCLK
HMOSI
HMISO
Host CPU
EEPROM
SPI
ECS
ESCLK
EMOSI
EMISO
Auto-Initialization
EEPROM
8
x
ARINC
429
Transmit
Buses
TRANSMITTER 0
TRANSMIT TIMER
ARINC 429
TRANSMIT
SCHEDULER 0
ARINC 429
Descriptor Table 0
CHANNEL 0
CHANNEL 1
CHANNEL 2
CHANNEL 3
Interrupt Handler
ACK
INT
MODE2:0
MRST
RUN
READY
CHANNEL 4
CHANNEL 5
HI-3220
VDD
GND
CHANNEL 6
CHANNEL 7
PRODUCT OPTIONS
PART NUMBER PACKAGE LINE RECEIVERS TRANSMIT CHANNELS
HI-3220 80-pin QFP 16 on-chip 8 Transmitters & SLP7:0 outputs
HI-3221 72-pin QFN 16 on-chip 8 Transmitters. No SLP7:0 outputs
HI-3222 48-pin QFN 8 on-chip 4 Transmitters. No SLP outputs
HI-3223 52-pin QFP or 64-pin QFN 8 on-chip 4 Transmitters & SLP3:0 outputs
HI-3225 80-pin QFP 16 External 8 Transmitters & SLP7:0 outputs
HI-3226 72-pin QFN 16 External 8 Transmitters. No SLP7:0 outputs
32 x 32
Transmit FIFO
DS3220 Rev. L HOLT INTEGRATED CIRCUITS
3
PIN DESCRIPTIONS (HI-3220, HI-3221, HI-3222, HI-3223)
Signal Function Description Internal
Pull-Up/Down
ACK INPUT Interrupt Acknowledge. Active low. Pull-Up
INT OUTPUT Interrupt. Active low, open-drain. Pull-Up
ARX0N-40 ANALOG INPUT ARINC 429 Receive bus negative line input for channel 0. Requires external 40KOhm resistor.
ARX0P-40 ANALOG INPUT ARINC 429 Receive bus positive line input for channel 0. Requires external 40KOhm resistor.
ARX1N-40 ANALOG INPUT ARINC 429 Receive bus negative line input for channel 1. Requires external 40KOhm resistor.
ARX1P-40 ANALOG INPUT ARINC 429 Receive bus positive line input for channel 1. Requires external 40KOhm resistor.
ARX2N-40 ANALOG INPUT ARINC 429 Receive bus negative line input for channel 2. Requires external 40KOhm resistor.
ARX2P-40 ANALOG INPUT ARINC 429 Receive bus positive line input for channel 2. Requires external 40KOhm resistor.
ARX3N-40 ANALOG INPUT ARINC 429 Receive bus negative line input for channel 3. Requires external 40KOhm resistor.
ARX3P-40 ANALOG INPUT ARINC 429 Receive bus positive line input for channel 3. Requires external 40KOhm resistor.
ARX4N-40 ANALOG INPUT ARINC 429 Receive bus negative line input for channel 4. Requires external 40KOhm resistor.
ARX4P-40 ANALOG INPUT ARINC 429 Receive bus positive line input for channel 4. Requires external 40KOhm resistor.
ARX5N-40 ANALOG INPUT ARINC 429 Receive bus negative line input for channel 5. Requires external 40KOhm resistor.
ARX5P-40 ANALOG INPUT ARINC 429 Receive bus positive line input for channel 5. Requires external 40KOhm resistor.
ARX6N-40 ANALOG INPUT ARINC 429 Receive bus negative line input for channel 6. Requires external 40KOhm resistor.
ARX6P-40 ANALOG INPUT ARINC 429 Receive bus positive line input for channel 6. Requires external 40KOhm resistor.
ARX7N-40 ANALOG INPUT ARINC 429 Receive bus negative line input for channel 7. Requires external 40KOhm resistor.
ARX7P-40 ANALOG INPUT ARINC 429 Receive bus positive line input for channel 7. Requires external 40KOhm resistor.
ARX8N-40 ANALOG INPUT ARINC 429 Receive bus negative line input for channel 8. Requires external 40KOhm resistor.
ARX8P-40 ANALOG INPUT ARINC 429 Receive bus positive line input for channel 8. Requires external 40KOhm resistor.
ARX9N-40 ANALOG INPUT ARINC 429 Receive bus negative line input for channel 9. Requires external 40KOhm resistor.
ARX9P-40 ANALOG INPUT ARINC 429 Receive bus positive line input for channel 9. Requires external 40KOhm resistor.
ARX10N-40 ANALOG INPUT ARINC 429 Receive bus negative line input for channel 10. Requires external 40KOhm resistor.
ARX10P-40 ANALOG INPUT ARINC 429 Receive bus positive line input for channel 10. Requires external 40KOhm resistor.
ARX11N-40 ANALOG INPUT ARINC 429 Receive bus negative line input for channel 11. Requires external 40KOhm resistor.
ARX11P-40 ANALOG INPUT ARINC 429 Receive bus positive line input for channel 11. Requires external 40KOhm resistor.
ARX12N-40 ANALOG INPUT ARINC 429 Receive bus negative line input for channel 12. Requires external 40KOhm resistor.
ARX12P-40 ANALOG INPUT ARINC 429 Receive bus positive line input for channel 12. Requires external 40KOhm resistor.
ARX13N-40 ANALOG INPUT ARINC 429 Receive bus negative line input for channel 13. Requires external 40KOhm resistor.
ARX13P-40 ANALOG INPUT ARINC 429 Receive bus positive line input for channel 13. Requires external 40KOhm resistor.
ARX14N-40 ANALOG INPUT ARINC 429 Receive bus negative line input for channel 14. Requires external 40KOhm resistor.
ARX14P-40 ANALOG INPUT ARINC 429 Receive bus positive line input for channel 14. Requires external 40KOhm resistor.
ARX15N-40 ANALOG INPUT ARINC 429 Receive bus negative line input for channel 15. Requires external 40KOhm resistor.
ARX15P-40 ANALOG INPUT ARINC 429 Receive bus positive line input for channel 15. Requires external 40KOhm resistor.
TX0N OUTPUT ARINC 429 Tx channel 0 negative data output to line driver
TX0P OUTPUT ARINC 429 Tx channel 0 positive data output to line driver
TX1N OUTPUT ARINC 429 Tx channel 1 negative data output to line driver
TX1P OUTPUT ARINC 429 Tx channel 1 positive data output to line driver
TX2N OUTPUT ARINC 429 Tx channel 2 negative data output to line driver
TX2P OUTPUT ARINC 429 Tx channel 2 positive data output to line driver
TX3N OUTPUT ARINC 429 Tx channel 3 negative data output to line driver
TX3P OUTPUT ARINC 429 Tx channel 3 positive data output to line driver
TX4N OUTPUT ARINC 429 Tx channel 4 negative data output to line driver
TX4P OUTPUT ARINC 429 Tx channel 4 positive data output to line driver
TX5N OUTPUT ARINC 429 Tx channel 5 negative data output to line driver
TX5P OUTPUT ARINC 429 Tx channel 5 positive data output to line driver
TX6N OUTPUT ARINC 429 Tx channel 6 positive data output to line driver
TX6P OUTPUT ARINC 429 Tx channel 6 positive data output to line driver
TX7N OUTPUT ARINC 429 Tx channel 7 positive data output to line driver
TX7P OUTPUT ARINC 429 Tx channel 7 positive data output to line driver
SLP0 OUTPUT ARINC 429 Tx channel 0 slew rate control (see Tx Control Register) (HI-3220 and HI-3223).
SLP1 OUTPUT ARINC 429 Tx channel 1 slew rate control (see Tx Control Register) (HI-3220 and HI-3223).
SLP2 OUTPUT ARINC 429 Tx channel 2 slew rate control (see Tx Control Register) (HI-3220 and HI-3223).
SLP3 OUTPUT ARINC 429 Tx channel 3 slew rate control (see Tx Control Register) (HI-3220 and HI-3223).
SLP4 OUTPUT ARINC 429 Tx channel 4 slew rate control (see Tx Control Register) (HI-3220 and HI-3223).
SLP5 OUTPUT ARINC 429 Tx channel 5 slew rate control (see Tx Control Register) (HI-3220 and HI-3223).
SLP6 OUTPUT ARINC 429 Tx channel 6 slew rate control (see Tx Control Register) (HI-3220 and HI-3223).
SLP7 OUTPUT ARINC 429 Tx channel 7 slew rate control (see Tx Control Register) (HI-3220 and HI-3223).
HI-3220
PIN DESCRIPTIONS (HI-3220, HI-3221, HI-3222, HI-3223) continued
Signal Function Description Internal
Pull-Up/Down
MODE0/ECS I/O MODE0 configuration input sampled at reset / SPI chip select output for initialization EEPROM See Note below
EMISO INPUT SPI serial data input from auto-inialization EEPROM Pull-Down
MODE1/EMOSI I/O MODE1 configuration input sampled at reset / SPI serial data output to initialization EEPROM See Note below
MODE2/ESCLK I/O MODE2 configuration input sampled at reset / SPI clock for auto-initialization EEPROM See Note below
GND POWER Chip 0V supply. All four pins must be connected.
VDD POWER 3.3V power supply. All four pins must be powered.
HCS INPUT Host chip select. Data is shifted into HMOSI and out of HMISO when HCS is low Pull-Up
HMISO OUTPUT Host CPU SPI interface serial data output Pull-Down
HMOSI INPUT Host CPU SPI interface serial data input Pull-Down
HSCLK INPUT Host SPI Clock. Data is shifted into or out of the SPI interface using HSCLK Pull-Down
MCLK INPUT Master and reference clock for ARINC 429 bus bit timing. 50MHz +/- 0.1%
MRST INPUT Master Reset to HI-322X Active Low. 225 ns minimum pulse width. Pull-Down
READY OUTPUT READY goes high when post-RESET initialization is complete
RUN INPUT Master enable signal for ARINC 429 transmit schedulers Pull-Down
SCANEN INPUT Factory test only. Connect to GND. Pull-Down
SCANSHFT INPUT Factory test only. Connect to GND. Pull-Down
DS3220 Rev. L HOLT INTEGRATED CIRCUITS
4
HI-3220
PIN CONFIGURATIONS
80 - Pin Plastic Quad Flat Pack (PQFP)
HI-3220PQx
SLP3 1
ARX8P-40 2
ARX8N-40 3
ARX0P-40 4
ARX0N-40 5
ARX9P-40 6
ARX9N-40 7
ARX1P-40 8
ARX1N-40 9
VDD 10
GND 11
ARX2P-40 12
ARX2N-40 13
ARX10P-40 14
ARX10N-40 15
ARX3P-40 16
ARX3N-40 17
ARX11P-40 18
ARX11N-40 19
SLP0 20
60 SLP2
59 ARX15N-40
58 ARX15P-40
57 ARX7N-40
56 ARX7P-40
55 ARX14N-40
54 ARX14P-40
53 ARX6N-40
52 ARX6P-40
51 GND
50 VDD
49 ARX5N-40
48 ARX5P-40
47 ARX13N-40
46 ARX13P-40
45 ARX4N-40
44 ARX4P-40
43 ARX12N-40
42 ARX12P-40
41 SLP1
80
SLP7
79
TX3N
78
TX3P
77
MODE0/ECS
76
EMISO
75
TX7N
74
TX7P
73
MODE1/EMOSI
72
MODE2/ESCLK
71
GND
70
VDD
69
MCLK
68
READY
67
TX6N
66
TX6P
65
SCANSHFT
64
SCANEN
63
TX2N
62
TX2P
61
SLP6
SLP4
21
TX0P
22
TX0N
23
HCS
24
HMOSI
25
TX4P
26
TX4N
27
HSCLK
28
HMISO
29
VDD
30
GND
31
MRST
32
RUN
33
TX5P
34
TX5N
35
INT
36
ACK
37
TX1P
38
TX1N
39
SLP5
40
NOTE 1: When not using an external EEPROM, the Mode0, Mode1 and Mode2 pins must be connected to either VDD or GND through
a suitable pull-up or pull-down resistor ( , depending on the desired power up mode. These pins do not have internal pull-up or
pull-down resistors and need to be connected to a known state to prevent possible initialization of an un-intended mode.
NOTE 2: Unused analog receiver inputs (e. g. ARX8P-40,
1K - 50K)
ARX8N-40, etc.) should be left floating.
DS3220 Rev. L HOLT INTEGRATED CIRCUITS
5
HI-3220
48
47
MODE0/ECS
46
EMISO
45
MODE1/EMOSI
44
MODE2/ESCLK
43
GND
42
VDD
41
MCLK
40
READY
39
SCANSHFT
38
SCANEN
37
TX2N
TX3P
1
ARX0P-40 2
ARX0N-40 3
ARX1P-40 4
ARX1N-40 5
VDD 6
GND 7
ARX2P-40 8
ARX2N-40 9
ARX3P-40 10
ARX3N-40 11
TX0P 12
TX3N 36
35 ARX7N-40
34 ARX7P-40
33 ARX6N-40
32 ARX6P-40
31 GND
30 VDD
29 ARX5N-40
28 ARX5P-40
27 ARX4N-40
26 ARX4P-40
25 TX1N
TX2P
TX0N
13
HCS
14
HMOSI
15
HSCLK
16
HMISO
17
VDD
18
GND
19
MRST
20
RUN
21
INT
22
ACK
23
TX1P
24
HI-3222PCx
48 - Pin Plastic QFN (Top View)
PIN CONFIGURATIONS (continued)
72 - Pin Plastic QFN (Top View)
HI-3221PCx
54 ARX15N-40
53 ARX15P-40
52 ARX7N-40
51 ARX7P-40
50 ARX14N-40
49 ARX14P-40
48 ARX6N-40
47 ARX6P-40
46 GND
45 VDD
44 ARX5N-40
43 ARX5P-40
42 ARX13N-40
41 ARX13P-40
40 ARX4N-40
39 ARX4P-40
38 ARX12N-40
37 ARX12P-40
ARX8P-40 1
ARX8N-40 2
ARX0P-40 3
ARX0N-40 4
ARX9P-40 5
ARX9N-40 6
ARX1P-40 7
ARX1N-40 8
VDD 9
GND 10
ARX2P-40 11
ARX2N-40 12
ARX10P-40 13
ARX10N-40 14
ARX3P-40 15
ARX3N-40 16
ARX11P-40 17
ARX11N-40 18
TX0P
19
TX0N
20
HCS
21
HMOSI
22
TX4P
23
TX4N
24
HSCLK
25
HMISO
26
VDD
27
GND
28
MRST
29
RUN
30
TX5P
31
TX5N
32
INT
33
ACK
34
TX1P
35
TX1N
36
72
TX3N
71
TX3P
70
MODE0/ECS
69
EMISO
68
TX7N
67
TX7P
66
MODE1/EMOSI
65
MODE2/ESCLK
64
GND
63
VDD
62
MCLK
61
READY
60
TX6N
59
TX6P
58
SCANSHFT
57
SCANEN
56
TX2N
55
TX2P
HI-3223PCx
64
TX3N
63
TX3P
62
MODE0/ECS
61
EMISO
60
MODE1/EMOSI
59
MODE2/ESCLK
58
GND
57
VDD
56
MCLK
55
READY
54
SCANSHFT
53
SCANEN
52
TX2N
51
TX2P
50
-
49
-
48 SLP2
47 -
46 ARX7N-40
45 ARX7P-40
44 ARX6N-40
43 ARX6P-40
42 GND
41 VDD
40 ARX5N-40
39 ARX5P-40
38 -
37 ARX4N-40
36 ARX4P-40
35 -
34 -
33 SLP1
64 - Pin Plastic QFN (Top View)
-
TX0P
18
TX0N
19
HCS
20
HMOSI
21
HSCLK
22
HMISO
23
VDD
24
GND
25
MRST
26
RUN
27
INT
28
ACK
29
TX1P
30
TX1N
31
-
32
17
SLP3 1
- 2
ARX0P-40 3
ARX0N-40 4
- 5
ARX1P-40 6
ARX1N-40 7
- 8
VDD 9
GND 10
ARX2P-40 11
ARX2N-40 12
- 13
ARX3P-40 14
ARX3N-40 15
SLP0 16
HI-3223PQx
52
51
MODE0/ECS
50
EMISO
49
MODE1/EMOSI
48
MODE2/ESCLK
47
GND
46
VDD
45
MCLK
44
READY
43
SCANSHFT
42
SCANEN
41
TX2N
40
TX2P
TX3P
39 SLP2
38 ARX7N-40
37 ARX7P-40
36 ARX6N-40
35 ARX6P-40
34 GND
33 VDD
32 ARX5N-40
31 ARX5P-40
30 ARX4N-40
29 ARX4P-40
28 SLP1
27 TX1N
TX0P
14
TX0N
15
HCS
16
HMOSI
17
HSCLK
18
HMISO
19
VDD
20
GND
21
MRST
22
RUN
23
INT
24
ACK
25
TX1P
26
TX3N 1
SLP3 2
ARX0P-40 3
ARX0N-40 4
ARX1P-40 5
ARX1N-40 6
VDD 7
GND 8
ARX2P-40 9
ARX2N-40 10
ARX3P-40 11
ARX3N-40 12
SLP0 13
52 - Pin Plastic Quad Flat Pack (PQFP)
“-” denotes “Not Connected internally”
DS3220 Rev. L HOLT INTEGRATED CIRCUITS
6
PIN DESCRIPTIONS (HI-3225, HI-3226)
Signal Function Description Internal
Pull-Up/Down
ACK INPUT Interrupt Acknowledge. Active low. Pull-Up
INT OUTPUT Interrupt. Active low, open-drain. Pull-Up
RX0N INPUT ARINC 429 Digital input from line receiver negative signal for channel 0. Pull-down
RX0P INPUT ARINC 429 Digital input from line receiver positive signal for channel 0. Pull-down
RX1N INPUT ARINC 429 Digital input from line receiver negative signal for channel 1. Pull-down
RX1P INPUT ARINC 429 Digital input from line receiver positive signal for channel 1. Pull-down
RX2N INPUT ARINC 429 Digital input from line receiver negative signal for channel 2. Pull-down
RX2P INPUT ARINC 429 Digital input from line receiver positive signal for channel 2. Pull-down
RX3N INPUT ARINC 429 Digital input from line receiver negative signal for channel 3. Pull-down
RX3P INPUT ARINC 429 Digital input from line receiver positive signal for channel 3. Pull-down
RX4N INPUT ARINC 429 Digital input from line receiver negative signal for channel 4. Pull-down
RX4P INPUT ARINC 429 Digital input from line receiver positive signal for channel 4. Pull-down
RX5N INPUT ARINC 429 Digital input from line receiver negative signal for channel 5. Pull-down
RX5P INPUT ARINC 429 Digital input from line receiver positive signal for channel 5. Pull-down
RX6N INPUT ARINC 429 Digital input from line receiver negative signal for channel 6. Pull-down
RX6P INPUT ARINC 429 Digital input from line receiver positive signal for channel 6. Pull-down
RX7N INPUT ARINC 429 Digital input from line receiver negative signal for channel 7. Pull-down
RX7P INPUT ARINC 429 Digital input from line receiver positive signal for channel 7. Pull-down
RX8N INPUT ARINC 429 Digital input from line receiver negative signal for channel 8. Pull-down
RX8P INPUT ARINC 429 Digital input from line receiver positive signal for channel 8. Pull-down
RX9N INPUT ARINC 429 Digital input from line receiver negative signal for channel 9. Pull-down
RX9P INPUT ARINC 429 Digital input from line receiver positive signal for channel 9. Pull-down
RX10N INPUT ARINC 429 Digital input from line receiver negative signal for channel 10. Pull-down
RX10P INPUT ARINC 429 Digital input from line receiver positive signal for channel 10. Pull-down
RX11N INPUT ARINC 429 Digital input from line receiver negative signal for channel 11. Pull-down
RX11P INPUT ARINC 429 Digital input from line receiver positive signal for channel 11. Pull-down
RX12N INPUT ARINC 429 Digital input from line receiver negative signal for channel 12. Pull-down
RX12P INPUT ARINC 429 Digital input from line receiver positive signal for channel 12. Pull-down
RX13N INPUT ARINC 429 Digital input from line receiver negative signal for channel 13. Pull-down
RX13P INPUT ARINC 429 Digital input from line receiver positive signal for channel 13. Pull-down
RX14N INPUT ARINC 429 Digital input from line receiver negative signal for channel 14. Pull-down
RX14P INPUT ARINC 429 Digital input from line receiver positive signal for channel 14. Pull-down
RX15N INPUT ARINC 429 Digital input from line receiver negative signal for channel 15. Pull-down
RX15P INPUT ARINC 429 Digital input from line receiver positive signal for channel 15. Pull-down
TX0N OUTPUT ARINC 429 Tx channel 0 negative data output to line driver
TX0P OUTPUT ARINC 429 Tx channel 0 positive data output to line driver
TX1N OUTPUT ARINC 429 Tx channel 1 negative data output to line driver
TX1P OUTPUT ARINC 429 Tx channel 1 positive data output to line driver
TX2N OUTPUT ARINC 429 Tx channel 2 negative data output to line driver
TX2P OUTPUT ARINC 429 Tx channel 2 positive data output to line driver
TX3N OUTPUT ARINC 429 Tx channel 3 negative data output to line driver
TX3P OUTPUT ARINC 429 Tx channel 3 positive data output to line driver
TX4N OUTPUT ARINC 429 Tx channel 4 negative data output to line driver
TX4P OUTPUT ARINC 429 Tx channel 4 positive data output to line driver
TX5N OUTPUT ARINC 429 Tx channel 5 negative data output to line driver
TX5P OUTPUT ARINC 429 Tx channel 5 positive data output to line driver
TX6N OUTPUT ARINC 429 Tx channel 6 positive data output to line driver
TX6P OUTPUT ARINC 429 Tx channel 6 positive data output to line driver
TX7N OUTPUT ARINC 429 Tx channel 7 positive data output to line driver
TX7P OUTPUT ARINC 429 Tx channel 7 positive data output to line driver
SLP0 OUTPUT ARINC 429 Tx channel 0 slew rate control (see Tx Control Register) (HI-3225).
SLP1 OUTPUT ARINC 429 Tx channel 1 slew rate control (see Tx Control Register) (HI-3225).
SLP2 OUTPUT ARINC 429 Tx channel 2 slew rate control (see Tx Control Register) (HI-3225).
SLP3 OUTPUT ARINC 429 Tx channel 3 slew rate control (see Tx Control Register) (HI-3225).
SLP4 OUTPUT ARINC 429 Tx channel 4 slew rate control (see Tx Control Register) (HI-3225).
SLP5 OUTPUT ARINC 429 Tx channel 5 slew rate control (see Tx Control Register) (HI-3225).
SLP6 OUTPUT ARINC 429 Tx channel 6 slew rate control (see Tx Control Register) (HI-3225).
SLP7 OUTPUT ARINC 429 Tx channel 7 slew rate control (see Tx Control Register) (HI-3225).
HI-3220
DS3220 Rev. L HOLT INTEGRATED CIRCUITS
7
PIN DESCRIPTIONS (HI-3225, HI-3226) continued
Signal Function Description Internal
Pull-Up/Down
MODE0/ECS I/O MODE0 configuration input sampled at reset / SPI chip select output for EEPROM initialization See Note below
EMISO INPUT SPI serial data input from auto-inialization EEPROM Pull-Down
MODE1/EMOSI I/O MODE1 configuration input sampled at reset / SPI serial data output for EEPROM initialization See Note below
MODE2/ESCLK I/O MODE2 configuration input sampled at reset / SPI clock for EEPROM auto-initialization See Note below
GND POWER Chip 0V supply. All four pins must be connected.
VDD POWER 3.3V power supply. All four pins must be powered.
HCS INPUT Host chip select. Data is shifted into HMOSI and out of HMISO when HCS is low Pull-Up
HMISO OUTPUT Host CPU SPI interface serial data output Pull-Down
HMOSI INPUT Host CPU SPI interface serial data input Pull-Down
HSCLK INPUT Host SPI Clock. Data is shifted into or out of the SPI interface using HSCLK Pull-Down
MCLK INPUT Master and reference clock for ARINC 429 bus bit timing. 50 MHZ +/- 0.1%
MRST INPUT Master Reset to HI-322X Active Low. 225 ns minimum pulse width. Pull-Down
READY OUTPUT READY goes high when post-RESET initialization is complete
RUN INPUT Master enable signal for ARINC 429 transmit schedulers Pull-Down
SCANEN INPUT Factory test only. Connect to GND. Pull-Down
SCANSHFT INPUT Factory test only. Connect to GND. Pull-Down
PIN CONFIGURATIONS
80 - Pin Plastic Quad Flat Pack (PQFP)
HI-3225PQx
SLP3 1
RX8P 2
RX8N 3
RX0P 4
RX0N 5
RX9P 6
RX9N 7
RX1P 8
RX1N 9
VDD 10
GND 11
RX2P 12
RX2N 13
RX10P 14
RX10N 15
RX3P 16
RX3N 17
RX11P 18
RX11N 19
SLP0 20
60 SLP2
59 RX15N
58 RX15P
57 RX7N
56 RX7P
55 RX14N
54 RX14P
53 RX6N
52 RX6P
51 GND
50 VDD
49 RX5N
48 RX5P
47 RX13N
46 RX13P
45 RX4N
44 RX4P
43 RX12N
42 RX12P
41 SLP1
80
SLP7
79
TX3N
78
TX3P
77
MODE0/ECS
76
EMISO
75
TX7N
74
TX7P
73
MODE1/EMOSI
72
MODE2/ESCLK
71
GND
70
VDD
69
MCLK
68
READY
67
TX6N
66
TX6P
65
SCANSHFT
64
SCANEN
63
TX2N
62
TX2P
61
SLP6
SLP4
21
TX0P
22
TX0N
23
HCS
24
HMOSI
25
TX4P
26
TX4N
27
HSCLK
28
HMISO
29
VDD
30
GND
31
MRST
32
RUN
33
TX5P
34
TX5N
35
INT
36
ACK
37
TX1P
38
TX1N
39
SLP5
40
HI-3220
72 - Pin Plastic QFN (Top View)
HI-3226PCx
54 RX15N
53 RX15P
52 RX7N
51 RX7P
50 RX14N
49 RX14P
48 RX6N
47 RX6P
46 GND
45 VDD
44 RX5N
43 RX5P
42 RX13N
41 RX13P
40 RX4N
39 RX4P
38 RX12N
37 RX12P
RX8P 1
RX8N 2
RX0P 3
RX0N 4
RX9P 5
RX9N 6
RX1P 7
RX1N 8
VDD 9
GND 10
RX2P 11
RX2N 12
RX10P 13
RX10N 14
RX3P 15
RX3N 16
RX11P 17
RX11N 18
TX0P
19
TX0N
20
HCS
21
HMOSI
22
TX4P
23
TX4N
24
HSCLK
25
HMISO
26
VDD
27
GND
28
MRST
29
RUN
30
TX5P
31
TX5N
32
INT
33
ACK
34
TX1P
35
TX1N
36
72
TX3N
71
TX3P
70
MODE0/ECS
69
EMISO
68
TX7N
67
TX7P
66
MODE1/EMOSI
65
MODE2/ESCLK
64
GND
63
VDD
62
MCLK
61
READY
60
TX6N
59
TX6P
58
SCANSHFT
57
SCANEN
56
TX2N
55
TX2P
NOTE: When not using an external EEPROM, the Mode0, Mode1 and Mode2 pins must be connected to either VDD or GND through a
suitable pull-up or pull-down resistor ( , depending on the desired power up mode. These pins do not have internal pull-up or
pull-down resistors and need to be connected to a known state to prevent possible initialization of an un-intended mode.
1K - 50K)
NOTE 2: Unused digital receiver inputs (e. g. RX15P, RX15N, etc.) should be left floating.
DS3220 Rev. L HOLT INTEGRATED CIRCUITS
8
APPLICATION OVERVIEW
The HI-3220 is a flexible device for managing ARINC 429
communications and data storage in many avionics
applications. The device architecture centers around a
32K x 8 static RAM used for data storage, data filtering
tables and table-driven transmission schedulers. Once
configured, the device can operate autonomously without
a host CPU, negating the need for software development
or DO-178 certification. Configuration data may be
uploaded into the device from an external EEPROM,
following system reset.
The device supports up to sixteen ARINC 429 receive
channels. Analog line receivers are on-chip (HI-3220, HI-
3221 and HI-3222), or off-chip (HI-3225 and HI-3226).
Received data is stored in on-chip RAM organized by
channel number and label. The data table continually
updates as new labels arrive. Programmable interrupts
and filters alert the host subsystem to labels of interest.
Each ARINC 429 receive channel also includes a 64
message deep FIFO allowing selected label data to be
queued for subsequent host access.
The HI-3220 supports up to eight independent ARINC
429 transmit channels. Transmission may be controlled
entirely by an external CPU, or autonomously by
programming one or more of the eight on-chip ARINC
429 transmit schedulers. These allow periodic
transmission to occur without CPU. Source data for
transmission may be selected from RAM based tables of
constants and / or from the received channel data.
Powerful options exist for constructing ARINC 429 labels
as well as controlling their timing and conditional
transmission.
Even when running under the control of schedulers, the
host CPU may insert new labels for transmission at will.
The following examples show five possible configurations
of how the HI-3220 may be used:
Example 1. ARINC 429 Data reception using on-chip RAM
16K x 8 RAM
(of 32K available)
16 x ARINC 429
Receive Buses
SPI
Channel 0, Label FF
“
“
“
Channel 0, Label 01
Channel 0, Label 00
Channel 1, Label FF
“
“
“
Channel 1, Label 01
Channel 1, Label 00
Channel 2, Label FF
“
“
“
Channel 2, Label 01
Channel 2, Label 00
Channels 12-3, Label FF
“
“
“
Channels 12-3, Label 01
Channels 12-3, Label 00
Channel 13, Label FF
“
“
“
Channel 13, Label 01
Channel 13, Label 00
Channel 14, Label FF
“
“
“
Channel 14, Label 01
Channel 14, Label 00
Channel 15, Label FF
“
“
“
Channel 15, Label 01
Channel 15, Label 00
RECEIVE
INTERRUPT
TABLE
INT
ACK
HCSB
HSCLK
HMOSI
HMISO
RECEIVER 15
RECEIVER 14
RECEIVER 13
RECEIVER 2
RECEIVER 1
RECEIVER 0
Host CPU
HI-3220
RECEIVERS 12-3
HI-3220
DS3220 Rev. L HOLT INTEGRATED CIRCUITS
9
Example 3. ARINC 429 Data transmission directly from CPU
TRANSMITTER 0
SPI
HCS
HSCLK
HMOSI
HMISO
Host CPU 8 x ARINC 429
Transmit Buses
HI-3220
16 x ARINC 429
Receive Buses
RECEIVER 0
FIFO STATUS
HI-3220
Message
64
“
“
“
Message
2
Message
1
LABEL
FILTER
FILTER
TABLE 0
SPI
ARINC 429
RECEIVE FIFO
INTERRUPT
CONTROL
INT
ACK
HCSB
HSCLK
HMOSI
HMISO
Host CPU
FIFO THRESHOLD
CHANNEL 0
CHANNEL 1
CHANNEL 2
CHANNEL 3
...............
...............
CHANNEL 14
CHANNEL 15
64 x 32 FIFO
Example 2. ARINC 429 Data reception using on-chip filters and FIFOs
Example 4. ARINC 429 Data transmission using on-chip schedulers
TRANSMIT
SCHEDULER 0
RAM
Descriptor Table 7
8 x ARINC 429
Transmit Buses
TRANSMITTER 0
Descriptor Tables 2-6
Descriptor Table 1
Descriptor Table 0
TRANSMIT TIMER
CHANNEL 0
CHANNEL 1
..............
CHANNEL 7
EEPROM
SPI
ECS
ESCLK
EMOSI
EMISO
Auto-Initialization
EEPROM
HI-3220
SPI
HCS
HSCLK
HMOSI
HMISO
Host CPU
TRANSMITTER 1
TRANSMITTER 2
TRANSMITTER 3
TRANSMITTER 4
TRANSMITTER 5
TRANSMITTER 6
TRANSMITTER 7
FIFO 0
FIFO 1
FIFO 2
FIFO 3
FIFO 4
FIFO 5
FIFO 6
FIFO 7
32 x 32 FIFOs
HI-3220
DS3220 Rev. L HOLT INTEGRATED CIRCUITS
10
Example 5. Autonomous ARINC 429 Data Concentrator / Repeater
8 x ARINC 429
Transmit Buses
TRANSMITTER 7
HI-3220
16 x ARINC 429
Receive Buses
Channel 15, Label FF
“
Channel 15, Label 01
Channel 15, Label 00
RECEIVER 15
RECEIVER 14
RECEIVER 13
RECEIVER 12
RECEIVER 11
RECEIVER 10
RECEIVER 9
RECEIVER 8
Channel 14, Label FF
“
Channel 14, Label 01
Channel 14, Label 00
Channel 13, Label FF
“
Channel 13, Label 01
Channel 13, Label 00
Channel 12, Label FF
“
Channel 12, Label 01
Channel 12, Label 00
Channel 11, Label FF
“
Channel 11, Label 01
Channel 11, Label 00
Channel 10, Label FF
“
Channel 10, Label 01
Channel 10, Label 00
Channel 9, Label FF
“
Channel 9, Label 01
Channel 9, Label 00
Channel 8, Label FF
“
Channel 8, Label 01
Channel 8, Label 00
Channel 7, Label FF
“
Channel 7, Label 01
Channel 7, Label 00
Channel 6, Label FF
“
Channel 6, Label 01
Channel 6, Label 00
Channel 5, Label FF
“
Channel 5, Label 01
Channel 5, Label 00
Channel 4, Label FF
“
Channel 4, Label 01
Channel 4, Label 00
Channel 3, Label FF
“
Channel 3, Label 01
Channel 3, Label 00
Channel 2, Label FF
“
Channel 2, Label 01
Channel 2, Label 00
Channel 1, Label FF
“
Channel 1, Label 01
Channel 1, Label 00
Channel 0, Label FF
“
Channel 0, Label 01
Channel 0, Label 00
RECEIVER 7
RECEIVER 6
RECEIVER 5
RECEIVER 4
RECEIVER 3
RECEIVER 2
RECEIVER 1
RECEIVER 0
TRANSMIT
SCHEDULER 6
TRANSMITTER 6
Descriptor Table 6
TRANSMIT TIMER
TRANSMIT
SCHEDULER 5
TRANSMITTER 5
Descriptor Table 5
TRANSMIT TIMER
TRANSMIT
SCHEDULER 4
TRANSMITTER 4
Descriptor Table 4
TRANSMIT TIMER
TRANSMIT
SCHEDULER 3
TRANSMITTER 3
Descriptor Table 3
TRANSMIT TIMER
TRANSMIT
SCHEDULER 2
TRANSMITTER 2
Descriptor Table 2
TRANSMIT TIMER
TRANSMIT
SCHEDULER 1
TRANSMITTER 1
Descriptor Table 1
TRANSMIT TIMER
TRANSMIT
SCHEDULER 0
TRANSMITTER 0
Descriptor Table 0
TRANSMIT TIMER
EEPROM
SPI
ECS
ESCLK
EMOSI
EMISO
Auto-Initialization
EEPROM
TRANSMIT
SCHEDULER 6
Descriptor Table 7
TRANSMIT TIMER
HI-3220
HI-3220 MEMORY MAP
ARINC 429
Receive
Data
0x0000
0x4000
0x47FF
ARINC 429 Receive FIFO
Tx3 Transmit Schedule Table
0x4800
0x6BFF
Configuration Registers
0x8000
0x8XXX
ARINC 429 RX FIFO Enable Map
ARINC 429 RX Interrupt Map
Shaded Area
User - Programmed
Non-shaded Area
Data Storage
DS3220 Rev. L HOLT INTEGRATED CIRCUITS
11
0x6C00
Tx2 Transmit Schedule Table
Tx1 Transmit Schedule Table
Tx0 Transmit Schedule Table
Tx4 Transmit Schedule Table
Tx5 Transmit Schedule Table
Tx6 Transmit Schedule Table
0x4FFF
0x5000
0x53FF
0x5400
0x57FF
0x5800
0x5BFF
0x5C00
0x5FFF
0x6000
0x63FF
0x6400
0x67FF
0x6800
0x69FF
0x6A00
0x3FFF
0x7000
0x6FFF
Tx7 Transmit Schedule Table
ARINC 429 Transmit FIFO
0x7FFF
HI-3220
HI-3220 REGISTER MAP
ADDRESS R/W REGISTER MNEMONIC DESCRIPTION
0x8000 R/W MASTER CONTROL REGISTER MCR HI-3220 global configuration (write address)
0x8001 R MASTER CONTROL REGISTER MCR HI-3220 global configuration (read address)
0x8002 R MASTER STATUS REGISTER MSR Indicates HI-3220 current status
0x8003 R Not used
0x8004 R* PENDING INTERRUPT REGISTER PIR Indicates Interrupt type
0x8005 R Not used
0x8006 R* RECEIVE PENDING INTERRUPT LOW RPIRL Defines channel(7-0) with pending Interrupt
0x8007 R Not used
0x8008 R* RECEIVE PENDING INTERRUPT HIGH RPIRH Defines channel(15-8) with pending Interrupt
0x8009 R Not used
0x800A R* PENDING INTERRUPT REGISTER PIR Indicates Interrupt type
0x800B R* RECEIVE PENDING INTERRUPT LOW RPIRL Defines channel(7-0) with pending Interrupt
0x800C R* RECEIVE PENDING INTERRUPT HIGH RPIRH Defines channel(15-8) with pending Interrupt
0x800D R RECEIVE FIFO THRESHOLD FLAG (LOW) FTFL Shows which Rx FIFOs hold > (thresh) words
0x800E R RECEIVE FIFO THRESHOLD FLAG (HIGH) FTFH Shows which Rx FIFOs hold > (thresh) words
0x800F R TRANSMITTER FIFO THRESHOLD FLAGS TFR Shows which Tx FIFOs hold < (thresh) words
0x8010 R RECEIVE INTERRUPT ADDRESS 0 IAR0 ARINC 429 Interrupt Vector channel 0
0x8011 R RECEIVE INTERRUPT ADDRESS 1 IAR1 ARINC 429 Interrupt Vector channel 1
0x8012 R RECEIVE INTERRUPT ADDRESS 2 IAR2 ARINC 429 Interrupt Vector channel 2
0x8013 R RECEIVE INTERRUPT ADDRESS 3 IAR3 ARINC 429 Interrupt Vector channel 3
0x8014 R RECEIVE INTERRUPT ADDRESS 4 IAR4 ARINC 429 Interrupt Vector channel 4
0x8015 R RECEIVE INTERRUPT ADDRESS 5 IAR5 ARINC 429 Interrupt Vector channel 5
0x8016 R RECEIVE INTERRUPT ADDRESS 6 IAR6 ARINC 429 Interrupt Vector channel 6
0x8017 R RECEIVE INTERRUPT ADDRESS 7 IAR7 ARINC 429 Interrupt Vector channel 7
0x8018 R RECEIVE INTERRUPT ADDRESS 8 IAR8 ARINC 429 Interrupt Vector channel 8
0x8019 R RECEIVE INTERRUPT ADDRESS 9 IAR9 ARINC 429 Interrupt Vector channel 9
0x801A R RECEIVE INTERRUPT ADDRESS 10 IAR10 ARINC 429 Interrupt Vector channel 10
0x801B R RECEIVE INTERRUPT ADDRESS 11 IAR11 ARINC 429 Interrupt Vector channel 11
0x801C R RECEIVE INTERRUPT ADDRESS 12 IAR12 ARINC 429 Interrupt Vector channel 12
0x801D R RECEIVE INTERRUPT ADDRESS 13 IAR13 ARINC 429 Interrupt Vector channel 13
0x801E R RECEIVE INTERRUPT ADDRESS 14 IAR14 ARINC 429 Interrupt Vector channel 14
0x801F R RECEIVE INTERRUPT ADDRESS 15 IAR15 ARINC 429 Interrupt Vector channel 15
0x8020 R/W RECEIVE CONTROL REGISTER 0 RXC0 Configures ARINC 429 receive channel 0
0x8021 R/W RECEIVE CONTROL REGISTER 1 RXC1 Configures ARINC 429 receive channel 1
0x8022 R/W RECEIVE CONTROL REGISTER 2 RXC2 Configures ARINC 429 receive channel 2
0x8023 R/W RECEIVE CONTROL REGISTER 3 RXC3 Configures ARINC 429 receive channel 3
0x8024 R/W RECEIVE CONTROL REGISTER 4 RXC4 Configures ARINC 429 receive channel 4
0x8025 R/W RECEIVE CONTROL REGISTER 5 RXC5 Configures ARINC 429 receive channel 5
0x8026 R/W RECEIVE CONTROL REGISTER 6 RXC6 Configures ARINC 429 receive channel 6
0x8027 R/W RECEIVE CONTROL REGISTER 7 RXC7 Configures ARINC 429 receive channel 7
0x8028 R/W RECEIVE CONTROL REGISTER 8 RXC8 Configures ARINC 429 receive channel 8
0x8029 R/W RECEIVE CONTROL REGISTER 9 RXC9 Configures ARINC 429 receive channel 9
0x802A R/W RECEIVE CONTROL REGISTER 10 RXC10 Configures ARINC 429 receive channel 10
0x802B R/W RECEIVE CONTROL REGISTER 11 RXC11 Configures ARINC 429 receive channel 11
0x802C R/W RECEIVE CONTROL REGISTER 12 RXC12 Configures ARINC 429 receive channel 12
0x802D R/W RECEIVE CONTROL REGISTER 13 RXC13 Configures ARINC 429 receive channel 13
0x802E R/W RECEIVE CONTROL REGISTER 14 RXC14 Configures ARINC 429 receive channel 14
0x802F R/W RECEIVE CONTROL REGISTER 15 RXC15 Configures ARINC 429 receive channel 15
Fast Access Registers * Register is cleared when read (auto clear)
Memory mapped register access only
DS3220 Rev. L HOLT INTEGRATED CIRCUITS
12
HI-3220
ARINC-429-DATA-MANAGEMENT-ENGINE

More Related Content

What's hot

What's hot (20)

Cpld fpga
Cpld fpgaCpld fpga
Cpld fpga
 
Unit V - Product Debugging and Testing
Unit V -  Product Debugging and TestingUnit V -  Product Debugging and Testing
Unit V - Product Debugging and Testing
 
AutoCad Electrical
AutoCad ElectricalAutoCad Electrical
AutoCad Electrical
 
Wireless Electronic Notice Board
Wireless Electronic Notice BoardWireless Electronic Notice Board
Wireless Electronic Notice Board
 
Basics of control system
Basics of control system Basics of control system
Basics of control system
 
Fpga based motor controller
Fpga based motor controllerFpga based motor controller
Fpga based motor controller
 
gate level modeling
gate level modelinggate level modeling
gate level modeling
 
Efisiensi solar cells
Efisiensi solar cellsEfisiensi solar cells
Efisiensi solar cells
 
TMS320C5x
TMS320C5xTMS320C5x
TMS320C5x
 
n-MOS Fabrication Process
n-MOS Fabrication Processn-MOS Fabrication Process
n-MOS Fabrication Process
 
Interrupt in 8051
Interrupt in 8051Interrupt in 8051
Interrupt in 8051
 
Interfacing LCD with 8051 Microcontroller
Interfacing LCD with 8051 MicrocontrollerInterfacing LCD with 8051 Microcontroller
Interfacing LCD with 8051 Microcontroller
 
PLC Timers
PLC TimersPLC Timers
PLC Timers
 
MILITARY ROBOT BASED ON IOT
MILITARY ROBOT BASED ON IOTMILITARY ROBOT BASED ON IOT
MILITARY ROBOT BASED ON IOT
 
5.14 Electromagnetic environment
5.14 Electromagnetic environment5.14 Electromagnetic environment
5.14 Electromagnetic environment
 
PLC(Programmable Logic Controller)-Control system Engineering.
PLC(Programmable Logic Controller)-Control system Engineering.PLC(Programmable Logic Controller)-Control system Engineering.
PLC(Programmable Logic Controller)-Control system Engineering.
 
presentation on plc.pptx
presentation on plc.pptxpresentation on plc.pptx
presentation on plc.pptx
 
Analog Communication Lab Manual
Analog Communication Lab ManualAnalog Communication Lab Manual
Analog Communication Lab Manual
 
Plc presentation
Plc presentation Plc presentation
Plc presentation
 
Integrated Circuits
Integrated CircuitsIntegrated Circuits
Integrated Circuits
 

Similar to ARINC-429-DATA-MANAGEMENT-ENGINE

Study of Data sheet of 56824 DSP processors
Study of Data sheet of 56824 DSP processorsStudy of Data sheet of 56824 DSP processors
Study of Data sheet of 56824 DSP processorsEr. Ashish Pandey
 
Ht usb5130-v2
Ht usb5130-v2Ht usb5130-v2
Ht usb5130-v2handson28
 
Bluetooth based home appliances control
Bluetooth based home appliances controlBluetooth based home appliances control
Bluetooth based home appliances controlPROJECTRONICS
 
The arduino uno is a microcontroller board based on the
The arduino uno is a microcontroller board based on theThe arduino uno is a microcontroller board based on the
The arduino uno is a microcontroller board based on thePramod Kumar
 
Education Documantary
Education DocumantaryEducation Documantary
Education Documantarytagataho
 
Office automation system using arduino
Office automation system using arduinoOffice automation system using arduino
Office automation system using arduinoAshfaqul Haque John
 
Embedded application development
Embedded application developmentEmbedded application development
Embedded application developmentAakash Raj
 
Touch Switch (Smart Switches) by arduino Project report file
Touch Switch (Smart Switches) by arduino  Project  report fileTouch Switch (Smart Switches) by arduino  Project  report file
Touch Switch (Smart Switches) by arduino Project report fileimkanhaiyalal
 
Arduino a000066-datasheet
Arduino a000066-datasheetArduino a000066-datasheet
Arduino a000066-datasheetThien Tranminh
 
LPC 2148 ARM MICROCONTROLLER
LPC 2148 ARM MICROCONTROLLERLPC 2148 ARM MICROCONTROLLER
LPC 2148 ARM MICROCONTROLLERsravannunna24
 

Similar to ARINC-429-DATA-MANAGEMENT-ENGINE (20)

NFS-320
NFS-320NFS-320
NFS-320
 
Study of Data sheet of 56824 DSP processors
Study of Data sheet of 56824 DSP processorsStudy of Data sheet of 56824 DSP processors
Study of Data sheet of 56824 DSP processors
 
Ht usb5130-v2
Ht usb5130-v2Ht usb5130-v2
Ht usb5130-v2
 
NFS-320
NFS-320NFS-320
NFS-320
 
NFS-320
NFS-320NFS-320
NFS-320
 
Bluetooth based home appliances control
Bluetooth based home appliances controlBluetooth based home appliances control
Bluetooth based home appliances control
 
Assignment
AssignmentAssignment
Assignment
 
The arduino uno is a microcontroller board based on the
The arduino uno is a microcontroller board based on theThe arduino uno is a microcontroller board based on the
The arduino uno is a microcontroller board based on the
 
Education Documantary
Education DocumantaryEducation Documantary
Education Documantary
 
Arduino uno
Arduino unoArduino uno
Arduino uno
 
Office automation system using arduino
Office automation system using arduinoOffice automation system using arduino
Office automation system using arduino
 
Embedded application development
Embedded application developmentEmbedded application development
Embedded application development
 
2 unit-es-printed
2 unit-es-printed2 unit-es-printed
2 unit-es-printed
 
PLC_1.ppt
PLC_1.pptPLC_1.ppt
PLC_1.ppt
 
Touch Switch (Smart Switches) by arduino Project report file
Touch Switch (Smart Switches) by arduino  Project  report fileTouch Switch (Smart Switches) by arduino  Project  report file
Touch Switch (Smart Switches) by arduino Project report file
 
SURVEILLANCE ROBOT
SURVEILLANCE ROBOTSURVEILLANCE ROBOT
SURVEILLANCE ROBOT
 
Arduino a000066-datasheet
Arduino a000066-datasheetArduino a000066-datasheet
Arduino a000066-datasheet
 
LPC 2148 ARM MICROCONTROLLER
LPC 2148 ARM MICROCONTROLLERLPC 2148 ARM MICROCONTROLLER
LPC 2148 ARM MICROCONTROLLER
 
NFS2-3030
NFS2-3030NFS2-3030
NFS2-3030
 
iot1&2.pdf
iot1&2.pdfiot1&2.pdf
iot1&2.pdf
 

More from Massimo Talia

BPMN tutorial by Draw Libre Office
BPMN  tutorial by Draw Libre OfficeBPMN  tutorial by Draw Libre Office
BPMN tutorial by Draw Libre OfficeMassimo Talia
 
Dynamical systems simulation in Python for science and engineering
Dynamical systems simulation in Python for science and engineeringDynamical systems simulation in Python for science and engineering
Dynamical systems simulation in Python for science and engineeringMassimo Talia
 
Dlgs 165/2001 e dlgs 75/2017-Ordinamento del lavoro nelle PA e successive int...
Dlgs 165/2001 e dlgs 75/2017-Ordinamento del lavoro nelle PA e successive int...Dlgs 165/2001 e dlgs 75/2017-Ordinamento del lavoro nelle PA e successive int...
Dlgs 165/2001 e dlgs 75/2017-Ordinamento del lavoro nelle PA e successive int...Massimo Talia
 
A Framework of Knowledge, Skills and Attitudes Conductive to High Performanc...
A Framework of Knowledge, Skills and Attitudes  Conductive to High Performanc...A Framework of Knowledge, Skills and Attitudes  Conductive to High Performanc...
A Framework of Knowledge, Skills and Attitudes Conductive to High Performanc...Massimo Talia
 
Progettazione ed installazione impianti d'antenna
Progettazione ed installazione impianti d'antenna Progettazione ed installazione impianti d'antenna
Progettazione ed installazione impianti d'antenna Massimo Talia
 
Report 2030 Digital Decade
Report 2030 Digital DecadeReport 2030 Digital Decade
Report 2030 Digital DecadeMassimo Talia
 
Artificial Intelligence The Future of Humankind
Artificial Intelligence The Future of HumankindArtificial Intelligence The Future of Humankind
Artificial Intelligence The Future of HumankindMassimo Talia
 
Intro to embedded systems programming
Intro to embedded systems programming Intro to embedded systems programming
Intro to embedded systems programming Massimo Talia
 
Implementing-Value-Based-Healthcare-In-Europe-EIT-Summit-2019
Implementing-Value-Based-Healthcare-In-Europe-EIT-Summit-2019Implementing-Value-Based-Healthcare-In-Europe-EIT-Summit-2019
Implementing-Value-Based-Healthcare-In-Europe-EIT-Summit-2019Massimo Talia
 
Codice-ATECO-ISTAT-62.0
Codice-ATECO-ISTAT-62.0Codice-ATECO-ISTAT-62.0
Codice-ATECO-ISTAT-62.0Massimo Talia
 
Auriga-DiProgess MAX2-Misuratore-di-campo-TV-Fibra-Ottica
Auriga-DiProgess MAX2-Misuratore-di-campo-TV-Fibra-OtticaAuriga-DiProgess MAX2-Misuratore-di-campo-TV-Fibra-Ottica
Auriga-DiProgess MAX2-Misuratore-di-campo-TV-Fibra-OtticaMassimo Talia
 
Guida SW Compilazione Fattura Elettronica_guida_.pdf
Guida SW Compilazione Fattura Elettronica_guida_.pdfGuida SW Compilazione Fattura Elettronica_guida_.pdf
Guida SW Compilazione Fattura Elettronica_guida_.pdfMassimo Talia
 
Python Control library
Python Control libraryPython Control library
Python Control libraryMassimo Talia
 
Specifiche Tecniche Fatturazione Europea v2.3_15052023
Specifiche Tecniche Fatturazione Europea v2.3_15052023Specifiche Tecniche Fatturazione Europea v2.3_15052023
Specifiche Tecniche Fatturazione Europea v2.3_15052023Massimo Talia
 
le-competenze-professionali-degli-ingegneri-secondo-il-dpr-328-2001
le-competenze-professionali-degli-ingegneri-secondo-il-dpr-328-2001le-competenze-professionali-degli-ingegneri-secondo-il-dpr-328-2001
le-competenze-professionali-degli-ingegneri-secondo-il-dpr-328-2001Massimo Talia
 
CEIm-magazine-Novembre-Dicembre-2022
CEIm-magazine-Novembre-Dicembre-2022CEIm-magazine-Novembre-Dicembre-2022
CEIm-magazine-Novembre-Dicembre-2022Massimo Talia
 
Linee-guida-iscrizione-CTU-tribunale
Linee-guida-iscrizione-CTU-tribunaleLinee-guida-iscrizione-CTU-tribunale
Linee-guida-iscrizione-CTU-tribunaleMassimo Talia
 
Energia e Dintorni - Settembre 2022
Energia e Dintorni - Settembre 2022Energia e Dintorni - Settembre 2022
Energia e Dintorni - Settembre 2022Massimo Talia
 
Impianto elettrico sicuro CNI
Impianto elettrico sicuro CNIImpianto elettrico sicuro CNI
Impianto elettrico sicuro CNIMassimo Talia
 
CEIm-Magazine-Ottobre 2022
CEIm-Magazine-Ottobre 2022CEIm-Magazine-Ottobre 2022
CEIm-Magazine-Ottobre 2022Massimo Talia
 

More from Massimo Talia (20)

BPMN tutorial by Draw Libre Office
BPMN  tutorial by Draw Libre OfficeBPMN  tutorial by Draw Libre Office
BPMN tutorial by Draw Libre Office
 
Dynamical systems simulation in Python for science and engineering
Dynamical systems simulation in Python for science and engineeringDynamical systems simulation in Python for science and engineering
Dynamical systems simulation in Python for science and engineering
 
Dlgs 165/2001 e dlgs 75/2017-Ordinamento del lavoro nelle PA e successive int...
Dlgs 165/2001 e dlgs 75/2017-Ordinamento del lavoro nelle PA e successive int...Dlgs 165/2001 e dlgs 75/2017-Ordinamento del lavoro nelle PA e successive int...
Dlgs 165/2001 e dlgs 75/2017-Ordinamento del lavoro nelle PA e successive int...
 
A Framework of Knowledge, Skills and Attitudes Conductive to High Performanc...
A Framework of Knowledge, Skills and Attitudes  Conductive to High Performanc...A Framework of Knowledge, Skills and Attitudes  Conductive to High Performanc...
A Framework of Knowledge, Skills and Attitudes Conductive to High Performanc...
 
Progettazione ed installazione impianti d'antenna
Progettazione ed installazione impianti d'antenna Progettazione ed installazione impianti d'antenna
Progettazione ed installazione impianti d'antenna
 
Report 2030 Digital Decade
Report 2030 Digital DecadeReport 2030 Digital Decade
Report 2030 Digital Decade
 
Artificial Intelligence The Future of Humankind
Artificial Intelligence The Future of HumankindArtificial Intelligence The Future of Humankind
Artificial Intelligence The Future of Humankind
 
Intro to embedded systems programming
Intro to embedded systems programming Intro to embedded systems programming
Intro to embedded systems programming
 
Implementing-Value-Based-Healthcare-In-Europe-EIT-Summit-2019
Implementing-Value-Based-Healthcare-In-Europe-EIT-Summit-2019Implementing-Value-Based-Healthcare-In-Europe-EIT-Summit-2019
Implementing-Value-Based-Healthcare-In-Europe-EIT-Summit-2019
 
Codice-ATECO-ISTAT-62.0
Codice-ATECO-ISTAT-62.0Codice-ATECO-ISTAT-62.0
Codice-ATECO-ISTAT-62.0
 
Auriga-DiProgess MAX2-Misuratore-di-campo-TV-Fibra-Ottica
Auriga-DiProgess MAX2-Misuratore-di-campo-TV-Fibra-OtticaAuriga-DiProgess MAX2-Misuratore-di-campo-TV-Fibra-Ottica
Auriga-DiProgess MAX2-Misuratore-di-campo-TV-Fibra-Ottica
 
Guida SW Compilazione Fattura Elettronica_guida_.pdf
Guida SW Compilazione Fattura Elettronica_guida_.pdfGuida SW Compilazione Fattura Elettronica_guida_.pdf
Guida SW Compilazione Fattura Elettronica_guida_.pdf
 
Python Control library
Python Control libraryPython Control library
Python Control library
 
Specifiche Tecniche Fatturazione Europea v2.3_15052023
Specifiche Tecniche Fatturazione Europea v2.3_15052023Specifiche Tecniche Fatturazione Europea v2.3_15052023
Specifiche Tecniche Fatturazione Europea v2.3_15052023
 
le-competenze-professionali-degli-ingegneri-secondo-il-dpr-328-2001
le-competenze-professionali-degli-ingegneri-secondo-il-dpr-328-2001le-competenze-professionali-degli-ingegneri-secondo-il-dpr-328-2001
le-competenze-professionali-degli-ingegneri-secondo-il-dpr-328-2001
 
CEIm-magazine-Novembre-Dicembre-2022
CEIm-magazine-Novembre-Dicembre-2022CEIm-magazine-Novembre-Dicembre-2022
CEIm-magazine-Novembre-Dicembre-2022
 
Linee-guida-iscrizione-CTU-tribunale
Linee-guida-iscrizione-CTU-tribunaleLinee-guida-iscrizione-CTU-tribunale
Linee-guida-iscrizione-CTU-tribunale
 
Energia e Dintorni - Settembre 2022
Energia e Dintorni - Settembre 2022Energia e Dintorni - Settembre 2022
Energia e Dintorni - Settembre 2022
 
Impianto elettrico sicuro CNI
Impianto elettrico sicuro CNIImpianto elettrico sicuro CNI
Impianto elettrico sicuro CNI
 
CEIm-Magazine-Ottobre 2022
CEIm-Magazine-Ottobre 2022CEIm-Magazine-Ottobre 2022
CEIm-Magazine-Ottobre 2022
 

Recently uploaded

Call Girls in Dwarka Sub City 💯Call Us 🔝8264348440🔝
Call Girls in Dwarka Sub City 💯Call Us 🔝8264348440🔝Call Girls in Dwarka Sub City 💯Call Us 🔝8264348440🔝
Call Girls in Dwarka Sub City 💯Call Us 🔝8264348440🔝soniya singh
 
(ANIKA) Wanwadi Call Girls Just Call 7001035870 [ Cash on Delivery ] Pune Esc...
(ANIKA) Wanwadi Call Girls Just Call 7001035870 [ Cash on Delivery ] Pune Esc...(ANIKA) Wanwadi Call Girls Just Call 7001035870 [ Cash on Delivery ] Pune Esc...
(ANIKA) Wanwadi Call Girls Just Call 7001035870 [ Cash on Delivery ] Pune Esc...ranjana rawat
 
Call Girls Delhi {Rs-10000 Laxmi Nagar] 9711199012 Whats Up Number
Call Girls Delhi {Rs-10000 Laxmi Nagar] 9711199012 Whats Up NumberCall Girls Delhi {Rs-10000 Laxmi Nagar] 9711199012 Whats Up Number
Call Girls Delhi {Rs-10000 Laxmi Nagar] 9711199012 Whats Up NumberMs Riya
 
(SANA) Call Girls Landewadi ( 7001035870 ) HI-Fi Pune Escorts Service
(SANA) Call Girls Landewadi ( 7001035870 ) HI-Fi Pune Escorts Service(SANA) Call Girls Landewadi ( 7001035870 ) HI-Fi Pune Escorts Service
(SANA) Call Girls Landewadi ( 7001035870 ) HI-Fi Pune Escorts Serviceranjana rawat
 
《1:1仿制麦克马斯特大学毕业证|订制麦克马斯特大学文凭》
《1:1仿制麦克马斯特大学毕业证|订制麦克马斯特大学文凭》《1:1仿制麦克马斯特大学毕业证|订制麦克马斯特大学文凭》
《1:1仿制麦克马斯特大学毕业证|订制麦克马斯特大学文凭》o8wvnojp
 
Vip Noida Escorts 9873940964 Greater Noida Escorts Service
Vip Noida Escorts 9873940964 Greater Noida Escorts ServiceVip Noida Escorts 9873940964 Greater Noida Escorts Service
Vip Noida Escorts 9873940964 Greater Noida Escorts Serviceankitnayak356677
 
《伯明翰城市大学毕业证成绩单购买》学历证书学位证书区别《复刻原版1:1伯明翰城市大学毕业证书|修改BCU成绩单PDF版》Q微信741003700《BCU学...
《伯明翰城市大学毕业证成绩单购买》学历证书学位证书区别《复刻原版1:1伯明翰城市大学毕业证书|修改BCU成绩单PDF版》Q微信741003700《BCU学...《伯明翰城市大学毕业证成绩单购买》学历证书学位证书区别《复刻原版1:1伯明翰城市大学毕业证书|修改BCU成绩单PDF版》Q微信741003700《BCU学...
《伯明翰城市大学毕业证成绩单购买》学历证书学位证书区别《复刻原版1:1伯明翰城市大学毕业证书|修改BCU成绩单PDF版》Q微信741003700《BCU学...ur8mqw8e
 
Call Girls Service Kolkata Aishwarya 🤌 8250192130 🚀 Vip Call Girls Kolkata
Call Girls Service Kolkata Aishwarya 🤌  8250192130 🚀 Vip Call Girls KolkataCall Girls Service Kolkata Aishwarya 🤌  8250192130 🚀 Vip Call Girls Kolkata
Call Girls Service Kolkata Aishwarya 🤌 8250192130 🚀 Vip Call Girls Kolkataanamikaraghav4
 
(办理学位证)多伦多大学毕业证成绩单原版一比一
(办理学位证)多伦多大学毕业证成绩单原版一比一(办理学位证)多伦多大学毕业证成绩单原版一比一
(办理学位证)多伦多大学毕业证成绩单原版一比一C SSS
 
(办理学位证)加州州立大学北岭分校毕业证成绩单原版一比一
(办理学位证)加州州立大学北岭分校毕业证成绩单原版一比一(办理学位证)加州州立大学北岭分校毕业证成绩单原版一比一
(办理学位证)加州州立大学北岭分校毕业证成绩单原版一比一Fi sss
 
(PARI) Alandi Call Girls Just Call 7001035870 [ Cash on Delivery ] Pune Escorts
(PARI) Alandi Call Girls Just Call 7001035870 [ Cash on Delivery ] Pune Escorts(PARI) Alandi Call Girls Just Call 7001035870 [ Cash on Delivery ] Pune Escorts
(PARI) Alandi Call Girls Just Call 7001035870 [ Cash on Delivery ] Pune Escortsranjana rawat
 
定制(UI学位证)爱达荷大学毕业证成绩单原版一比一
定制(UI学位证)爱达荷大学毕业证成绩单原版一比一定制(UI学位证)爱达荷大学毕业证成绩单原版一比一
定制(UI学位证)爱达荷大学毕业证成绩单原版一比一ss ss
 
(ZARA) Call Girls Jejuri ( 7001035870 ) HI-Fi Pune Escorts Service
(ZARA) Call Girls Jejuri ( 7001035870 ) HI-Fi Pune Escorts Service(ZARA) Call Girls Jejuri ( 7001035870 ) HI-Fi Pune Escorts Service
(ZARA) Call Girls Jejuri ( 7001035870 ) HI-Fi Pune Escorts Serviceranjana rawat
 
定制(RHUL学位证)伦敦大学皇家霍洛威学院毕业证成绩单原版一比一
定制(RHUL学位证)伦敦大学皇家霍洛威学院毕业证成绩单原版一比一定制(RHUL学位证)伦敦大学皇家霍洛威学院毕业证成绩单原版一比一
定制(RHUL学位证)伦敦大学皇家霍洛威学院毕业证成绩单原版一比一ss ss
 
VIP Call Girl Saharanpur Aashi 8250192130 Independent Escort Service Saharanpur
VIP Call Girl Saharanpur Aashi 8250192130 Independent Escort Service SaharanpurVIP Call Girl Saharanpur Aashi 8250192130 Independent Escort Service Saharanpur
VIP Call Girl Saharanpur Aashi 8250192130 Independent Escort Service SaharanpurSuhani Kapoor
 
Papular No 1 Online Istikhara Amil Baba Pakistan Amil Baba In Karachi Amil B...
Papular No 1 Online Istikhara Amil Baba Pakistan  Amil Baba In Karachi Amil B...Papular No 1 Online Istikhara Amil Baba Pakistan  Amil Baba In Karachi Amil B...
Papular No 1 Online Istikhara Amil Baba Pakistan Amil Baba In Karachi Amil B...Authentic No 1 Amil Baba In Pakistan
 
VIP Call Girls Hitech City ( Hyderabad ) Phone 8250192130 | ₹5k To 25k With R...
VIP Call Girls Hitech City ( Hyderabad ) Phone 8250192130 | ₹5k To 25k With R...VIP Call Girls Hitech City ( Hyderabad ) Phone 8250192130 | ₹5k To 25k With R...
VIP Call Girls Hitech City ( Hyderabad ) Phone 8250192130 | ₹5k To 25k With R...Suhani Kapoor
 
WhatsApp 9892124323 ✓Call Girls In Khar ( Mumbai ) secure service - Bandra F...
WhatsApp 9892124323 ✓Call Girls In Khar ( Mumbai ) secure service -  Bandra F...WhatsApp 9892124323 ✓Call Girls In Khar ( Mumbai ) secure service -  Bandra F...
WhatsApp 9892124323 ✓Call Girls In Khar ( Mumbai ) secure service - Bandra F...Pooja Nehwal
 

Recently uploaded (20)

Call Girls in Dwarka Sub City 💯Call Us 🔝8264348440🔝
Call Girls in Dwarka Sub City 💯Call Us 🔝8264348440🔝Call Girls in Dwarka Sub City 💯Call Us 🔝8264348440🔝
Call Girls in Dwarka Sub City 💯Call Us 🔝8264348440🔝
 
(ANIKA) Wanwadi Call Girls Just Call 7001035870 [ Cash on Delivery ] Pune Esc...
(ANIKA) Wanwadi Call Girls Just Call 7001035870 [ Cash on Delivery ] Pune Esc...(ANIKA) Wanwadi Call Girls Just Call 7001035870 [ Cash on Delivery ] Pune Esc...
(ANIKA) Wanwadi Call Girls Just Call 7001035870 [ Cash on Delivery ] Pune Esc...
 
Call Girls Delhi {Rs-10000 Laxmi Nagar] 9711199012 Whats Up Number
Call Girls Delhi {Rs-10000 Laxmi Nagar] 9711199012 Whats Up NumberCall Girls Delhi {Rs-10000 Laxmi Nagar] 9711199012 Whats Up Number
Call Girls Delhi {Rs-10000 Laxmi Nagar] 9711199012 Whats Up Number
 
(SANA) Call Girls Landewadi ( 7001035870 ) HI-Fi Pune Escorts Service
(SANA) Call Girls Landewadi ( 7001035870 ) HI-Fi Pune Escorts Service(SANA) Call Girls Landewadi ( 7001035870 ) HI-Fi Pune Escorts Service
(SANA) Call Girls Landewadi ( 7001035870 ) HI-Fi Pune Escorts Service
 
《1:1仿制麦克马斯特大学毕业证|订制麦克马斯特大学文凭》
《1:1仿制麦克马斯特大学毕业证|订制麦克马斯特大学文凭》《1:1仿制麦克马斯特大学毕业证|订制麦克马斯特大学文凭》
《1:1仿制麦克马斯特大学毕业证|订制麦克马斯特大学文凭》
 
Vip Noida Escorts 9873940964 Greater Noida Escorts Service
Vip Noida Escorts 9873940964 Greater Noida Escorts ServiceVip Noida Escorts 9873940964 Greater Noida Escorts Service
Vip Noida Escorts 9873940964 Greater Noida Escorts Service
 
《伯明翰城市大学毕业证成绩单购买》学历证书学位证书区别《复刻原版1:1伯明翰城市大学毕业证书|修改BCU成绩单PDF版》Q微信741003700《BCU学...
《伯明翰城市大学毕业证成绩单购买》学历证书学位证书区别《复刻原版1:1伯明翰城市大学毕业证书|修改BCU成绩单PDF版》Q微信741003700《BCU学...《伯明翰城市大学毕业证成绩单购买》学历证书学位证书区别《复刻原版1:1伯明翰城市大学毕业证书|修改BCU成绩单PDF版》Q微信741003700《BCU学...
《伯明翰城市大学毕业证成绩单购买》学历证书学位证书区别《复刻原版1:1伯明翰城市大学毕业证书|修改BCU成绩单PDF版》Q微信741003700《BCU学...
 
Call Girls Service Kolkata Aishwarya 🤌 8250192130 🚀 Vip Call Girls Kolkata
Call Girls Service Kolkata Aishwarya 🤌  8250192130 🚀 Vip Call Girls KolkataCall Girls Service Kolkata Aishwarya 🤌  8250192130 🚀 Vip Call Girls Kolkata
Call Girls Service Kolkata Aishwarya 🤌 8250192130 🚀 Vip Call Girls Kolkata
 
(办理学位证)多伦多大学毕业证成绩单原版一比一
(办理学位证)多伦多大学毕业证成绩单原版一比一(办理学位证)多伦多大学毕业证成绩单原版一比一
(办理学位证)多伦多大学毕业证成绩单原版一比一
 
CIVIL ENGINEERING
CIVIL ENGINEERINGCIVIL ENGINEERING
CIVIL ENGINEERING
 
9953330565 Low Rate Call Girls In Jahangirpuri Delhi NCR
9953330565 Low Rate Call Girls In Jahangirpuri  Delhi NCR9953330565 Low Rate Call Girls In Jahangirpuri  Delhi NCR
9953330565 Low Rate Call Girls In Jahangirpuri Delhi NCR
 
(办理学位证)加州州立大学北岭分校毕业证成绩单原版一比一
(办理学位证)加州州立大学北岭分校毕业证成绩单原版一比一(办理学位证)加州州立大学北岭分校毕业证成绩单原版一比一
(办理学位证)加州州立大学北岭分校毕业证成绩单原版一比一
 
(PARI) Alandi Call Girls Just Call 7001035870 [ Cash on Delivery ] Pune Escorts
(PARI) Alandi Call Girls Just Call 7001035870 [ Cash on Delivery ] Pune Escorts(PARI) Alandi Call Girls Just Call 7001035870 [ Cash on Delivery ] Pune Escorts
(PARI) Alandi Call Girls Just Call 7001035870 [ Cash on Delivery ] Pune Escorts
 
定制(UI学位证)爱达荷大学毕业证成绩单原版一比一
定制(UI学位证)爱达荷大学毕业证成绩单原版一比一定制(UI学位证)爱达荷大学毕业证成绩单原版一比一
定制(UI学位证)爱达荷大学毕业证成绩单原版一比一
 
(ZARA) Call Girls Jejuri ( 7001035870 ) HI-Fi Pune Escorts Service
(ZARA) Call Girls Jejuri ( 7001035870 ) HI-Fi Pune Escorts Service(ZARA) Call Girls Jejuri ( 7001035870 ) HI-Fi Pune Escorts Service
(ZARA) Call Girls Jejuri ( 7001035870 ) HI-Fi Pune Escorts Service
 
定制(RHUL学位证)伦敦大学皇家霍洛威学院毕业证成绩单原版一比一
定制(RHUL学位证)伦敦大学皇家霍洛威学院毕业证成绩单原版一比一定制(RHUL学位证)伦敦大学皇家霍洛威学院毕业证成绩单原版一比一
定制(RHUL学位证)伦敦大学皇家霍洛威学院毕业证成绩单原版一比一
 
VIP Call Girl Saharanpur Aashi 8250192130 Independent Escort Service Saharanpur
VIP Call Girl Saharanpur Aashi 8250192130 Independent Escort Service SaharanpurVIP Call Girl Saharanpur Aashi 8250192130 Independent Escort Service Saharanpur
VIP Call Girl Saharanpur Aashi 8250192130 Independent Escort Service Saharanpur
 
Papular No 1 Online Istikhara Amil Baba Pakistan Amil Baba In Karachi Amil B...
Papular No 1 Online Istikhara Amil Baba Pakistan  Amil Baba In Karachi Amil B...Papular No 1 Online Istikhara Amil Baba Pakistan  Amil Baba In Karachi Amil B...
Papular No 1 Online Istikhara Amil Baba Pakistan Amil Baba In Karachi Amil B...
 
VIP Call Girls Hitech City ( Hyderabad ) Phone 8250192130 | ₹5k To 25k With R...
VIP Call Girls Hitech City ( Hyderabad ) Phone 8250192130 | ₹5k To 25k With R...VIP Call Girls Hitech City ( Hyderabad ) Phone 8250192130 | ₹5k To 25k With R...
VIP Call Girls Hitech City ( Hyderabad ) Phone 8250192130 | ₹5k To 25k With R...
 
WhatsApp 9892124323 ✓Call Girls In Khar ( Mumbai ) secure service - Bandra F...
WhatsApp 9892124323 ✓Call Girls In Khar ( Mumbai ) secure service -  Bandra F...WhatsApp 9892124323 ✓Call Girls In Khar ( Mumbai ) secure service -  Bandra F...
WhatsApp 9892124323 ✓Call Girls In Khar ( Mumbai ) secure service - Bandra F...
 

ARINC-429-DATA-MANAGEMENT-ENGINE

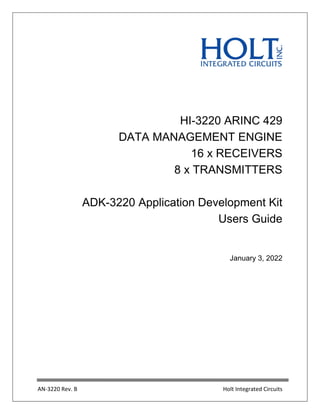
  • 1. AN-3220 Rev. B Holt Integrated Circuits HI-3220 ARINC 429 DATA MANAGEMENT ENGINE 16 x RECEIVERS 8 x TRANSMITTERS ADK-3220 Application Development Kit Users Guide January 3, 2022
  • 2. AN-3220 AN-3220 Rev. B Holt Integrated Circuits 2 REVISION HISTORY Revision Date Description of Change AN-3220, Rev. New 01-26-18 Initial Release A 04-25-18 Correct Op Code typo on p. 31. 0xEE should be 0xE0. Pins J7 and J9 were erroneously reversed in Mode Table on p. 7. B 01/03/2022 Add links to download board files. An alternate part number for the MCU (64K Flash version) was also added to the BOM.
  • 3. AN-3220 AN-3220 Rev. B Holt Integrated Circuits 3 Introduction The Holt ADK-3220 Evaluation board demonstrates the broad feature set of Holt’s ARINC 429 Data Management Engine, with sixteen ARINC 429 Receivers and eight digital Transmitters integrated into a single IC. The HI-3220 is the successor to the HI-3200 and HI-3210 with expanded channels and new feature enhancements designed to increase host communication efficiency. The HI-3220 receiver channels features DO-160G lightning protection. The HI-3200 has a maximum SPI rate of 40MHz. This guide describes how to set up and run the board. Additional support material and all required project software are found in the included Holt USB memory stick. A version of the demonstration software is pre-programmed into the microcontroller flash; the board is operational right out of the box without installing or running the provided software development tools. ADK-3220 CTX Evaluation Board, mounted on the ARM Cortex M3 MCU Board
  • 4. AN-3220 AN-3220 Rev. B Holt Integrated Circuits 4 Evaluation Kit Contents • This User Guide. • Holt HI-3220 Project Software and Documentation USB memory stick. • IAR Systems Embedded Workbench® for ARM (32KB KickStart) on USB memory stick. • Plug-in 5V DC power adapter. • USB mini debug interface cable. • RS-232 serial cable, DB-9M to DB-9F for console I/O using a connected computer. • USB to serial dongle adapter. • 2-board assembly comprised of: Upper HI-3220 evaluation board. DIP switches configure board operation. Lower MCU board with (Microchip/Atmel) ARM Cortex M3 16-/32-bit microprocessor, debug interface and regulated 3.3VDC power supply Hardware Block Diagram Cortex M3 MCU board HOLT HI-3220 SPI (4) 40MHz Max. RS-232 Console USB Debug Port LEDs Debugger, Power User Push Button Switches SW1, SW2 SW1 DIPs (4) J11 12-pinl Host I/F Header for standalone use RESET Button SW3 Sixteen ARINC 429 Receivers nMR 50 MHz OSC 5V to 3.3V Reg +3.3V 5V HI-8597 EEPROM (optional) MODE Jumpers J7, J8, J9 SPI (4) RUN READY ARINC TX0 – TX3 BUS J1, J2 Header Pins Status LEDs: TX amber ERR red RX green User1 green User2 green RUN LED READY LED Integrated DO-160G Protected J6 Header Pins DO-160G Protected Eight ARINC 429 Line Drivers INTACK INT HI-8597 ARINC TX4 - TX7 BUS DO-160G Protected J4 Header Pins * * * Main host processor card Holt HI-3220 daughter card
  • 5. AN-3220 AN-3220 Rev. B Holt Integrated Circuits 5 HI-322x Highlighted Feature Differences Compared to HI-3200/3210 Family ● Increased SPI clock rate to 40MHz. ● Up to Sixteen integrated ARINC 429 Receiver channels (eight more than HI-3200/10 family) with DO-160G level-3 lightning protection. Lighting protection available on parts with integrated on-chip receivers (3220, 3221 and 3222). ● Up to Eight ARINC 429 Transmit channels (four more than HI-3200/10 family). ● Receiver 64 word deep FIFO’s increased from 32. ● Transmit 32 word deep FIFO’s. ● Transmit and Receive FIFO count registers enables efficient host reading. ● Transmit and Receive FIFO threshold count interrupt registers. ● ARINC Transmit and Receive 50KHz rate support in addition to standard ARINC 429 12.5 KHz and 100 KHz rates. ● ARINC Transmit TRISTATE control bit for enabling Hi-Z mode in certain Line Drivers. ● Transmit scheduler feature improvements: o Simplified Transmit scheduler Op Codes. o Packet Timer period and offset control. o Delay Op Code. o Transmit scheduler 1ms prescaler option. o Transmit Watch-Dog Timer function. ● Ability to read the Mode status bits [7:5] in register 0x807A indicating the state of the Mode0-2 pins latched after a reset.
  • 6. AN-3220 AN-3220 Rev. B Holt Integrated Circuits 6 Push-buttons Push-button Switches (on main CM3 board) DESCRIPTION SW1 Transmits a Test message on channels TX5, TX6 and TX7. TX5 = Low Speed (12.5KHz) TX6 = Mid Speed (50KHz) TX7 = High Speed (100KHz) SW2 Simple SPI sequence test sequence – useful for trouble shooting the SPI interface. See section “HI-3220 SPI basics for trouble shooting” near the end of this document. DIP SWITCHES SWITCH DEFAULT DESCRIPTION SW 1 OFF SPI frequency select. OFF = 24MHz. ON = 16MHz. Checked at power up. SW 2 ON Open = Logs TX descriptor table values to the console. SW 3 ON Available to user SW 4 ON Available to user.
  • 7. AN-3220 AN-3220 Rev. B Holt Integrated Circuits 7 Jumper Settings for EEPROM auto-initialization (optional feature) Factory default is Mode 0. See RESET and START-UP MODES in the data sheet for the list of self-checks the HI-3220 performs in each mode. MODE M2 J9 M1 J8 M0 J7 EEPROM Init 0 0 0 0 NO 1 0 0 1 YES 2 0 1 0 No 3 0 1 1 YES 4 1 0 0 NO 5 1 0 1 NO 6 1 1 0 RAM BIST ENA HI-3220 supply current measurement test points TP13 and TP14 To measure the HI-3220 supply current remove R35 zero-ohm resistor and insert a current meter between TP13 and TP14. When READY is high there is addition current through LED1 so remove R33 or subtract the LED1 current (~3.6mA) from the measured current. External Host interface to the HI-3220 daughter board. The HI-3220 daughter board can be separated from the MCU board and connected to a user FPGA or MCU host for quick prototyping purposes. All essential interface signals are provided on J11 12-pin header connector. The Demo Mode switches and LEDs are not included, but they are accessible on J3 and J5 header connectors, if needed. J11 Pin SIGNAL J11 Pin SIGNAL 1 nHCS (SPI) 7 RUN 2 HSCK (SPI) 8 INTn 3 HMOSI (SPI) 9 INTACK 4 HMISO (SPI) 10 SW1 -1 DIP 5 /MRST 11 GND 6 READY 12 3.3 VDD LED indicators LEDS FUNCTION TYPICAL USAGE
  • 8. AN-3220 AN-3220 Rev. B Holt Integrated Circuits 8 LED1 READY On when READY is high (connected to READY pin) LED2 RUN On when RUN is high (connected to the RUN pin) LED3 RX Host controlled – Typically On when reading FIFO messages. LED4 USER2 Host controlled - Available to user LED5 USER1 Host controlled - Flashes ONLY in main idle loop. LED6 ERROR Host controlled - for flagging errors , like EEPROM write errors LED7 TX Host controlled - Typically On when transmitting Getting Started The first section of this user guide provides instructions how to set up the demo board and run the built- in demo programs and utilities that are pre-programmed into the Microchip/Atmel ARM Cortex M3 MCU. The next section instructs how to install the IAR EWARM IDE and the Holt demonstration program. The supplied demo program on the USB memory stick is the same version already programmed in MCU flash memory. Hardware Design Overview Refer to the end of this guide for separate schematic diagrams and bills of material for the upper daughter board and lower MCU board. The detachable daughter board can be separated from the lower MCU board for connection to a user- supplied alternate MCU or FPGA board. The inter-board headers are located on 0.1” (2.54 mm) grid for compatibility with generic prototyping boards. All host interface signals go through the inter-board headers. See the External Host interface header pin description for the pin list in the previous section. The lower ARM Cortex M3 board is based on the flash-programmable Microchip /Atmel AT91SAM3U-EK MCU. A 4-signal Serial Peripheral Interface (SPI) connects to the HI-3220 DUT. A UART-based serial port provides RS-232 console I/O (optional). An uncommitted USB 2.0 port is available for future expansion. Two pushbuttons are available for software interaction. A RESET pushbutton resets the ARM microprocessor, which in turn controls the DUT Master Reset signal. The ARM Cortex M3 board includes “J-Link On Board” debug interface, licensed from www.segger.com, providing out-of-box readiness without having to buy a costly JTAG debug cable. The kit includes a mini USB cable for connecting the board’s debug interface to your computer. (For users already owning an ARM debug interface with ribbon-cable connector, an ARM-standard 2x10 debug connector provides
  • 9. AN-3220 AN-3220 Rev. B Holt Integrated Circuits 9 debug connectivity. In this case, jumper JP2 on the bottom of the lower board should be soldered closed to disable “J-Link On Board”). Initial Set Up Before attempting to run the demo programs, a suitable PC is required with serial COM support so the demo programs and utilities can be invoked by entering commands on the console menu. This demo program is already flashed into the Cortex M3 MCU and operates out of the box – no IDE flash programming is required to run the demo programs. 1. Your PC will need a serial (COM) port and a “terminal emulation” program like TeraTerm. Most computers no longer have RS232 com ports so will require a serial-to-USB adapter, supplied with the ADK. Connect this to the computer’s USB port and the 9 pin connector to the ADK board. 2. If using Windows 2000 or Windows XP, you can use HyperTerminal for terminal emulation. Open HyperTerminal by clicking Start then All Programs; click the Windows Accessories then Communications program group. Double-click HyperTerminal to run it. Skip the next paragraph. If using Vista, Windows 7 or Windows 10… HyperTerminal is not included with these versions of Windows. Install the free open-source terminal emulation program, TeraTerm 4.71, by running the provided teraterm-4.71.exe installer program from the Holt CD. Accept the license agreement stating redistribution is permitted provided that copyright notice is retained. The notice can be displayed from the TeraTerm window by clicking Help then clicking About TeraTerm. Continuing to install… • Accept the default install destination and click Next. • At the Select Components screen, unselect all options except Additional Plug-in = TTXResizeMenu and click Next. • Select the installed language, then click Next. • Accept the default Start Menu folder, then click Next. • Select any desired shortcuts, then click Next. • At the Ready to Install screen, click Install. Run the TeraTerm program. At the New Connection screen, select (x)Serial and choose the selected COM port. Click Setup then Serial Port to open the serial port setup window. Choose these settings: Baud Rate: 115200, Data: 8 bits, Parity: none, Stop: 1 bit, Flow Control: none.
  • 10. AN-3220 AN-3220 Rev. B Holt Integrated Circuits 10 3. Plug-in the provided 5V DC power supply and connect the cable to the power input jack on the lower circuit board. If TeraTerm is running and configured correctly, the command menu below should appear in the console window. This menu appears whenever board power is applied, or when the RESET pushbutton is pressed. After verifying correct TeraTerm communication with the evaluation board, the terminal set up can be saved by clicking Setup then Save Setup. 4. At power up, all the LED’s will briefly flash. The READY LED should remain ON and the RUN LED should be OFF. The green USER1 LED flashes at 1.2 Hz when the program is in the main idle loop. Getting Started with Demos After powering up the board the menu of commands are displayed on the console. ------------------------------------------------- Holt Integrated Circuits HI-3220 Demo Program Ver. 1.0 Compiled: Jan 26 2018 08:27:43 ------------------------------------------------- DIP switches: 01 SPI 24MHz Waiting for READY high after reset... MSR = 20 Expected value is 20 READY OK MODE Pins read: 0 MODES 1 or 3 auto-initializes from EEPROM - must have been programmed first or will fault ************************************************* Holt Integrated Circuits HI-3220 Demo Program Ver. 1.0 Compiled: Jan 26 2018 08:27:42 ************************************************* ------------- ADK-3220 DEMOS -------------- Press '0' - RX RAM RECEPTION LOOPBACK Press '1' - RX RAM RECEPTION NO LOOPBACK Press '2' - RX FIFO and TX FIFO Direct Press '3' - TX FIFO Direct Immediate Press '4' - TX0 Simple Transmit Scheduler-continuous Press '5' - RX0 -> TX0 Repeater Press '6' - RX0 + RX1 -> TX0 Concentrator Press '7' - SUB MENU: 1-One Time Transmission, 2-PacketTimer, 3-RX&TXDemo 4- Transmit using all 8 schedulers Press '8' - Enables RX0-RX15 receivers, use with command '9' Press '9' - Reads and Displays all RX channels FIFOs Press 'p' - Demo configuration for EEPROM demo Press 'P' - Programs auto-initization EEPROM Press 'k' - Transmit a message on TX2 and TX3 ----------- UTILITIES ------------- Press 'a' - Enter Watch Window Address Press 'c' - Clears most device memory 0-0x8088 Press 'd' - Display selected RX RAM Memory blocks 0-0x3FFF, q=quit Press 'e' - Display Receiver FIFO look-up label and interrupt look-up tables Memory Press 'h' - Display this help menu Press 'i' - Set interrupts SUB-MENU Press 'I' - Set Interrupt regs for testing Press 'l' - Toggle the LOOPBACK register from 00 <-> 0xFF Press 'L' - Demonstrate setting and clearing Label acceptance table memory Press 'm' - Write byte to specified Address
  • 11. AN-3220 AN-3220 Rev. B Holt Integrated Circuits 11 Press 'M' - Write byte(s) to memory Range Press 'O and o' - WDT Demo, init and refresh Press 'r' - Toggle RUN pin state Press 'R' - 3220 Software Reset Press 't' - Display ALL Transmit Tables 0x4000-0x67FF, q=quit Press 'w' - Display Device Memory from MAP Press 'x' - Transmits number of mesgs on given channel Press 'Space Bar' - Display Selected Registers =========================================================== Press 'H' for this help menu, or press any valid menu key. >> Demonstration Programs and Utilities It is highly recommended to first review the HI-3220 data sheet to gain basic understanding of the device so you get the most benefit from the demos and utilities described in this document. Nearly all menu commands entered on the console instruct the ARM MCU to issue SPI Op Codes to write or read data in the HI-3220. The host configures the HI-3220 by writing to various Control Registers using the SPI interface along with other related system registers in space 0x8000 - 0x8087. Access to resisters or memory locations are enabled once the READY pin is asserted high after a master reset. Message data, transmit schedulers, RX FIFO enable, RX interrupt enable tables reside from location 0x0000 to 0x8000. See the HI-3220 Memory Map in page 11 of the data sheet. Once the host configures the device and loads necessary data tables, the device is enabled to receive or transmit data when the RUN pin is set high. The RUN input pin of the HI-3220 is controlled by the MCU GPIO pin and is toggled by the ‘r’ command. When the RUN pin is high the green RUN status LED is ON. More about the RUN pin later. In addition to the demos there is an assortment of SPI utilities which allow viewing and modification of registers or memory ranges, and setting/clearing single bits in the RX interrupt and RX FIFO Enable MAP tables. These are very useful debugging utilities and are provided since traditional IDE debuggers cannot access memory through a SPI interface. Note: By default, all SPI utilities use hex format for display of addresses or data without showing the traditional “0x” in front of the value. Demonstrations and Examples The first set of demo programs 0-6 are modeled by the Example diagrams 1-5 shown in the data sheet on pages 3, 4 and 5. In the demo descriptions, the documentation will typically refer to these methods shown in the 3rd column. The demos demonstrate one or two of these methods to transmit and receive data. The key demos listed below demonstrate the essential features of the HI-3220. Entering a number in the console menu executes the corresponding demo listed. DEMO NUMBER DEMO DESCRIPTION NOTES
  • 12. AN-3220 AN-3220 Rev. B Holt Integrated Circuits 12 Example 0 On-chip RAM reception – Loopback. The Transmitter by Direct FIFO method is also used. Example 1 On-chip RAM reception. The Transmitter by Direct FIFO method is also used. Example 2 Data reception using on-chip FIFO’s. RX FIFO Reception Example 3 TX FIFO Data transmission direct from MCU. Transmit Direct by FIFO loading Example 4 TX Simple Data transmission on-chip schedulers. Requires Descriptor table(s) Transmit scheduler(s) Example 5 RX0 –> TX0 Repeater Messages received on RX0 are retransmitted on TX0 Example 6 RX0 + RX1 -> TX0 Concentrator Messages received on RX0 and RX1 are both retransmitted on TX0 Example 7 Sub Menu commands See descriptions below Example 8 This is a Demo utility that enables all sixteen receivers used in some the other demos. Configures all 16 Receivers for reception. Example 9 This is a Demo utility reads any RX FIFO messages and displays them on the console used in some of the other demos.
  • 13. AN-3220 AN-3220 Rev. B Holt Integrated Circuits 13 Two pushbutton switches on the bottom board provide two utility functions. SW1 Push-button - Configures the MCR and TX5, TX6 and TX7 Control Registers and transmits a single message on those three transmitter channels. TX5 transmits at Low-Speed, TX6 at 50K speed and TX transmits at Hi-Speed. The green TX LED will briefly flash. SW2 Push-button - Generates four essential SPI sequences that demonstrate proper SPI signaling to communicate with the HI-3220. For a detailed look at the SPI signaling refer to the end of this document. Read Register MSR (0x02) returns value 0x20, Write 0x8000 to the MAP register. Write 0xC0 to the MAP address location (0x8000), Read byte at MAP location returns 0xC0.
  • 14. AN-3220 AN-3220 Rev. B Holt Integrated Circuits 14 Demo Descriptions Demo 0: Press the ‘0’ key for RAM Reception - LOOPBACK. Demo 0 programs the LOOPBACK register with 0xFF so all RX channels are configured in LOOPBACK mode. Messages are loaded into Receive Data memory organized by label value. Each channel 0-15 has 256 4-byte locations for each message organized by label value. TX0 - TX7 transmitters are used to transmit the test data using transmit direct method by loading the Transmit FIFO’s with message data. All transmitters are configured in high-speed and Parity ON is enabled for RX0 and RX1. All sixteen Receivers are similarly configured. Initially the transmit data is set for Label 00 and data 00 45 67. ARINC 429 data is transmitted to the eight channels using the Transmit Direct method (example 3). After each transmitter FIFO is loaded the label and byte 1 are incremented by one. In LOOPBACK mode, each Transmitter is mapped to two consecutive Receivers as shown below. For each ‘0’ key press, this output will be displayed on the console. Three interrupt flags and the system registers are displayed before the messages for each channel 0-15 for debug information. Quit> 0 ARINC RAM Reception LOOPBACK Loop Back Mode PIR REG 0x8004 = 0x04 RPIRl REG 0x8006 = 0xFF RPIRH REG 0x8008 = 0xFF 0 1 2 3 4 5 6 7 8 9 A B C D E F MAP:8000 C0 C0 30 00 00 00 00 00 00 00 00 00 00 FF FF FF MAP:8010 00 00 01 01 02 02 03 03 04 04 05 05 06 06 07 07 MAP:8020 80 80 A0 A0 A0 A0 A0 A0 A0 A0 A0 A0 A0 A0 A0 A0 (RX Control Registers) MAP:8030 80 80 80 80 80 80 80 80 00 00 00 00 00 00 00 00 (TX Control Registers) MAP:8040 00 00 00 00 00 00 00 00 00 FF F8 FF FF 00 00 00 (LOOPBACK Reg 0x8049=0xFF) MAP:8050 00 00 00 00 00 00 00 00 00 00 00 00 00 00 00 00 MAP:8060 00 00 00 00 00 00 00 00 01 01 01 01 01 01 01 01 MAP:8070 01 01 01 01 01 01 01 01 00 00 00 00 00 00 FF 00
  • 15. AN-3220 AN-3220 Rev. B Holt Integrated Circuits 15 ** RX messages by polling ** RX-CH0: Label:00 00 45 67 RX-CH1: Label:00 00 45 67 RX-CH2: Label:01 01 45 E7 RX-CH3: Label:01 01 45 E7 RX-CH4: Label:02 02 45 E7 RX-CH5: Label:02 02 45 E7 RX-CH6: Label:03 03 45 E7 RX-CH7: Label:03 03 45 E7 RX-CH8: Label:04 04 45 E7 RX-CH9: Label:04 04 45 E7 RX-CH10: Label:05 05 45 E7 RX-CH11: Label:05 05 45 E7 RX-CH12: Label:06 06 45 E7 RX-CH13: Label:06 06 45 E7 RX-CH14: Label:07 07 45 E7 RX-CH15: Label:07 07 45 E7 Quit> Optionally, instead of reading the Receiver data by RAM access, the data can be read from a FIFO. This is demonstrated in Demo 2. By default, the C program is compiled for Polling using the macro INTERRUPT_MESG_ENA. A simple interrupt method to read the message is provided by changing this macro to a 1 in the 3220_initialization.h file which then causes the messages to be read and displayed in the interrupt handler. Demo 1: Press the ‘1’ key for RAM Reception - normal mode. Demo 1 is the same demo as Demo 0 except the LOOPBACK feature is turned OFF (LOOPBACK register 0x8049 = 0x00). An oscilloscope can be used to view the ARINC transmissions on J4 or J6 header pins. For example J6 pin 1 is TX0AOUT and pin 2 is TX0BOUT. Without jumper wires connected between a Transmitter and a Receiver, only the register data is displayed on the console. Optionally connect an external ARINC 429 high speed source to any of the Receiver input channels 0-15 on the header connectors. RX channels 0-7 are available on J1 and channel 8-17 are on J2. To set up a single Transmit channel to be received by a Receiver channel connect the following using a pair of clip leads. Connect TX0 outputs to RX0 inputs and verify that data is displayed on the console when the ‘1’ key is pressed. Optionally connect more channels or an external ARINC 429 source and press the ‘1’ key again to see the data. J6-1 TX0AOUT Jumper to J1-1 RIN0P
  • 16. AN-3220 AN-3220 Rev. B Holt Integrated Circuits 16 J6-2 TX0BOUT Jumper to J1-2 RIN0N > 1 ARINC RAM Reception NO LOOPBACK Normal Mode PIR REG 0x8004 = 0x04 RPIRl REG 0x8006 = 0x02 RPIRH REG 0x8008 = 0x75 0 1 2 3 4 5 6 7 8 9 A B C D E F MAP:8000 C0 C0 30 00 00 00 00 00 00 00 00 00 00 02 75 FF MAP:8010 00 03 00 00 00 00 00 00 04 00 05 00 06 06 07 00 MAP:8020 80 80 A0 A0 A0 A0 A0 A0 A0 A0 A0 A0 A0 A0 A0 A0 MAP:8030 80 80 80 80 80 80 80 80 00 00 00 00 00 00 00 00 MAP:8040 00 00 00 00 00 00 00 00 00 00 F8 FF FF 00 00 00 MAP:8050 00 00 00 00 00 00 00 00 00 00 00 00 00 00 00 00 MAP:8060 00 00 00 00 00 00 00 00 00 01 00 00 00 00 00 00 MAP:8070 01 00 01 00 01 01 01 00 00 00 00 00 00 00 FF 00 ** RX messages by polling ** RX-CH0: Label:00 00 45 67 Quit> Demo 2: Press the ‘2’ key for RX FIFO Reception and TX Direct Transmit. This demonstrates Receiver FIFO reception on all sixteen Receivers. Each Transmit channel TX0-TX7 transmits 32 messages to supply message data to the RX0-RX15 Receivers. Since LOOPBACK was demonstrated in Demo 0 and 1 this demo relies on external clip-lead connections. A pair of clip-leads is required for each channel. For example to connect TX0 to RX0 and TX7 to RX15 make the following connections. J6-1 TX0AOUT Jumper to J1-1 RIN0P J6-2 TX0BOUT Jumper to J1-2 RIN0N J4-7 TX7AOUT Jumper to J2-15 RIN15P J4-8 TX7BOUT Jumper to J2-16 RIN15N A data pattern function creates patterns as follows for 32 messages each which are loaded into the Transmit FIFO’s. The first two bytes (label and Byte1) are loaded with the label. Byte2 is loaded with increment data starting with value 0x00. Byte3 is the complement of Byte2.
  • 17. AN-3220 AN-3220 Rev. B Holt Integrated Circuits 17 Each Receiver channel features a 64 message deep FIFO. The RX FIFO read section of the software first reads the message count in each RX FIFO channel then it calls a function to read that many messages. It repeats this for all sixteen Receiver channels. See the demo code for exact details. The console display should look like this after the connections are made and the ‘2’ key is pressed. RX 0:0 00 00 00 FF RX 0:1 00 00 01 FE * * * RX 0:30 00 00 1E E1 RX 0:31 00 00 1F E0 RX 15:0 07 07 00 FF RX 15:1 07 07 01 FE * * * RX 15:30 07 07 1E E1 RX 15:31 07 07 1F E0 Demo 3: Press ‘3’ to transmit a message on TX2 and TX3 using transmission directly by CPU. This method has already been demonstrated in the previous demos 0-2. Transmission by Direct method is when the Transmit FIFO is loaded with data and the RUN pin is set high. This causes the transmission of any data in the FIFO’s for that channel until the FIFO is empty. Pressing ‘SW3” push- button also uses this method to transmit three messages, one message each on TX5, TX6 and TX7. Demo ‘k’ also uses this method to transmit a message on TX2 and TX3. Transmit Scheduler demos The next set of Demos use the Transmit Scheduler features of the HI-3220 to accomplish a variety of capabilities. Each Transmit channel TX0-TX7 has a transmit controller and supporting descriptor table space in memory starting at address 0x4000. For channels 0 and 1 either 128 or 256 message descriptors can be loaded into the descriptor memory space. Channels 2-7 are fixed at 128 messages. Each descriptor consists of eight bytes for an Op Code, timer values and message data. See the data sheet for more details for how the Transmit Scheduler works. Once the descriptors are initialized and Control Register bits are properly set, the scheduler runs when the RUN pin is set high. To stop the scheduler set the RUN pin low. Use command ‘r’ to toggle the RUN pin high or low in these demos. Some examples what each a Transmit Scheduler can be used for: 1. Transmit up to 128 or 256 immediate messages.
  • 18. AN-3220 AN-3220 Rev. B Holt Integrated Circuits 18 2. Transmit messages automatically conditionally or unconditionally if message is received from any Receiver channel and by ARINC label value. 3. Transmit messages the same as item 2 above, but optionally reinsert ARINC SDI bits (ARINC bits 9 and 10). 4. Autonomous operation once the auto-initialization EEPROM is programmed. 5. One-shot or continuous transmission of the number of programmed message descriptors until the end of the table is reached or the End of Sequence value 0x00 is encountered by the Scheduler. 6. The Transmit Scheduler message auto routing capabilities allows the device to be configured as a Data Concentrator or Repeater. Demo 4: Press ‘4’ for TX0 Simple Scheduler – continuous. This demo initializes the Transmit TX0 descriptor table with 31 messages with the Immediate Op Code. After the 3rd message transmits, a 10ms delay Op Code delays transmission before the remaining messages transmit. All 31 messages are the same except byte3 that increments, Label 00, byte1: 0x00, byte2 increment data, and byte3 =0x04. After each message is loaded in the descriptor table, the label is incremented for the next descriptor. After the program loads all 32 descriptors, an End of Sequence Op Code is written in the next address with 0x00. The repetition rate is set for 40ms. After pressing ‘4’, the demo quickly returns to the main console menu. Press ‘r’ to set the RUN pin high to start the scheduler, the first three messages transmits followed by a 10ms delay then the remaining messages transmit. This occurs every 40ms. If ‘r’ is pressed again, RUN goes low and transmission stops and if ‘r’ is pressed again the RUN pin is set high again and transmissions resume. View the ARINC TX0 channel transmissions on J6 pin 1 and 2 with an oscilloscope.
  • 19. AN-3220 AN-3220 Rev. B Holt Integrated Circuits 19 To read back the data and display it on the console using the FIFO Reception method, first connect the TX0 transmitter outputs to the RX0 Receiver inputs as follows. J6-1 TXOAOUT Jumper to J2-1 RINOP J6-2 TXOBOUT Jumper to J2-2 RINON Press ‘8’ to initialize Receivers 0-15 then press ‘r’ to start transmission. Press ‘r’ again to stop transmission. Press ‘9’ to display 64 messages on the console. There are 64 messages because that is the Receiver FIFO depth. Probably several 64-message groups were transmitted between the first and second ‘r’ key presses, and the FIFO overflowed. When the Receive FIFO fills, a subsequent message is loaded in the FIFO overwriting the oldest stored message. You can also leave RUN high and randomly press ‘9’ to display the FIFO messages in this case the first displayed message will unlikely be the first message in the descriptor table. Commands ‘8’ and ‘9’ from the console menu can be used anytime to configure the RX Receivers and display the RX FIFO data.
  • 20. AN-3220 AN-3220 Rev. B Holt Integrated Circuits 20 Repeater Demo Press ‘5’ for RX0 -> TX0 Repeater. This demo sets up a single descriptor in the TX0 scheduler table to perform a Repeater function and returns control back to the console main loop. Pressing ‘r’ sets the RUN pin high to start the scheduler. Any message received on Receiver 0 automatically re-transmits the message on TX0 without host intervention. Optionally, the host can receive the message if desired, using RAM Reception or FIFO Reception. The descriptor is configured to reference RX0 channel, label 0 message in RAM memory (0x0000). This example uses an IDC Op Code for byte-1, the re-transmitted message will have the label value stored in Byte5. Bytes 2, 3 and 4 are indexed and come from RX0 channel where the label 0x00 message data is stored, but actually the first byte is a Status Byte in this location. Review Demo 5 code in 3220Demo.c to view the C code configuration steps. Indexed Conditional Op Codes use NEWTX0 - NEWTX3 bits in the Received Data Status Bytes. This Status Byte is the first byte in Received data memory (See page 19 of the data sheet) that is loaded for every received message. When a message is received, all the bits in this Status Byte register are set. This is how the scheduler detects when a new message is received. If a descriptor references any of the data from this block, the corresponding NEWTXx bit is cleared depending on the Transmitter channel (TX0-TX7). The single Transmit descriptor consisting of eight bytes shown below is loaded into starting location 0x4000 since that is the first location of the TX0 descriptor table. These values are set in arrays which makes them easy to alter in C code for experimentation. Descriptor Bytes 1-8 Byte1 Byte2 Byte3 Byte4 Byte5 Byte6 Byte7 Byte8 Op Code RX Label PTP/Delay PTO ARINC Label ARINC Byte1 ARINC Byte3 ARINC Byte3 IDC (0101) 0x02 0x00 0x00 0x02 N/A N/A N/A For a repeater, PRESCALE bit 6 is set in the TX0 Control Register. This sets the repetition rate to 1ms to minimize latency between message arrival on the RX0 Receiver to when the Scheduler retransmits the message on TXO.
  • 21. AN-3220 AN-3220 Rev. B Holt Integrated Circuits 21 To view the descriptor bytes in memory, use the ‘a’ command utility and enter address 4000. The descriptor memory should appear with the following data (only partially shown): 0 1 2 3 4 5 6 7 8 9 A B C D E F MAP:4000 50 02 00 00 02 00 00 00 00 00 00 00 00 00 00 00 ^--- EOS For example: RX0 Incoming message: 00 02 34 56 TX0 Repeated message: 00 02 34 56 To change the transmitted label, simply change the label (Byte 5) to any desired value in the software. In the demo program, descriptor bytes are stored in eight byte arrays[]. Experimentation can be performed by changing the descriptor byte values in the array and rebuilding the project or by altering bytes by using the SPI utility command ‘m’ which allows writing a byte to any address entered on the console. View the result with the SPI utility command ‘a’ to set the starting address and display a block of addresses and corresponding data values. For this demonstration, connect two clip-leads to make an external connection between TX2 outputs and RX0 inputs (similar to the previous demos). When the ‘k’ key is pressed, a message will transmit on TX2 so this will be the source or input message the Repeater retransmits on TX0. Steps: Press ‘5’ to execute the Repeater demo. Press ‘r’ to run scheduler (RUN high) Press ‘k’ to transmit test messages on TX2 and TX3 (TX3 is ignored for this demo.) Press ‘9’ to display the message. To see the repeated transmission, connect another pair of clip-leads from the TX0 output pins to the RX3 channel inputs. This allows read back and retransmitted message display on TX0 on the console. Results: > 5 Press ‘6’ for Repeater Demo Press ‘8’ to enable Receivers Press ‘r’ to set RUN high which runs the scheduler Press ‘k’ to transmit TX2 TX3 test messages – Transmits message 0x02 0x02 0x34 0x56 on TX2 Press ‘9’ to read the FIFO data and display it on the console Displayed result:
  • 22. AN-3220 AN-3220 Rev. B Holt Integrated Circuits 22 mesgs: 1 RX 0:0 02 02 34 56 mesgs: 1 RX 3:0 02 02 34 56 Elapsed time 0.007210 > Each time ‘k’ is pressed, a message is transmitted on TX2 and this is received by RX0 and the scheduler retransmits the message on TX0. The scope capture below shows the TX2 transmission on top and the retransmitted message on TX0 below. The Scheduler 1ms timer is asynchronous relative to messages, so the worst case latency is shown below at 1ms in this case. Pressing ‘k’ several times will reveal delays anywhere between the two vertical cursor lines. Demo 6: Press ‘6’ for RX0 + RX1 -> TX0 Concentrator Demo. The concentrator demo receives messages on two Receiver channels (RX0 and RX1) and retransmits them both on TX0 transmitter. This demo sets up two descriptors in the TX0 scheduler table. The first descriptor references the RX0 channel message and the second one references the RX1 message (both Label 0). After pressing ‘6’, control returns back to the main console menu. Press ‘r’ to set the RUN pin high, starting the scheduler. Any new messages received on Receiver 0 or Receiver 1 will automatically re-transmit to TX0 with no host intervention. Optionally, the host can receive the messages if desired, using either RAM access or FIFO Reception. This is very similar to the Repeater demo except two descriptors are loaded into the TX0 descriptor table at location 0x4000. View the descriptor table at location 0x4000 (using the ‘a’ command): 0 1 2 3 4 5 6 7 8 9 A B C D E F MAP:4000 50 02 00 00 11 00 00 00 51 03 00 00 22 00 00 00 MAP:4010 00 (EOS)
  • 23. AN-3220 AN-3220 Rev. B Holt Integrated Circuits 23 The ‘k’ command is again used here to transmit test messages on TX2 and TX3 outputs. TX2 and TX3 outputs should be connected to RX0 and RX1 respectively. And finally, jumper TX0 to RX3 to view TX0 output received by RX3 displayed on the console TX2 transmits 00 02 34 56  Received by RX0 TX3 transmits 00 03 78 9A  Received by RX1 Results: > 6 Concentrator Demo Press 8 to enable the receivers Press r to set RUN high to run scheduler Press k to transmit TX2 TX3 test messages Press 9 to read the FIFO data and display it on the console mesgs: 1 RX 0:0 02 02 34 56 mesgs: 1 RX 1:0 03 03 78 9A mesgs: 2 RX 3:0 11 02 34 D6 RX 3:1 22 03 78 9A A few things to note here: The label values were changed to 0x11 and 0x22 in the descriptor tables for this demo so those are the new transmitted label values the concentrator transmits. The RX3 receiver is monitoring TX0 output and receives both messages from RX0 and RX1 and is displayed.
  • 24. AN-3220 AN-3220 Rev. B Holt Integrated Circuits 24 A scope capture of the Concentrator Transmissions is shown: A block diagram shows the paired connections for this demo. RX0 RX1 RX3 TX0 TX2 TX3 RX0 + RX1 messages TX0 routed to RX3 for FIFO capture and display Test Output Mesg Test Output Mesg Each line shown is a pair
  • 25. AN-3220 AN-3220 Rev. B Holt Integrated Circuits 25 A simplified implementation only requires the two RX0 and RX1 channel inputs, and one TX0 channel output for this concentrator without all the looped-back connections. RX0 RX1 TX0 RX0 + RX1 messages Each line shown is a pair Demo 5 uses a single descriptor while Demo 6 used just two descriptors leaving the available descriptor table memory largely unused; this unused descriptor space can be used for other messaging tasks. TX0 One-Time transmission Demo. Press ‘7’ then from the sub-menu Press ‘1’. This demo uses the same exact demo code function as Demo 3, except after a 10ms delay the TX0 Control Register is written again to clear the RUN bit. This demonstrates One-Time transmission of all programmed descriptor messages. After all the messages are sequenced and transmitted, the scheduler stops. View the transmitted messages on a scope on TX0 outputs or make external connections to any receivers and use the ‘8’ and ‘9’ commands to enable reception and display the messages on the console similar to previous demos.
  • 26. AN-3220 AN-3220 Rev. B Holt Integrated Circuits 26 TX0-TX3 Scheduler Packet-Timer Demo. Press ‘7’ then from the sub-menu Press ‘2’. The Packet-Timer demo programs the descriptor tables for TX0, TX1, TX2 and TX3 to implement the examples 1 -4 listed in the Packet Timer section of the HI-3220 data sheet. Each example uses different values for PTP (byte3) and PTO (byte4) of the descriptor bytes to demonstrate the flexible timing options of the Transmit Scheduler. In order to duplicate this scope plot, trigger positive on the RUN signal on TP2 using the oscilloscope external trigger input and view TX0, TX1, TX2 and TX3 on a four channel oscilloscope. Press 7, then Press 2. Press ‘r’ to start the scheduler which sets the RUN pin high. TX0=Yellow, TX1=Green, TX2=Blue, TX3=Red. Demo P: Both lower case ‘p’ and upper case ‘P’ are used in this demo. Using the HI-3220 with a preprogrammed EEPROM allows auto-initialization and autonomous operation without MCU or FPGA control. Once the configuration data is stored in the EEPROM, the HI-3220 will automatically load all register and selected memory areas shown shaded in the memory map in the data sheet from the EEPROM into the HI-3220 at RESET if the Mode [2:0] inputs are configured for Mode 1 or Mode 3 according to the flow chart on page 27 of the data sheet. The user must configure Control Registers, Descriptor Tables etc. in the device to achieve the desired functionality before programming the EEPROM with the ‘P’ command. The ‘P’ command simply copies the HI-3220 data and register space into the EEPROM.
  • 27. AN-3220 AN-3220 Rev. B Holt Integrated Circuits 27 For this demo, the function autoInitEEPROMExample() is called first; this function configures all sixteen Receivers and eight Transmitters for high speed operation in LOOPBACK mode. This configuration is programmed in the EEPROM for this demo. Demo steps: 1. Set the three Mode pins low, Mode0, Mode1 and Mode2 by placing the jumper shunts in the down position on J7, J8 and J9. Note: This is only required if the EEPROM was never programmed before. 2. Press ‘p’ to execute the autoInitEEPROMExample() function. To test this demo configuration, follow the steps below. This exercise is run to verify that the configuration operates as desired before programming the EEPROM. a. Press ‘r’ to set RUN high. b. Press ‘k’ to transmit a message on TX2 and TX3. c. Press ‘9’ to read the received messages. Due to LOOPBACK, each Transmitter is duplicated internally routed to two Receivers. mesgs: 1 RX 4:0 02 02 34 56 mesgs: 1 RX 5:0 02 02 34 56 mesgs: 1 RX 6:0 03 03 78 9A mesgs: 1 RX 7:0 03 03 78 9A 3. Press ‘P’ to program this configuration into the EEPROM. The red ERROR LED flashes briefly. 4. Change the Mode0-2 jumpers for Mode1 or Mode3 and power-cycle the board Off/On or Press RESET. The HI-3220 should auto-initialize from EEPROM. 5. Repeat the sequence steps a-c above to see the demo work the same as before but this time the autoInitEEPROMExample() function call is not needed because the configuration was copied into the HI-3220 from the EEPROM by the auto-initialization sequence. Auto-initialization from EEPROM is an optional feature; an EEPROM is not needed if this feature is not used. Demo x: Transmits a custom message. Press ‘x’ to transmit a custom message on any TX0-TX7 transmitter channel. This utility prompts for a channel number (0-7), message count (0-32), label value (byte), and the Transmit Control Register value then transmits the message(s).
  • 28. AN-3220 AN-3220 Rev. B Holt Integrated Circuits 28 Console Menu Utilities A SPI peripheral presents some difficulty during development. Traditional bus-interfaced debug environments use memory windows to display memory-mapped registers or memory contents. This capability is not available using SPI, so various SPI utility functions are provided in the Holt demo for writing and reading registers and memory space. These utilities are essential for debug during development, but require a UART/serial port connected to a PC running terminal emulation such as HyperTerminal or TeraTerm. Some of the provided functions write or display a single address location; others access a range of addresses. All address and data values are hex by default. Command ‘w’: This command displays the 256 byte region beginning at location 0x8000. This is useful because 0x8000 is the start address for the system registers. After power-up or RESET, nearly all memory contains zeros. Notice the ‘2’ in the upper nibble at address 0x8002 shows the READY bit in the MSR is set high. 0 1 2 3 4 5 6 7 8 9 A B C D E F MAP:8000 00 00 20 00 00 00 00 00 00 00 00 00 00 00 00 FF MAP:8010 00 00 00 00 00 00 00 00 00 00 00 00 00 00 00 00 MAP:8020 00 00 00 00 00 00 00 00 00 00 00 00 00 00 00 00 MAP:8030 00 00 00 00 00 00 00 00 00 00 00 00 00 00 00 00 MAP:8040 00 00 00 00 00 00 00 00 00 00 F8 00 00 00 00 00 MAP:8050 00 00 00 00 00 00 00 00 00 00 00 00 00 00 00 00 MAP:8060 00 00 00 00 00 00 00 00 00 00 00 00 00 00 00 00 MAP:8070 00 00 00 00 00 00 00 00 00 00 00 00 00 00 FF 00 MAP:8080 00 00 00 00 00 00 00 00 00 00 00 00 00 00 00 00 =============================================================== Keys: 'W' Watch '<' Up '>' Down 'R' Refresh 'A' Address 0x8000-0x808F End MAP:8090 Pressing the < key subtracts 256 from the start address and pressing > adds 256 to the start address. Command ‘a’: This prompts for a 4-digit hex address and displays that 256 byte region. a Enter 16-bit hex address: 4000 0 1 2 3 4 5 6 7 8 9 A B C D E F MAP:4000 00 00 00 00 00 00 00 00 00 00 00 00 00 00 00 00 MAP:4010 00 00 00 00 00 00 00 00 00 00 00 00 00 00 00 00 MAP:4020 00 00 00 00 00 00 00 00 00 00 00 00 00 00 00 00 MAP:4030 00 00 00 00 00 00 00 00 00 00 00 00 00 00 00 00 MAP:4040 00 00 00 00 00 00 00 00 00 00 00 00 00 00 00 00 MAP:4050 00 00 00 00 00 00 00 00 00 00 00 00 00 00 00 00 MAP:4060 00 00 00 00 00 00 00 00 00 00 00 00 00 00 00 00 MAP:4070 00 00 00 00 00 00 00 00 00 00 00 00 00 00 00 00 MAP:4080 00 00 00 00 00 00 00 00 00 00 00 00 00 00 00 00 MAP:4090 00 00 00 00 00 00 00 00 00 00 00 00 00 00 00 00 MAP:40A0 00 00 00 00 00 00 00 00 00 00 00 00 00 00 00 00 MAP:40B0 00 00 00 00 00 00 00 00 00 00 00 00 00 00 00 00 MAP:40C0 00 00 00 00 00 00 00 00 00 00 00 00 00 00 00 00 MAP:40D0 00 00 00 00 00 00 00 00 00 00 00 00 00 00 00 00 MAP:40E0 00 00 00 00 00 00 00 00 00 00 00 00 00 00 00 00 MAP:40F0 00 00 00 00 00 00 00 00 00 00 00 00 00 00 00 00 ===============================================================
  • 29. AN-3220 AN-3220 Rev. B Holt Integrated Circuits 29 Keys: 'W' Watch '<' Up '>' Down 'R' Refresh 'A' Address 0x4000-0x40FF End MAP:4100 Command ‘c’: Sometimes it is useful to clear all device memory from the console instead of using reset or power cycling the board. This guarantees fresh initialization values and device memory is cleared to zeros making it easier to identify updated values later. Press ‘c’ to clear all memory. Command ‘d’: This command prompts for a channel value and expects 0-F to be entered. The corresponding RX RAM message buffer is displayed for all 256 labels. The utility continuously prompts for another value to repeat the process. Press ‘q’ to quit the utility. Command ‘L’: This command demonstrates two useful functions that set or clear ARINC Labels in the Received Data Enable Look-Up table; refer to HI-3220 data sheet page 20. Functions setLabel(chx,label) and clearLabel(chx,label) can be called by the user in their own C projects. The input parameters for these functions are Receiver channel number (0-15) and label (0-255 dec). Setting the appropriate bit manually in the table is otherwise a tedious process. A Data Enable Look-Up table diagram is provided in the data sheet, showing how the label enable bits are arranged in the table memory. Press ’L’ to set the labels called out in the demo. The following sequence takes place. 1. Channel CH0 labels are set: 0, 16, 127, 128, 254. 2. Channel CH7 labels are set: 1, 17, 128, 255. 3. Channel CH15 label 255 is set. 4. The table memory is displayed on the console. 5. Channel CH15 label is cleared. 6. The table memory is displayed again on the console showing revealing CH15 label 255 is now cleared. Results 0 1 2 3 4 5 6 7 8 9 A B C D E F MAP:6800 01 00 01 00 00 00 00 00 00 00 00 00 00 00 00 80 RX0 Labels 0, 16, 128 set MAP:6810 01 00 00 00 00 00 00 00 00 00 00 00 00 00 00 40 RX0 Labels 128, 254 set MAP:6820 00 00 00 00 00 00 00 00 00 00 00 00 00 00 00 00 MAP:6830 00 00 00 00 00 00 00 00 00 00 00 00 00 00 00 00 MAP:6840 00 00 00 00 00 00 00 00 00 00 00 00 00 00 00 00 MAP:6850 00 00 00 00 00 00 00 00 00 00 00 00 00 00 00 00 MAP:6860 00 00 00 00 00 00 00 00 00 00 00 00 00 00 00 00 MAP:6870 00 00 00 00 00 00 00 00 00 00 00 00 00 00 00 00 MAP:6880 00 00 00 00 00 00 00 00 00 00 00 00 00 00 00 00 MAP:6890 00 00 00 00 00 00 00 00 00 00 00 00 00 00 00 00
  • 30. AN-3220 AN-3220 Rev. B Holt Integrated Circuits 30 MAP:68A0 00 00 00 00 00 00 00 00 00 00 00 00 00 00 00 00 MAP:68B0 00 00 00 00 00 00 00 00 00 00 00 00 00 00 00 00 MAP:68C0 00 00 00 00 00 00 00 00 00 00 00 00 00 00 00 00 MAP:68D0 00 00 00 00 00 00 00 00 00 00 00 00 00 00 00 00 MAP:68E0 02 00 02 00 00 00 00 00 00 00 00 00 00 00 00 00 RX7 Labels 1, 17 set MAP:68F0 01 00 00 00 00 00 00 00 00 00 00 00 00 00 00 80 RX7 Labels 128, 255 set MAP:6900 00 00 00 00 00 00 00 00 00 00 00 00 00 00 00 00 MAP:6910 00 00 00 00 00 00 00 00 00 00 00 00 00 00 00 00 MAP:6920 00 00 00 00 00 00 00 00 00 00 00 00 00 00 00 00 MAP:6930 00 00 00 00 00 00 00 00 00 00 00 00 00 00 00 00 MAP:6940 00 00 00 00 00 00 00 00 00 00 00 00 00 00 00 00 MAP:6950 00 00 00 00 00 00 00 00 00 00 00 00 00 00 00 00 MAP:6960 00 00 00 00 00 00 00 00 00 00 00 00 00 00 00 00 MAP:6970 00 00 00 00 00 00 00 00 00 00 00 00 00 00 00 00 MAP:6980 00 00 00 00 00 00 00 00 00 00 00 00 00 00 00 00 MAP:6990 00 00 00 00 00 00 00 00 00 00 00 00 00 00 00 00 MAP:69A0 00 00 00 00 00 00 00 00 00 00 00 00 00 00 00 00 MAP:69B0 00 00 00 00 00 00 00 00 00 00 00 00 00 00 00 00 MAP:69C0 00 00 00 00 00 00 00 00 00 00 00 00 00 00 00 00 MAP:69D0 00 00 00 00 00 00 00 00 00 00 00 00 00 00 00 00 MAP:69E0 00 00 00 00 00 00 00 00 00 00 00 00 00 00 00 00 MAP:69F0 00 00 00 00 00 00 00 00 00 00 00 00 00 00 00 80 RX15 label 255 set 0 1 2 3 4 5 6 7 8 9 A B C D E F MAP:6800 01 00 01 00 00 00 00 00 00 00 00 00 00 00 00 80 MAP:6810 01 00 00 00 00 00 00 00 00 00 00 00 00 00 00 40 MAP:6820 00 00 00 00 00 00 00 00 00 00 00 00 00 00 00 00 MAP:6830 00 00 00 00 00 00 00 00 00 00 00 00 00 00 00 00 MAP:6840 00 00 00 00 00 00 00 00 00 00 00 00 00 00 00 00 MAP:6850 00 00 00 00 00 00 00 00 00 00 00 00 00 00 00 00 MAP:6860 00 00 00 00 00 00 00 00 00 00 00 00 00 00 00 00 MAP:6870 00 00 00 00 00 00 00 00 00 00 00 00 00 00 00 00 MAP:6880 00 00 00 00 00 00 00 00 00 00 00 00 00 00 00 00 MAP:6890 00 00 00 00 00 00 00 00 00 00 00 00 00 00 00 00 MAP:68A0 00 00 00 00 00 00 00 00 00 00 00 00 00 00 00 00 MAP:68B0 00 00 00 00 00 00 00 00 00 00 00 00 00 00 00 00 MAP:68C0 00 00 00 00 00 00 00 00 00 00 00 00 00 00 00 00 MAP:68D0 00 00 00 00 00 00 00 00 00 00 00 00 00 00 00 00 MAP:68E0 02 00 02 00 00 00 00 00 00 00 00 00 00 00 00 00 MAP:68F0 01 00 00 00 00 00 00 00 00 00 00 00 00 00 00 80 MAP:6900 00 00 00 00 00 00 00 00 00 00 00 00 00 00 00 00 MAP:6910 00 00 00 00 00 00 00 00 00 00 00 00 00 00 00 00 MAP:6920 00 00 00 00 00 00 00 00 00 00 00 00 00 00 00 00 MAP:6930 00 00 00 00 00 00 00 00 00 00 00 00 00 00 00 00 MAP:6940 00 00 00 00 00 00 00 00 00 00 00 00 00 00 00 00 MAP:6950 00 00 00 00 00 00 00 00 00 00 00 00 00 00 00 00 MAP:6960 00 00 00 00 00 00 00 00 00 00 00 00 00 00 00 00 MAP:6970 00 00 00 00 00 00 00 00 00 00 00 00 00 00 00 00 MAP:6980 00 00 00 00 00 00 00 00 00 00 00 00 00 00 00 00 MAP:6990 00 00 00 00 00 00 00 00 00 00 00 00 00 00 00 00 MAP:69A0 00 00 00 00 00 00 00 00 00 00 00 00 00 00 00 00 MAP:69B0 00 00 00 00 00 00 00 00 00 00 00 00 00 00 00 00 MAP:69C0 00 00 00 00 00 00 00 00 00 00 00 00 00 00 00 00 MAP:69D0 00 00 00 00 00 00 00 00 00 00 00 00 00 00 00 00 MAP:69E0 00 00 00 00 00 00 00 00 00 00 00 00 00 00 00 00 MAP:69F0 00 00 00 00 00 00 00 00 00 00 00 00 00 00 00 00 - CH15 label 255 cleared Optionally use the ‘a’ or ‘e’ command to display this region of device memory. Command ‘m’: (modify register/memory value) This command is used to write a byte to any 16-bit address. > m
  • 31. AN-3220 AN-3220 Rev. B Holt Integrated Circuits 31 Enter 16-bit hex address: 69ff Enter hex byte : 80 readback: 80 (This action just re enabled CH15 label 255 again from the previous demo. There are a few more utility commands that the user can explore and might find useful. Application considerations ARINC 429 Reception by RAM vs. Reception by FIFO (and host keeping pace with data) There are two methods to read ARINC 429 messages. Reception by RAM access uses a single 4-byte buffer location mapped in 16K device memory according to channel number (0-15) and Label value. See the data sheet on page 18 for the memory organization. Reception by FIFO access uses a 64 message FIFO for each Receiver channel (0-15). The preferred method depends on user requirements, speed of host controller, software overhead and ARINC 429 traffic. When using Reception by RAM access, the host must read a message on the same channel and same Label before the next message arrives, or next message data will overwrite the previous data. If the next message is on a different channel or different label, no overwrite occurs because that channel or label maps into a different 4-byte buffer location. An INT interrupt could be used to achieve fast response to reading these messages. In high speed, ARINC 429 messages could arrive about every 360µs. Using FIFO access helps alleviate tight timing constraints by storing up to 64 messages before potential overwrite occurs when the host fails to read messages fast enough to keep up with incoming traffic. RX channel interrupts and a FIFO Threshold register provide flexibility for designing a solution that processes messages fast enough to meet application requirements. Because of the FIFO’s ability to store up to 64 messages before a possible overwrite (or data loss) occurs, a polling strategy is often used instead of an interrupt. The easiest way to configure the device to receive ARINC 429 messages is using FIFO Reception method. The easiest way to configure and transmit ARINC 429 data is to use the MCU Direct Transmit method. Improved Host Receiver FIFO reading efficiency with the HI-322x family A new feature in the HI-3220 family is the ability to read the current message count of either the Transmit FIFOs or the Receiver FIFOs. This allows the host to read a channel’s FIFO count and pass that count to a Read_FIFO16 function that reads all the messages in one shot. In addition a new C driver reads 16-bits at a time. This feature is used in the demos in several places, but the two essential lines of code are.
  • 32. AN-3220 AN-3220 Rev. B Holt Integrated Circuits 32 mesgCnt = ReadRegister(FCVOR, 0); Fetch message count of Receiver RX0 FIFO Read_FIFO16(ch0, bufferRX, mesgCnt); Reads all FIFO messages into the buffer EEPROM auto-initialization feature The optional EEPROM auto-initialization feature allows the device to automatically copy register, Transmit Scheduler tables, Interrupt Map and FIFO Enable Map values from a preprogrammed EEPROM into device memory space after power-up or reset. This feature is useful if it’s necessary to initialize and run the device before a host MCU or FPGA can perform initialization, or if the application is an autonomous Data Concentrator or Repeater that operates autonomously, without a host MCU or FPGA. In most cases, if a host is available, “initialize from EEPROM” is not typically needed. When not using an EEPROM, the Mode0-2 pins must be tied either to VDD or GND through 1K to 3.3K resistors, depending on the desired power-up mode. These pins do not have integrated pull-up or pull- down resistors and 3-bit mode must be either 0, 1, 2 or 5 as indicated in Figure 1 of the data sheet. HI-3220 SPI basics for troubleshooting This is a brief tutorial on host SPI communication with the HI-3220. Four simple SPI sequences are generated when the SW2 push-button switch is pressed, as explained below. The logic analyzer plots show the waveforms for each of these. This information may be helpful when troubleshooting the Master SPI interface. The four separate SPI sequences that produce these waveforms are shown below. retVal = ReadRegister(0x02, 0); // read MSR register 0x8002 Write_MAP (0x8000,0); // write 0x8000 address (MCR) to the MAP pointer Write_MAP_Byte (0xC0,0); // write 0xC0 to MCR – MAP points to MCR register retVal2 = Read_MAP_Byte(0); // read byte at existing MAP pointer The values of retVal and retVal2 are displayed on the console when SW2 is pressed. Simple SPI example MSR = 20 MCR = C0 The simplest SPI operation that can be used to test the interface is the Read Register Op Code to read the value of the Master Status Register(MSR) which should contain 0x20 with bit-5 READY set high. When the HI-3220 becomes READY after RESET, the READY output pin is set high and bit-5 should also be high in the MSR if when read by SPI. The Register Read two byte Op Code 0xE0 + 0x20 consists of an Op Code byte followed by another byte for the lower portion of the 16-bit address. The AAA-AAAA field is split between the first Op Code byte and the second Op Code byte. This Op Code automatically adds 0x80 for the upper address byte to the lower address byte provided by the AAA-AAAA field so the address is 0x8002. The Master Status register location is 0x8002 so that is the register that is returned with this Op Code. The SPI sequence is shown below and the user should verify the Master SPI signaling
  • 33. AN-3220 AN-3220 Rev. B Holt Integrated Circuits 33 is similar to this waveform. Notice SO data is clocked out on the negative edge of SPI clock and the Master should clock data on the rising edge. This is SPI mode 0. Read the MSR (0x8002) If the Read Register Op Code is working properly, the user can proceed to the next steps to verify the following three SPI sequences which determines whether SPI writes are working. The MAP (memory address pointer) register is used to write and read back a register (or memory) location. First an address is written to the 16-bit MAP pointer then a byte value is written to this location using an Op Code that uses the MAP pointer value for the write address. The value is then read back, also using the same MAP pointer address. This should return the original byte value that was originally written. See the following there SPI sequences for these examples. Write address 0x8000 to the MAP pointer
  • 34. AN-3220 AN-3220 Rev. B Holt Integrated Circuits 34 Write value 0xC0 to MAP address Read value at MAP address (should be 0xC0) Final Tips: 1. The READY output pin must be high in order to write to any Control Register or other memory space. READY is asserted high after a qualifying negative reset pulse on the /MRST input. 2. When loading Transmitter Descriptor tables, always load an EOS (0x00) byte after the last loaded descriptor to terminate the descriptors unless the table is fully loaded. 3. The RUN pin must be high in order for the Receivers or Transmitters to operate. 4. When using the EEPROM to auto-initialize, it must have been previously programmed. If the HI-322x powers-up in Mode 1 or Mode 3 with an unprogrammed EEPROM, a fault will occur and the red LED goes On. 5. When initializing RX Receiver channels for FIFO message reception remember to also initialize the Received FIFO Enable Look-Up Table so the desired labels are enabled. Logic-1 enables a label and 0 disables the label. The device powers up with all the label entries cleared to 0x00 so by default all labels are disabled. If a label is disabled, no message reception on that channel will occur. The demos typically set all the label table memory to 0xFF.
  • 35. AN-3220 AN-3220 Rev. B Holt Integrated Circuits 35 Getting Started with the Holt API demo software project and installing IAR Systems Embedded Workbench for ARM Compiler 1. Installed IAR Systems Embedded Workbench for ARM (EWARM ) compiler is required BEFORE adding the Holt demo project, so all Atmel board library files and the demo project folder are created in the proper locations. Follow the “Holt HI-3220 Demo Project Installation Guide” found in the Project folder on the Holt CD-ROM. Before proceeding to the next steps IAR must be installed and the Holt project folder must be in the proper folder location, according to that guide. Instructions beyond this point assume you have completed the above installation tasks. The Holt demo project requires IAR EWARM version 7.1 or greater. If using IAR 8.x versions, another technical note provided additional guidance. 2. Launch IAR Embedded Workbench from the Windows Start menu. A blank screen should appear. Open the Holt HI-3220 Demo Project from the IAR File pull-down menu, click on File/Open/Workspace and navigate to the project folder location and select “HI-3220 Demo.eww” and click the Open button. 3. Debug requires an interface between the computer running IAR Embedded Workbench® and the HI-3220 Application Development Kit. Connect the small end of the provided USB cable to the evaluation board USB connector marked DEBUG. Connect the other end of the USB cable to a free computer USB port. The IAR C-SPY Debugger for ARM includes drivers for numerous target system interfaces, including built in “J-link On Board”. The first time the evaluation board USB cable is connected to the computer, the Windows “Found New Hardware” message should appear for the J-Link device. After several seconds, Windows should load the appropriate driver and advise, “Your hardware is ready for use”. If Windows fails to find the J-Link driver, direct it to look in the Drivers directory the IAR Embedded Workbench® installation CD. If difficulties arise when initiating a debug session at step 5, click Project then Options. In the window that opens, under Category = Debugger highlight J-Link/J-Trace. Click the tab labeled Connection, then verify Communications = USB and Interface = SWD. 3. Open IAR Embedded Workbench®. Click File, then Open Workspace, then navigate to the project subdirectory created in step 4. Select the project file with .eww extension, then click Open. (The next time Embedded Workbench® opens, this project will appear in the Recent Workspaces list when File is clicked.)
  • 36. AN-3220 AN-3220 Rev. B Holt Integrated Circuits 36 4. If problems occur with IAR installation or with using the IAR debugger, two Holt technical notes are provided to help resolve these issues included on the Holt CD ROM. 5. The demo project only uses unsigned integer variables. Optionally turn off the nuisance compiler message that occurs when a variable’s most significant bit toggles. The message looks like this: Remark[Pe068]: integer conversion resulted in a change of sign To disable this diagnostic message, click Project then click Options Category = C/C++ Compiler Tab = Diagnostics Suppress these diagnostics: add "Pe068" to list 6. RAM based projects are not supported due to the limited amount of RAM on the MCU. By design the Cortex™-M3 runs slower in RAM than in Flash so there is little need for a RAM based project. Compile the project by clicking the Make button. See following illustration. If the Build messages window in IAR Embedded Workbench® indicates no errors or warnings, you can continue. If errors occurred, correct them and recompile the program. 11. Initiate a debug session by clicking the Restart Debugger button. This downloads the compiled program into the MCU and readies the board for program execution. Click Go to start execution. Click Break (normally displayed during execution as a red upheld hand) to stop execution. Stop Debug Toggle Brkpoint Restart Debugger Make Reset Break Step Into Run to Cursor Go Step Over Compile IMPORTANT EMBEDDED WORKBENCH BUTTONS
  • 37. AN-3220 AN-3220 Rev. B Holt Integrated Circuits 37 The IAR IDE screen with the Holt HI-3220 project loaded. Resized the IDE screens may be necessary.
  • 38. AN-3220 AN-3220 Rev. B Holt Integrated Circuits 38 Project File List with Selected Descriptions HEADER FILES WITHOUT CORRESPONDING C FILES device_3220.h Contains all macros for the HI-3220 including define statements for registers, control register bits, Op Codes and selected table start addresses. 3220_initialization.h Definitions for a few configuration settings including the INTERRUP_MESG_ENA macro used to disable or enable interrupts in the demo. HI-322x Low-Level SPI drivers and other 3220 specific support functions device_3220.h (same as above) Contains all macros for the HI-3220 including define statements for registers, control register bits, Op Codes and selected table start addresses. driver_3220.c/driver_3220.h Host Cortex M3 SPI low-level SPI drivers and messaging functions. 32xxSupport.c/32xxSupport.h Host helper functions for configuring, table initialization and transmitting and receiving ARINC messages. Other main C FILES WITH CORRESPONDING HEADER FILES Most of the function names are self-explanatory. main.c The primary program entry and main loop in main(). Board_3220.c Contains macros for SPI initialization, LEDs and various I/Os. Timer1 tick 1ms initialization supporting delay functions and host timer interrupt handler. Board related to the host MCU.
  • 39. AN-3220 AN-3220 Rev. B Holt Integrated Circuits 39 3220_Interrupts.c Initialization and IRQ handler for message interrupts on the 3220 INT pin. Functions to set or clear interrupt label enable table memory. 3220Demo.c ( these demos are called mostly from the console) All demos are contained here. See the header file for a complete listing. console.c Console functions used by all demos. Show_menu(); displays the main menu chk_key_input(); Key entry detect and demo execution handler. Application Development Kit Notes The HI-3220 was designed for compatibility with microcontrollers or FPGAs having a Serial Peripheral Interface (SPI). Device RAM and register locations are written or read with the help of 8-bit SPI commands. Most read or write operations use a Memory Address Pointer (MAP) to designate the address of the next location accessed. To speed up multi-word transfers, the Memory Address Pointer automatically increments to the next address after each word read or write is performed. The HI-3220 data transfer speed depends on the SPI clock frequency provided by the MCU SPI interface. The ARM Cortex M3 MCU master clock frequency is 96MHz, using an internal PLL. MCU peripherals divide this clock by two for a 48MHz clock source. The SPI block divides this by three for a 16MHz SPI clock or divides by 2 for 24MHz SPI clock. The HI-3220 has a maximum SPI clock frequency of 40MHz. The demo board includes a fully featured high-end USB debugger port. No additional debug tools are required to rebuild the demo project and re-flash the ARM Cortex M3 processor. HI-3220 use with an external MCU or FPGA Using the HI-3220 daughter card with an external MCU or FPGA is made easy because the 50MHz oscillator is contained on this card and the essential interface signals are available on J11 header connector. See the schematic and the header pin out description in a previous section of this document for those details.
  • 40. AN-3220 AN-3220 Rev. B Holt Integrated Circuits 40 Summary The HI-3220 is a powerful ARINC 429 multi-channel Transmitter and Receiver solution. Its high-speed 4- wire SPI interface makes it easy to control. The maximum 40MHz SPI rate and new features in the HI-3220 increases the host communication efficiency. The HI-3220 can auto-initialize from EPPROM and operate without a FPGA or MCU in some applications. The demo program demonstrates nearly all aspects of the device and the low level C drivers make it easy to port to other platforms. A rich set of menu SPI access utilities allow viewing/modifying device memory on the console. Board Files and Schematic Links BOM and Schematic Files: EV-CM3-64 BOM and Schematic Files: EV-3220
  • 41. GENERALDESCRIPTION The HI-3220 from Holt Integrated Circuits is a family of single chip CMOS high density application data management ICs capable of managing, storing and forwarding avionics data messages between sixteen ARINC 429 receive channels and eight ARINC 429 transmit channels. Options for eight receive and four transmit channels are also available in a compact, cost effective 7mm x 7mm QFN package footprint. The ARINC 429 buses may operate independently - the IC can be programmed to automatically re-format, re-label, re-packetize and re-transmit data from ARINC 429 receive buses to ARINC 429 transmit buses. Alternatively, a host CPU can send and receive data on multiple buses. 32KB of on-board memory allows received data to be logically organized and automatically updated as new ARINC 429 labels are received via ARINC 429 label mailboxes. A 64 message deep Receive FIFO is also available for each receive channel. Each transmitter has the option to independently enable a programmable scheduler on the ARINC 429 bus, or to have the CPU directly send data. An optional auto-initialization feature allows configuration informa- tion to be up-loaded from an external EEPROM on reset to facilitate rapid start-up or operation without a host CPU. The HI-3220, HI-3221, HI-3222 and HI-3223 have integrated ARINC 429 line receivers, capable of RTCA/DO-160 level 3 lightning compliance with external 40kΩ resistors. HI-3225 and HI-3226 utilize external line receivers, for example Holt’s octal HI-8458 family. The HI-3222 and HI-3223 are 8-channel receive, 4-channel transmit options available in smaller package footprints, with HI-3223 having the same slope control feature as HI-3220. Transmit outputs interface directly to external HI-8592, HI-8596, or integrated lightning protected HI-8597 ARINC 429 line drivers. All parts use a 40 MHz 4-wire SPI (Serial Peripheral Interface) host connection. HI-3220 and HI-3225 are available in an 80-pin PQFP package, whereas HI-3221 and HI-3226 are available in a 72-pin 10mm x 10mm QFN package. The HI-3222 (8-ch. Rx, 4-ch. Tx) is available in a very compact 48-pin 7mm x 7mm QFN. FEATURES · Fully compliant to ARINC 429 Specification · Sixteen ARINC 429 Receive channels with optional integrated line Receivers · Eight ARINC 429 Transmit channels · 8-channel Rx, 4-channel Tx version available in compact 48-pin 7mm x 7mm QFN · 32 KB on chip user-configurable data storage memory · Programmable receive data filtering · Option for programmable transmission schedulers for periodic ARINC 429 broadcasting or CPU directed transmission · Auto-initialization feature allows power-on configuration or independent operation without CPU · 40 MHZ SPI CPU interface · Transmitter rate and tri-state control outputs · Supports 100kbs / 50kbs / 12.5kbs data rates (DS3220 Rev. L) 04/22 High Density 16Rx / 8Tx or 8Rx / 4Tx ARINC 429 Protocol IC with optional Integrated Line Receivers April 2022 HI-3220 PIN CONFIGURATION APPLICATION CPU ARINC 429 16 x Receive ARINC 429 8 x Transmit HI-3220/3221 Controller Memory 80 - Pin Plastic Quad Flat Pack (PQFP) HI-3220PQx SLP3 1 ARX8P-40 2 ARX8N-40 3 ARX0P-40 4 ARX0N-40 5 ARX9P-40 6 ARX9N-40 7 ARX1P-40 8 ARX1N-40 9 VDD 10 GND 11 ARX2P-40 12 ARX2N-40 13 ARX10P-40 14 ARX10N-40 15 ARX3P-40 16 ARX3N-40 17 ARX11P-40 18 ARX11N-40 19 SLP0 20 60 SLP2 59 ARX15N-40 58 ARX15P-40 57 ARX7N-40 56 ARX7P-40 55 ARX14N-40 54 ARX14P-40 53 ARX6N-40 52 ARX6P-40 51 GND 50 VDD 49 ARX5N-40 48 ARX5P-40 47 ARX13N-40 46 ARX13P-40 45 ARX4N-40 44 ARX4P-40 43 ARX12N-40 42 ARX12P-40 41 SLP1 80 SLP7 79 TX3N 78 TX3P 77 MODE0/ECS 76 EMISO 75 TX7N 74 TX7P 73 MODE1/EMOSI 72 MODE2/ESCLK 71 GND 70 VDD 69 MCLK 68 READY 67 TX6N 66 TX6P 65 SCANSHFT 64 SCANEN 63 TX2N 62 TX2P 61 SLP6 SLP4 21 TX0P 22 TX0N 23 HCS 24 HMOSI 25 TX4P 26 TX4N 27 HSCLK 28 HMISO 29 VDD 30 GND 31 MRST 32 RUN 33 TX5P 34 TX5N 35 INT 36 ACK 37 TX1P 38 TX1N 39 SLP5 40
  • 42. DS3220 Rev. L HOLT INTEGRATED CIRCUITS 2 BLOCK DIAGRAM ARINC 429 RECEIVE DATA MEMORY 0 1K x 8 16 x ARINC 429 Integrated Line Receivers (HI-3220/3221 ONLY) RECEIVER 0 Message 64 “ “ “ Message 2 Message 1 LABEL FILTER FILTER TABLE 0 CHANNEL 0 CHANNEL 1 CHANNEL 2 CHANNEL 3 CHANNEL 4 CHANNEL 5 ............. CHANNEL 15 64 x 32 FIFO SPI HCS HSCLK HMOSI HMISO Host CPU EEPROM SPI ECS ESCLK EMOSI EMISO Auto-Initialization EEPROM 8 x ARINC 429 Transmit Buses TRANSMITTER 0 TRANSMIT TIMER ARINC 429 TRANSMIT SCHEDULER 0 ARINC 429 Descriptor Table 0 CHANNEL 0 CHANNEL 1 CHANNEL 2 CHANNEL 3 Interrupt Handler ACK INT MODE2:0 MRST RUN READY CHANNEL 4 CHANNEL 5 HI-3220 VDD GND CHANNEL 6 CHANNEL 7 PRODUCT OPTIONS PART NUMBER PACKAGE LINE RECEIVERS TRANSMIT CHANNELS HI-3220 80-pin QFP 16 on-chip 8 Transmitters & SLP7:0 outputs HI-3221 72-pin QFN 16 on-chip 8 Transmitters. No SLP7:0 outputs HI-3222 48-pin QFN 8 on-chip 4 Transmitters. No SLP outputs HI-3223 52-pin QFP or 64-pin QFN 8 on-chip 4 Transmitters & SLP3:0 outputs HI-3225 80-pin QFP 16 External 8 Transmitters & SLP7:0 outputs HI-3226 72-pin QFN 16 External 8 Transmitters. No SLP7:0 outputs 32 x 32 Transmit FIFO
  • 43. DS3220 Rev. L HOLT INTEGRATED CIRCUITS 3 PIN DESCRIPTIONS (HI-3220, HI-3221, HI-3222, HI-3223) Signal Function Description Internal Pull-Up/Down ACK INPUT Interrupt Acknowledge. Active low. Pull-Up INT OUTPUT Interrupt. Active low, open-drain. Pull-Up ARX0N-40 ANALOG INPUT ARINC 429 Receive bus negative line input for channel 0. Requires external 40KOhm resistor. ARX0P-40 ANALOG INPUT ARINC 429 Receive bus positive line input for channel 0. Requires external 40KOhm resistor. ARX1N-40 ANALOG INPUT ARINC 429 Receive bus negative line input for channel 1. Requires external 40KOhm resistor. ARX1P-40 ANALOG INPUT ARINC 429 Receive bus positive line input for channel 1. Requires external 40KOhm resistor. ARX2N-40 ANALOG INPUT ARINC 429 Receive bus negative line input for channel 2. Requires external 40KOhm resistor. ARX2P-40 ANALOG INPUT ARINC 429 Receive bus positive line input for channel 2. Requires external 40KOhm resistor. ARX3N-40 ANALOG INPUT ARINC 429 Receive bus negative line input for channel 3. Requires external 40KOhm resistor. ARX3P-40 ANALOG INPUT ARINC 429 Receive bus positive line input for channel 3. Requires external 40KOhm resistor. ARX4N-40 ANALOG INPUT ARINC 429 Receive bus negative line input for channel 4. Requires external 40KOhm resistor. ARX4P-40 ANALOG INPUT ARINC 429 Receive bus positive line input for channel 4. Requires external 40KOhm resistor. ARX5N-40 ANALOG INPUT ARINC 429 Receive bus negative line input for channel 5. Requires external 40KOhm resistor. ARX5P-40 ANALOG INPUT ARINC 429 Receive bus positive line input for channel 5. Requires external 40KOhm resistor. ARX6N-40 ANALOG INPUT ARINC 429 Receive bus negative line input for channel 6. Requires external 40KOhm resistor. ARX6P-40 ANALOG INPUT ARINC 429 Receive bus positive line input for channel 6. Requires external 40KOhm resistor. ARX7N-40 ANALOG INPUT ARINC 429 Receive bus negative line input for channel 7. Requires external 40KOhm resistor. ARX7P-40 ANALOG INPUT ARINC 429 Receive bus positive line input for channel 7. Requires external 40KOhm resistor. ARX8N-40 ANALOG INPUT ARINC 429 Receive bus negative line input for channel 8. Requires external 40KOhm resistor. ARX8P-40 ANALOG INPUT ARINC 429 Receive bus positive line input for channel 8. Requires external 40KOhm resistor. ARX9N-40 ANALOG INPUT ARINC 429 Receive bus negative line input for channel 9. Requires external 40KOhm resistor. ARX9P-40 ANALOG INPUT ARINC 429 Receive bus positive line input for channel 9. Requires external 40KOhm resistor. ARX10N-40 ANALOG INPUT ARINC 429 Receive bus negative line input for channel 10. Requires external 40KOhm resistor. ARX10P-40 ANALOG INPUT ARINC 429 Receive bus positive line input for channel 10. Requires external 40KOhm resistor. ARX11N-40 ANALOG INPUT ARINC 429 Receive bus negative line input for channel 11. Requires external 40KOhm resistor. ARX11P-40 ANALOG INPUT ARINC 429 Receive bus positive line input for channel 11. Requires external 40KOhm resistor. ARX12N-40 ANALOG INPUT ARINC 429 Receive bus negative line input for channel 12. Requires external 40KOhm resistor. ARX12P-40 ANALOG INPUT ARINC 429 Receive bus positive line input for channel 12. Requires external 40KOhm resistor. ARX13N-40 ANALOG INPUT ARINC 429 Receive bus negative line input for channel 13. Requires external 40KOhm resistor. ARX13P-40 ANALOG INPUT ARINC 429 Receive bus positive line input for channel 13. Requires external 40KOhm resistor. ARX14N-40 ANALOG INPUT ARINC 429 Receive bus negative line input for channel 14. Requires external 40KOhm resistor. ARX14P-40 ANALOG INPUT ARINC 429 Receive bus positive line input for channel 14. Requires external 40KOhm resistor. ARX15N-40 ANALOG INPUT ARINC 429 Receive bus negative line input for channel 15. Requires external 40KOhm resistor. ARX15P-40 ANALOG INPUT ARINC 429 Receive bus positive line input for channel 15. Requires external 40KOhm resistor. TX0N OUTPUT ARINC 429 Tx channel 0 negative data output to line driver TX0P OUTPUT ARINC 429 Tx channel 0 positive data output to line driver TX1N OUTPUT ARINC 429 Tx channel 1 negative data output to line driver TX1P OUTPUT ARINC 429 Tx channel 1 positive data output to line driver TX2N OUTPUT ARINC 429 Tx channel 2 negative data output to line driver TX2P OUTPUT ARINC 429 Tx channel 2 positive data output to line driver TX3N OUTPUT ARINC 429 Tx channel 3 negative data output to line driver TX3P OUTPUT ARINC 429 Tx channel 3 positive data output to line driver TX4N OUTPUT ARINC 429 Tx channel 4 negative data output to line driver TX4P OUTPUT ARINC 429 Tx channel 4 positive data output to line driver TX5N OUTPUT ARINC 429 Tx channel 5 negative data output to line driver TX5P OUTPUT ARINC 429 Tx channel 5 positive data output to line driver TX6N OUTPUT ARINC 429 Tx channel 6 positive data output to line driver TX6P OUTPUT ARINC 429 Tx channel 6 positive data output to line driver TX7N OUTPUT ARINC 429 Tx channel 7 positive data output to line driver TX7P OUTPUT ARINC 429 Tx channel 7 positive data output to line driver SLP0 OUTPUT ARINC 429 Tx channel 0 slew rate control (see Tx Control Register) (HI-3220 and HI-3223). SLP1 OUTPUT ARINC 429 Tx channel 1 slew rate control (see Tx Control Register) (HI-3220 and HI-3223). SLP2 OUTPUT ARINC 429 Tx channel 2 slew rate control (see Tx Control Register) (HI-3220 and HI-3223). SLP3 OUTPUT ARINC 429 Tx channel 3 slew rate control (see Tx Control Register) (HI-3220 and HI-3223). SLP4 OUTPUT ARINC 429 Tx channel 4 slew rate control (see Tx Control Register) (HI-3220 and HI-3223). SLP5 OUTPUT ARINC 429 Tx channel 5 slew rate control (see Tx Control Register) (HI-3220 and HI-3223). SLP6 OUTPUT ARINC 429 Tx channel 6 slew rate control (see Tx Control Register) (HI-3220 and HI-3223). SLP7 OUTPUT ARINC 429 Tx channel 7 slew rate control (see Tx Control Register) (HI-3220 and HI-3223). HI-3220
  • 44. PIN DESCRIPTIONS (HI-3220, HI-3221, HI-3222, HI-3223) continued Signal Function Description Internal Pull-Up/Down MODE0/ECS I/O MODE0 configuration input sampled at reset / SPI chip select output for initialization EEPROM See Note below EMISO INPUT SPI serial data input from auto-inialization EEPROM Pull-Down MODE1/EMOSI I/O MODE1 configuration input sampled at reset / SPI serial data output to initialization EEPROM See Note below MODE2/ESCLK I/O MODE2 configuration input sampled at reset / SPI clock for auto-initialization EEPROM See Note below GND POWER Chip 0V supply. All four pins must be connected. VDD POWER 3.3V power supply. All four pins must be powered. HCS INPUT Host chip select. Data is shifted into HMOSI and out of HMISO when HCS is low Pull-Up HMISO OUTPUT Host CPU SPI interface serial data output Pull-Down HMOSI INPUT Host CPU SPI interface serial data input Pull-Down HSCLK INPUT Host SPI Clock. Data is shifted into or out of the SPI interface using HSCLK Pull-Down MCLK INPUT Master and reference clock for ARINC 429 bus bit timing. 50MHz +/- 0.1% MRST INPUT Master Reset to HI-322X Active Low. 225 ns minimum pulse width. Pull-Down READY OUTPUT READY goes high when post-RESET initialization is complete RUN INPUT Master enable signal for ARINC 429 transmit schedulers Pull-Down SCANEN INPUT Factory test only. Connect to GND. Pull-Down SCANSHFT INPUT Factory test only. Connect to GND. Pull-Down DS3220 Rev. L HOLT INTEGRATED CIRCUITS 4 HI-3220 PIN CONFIGURATIONS 80 - Pin Plastic Quad Flat Pack (PQFP) HI-3220PQx SLP3 1 ARX8P-40 2 ARX8N-40 3 ARX0P-40 4 ARX0N-40 5 ARX9P-40 6 ARX9N-40 7 ARX1P-40 8 ARX1N-40 9 VDD 10 GND 11 ARX2P-40 12 ARX2N-40 13 ARX10P-40 14 ARX10N-40 15 ARX3P-40 16 ARX3N-40 17 ARX11P-40 18 ARX11N-40 19 SLP0 20 60 SLP2 59 ARX15N-40 58 ARX15P-40 57 ARX7N-40 56 ARX7P-40 55 ARX14N-40 54 ARX14P-40 53 ARX6N-40 52 ARX6P-40 51 GND 50 VDD 49 ARX5N-40 48 ARX5P-40 47 ARX13N-40 46 ARX13P-40 45 ARX4N-40 44 ARX4P-40 43 ARX12N-40 42 ARX12P-40 41 SLP1 80 SLP7 79 TX3N 78 TX3P 77 MODE0/ECS 76 EMISO 75 TX7N 74 TX7P 73 MODE1/EMOSI 72 MODE2/ESCLK 71 GND 70 VDD 69 MCLK 68 READY 67 TX6N 66 TX6P 65 SCANSHFT 64 SCANEN 63 TX2N 62 TX2P 61 SLP6 SLP4 21 TX0P 22 TX0N 23 HCS 24 HMOSI 25 TX4P 26 TX4N 27 HSCLK 28 HMISO 29 VDD 30 GND 31 MRST 32 RUN 33 TX5P 34 TX5N 35 INT 36 ACK 37 TX1P 38 TX1N 39 SLP5 40 NOTE 1: When not using an external EEPROM, the Mode0, Mode1 and Mode2 pins must be connected to either VDD or GND through a suitable pull-up or pull-down resistor ( , depending on the desired power up mode. These pins do not have internal pull-up or pull-down resistors and need to be connected to a known state to prevent possible initialization of an un-intended mode. NOTE 2: Unused analog receiver inputs (e. g. ARX8P-40, 1K - 50K) ARX8N-40, etc.) should be left floating.
  • 45. DS3220 Rev. L HOLT INTEGRATED CIRCUITS 5 HI-3220 48 47 MODE0/ECS 46 EMISO 45 MODE1/EMOSI 44 MODE2/ESCLK 43 GND 42 VDD 41 MCLK 40 READY 39 SCANSHFT 38 SCANEN 37 TX2N TX3P 1 ARX0P-40 2 ARX0N-40 3 ARX1P-40 4 ARX1N-40 5 VDD 6 GND 7 ARX2P-40 8 ARX2N-40 9 ARX3P-40 10 ARX3N-40 11 TX0P 12 TX3N 36 35 ARX7N-40 34 ARX7P-40 33 ARX6N-40 32 ARX6P-40 31 GND 30 VDD 29 ARX5N-40 28 ARX5P-40 27 ARX4N-40 26 ARX4P-40 25 TX1N TX2P TX0N 13 HCS 14 HMOSI 15 HSCLK 16 HMISO 17 VDD 18 GND 19 MRST 20 RUN 21 INT 22 ACK 23 TX1P 24 HI-3222PCx 48 - Pin Plastic QFN (Top View) PIN CONFIGURATIONS (continued) 72 - Pin Plastic QFN (Top View) HI-3221PCx 54 ARX15N-40 53 ARX15P-40 52 ARX7N-40 51 ARX7P-40 50 ARX14N-40 49 ARX14P-40 48 ARX6N-40 47 ARX6P-40 46 GND 45 VDD 44 ARX5N-40 43 ARX5P-40 42 ARX13N-40 41 ARX13P-40 40 ARX4N-40 39 ARX4P-40 38 ARX12N-40 37 ARX12P-40 ARX8P-40 1 ARX8N-40 2 ARX0P-40 3 ARX0N-40 4 ARX9P-40 5 ARX9N-40 6 ARX1P-40 7 ARX1N-40 8 VDD 9 GND 10 ARX2P-40 11 ARX2N-40 12 ARX10P-40 13 ARX10N-40 14 ARX3P-40 15 ARX3N-40 16 ARX11P-40 17 ARX11N-40 18 TX0P 19 TX0N 20 HCS 21 HMOSI 22 TX4P 23 TX4N 24 HSCLK 25 HMISO 26 VDD 27 GND 28 MRST 29 RUN 30 TX5P 31 TX5N 32 INT 33 ACK 34 TX1P 35 TX1N 36 72 TX3N 71 TX3P 70 MODE0/ECS 69 EMISO 68 TX7N 67 TX7P 66 MODE1/EMOSI 65 MODE2/ESCLK 64 GND 63 VDD 62 MCLK 61 READY 60 TX6N 59 TX6P 58 SCANSHFT 57 SCANEN 56 TX2N 55 TX2P HI-3223PCx 64 TX3N 63 TX3P 62 MODE0/ECS 61 EMISO 60 MODE1/EMOSI 59 MODE2/ESCLK 58 GND 57 VDD 56 MCLK 55 READY 54 SCANSHFT 53 SCANEN 52 TX2N 51 TX2P 50 - 49 - 48 SLP2 47 - 46 ARX7N-40 45 ARX7P-40 44 ARX6N-40 43 ARX6P-40 42 GND 41 VDD 40 ARX5N-40 39 ARX5P-40 38 - 37 ARX4N-40 36 ARX4P-40 35 - 34 - 33 SLP1 64 - Pin Plastic QFN (Top View) - TX0P 18 TX0N 19 HCS 20 HMOSI 21 HSCLK 22 HMISO 23 VDD 24 GND 25 MRST 26 RUN 27 INT 28 ACK 29 TX1P 30 TX1N 31 - 32 17 SLP3 1 - 2 ARX0P-40 3 ARX0N-40 4 - 5 ARX1P-40 6 ARX1N-40 7 - 8 VDD 9 GND 10 ARX2P-40 11 ARX2N-40 12 - 13 ARX3P-40 14 ARX3N-40 15 SLP0 16 HI-3223PQx 52 51 MODE0/ECS 50 EMISO 49 MODE1/EMOSI 48 MODE2/ESCLK 47 GND 46 VDD 45 MCLK 44 READY 43 SCANSHFT 42 SCANEN 41 TX2N 40 TX2P TX3P 39 SLP2 38 ARX7N-40 37 ARX7P-40 36 ARX6N-40 35 ARX6P-40 34 GND 33 VDD 32 ARX5N-40 31 ARX5P-40 30 ARX4N-40 29 ARX4P-40 28 SLP1 27 TX1N TX0P 14 TX0N 15 HCS 16 HMOSI 17 HSCLK 18 HMISO 19 VDD 20 GND 21 MRST 22 RUN 23 INT 24 ACK 25 TX1P 26 TX3N 1 SLP3 2 ARX0P-40 3 ARX0N-40 4 ARX1P-40 5 ARX1N-40 6 VDD 7 GND 8 ARX2P-40 9 ARX2N-40 10 ARX3P-40 11 ARX3N-40 12 SLP0 13 52 - Pin Plastic Quad Flat Pack (PQFP) “-” denotes “Not Connected internally”
  • 46. DS3220 Rev. L HOLT INTEGRATED CIRCUITS 6 PIN DESCRIPTIONS (HI-3225, HI-3226) Signal Function Description Internal Pull-Up/Down ACK INPUT Interrupt Acknowledge. Active low. Pull-Up INT OUTPUT Interrupt. Active low, open-drain. Pull-Up RX0N INPUT ARINC 429 Digital input from line receiver negative signal for channel 0. Pull-down RX0P INPUT ARINC 429 Digital input from line receiver positive signal for channel 0. Pull-down RX1N INPUT ARINC 429 Digital input from line receiver negative signal for channel 1. Pull-down RX1P INPUT ARINC 429 Digital input from line receiver positive signal for channel 1. Pull-down RX2N INPUT ARINC 429 Digital input from line receiver negative signal for channel 2. Pull-down RX2P INPUT ARINC 429 Digital input from line receiver positive signal for channel 2. Pull-down RX3N INPUT ARINC 429 Digital input from line receiver negative signal for channel 3. Pull-down RX3P INPUT ARINC 429 Digital input from line receiver positive signal for channel 3. Pull-down RX4N INPUT ARINC 429 Digital input from line receiver negative signal for channel 4. Pull-down RX4P INPUT ARINC 429 Digital input from line receiver positive signal for channel 4. Pull-down RX5N INPUT ARINC 429 Digital input from line receiver negative signal for channel 5. Pull-down RX5P INPUT ARINC 429 Digital input from line receiver positive signal for channel 5. Pull-down RX6N INPUT ARINC 429 Digital input from line receiver negative signal for channel 6. Pull-down RX6P INPUT ARINC 429 Digital input from line receiver positive signal for channel 6. Pull-down RX7N INPUT ARINC 429 Digital input from line receiver negative signal for channel 7. Pull-down RX7P INPUT ARINC 429 Digital input from line receiver positive signal for channel 7. Pull-down RX8N INPUT ARINC 429 Digital input from line receiver negative signal for channel 8. Pull-down RX8P INPUT ARINC 429 Digital input from line receiver positive signal for channel 8. Pull-down RX9N INPUT ARINC 429 Digital input from line receiver negative signal for channel 9. Pull-down RX9P INPUT ARINC 429 Digital input from line receiver positive signal for channel 9. Pull-down RX10N INPUT ARINC 429 Digital input from line receiver negative signal for channel 10. Pull-down RX10P INPUT ARINC 429 Digital input from line receiver positive signal for channel 10. Pull-down RX11N INPUT ARINC 429 Digital input from line receiver negative signal for channel 11. Pull-down RX11P INPUT ARINC 429 Digital input from line receiver positive signal for channel 11. Pull-down RX12N INPUT ARINC 429 Digital input from line receiver negative signal for channel 12. Pull-down RX12P INPUT ARINC 429 Digital input from line receiver positive signal for channel 12. Pull-down RX13N INPUT ARINC 429 Digital input from line receiver negative signal for channel 13. Pull-down RX13P INPUT ARINC 429 Digital input from line receiver positive signal for channel 13. Pull-down RX14N INPUT ARINC 429 Digital input from line receiver negative signal for channel 14. Pull-down RX14P INPUT ARINC 429 Digital input from line receiver positive signal for channel 14. Pull-down RX15N INPUT ARINC 429 Digital input from line receiver negative signal for channel 15. Pull-down RX15P INPUT ARINC 429 Digital input from line receiver positive signal for channel 15. Pull-down TX0N OUTPUT ARINC 429 Tx channel 0 negative data output to line driver TX0P OUTPUT ARINC 429 Tx channel 0 positive data output to line driver TX1N OUTPUT ARINC 429 Tx channel 1 negative data output to line driver TX1P OUTPUT ARINC 429 Tx channel 1 positive data output to line driver TX2N OUTPUT ARINC 429 Tx channel 2 negative data output to line driver TX2P OUTPUT ARINC 429 Tx channel 2 positive data output to line driver TX3N OUTPUT ARINC 429 Tx channel 3 negative data output to line driver TX3P OUTPUT ARINC 429 Tx channel 3 positive data output to line driver TX4N OUTPUT ARINC 429 Tx channel 4 negative data output to line driver TX4P OUTPUT ARINC 429 Tx channel 4 positive data output to line driver TX5N OUTPUT ARINC 429 Tx channel 5 negative data output to line driver TX5P OUTPUT ARINC 429 Tx channel 5 positive data output to line driver TX6N OUTPUT ARINC 429 Tx channel 6 positive data output to line driver TX6P OUTPUT ARINC 429 Tx channel 6 positive data output to line driver TX7N OUTPUT ARINC 429 Tx channel 7 positive data output to line driver TX7P OUTPUT ARINC 429 Tx channel 7 positive data output to line driver SLP0 OUTPUT ARINC 429 Tx channel 0 slew rate control (see Tx Control Register) (HI-3225). SLP1 OUTPUT ARINC 429 Tx channel 1 slew rate control (see Tx Control Register) (HI-3225). SLP2 OUTPUT ARINC 429 Tx channel 2 slew rate control (see Tx Control Register) (HI-3225). SLP3 OUTPUT ARINC 429 Tx channel 3 slew rate control (see Tx Control Register) (HI-3225). SLP4 OUTPUT ARINC 429 Tx channel 4 slew rate control (see Tx Control Register) (HI-3225). SLP5 OUTPUT ARINC 429 Tx channel 5 slew rate control (see Tx Control Register) (HI-3225). SLP6 OUTPUT ARINC 429 Tx channel 6 slew rate control (see Tx Control Register) (HI-3225). SLP7 OUTPUT ARINC 429 Tx channel 7 slew rate control (see Tx Control Register) (HI-3225). HI-3220
  • 47. DS3220 Rev. L HOLT INTEGRATED CIRCUITS 7 PIN DESCRIPTIONS (HI-3225, HI-3226) continued Signal Function Description Internal Pull-Up/Down MODE0/ECS I/O MODE0 configuration input sampled at reset / SPI chip select output for EEPROM initialization See Note below EMISO INPUT SPI serial data input from auto-inialization EEPROM Pull-Down MODE1/EMOSI I/O MODE1 configuration input sampled at reset / SPI serial data output for EEPROM initialization See Note below MODE2/ESCLK I/O MODE2 configuration input sampled at reset / SPI clock for EEPROM auto-initialization See Note below GND POWER Chip 0V supply. All four pins must be connected. VDD POWER 3.3V power supply. All four pins must be powered. HCS INPUT Host chip select. Data is shifted into HMOSI and out of HMISO when HCS is low Pull-Up HMISO OUTPUT Host CPU SPI interface serial data output Pull-Down HMOSI INPUT Host CPU SPI interface serial data input Pull-Down HSCLK INPUT Host SPI Clock. Data is shifted into or out of the SPI interface using HSCLK Pull-Down MCLK INPUT Master and reference clock for ARINC 429 bus bit timing. 50 MHZ +/- 0.1% MRST INPUT Master Reset to HI-322X Active Low. 225 ns minimum pulse width. Pull-Down READY OUTPUT READY goes high when post-RESET initialization is complete RUN INPUT Master enable signal for ARINC 429 transmit schedulers Pull-Down SCANEN INPUT Factory test only. Connect to GND. Pull-Down SCANSHFT INPUT Factory test only. Connect to GND. Pull-Down PIN CONFIGURATIONS 80 - Pin Plastic Quad Flat Pack (PQFP) HI-3225PQx SLP3 1 RX8P 2 RX8N 3 RX0P 4 RX0N 5 RX9P 6 RX9N 7 RX1P 8 RX1N 9 VDD 10 GND 11 RX2P 12 RX2N 13 RX10P 14 RX10N 15 RX3P 16 RX3N 17 RX11P 18 RX11N 19 SLP0 20 60 SLP2 59 RX15N 58 RX15P 57 RX7N 56 RX7P 55 RX14N 54 RX14P 53 RX6N 52 RX6P 51 GND 50 VDD 49 RX5N 48 RX5P 47 RX13N 46 RX13P 45 RX4N 44 RX4P 43 RX12N 42 RX12P 41 SLP1 80 SLP7 79 TX3N 78 TX3P 77 MODE0/ECS 76 EMISO 75 TX7N 74 TX7P 73 MODE1/EMOSI 72 MODE2/ESCLK 71 GND 70 VDD 69 MCLK 68 READY 67 TX6N 66 TX6P 65 SCANSHFT 64 SCANEN 63 TX2N 62 TX2P 61 SLP6 SLP4 21 TX0P 22 TX0N 23 HCS 24 HMOSI 25 TX4P 26 TX4N 27 HSCLK 28 HMISO 29 VDD 30 GND 31 MRST 32 RUN 33 TX5P 34 TX5N 35 INT 36 ACK 37 TX1P 38 TX1N 39 SLP5 40 HI-3220 72 - Pin Plastic QFN (Top View) HI-3226PCx 54 RX15N 53 RX15P 52 RX7N 51 RX7P 50 RX14N 49 RX14P 48 RX6N 47 RX6P 46 GND 45 VDD 44 RX5N 43 RX5P 42 RX13N 41 RX13P 40 RX4N 39 RX4P 38 RX12N 37 RX12P RX8P 1 RX8N 2 RX0P 3 RX0N 4 RX9P 5 RX9N 6 RX1P 7 RX1N 8 VDD 9 GND 10 RX2P 11 RX2N 12 RX10P 13 RX10N 14 RX3P 15 RX3N 16 RX11P 17 RX11N 18 TX0P 19 TX0N 20 HCS 21 HMOSI 22 TX4P 23 TX4N 24 HSCLK 25 HMISO 26 VDD 27 GND 28 MRST 29 RUN 30 TX5P 31 TX5N 32 INT 33 ACK 34 TX1P 35 TX1N 36 72 TX3N 71 TX3P 70 MODE0/ECS 69 EMISO 68 TX7N 67 TX7P 66 MODE1/EMOSI 65 MODE2/ESCLK 64 GND 63 VDD 62 MCLK 61 READY 60 TX6N 59 TX6P 58 SCANSHFT 57 SCANEN 56 TX2N 55 TX2P NOTE: When not using an external EEPROM, the Mode0, Mode1 and Mode2 pins must be connected to either VDD or GND through a suitable pull-up or pull-down resistor ( , depending on the desired power up mode. These pins do not have internal pull-up or pull-down resistors and need to be connected to a known state to prevent possible initialization of an un-intended mode. 1K - 50K) NOTE 2: Unused digital receiver inputs (e. g. RX15P, RX15N, etc.) should be left floating.
  • 48. DS3220 Rev. L HOLT INTEGRATED CIRCUITS 8 APPLICATION OVERVIEW The HI-3220 is a flexible device for managing ARINC 429 communications and data storage in many avionics applications. The device architecture centers around a 32K x 8 static RAM used for data storage, data filtering tables and table-driven transmission schedulers. Once configured, the device can operate autonomously without a host CPU, negating the need for software development or DO-178 certification. Configuration data may be uploaded into the device from an external EEPROM, following system reset. The device supports up to sixteen ARINC 429 receive channels. Analog line receivers are on-chip (HI-3220, HI- 3221 and HI-3222), or off-chip (HI-3225 and HI-3226). Received data is stored in on-chip RAM organized by channel number and label. The data table continually updates as new labels arrive. Programmable interrupts and filters alert the host subsystem to labels of interest. Each ARINC 429 receive channel also includes a 64 message deep FIFO allowing selected label data to be queued for subsequent host access. The HI-3220 supports up to eight independent ARINC 429 transmit channels. Transmission may be controlled entirely by an external CPU, or autonomously by programming one or more of the eight on-chip ARINC 429 transmit schedulers. These allow periodic transmission to occur without CPU. Source data for transmission may be selected from RAM based tables of constants and / or from the received channel data. Powerful options exist for constructing ARINC 429 labels as well as controlling their timing and conditional transmission. Even when running under the control of schedulers, the host CPU may insert new labels for transmission at will. The following examples show five possible configurations of how the HI-3220 may be used: Example 1. ARINC 429 Data reception using on-chip RAM 16K x 8 RAM (of 32K available) 16 x ARINC 429 Receive Buses SPI Channel 0, Label FF “ “ “ Channel 0, Label 01 Channel 0, Label 00 Channel 1, Label FF “ “ “ Channel 1, Label 01 Channel 1, Label 00 Channel 2, Label FF “ “ “ Channel 2, Label 01 Channel 2, Label 00 Channels 12-3, Label FF “ “ “ Channels 12-3, Label 01 Channels 12-3, Label 00 Channel 13, Label FF “ “ “ Channel 13, Label 01 Channel 13, Label 00 Channel 14, Label FF “ “ “ Channel 14, Label 01 Channel 14, Label 00 Channel 15, Label FF “ “ “ Channel 15, Label 01 Channel 15, Label 00 RECEIVE INTERRUPT TABLE INT ACK HCSB HSCLK HMOSI HMISO RECEIVER 15 RECEIVER 14 RECEIVER 13 RECEIVER 2 RECEIVER 1 RECEIVER 0 Host CPU HI-3220 RECEIVERS 12-3 HI-3220
  • 49. DS3220 Rev. L HOLT INTEGRATED CIRCUITS 9 Example 3. ARINC 429 Data transmission directly from CPU TRANSMITTER 0 SPI HCS HSCLK HMOSI HMISO Host CPU 8 x ARINC 429 Transmit Buses HI-3220 16 x ARINC 429 Receive Buses RECEIVER 0 FIFO STATUS HI-3220 Message 64 “ “ “ Message 2 Message 1 LABEL FILTER FILTER TABLE 0 SPI ARINC 429 RECEIVE FIFO INTERRUPT CONTROL INT ACK HCSB HSCLK HMOSI HMISO Host CPU FIFO THRESHOLD CHANNEL 0 CHANNEL 1 CHANNEL 2 CHANNEL 3 ............... ............... CHANNEL 14 CHANNEL 15 64 x 32 FIFO Example 2. ARINC 429 Data reception using on-chip filters and FIFOs Example 4. ARINC 429 Data transmission using on-chip schedulers TRANSMIT SCHEDULER 0 RAM Descriptor Table 7 8 x ARINC 429 Transmit Buses TRANSMITTER 0 Descriptor Tables 2-6 Descriptor Table 1 Descriptor Table 0 TRANSMIT TIMER CHANNEL 0 CHANNEL 1 .............. CHANNEL 7 EEPROM SPI ECS ESCLK EMOSI EMISO Auto-Initialization EEPROM HI-3220 SPI HCS HSCLK HMOSI HMISO Host CPU TRANSMITTER 1 TRANSMITTER 2 TRANSMITTER 3 TRANSMITTER 4 TRANSMITTER 5 TRANSMITTER 6 TRANSMITTER 7 FIFO 0 FIFO 1 FIFO 2 FIFO 3 FIFO 4 FIFO 5 FIFO 6 FIFO 7 32 x 32 FIFOs HI-3220
  • 50. DS3220 Rev. L HOLT INTEGRATED CIRCUITS 10 Example 5. Autonomous ARINC 429 Data Concentrator / Repeater 8 x ARINC 429 Transmit Buses TRANSMITTER 7 HI-3220 16 x ARINC 429 Receive Buses Channel 15, Label FF “ Channel 15, Label 01 Channel 15, Label 00 RECEIVER 15 RECEIVER 14 RECEIVER 13 RECEIVER 12 RECEIVER 11 RECEIVER 10 RECEIVER 9 RECEIVER 8 Channel 14, Label FF “ Channel 14, Label 01 Channel 14, Label 00 Channel 13, Label FF “ Channel 13, Label 01 Channel 13, Label 00 Channel 12, Label FF “ Channel 12, Label 01 Channel 12, Label 00 Channel 11, Label FF “ Channel 11, Label 01 Channel 11, Label 00 Channel 10, Label FF “ Channel 10, Label 01 Channel 10, Label 00 Channel 9, Label FF “ Channel 9, Label 01 Channel 9, Label 00 Channel 8, Label FF “ Channel 8, Label 01 Channel 8, Label 00 Channel 7, Label FF “ Channel 7, Label 01 Channel 7, Label 00 Channel 6, Label FF “ Channel 6, Label 01 Channel 6, Label 00 Channel 5, Label FF “ Channel 5, Label 01 Channel 5, Label 00 Channel 4, Label FF “ Channel 4, Label 01 Channel 4, Label 00 Channel 3, Label FF “ Channel 3, Label 01 Channel 3, Label 00 Channel 2, Label FF “ Channel 2, Label 01 Channel 2, Label 00 Channel 1, Label FF “ Channel 1, Label 01 Channel 1, Label 00 Channel 0, Label FF “ Channel 0, Label 01 Channel 0, Label 00 RECEIVER 7 RECEIVER 6 RECEIVER 5 RECEIVER 4 RECEIVER 3 RECEIVER 2 RECEIVER 1 RECEIVER 0 TRANSMIT SCHEDULER 6 TRANSMITTER 6 Descriptor Table 6 TRANSMIT TIMER TRANSMIT SCHEDULER 5 TRANSMITTER 5 Descriptor Table 5 TRANSMIT TIMER TRANSMIT SCHEDULER 4 TRANSMITTER 4 Descriptor Table 4 TRANSMIT TIMER TRANSMIT SCHEDULER 3 TRANSMITTER 3 Descriptor Table 3 TRANSMIT TIMER TRANSMIT SCHEDULER 2 TRANSMITTER 2 Descriptor Table 2 TRANSMIT TIMER TRANSMIT SCHEDULER 1 TRANSMITTER 1 Descriptor Table 1 TRANSMIT TIMER TRANSMIT SCHEDULER 0 TRANSMITTER 0 Descriptor Table 0 TRANSMIT TIMER EEPROM SPI ECS ESCLK EMOSI EMISO Auto-Initialization EEPROM TRANSMIT SCHEDULER 6 Descriptor Table 7 TRANSMIT TIMER HI-3220
  • 51. HI-3220 MEMORY MAP ARINC 429 Receive Data 0x0000 0x4000 0x47FF ARINC 429 Receive FIFO Tx3 Transmit Schedule Table 0x4800 0x6BFF Configuration Registers 0x8000 0x8XXX ARINC 429 RX FIFO Enable Map ARINC 429 RX Interrupt Map Shaded Area User - Programmed Non-shaded Area Data Storage DS3220 Rev. L HOLT INTEGRATED CIRCUITS 11 0x6C00 Tx2 Transmit Schedule Table Tx1 Transmit Schedule Table Tx0 Transmit Schedule Table Tx4 Transmit Schedule Table Tx5 Transmit Schedule Table Tx6 Transmit Schedule Table 0x4FFF 0x5000 0x53FF 0x5400 0x57FF 0x5800 0x5BFF 0x5C00 0x5FFF 0x6000 0x63FF 0x6400 0x67FF 0x6800 0x69FF 0x6A00 0x3FFF 0x7000 0x6FFF Tx7 Transmit Schedule Table ARINC 429 Transmit FIFO 0x7FFF HI-3220
  • 52. HI-3220 REGISTER MAP ADDRESS R/W REGISTER MNEMONIC DESCRIPTION 0x8000 R/W MASTER CONTROL REGISTER MCR HI-3220 global configuration (write address) 0x8001 R MASTER CONTROL REGISTER MCR HI-3220 global configuration (read address) 0x8002 R MASTER STATUS REGISTER MSR Indicates HI-3220 current status 0x8003 R Not used 0x8004 R* PENDING INTERRUPT REGISTER PIR Indicates Interrupt type 0x8005 R Not used 0x8006 R* RECEIVE PENDING INTERRUPT LOW RPIRL Defines channel(7-0) with pending Interrupt 0x8007 R Not used 0x8008 R* RECEIVE PENDING INTERRUPT HIGH RPIRH Defines channel(15-8) with pending Interrupt 0x8009 R Not used 0x800A R* PENDING INTERRUPT REGISTER PIR Indicates Interrupt type 0x800B R* RECEIVE PENDING INTERRUPT LOW RPIRL Defines channel(7-0) with pending Interrupt 0x800C R* RECEIVE PENDING INTERRUPT HIGH RPIRH Defines channel(15-8) with pending Interrupt 0x800D R RECEIVE FIFO THRESHOLD FLAG (LOW) FTFL Shows which Rx FIFOs hold > (thresh) words 0x800E R RECEIVE FIFO THRESHOLD FLAG (HIGH) FTFH Shows which Rx FIFOs hold > (thresh) words 0x800F R TRANSMITTER FIFO THRESHOLD FLAGS TFR Shows which Tx FIFOs hold < (thresh) words 0x8010 R RECEIVE INTERRUPT ADDRESS 0 IAR0 ARINC 429 Interrupt Vector channel 0 0x8011 R RECEIVE INTERRUPT ADDRESS 1 IAR1 ARINC 429 Interrupt Vector channel 1 0x8012 R RECEIVE INTERRUPT ADDRESS 2 IAR2 ARINC 429 Interrupt Vector channel 2 0x8013 R RECEIVE INTERRUPT ADDRESS 3 IAR3 ARINC 429 Interrupt Vector channel 3 0x8014 R RECEIVE INTERRUPT ADDRESS 4 IAR4 ARINC 429 Interrupt Vector channel 4 0x8015 R RECEIVE INTERRUPT ADDRESS 5 IAR5 ARINC 429 Interrupt Vector channel 5 0x8016 R RECEIVE INTERRUPT ADDRESS 6 IAR6 ARINC 429 Interrupt Vector channel 6 0x8017 R RECEIVE INTERRUPT ADDRESS 7 IAR7 ARINC 429 Interrupt Vector channel 7 0x8018 R RECEIVE INTERRUPT ADDRESS 8 IAR8 ARINC 429 Interrupt Vector channel 8 0x8019 R RECEIVE INTERRUPT ADDRESS 9 IAR9 ARINC 429 Interrupt Vector channel 9 0x801A R RECEIVE INTERRUPT ADDRESS 10 IAR10 ARINC 429 Interrupt Vector channel 10 0x801B R RECEIVE INTERRUPT ADDRESS 11 IAR11 ARINC 429 Interrupt Vector channel 11 0x801C R RECEIVE INTERRUPT ADDRESS 12 IAR12 ARINC 429 Interrupt Vector channel 12 0x801D R RECEIVE INTERRUPT ADDRESS 13 IAR13 ARINC 429 Interrupt Vector channel 13 0x801E R RECEIVE INTERRUPT ADDRESS 14 IAR14 ARINC 429 Interrupt Vector channel 14 0x801F R RECEIVE INTERRUPT ADDRESS 15 IAR15 ARINC 429 Interrupt Vector channel 15 0x8020 R/W RECEIVE CONTROL REGISTER 0 RXC0 Configures ARINC 429 receive channel 0 0x8021 R/W RECEIVE CONTROL REGISTER 1 RXC1 Configures ARINC 429 receive channel 1 0x8022 R/W RECEIVE CONTROL REGISTER 2 RXC2 Configures ARINC 429 receive channel 2 0x8023 R/W RECEIVE CONTROL REGISTER 3 RXC3 Configures ARINC 429 receive channel 3 0x8024 R/W RECEIVE CONTROL REGISTER 4 RXC4 Configures ARINC 429 receive channel 4 0x8025 R/W RECEIVE CONTROL REGISTER 5 RXC5 Configures ARINC 429 receive channel 5 0x8026 R/W RECEIVE CONTROL REGISTER 6 RXC6 Configures ARINC 429 receive channel 6 0x8027 R/W RECEIVE CONTROL REGISTER 7 RXC7 Configures ARINC 429 receive channel 7 0x8028 R/W RECEIVE CONTROL REGISTER 8 RXC8 Configures ARINC 429 receive channel 8 0x8029 R/W RECEIVE CONTROL REGISTER 9 RXC9 Configures ARINC 429 receive channel 9 0x802A R/W RECEIVE CONTROL REGISTER 10 RXC10 Configures ARINC 429 receive channel 10 0x802B R/W RECEIVE CONTROL REGISTER 11 RXC11 Configures ARINC 429 receive channel 11 0x802C R/W RECEIVE CONTROL REGISTER 12 RXC12 Configures ARINC 429 receive channel 12 0x802D R/W RECEIVE CONTROL REGISTER 13 RXC13 Configures ARINC 429 receive channel 13 0x802E R/W RECEIVE CONTROL REGISTER 14 RXC14 Configures ARINC 429 receive channel 14 0x802F R/W RECEIVE CONTROL REGISTER 15 RXC15 Configures ARINC 429 receive channel 15 Fast Access Registers * Register is cleared when read (auto clear) Memory mapped register access only DS3220 Rev. L HOLT INTEGRATED CIRCUITS 12 HI-3220