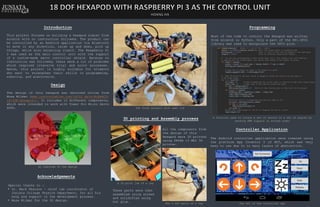
Introduction
This project focuses on building a hexapod almost from
scratch with no instruction followed. The product can
be controlled by an Android application via Bluetooth
to move in any direction, raise up and down, pick up
things, while also balancing itself. The Raspberry Pi
3 was used as the main control unit with the support
of a custom-made servo controller shield. Because no
instruction was followed, there were a lot of problems
which required intensive trial and error processes.
Hence, this project is highly suitable for students
who want to strengthen their skills in programming,
robotics, and electronics.
Design
The design of this hexapod was obtained online from
Musa Wilmar (www.instructables.com/id/Si mple-NodeMCU-
18-DOF-Hexapod/). It includes 12 different components,
which were intended to work with Tower Pro Micro Servo
SG90.
A 3D print job of a leg
Programming
Most of the code to control the Hexapod was written
from scratch in Python. Only a part of the RPi.GPIO
library was used to manipulate the GPIO pins.
The final product with open lid
The 4 DOF parts of a leg
An overview of the design
3D printing and Assembly process
Acknowledgements
Special thanks to :
• Dr. Mark Pearson – chief lab coordinator of
Juniata College Physics Department, for all his
help and support in the development process.
• Musa Wilmar for the 3D design.
All the components from
the design of this
Hexapod were 3D printed
using PRUSA i3 MK2 3D
printer.
Controller Application
The Android controller application were created using
the platform App Inventor 2 of MIT, which was very
easy to use due to to many layers of abstraction.
A function used to rotate a set of servos to a set of angles by
sending PWM signals in sorted order
These parts were then
assembled using screws
and solidified using
hot glue. The GUI of the controller app

Hexapod project

  • 1.
    Introduction This project focuseson building a hexapod almost from scratch with no instruction followed. The product can be controlled by an Android application via Bluetooth to move in any direction, raise up and down, pick up things, while also balancing itself. The Raspberry Pi 3 was used as the main control unit with the support of a custom-made servo controller shield. Because no instruction was followed, there were a lot of problems which required intensive trial and error processes. Hence, this project is highly suitable for students who want to strengthen their skills in programming, robotics, and electronics. Design The design of this hexapod was obtained online from Musa Wilmar (www.instructables.com/id/Si mple-NodeMCU- 18-DOF-Hexapod/). It includes 12 different components, which were intended to work with Tower Pro Micro Servo SG90. A 3D print job of a leg Programming Most of the code to control the Hexapod was written from scratch in Python. Only a part of the RPi.GPIO library was used to manipulate the GPIO pins. The final product with open lid The 4 DOF parts of a leg An overview of the design 3D printing and Assembly process Acknowledgements Special thanks to : • Dr. Mark Pearson – chief lab coordinator of Juniata College Physics Department, for all his help and support in the development process. • Musa Wilmar for the 3D design. All the components from the design of this Hexapod were 3D printed using PRUSA i3 MK2 3D printer. Controller Application The Android controller application were created using the platform App Inventor 2 of MIT, which was very easy to use due to to many layers of abstraction. A function used to rotate a set of servos to a set of angles by sending PWM signals in sorted order These parts were then assembled using screws and solidified using hot glue. The GUI of the controller app