1. Lab 9 - Human Cardiovascular and Respiratory Function
In this lab, you will examine cardiovascular and respiratory variables under different
physiological conditions, such as rest and exercise.
Auscultation of Heart Sounds
Background
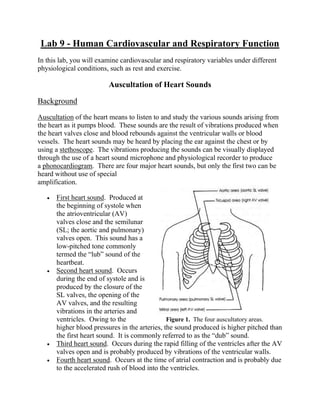
Auscultation of the heart means to listen to and study the various sounds arising from
the heart as it pumps blood. These sounds are the result of vibrations produced when
the heart valves close and blood rebounds against the ventricular walls or blood
vessels. The heart sounds may be heard by placing the ear against the chest or by
using a stethoscope. The vibrations producing the sounds can be visually displayed
through the use of a heart sound microphone and physiological recorder to produce
a phonocardiogram. There are four major heart sounds, but only the first two can be
heard without use of special
amplification.
First heart sound. Produced at
the beginning of systole when
the atrioventricular (AV)
valves close and the semilunar
(SL; the aortic and pulmonary)
valves open. This sound has a
low-pitched tone commonly
termed the “lub” sound of the
heartbeat.
Second heart sound. Occurs
during the end of systole and is
produced by the closure of the
SL valves, the opening of the
AV valves, and the resulting
vibrations in the arteries and
ventricles. Owing to the
higher blood pressures in the arteries, the sound produced is higher pitched than
the first heart sound. It is commonly referred to as the “dub” sound.
Third heart sound. Occurs during the rapid filling of the ventricles after the AV
valves open and is probably produced by vibrations of the ventricular walls.
Fourth heart sound. Occurs at the time of atrial contraction and is probably due
to the accelerated rush of blood into the ventricles.
Figure 1. The four auscultatory areas.
2. Procedure
Using a stethoscope, listen to your partner’s heart sounds, paying special attention to
the four major auscultatory areas on the chest where the sounds from each valve can
be heard most clearly (Figure 1).
Measurement of Blood Pressure
Background
The determination of an individual’s blood pressure is one of the most useful clinical
measurements that can be taken. By “blood pressure” we mean the pressure exerted
by the blood against the vessel walls, the arterial blood pressure being the most useful,
and hence the most frequently measured, pressure. You should become familiar with
the following pressures used in cardiovascular physiology.
Systolic blood pressure. The highest pressure in the artery, produced in the
heart's contraction (systolic) phase. The normal value for a 20-year-old man is
120 mm Hg.
Diastolic blood pressure. The lowest pressure in the artery, produced in the
heart's relaxation (diastolic) phase. The normal value for a 20-year-old man is
80 mm Hg.
Pulse pressure. The difference between the systolic and diastolic pressures.
The normal value is 40 mm Hg.
Mean blood pressure. Diastolic pressure plus one third of the pulse pressure.
This is an estimate of the average effective pressure forcing blood through the
circulatory system. The normal value is 96 to 100 mm Hg.
3. Figure 2. Apparatus for measuring blood pressure indirectly.
The mean blood pressure is a function of two factors – cardiac output (CO) and total
peripheral resistance (TPR). Peripheral resistance depends on the caliber (diameter)
of the blood vessels and the viscosity of the blood.
Mean BP = Cardiac output (ml/sec) × Total peripheral resistance (TPR units)
Cardiac output (ml/min) = Heart rate/min × Stroke volume (ml)
Thus, the measurement of blood pressure provides us with information on the heart's
pumping efficiency and the condition of the systemic blood vessels. In general, we
say that the systolic blood pressure indicates the force of contraction of the heart,
whereas the diastolic blood pressure indicates the condition of the systemic blood
vessels (for instance, an increase in the diastolic blood pressure indicates a decrease in
vessel elasticity).
Procedures
Blood pressure may be measured either directly or indirectly. In the direct method, a
cannula is inserted into the artery and the direct head-on pressure of the blood is
measured with a transducer or mercury manometer. In the indirect method, pressure
is applied externally to the artery and the pressure is determined by listening to arterial
sounds (using a stethoscope) below the point where the pressure is applied (Figure 2).
4. This is called the auscultatory method, because the detection of the sounds is termed
auscultation. An older and less accurate method is the palpatory method, in which
one simply palpates, or feels, the pulse as pressure is applied to the artery. In either of
these indirect methods, pressure is applied to the artery using an instrument called
the sphygmomanometer. It consists of an inflatable rubber bag (cuff), a rubber bulb
for introducing air into the cuff, and a mercury or anaeroid manometer for measuring
the pressure in the cuff. Human blood pressure is most commonly measured in the
brachial artery of the upper arm. In addition to being a convenient place for taking
measurements, it has the added advantage of being at approximately the same level as
the heart, so that the pressures obtained closely approximate the pressure in the aorta
leaving the heart. This allows us to correlate blood pressure with heart activity.
Palpatory Method
1. Have the subject seated, with his or her arm resting on a table. Wrap the
pressure cuff snugly around the bare upper arm, making certain that the
inflatable bag within the cuff is placed over the inside of the arm where it can
exert pressure on the brachial artery. Wrap the end of the cuff around the arm
and tuck it into the last turn, or press the fasteners together to secure the cuff on
the arm. Close the valve on the bulb by turning it clockwise.
2. With one hand, palpate (feel) the radial pulse in the wrist. Slowly inflate the
cuff by pumping the bulb with the other hand and note the pressure reading
when the radial pulse is first lost. Then increase the pressure to around 20 mm
Hg above this point. Slowly reduce the pressure in the cuff by turning the
valve counterclockwise slightly to let air out of the bag. Note the pressure
when the radial pulse first reappears. This is systolic blood pressure, the
highest pressure in the systemic artery.
3. Let all the air out of the cuff, allow the subject to rest, and then run a second
determination. Do not leave the cuff inflated for more than 2 minutes, because
it is uncomfortable and will cause a sustained increase in blood pressure.
4. The systolic pressure recorded with the palpatory method is usually around 5
mm Hg lower than that obtained using the auscultatory method. A major
disadvantage of the palpatory method is that it cannot be used to measure the
diastolic pressure.
Auscultatory Method
In the auscultatory method, the pressure cuff is used as in the palpatory method, and a
stethoscope is used to listen to change in sounds in the brachial artery.
1. Place the bell of the stethoscope below the cuff and over the brachial artery
where it branches into the radial and ulnar arteries (Figure 17.2). Use your
5. fingers, rather than your thumb, to hold the stethoscope over the artery;
otherwise you may be measuring the thumb arterial pressure rather than the
brachial artery pressure. With no air in the cuff no sounds can be heard.
2. Inflate the cuff so the pressure is above diastolic (80-90 mm Hg), and you will
be able to hear the spurting of blood through the partially occluded artery.
Increase the cuff pressure to around 160 mm Hg; this pressure should be above
systolic pressure so that the artery is completely collapsed and no sounds are
heard.
3. Now, open the valve and begin to slowly lower the pressure in the cuff. As the
pressure decreases you will be able to hear four phases of sound changes; these
were first reported by Korotkoff in 1905 and are called Korotkoff sounds.
Phase 1. Appearance of a fairly sharp thudding sound that increases in
intensity during the next 10 mm Hg of drop in pressure. The pressure
when the sound first appears is the systolic pressure.
Phase 2. The sounds become a softer murmur during the next 10 to 15
mm Hg of drop in pressure.
Phase 3. The sounds become louder again and have a sharper thudding
quality during the next 10 to 15 mm Hg of drop in pressure.
Phase 4. The sounds suddenly become muffled and reduced in intensity.
The pressure at this point is termed thediastolic pressure. This muffled
sound continues for another drop in pressure of 5 mm Hg, after which all
sound disappears. The point where the sound ceases completely is called
the end diastolic pressure. It is sometimes recorded along with the
systolic and diastolic pressures in this manner: 120/80/75.
The auscultatory method has been found to be fairly close to the direct method in the
pressures recorded; usually the systolic pressure is about 3 to 4 mm Hg lower than
that obtained with the direct method.
Blood pressure varies with a person's age, weight, and sex. Below the age of 35, a
woman generally has a pressure 10 mm lower than that of a man. However, after 40
to 45 years of age, a woman's blood pressure increases faster than does a man's. The
old rule of thumb of 100 plus your age is still a good estimate of what your systolic
pressure should be at any given age. After the age of 50, however, the rule is invalid.
The increase in blood pressure with age is caused largely by the overall loss of vessel
elasticity with age, part of which is due to the increased deposit of cholesterol and
other lipids in the blood vessel walls.
Practice taking blood pressure on your partner until you become adept at detecting the
systolic and diastolic sounds. You will find this can be quite difficult in some people,
especially those whose arteries are located deep in the body tissues.
6. Postural Effects on Blood Pressure
Measure your partner's blood pressure while she or he is lying down (supine), sitting,
and standing. Record your results on your worksheet and also think about what might
cause the changes in pressure that accompany these changes in body position.
Exercise Test
This test examines the short-term effects of exercise on blood pressure.
Note – The subject should be in good health, with no known cardiovascular or
respiratory problems.
1. Have the subject sit comfortably.
2. Record the systolic and diastolic blood pressure every 5 minutes until a
constant level is obtained.
3. Have him or her run up and down several flights of stairs, and then return to the
sitting position.
4. Obtain and record the blood pressure immediately, then every minute for 5
minutes.
Cold Pressor Test
This test is used to demonstrate the effect of a sensory stimulus (cold) on blood
pressure. A normal reflex response to such a cold stimulus is an increase in blood
pressure (both systolic and diastolic). In a normal individual the systolic pressure will
rise no more than 10 mm Hg, but in a hypertensive individual the rise may be 30 to 40
mm Hg.
1. Have the subject sit down comfortably or lie supine.
2. Record the systolic and diastolic blood pressure every 5 minutes until a
constant level is obtained.
3. Immerse the subject's free hand in ice water (approximately 5 °C) to a depth
well above the wrist.
4. After a lapse of 10 to 15 seconds, obtain the blood pressure every 20 seconds
for 1 or 2 minutes and record. If there is insufficient time to obtain both
systolic and diastolic pressure, just measure the systolic value.
Respiratory Movements
Background
7. Of the many processes occurring in our bodies each instant, those that function in the
movement of oxygen to the tissues are among the most important. If tissues are
deprived of oxygen for too long a time, they die; this time factor is especially critical
for the cells of vital organs such as the heart and brain. Because of the importance of
O2 and CO2, their concentration in the lungs and blood is finely regulated by a variety
of receptors, reflexes, and feedback processes that control our respiratory patterns.
You can gain insight into some of these control processes by observing a person's
respiratory movements and the alteration of these movements caused by various
factors.
Also important in oxygen delivery are the capacity of the lungs for air intake and the
ability of the lungs to move air in and out quickly. You will analyze these functions
when you study the various lung volumes and capacities and conduct the pulmonary
function tests.
In our setup, respiratory movements are recorded using a piezoelectric pneumograph
(called “Pneumotrace II”) that wraps around the subject’s chest. Piezoelectric devices
generate a voltage in response to stretching or bending, which can then be measured
directly by our MacLab units. The disadvantage of this type of recorder for a
pneumograph is that a constant degree of stretch does not produce a constant voltage –
instead, the voltage declines to zero with time. As a result, the Pneumotrace is quite
sensitive to rapid changes thoracic (= lung) volume, but not to slower changes. You
may have to adjust the sensitivity inChart to get a useable reading, and the apparent
volume of an inhalation or exhalation will be confounded with the speed of volume
changes.
In these experiments, the subject should be seated close to the recorder when being
tested but should not look at the record. Use a suitable recording rate so that
respiratory rates can be determined.
Procedures
Be sure to answer the worksheet questions accompanying each exercise.
Setup
The Pneumotrace is attached directly to one of the input channels on the MacLab
unit. Use Chart to record the resulting voltages. (You should be able to handle the
details yourself by now.)
Normal Respiratory Pattern
8. Record the subject's normal cyclic pattern of respiration for 1 to 2 minutes using
chart. Note the amplitude of the inspiration and expiration cycles.
Hyperventilation
1. Record normal ventilation for a few cycles.
2. At a given signal, mark the recording and have the subject breathe as fast and
as deeply as possible for 30 seconds.
3. At the end of this period, obtain a record of the aftereffects of the
hyperventilation. The subject should allow his breathing to be as involuntary
as possible during this post-hyperventilation period.
If the subject gets dizzy while hyperventilating, have him stop, but record the
respiratory response.
Hyperventilation in a Closed System
Repeat the hyperventilation experiment with the subject breathing in and out of a
paper or plastic bag. (The bag should be held tightly around the nose and mouth. Be
sure to avoid leakage of air from the bag.) Record the respiratory movements after
hyperventilation.
Rebreathing
Record respiratory movements while the subject breathes in and out of a paper or
plastic bag for several minutes. In this case, the subject should allow his breathing to
be as involuntary as possible. Observe the rate and amplitude (as well as you can
from the Pneumotrace) of ventilation and how these values change over time.
Effect of Exercise
Record respiratory movements after the subject has exercised by running up and down
several flights of stairs (as before, only healthy individuals should participate).
Respiratory Volumes
Background
The total capacity of the lungs is divided into various volumes and capacities
according to the function of these in the intake or exhalation of air. For a proper
understanding of respiratory processes, it is necessary that you become familiar with
these volumes and capacities.
9. As shown in Figure 3, the total amount of air one’s lungs can possibly hold can be
subdivided into four volumes, defined as follows:
Tidal volume (TV). The amount of air inspired or expired during normal, quiet
respiration.
Inspiratory reserve volume (IRV). The amount of air that can be forcefully
inspired above and beyond that taken in during a normal inspiration.
Expiratory reserve volume (ERV). The amount of air that can be forcefully
expired following a normal expiration.
Residual volume (RV). The amount of air that remains trapped in the lungs
after a maximal expiratory effort.
In addition to these four volumes, which do not overlap, there are four capacities,
which are combinations of two or more volumes.
Total lung capacity (TLC). The total amount of air the lungs can contain-the
sum of all four volumes.
Vital capacity (VC). The maximal amount of air that can be forcefully expired
after a maximal inspiration.
Functional residual capacity (FRC). The amount of air remaining in the lungs
after a normal expiration.
Inspiratory capacity (IC). The maximal amount of air that can be inspired after
a normal expiration.
Figure 3. Long volumes and capacities for a normal adult male.
The milliliter values given for these volumes and capacities in Figure 3 are for a
normal adult male. In the female they are all 20% to 25% smaller.
10. The respiratory volumes can be measured with a simple instrument called
a spirometer. This consists of a lightweight plastic bell inverted in a drum filled with
water. A mouthpiece and hose allow the collection of air in the inverted bell. In this
experiment you will use your own disposable mouthpiece. Record your results in the
table on your worksheet.
Procedures
Setup
The spirometer must be connected to the bridge amp, and then the bridge amp
connected to the MacLab. You will also need to calibrate the spirometer in Chart.
See if you can do this without instruction.
Tidal Volume (TV)
Set the spirometer dial at zero. Take a normal inspiration, place your mouth over the
mouthpiece, and exhale a normal expiration into the spirometer. You will have to
make a conscious effort not to exceed your normal volume. Read the amount exhaled
on the dial. Have your lab partner count your respiratory cycles for 1 minute while
you are seated at rest. Multiply your tidal volume by your respiratory rate per minute
to give your resting respiratory minute volume.
Expiratory Reserve Volume (ERV)
Set the spirometer dial at zero. After a normal expiration, place your mouth over the
mouthpiece and forcefully exhale as much air as possible into the spirometer.
Vital Capacity (VC)
Set the spirometer dial at zero. Inhale as deeply as possible; place your mouth over
the mouthpiece, hold your nose, and exhale into the spirometer with a maximal effort.
Repeat the measurement three times and record the largest volume. You can use the
nomograms at the end of this handout to determine your predicted vital capacity on
the basis of your age, height, and sex. How does your predicted VC compare with
your measured VC?
Inspiratory Reserve Volume (IRV) and Inspiratory Capacity (IC)
From the three previous volume measurements you can now calculate the IRV and the
IC (see Figure 3).