PipeFab For Revit_AU_LasVegas_2018
•
1 like•257 views

PipeFab provides complete solutions for Fire Protection design, Review, installation drawings and Pipe Fabrication

Recommended
Recommended
More Related Content
What's hot
What's hot (19)
Similar to PipeFab For Revit_AU_LasVegas_2018
Similar to PipeFab For Revit_AU_LasVegas_2018 (20)
Recently uploaded
Recently uploaded (20)
PipeFab For Revit_AU_LasVegas_2018
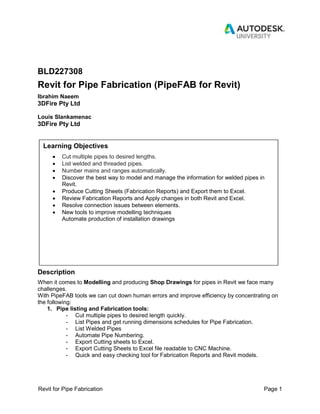
- 1. Revit for Pipe Fabrication Page 1 BLD227308 Revit for Pipe Fabrication (PipeFAB for Revit) Ibrahim Naeem 3DFire Pty Ltd Louis Slankamenac 3DFire Pty Ltd Description When it comes to Modelling and producing Shop Drawings for pipes in Revit we face many challenges. With PipeFAB tools we can cut down human errors and improve efficiency by concentrating on the following: 1. Pipe listing and Fabrication tools: - Cut multiple pipes to desired length quickly. - List Pipes and get running dimensions schedules for Pipe Fabrication. - List Welded Pipes - Automate Pipe Numbering. - Export Cutting sheets to Excel. - Export Cutting Sheets to Excel file readable to CNC Machine. - Quick and easy checking tool for Fabrication Reports and Revit models. Learning Objectives Cut multiple pipes to desired lengths. List welded and threaded pipes. Number mains and ranges automatically. Discover the best way to model and manage the information for welded pipes in Revit. Produce Cutting Sheets (Fabrication Reports) and Export them to Excel. Review Fabrication Reports and Apply changes in both Revit and Excel. Resolve connection issues between elements. New tools to improve modelling techniques Automate production of installation drawings
- 2. Revit for Pipe Fabrication Page 2 2. Modelling and Annotation tools: - Harmonize Pipes and Fittings - Automatically Connect Pipes to Sprinklers - Remove Couplings on Socket Halves (Pap Ends) - Group Pipes and Fittings - Rotate Pipes - Delete Pipes - Automatically Place Correct Type of Hangers based on the distance from Slab/Beam - Automatically Place Pipe Sleeves with penetration dimensions - Automatically Tag Droppers/Risers - Automatically Tag Pipe Distances to Structural Slab/Beam - Automatically dimension Sprinkler to Sprinkler and Sprinkler to Wall - Pipe Spool Listing and Drawings 3DFIRE BIM TEAM: Ibrahim Naeem - Associate BIM Manager at 3DFire, 7 years of BIM experience with recognitions from Autodesk & BRE and valuable experience in BIM, GIS and technology. Ibrahim experience includes consulting, contracting and Engineering Systems Managing. support@3dfire.com.au Louis Slankamenac - Managing Director at 3Dfire with 17 years of industry experience. Louis is responsible for the design and engineering functions within 3D Fire business, with focus on maximizing efficiencies in project delivery. design@3dfire.com.au
- 3. Revit for Pipe Fabrication Page 3 Cutting Multiple pipes to desired lengths PipeFAB has the ability to set the Maximum and Minimum pipe parameter lengths depending on the project requirements. Challenges to overcome Paps (taps) that are too close to the end/start of the pipe. Outcome Cut tool will cut pipes so taps (paps) are within correct chosen parameters.
- 4. Revit for Pipe Fabrication Page 4 While max chosen length is set to be 6400 mm tool will cut pipe 6326.9 mm because of the constrains explained above. Pipe length will be rounded off to 6325 mm at a later stage of the program. The next pipe is cut to 6400mm as per max set length value.
- 5. Revit for Pipe Fabrication Page 5 Listing Pipes The next step is to list pipes and made on fittings. Here are a few examples:
- 6. Revit for Pipe Fabrication Page 6 Listed pipe properties: List Pipes procedure Tolerance needs to be set up before listing pipes:
- 7. Revit for Pipe Fabrication Page 7 Pick start point and nearest pipe. Program will do the following: 1- List all pipes in correct order according to the flow direction. 2- All required parameters of the pipes are automatically added to each pipe with no additional work to be done. 3- A new floor plan with running dimension is generated in Revit for easy visual check. 4- All pipes listed are colored green in 3D View.
- 8. Revit for Pipe Fabrication Page 8 Listing Welded Pipes and Fittings This tool assists with automatic listing of Welded pipes and Fittings in Revit
- 9. Revit for Pipe Fabrication Page 9 Automatic Pipe Numbering Example of Mains Numbering - Numbering extends outwards from start point as shown below: Start Point of Flow
- 10. Revit for Pipe Fabrication Page 10 Example of Ranges (Branches) Numbering - Numbering extends outwards from start point as shown below: Pipes with same parameters will be tagged with the same numbers. Numbering Pipes Procedure Tolerance needs to be set up before Numbering pipes:
- 11. Revit for Pipe Fabrication Page 11 Pick start point and nearest pipe. Program will do the following: 1- Number Each Pipe following direction of flow. 2- All Pipes with the same lengths and listing parameters would be given same number within a given tolerance. Example: Pipe 1 length = 1950 mm long with 32U tap at 1005 mm from start Pipe 2 length = 1955 mm long with 32U tap at 1010 mm from start Both Pipes will be tagged as A01 because set tolerance is 10mm. .
- 12. Revit for Pipe Fabrication Page 12 Once Numbering is completed, Cutting Sheets will be created by using Revit Schedule. Revit will not show the length of the pipes with the same pipe number but with different lengths (as described above): This will happen for all instances when this occurs. Solution: Round-up Pipe Lengths tool copies Length Parameters and makes new Fake Length Parameters. Collate Similar Pipe data tool will collate all Length Parameters values for pipes discussed above, generate average length values and place them in Fake Lengths column.
- 13. Revit for Pipe Fabrication Page 13 Export Cutting Sheets according to Template Export Cutting sheets to excel for easier review and further use. You have an option to use your own Template. Exported Data Review Revit Excel Fabrication review tool allows quick amendments so changing the values in cells can be published in both Revit Schedule and Excel.
- 14. Revit for Pipe Fabrication Page 14 Exporting CNC Files Once Review Process is Complete, time to send CNC Files to manufacturer.
- 15. Revit for Pipe Fabrication Page 15 Harmonize Pipes and Fittings. At any point in the project elements can get disconnected. Pipe-Fab presents a solution to solve this problem.
- 16. Revit for Pipe Fabrication Page 16 Automatically Connect Pipe to Sprinkler Connecting pipes to sprinklers is time consuming. Automatic Connect Pipe to Sprinklers tool makes this process quicker and more efficient. Examples:
- 17. Revit for Pipe Fabrication Page 17
- 18. Revit for Pipe Fabrication Page 18 Remove Coupling When connecting Grooved Pipe with Threaded pipe Socket Half (Pap End) Connection is made. This process also generates coupling on pipe which should not be there. Auto Remove Couplings on Socket Halves tool automatically deletes all couplings placed on Socket Halves (Pap Ends).
- 19. Revit for Pipe Fabrication Page 19 Group Pipes and Fittings Cutting Threaded Pipes with welded Paps is a challenge in Revit as we loose paps in this process. PipeFAB has a tool to overcome this problem.
- 20. Revit for Pipe Fabrication Page 20 Rotate Pipes Rotating pipes in Revit is not an easy process, PipeFab makes it easier. Delete Pipes Activate Delete Pipe Command, click on the pipe you want to eliminate and then click near the fitting you want the pipes to move to:
- 21. Revit for Pipe Fabrication Page 21 Automatically Place Correct Type of Hangers based on the distance from Slab/Beam Place Hangers. This tool will choose type of hanger based on the distance of the centre line of pipe from slab/beam. As you can see below this is a small portion of network under different slabs with different slab thicknesses. You need to select the pipes and then select hanger tool and program will give you the correct hangers. Two Slabs with different elevations Different hangers type accordingly.
- 22. Revit for Pipe Fabrication Page 22 Automatic Placements of Pipe Sleeves with penetrations dimensions This tool enables the user to place pipe sleeves for pipes penetrating walls and slabs.
- 23. Revit for Pipe Fabrication Page 23 Created sleeves contain the following data: - Distance from Center Line of Sleeve to Top of Structural Slab/Beam - Distance from Center Line of Sleeve to Structural Floor Level - Sleeve length.
- 24. Revit for Pipe Fabrication Page 24 Automatic Tagging of Droppers/Risers The Riser/Dropper Height tool gives the overall length and direction of pipe (Up or Down).
- 25. Revit for Pipe Fabrication Page 25 Automatically tagging of Pipe Distances to Structural Slab/Beam This tool provides the following data (useful for installation drawings): 1- Distances to all the structural elements from center line of the pipe i.e. pipe runs under two different slabs and a beam. It will give the following outputs: - (650S, 90B, 600S) where S =Slab and B = Beam (Beam – Slab Offset All). - Only the critical dimension 90B (Beam-Slab offset)
- 26. Revit for Pipe Fabrication Page 26 Automatic dimensioning of Sprinkler to Sprinkler and Sprinkler to Wall These Dimensions can be used for both documentation and design checking. Tool does the following: 1- Provides dimensions of Sprinkler to Sprinkler and Sprinkler to Walls for Below Ceiling, Exposed and Concealed Space Sprinklers. 2- For Clarity only dimension for one array will be shown. 3- Tool determines dimensions in between Sprinklers and Walls from linked Structural/Architectural Revit file. For CS Sprinklers, only Full Height Walls are considered
- 27. Revit for Pipe Fabrication Page 27 BC&EXP Sprinklers Dimensions Pipe Spool Listing and Drawings Custom made pipe Assemblies that cannot be listed in schedules are listed by using this tool. Examples:
- 28. Revit for Pipe Fabrication Page 28 Tool will create a plan and name it according to the family name and family tag number. i.e. Assembly OFF 1 will be shown in a plan named OFF 1, Assembly OFF2 will be shown in a plan OFF 2 and so on.
- 29. Revit for Pipe Fabrication Page 29 For Installation Drawing Final product of all of the above is Installation Drawing shown below: Conclusion The Pipe-Fab offers many solutions for Pipe Fabrication and documentation inside Revit. Please visit http://www.3dfire.com.au for more information.