1. How to reduce images size using XnView
1) Run the program
You should see the screen shots below
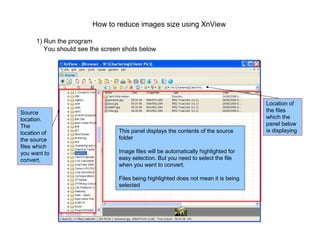
Location of
Source the files
location. which the
The panel below
location of This panel displays the contents of the source is displaying
the source folder
files which
you want to Image files will be automatically highlighted for
convert. easy selection. But you need to select the file
when you want to convert.
Files being highlighted does not mean it is being
selected
2. 2) Select the files that you want to convert.
Once selected, click on
To select multiple files, press and hold control, then click on the files
3. 3) Once you clicked on Convert, you should see the screen shot below.
General Tab
This is the location where you’d
have to determine where you
want to save the converted or
resized files. This panel displays the files you have
selected, and is going to resize or
This part lets you select what convert.
format of the image files to convert
to.
If don’t want to change the format,
then select the same format as the
original file or check here.
Delete Original – Once the file has
been converted / resized, the original
file will be deleted.
Keep Original Date/Time Attributes
– Files converted or resized will
retain its original date / time
information.
4. 4) Click on Transformations Tab.
Click on Resize
Click on Add
For the width, a standard 1024 should be
good enough.
Enter 1024 for the width, leave other settings
as default.
Or you can enter 768 for the height and leave
other settings default
5) Press GO.
Check if your files have been
converted or resized.
End