Getting Enter in Android development
•
0 likes•290 views

This document is designed for those who wants to get enter in Android development. if you follow this doc correctly you will able to set your Hello World Android App. It is requested to all Experts that kindly don't read this doc if you are already aware of all the facts of Android development

Recommended
More Related Content
What's hot
What's hot (20)
Viewers also liked
Viewers also liked (20)
Similar to Getting Enter in Android development
Similar to Getting Enter in Android development (20)
Recently uploaded
Recently uploaded (20)
Getting Enter in Android development
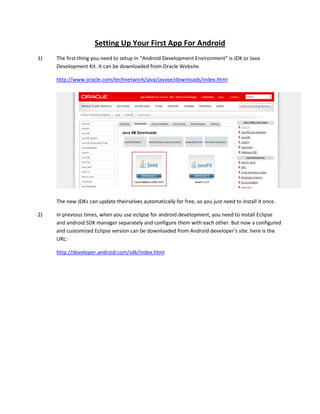
- 1. Setting Up Your First App For Android 1) The first thing you need to setup in “Android Development Environment” is JDK or Java Development Kit. It can be downloaded from Oracle Website. http://www.oracle.com/technetwork/java/javase/downloads/index.html The new JDKs can update theirselves automatically for free, so you just need to install it once. 2) In previous times, when you use eclipse for android development, you need to install Eclipse and android SDK manager separately and configure them with each other. But now a configured and customized Eclipse version can be downloaded from Android developer’s site. here is the URL: http://developer.android.com/sdk/index.html
- 2. 3) You don’t need to install anything after downloading this Bundle. Android SDK will be downloaded as a compressed File that contains Eclipse and Android SDK manager. You need to Run Eclipse from the respective folder.
- 3. 4) Congratulations…! You have successfully environment for android Development. 5) If you are opening Eclipse for the first time, then there will be 99% chances that you will see the following dialogue box(if this dialogue doesn’t appear then it means that eclipse is getting its info from some previous versions). This dialogue box require you to set up the Directory or Workspace in which you or eclipse will store all the projects or apps and their related data(It is recommended that you choose drive other than “C” in order to prevent drive access errors due to OS security reasons, in future).
- 4. 6) Select you desired path and folder and click OK. 7) Here is the first look of Environment. It’s a welcome Screen. 8) Go to File->new->Android Application Project. 9) The following Dialogue Box will appear.
- 5. Here: Application NameThe name of your application Project Name The name of the folder in which all related and required files will be stored during the development phase. It resides in the workspace folder. Package Name The name of the package in which main classes resides. The concept is same as in the Java Language. Minimum SDK RequiredThe lowest version of Android that your app supports, indicated using the API level. To support as many devices as possible, you should set this to the lowest version available that allows your app to provide its core feature set. If any feature of your app is possible only on newer versions of Android and its not critical to the app's core feature set, you can enable the feature only when running on the versions that support it. Target SDKindicates the highest version of Android (also using the API level) with which you have tested with your application. As new versions of Android become available, you should test your app on the new version and update this value to match the latest API level in order to take advantage of new platform features. Compile With is the platform version against which you will compile your app. By default, this is set to the latest version of Android available in your SDK. (It should be Android 4.1 or greater; if you don't have such a version available, you must install one using the SDK Manager). You can
- 6. still build your app to support older versions, but setting the build target to the latest version allows you to enable new features and optimize your app for a great user experience on the latest devices. ThemeFor the first time, select none. And then Click Next (some above content is copied from Android developer’s site ) 10) In the below screen, Just Click Next with the default Options. 11) The next screen enables you to customize the icon of your Application. For the first time you can skip this option. Click Next. (You are allowed to create your own icon in any graphic software and use it as your app icon). 12) The next screen will be of Create Activity. For the First time, select Blank Activity and click next.
- 7. 13) Set some attributes of the activity. Go with the Defaults and click finish. Congrats…!! You have just set up your Fist Project. This will take some time so be patient. (You might need to close the welcome screen before viewing the created project.) 14) The next screen that appears will be something like this.
- 8. 14) Now you really want to see your app running. For this you need to have an android phone or an emulator. 15) Eclipse and Android SDK enables you to set up multiple emulators at the same time. 16) Emulators are called AVD or Android Virtual Device. 17) To set up or configure an emulator you need to open AVD manager by clicking its image as shown in above figure. 18) Here is the Dialogue you will get when click the icon. 19) Click NEW… A new Dialogue will appear.
- 9. 20) Give some related AVD name. 21) In the Device option you will see all the devices that have already been included before. For the first time go with some predefined device. 22) Target Android version or API has already been set when you are setting up your Project. 23) Don’t play with all the options. 24) Just set the amount of RAM of the computer you want to dedicate for the AVD, Set the internal storage of the phone and Select Emulation option of HOST GPU. Finally Click OK.
- 10. 25) Congrats…!! You have just set up an AVD. 26) But you are still a bit away from executing your App. 27) Click on Run Configuration. 28) Double Click on Android Application.
- 11. 29) Select your Project and click Apply. 30) In the target tab, select your AVD and click apply.
- 12. 31) Select RUN in the common tab.Click Apply close this dialogue.
- 13. 32) Now Click on RUN AS(Just Below Window menu) and Let your app finally run on AVD. It takes time. Be patient.