How to Make Cluster Manifolds
•Download as PPT, PDF•
2 likes•711 views

Cluster Manifolds are dirt cheep, size expandable vacuum manifolds with independent and disposable collection.

Recommended
More Related Content
Viewers also liked
Viewers also liked (12)
Similar to How to Make Cluster Manifolds
Similar to How to Make Cluster Manifolds (20)
Recently uploaded
Recently uploaded (20)
How to Make Cluster Manifolds
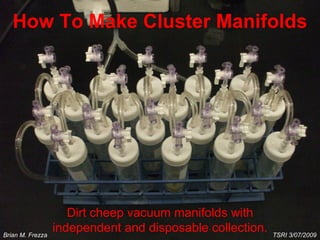
- 1. How To Make Cluster Manifolds Dirt cheep vacuum manifolds with independent and disposable collection. TSRI 3/07/2009 Brian M. Frezza
- 2. Materials 50mL Centrifuge tubes Preferably with smooth flat lids The one’s pictured here come from Genesee Scientific: Catalog #21-108 TSRI 3/07/2009 Brian M. Frezza
- 3. Materials Large Test Tube Rack The size of the rack will define the maximize size of the manifold, but that can be as large as you’d like. Tubes should fit snugly in the rack slots. TSRI 3/07/2009 Brian M. Frezza
- 4. Materials Make-Male Lure adaptors: Value Plastics Product #MTLCS-9 Female-Female Lure adaptors: Value Plastics Product # FTLC-6 3-way or 2-way Lure stopcocks: Value Plastics Product # VPB1000055N You’ll need some slip style lure adaptors to connect the junctions, and stopcocks to control the flow of vacuum. These are sold dirt cheep in packs of 100. TSRI 3/07/2009 Brian M. Frezza
- 5. Materials You’ll need some tubing to connect everything. The diameter of the tubing must be such that it fits snugly (air tight) around the male lures, but is strong enough not to collapse under vacuum. I prefer Tygon R-3603 tubing with a 1/8’’ ID and 1/4’’ OD. This tubing is flexible but fits tightly onto male lures, and they’re clear so you can see any obstructions. You’ll also need a scissors on hand to cut the tubing TSRI 3/07/2009 Brian M. Frezza
- 6. Materials 1/4’’ Y-adaptor Y-adaptors: Value Plastics Product #Y260-J1A Standard Vacuum tubing that connects to a house line. Typically 1/4’’ ID will do the trick. TSRI 3/07/2009 Brian M. Frezza
- 7. Equipment In my experience, Torx drivers work best, but a Hex (Allen) will do in a pinch. You’ll need a screw driver for poking lure sized holes. The tip size must be just smaller a male lure fitting. TSRI 3/07/2009 Brian M. Frezza
- 9. Before we get started, lets demonstrate how to use your screw driver to poke effective female lure fittings into the centrifuge tube lids First, remove the lid from the tube and lay it face up on a hard flat surface. Then hold the skew driver at a 90 degree angle directly above where you want to poke the hole Next, slowly apply downward pressure to the screwdriver while holding the lid still with your other hand. The more slowly you apply the pressure the cleaner the hole you will poke. If you go too fast, you may tear the lid around the hole. If you do, toss the lid and try again. You’ll use this trick several times in the course of building your manifold.
- 10. Step 1: Pick a Rack Size I’m going to demonstrate using this 4x4 rack I found in a trash can. Because that’s how I roll. This rack in particular is really tightly packed, so we’re only going to fill every other slot. Also, I chose not to go with the racks the tubes are usually supplied in. This blue rack here holds the tubes much more snugly, since you don’t want them rattling around when you turn the vacuum on. TSRI 3/07/2009 Brian M. Frezza
- 11. Step 2: Prepare the Tubes Using your expert hole poking skills learned earlier, go ahead and poke 2 holes in each lid for the outside rows of tubes and 4 holes in each lid of the inside rows of tubes as I’ve show below. If your rack isn’t square, arrange it so that the longer side goes left to right, and follow the same pattern as above for your holes. Be sure to poke the holes as far apart as possible on the lids. Long edge 2 Holes 4 Holes 4 Holes 2 Holes TSRI 3/07/2009 Brian M. Frezza
- 12. Step 3: Prepare the Tubing For each tube with 2 holes, cut one long length of tubing (~10cm) For all but one of the tubes with 4 holes, cut two short piece of tubing (~7cm) Finally, cut 2 really long piece of tubing (~50cm) for the ends (not shown). TSRI 3/07/2009 Brian M. Frezza
- 13. Step 4: Prepare the Tubing Slide a male-male lure adaptor into each end of the all of the tubing you just cut. This should be a really tight (air tight) fit. TSRI 3/07/2009 Brian M. Frezza
- 14. Step 5: Prepare the Taps Slide each stopcock into a female-female lure adaptor and then a male-male lure adaptor as show below. Be sure the male lure is on the bottom Make one of these for every tube in the rack TSRI 3/07/2009 Brian M. Frezza
- 15. Step 6: Prepare the Y-Adaptor Connect the top ends of the Y adaptor to the two really long piece of tubing as show to the right. Connect the bottom end of a Y adaptor to vacuum tubing large enough to connect to a house tap as show to the left. TSRI 3/07/2009 Brian M. Frezza
- 16. Step 7: Connect the Tubes Use the small tubing to connect the 4-hole tubes in a criss-cross pattern as show below Use the longer tubing to connect the 2-hole tubes in column as show below When you’re done connecting both your rack should look like this. TSRI 3/07/2009 Brian M. Frezza
- 17. Step 8: Connect the Taps Place one tap in each tube in the outermost hole When you’re done that, your rack should look like this TSRI 3/07/2009 Brian M. Frezza
- 18. Quick Double Check 2-way tubes should look like this (above) 4-way tubes should look like this (below). TSRI 3/07/2009 Brian M. Frezza
- 19. Step 9: Connect the Y-adaptor Connect the two ends of the Y adaptor to the end holes in the 4-hole tubes When you’re all done, your rack should look like this. TSRI 3/07/2009 Brian M. Frezza
- 20. Step 10: Connect the House Vacuum Leave the house vacuum off when you’re not using the manifold. Connect the other end of the Y-adaptor to the house vacuum. TSRI 3/07/2009 Brian M. Frezza
- 21. Congratulations, you now have a working cluster manifold! TSRI 3/07/2009 Brian M. Frezza
- 22. Independent Disposable Collection Elutant from each tap is not mixed into a shared waste, and instead is collected in each tube independently. This allows you to save elutant for instance when eluting your DNA from a mini-prep. Each collection tube is also disposable. So when you’re done collecting your sample you can simply swap in a fresh tube and not worry about cross-contamination. TSRI 3/07/2009 Brian M. Frezza
- 23. Size Expandable Cluster Manifold can be built to any size specification. All you need is a larger rack and more tubes. TSRI 3/07/2009 Brian M. Frezza
- 24. Compare to Commercial Manifold Sigma VM20 manifold 20 tap Cluster Manifold ~$10.00 $110.00 Cost ~20 min ~1 min Setup time Variable Fixed Size Disposable Washing Cleaning Independent Tubes Shared waste bin Collection Cluster Standard TSRI 3/07/2009 Brian M. Frezza