Use tool box in pixlr
•
1 like•470 views

This tutorial adopted a comparison perspective of introducing tools in Pixlr for image editing.

Recommended
More Related Content
What's hot
What's hot (19)
Viewers also liked
Viewers also liked (15)
Similar to Use tool box in pixlr
Similar to Use tool box in pixlr (20)
More from Sirui Wang
More from Sirui Wang (9)
Recently uploaded
Recently uploaded (20)
Use tool box in pixlr
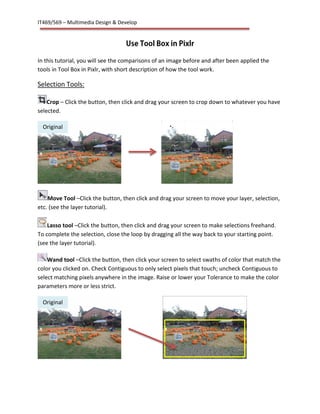
- 1. IT469/569 – Multimedia Design & Develop In this tutorial, you will see the comparisons of an image before and after been applied the tools in Tool Box in Pixlr, with short description of how the tool work. Selection Tools: Crop – Click the button, then click and drag your screen to crop down to whatever you have selected. Move Tool –Click the button, then click and drag your screen to move your layer, selection, etc. (see the layer tutorial). Lasso tool –Click the button, then click and drag your screen to make selections freehand. To complete the selection, close the loop by dragging all the way back to your starting point. (see the layer tutorial). Wand tool –Click the button, then click your screen to select swaths of color that match the color you clicked on. Check Contiguous to only select pixels that touch; uncheck Contiguous to select matching pixels anywhere in the image. Raise or lower your Tolerance to make the color parameters more or less strict. Original Original
- 2. IT469/569 – Multimedia Design & Develop Editing tools: Pencil tool –Click the button, then click your image to draw freehand. You can use the color panel at the bottom of tool box to select different colors Brush tool –Click the button, then click your image to draw freehand. You can use the color panel at the bottom of tool box to select different colors Eraser tool –Click the button, then click and drag your image to erase that area. Original Original Original
- 3. IT469/569 – Multimedia Design & Develop Paint Bucket tool –Click the button, then click your image to apply a solid color to that area. You can use the color panel at the bottom of tool box to select different colors Gradient tool –Click the button, then click and drag your image to apply a color gradient to that portion of the image. The color(s) of the gradient come from the two color patches in your Tools panel (usually white and black as the defaults). Change the color patches to change the color(s) used in the gradient. You can also modify the type of gradient by changing the options at the top of the screen. Clone Stamp tool –Click the button, then hold down Ctrl and click an area of the image that you’d like to clone. Release Ctrl, then move the cursor over the area where you want the cloned image to be and click and drag; the area around your source will then appear wherever you click and drag. This tool is useful for covering imperfections or replicate objects. Original Original Original
- 4. IT469/569 – Multimedia Design & Develop Color Replace tool – Click the button, then select a color from the color panel which locates at the bottom of the tool box. Click on the image to replace color. Drawing tool –Click the button, then click and drag to draw freehand shapes. Use the options at the top of the screen to bring various effects to your image. Blending tools: Blur tool – Click the button, then click your image to blur that area. Use the options at the top of the screen to customize. Sharpen tool – Click the button, then click your image to sharpen that area. Use the options at the top of the screen to customize. Original Original Original
- 5. IT469/569 – Multimedia Design & Develop Smudge tool – Click the button, then click your image to smudge that area. Use the options at the top of the screen to customize. Sponge tool – Click the button, then click your image to saturate or desaturate (i.e. intensify or reduce) the colors in that area. Use the options at the top of the screen to customize. Original Original Original
- 6. IT469/569 – Multimedia Design & Develop Dodge tool – Click the button, then click your image to lighten that area. Use the options at the top of the screen to customize. Burn tool -Click the button, then click your image to darken that area. Use the options at the top of the screen to customize. Special Filters and Effects: Red Eye tool –Click the button, then click on the red parts of the eye in the photo to correct those areas. Spot heal tool – Click the button, then click on the image to heal any spot. Bloat tool –Click the button, then click your image to fatten up that area. Useful for making lips more pouty, eyes bigger, etc. Original Original Original
- 7. IT469/569 – Multimedia Design & Develop Pinch tool -Click the button, then click your image to shrink that area. Miscellaneous tools: Color Picker tool –Click the button, then click a color you like in your image; that color will now be the mail color in you color patches. To select a picked color as the alternate (i.e. background) color in your color patches, hold SHIFT while clicking. Type tool –Click the button, then click and drag your image to create a box into which you can type. (see Layer tutorial) Hand tool –Click the button, then click and drag your image to scroll it around. Magnifying tool -Click the button, then click your image to magnify. Original