SlideShare a Scribd company logo
1 of 19
CentoOS 7 Installation Steps
1. Boot installation media:
a) Press Enter (Test this media & install CentOS 7 is the default choice):
b) Wait for the check to finish.
c) Watch the installer start up. Anaconda will list the purpose of each virtual console
(CTRL+ALT+F1 through F5):
2. Select language to use and click Continue.
3. The Installation Summary screen will be presented with several icons to click on.
Unfortunately, networking is not enabled by default, and appears as the last thing to get done.
Networking should be done first, so NTP can be enabled in the Date and Time settings.
Automatic partitioning is already selected, but must be confirmed. Manual partitioning can also
be done to allow smoother updates.
The steps that follow will lead you through settings in a sensible order allowing you to enable
NTP, and perform easy upgrades.
4. Click the Network and Hostname icon and configure these items first:
a) Turn on interface in upper right corner.
b) Click Configure in lower right, if static configuration desired.
c) Set hostname in lower left corner to centos7.example.com (or another FQDN).
d) Click Done in upper left corner.
5. Click the Date and Time icon to make these changes:
a) Set time in lower left corner.
b) Enable NTP in upper right corner.
c) Click Done in upper left corner.
6. Click the Software Selection icon to make the choices below:
a) GNOME Desktop on left side.
b) GNOME Applications on right side.
c) Internet Applications on right side.
d) Office Suite and Productivity on right side (for larger installations)
e) Legacy X Window System Compatibility.
f) Compatibility Libraries.
g) Click Done in upper left corner.
7. Click the Installation Destination icon to perform manual partitioning, , if you want easy
upgrades, otherwise allow automatic partitioning and skip this step.
Note: The values shown are appropriate for an installation to an 8 GiB disk. Larger disks`
should have up to 50 GiB root partition with the remainder allocated to the home partition.
a) Select to create the partitions manually.
b) Click Done in upper left corner.
c) Click to create mount points automatically.
d) Select root partition and reduce Desired Capacity by amount for home.
e) Click Update Settings in lower right corner.
f) Click + button in lower left corner.
g) Choose /home as the mount point.
h) Enter the Desired Capacity reduced from the root partition.
i) Click Add Mount Point.
j) Click the Done button in the upper left corner.
k) If everything looks right, click Accept Changes (or return).
8. If your Installation Summary looks like the capture below:
a) Click Begin Installation in lower left corner.
b) The Configuration screen should be shown as below.
c) Set the root password and create a user while installation proceeds.
9. Click Root Password to set the root password:
a) Type a strong password.
b) Retype the same strong password.
c) Write down, store, or memorize your root password.
d) Click Done in upper right corner.
10. Click User Creation to create an ordinary user account:
a) Type your full name.
b) Possibly edit your user name.
c) Select to make the user an Administrator (member of wheel group).
d) Type a strong password.
e) Retype the same password.
f) Write down, store, or memorize your user password.
g) Click Done in the upper left corner.
11. Make sure the Configuration of the User Settings is finished. It should look like the capture
below. The installation should continue for some time, so it is often a good time for a break!
12. Once it has completed installing the software packages it should appear similar to the image
below.
a) Click to reboot the system.
b) Wait while the system restarts.
13. The time to reboot might be unusually long. Be patient if the screen looks like this:
14. The first step of the Initial Setup is to accept the license. Click on the License Information icon
on the left side of the screen.
15. To accept the license:
a) Click the checkbox in the lower left corner of the screen.
b) Click the Done button in the upper left corner of the screen.
16. Finish the Initial Setup Configuration by clicking the Finish Configuration button.
17. Configure Kdump next:
a) Disabling kdump is recommended by unchecking the Enable kdump checkbox.
b) Click the Forward button.
c) Click the No button to avoid rebooting.
d) Wait while the login greeter loads.
18. Login to the system:
a) Click the name of the user.
b) Type the password.
c) Click the Sign In button.
19. Start the Localization dialog:
a) Choose your language and click Next.
b) Click the Next button to continue (Use the + button if you want to add more).
c) Click the Next button to continue (Use Add Account button if you want to add an account).
d) Finally, click the Start using CentOS Linux button!

More Related Content

What's hot

How To Install and Configure GNome on CentOS 7
How To Install and Configure GNome on CentOS 7How To Install and Configure GNome on CentOS 7
How To Install and Configure GNome on CentOS 7VCP Muthukrishna
 
How To Configure VNC Server on CentOS 7
How To Configure VNC Server on CentOS 7How To Configure VNC Server on CentOS 7
How To Configure VNC Server on CentOS 7VCP Muthukrishna
 
How To Install and Configure SUDO on RHEL 7
How To Install and Configure SUDO on RHEL 7How To Install and Configure SUDO on RHEL 7
How To Install and Configure SUDO on RHEL 7VCP Muthukrishna
 
Configure Run Levels RHEL 7 or CentOS 7
Configure Run Levels RHEL 7 or CentOS 7Configure Run Levels RHEL 7 or CentOS 7
Configure Run Levels RHEL 7 or CentOS 7VCP Muthukrishna
 
How To Install and Use ABRT CLI on RHEL 7
How To Install and Use ABRT CLI on RHEL 7How To Install and Use ABRT CLI on RHEL 7
How To Install and Use ABRT CLI on RHEL 7VCP Muthukrishna
 
How To View Login History and Logout History on RHEL 7
How To View Login History and Logout History on RHEL 7How To View Login History and Logout History on RHEL 7
How To View Login History and Logout History on RHEL 7VCP Muthukrishna
 
How To Install and Configure Splunk on RHEL 7 in AWS
How To Install and Configure Splunk on RHEL 7 in AWSHow To Install and Configure Splunk on RHEL 7 in AWS
How To Install and Configure Splunk on RHEL 7 in AWSVCP Muthukrishna
 
How To Protect SSH Access with Fail2Ban on RHEL 7
How To Protect SSH Access with Fail2Ban on RHEL 7How To Protect SSH Access with Fail2Ban on RHEL 7
How To Protect SSH Access with Fail2Ban on RHEL 7VCP Muthukrishna
 
Install and Configure WordPress in AWS on RHEL 7 or CentOS 7
Install and Configure WordPress in AWS on RHEL 7 or CentOS 7Install and Configure WordPress in AWS on RHEL 7 or CentOS 7
Install and Configure WordPress in AWS on RHEL 7 or CentOS 7VCP Muthukrishna
 
How To Configure SNMP Logging on RHEL 7
How To Configure SNMP Logging on RHEL 7How To Configure SNMP Logging on RHEL 7
How To Configure SNMP Logging on RHEL 7VCP Muthukrishna
 
How to Install MariaDB Server or MySQL Server on CentOS 7
How to Install MariaDB Server or MySQL Server on CentOS 7How to Install MariaDB Server or MySQL Server on CentOS 7
How to Install MariaDB Server or MySQL Server on CentOS 7VCP Muthukrishna
 
How To Check IE Enhanced Security Is Enabled Windows PowerShell
How To Check IE Enhanced Security Is Enabled Windows PowerShellHow To Check IE Enhanced Security Is Enabled Windows PowerShell
How To Check IE Enhanced Security Is Enabled Windows PowerShellVCP Muthukrishna
 
Install VMWare Tools CentOS 7
Install VMWare Tools CentOS 7Install VMWare Tools CentOS 7
Install VMWare Tools CentOS 7VCP Muthukrishna
 
How to Upgrade Openfire on CentOS 7
How to Upgrade Openfire on CentOS 7How to Upgrade Openfire on CentOS 7
How to Upgrade Openfire on CentOS 7VCP Muthukrishna
 
How To Configure Amazon EC2 Load Balancer
How To Configure Amazon EC2 Load BalancerHow To Configure Amazon EC2 Load Balancer
How To Configure Amazon EC2 Load BalancerVCP Muthukrishna
 
How to install and configure firewall on ubuntu os
How to install and configure firewall on ubuntu osHow to install and configure firewall on ubuntu os
How to install and configure firewall on ubuntu osVCP Muthukrishna
 
How To Install and Generate Audit Reports in CentOS 7 or RHEL 7
How To Install and Generate Audit Reports in CentOS 7 or RHEL 7How To Install and Generate Audit Reports in CentOS 7 or RHEL 7
How To Install and Generate Audit Reports in CentOS 7 or RHEL 7VCP Muthukrishna
 
How To Install and Configure Open SSH Server on Ubuntu
How To Install and Configure Open SSH Server on UbuntuHow To Install and Configure Open SSH Server on Ubuntu
How To Install and Configure Open SSH Server on UbuntuVCP Muthukrishna
 
How To Install and Configure Apache SSL on CentOS 7
How To Install and Configure Apache SSL on CentOS 7How To Install and Configure Apache SSL on CentOS 7
How To Install and Configure Apache SSL on CentOS 7VCP Muthukrishna
 

What's hot (20)

How To Install and Configure GNome on CentOS 7
How To Install and Configure GNome on CentOS 7How To Install and Configure GNome on CentOS 7
How To Install and Configure GNome on CentOS 7
 
How To Configure VNC Server on CentOS 7
How To Configure VNC Server on CentOS 7How To Configure VNC Server on CentOS 7
How To Configure VNC Server on CentOS 7
 
How To Install and Configure SUDO on RHEL 7
How To Install and Configure SUDO on RHEL 7How To Install and Configure SUDO on RHEL 7
How To Install and Configure SUDO on RHEL 7
 
Configure Run Levels RHEL 7 or CentOS 7
Configure Run Levels RHEL 7 or CentOS 7Configure Run Levels RHEL 7 or CentOS 7
Configure Run Levels RHEL 7 or CentOS 7
 
How To Install and Use ABRT CLI on RHEL 7
How To Install and Use ABRT CLI on RHEL 7How To Install and Use ABRT CLI on RHEL 7
How To Install and Use ABRT CLI on RHEL 7
 
How To View Login History and Logout History on RHEL 7
How To View Login History and Logout History on RHEL 7How To View Login History and Logout History on RHEL 7
How To View Login History and Logout History on RHEL 7
 
How To Install and Configure Splunk on RHEL 7 in AWS
How To Install and Configure Splunk on RHEL 7 in AWSHow To Install and Configure Splunk on RHEL 7 in AWS
How To Install and Configure Splunk on RHEL 7 in AWS
 
How To Protect SSH Access with Fail2Ban on RHEL 7
How To Protect SSH Access with Fail2Ban on RHEL 7How To Protect SSH Access with Fail2Ban on RHEL 7
How To Protect SSH Access with Fail2Ban on RHEL 7
 
Install and Configure WordPress in AWS on RHEL 7 or CentOS 7
Install and Configure WordPress in AWS on RHEL 7 or CentOS 7Install and Configure WordPress in AWS on RHEL 7 or CentOS 7
Install and Configure WordPress in AWS on RHEL 7 or CentOS 7
 
How To Configure SNMP Logging on RHEL 7
How To Configure SNMP Logging on RHEL 7How To Configure SNMP Logging on RHEL 7
How To Configure SNMP Logging on RHEL 7
 
How to Install MariaDB Server or MySQL Server on CentOS 7
How to Install MariaDB Server or MySQL Server on CentOS 7How to Install MariaDB Server or MySQL Server on CentOS 7
How to Install MariaDB Server or MySQL Server on CentOS 7
 
How To Check IE Enhanced Security Is Enabled Windows PowerShell
How To Check IE Enhanced Security Is Enabled Windows PowerShellHow To Check IE Enhanced Security Is Enabled Windows PowerShell
How To Check IE Enhanced Security Is Enabled Windows PowerShell
 
Install VMWare Tools CentOS 7
Install VMWare Tools CentOS 7Install VMWare Tools CentOS 7
Install VMWare Tools CentOS 7
 
How to Upgrade Openfire on CentOS 7
How to Upgrade Openfire on CentOS 7How to Upgrade Openfire on CentOS 7
How to Upgrade Openfire on CentOS 7
 
How To Configure Amazon EC2 Load Balancer
How To Configure Amazon EC2 Load BalancerHow To Configure Amazon EC2 Load Balancer
How To Configure Amazon EC2 Load Balancer
 
DNF Failed To Open Cache
DNF Failed To Open CacheDNF Failed To Open Cache
DNF Failed To Open Cache
 
How to install and configure firewall on ubuntu os
How to install and configure firewall on ubuntu osHow to install and configure firewall on ubuntu os
How to install and configure firewall on ubuntu os
 
How To Install and Generate Audit Reports in CentOS 7 or RHEL 7
How To Install and Generate Audit Reports in CentOS 7 or RHEL 7How To Install and Generate Audit Reports in CentOS 7 or RHEL 7
How To Install and Generate Audit Reports in CentOS 7 or RHEL 7
 
How To Install and Configure Open SSH Server on Ubuntu
How To Install and Configure Open SSH Server on UbuntuHow To Install and Configure Open SSH Server on Ubuntu
How To Install and Configure Open SSH Server on Ubuntu
 
How To Install and Configure Apache SSL on CentOS 7
How To Install and Configure Apache SSL on CentOS 7How To Install and Configure Apache SSL on CentOS 7
How To Install and Configure Apache SSL on CentOS 7
 

Viewers also liked

Fleet Commander - Flock 2017
Fleet Commander - Flock 2017Fleet Commander - Flock 2017
Fleet Commander - Flock 2017Alberto Ruiz
 
PowerDNS Webinar - Part 2
PowerDNS Webinar - Part 2PowerDNS Webinar - Part 2
PowerDNS Webinar - Part 2Men and Mice
 
DNS High-Availability Tools - Open-Source Load Balancing Solutions
DNS High-Availability Tools - Open-Source Load Balancing SolutionsDNS High-Availability Tools - Open-Source Load Balancing Solutions
DNS High-Availability Tools - Open-Source Load Balancing SolutionsMen and Mice
 
What is new in BIND 9.11?
What is new in BIND 9.11?What is new in BIND 9.11?
What is new in BIND 9.11?Men and Mice
 
Linux system administrators-guide
Linux system administrators-guideLinux system administrators-guide
Linux system administrators-guideKeith Wright
 
Rooting your internals - Exploiting Internal Network Vulns via the Browser Us...
Rooting your internals - Exploiting Internal Network Vulns via the Browser Us...Rooting your internals - Exploiting Internal Network Vulns via the Browser Us...
Rooting your internals - Exploiting Internal Network Vulns via the Browser Us...Michele Orru
 
RHEL-7 Administrator Guide for RedHat 7
RHEL-7  Administrator Guide for RedHat 7RHEL-7  Administrator Guide for RedHat 7
RHEL-7 Administrator Guide for RedHat 7Hemnath R.
 
BIND 9 logging best practices
BIND 9 logging best practicesBIND 9 logging best practices
BIND 9 logging best practicesMen and Mice
 
Trabalho Linux - Red Hat
Trabalho Linux -  Red HatTrabalho Linux -  Red Hat
Trabalho Linux - Red HatAwsomeInfo
 
Malware Detection with OSSEC HIDS - OSSECCON 2014
Malware Detection with OSSEC HIDS - OSSECCON 2014Malware Detection with OSSEC HIDS - OSSECCON 2014
Malware Detection with OSSEC HIDS - OSSECCON 2014Santiago Bassett
 
RHCE (RED HAT CERTIFIED ENGINEERING)
RHCE (RED HAT CERTIFIED ENGINEERING)RHCE (RED HAT CERTIFIED ENGINEERING)
RHCE (RED HAT CERTIFIED ENGINEERING)Sumant Garg
 
Red hat linux
Red hat linuxRed hat linux
Red hat linuxluiiis1
 
I'm the butcher would you like some BeEF
I'm the butcher would you like some BeEFI'm the butcher would you like some BeEF
I'm the butcher would you like some BeEFMichele Orru
 

Viewers also liked (20)

Implementing ossec
Implementing ossecImplementing ossec
Implementing ossec
 
Ps3 linux
Ps3 linuxPs3 linux
Ps3 linux
 
Fleet Commander - Flock 2017
Fleet Commander - Flock 2017Fleet Commander - Flock 2017
Fleet Commander - Flock 2017
 
DNSTap Webinar
DNSTap WebinarDNSTap Webinar
DNSTap Webinar
 
PowerDNS Webinar - Part 2
PowerDNS Webinar - Part 2PowerDNS Webinar - Part 2
PowerDNS Webinar - Part 2
 
DNS High-Availability Tools - Open-Source Load Balancing Solutions
DNS High-Availability Tools - Open-Source Load Balancing SolutionsDNS High-Availability Tools - Open-Source Load Balancing Solutions
DNS High-Availability Tools - Open-Source Load Balancing Solutions
 
What is new in BIND 9.11?
What is new in BIND 9.11?What is new in BIND 9.11?
What is new in BIND 9.11?
 
Rh199 rhel 7
Rh199   rhel 7Rh199   rhel 7
Rh199 rhel 7
 
Linux system administrators-guide
Linux system administrators-guideLinux system administrators-guide
Linux system administrators-guide
 
Rooting your internals - Exploiting Internal Network Vulns via the Browser Us...
Rooting your internals - Exploiting Internal Network Vulns via the Browser Us...Rooting your internals - Exploiting Internal Network Vulns via the Browser Us...
Rooting your internals - Exploiting Internal Network Vulns via the Browser Us...
 
RHEL-7 Administrator Guide for RedHat 7
RHEL-7  Administrator Guide for RedHat 7RHEL-7  Administrator Guide for RedHat 7
RHEL-7 Administrator Guide for RedHat 7
 
Install Linux CentOS 7.0
Install Linux CentOS 7.0Install Linux CentOS 7.0
Install Linux CentOS 7.0
 
BIND 9 logging best practices
BIND 9 logging best practicesBIND 9 logging best practices
BIND 9 logging best practices
 
Rh318 rhev3
Rh318 rhev3Rh318 rhev3
Rh318 rhev3
 
Trabalho Linux - Red Hat
Trabalho Linux -  Red HatTrabalho Linux -  Red Hat
Trabalho Linux - Red Hat
 
Malware Detection with OSSEC HIDS - OSSECCON 2014
Malware Detection with OSSEC HIDS - OSSECCON 2014Malware Detection with OSSEC HIDS - OSSECCON 2014
Malware Detection with OSSEC HIDS - OSSECCON 2014
 
RHCE (RED HAT CERTIFIED ENGINEERING)
RHCE (RED HAT CERTIFIED ENGINEERING)RHCE (RED HAT CERTIFIED ENGINEERING)
RHCE (RED HAT CERTIFIED ENGINEERING)
 
Red hat linux
Red hat linuxRed hat linux
Red hat linux
 
Rh436 pdf
Rh436 pdfRh436 pdf
Rh436 pdf
 
I'm the butcher would you like some BeEF
I'm the butcher would you like some BeEFI'm the butcher would you like some BeEF
I'm the butcher would you like some BeEF
 

Similar to Centos 7 Installation Steps

SOP - 2013 Server Build
SOP - 2013 Server BuildSOP - 2013 Server Build
SOP - 2013 Server BuildRobert Jones
 
9adcab7c 1 crash
9adcab7c 1 crash9adcab7c 1 crash
9adcab7c 1 crashPrezMan3141
 
Lab 4 Configure End Devices.pdf
Lab 4 Configure End Devices.pdfLab 4 Configure End Devices.pdf
Lab 4 Configure End Devices.pdfHaseebAli795005
 
Lotus notes-703-1232746032205457-2
Lotus notes-703-1232746032205457-2Lotus notes-703-1232746032205457-2
Lotus notes-703-1232746032205457-2IN023227
 
How to install Chromixium 0.7a
How to install Chromixium 0.7aHow to install Chromixium 0.7a
How to install Chromixium 0.7aRichJack
 
Windows xp and windows 7 installaton
Windows xp and windows 7 installatonWindows xp and windows 7 installaton
Windows xp and windows 7 installatonSiddharth Jain
 
Configuring virtualization on single linux machine
Configuring virtualization on single linux machineConfiguring virtualization on single linux machine
Configuring virtualization on single linux machinesudhir singh yadav
 
Cent os6 installation with virtualization packages
Cent os6 installation with virtualization packagesCent os6 installation with virtualization packages
Cent os6 installation with virtualization packagessudhir singh yadav
 
itft_Installing windows 2003
itft_Installing windows 2003 itft_Installing windows 2003
itft_Installing windows 2003 Swati Aggarwal
 
Pc hardware course work
Pc hardware course workPc hardware course work
Pc hardware course workIsmail Mukiibi
 
Formating computer
Formating computerFormating computer
Formating computerargusacademy
 
Raid 1 and raid 5 configuration in windows server
Raid 1 and raid 5 configuration in windows serverRaid 1 and raid 5 configuration in windows server
Raid 1 and raid 5 configuration in windows serversudhir singh yadav
 

Similar to Centos 7 Installation Steps (20)

Win xp setup
Win xp setupWin xp setup
Win xp setup
 
Win xp setup
Win xp setupWin xp setup
Win xp setup
 
SOP - 2013 Server Build
SOP - 2013 Server BuildSOP - 2013 Server Build
SOP - 2013 Server Build
 
9adcab7c 1 crash
9adcab7c 1 crash9adcab7c 1 crash
9adcab7c 1 crash
 
Win2k
Win2kWin2k
Win2k
 
Lab 4 Configure End Devices.pdf
Lab 4 Configure End Devices.pdfLab 4 Configure End Devices.pdf
Lab 4 Configure End Devices.pdf
 
Win2k (2)
Win2k (2)Win2k (2)
Win2k (2)
 
Lotus notes-703-1232746032205457-2
Lotus notes-703-1232746032205457-2Lotus notes-703-1232746032205457-2
Lotus notes-703-1232746032205457-2
 
How to install Chromixium 0.7a
How to install Chromixium 0.7aHow to install Chromixium 0.7a
How to install Chromixium 0.7a
 
Windows xp and windows 7 installaton
Windows xp and windows 7 installatonWindows xp and windows 7 installaton
Windows xp and windows 7 installaton
 
Configuring virtualization on single linux machine
Configuring virtualization on single linux machineConfiguring virtualization on single linux machine
Configuring virtualization on single linux machine
 
How to install windows xp
How to install windows xpHow to install windows xp
How to install windows xp
 
BitNation Client-Server Manual
BitNation Client-Server ManualBitNation Client-Server Manual
BitNation Client-Server Manual
 
Lotus Notes 7.0.3
Lotus Notes 7.0.3Lotus Notes 7.0.3
Lotus Notes 7.0.3
 
Cent os6 installation with virtualization packages
Cent os6 installation with virtualization packagesCent os6 installation with virtualization packages
Cent os6 installation with virtualization packages
 
Win xp setup
Win xp setupWin xp setup
Win xp setup
 
itft_Installing windows 2003
itft_Installing windows 2003 itft_Installing windows 2003
itft_Installing windows 2003
 
Pc hardware course work
Pc hardware course workPc hardware course work
Pc hardware course work
 
Formating computer
Formating computerFormating computer
Formating computer
 
Raid 1 and raid 5 configuration in windows server
Raid 1 and raid 5 configuration in windows serverRaid 1 and raid 5 configuration in windows server
Raid 1 and raid 5 configuration in windows server
 

Recently uploaded

Making_way_through_DLL_hollowing_inspite_of_CFG_by_Debjeet Banerjee.pptx
Making_way_through_DLL_hollowing_inspite_of_CFG_by_Debjeet Banerjee.pptxMaking_way_through_DLL_hollowing_inspite_of_CFG_by_Debjeet Banerjee.pptx
Making_way_through_DLL_hollowing_inspite_of_CFG_by_Debjeet Banerjee.pptxnull - The Open Security Community
 
Integration and Automation in Practice: CI/CD in Mule Integration and Automat...
Integration and Automation in Practice: CI/CD in Mule Integration and Automat...Integration and Automation in Practice: CI/CD in Mule Integration and Automat...
Integration and Automation in Practice: CI/CD in Mule Integration and Automat...Patryk Bandurski
 
Connect Wave/ connectwave Pitch Deck Presentation
Connect Wave/ connectwave Pitch Deck PresentationConnect Wave/ connectwave Pitch Deck Presentation
Connect Wave/ connectwave Pitch Deck PresentationSlibray Presentation
 
Scanning the Internet for External Cloud Exposures via SSL Certs
Scanning the Internet for External Cloud Exposures via SSL CertsScanning the Internet for External Cloud Exposures via SSL Certs
Scanning the Internet for External Cloud Exposures via SSL CertsRizwan Syed
 
Advanced Test Driven-Development @ php[tek] 2024
Advanced Test Driven-Development @ php[tek] 2024Advanced Test Driven-Development @ php[tek] 2024
Advanced Test Driven-Development @ php[tek] 2024Scott Keck-Warren
 
Benefits Of Flutter Compared To Other Frameworks
Benefits Of Flutter Compared To Other FrameworksBenefits Of Flutter Compared To Other Frameworks
Benefits Of Flutter Compared To Other FrameworksSoftradix Technologies
 
Pigging Solutions Piggable Sweeping Elbows
Pigging Solutions Piggable Sweeping ElbowsPigging Solutions Piggable Sweeping Elbows
Pigging Solutions Piggable Sweeping ElbowsPigging Solutions
 
Unblocking The Main Thread Solving ANRs and Frozen Frames
Unblocking The Main Thread Solving ANRs and Frozen FramesUnblocking The Main Thread Solving ANRs and Frozen Frames
Unblocking The Main Thread Solving ANRs and Frozen FramesSinan KOZAK
 
APIForce Zurich 5 April Automation LPDG
APIForce Zurich 5 April  Automation LPDGAPIForce Zurich 5 April  Automation LPDG
APIForce Zurich 5 April Automation LPDGMarianaLemus7
 
Install Stable Diffusion in windows machine
Install Stable Diffusion in windows machineInstall Stable Diffusion in windows machine
Install Stable Diffusion in windows machinePadma Pradeep
 
Streamlining Python Development: A Guide to a Modern Project Setup
Streamlining Python Development: A Guide to a Modern Project SetupStreamlining Python Development: A Guide to a Modern Project Setup
Streamlining Python Development: A Guide to a Modern Project SetupFlorian Wilhelm
 
costume and set research powerpoint presentation
costume and set research powerpoint presentationcostume and set research powerpoint presentation
costume and set research powerpoint presentationphoebematthew05
 
Designing IA for AI - Information Architecture Conference 2024
Designing IA for AI - Information Architecture Conference 2024Designing IA for AI - Information Architecture Conference 2024
Designing IA for AI - Information Architecture Conference 2024Enterprise Knowledge
 
#StandardsGoals for 2024: What’s new for BISAC - Tech Forum 2024
#StandardsGoals for 2024: What’s new for BISAC - Tech Forum 2024#StandardsGoals for 2024: What’s new for BISAC - Tech Forum 2024
#StandardsGoals for 2024: What’s new for BISAC - Tech Forum 2024BookNet Canada
 
Kotlin Multiplatform & Compose Multiplatform - Starter kit for pragmatics
Kotlin Multiplatform & Compose Multiplatform - Starter kit for pragmaticsKotlin Multiplatform & Compose Multiplatform - Starter kit for pragmatics
Kotlin Multiplatform & Compose Multiplatform - Starter kit for pragmaticscarlostorres15106
 
"LLMs for Python Engineers: Advanced Data Analysis and Semantic Kernel",Oleks...
"LLMs for Python Engineers: Advanced Data Analysis and Semantic Kernel",Oleks..."LLMs for Python Engineers: Advanced Data Analysis and Semantic Kernel",Oleks...
"LLMs for Python Engineers: Advanced Data Analysis and Semantic Kernel",Oleks...Fwdays
 
Swan(sea) Song – personal research during my six years at Swansea ... and bey...
Swan(sea) Song – personal research during my six years at Swansea ... and bey...Swan(sea) Song – personal research during my six years at Swansea ... and bey...
Swan(sea) Song – personal research during my six years at Swansea ... and bey...Alan Dix
 
"Federated learning: out of reach no matter how close",Oleksandr Lapshyn
"Federated learning: out of reach no matter how close",Oleksandr Lapshyn"Federated learning: out of reach no matter how close",Oleksandr Lapshyn
"Federated learning: out of reach no matter how close",Oleksandr LapshynFwdays
 
Snow Chain-Integrated Tire for a Safe Drive on Winter Roads
Snow Chain-Integrated Tire for a Safe Drive on Winter RoadsSnow Chain-Integrated Tire for a Safe Drive on Winter Roads
Snow Chain-Integrated Tire for a Safe Drive on Winter RoadsHyundai Motor Group
 

Recently uploaded (20)

Making_way_through_DLL_hollowing_inspite_of_CFG_by_Debjeet Banerjee.pptx
Making_way_through_DLL_hollowing_inspite_of_CFG_by_Debjeet Banerjee.pptxMaking_way_through_DLL_hollowing_inspite_of_CFG_by_Debjeet Banerjee.pptx
Making_way_through_DLL_hollowing_inspite_of_CFG_by_Debjeet Banerjee.pptx
 
Integration and Automation in Practice: CI/CD in Mule Integration and Automat...
Integration and Automation in Practice: CI/CD in Mule Integration and Automat...Integration and Automation in Practice: CI/CD in Mule Integration and Automat...
Integration and Automation in Practice: CI/CD in Mule Integration and Automat...
 
E-Vehicle_Hacking_by_Parul Sharma_null_owasp.pptx
E-Vehicle_Hacking_by_Parul Sharma_null_owasp.pptxE-Vehicle_Hacking_by_Parul Sharma_null_owasp.pptx
E-Vehicle_Hacking_by_Parul Sharma_null_owasp.pptx
 
Connect Wave/ connectwave Pitch Deck Presentation
Connect Wave/ connectwave Pitch Deck PresentationConnect Wave/ connectwave Pitch Deck Presentation
Connect Wave/ connectwave Pitch Deck Presentation
 
Scanning the Internet for External Cloud Exposures via SSL Certs
Scanning the Internet for External Cloud Exposures via SSL CertsScanning the Internet for External Cloud Exposures via SSL Certs
Scanning the Internet for External Cloud Exposures via SSL Certs
 
Advanced Test Driven-Development @ php[tek] 2024
Advanced Test Driven-Development @ php[tek] 2024Advanced Test Driven-Development @ php[tek] 2024
Advanced Test Driven-Development @ php[tek] 2024
 
Benefits Of Flutter Compared To Other Frameworks
Benefits Of Flutter Compared To Other FrameworksBenefits Of Flutter Compared To Other Frameworks
Benefits Of Flutter Compared To Other Frameworks
 
Pigging Solutions Piggable Sweeping Elbows
Pigging Solutions Piggable Sweeping ElbowsPigging Solutions Piggable Sweeping Elbows
Pigging Solutions Piggable Sweeping Elbows
 
Unblocking The Main Thread Solving ANRs and Frozen Frames
Unblocking The Main Thread Solving ANRs and Frozen FramesUnblocking The Main Thread Solving ANRs and Frozen Frames
Unblocking The Main Thread Solving ANRs and Frozen Frames
 
APIForce Zurich 5 April Automation LPDG
APIForce Zurich 5 April  Automation LPDGAPIForce Zurich 5 April  Automation LPDG
APIForce Zurich 5 April Automation LPDG
 
Install Stable Diffusion in windows machine
Install Stable Diffusion in windows machineInstall Stable Diffusion in windows machine
Install Stable Diffusion in windows machine
 
Streamlining Python Development: A Guide to a Modern Project Setup
Streamlining Python Development: A Guide to a Modern Project SetupStreamlining Python Development: A Guide to a Modern Project Setup
Streamlining Python Development: A Guide to a Modern Project Setup
 
costume and set research powerpoint presentation
costume and set research powerpoint presentationcostume and set research powerpoint presentation
costume and set research powerpoint presentation
 
Designing IA for AI - Information Architecture Conference 2024
Designing IA for AI - Information Architecture Conference 2024Designing IA for AI - Information Architecture Conference 2024
Designing IA for AI - Information Architecture Conference 2024
 
#StandardsGoals for 2024: What’s new for BISAC - Tech Forum 2024
#StandardsGoals for 2024: What’s new for BISAC - Tech Forum 2024#StandardsGoals for 2024: What’s new for BISAC - Tech Forum 2024
#StandardsGoals for 2024: What’s new for BISAC - Tech Forum 2024
 
Kotlin Multiplatform & Compose Multiplatform - Starter kit for pragmatics
Kotlin Multiplatform & Compose Multiplatform - Starter kit for pragmaticsKotlin Multiplatform & Compose Multiplatform - Starter kit for pragmatics
Kotlin Multiplatform & Compose Multiplatform - Starter kit for pragmatics
 
"LLMs for Python Engineers: Advanced Data Analysis and Semantic Kernel",Oleks...
"LLMs for Python Engineers: Advanced Data Analysis and Semantic Kernel",Oleks..."LLMs for Python Engineers: Advanced Data Analysis and Semantic Kernel",Oleks...
"LLMs for Python Engineers: Advanced Data Analysis and Semantic Kernel",Oleks...
 
Swan(sea) Song – personal research during my six years at Swansea ... and bey...
Swan(sea) Song – personal research during my six years at Swansea ... and bey...Swan(sea) Song – personal research during my six years at Swansea ... and bey...
Swan(sea) Song – personal research during my six years at Swansea ... and bey...
 
"Federated learning: out of reach no matter how close",Oleksandr Lapshyn
"Federated learning: out of reach no matter how close",Oleksandr Lapshyn"Federated learning: out of reach no matter how close",Oleksandr Lapshyn
"Federated learning: out of reach no matter how close",Oleksandr Lapshyn
 
Snow Chain-Integrated Tire for a Safe Drive on Winter Roads
Snow Chain-Integrated Tire for a Safe Drive on Winter RoadsSnow Chain-Integrated Tire for a Safe Drive on Winter Roads
Snow Chain-Integrated Tire for a Safe Drive on Winter Roads
 

Centos 7 Installation Steps

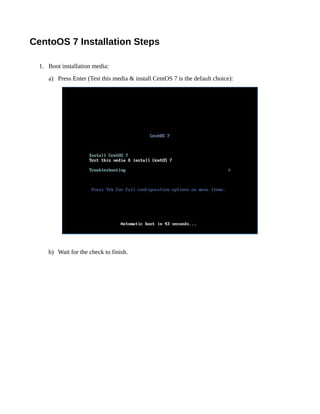
  • 1. CentoOS 7 Installation Steps 1. Boot installation media: a) Press Enter (Test this media & install CentOS 7 is the default choice): b) Wait for the check to finish.
  • 2. c) Watch the installer start up. Anaconda will list the purpose of each virtual console (CTRL+ALT+F1 through F5): 2. Select language to use and click Continue.
  • 3. 3. The Installation Summary screen will be presented with several icons to click on. Unfortunately, networking is not enabled by default, and appears as the last thing to get done. Networking should be done first, so NTP can be enabled in the Date and Time settings. Automatic partitioning is already selected, but must be confirmed. Manual partitioning can also be done to allow smoother updates. The steps that follow will lead you through settings in a sensible order allowing you to enable NTP, and perform easy upgrades.
  • 4. 4. Click the Network and Hostname icon and configure these items first: a) Turn on interface in upper right corner. b) Click Configure in lower right, if static configuration desired. c) Set hostname in lower left corner to centos7.example.com (or another FQDN). d) Click Done in upper left corner.
  • 5. 5. Click the Date and Time icon to make these changes: a) Set time in lower left corner. b) Enable NTP in upper right corner. c) Click Done in upper left corner.
  • 6. 6. Click the Software Selection icon to make the choices below: a) GNOME Desktop on left side. b) GNOME Applications on right side. c) Internet Applications on right side. d) Office Suite and Productivity on right side (for larger installations) e) Legacy X Window System Compatibility. f) Compatibility Libraries. g) Click Done in upper left corner.
  • 7. 7. Click the Installation Destination icon to perform manual partitioning, , if you want easy upgrades, otherwise allow automatic partitioning and skip this step. Note: The values shown are appropriate for an installation to an 8 GiB disk. Larger disks` should have up to 50 GiB root partition with the remainder allocated to the home partition. a) Select to create the partitions manually. b) Click Done in upper left corner. c) Click to create mount points automatically. d) Select root partition and reduce Desired Capacity by amount for home. e) Click Update Settings in lower right corner. f) Click + button in lower left corner. g) Choose /home as the mount point. h) Enter the Desired Capacity reduced from the root partition. i) Click Add Mount Point. j) Click the Done button in the upper left corner. k) If everything looks right, click Accept Changes (or return).
  • 8. 8. If your Installation Summary looks like the capture below: a) Click Begin Installation in lower left corner. b) The Configuration screen should be shown as below. c) Set the root password and create a user while installation proceeds.
  • 9. 9. Click Root Password to set the root password: a) Type a strong password. b) Retype the same strong password. c) Write down, store, or memorize your root password. d) Click Done in upper right corner.
  • 10. 10. Click User Creation to create an ordinary user account: a) Type your full name. b) Possibly edit your user name. c) Select to make the user an Administrator (member of wheel group). d) Type a strong password. e) Retype the same password. f) Write down, store, or memorize your user password. g) Click Done in the upper left corner.
  • 11. 11. Make sure the Configuration of the User Settings is finished. It should look like the capture below. The installation should continue for some time, so it is often a good time for a break!
  • 12. 12. Once it has completed installing the software packages it should appear similar to the image below. a) Click to reboot the system. b) Wait while the system restarts.
  • 13. 13. The time to reboot might be unusually long. Be patient if the screen looks like this: 14. The first step of the Initial Setup is to accept the license. Click on the License Information icon on the left side of the screen.
  • 14. 15. To accept the license: a) Click the checkbox in the lower left corner of the screen. b) Click the Done button in the upper left corner of the screen.
  • 15. 16. Finish the Initial Setup Configuration by clicking the Finish Configuration button.
  • 16. 17. Configure Kdump next: a) Disabling kdump is recommended by unchecking the Enable kdump checkbox. b) Click the Forward button. c) Click the No button to avoid rebooting. d) Wait while the login greeter loads.
  • 17. 18. Login to the system: a) Click the name of the user. b) Type the password. c) Click the Sign In button.
  • 18. 19. Start the Localization dialog: a) Choose your language and click Next. b) Click the Next button to continue (Use the + button if you want to add more).
  • 19. c) Click the Next button to continue (Use Add Account button if you want to add an account). d) Finally, click the Start using CentOS Linux button!