
Recommended
More Related Content
Similar to Bb collaborate tutor instructions 2013
Similar to Bb collaborate tutor instructions 2013 (20)
More from vccsnewhorizons
More from vccsnewhorizons (17)
Bb collaborate tutor instructions 2013
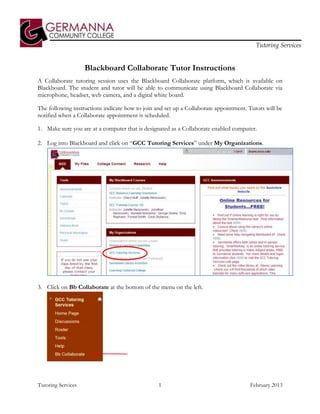
- 1. Tutoring Services Blackboard Collaborate Tutor Instructions A Collaborate tutoring session uses the Blackboard Collaborate platform, which is available on Blackboard. The student and tutor will be able to communicate using Blackboard Collaborate via microphone, headset, web camera, and a digital white board. The following instructions indicate how to join and set up a Collaborate appointment. Tutors will be notified when a Collaborate appointment is scheduled. 1. Make sure you are at a computer that is designated as a Collaborate enabled computer. 2. Log into Blackboard and click on “GCC Tutoring Services” under My Organizations. 3. Click on Bb Collaborate at the bottom of the menu on the left. Tutoring Services 1 February 2013
- 2. Tutoring Services 4. Click on the Collaborate logo or the name of the session to start loading the session. 5. Once the session has started, click Close in the Recording Reminder Box. Tutoring Services 2 February 2013
- 3. Tutoring Services 6. Click the Talk button. The student will be able to hear you when you speak into the microphone. Remind the student to run the Audio Set up Wizard then click Talk. Click any icon marked with an X in the Global Options Menu to turn that feature on. 7. If necessary, click the icons next to the words MAIN ROOMto grant the student audio, video, chat, and whiteboard or other permissions. Note: At this time Daniel Technology Center Computerdoes not have video capability. 8. Click the Videobutton to transmit video of yourself. You may also set up a photo of yourself in your profile that will automatically appear if you cannot use the video feature. Tutoring Services 3 February 2013
- 4. Tutoring Services 9. Don’t forget to ask the student to take the tutoring survey before disconnecting. Click the Web Tour button and copy and paste the survey link (use Ctrl-Vto paste) into the field then enter. 10. Once you reach the survey, uncheck the Follow Me box. You will not be able to see the student’s response on the survey while he/she is taking the survey (let the student know this). Activity Indicators Icons may appear next to the student’s name. These icons indicate what feature the student is currently using. Tutoring Services 4 February 2013
- 5. Tutoring Services Status Indicators Status indicators appear next to the student’s name when data is being sent and received. Indicators signify a delay in sending and/or receipt of data. Keep an eye on the indicators and you will be able to see when it might be appropriate to adjust your pace (temporarily stop talking, turn off your video, or pause your application sharing) so the student can catch up. In the example: Charlie is talking Ricky is experiencing moderate delay in receiving audio Vivian is experiencing a significant delay in receiving audio Ethel is not having any problems receiving audio Tutoring Services 5 February 2013
- 6. Tutoring Services Features of the Blackboard Collaborate Main Window Audio Setup Whiteboard Application Web Tour Navigate Pages Load Content Start Recoding Wizard Sharing View Pages Audio & Show Page Video Panel Explorer Explore Mode Global Content Area Options Menu Whiteboard Participants Tools Palette Panel Chat panel Tutoring Services 6 February 2013