
Recommended
Recommended
More Related Content
More from todd801
More from todd801 (20)
Recently uploaded
Recently uploaded (20)
The 90-second oil change Castrol claims a breakthroughNatha.docx
- 1. The 90-second oil change: Castrol claims a breakthrough Nathan Bomey, USA TODAY Published 12:09 a.m. ET Oct. 8, 2015 | Updated 10:37 a.m. ET Oct. 8, 2015 The oil change may be about to endure a change of its own. A big motor-oil maker plans to announce Thursday that it has achieved a breakthrough in engine- lubrication design that makes it easy to change the oil in a vehicle in as little as 90 seconds, Castrol, a division of BP, says the modification over current des igns also lowers carbon emissions and fosters recycling. The new system, which Castrol has dubbed Nexcel, must be inte grated into vehicle engines at the design stage. That means it won't hit mainstream cars for another five years — about the length of time between major model changes for man y automakers. Castrol said it's in discussions with several major automakers to speed adoption of the Nexcel system, which it brags is significantly faster than the 20 minutes it traditionally takes to get an oil change.
- 2. It's "a revolutionary technology that's the most significant chan ge in oil servicing since the introduction of the vehicle," said Steve Goodier, project lea der. "The average driver will not notice a direct difference as far as driving it down the r oad is concerned. Where the driver will see a benefit — and it's quite significant — is time." A product development team of about 50 people, including tech nologists in the United Kingdom, U.S. and Germany, created the system. The company did not reveal many details about the technology, which it said also offers environmental benefits. It lowers carbon emissions when the car is driving and enables improved recycling of oil cells back into refined petrole um. "It means you do not waste a drop of lubricant during the oil-ch ange process," Goodier said. The system will make its debut in the Aston Martin Vulcan supe rcar, which can only be driven on racetracks, not streets. But Castrol said that decision was made to speed the process of development and testing, allowing other automakers to gauge performance before adopting the system. 90-second oil change? It could be a reality in 5 years. Shannon Rae Green reports.
- 3. 4 CONNECT TWEET 117 LINKEDIN COMMENT EMAIL MORE (Photo: Castrol) 4 117 SUBSCRIBE NOW to get home delivery NEWS SPORTS LIFE TECH TRAVEL OPINION 85° CROSSWORDS SOLAR ECLIPSE 2017 MOREMONEY A key test is whether the oil delivers smooth handling, braking and accelerating. Castrol said the technology "functioned smoothly" in a test in w hich a vehicle went from 62 miles per hour to a full stop in 1.6 seconds. The system has a lso been tested with everything from cheap minicars to racecars. What's unclear is how the technology could affect oil-change se rvice locations, which generally charge anywhere from $20 to $55 for a standard oil ch ange, according to consumer information website CostHelper.com.
- 4. Nexcel would make it substantially easier for consumers to chan ge their own oil, Goodier said. He said it's too early to discuss pricing for automa kers that may integrate the system into their cars or consumers who experience the simp lified oil-change process. Goodier said he "can't imagine" it would substantially disrupt th e oil-change service business model. But fewer hours spent on oil changes in the shop could mean fe wer jobs for technicians if service locations don't adapt. Follow USA TODAY reporter Nathan Bomey on Twitter @Nath anBomey. Cycle of Copper Reactions Introduction A renowned 19th century chemist described his first experience with chemicals in the following way: “While reading a textbook of chemistry I came upon the
- 5. statement, "nitric acid acts upon copper." I was getting tired of reading such absurd stuff and I was determined to see what this meant. Copper was more less familiar to me, for copper cents were then in use. I had seen a bottle marked nitric acid on a table in the doctor's office where I was then "doing time." I did not know its peculiarities, but the spirit of adventure was upon me. Having nitric acid and copper, I had only to learn what the words "act upon" meant. The statement "nitric acid acts upon copper" would be something more than mere words. All was still. In the interest of knowledge, I was even willing to sacrifice one of the few copper cents then in my possession. I put one of them on the table, opened the bottle marked nitric acid, poured some of the liquid on the copper and prepared to make an observation. But what was this wonderful thing which I beheld? The cent was already changed, and it was no small change either. A green-blue liquid foamed and fumed over the cent and over the table. The air in
- 6. the neighborhood of the performance became colored dark red. A great colored cloud arose. This was disagreeable and suffocating. How should I stop this? I tried to get rid of the objectionable mess by picking it up and throwing it out of the window. I learned another fact. Nitric acid not only acts upon copper, but it acts upon fingers. The pain led to another unpremeditated experiment. I drew my fingers across my trousers and another fact was discovered. Nitric acid acts upon trousers. Taking everything into consideration, that was the most impressive experiment and relatively probably the most costly experiment I have ever performed. ... It was a revelation to me. It resulted in a desire on my part to learn more about that remarkable kind of action. Plainly, the only way to learn about it was to see its results, to experiment, to work in a laboratory.” from F. H. Getman, "The Life of Ira Remsen"; Journal of Chemical Education: Easton,
- 7. Pennsylvania, 1940; pp 9-10. Chemistry is the study of chemical reactions – the rearrangement of atoms to form new materials. The passage above describes a variety of interesting reactions, some of which you will perform in this experiment. In this experiment you will perform a sequence of reactions of copper that form a cycle. As you record your observations, try to interpret them in terms of chemical equations. In particular, think about grouping them by reaction type. You will also practice quantitative laboratory techniques by determining the percent recovery of the initial sample of copper. The sequence or reactions in this lab begins and ends with copper metal, so it is called a cycle of copper reactions. Because no copper is added or removed between the initial and final steps, and because each reaction goes to completion, you should be able to quantitatively recover
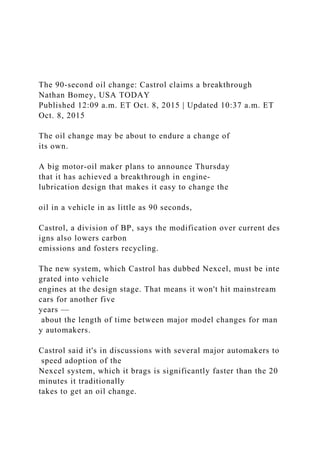
- 8. all of the copper you started with if you are careful and skillful. This diagram shows in an abbreviated form the reactions of the copper cycle. 1 2 Cu (s) → Cu(NO3)2 (aq) → Cu(OH)2 (aq) ↑ 5 ↓ 3 4 CuSO4 (aq) ← CuO (s) Obviously, these reactions are not balanced. They simply convey the changes that copper undergoes during the cycle. The numbers next each reaction arrow correspond to the following balanced reactions. (1) 8 HNO3 (aq) + 3 Cu (s) + O2 (g) → 3 Cu(NO3)2 (aq) + 4 H2O (l) + 2 NO2 (g) (2) Cu(NO3)2 (aq) + 2 NaOH (aq) → Cu(OH)2 (s) + 2 NaNO3 (aq)
- 9. (3) Cu(OH)2 (s) → CuO (s) + H2O (l) (4) CuO (s) + H2SO4 (aq) → CuSO4 (aq) + H2O (l) (5) CuSO4 (aq) + Zn (s) → ZnSO4 (aq) + Cu (s) Four types of reactions are represented here. Reaction (1) is an oxidation-reduction (redox) reaction. This involves the transfer of electrons, in this case from copper to nitrogen. Reaction (2) is a double-replacement precipitation reaction. Note that the nitrate and hydroxide ions switch partners as the copper hydroxide precipitates (forms a solid). Reaction (3) is a decomposition. The hydroxide ion breaks apart, leaving one oxygen combined with the copper. Reaction (4) is an acid-base reaction with a single replacement. The sulfate ion switches from the hydrogen to the copper, while the protons (hydrogen ions) combine with the oxide ion forming water. In this example, the oxide ion is a Bronsted- Lowry base, an acceptor of protons. The final reaction is another redox reaction in which zinc loses electrons to copper.
- 10. This experiment requires you to successfully complete the following tasks: • Carefully follow the procedure and work safely • Make detailed visual observations about the reactions which occur • Record data and perform calculations Most experiments require you to perform these tasks. They are all a part of being a successful scientist or engineer. Equipment, Chemicals and Supplies 2 M sulfuric acid (H2SO4) plastic weigh boat nitrile gloves 3 M sodium hydroxide (NaOH) 125 mL Erlenmeyer flask hot plate 5 M nitric acid (HNO3) 600 mL beaker metal tongs 2 M hydrochloric acid (HCl) 250 mL beaker metal scoopula
- 11. methanol 50 mL graduated cylinder glass stir rod zinc metal (Zn) granules 10 mL graduated cylinder wash bottle w/ deionized water copper granules (Cu) Safety Hazards Place your backpacks, skateboards, etc. on the counter in the back of the lab. Lab sessions are crowded, and it is important that people don’t trip and fall when working around open flames and chemicals. As with many experiments, the chemicals you will work with today can be harmful if you do not work safely. Understand what you are doing, be careful, and wear your safety protection (goggles and lab coat at all times). You will perform this experiment in the fume hood. It is not safe to breathe large amounts of some reactants and products and some gases produced by these reactions. If you accidentally spill a solution, notify the GSA immediately.
- 12. The GSA will clean up the spill. If some solution gets on your hands or nitrile gloves, wash them for a minimum of 15 minutes with soap and water after removing the gloves. While it seems like this is a long time to wash your hands, extra washing is necessary to remove chemicals which might have soaked into your skin. Pay attention to the GSA and follow all his or her instructions. Procedure
- 13. To work safely and avoid making mistakes and wasting time, read the entire procedure before starting the experiment. Record your observations for each question (denoted by [...] notation) on your data sheet. Do this as you perform the experiment. You will not remember what happened later after lab when you write your lab report’s Results section. NOTE: THE EXPERIMENT WILL BE PERFORMED IN THE FUME HOOD. 1. Take a 600 mL beaker and fill it about three quarters (350 mL) with warm water. Use heat- resistant gloves when pouring the warm water. Place the beaker on the hot plate IN THE FUME HOOD. Turn on the hot plate to a setting of 3 to keep the water warm. Do not allow the water to boil. 2. Weigh a clean 125 mL Erlenmeyer flask and record the mass on your data sheet. 3. Using a weigh boat, tare (zero out) the balance and add
- 14. around 0.40 grams of copper granules. (This is a very small amount. The tip of the scoopula should be enough.) Record the mass of the copper granules and flask on your data sheet. Add the granules to the Erlenmeyer flask by bending the weigh boat to avoid losing the product. 4. Measure 10 mL of 5.0 M nitric acid (HNO3) using a 10mL graduated cylinder. Please use caution and wear nitrile gloves when pouring chemicals. If any solution spills on your gloves, remove them, and wash your hands for a minimum of 15 minutes. 5. Add the 5.0 M nitric acid to the Erlenmeyer flask with the copper granules. Cradle the Erlenmeyer flask on top of the water bath for about 45 seconds. If any solution spills on yourself or the surface of the fume hood, notify the GSA immediately. Please keep the hood’s sash down to avoid inhaling the harmful fumes. Do not open all the way up as reactions take place. Remove the flask, swirl the solution and place it back on top of the water
- 15. bath. Keep repeating this step until all the copper has dissolved. [1] What is in the solution when the reaction is complete? Record your observations on the data sheet. 6. Once the copper dissolves, remove the flask from the water bath. Place the flask on the bench in the fume hood to cool. When the solution is cool, add 15 mL of deionized water. 7. Measure 15.0 mL of 3.0M NaOH with a 50mL graduated cylinder and add it to the Erlenmeyer flask while stirring the solution with a glass rod to precipitate Cu(OH)2. [2] What is formed in the solution besides Cu(OH)2? Record your observations on the data sheet. 8. Place the Erlenmeyer flask back on the hot plate (setting 6). Heat, DO NOT BOIL, the solution. Gently stir the solution with a glass rod to prevent
- 16. bumping (i.e. the formation of a large steam bubble in a locally overheated area). Record your observations on the data sheet. If your solution begins to boil, remove the Erlenmeyer flask using metal tongs and set it on the counter. Turn off the hot plate. 9. Once the transformation is complete, remove the solution from the hot plate using metal tongs and continue stirring for one minute on the bench. Then allow the solid material to settle. 10. Once settled, decant (pour off) the supernatant liquid into a 600 mL waste beaker at your bench. Be careful; avoid losing any solid. If you need more space this can be done outside of the hood. See the video Decantation for assistance (http://youtu.be/Xassu5TBFDs) 11. Add about 100 mL of hot deionized water to the solid that remains in the flask. Allow the solid to settle again and decant once more into the waste beaker. If you need more space this can
- 17. be done outside of the hood. [3] What is removed by the washing and decantation process? Record your observations on the data sheet. 12. Measure 15 mL of 2.0 M H2SO4 with a 50mL graduated cylinder. Pour this solution into the flask that contains the solid while stirring. [4] What is in the solution now? Record your observations on the data sheet. 13. Using a weigh boat, weigh 1.0 gram of zinc powder. IN THE FUME HOOD, add the zinc metal powder to the flask containing the solid solution. Stir until the supernatant liquid is colorless. If the zinc powder forms clumps in the solution, break the clumps apart with your stirring rod. [5] What happens? [6] What is the gas produced? Record your observations on the
- 18. data sheet. 14. When the evolution of gas ceases (no more bubbles), decant the supernatant liquid into the waste beaker. 15. If you see any silvery grains of unreacted Zn mixed in with your recovered Cu, add 5 mL of 2.0 M HCl and warm, but do not boil the solution. When the evolution of gas ceases, allow the solution to cool and decant the supernatant liquid into the waste beaker. 16. Wash the recovered Cu with about 5 mL of deionized water. Allow the solid to settle and decant the wash water into the waste beaker. Repeat the washing and decantation at least two more times. Dispose of all aqueous waste in your waste beaker in the container labeled A. http://youtu.be/Xassu5TBFDs 17. In the hood, wash the solid with about 5 mL of methanol. Allow the solid to settle and decant the methanol. Dispose of the methanol in the waste
- 19. container labeled S. 18. Place the Erlenmeyer flask on a hot plate to dry the copper metal (setting 6). Remove the hot flask from the hot plate with metal tongs. Set it on the bench top to cool. [7] What color is the solid material? Record your observations on the data sheet. 19. Once the Erlenmeyer flask is cool and the copper appears dry, weigh the flask with the solid. Record the mass on your data sheet. 20. Clean up your work area. Dispose of the solid copper product in the solid waste jar. Return borrowed equipment to the stockroom. Perform the necessary calculations and record your data on the data sheet. Calculate the mass of the product you recovered by subtracting the weight of the empty Erlenmeyer flask from the weight of the flask plus the copper metal. Calculate the percentage of recovery using this
- 20. equation: % recovered = mass of Cu recovered mass of Cu wire A significant portion of this laboratory procedure was taken from Ken Ostrowski’s website, www.ostrowskiness.com/sections/chemistry/HTMLLab/gclab1- 06.htm. Used with permission. http://www.ostrowskiness.com/sections/chemistry/HTMLLab/gc lab1-06.htm DATA SHEET FOR CYCLE OF COPPER Your name Lab partner’s name Lab section DATA AND OBSERVATIONS
- 21. Table 1: Data table on mass values Measured Mass Units (g) Erlenmeyer flask (Step 2) Copper granules (Step 3) Erlenmeyer flask and dry copper (Step 19) Mass of recovered copper Calculations on percent of copper recovered _______________% Answers to questions in the procedure. They should appear in the Results section of your report. Be detailed. Step 5: [1] What is in the solution when the reaction is complete? Step 7: [2] What is formed in the solution besides Cu(OH)2? Step 11: [3] What is removed by the washing and decantation process? Step 12: [4] What is in the solution now? Step 13: [5] What happens? [6] What is the gas produced?
- 22. Step 18: [7] What color is the solid material? Table 2: Observations from reactions in the copper cycle Reaction Observations Cu + HNO3 Cu(NO3)2 + NaOH Cu(OH)2 + heat CuO + H2SO4
- 23. CuSO4 + Zn Report: A template for the report is provided on Canvas. Be sure to follow the instructions in the template for each section of the report.
- 24. Discussion Questions Answer the following questions in the Discussion section of your report. You should consider these questions as you are performing your experiment. Take enough notes so that you can answer the questions after you have finished the experiment. 1. Identify the types of reactions observed and describe when they happened in the performance of this experiment. (10 pts.) 2. What would be the effect of using a single, solid chunk of copper metal instead of the copper granules? What would be the effect of using powdered copper metal? Describe the factor or factors taken in consideration to answer this question. (5pts.) 2. In step 4, you were warned not to let the solution bubble due to bumping or boiling. If the
- 25. solution did splash out of the flask due to bubbling, would this affect your final product? Explain. (5 pts.) 3. New U.S. pennies have a copper color. Why wouldn’t this cycle of copper procedure work with a penny instead of the copper granules? Compare the characteristics each has. (5 pts.)
- 26. Use the following template to write your lab report. Avoid using first person when writing. Lab reports are double-spaced. Follow the Cycle of Copper lab rubric to check how points are allotted. Cycle of Copper Reactions Name Lab partner(s) Date GSA’s name Section PROCEDURE(States changes made to the procedure. If no changes were done, say the procedure was followed as written.)
- 27. RESULTS(Fill in the data table. Write sample calculations and give a brief analysis of results.) Table 1: Data Table on Mass Values Measured Mass Units (g) Erlenmeyer flask Copper granules Erlenmeyer flask and dry copper Mass of recovered copper Percent of recovered copper Table 2: Observations from reactions in the copper cycle Reaction Observations Cu + HNO3 Cu(NO3)2 + NaOH Cu(OH)2 +heat CuO + H2SO4 CuSO4 + Zn
- 28. Sample calculations: (Write the equation used to find the percent of recovered copper and define the variables. Show the calculations.) Analysis of results:(Write a short paragraph where you describe why the amount of recovered copper either changed or stayed consistent from beginning to end. Remember to also include here the questions answered from the procedure in a separate paragraph.) DISCUSSION (Answer the following questions correctly and thoroughly using complete sentences.) 1. Identify the types of reactions observed and describe them in same order as they are done in the experiment for cycle of copper. 2. What would be the effect of using a single, solid chunk of copper metal instead of the copper granules? What would be the effect of using powdered copper metal? Describe the factor or factors taken in consideration to answer this question. 3. In step 4, you were warned not to let the solution bubble due to bumping or boiling. If the solution did splash out of the flask due to bubbling, would this affect your final product? Explain. 4. New U.S. pennies have a copper color. Why wouldn’t this cycle of copper procedure work with a penny instead of copper wire? Compare the characteristics each has. (Cite your source) REFLECTION(Explain personal contributions to the experiment
- 29. as well as your partner’s contributions. Identify at least one limitation encountered and give at least one suggestion for improvement.)