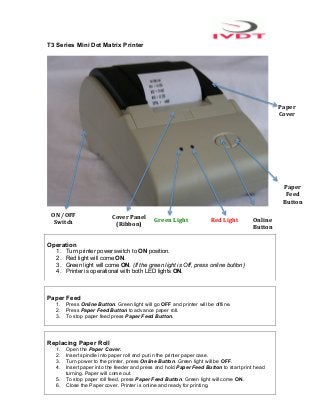
1. T3 Series Mini Dot Matrix Printer
Paper
Cover
Paper
Feed
Button
ON
/OFF
Cover
Panel
Switch
Green
Light
Red
Light
Online
(Ribbon)
Button
Operation
1. Turn printer power switch to ON position.
2. Red light will come ON.
3. Green light will come ON. (If the green light is Off, press online button)
4. Printer is operational with both LED lights ON.
Paper Feed
1. Press Online Button. Green light will go OFF and printer will be offline.
2. Press Paper Feed Button to advance paper roll.
3. To stop paper feed press Paper Feed Button.
Replacing Paper Roll
1. Open the Paper Cover.
2. Insert spindle into paper roll and put in the printer paper case.
3. Turn power to the printer, press Online Button. Green light will be OFF.
4. Insert paper into the feeder and press and hold Paper Feed Button to start print head
turning. Paper will come out.
5. To stop paper roll feed, press Paper Feed Button. Green light will come ON.
6. Close the Paper cover. Printer is online and ready for printing.
2. Ribbon Installation
1. Open the Paper Cover of the printer and push Ribbon Panel Cover towards paper roll.
2. Press the right side of the ribbon cassette, left side will be lifted. Remove cassette.
3. New cassette: Put down gently the right side of ribbon cassette and place the left side
down to engage the gear wheel in the print head. If required rotate the knob of the ribbon
cassette slightly in clockwise direction to make sure that ribbon cassette is down to the
bottom.
4. Re-install movable Ribbon Panel Cover and close the paper cover
Printer Self Test
1. Press and hold Paper Feed Button.
2. At the same time press and hold Online Button.
3. Printer will start to print out self checking script
0
Printer
Power
Switch
Spindle
RS232
Port
Power
connection
ON
/
OFF
from
SkidWeigh