More Related Content
More from Алькасар Медиа Сервис
More from Алькасар Медиа Сервис (9)
пкс
- 1. ANTERIOR CRUCIATE LIGAMENT RECONSTRUCTION
PATIENT INFORMATION AND REHABILITATION
MANAGEMENT GUIDELINES
T Spalding
Background: The Anterior Cruciate Ligament
The anterior cruciate ligament (ACL) is one of the main restraining ligaments in the knee. It
runs through the centre of the knee from the back of the femur (thigh bone) to the front of the
tibia (shin bone) and it acts as a link mechanism between the thigh and lower leg.
The main function of the ACL is in stabilising the knee especially in rotation movements and
sidestepping, cutting or pivoting manoeuvres.
This means that when the ACL is ruptured or torn the tibia moves abnormally on the femur
and almost jumps out of joint such that the knee buckles or gives way. The main feeling is a
sense of the knee giving way on twisting or pivoting movements and a feeling of not trusting
the knee. It is usual for individuals to be able to return to walking and straight line running
following a torn ACL but to not trust the knee on rough ground or twisting movements.
Mechanism of Injury
The ACL is typically injured in a non-contact twisting movement involving rapid deceleration
on the leg or sudden changing of direction such as side stepping, pivoting or landing from a
jump. Injuries are often associated with a popping sensation followed by the development of
swelling in the knee over the subsequent few hours due to bleeding from the torn ligament.
Typical injury scenarios include the footballer who catches their foot in the ground as they
are trying to change direction, the court player who lands awkwardly from a jump twisting on
the bent knee with the foot out to the side (Fig 1), and the skier who catches the ski at slow
speed twisting the leg out to the side (Fig 2). Depending on the exact mechanism it is also
possible to damage either the articular surface (articular cartilage) or the meniscus (footballer’s
cartilage).
Diagnosis
Injury to the ACL is diagnosed by detecting an increase in the forward movement of the tibia
in relation to the femur (Fig 3). Normally such movement is prevented by the ACL. Another
of the tests is the Pivot Shift test which gently reproduces the giving way sensation as the
knee is slowly bent.
1 © Tim Spalding 2003 www.timspalding.com
- 2. Proprioception: The special function Of The ACL
In addition to providing a restraint to abnormal knee movement the ACL also provides
important information to the muscles involved in the reflex control of knee movement. Nerve
fibres give the knee a sense of position and movement – this is known as proprioception and
is a normal feature of all joints. To some extent this can be compensated for after ACL injury
by specific rehabilitation exercises for the hamstrings and quadriceps (thigh) muscles.
However the knee is a complex joint, and in individuals who undertake pivoting type sports,
or when exercises are not enough to give the knee stability, then reconstruction of the ACL
may become necessary.
Indications For Reconstruction Of the ACL
The main consequence of tearing the ACL is that the knee no longer feels stable in pivoting
and twisting movements. The result is a tendency for repeated episodes of giving way or
buckling of the knee. It is these episodes that carry the risk of damaging the other structures
in the knee – in particular the articular cartilage and the meniscus.
When the meniscus is torn there is less protection for the joint surfaces (articular cartilage)
that can then wear away leading to a risk of developing wear and tear arthritis (osteoarthritis).
The articular surface itself can be damaged in the giving way movements, again increasing the
risk of later osteoarthritis. It is important therefore to avoid repeated episodes of giving way
of the knee. This can be achieved by either avoiding pivoting activities, using an ACL specific
sports brace or by reconstructing the ligament.
Surgical reconstruction is therefore indicated in individuals who wish to return to pivoting
type sports and in individuals who have problems with giving way in daily activities.
The Operation
The operation to reconstruct the ACL involves replacing it with other ligament type graft
tissue taken from around the knee. There are two main grafts in common use: the patella
tendon (Fig 12) or the hamstrings graft. Both are considered to be equally good and the
choice usually depends on the surgeon’s preference. It is probably best to avoid use of the
patella tendon if there is significant pre-existing anterior knee pain or in an individual whose
job mainly involves kneeling or squatting. Postoperative rehabilitation is the same for each
graft. The patella tendon graft consists of the central strip of the patella tendon that runs
from the patella to the tibia and a small piece of bone is kept attached to the ligament at each
end.
The hamstring graft consists of the semi tendonosis and gracilis tendons, which are the cord
like structures behind the inner aspect of the knee. The two tendons are taken through a small
incision on the front of the tibia and are folded in half to make a four strand construct.
2 © Tim Spalding 2003 www.timspalding.com
- 3. Surgery is performed under general anaesthesia and usually takes 1 – 1_ hours. The
procedure is outlined in the illustrations (Fig 4 – 10). The chosen graft is harvested through
small incisions and is prepared into a new ligament. The inside of the knee is prepared using
an arthroscopic technique. Tunnels are made in the tibia and femur through the sites of the
attachment points of the old ligament. The old ACL is removed to allow space for the new
graft. The new ligament is then held in place within the tunnels using absorbable screws or
staple fixation type devices. These usually do not need to be removed.
If there is a tear of the meniscus (Fig 11) or damage to the articular cartilage then this can be
tidied up or repaired during the procedure.
Aims, Results And Expectations Of The Surgery
The aim of the operation is to prevent the repeated episodes of giving way or buckling of the
knee and published results indicate that approximately 90% of patients consider their knee to
function normally or nearly normally after surgery. Full contact sport is allowed after
rehabilitation but not everyone gets back to their previous level of sport. Return to sport
depends on the time period since injury and other personal or business factors.
It is important to emphasise that the new ligament is not a “normal” ligament. Re-creating
stability with the graft is only one aspect of attempting to improve knee function after injury.
Other problems such as joint surface damage or meniscal tears may co-exist which can
interfere with the joints ability to tolerate the high loads associated with sport and other
arduous activities. Wear and tear arthritis that is associated with ligament injury is not
necessarily prevented by reconstruction surgery.
Potential Problems
Problems can occur. Some are minor but some may need another operation to help. It is
clearly important to understand these before undergoing surgery. The main risks include:
• Failure to provide enough stability in the knee to allow return to full sporting activities.
Either the ligament does not heal in a tight enough position to allow full confidence in
the leg or there is associated damage inside the knee that prevents return to full
function.
• Patella pain. Anterior knee pain in the form of discomfort in the front of the joint on
activity such as squatting or sitting with the knee bent can develop in 10 – 20% of
patients but this usually improves with specific rehabilitation. More importantly it
can be prevented by appropriate early rehabilitation and adherence to the guidelines
and advice in this booklet.
• Complications of deep vein thrombosis, wound infection can occur as in all operations.
The risk is approximately 1 – 2%.
• Re-rupture of the graft. This occurs in approximately 1 – 2%.
Early “Normal” Problems Following Surgery
3 © Tim Spalding 2003 www.timspalding.com
- 4. The following is list of common events that occur following surgery:
• Swelling: swelling or “effusion” in the knee is usual until up to three months after surgery.
The main aim of the first phase of rehabilitation is to reduce swelling.
• Difficulty kneeling: after any operation on the front part of the knee it takes a while to
tolerate kneeling but with gradual progression through use of a cushion then carpet and
finally a hard floor, this usually improves.
• Bruising: it is usual for bruising to appear down the leg as far as the inner aspect of heel.
It can be surprisingly tender and may take four to six weeks to disappear.
• Numbness around the knee. Numbness around the scars on the front part of the knee is
common as the nerves that supply sensation to the skin crisscross around the front of
the knee. This can be quite disconcerting for a few months and some residual area of
reduced sensation may persist in the long term. Usually this does not cause any
functional problems.
Rehabilitation
The overall plan detailed in this booklet emphasises the importance of pre-operative
education and exercises followed post operatively by early control of swelling and regaining
full extension (straightening) and flexion. Working on strength can only start once swelling
and range of movement has been controlled. Return to function then follows.
The key to success for rehabilitation is to regain normal full straightening of the knee as soon
as possible and to gain control of swelling in the early post operative phase before
progressing to strength activities.
For the first six weeks exercise are generally performed with the foot in contact with the
ground or the surface of an exercise machine – so called ‘closed’ kinetic chain exercises.
‘Open’ kinetic chain exercises, where the foot is unsupported, are introduced after six weeks
as knee control and strength improves. This allows for muscle strength to improve without
putting excessive stress on the graft.
Remember This Is Only A Guide
It is important to emphasise that the rehabilitation guidelines in this booklet are only meant as
a guide. The plan is based on current evidence and available information on ACL
reconstruction surgery. The main milestones are the key and there are many different
exercises to achieve those goals and different physiotherapists will have differing regimes to
use within the overview of this guide. Naturally patients vary and exercises are tailored to
each individual.
4 © Tim Spalding 2003 www.timspalding.com
- 5. ACL Rehabilitation
Pre Op
Rehabilitation begins before surgery in the pre operative phase to ensure that you and your
knee are ready for the operation.
• Ensure full range of movement, especially normal hyperextension.
• Exercises to maintain quadriceps and hamstring muscle strength.
• Advice session in physio department for familiarisation with post op exercises and
hospital stay.
Operative Day
• Admitted on morning of day of surgery.
• Re-assessed and examined on the ward by the surgeon or member of surgical team –
opportunity to ask questions.
• The consent form will be completed and your leg marked for the correct side.
• Outcome assessment questionnaires may be given to you to complete.
• At some stage a knee splint and a Cryo cuff (iced water compression device) will be
supplied.
Pain Relief Following Surgery
There are several strategies to reduce the discomfort following surgery and these are
constantly under re-evaluation in order to improve pain control. A separate information sheet
is available outlining these strategies but essentially they include the following: nerve blocks
which numb the leg for the first 12 – 18 hours, use of a knee splint to hold the leg straight for
24 – 48 hours reducing discomfort on movement, a Cryo cuff which is a cold water
compression device to reduce swelling and pain, and anti-inflammatory painkillers and
medication.
Initial Post Operative Period
You will be able to go home on the day of surgery or the first postoperative day after a night
in hospital. This will need to be discussed with your surgical team.
Most patients stay overnight and start to move their knee on the morning after surgery under
the instruction of the physiotherapist. If you opt to have surgery as a day case then you will
be able to go home some 3 – 4 hours after the operation but you will need to return to
hospital on the first or second day after surgery for the dressing to be removed and for
instruction on early exercises.
5 © Tim Spalding 2003 www.timspalding.com
- 6. On return from the operating theatre you will wake up with your leg held in a straight leg
splint, which prevents the knee bending. A Cryo cuff (ice compression device) will be
applied to the knee under the splint in order to keep the knee cool and reduce swelling.
Sometimes a drain is seen emerging from the dressing, removing any bleeding from the wound.
The splint and dressings are removed on the 1st or 2nd postoperative day and you will then
be instructed on crutches and on the exercises to perform for the first 2 weeks. Crutches are
usually required for the first 2 weeks but full weight bearing is allowed.
Summary of Rehabilitation Phases
There are five main rehabilitation phases and example exercises for each phase are given in the
sections that follow.
• Phase 1: Initial Post Op Phase – first 2 weeks
• Phase 2: Proprioception Phase – weeks 3 – 6
• Phase 3: Strength Phase – Weeks 6 – 12
• Phase 4: Early Sport Training - 3 - 6 months
• Phase 5: Return to Sport - 6 – 9 months.
You will be reviewed at the following times in outpatients and the goals for those stages are
detailed:
• 2 weeks.
• 6 weeks.
• 3 months.
• 6 months.
• 1 year.
Instructions On Discharge From Ward
Keep the wound dry for 3 days or until the wound has sealed.
Clips or Stitches to be removed at 7 days by local GP or district nurse.
Date for review in clinic or on ward after 2 weeks.
Date for Outpatient physiotherapy appointment.
Work Advice: to expect to be able to return as follows:
Desk work at 3 – 4 weeks
Light manual work at 6 weeks
Heavy manual work (ladder work etc) at 3 – 4 months.
Driving Advice: To return to driving at 3 – 4 weeks depending on knee function.
Instruction on use of Cryo cuff or ice packs to control swelling.
6 © Tim Spalding 2003 www.timspalding.com
- 7. Outpatient and Home Exercise Programme: Rehabilitation Phases
The rehabilitation phases and goals are presented below. There are many different exercises
available to achieve the goals and these are tailored to each individual by the physiotherapy
team. Various example exercises are outlined in each section.
General Principles for understanding the rehabilitation process
• Exercises need to be done 4 – 5 times per day: - Little and often is better than an extensive
overload period.
• Pain, heat and increasing swelling in the knee are bad: - Any of these symptoms can
mean that you may be overdoing exercises. It is unlikely that it indicates a serious
problem but you should always call your physiotherapist to discuss any extreme
pain, heat or increasing swelling within or around the knee.
• The difference between good and bad pain: - After major knee surgery your knee will be
sore. It is important to understand that discomfort is normal particularly when
performing some of the stretching exercises. In addition, your knee may ache after an
exercise session. This is expected and normal so long as it is not associated with any
significant increase in swelling. ‘Bad pain’ is usually sharp and severe in nature. It
may be brought on by pushing too hard and it may be accompanied by an increase in
swelling. Activities causing such a problem should be stopped and advice sought from
your physiotherapist.
7 © Tim Spalding 2003 www.timspalding.com
- 8. 1: Initial Post Op Phase – first 2 weeks
Aim
The aim of this phase is to regain range of movement and to allow the swelling in the knee to
settle. The most important aim is to regain normal and full extension (straightening) of the
knee. The physiotherapist usually sees you one week following surgery to add in extra
exercises.
1st Week Exercises
• Heel props resting the ankle on a pillow or support and pushing leg into extension to
match the normal side in order to prevent build up of scar tissue around the new graft.
• Flexion exercises (knee bending): active and passive movements over the edge of the bed
using the other leg for support and small range of swinging action if possible. Increase
using heel slides, side lying on the bed or wall slides (feet on the wall).
• Patella mobilisation exercises to prevent tethering of the patella in scar tissue.
• Mobilise weight bearing as tolerated using crutches.
• Control swelling with regular use of Cryo cuff or ice packs.
• Avoid active exercise with the leg unsupported (open chain exercise) from 30° flexion to
full extension for the first 6 weeks.
• Static muscle exercises (quadriceps, gluteal contractions and hamstring exercises).
2nd Week Additional Exercises
• Hip extension by bridging.
• Static bike to full movement with minimal resistance.
• Physio ball sitting: rocking / wall / balance. Progress as required.
• Gait education weaning off crutches.
• Scar mobilisation if wound healed.
• Four planes of straight leg raising.
• Quarter squats (using crutches or a chair for support initially).
2-Week Review Goals
Range of motion: full terminal extension to 110° flexion.
Wound healed.
Minimal swelling in knee and around wound.
Normal gait pattern.
Independent leg control.
8 © Tim Spalding 2003 www.timspalding.com
- 9. 2: Proprioception Phase – weeks 3 – 6
Aim
The aim of this phase is to work on proprioceptive exercises and to develop light endurance
and strength training. This stage is also important for developing core stability to provide the
framework to progress to full active function. By the end of six weeks your knee should feel
normal in activities of daily living.
Example Exercises
• Range of motion: active and passive, wall slides, heel slides on bed.
• Weight bearing: full weight bearing off crutches working to establish normal gait.
• Mini step ups and dips.
• Treadmill work: gradual increase in speed and gradient.
• Gym ball (bridging exercises).
• Start swimming (no breast stroke kick).
• Hamstring curls lying on the front using a lightweight or elastic cord resistance. (Delayed
until 6 weeks if hamstring tendons used for the graft)
• Mini trampette balance exercises.
• Rowing with low resistance.
• Outdoor cycling on the road tolerated once confidence achieved.
• Kneeling on a pillow or gym ball to desensitise the scar region.
• Static bike utilising gradual increase in resistance.
6-Week Review Goals
Full range of movement including normal hyperextension.
Minimal swelling.
Full patella mobility.
Minimal discomfort.
9 © Tim Spalding 2003 www.timspalding.com
- 10. 3: Strength Phase – Weeks 6 – 12
Aim
At six weeks the thigh muscle tone and definition (quadriceps / hamstrings) will be poor but
the bone blocks on the patella tendon graft or the soft tissue hamstring graft will now have
become solid within the femur and tibia tunnels such that more vigorous strength training can
commence. Progress is monitored and controlled by the physiotherapist according to the
speed of recovery of strength and control.
It is important to avoid too rapid progress, as there is a risk of developing overload
complications.
Example Exercises
• Start early jog training as control allows – on trampette or treadmill.
• Gradually progress to treadmill running.
• Step exercises with increased height speed and weight.
• Step machine working at a steady level.
• Gait re-education drills: walking fast / slow, side, front and backward.
• Progress walking to change of direction.
• Slow walking backwards on the treadmill.
3 Months Review Goals
No swelling
Full range of movement
Confident feeling of stability.
10 © Tim Spalding 2003 www.timspalding.com
- 11. 4: Early Sport Training Phase – 3 - 6 months
Aim
Pivoting and cutting manoeuvres are introduced at this stage, building up to light sport
training. This involves a progressive programme of slow and moderate speed strength training
and agility drills. Manual work should be possible within the restraints of the occupation.
Exercises for power and agility training are introduced.
Month 3 Example Exercises
• Jog / run on the treadmill or on the pavement.
• Normal skipping introduced.
• Lunges with increased intensity and frequency.
• Hopping: both or single leg action. Also side to side as tolerated.
• Mini trampette hopping.
• Running including gradual changes of pace plus acceleration/deceleration.
• Progress running through slow turns, figure of 8 turns, to tighter turns and cutting.
Months 4 – 6 Example Exercises
Hard pivoting and cutting is introduced at this stage providing satisfactory progress with
running training.
• Functional testing (single leg hop test).
• Agility training: shuttle runs, ball dribbling and other sports drills promoted.
• Specific sports training aimed at the individual.
• At the six months stage ready for discharge from rehabilitation and return to non contact
sport.
6 Months Review Goals
Functional and strength tests: 85% of normal side.
Return to non contact sports / training.
11 © Tim Spalding 2003 www.timspalding.com
- 12. 5: Return to Sport Phase – 6 – 9 months
Aim
The aim of this phase is to progress sport training and to develop strength / endurance levels
in order to establish a base for return to full sporting activity. This takes time, especially in
building up confidence to progress to full contact activities. Return to contact sport is not
recommended until strength and functional outcomes are measured at greater than 85% of the
normal side.
The time to regain pre injury level of skill and performance is very variable but can take 3 – 4
months of training and playing.
Guidance from the physiotherapist in regaining confidence in a sport environment by
modifying training and specific drills, can help with a quicker return to contact or full level
sport competition.
• Sports specific skills training is introduced with club activities.
• Progress is best achieved in conjunction with a general fitness programme.
• Full contact is best avoided until you are able to tolerate a full training session and you are
confident with your fitness and endurance.
Remember:
If you have any queries or if you require any advice regarding your knee or the rehabilitation
programme please do not hesitate to call your physiotherapist.
12 © Tim Spalding 2003 www.timspalding.com
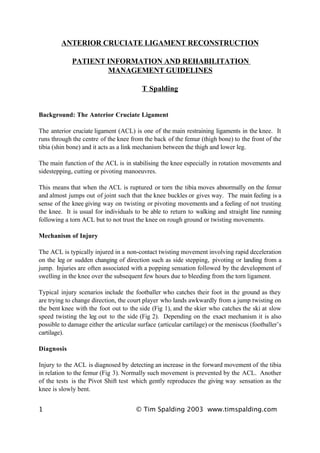
- 13. Anterior Cruciate Ligament Reconstruction Illustrations
Fig 1. One of the mechanisms of injury to the ACL – sudden deceleration while pivoting on
the leg.
13 © Tim Spalding 2003 www.timspalding.com
- 14. Fig 2. Another example of tearing the ACL by catching an edge while skiing and twisting the
lower leg outwards.
14 © Tim Spalding 2003 www.timspalding.com
- 15. Fig 3. The Anterior Draw ‘Lachmans’ test used to detect injury to the ACL.
Fig 4. Harvesting of the central 10mm strip of the patella tendon
15 © Tim Spalding 2003 www.timspalding.com
- 16. Fig 5. Harvesting of the two hamstring tendons on the inner aspect of the knee
16 © Tim Spalding 2003 www.timspalding.com
- 17. Fig 6. Preparation of the first tunnel, through the tibia into the base of the old ligament
17 © Tim Spalding 2003 www.timspalding.com
- 18. Fig 7. Preparation of the tunnel into the femur at the attachment point of the old ligament.
The knee is viewed form the side and a special jig is used to position the tunnel correctly.
18 © Tim Spalding 2003 www.timspalding.com
- 19. Fig 8. View form the front of the knee demonstrating the preparation of both tunnels
19 © Tim Spalding 2003 www.timspalding.com
- 20. Fig 9. The new ligament is pulled through the knee and is held in place by two absorbable
screws which fix the ends of the ligament in the prepared tunnels
Fig 10. Final view of the new ligament from the front of the knee showing the two screws
holding the patella tendon graft
20 © Tim Spalding 2003 www.timspalding.com
- 21. Fig 11. Illustration of a torn meniscus (footballers cartilage) being repaired using sutures.
21 © Tim Spalding 2003 www.timspalding.com