How to Create Mind Maps with SmartDraw
•
0 likes•576 views

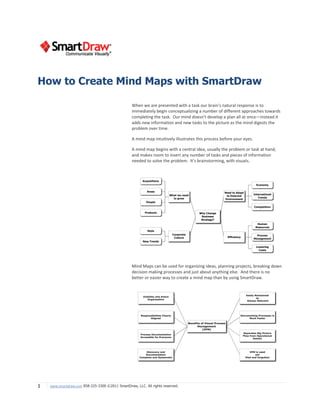
When we are presented with a task our brain's natural response is to immediately begin conceptualizing a number of different approaches towards completing the task. Our mind doesn't develop a plan all at once—instead it adds new information and new tasks to the picture as the mind digests the problem over time. A mind map intuitively illustrates this process before your eyes.
![Getting Started
To make a mind map in SmartDraw, start by selecting the mind map template by clicking its icon on the home panel.
Add Topics using the SmartPanel
SmartDraw’s mind map template will always have the main topic
already in place. You can add additional topics by pressing the Add
Topic button in the SmartPanel located to the left of your work area.
This SmartPanel is specifically designed to help you build mind maps.
Pressing the button again adds another topic and so on, automatically
arranging them on the page. Clicking on Add Subtopic adds a topic one
step below the topic currently selected.
Note that the lines connecting topics are added automatically and the
shapes are evenly spaced and perfectly aligned.
Add Text and Shapes Using the Keyboard
You can add text by selecting a shape and simply typing.
Just like filling in a form, you can use the tab or arrow key on the
keyboard to navigate from shape to shape and enter text.
You can also use the keyboard to add shapes. Hold down the [CTRL]
key and hit the left arrow key to add a shape to the left or hold down
the [CTRL] key and hit the up or down arrow key to add a shape above
or below the one you have selected. In fact, you can add all the shapes
to your mind map without taking your hands off the keyboard.
You can navigate from shape to shape using the [TAB] or [ARROW]
keys.
2 www.smartdraw.com 858-225-3300 ©2011 SmartDraw, LLC. All rights reserved.](data:image/gif;base64,R0lGODlhAQABAIAAAAAAAP///yH5BAEAAAAALAAAAAABAAEAAAIBRAA7)
Recommended
More Related Content
Similar to How to Create Mind Maps with SmartDraw
Similar to How to Create Mind Maps with SmartDraw (20)
More from SmartDraw Software
More from SmartDraw Software (19)
Recently uploaded
Recently uploaded (20)
How to Create Mind Maps with SmartDraw
- 1. How to Create Mind Maps with SmartDraw When we are presented with a task our brain's natural response is to immediately begin conceptualizing a number of different approaches towards completing the task. Our mind doesn't develop a plan all at once—instead it adds new information and new tasks to the picture as the mind digests the problem over time. A mind map intuitively illustrates this process before your eyes. A mind map begins with a central idea, usually the problem or task at hand, and makes room to insert any number of tasks and pieces of information needed to solve the problem. It's brainstorming, with visuals. Mind Maps can be used for organizing ideas, planning projects, breaking down decision making processes and just about anything else. And there is no better or easier way to create a mind map than by using SmartDraw. 1 www.smartdraw.com 858-225-3300 ©2011 SmartDraw, LLC. All rights reserved.
- 2. Getting Started To make a mind map in SmartDraw, start by selecting the mind map template by clicking its icon on the home panel. Add Topics using the SmartPanel SmartDraw’s mind map template will always have the main topic already in place. You can add additional topics by pressing the Add Topic button in the SmartPanel located to the left of your work area. This SmartPanel is specifically designed to help you build mind maps. Pressing the button again adds another topic and so on, automatically arranging them on the page. Clicking on Add Subtopic adds a topic one step below the topic currently selected. Note that the lines connecting topics are added automatically and the shapes are evenly spaced and perfectly aligned. Add Text and Shapes Using the Keyboard You can add text by selecting a shape and simply typing. Just like filling in a form, you can use the tab or arrow key on the keyboard to navigate from shape to shape and enter text. You can also use the keyboard to add shapes. Hold down the [CTRL] key and hit the left arrow key to add a shape to the left or hold down the [CTRL] key and hit the up or down arrow key to add a shape above or below the one you have selected. In fact, you can add all the shapes to your mind map without taking your hands off the keyboard. You can navigate from shape to shape using the [TAB] or [ARROW] keys. 2 www.smartdraw.com 858-225-3300 ©2011 SmartDraw, LLC. All rights reserved.
- 3. Rearrange Shapes To remove a shape select it and hit the delete key – just like you’d remove text in a word processor. Removing the shape makes your mind map reflow – just like deleting in a word processor causes your text to reflow. You can also insert a new topic and the mind map will automatically reformat to accommodate the new shape. Use the mouse to move shapes around and SmartDraw will adjust your mind map automatically. To move a shape, select it and without letting go of the mouse move it to any location you desire. As you move your shape, you’ll notice SmartDraw’s automatic connectors will attempt to grab it. SmartDraw shows you a dashed outline of where your shape will be if you let go of your mouse. To drop a shape into place, simply let go of your mouse. That’s how a visual processor works. No more lining shapes up manually and hooking them up with lines manually. If you prefer, you can also use the SmartPanel to demote and promote certain topics. If you want to keep a larger mind map more manageable, you can use the small minus key on any topic that has subtopics to temporarily hide those subtopics. To show the hidden subtopics, just click on the plus icon to reveal them. Convert Your Mind Map into a Project Chart or Timeline You can use a mind map to brainstorm tasks for a project and when you’re ready to convert it into a project chart, SmartDraw makes it easy. You can simply choose “View as Project (Gantt) Chart” from the SmartPanel and your mind map will be converted into a project chart with all of the topics, arranged hierarchically into a list with a start date, end date, and duration. Once your mind map has been converted to a project chart, you can specify task duration, add dependencies or milestones, and specify a resource responsible for completing each task. You can then take this Project Chart and convert it to a timeline to see major milestones even more easily. 3 www.smartdraw.com 858-225-3300 ©2011 SmartDraw, LLC. All rights reserved.
- 4. In a few clicks, you can go from a freshly brainstormed mind map to a detailed project chart and then a timeline overview. You can manage the entire project in this one document and easily switch back and forth to the different views using the tabs at the bottom of your work area. Changing the Style of Your Mind Map SmartDraw automatically applies professional design themes for you, but also gives you complete control to customize your mind map in any way you want. Change the entire look of your mind map by applying a new design theme with just one click. Or change the look of individual shapes instantly by selecting a new Quick Style. Choose from more than 40 preset looks. Share Your Mind Map with Others If you want to share your mind map with others, you can do so with a single click. You can send any SmartDraw visual to PowerPoint, Word, Excel, or Outlook using the buttons at the top of your work area. When you need to communicate an idea visually, do so with a mind map and use SmartDraw to work smarter and with better results, every time. Keyboard Shortcuts Create your entire chart without taking your hands off the keyboard with quick and easy keyboard controls. To add a shape to a mind map, simply hold down the [Ctrl] key and use the up, down, left or right arrow key. To add a new peer shape alongside a selected shape hit the [Enter] key and to add a subordinate shape use [Shift] + [Enter]. Here are some other keyboard shortcuts you may find useful: Keyboard Shortcuts Ctrl + Zoom In Ctrl - Zoom Out Ctrl + Arrow key Add shape in up/down/left/right (charts with auto-connectors only) Enter Adds a new peer shape alongside the selected shape. (charts with auto- connectors only) Shift + Enter Adds a new shape subordinate to the selected shape. (Mind Maps and Org Charts only) Ctrl+ Enter Adds a new peer shape alongside selected shape when in text entry mode. Insert Creates a new visual starting with the selected shape and adds hyperlinks between the two visuals Shift + Ctrl Zoom in (stops at 800%) Shift + Ctrl + G Ungroup F3 Find Next (Find and Replace dialog) Alt+F4 Exit / Close SmartDraw 4 www.smartdraw.com 858-225-3300 ©2011 SmartDraw, LLC. All rights reserved.
- 5. Delete Clear / Delete selected object Ctrl+A Select All Ctrl+B Bold Text Ctrl+C Copy Ctrl+D Duplicate Ctrl+F Find Ctrl+G Group Ctrl+H Replace Ctrl+I Italicize Text Ctrl+K Insert Hyperlink Ctrl+M Executes Text Entry Mode (only if shape or line is selected) Ctrl+N New Document Ctrl+O Open Document Ctrl+P Print Ctrl+Q Save changes and exit / close SmartDraw Ctrl+S Save Ctrl+T Opens Font Dialog Ctrl+U Underline Text Ctrl+V Paste Ctrl+W Save changes and exit to template selection screen Ctrl+X Cut Ctrl+Y Redo Ctrl+Z Undo 5 www.smartdraw.com 858-225-3300 ©2011 SmartDraw, LLC. All rights reserved.