Download to read offline
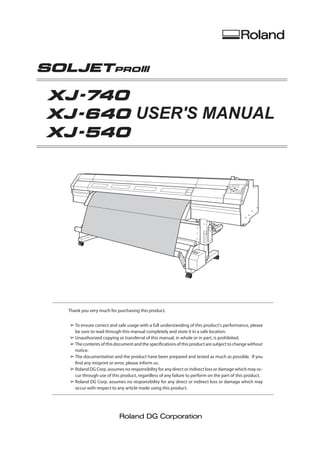


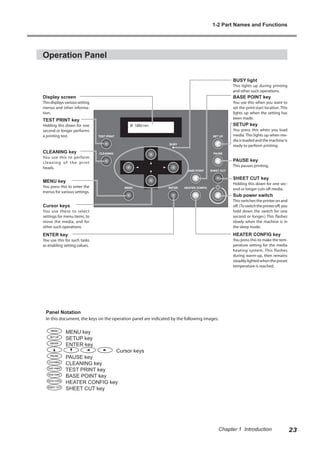

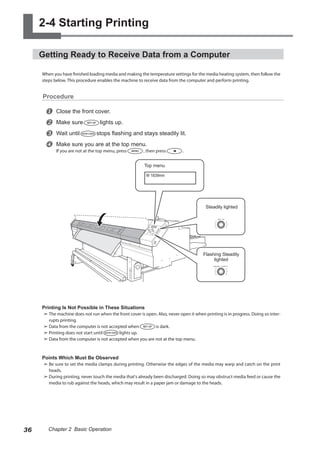


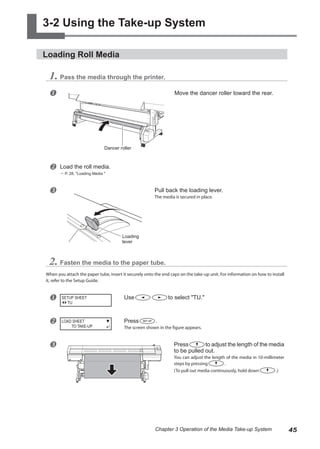
![3-1 The Take-up System
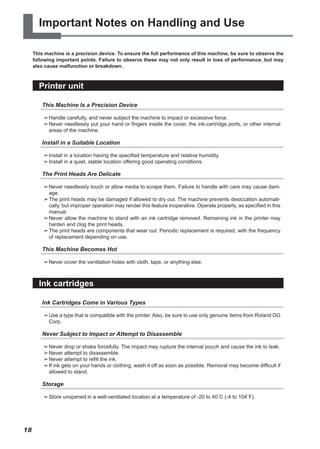
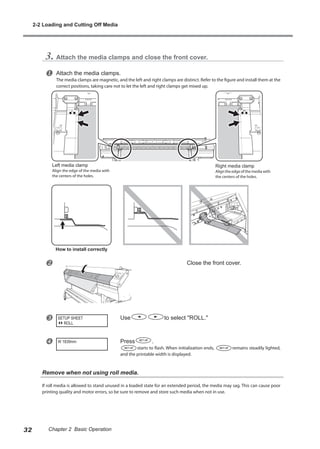
Features of the Take-up System
Using the take-up system lets you perform printing while the media is taken up automatically. This makes possible unat-
tended operation at night and efficient printing of lengthy media.
Operating Conditions for the Take-up System
Settings Related to Media Feed
When using the take-up system, to avoid pulling media with undue force, be sure to observe the follow-
ing points. Operations that pull the media with undue force, such as unsuitable take-up by the take-up
system, can cause printing to stop or result in misalignment of the printing position.
➢
Never use to pull the media back.
➢
Never operate the MANUAL switch for the take-up unit when the loading lever is pulled back.
➢
When loading and setting up media, set the [SETUP SHEET] menu item to "TU."
➢
Set the [FEED FOR DRY] menu item to "DISABLE."
? P. 88, "Drying the Trailing Edge of the Printing Area on the Dryer"
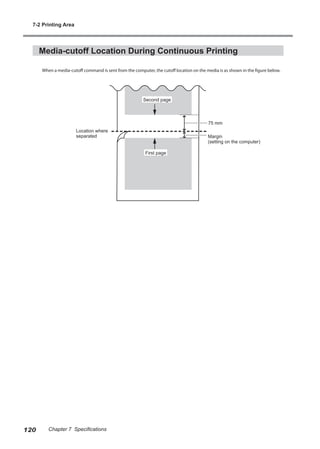
When Performing Continuous Printing of Two or More Pages
When you're performing continuous printing and take-up for two or more pages, give attention to the
following points.
➢
If the setting to execute automatic cutoff of the media can be made on the computer, then turn this set-
ting off. Making the setting on the computer to execute automatic cutoff of the media results in media
cutoff after each page is printed. (If the media clamps are installed, the clamps are detected and the
cutoff operation is not performed.) Take-up quits as soon as the media is cut off.
➢
On the computer, set the margin from the print-end position to the next print-start position (the page
spacing) to 40 millimeters or more. Setting this to a value of less than 40 millimeters may cause the
media to be pulled with undue force and result in printing being interrupted.
About the Paper Tube
For the paper tube, use the included item.
The included paper tube is a special part exclusively for use with this machine. Using something other than
the included item may result in spinning without traction or other problems that impede media take-up.
The paper tube is a part that wears out.
The replacement cycle varies according to usage conditions, but to ensure good media take-up, moni-
tor the state of the paper tube and replace it when necessary. To purchase a replacement, contact your
authorized Roland DG Corp. dealer.
44 Chapter 3 Operation of the Media Take-up System](https://image.slidesharecdn.com/xj-740640540usermanual-210909124322/85/Xj-740-640-540_user-manual-46-320.jpg)
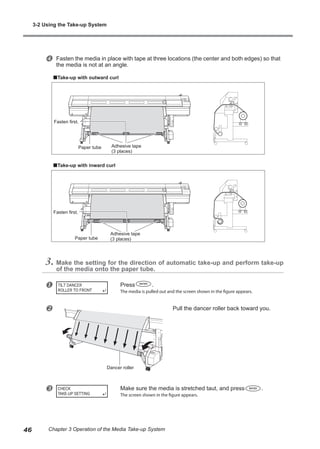

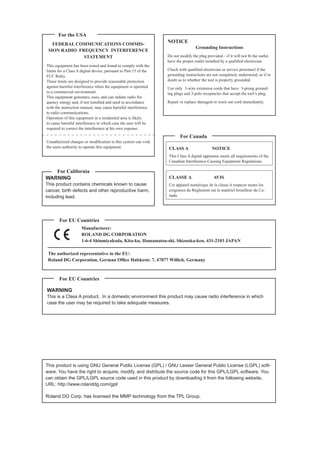
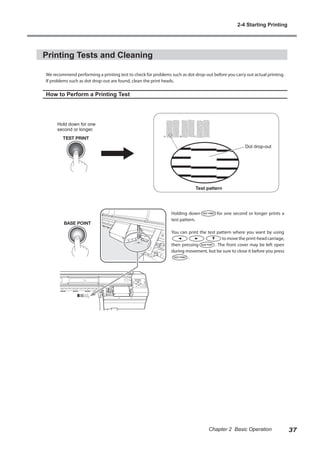
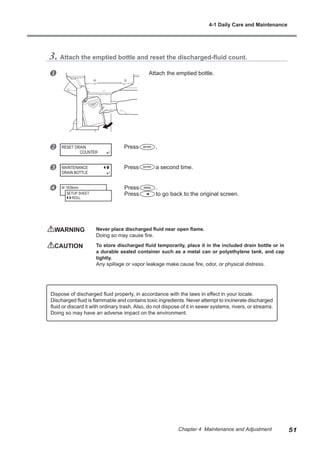
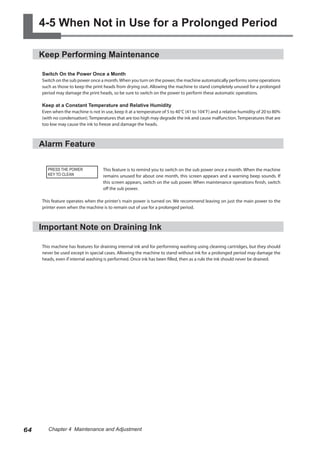
![4-1 Daily Care and Maintenance
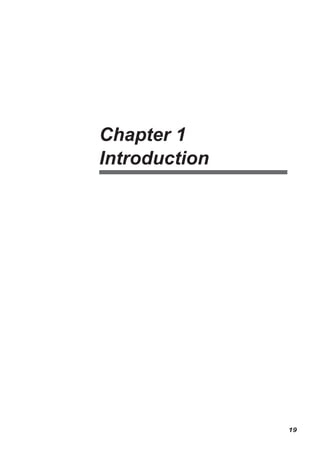
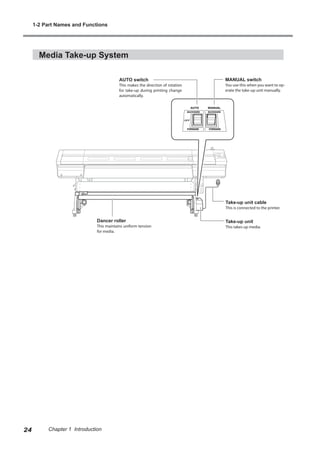
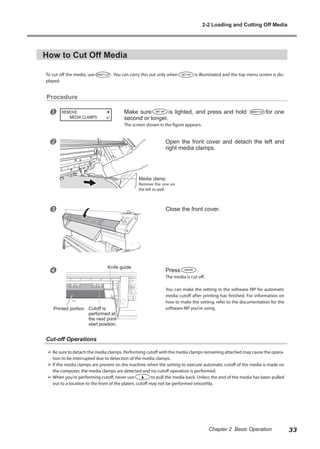
Disposing of Discharged Ink
The drain bottle collects discharged fluid. Dispose of collected material before the bottle becomes full. The message shown
in the figure appears when a certain amount of discharged fluid has collected in the bottle. Follow the procedure below to
discard the discharged fluid.
Resetting the discharged-fluid counter after disposal makes the message shown in
the figure disappear.
1. Choose the [DRAIN BOTTLE] menu item.
u Press .
Press several times.
v Press .
Press .
w Press .
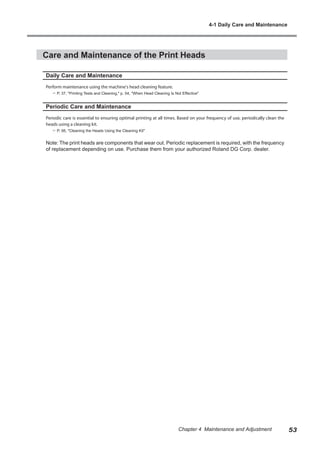
Press .
x Press .
Preparations are complete when this screen appears.
2. Empty the bottle by discarding the discharged fluid.
CAUTION Before you detach the drain bottle, be sure to wait for the screen to display "EMPTY
DRAIN BOTTLE."
Failing to follow this procedure may cause discharged fluid to flow out of the tube
and spill, soiling your hands or the floor.
CHECK
DRAIN BOTTLE
MENU
SUB MENU
SUB MENU
MAINTENANCE
MAINTENANCE
DRAIN BOTTLE
EMPTY
DRAIN BOTTLE
Press .
Upper limit
Discard before
this is reached.
50 Chapter 4 Maintenance and Adjustment](https://image.slidesharecdn.com/xj-740640540usermanual-210909124322/85/Xj-740-640-540_user-manual-52-320.jpg)

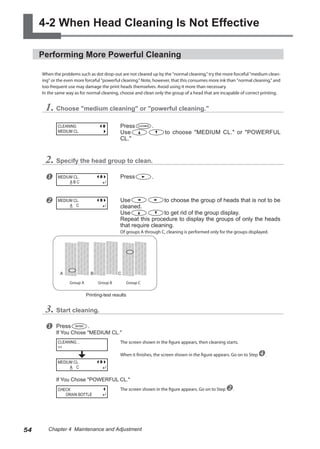

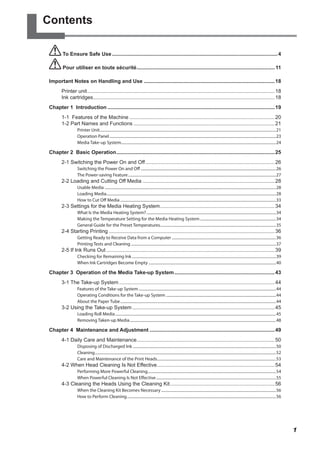
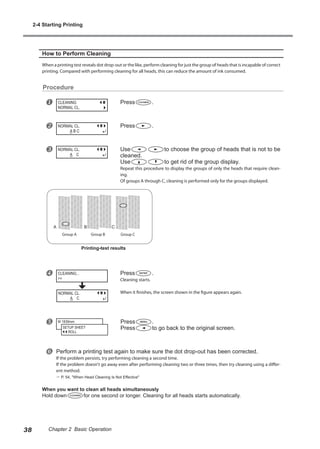
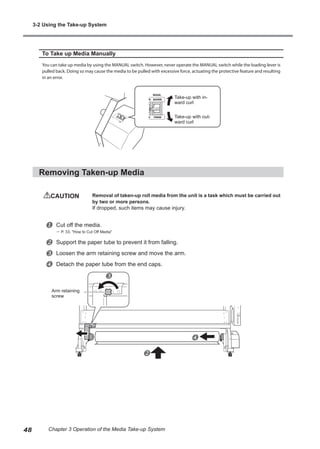
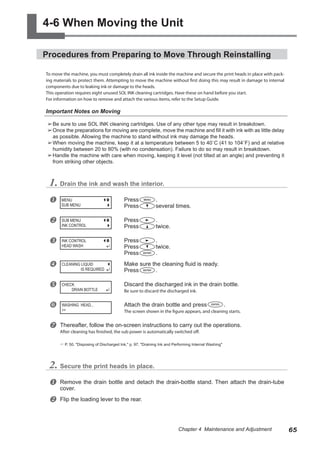
![4-4 Replacing Consumable Parts
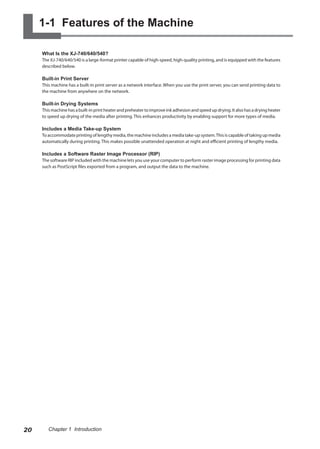
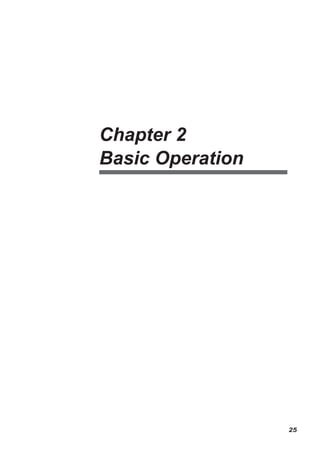
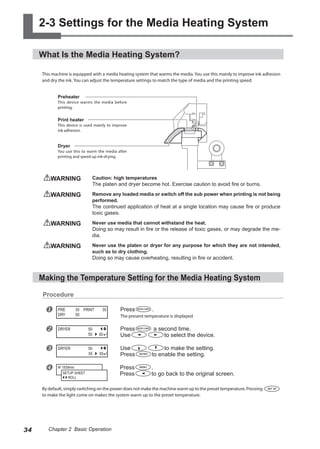
Replacing the Wipers
The wipers are components that you use when cleaning the print heads. When the screen displays a message like the one
shown, it means the item needs to be replaced. Replace with new items.
Important Notes on This Procedure
➢ To prevent the heads from drying out, finish this procedure in 30 minutes or less.
➢ A warning beep sounds after 30 minutes. At this time, stop work, attach the front cover, and press
. When the head-protection operation finishes, restart the procedure from the beginning.
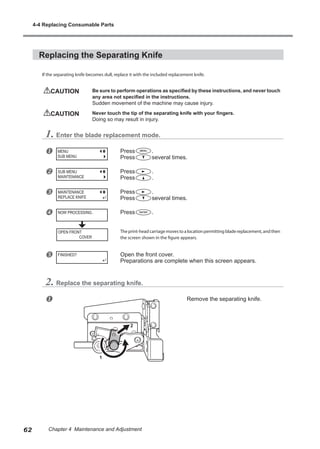
CAUTION Be sure to perform operations as specified by these instructions, and never touch
any area not specified in the instructions.
Sudden movement of the machine may cause injury.
1. Display the [REPLACE WIPER] menu item.
u Press .
Press several times.
v Press .
Press .
w Press .
Press .
x Press .
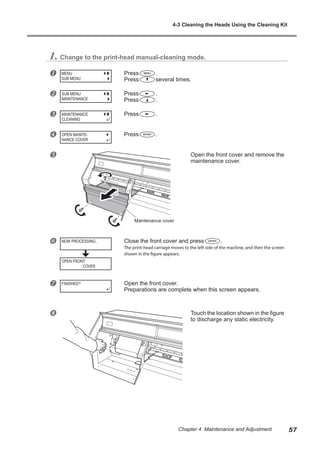
Theprint-headcarriagemovestoalocationpermittingwiperreplacement,andthen
the screen shown in the figure appears.
y Open the front cover.
Preparations are complete when this screen appears.
z Touch the location shown in the figure
to discharge any static electricity.
TIME FOR
WIPER REPLACE
MENU
SUB MENU
SUB MENU
MAINTENANCE
MAINTENANCE
REPLACE WIPER
NOW PROCESSING..
FINISHED?
Press .
OPEN FRONT
COVER
60 Chapter 4 Maintenance and Adjustment](https://image.slidesharecdn.com/xj-740640540usermanual-210909124322/85/Xj-740-640-540_user-manual-62-320.jpg)
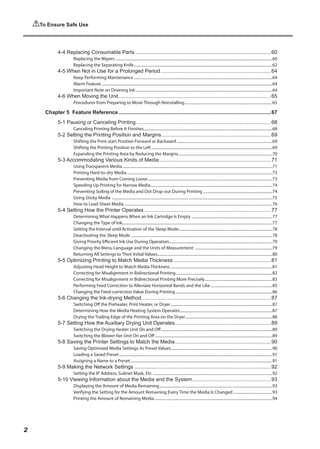
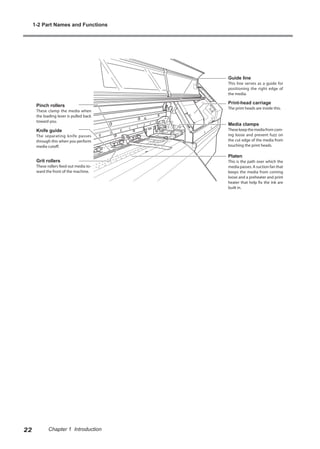
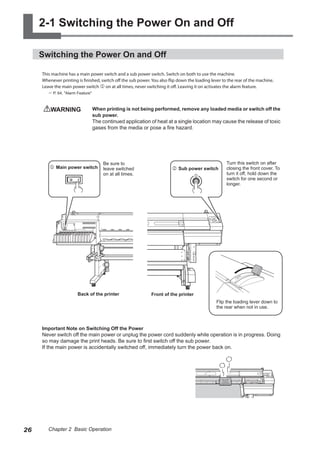
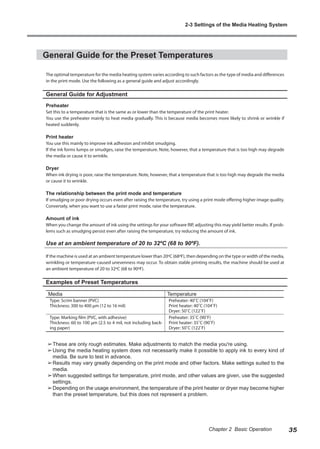
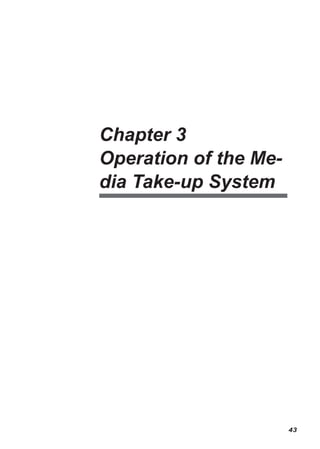
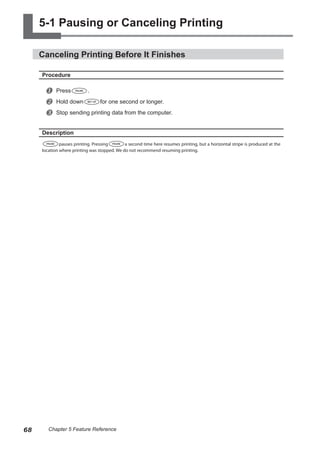
![2. Replace the wipers. Use the included tweezers.
u Detach the old wipers.
Detach the hook and pull up and
out.
v Insert the new wipers.
w Attach the hook.
3. Quit the [REPLACE WIPER] menu item.
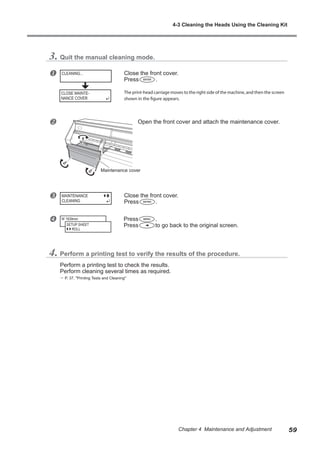
u Close the front cover.
Press .
After the process to quit the [REPLACE WIPER] menu item ends, the screen shown
in the figure appears.
v Press .
Press to go back to the original screen.
w Perform a printing test to verify the results of the procedure.
? P. 37, "Printing Tests and Cleaning"
CLEANING...
W 1839mm
SETUP SHEET
ROLL
Felt surface toward
the back
Rubber surface toward
the front
Hook
MAINTENANCE
REPLACE WIPER
4-4 Replacing Consumable Parts
61
Chapter 4 Maintenance and Adjustment](https://image.slidesharecdn.com/xj-740640540usermanual-210909124322/85/Xj-740-640-540_user-manual-63-320.jpg)
![v Install a new knife.
The knife is secured in place by the magnet.
w Slowly insert it into the groove.
x Tighten the screw.
Take care to ensure that the knife does
not slip out of position at this time.
3. Quit the [REPLACE KNIFE] menu item.
u Close the front cover.
Press .
v Press .
Press to go back to the original screen.
MAINTENANCE
REPLACE KNIFE
W 1839mm
SETUP SHEET
ROLL
Magnet
Positioning
groove
4-4 Replacing Consumable Parts
63
Chapter 4 Maintenance and Adjustment](https://image.slidesharecdn.com/xj-740640540usermanual-210909124322/85/Xj-740-640-540_user-manual-65-320.jpg)


![x Press .
Description
You can shift the printing position to the left by using . Note, however that this setting must be made for each indi-
vidual page.When the printing of one page finishes, the left-right positioning returns to its default value.When the position
has been set, lights up and the screen displays the printable width at the set position.
This feature is also available when printing various test patterns, and can help you use media with less waste. Note, however,
that the left and right positions are not restored to their defaults for test patterns.
Expanding the Printing Area by Reducing the Margins
Procedure
u Press .
Press several times.
v Press .
Press several times.
w Press .
Use to select [5 mm].
x Press to enable the setting.
The settings are saved and the screen shown in the figure appears.
Description
This makes the setting for distance from the left or right media clamp to the corresponding left or right edge of the printing
area. You can select either "5 mm" or "10 mm." Setting this to "5 mm" lets you expand the printing area.
? P. 119 "Printing Area and Margins"
Note, however, that when you're using transparent media, setting this to "5 mm" may result in printing on top of the media
clamps.
Changing the setting while is lighted makes go dark. To start printing, press once more and redo
the preparations for printing.
Default Setting
[SIDE MARGIN]: 10 mm
MENU
SUB MENU
SIDE MARGIN
10 mm 5 mm
SETUP SHEET
ROLL
5-2 Setting the Printing Position and Margins
70 Chapter 5 Feature Reference](https://image.slidesharecdn.com/xj-740640540usermanual-210909124322/85/Xj-740-640-540_user-manual-72-320.jpg)
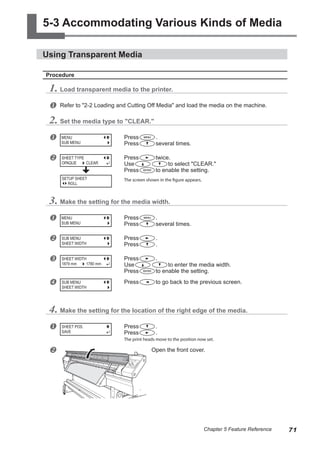
![w Use to move the heads.
x After positioning, close the front cover.
Press to enable the setting.
y Press .
Press to go back to the original screen, then press
.
The top menu appears.
Description
The media width can be sensed automatically for opaque media, but not for transparent media.
This means that the width and mounted location of the media must be set manually. Incorrect settings may cause ink to be
applied at locations where no media is present.
To quit making settings at the [SHEET POS.] menu item, use to select "CANCEL," then
close the front cover and press .
Note that to keep the heads from drying out, the [SHEET POS.] menu item ends automatically after a certain interval, even
if you’re still making settings there.
The settings for the media width and start position made here are effective only when [SHEETTYPE] is set to "CLEAR." Select-
ing "OPAQUE" disables the settings, although the setting values are saved in memory. Choosing "CLEAR" again enables the
values set previously.
Default Setting
[SHEET TYPE]: OPAQUE
[SHEET WIDTH]: 1879 mm (XJ-740) , 1625 mm (XJ-640), 1371 mm (XJ-540)
W 1760mm
SHEET POS.
CANCEL
Align this surface with the edge of the media.
5-3 Accommodating Various Kinds of Media
72 Chapter 5 Feature Reference](https://image.slidesharecdn.com/xj-740640540usermanual-210909124322/85/Xj-740-640-540_user-manual-74-320.jpg)
![Printing Hard-to-dry Media
Procedure
u Press .
Press several times.
v Press .
Press several times.
w Press .
Use to set the value.
Press .
x Press .
Press to go back to the original screen.
Description
You use this when ink dries poorly even when the print heater and dryer are used. Larger values produce progressively slower
movement of the media, enabling you to extend the drying time accordingly. Printing time takes correspondingly longer.
You can also make this setting on the computer. When you have made the setting on the computer, the computer's setting
is used and the printer's setting is ignored.
Default Setting
[SCAN INTERVAL]: OFF
Preventing Media from Coming Loose
Procedure
u Press .
Press several times.
v Press .
Press several times.
w Press .
Use to set the value.
Press to enable the setting.
x Press .
Press to go back to the original screen.
Description
The platen uses suction to grip the media and keep it stable. When media comes loose from the platen because it is warped
MENU
SUB MENU
SUB MENU
SCAN INTERVAL
SCAN INTERVAL
OFF 1.0 sec
W 1839mm
SETUP SHEET
ROLL
MENU
SUB MENU
SUB MENU
VACUUM POWER
VACUUM POWER
AUTO 90%
W 1839mm
SETUP SHEET
ROLL
5-3 Accommodating Various Kinds of Media
73
Chapter 5 Feature Reference](https://image.slidesharecdn.com/xj-740640540usermanual-210909124322/85/Xj-740-640-540_user-manual-75-320.jpg)
![or wrinkled, increasing the suction force may help correct the problem. Conversely, when the media is flimsy and cannot
move smoothly, reducing the suction force may help.
When set to "AUTO," the suction force is automatically adjusted to the optimal level for the media width.
You can also make this setting on the computer. When you have made the setting on the computer, the computer's setting
is used and the printer's setting is ignored.
Default Setting
[VACUUM POWER]: AUTO
Speeding Up Printing for Narrow Media
Procedure
u Press .
Press several times.
v Press .
Press several times.
w Press .
Use to select "SHEET" or "OFF."
Press to enable the setting.
x Press .
Press to go back to the original screen.
Description
This shortens printing time by reducing the width of head movement to the minimum necessary. This is effective when the
width of the media or the printing data is narrow.
"SHEET" matches the range of head movement to the width of the media.
"OFF" matches the range of head movement to the printing data. Movement is limited to the minimum amount necessary,
and this can be expected to yield the fastest printing. Note, however, that because the speed of media movement is no
longer constant, colors may be uneven.
"FULL" makes the speed of media movement constant at all times.
Default Setting
[FULL WIDTH S]: FULL
Preventing Soiling of the Media and Dot Drop-out During Printing
Procedure
u Press .
Press several times.
MENU
SUB MENU
SUB MENU
FULL WIDTH S
FULL WIDTH S
FULL OFF
W 1839mm
SETUP SHEET
ROLL
MENU
SUB MENU
5-3 Accommodating Various Kinds of Media
74 Chapter 5 Feature Reference](https://image.slidesharecdn.com/xj-740640540usermanual-210909124322/85/Xj-740-640-540_user-manual-76-320.jpg)
![v Press .
Press several times.
w Press .
Use to select a value from "10 min" to "990 min,"
or "PAGE."
Press to enable the setting.
x Press .
Press to go back to the original screen.
Description
Ink tends to collect on the surface of the heads when you use media prone to buildup of static charge, when the ambient
temperature is low, or when the head height is set to“HIGH.”Under some conditions, this ink may be transferred to the media
or cause dot drop-out. Use this feature at such times. The ink buildup is removed as printing is performed.
When this is set to "PAGE," automatic cleaning is performed every time before printing starts.
When this is set to a value from "10 min" to "990 min," automatic cleaning is performed when the cumulative printing time
reaches the value you set here.
When this is set to "NONE," no automatic cleaning is performed.
Using "PAGE" or a value from "10 min" to "990 min," results in longer printing times. Also, when this is set to a value from "10
min" to "990 min," printing pauses and so colors may be uneven.
? P. 81, "Adjusting Head Height to Match Media Thickness"
Default Setting
[PERIODIC CL.]: NONE
Using Sticky Media
Procedure
u Press .
Press several times.
v Press .
Press several times.
w Press .
Use to select "ENABLE."
Press to enable the setting.
x Press .
Press to go back to the original screen.
Description
Some types of media may tend to stick to the platen. Starting printing with the media sticking to the platen may make normal
media feed impossible and cause the media to jam. When you're using such media, set the [MEDIA RELEASE] menu item
to "ENABLE." This peels off the media if sticking before starting printing. Note, however, that media feed may be unstable
SUB MENU
PERIODIC CL.
PERIODIC CL .
NONE 10 min
W 1839mm
SETUP SHEET
ROLL
MENU
SUB MENU
SUB MENU
MEDIA RELEASE
MEDIA RELEASE
DISABLE ENABLE
W 1839mm
SETUP SHEET
ROLL
5-3 Accommodating Various Kinds of Media
75
Chapter 5 Feature Reference](https://image.slidesharecdn.com/xj-740640540usermanual-210909124322/85/Xj-740-640-540_user-manual-77-320.jpg)
![when printing is performed after executing this operation. Leave this menu item set to "DISABLE" unless you specifically
need to change it.
Default Setting
[MEDIA RELEASE]: DISABLE
How to Load Sheet Media
As with standard-size media, make sure of the following points when loading sheet media.
Procedure
u If roll media is loaded, remove the media first.
v Pass the sheet media through the machine.
w Align the front edge of the media with the
location shown in the figure.
x Pull back the loading lever.
The media is secured in place.
y Attach the media clamps and close the front cover.
? P. 32, "Loading Media," step 3
z Use to select "ROLL."
{ Press .
starts to flash. When initialization ends, remains steadily lighted, and the printable width is dis-
played.
SETUP SHEET
ROLL
W 1839mm
Loading lever
Media Align here
5-3 Accommodating Various Kinds of Media
76 Chapter 5 Feature Reference](https://image.slidesharecdn.com/xj-740640540usermanual-210909124322/85/Xj-740-640-540_user-manual-78-320.jpg)
![5-4 Setting How the Printer Operates
Determining What Happens When an Ink Cartridge Is Empty
Procedure
u Press .
Press several times.
v Press .
Press twice.
w Press twice.
Use to make the setting.
Press to enable the setting.
x Press .
Press to go back to the original screen.
Description
This lets you change, according to your purpose, the operation that takes place when an ink cartridge is empty.
"STOP" immediately pauses operation when a cartridge becomes empty. Because pausing printing in progress may make
colors uneven, it is best to ensure a sufficient amount of remaining ink before you begin printing.
"CONT." (continue) is a mode in which operation is not automatically stopped. When a cartridge becomes empty, a warning
beep sounds but printing doesn't stop. To replace the cartridge, you must either wait until printing ends or press to
pause printing. Note that operation does not stop even if ink runs out completely.
Default Setting
[EMPTY MODE]: STOP
Changing the Type of Ink
Procedure
u Press .
Press several times.
v Press .
Press twice.
w Press .
Press .
x Press .
Use to make the setting.
Press to execute the setting.
Description
You use this when changing the type of ink. Selecting the type of ink used for replacement starts head-cleaning and ink-filling
MENU
SUB MENU
SUB MENU
INK CONTROL
EMPTY MODE
STOP CONT.
W 1839mm
SETUP SHEET
ROLL
MENU
SUB MENU
SUB MENU
INK CONTROL
INK CONTROL
CHANGE INK SET
CHANGE INK SET
E-SOL Max LcLm
77
Chapter 5 Feature Reference](https://image.slidesharecdn.com/xj-740640540usermanual-210909124322/85/Xj-740-640-540_user-manual-79-320.jpg)
![operations. Follow the on-screen instructions to insert and remove cartridges.
This operation requires four unused SOL INK cleaning cartridges.
Setting the Interval until Activation of the Sleep Mode
Procedure
u Press .
Press several times.
v Press .
Press several times.
w Press twice.
Use to make the setting.
Press to enable the setting.
x Press .
Press to go back to the original screen.
Default Setting
[INTERVAL]: 30min
Deactivating the Sleep Mode
Procedure
u Press .
Press several times.
v Press .
Press several times.
w Press .
Press .
x Press .
Use to select "DISABLE."
Press to enable the setting.
y Press .
Press to go back to the original screen.
Default Setting
[SETTING]: ENABLE
MENU
SUB MENU
SUB MENU
SLEEP
INTERVAL
30min 15min
W 1839mm
SETUP SHEET
ROLL
MENU
SUB MENU
SUB MENU
SLEEP
SLEEP
SETTING
SETTING
ENABLE DISABLE
W 1839mm
SETUP SHEET
ROLL
5-4 Setting How the Printer Operates
78 Chapter 5 Feature Reference](https://image.slidesharecdn.com/xj-740640540usermanual-210909124322/85/Xj-740-640-540_user-manual-80-320.jpg)
![Giving Priority Efficient Ink Use During Operation
Procedure
u Press .
Press several times.
v Press .
Press several times.
w Press .
Use to select "ENABLE."
Press to enable the setting.
x Press .
Press to go back to the original screen.
Description
This menu item is displayed only when using four-color inks (cyan, magenta, yellow, and black). It sets whether efficient ink
use or image quality takes priority when you're performing bidirectional printing. Note, however, that some high-speed print
modes may not be affected by this setting.
Setting this to "DISABLE" performs printing with priority given to image quality.
Setting this to "ENABLE" lets you use ink more efficiently, although image quality may be slightly coarser.
Default Setting
[ALTERNATE HEAD]: DISABLE
Changing the Menu Language and the Units of Measurement
Procedure
u Hold down and switch on the sub power.
Use to select the display (menu) language.
Press .
v Use to select the measurement unit for length.
Press .
w Use to select to the measurement unit for tempera-
ture.
Press .
Description
This sets the language and units of measurement displayed on the printer's screen.
MENU
SUB MENU
SUB MENU
ALTERNATE HEAD
ALTERNATE HEAD
DISABLE ENABLE
W 1839mm
SETUP SHEET
ROLL
MENU LANGUAGE
ENGLISH
LENGTH UNIT
mm INCH
TEMP. UNIT
C F
5-4 Setting How the Printer Operates
79
Chapter 5 Feature Reference](https://image.slidesharecdn.com/xj-740640540usermanual-210909124322/85/Xj-740-640-540_user-manual-81-320.jpg)
![Default Setting
[MENU LANGUAGE]: ENGLISH
[LENGTH UNIT]: mm
[TEMP. UNIT]: ˚C
Returning All Settings to Their Initial Values
Procedure
u Press .
Press several times.
v Press .
Press several times.
Press to execute.
Description
Thismenuitemreturnsallsettingstothesameastheirfactorydefaults.However,thesettingsfor[MENULANGUAGE],[LENGTH
UNIT], and [TEMP. UNIT] are not returned to the factory defaults.
MENU
SUB MENU
SUB MENU
FACTORY DEFAULT
5-4 Setting How the Printer Operates
80 Chapter 5 Feature Reference](https://image.slidesharecdn.com/xj-740640540usermanual-210909124322/85/Xj-740-640-540_user-manual-82-320.jpg)
![5-5 Optimizing Printing to Match Media Thickness
Adjusting Head Height to Match Media Thickness
Procedure
u Press .
Press several times.
v Press .
w Open the front cover.
Move the lever to adjust the height of the head.
Moving the lever to "HIGH" makes a warning beep sound twice. Moving
it to "LOW" makes the warning beep sound once.
x Close the front cover.
The print heads return to their original position and the screen shown in the figure
appears.
y Press .
Press to go back to the original screen.
Description
Depending on the media, media may wrinkle or come loose from the platen during printing, increasing the chance of contact
with the print heads. When you are using such media, adjust the head height to "HIGH."
Printing quality when the head height is set to“HIGH”may be coarser or otherwise lower than when set to“LOW.”If this hap-
pens, refer to the pages indicated below.
? P. 74, "Preventing Soiling of the Media and Dot Drop-out During Printing," p. 82, "Correcting for Misalignment in Bidirectional Printing,"
p. 83, "Correcting for Misalignment in Bidirectional Printing More Precisely"
Default Setting
[HEAD HEIGHT]: LOW
MENU
HEAD HEIGHT
HEAD HEIGHT
LOW LOW
MENU
HEAD HEIGHT
W 1839mm
SETUP SHEET
ROLL
Height-adjustment lever
Move firmly, until it stops.
HIGH
LOW
81
Chapter 5 Feature Reference](https://image.slidesharecdn.com/xj-740640540usermanual-210909124322/85/Xj-740-640-540_user-manual-83-320.jpg)
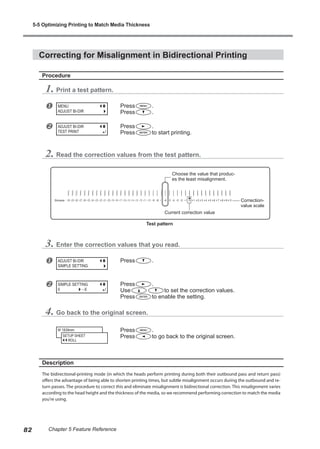
![Correcting for Misalignment in Bidirectional Printing More Precisely
Procedure
1. Print a test pattern.
u Press .
Press .
v Press .
Press .
w Press .
Press to start printing.
2. Read the correction values from the test pattern.
3. Enter the correction values that you read.
Enter the corresponding correction values for H1 through H6.
u Press .
v Press .
Use to select. Use to set the correction
value.
Press to finish making the settings for [SETTING NO.1].
MENU
ADJUST BI-DIR
ADJUST BI-DIR
DETAIL SETTING
DETAIL SETING
TEST PRINT
H3
H4
H5
H6
H2
H1
NO.1
H3
H4
H2
H1
NO.2
H1
NO.1
H5
H6
H3
H4
H5
H6
H2
H1
NO.3
H3
H4
H5
H6
H2
H1
NO.4
DETAIL SETTING
SETTING NO.1
H1 H2 H3
0 0 0
H4 H5 H6
0 0 0
Test pattern
Choose the value that produces
the least misalignment.
Correction-value scale
Current correction value
5-5 Optimizing Printing to Match Media Thickness
83
Chapter 5 Feature Reference](https://image.slidesharecdn.com/xj-740640540usermanual-210909124322/85/Xj-740-640-540_user-manual-85-320.jpg)
![w Press .
x Press .
Use to select. Use to set the correction
value.
Press to finish making the settings for [SETTING NO.2].
y Press .
z Press .
Use to select. Use to set the correction
value.
Press to finish making the settings for [SETTING NO.3].
{ Press .
| Press .
Use to select. Use to set the correction
value.
Press to finish making the settings for [SETTING NO.4].
4. Go back to the original screen.
Press .
Press to go back to the original screen.
Description
This corrects, for each head, the minute misalignment that occurs in the bidirectional-printing mode. When further correc-
tion is required, such as when adjustment made using [SIMPLE SETTING] does not enhance printing, use [DETAIL SETTING]
to make corrections for each head.
DETAIL SETTING
SETTING NO.2
H1 H2 H3
0 0 0
DETAIL SETTING
SETTING NO.3
H1 H2 H3
0 0 0
DETAIL SETTING
SETTING NO.4
H1 H2 H3
0 0 0
W 1839mm
H4 H5 H6
0 0 0
H4 H5 H6
0 0 0
H4 H5 H6
0 0 0
5-5 Optimizing Printing to Match Media Thickness
84 Chapter 5 Feature Reference](https://image.slidesharecdn.com/xj-740640540usermanual-210909124322/85/Xj-740-640-540_user-manual-86-320.jpg)
![To make the setting for the correction value even more accurate, we recommend carrying out the following before printing
the test pattern.
➢ After loading the media, use to feed out the media by about one meter.
? P. 69, "Shifting the Print-start Position Forward or Backward"
➢ Set the print-start position near the center of the media.
? P. 69, "Shifting the Printing Position to the Left"
Note, however, that you can also make this setting on the computer (by, for example, choosing the media type in the soft-
ware RIP you are using). When you have made the setting on the computer, the computer's setting is used and the printer's
setting is ignored.
Default Setting
[SETTING]: 0.00%
Changing the Feed-correction Value During Printing
Procedure
u While printing is in progress, press .
v Press .
The current correction value is displayed.
w Use to set the correction value.
Press to enable the setting.
The changed correction value is saved and immediately applied to printing.
Description
If white or dark-colored stripes appear during printing, you can change the feed-correction value without stopping the
printing operation in progress. If white horizontal stripes appear, you make the correction value smaller. If dark horizontal
stripes appear, you make the value larger. You can change the correction value regardless of whether settings made on the
machine or settings made on the computer take precedence.
A correction value set while printing is in progress is saved only as a setting on the machine.
MENU
CALIBRATION
SETTING
- 0.80%
- 0.80%
SETTING
- 0.90%
- 0.80%
Approx. 1 m
Print-start position
5-5 Optimizing Printing to Match Media Thickness
86 Chapter 5 Feature Reference](https://image.slidesharecdn.com/xj-740640540usermanual-210909124322/85/Xj-740-640-540_user-manual-88-320.jpg)
![5-6 Changing the Ink-drying Method
Switching Off the Preheater, Print Heater, or Dryer
Procedure
u Press twice.
Use to select the device.
Press several times to select "OFF."
Press to enable the setting.
v Press .
Press to go back to the original screen.
Description
This makes the temperature settings for the media heating system (preheater, print heater, and dryer), as well as switching
these devices on or off. When this is set to "OFF," these devices do not operate at all.
You can also make these settings on the computer.When you've made the settings on the computer, the computer's settings
take precedence and the printer's settings are ignored.
Default Setting
[PRE] (preheater): 35˚C (94˚F)
[PRINT] (print heater): 35˚C (94˚F)
[DRYER]: 50˚C (122˚F)
Determining How the Media Heating System Operates
Procedure
u Hold down and press .
v Press .
w Press .
Use to make the setting.
Press to enable the setting.
x Press .
Press to go back to the original screen.
Description
This feature controls the temperature of the media heating system automatically when is dark.
"MENU" performs heating to the preset temperature at all times, without lowering the temperature when is dark.
"30˚C" lowers the media heating system to a fixed temperature (30˚C) when is dark.
"OFF" switches off the media heating system when is dark.
PRE 35
OFF
35
W 1839mm
SETUP SHEET
ROLL
HEATER MENU
FEED FOR DRY
HEATER MENU
PREHEATING
PREHEATING
30 C MENU
W 1839mm
SETUP SHEET
ROLL
87
Chapter 5 Feature Reference](https://image.slidesharecdn.com/xj-740640540usermanual-210909124322/85/Xj-740-640-540_user-manual-89-320.jpg)
![Default Setting
[PREHEATING]: 30˚C
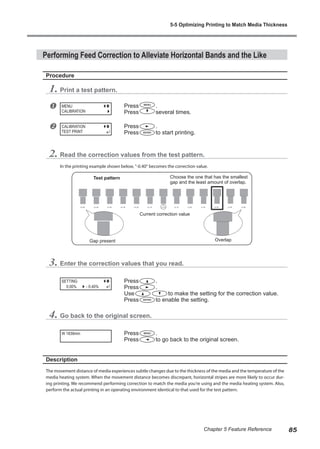
Drying the Trailing Edge of the Printing Area on the Dryer
Procedure
u Hold down and press .
v Press .
Use to select "ENABLE."
Press to enable the setting.
w Press .
Press to go back to the original screen.
Description
When this menu item is set to "ENABLE," additional media feed is performed until the trailing edge of the printing area is
positioned directly on the dryer. The margin between the print-end position and the next print-start position is fixed at 200
mm. Any margin setting made on the computer is ignored.
When this is set to "DISABLE," media feed stops simultaneously when printing ends. This means that the trailing edge of the
printing area is not fed to the dryer unless you continue with a subsequent printing operation.
When you're using the take-up unit, be sure to set this to "DISABLE."
? P. 44, "Operating Conditions for the Take-up System"
Default Setting
[FEED FOR DRY]: DISABLE
HEATER MENU
FEED FOR DRY
FEED FOR DRY
DISABLE ENABLE
W 1839mm
SETUP SHEET
ROLL
5-6 Changing the Ink-drying Method
88 Chapter 5 Feature Reference](https://image.slidesharecdn.com/xj-740640540usermanual-210909124322/85/Xj-740-640-540_user-manual-90-320.jpg)
![5-7 Setting How the Auxiliary Drying Unit Operates
When the optionally available auxiliary drying unit is installed, use the setting menus on the machine to set how the drying
unit operates. For detailed information about the auxiliary drying unit, refer to the user's manual for drying unit.
Switching the Drying-heater Unit On and Off
Procedure
u Hold down and press .
Press twice.
v Press .
Use to select "ENABLE" or "DISABLE."
Press .
w Press .
Press to go back to the original screen.
Description
This switches the auxiliary drying unit's drying-heater unit on or off.
The temperature setting for the drying-heater unit is based on the setting made on the machine. After you've completed
installation of the auxiliary drying unit, set the machine's [OPTION DRYER] menu item to "ENABLE."
Default Setting
[OPTION DRYER]: DISABLE
Switching the Blower-fan Unit On and Off
Procedure
u Hold down and press .
Press .
v Press .
Use to select "ENABLE" or "DISABLE."
Press .
w Press .
Press to go back to the original screen.
Description
This switches the auxiliary drying unit's blower-fan unit on or off. After you've completed installation of the auxiliary drying
unit, set the machine's [BLOWER FAN] menu item to "ENABLE."
Default Setting
[BLOWER FAN]: DISABLE
HEATER MENU
OPTION DRYER
OPTION DRYER
DISABLE ENABLE
W 1839mm
SETUP SHEET
ROLL
HEATER MENU
BLOWER FAN
BLOWER FAN
DISABLE ENABLE
W 1839mm
SETUP SHEET
ROLL
89
Chapter 5 Feature Reference](https://image.slidesharecdn.com/xj-740640540usermanual-210909124322/85/Xj-740-640-540_user-manual-91-320.jpg)
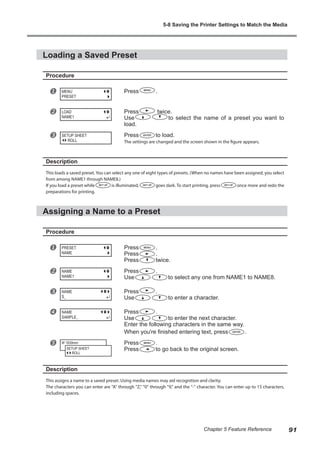
![5-8 Saving the Printer Settings to Match the Media
Saving Optimized Media Settings As Preset Values
Procedure
u Press .
v Press .
Press .
w Press .
Use to select any one from "NAME1" to "NAME8."
Press to save.
The present menu settings are saved in the preset you chose in step w.
x Press .
Press to go back to the original screen.
Description
Using the [PRESET] menu item lets you easily change a wide variety of settings to optimize them for the media.
Making changes for each menu item every time you change the media can be troublesome. That's why it can be useful to
save the menu-item settings optimized for an often-used type of media as a preset. The next time you use the media, you
can change the menu-item settings to the optimal values for the media simply by loading the preset you saved. Menu items
that can be saved in presets are listed below.
Menu item Page to see
[ADJUST BI-DIR SIMPLE SETTING] P. 82, "Correcting for Misalignment in Bidirectional Printing"
[ADJUST BI-DIR DETAIL SETTING] P. 83, "Correcting for Misalignment in Bidirectional Printing More Precisely"
[ALTERNATE HEAD] P. 79, "Giving Priority Efficient Ink Use During Operation"
[BLOWER FAN] P. 89, "Switching the Blower-fan Unit On and Off"
[CALIBRATION] P. 85, "Performing Feed Correction to Alleviate Horizontal Bands and the Like"
[FEED FOR DRY] P. 88, "Drying the Trailing Edge of the Printing Area on the Dryer"
[FULL WIDTH S] P. 74, "Speeding Up Printing for Narrow Media"
[MEDIA RELEASE] P. 75, "Using Sticky Media"
[PRE], [PRINT], [DRYER] P. 34, "Making the Temperature Setting for the Media Heating System"
[PREHEATING] P. 87, "Determining How the Media Heating System Operates"
[SCAN INTERVAL] P. 73, "Printing Hard-to-dry Media"
[SHEET TYPE], [SHEET WIDTH],
[SHEET POS.]
P. 71, "Using Transparent Media"
[SIDE MARGIN] P. 70, "Expanding the Printing Area by Reducing the Margins"
[VACUUM POWER] P. 73, "Preventing Media from Coming Loose"
You can save up to eight presets. You can assign a name to each preset. Using media names may aid recognition and clar-
ity.
? P. 91, "Loading a Saved Preset," p. 91, "Assigning a Name to a Preset"
MENU
PRESET
PRESET
SAVE
SAVE
NAME1
W 1839mm
SETUP SHEET
ROLL
90 Chapter 5 Feature Reference](https://image.slidesharecdn.com/xj-740640540usermanual-210909124322/85/Xj-740-640-540_user-manual-92-320.jpg)
![5-9 Making the Network Settings
Setting the IP Address, Subnet Mask, Etc.
Procedure
u Press .
Press several times.
v Press .
Press .
w Press .
Use to choose the item whose setting you want to
make.
x Press twice.
Use to select the address number.
y Press .
z Repeat x and y to set all the address numbers.
When you have finished making the setting, press .
{ Press .
Press to go back to the original screen.
Description
Make sure the machine is connected to the network by an Ethernet cable.
For detailed information about the settings, consult your network administrator.
[IP ADDRESS]: IP address
[SUBNET MASK]: Subnet mask
[GATEWAY ADDR.]: Gateway address
MENU
SYSTEM INFO.
SYSTEM INFO.
NETWORK
NETWORK
IP ADDRESS
IP ADDRESSS
000 . 000 . 000 . 000
IP ADDRESS
192 . 000 . 000 . 000
IP ADDRESS
192 . 168 . 000 . 003
W 1839mm
SETUP SHEET
ROLL
92 Chapter 5 Feature Reference](https://image.slidesharecdn.com/xj-740640540usermanual-210909124322/85/Xj-740-640-540_user-manual-94-320.jpg)
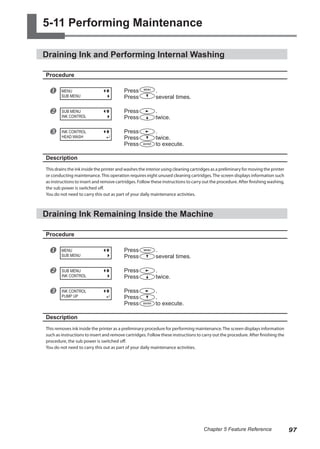
![Description
Setting this to "ENABLE" automatically displays the [SHEET REMAIN] menu item whenever you change the media and finish
setup. This makes it impossible to go on to the next operation unless you redo the setting for the amount remaining. This
can be useful for keeping you from forgetting to redo the setting when you change the media.
When you set this to "ENABLE," however, be sure also to set the [SHEET TYPE] menu item to "OPAQUE." When the [SHEET
TYPE] menu item is set to "CLEAR," then the [SHEET REMAIN] menu item is not displayed automatically, regardless of the
setting for the [AUTO DISPLAY] menu item.
? P. 71, "Using Transparent Media"
Default Setting
[AUTO DISPLAY]: DISABLE
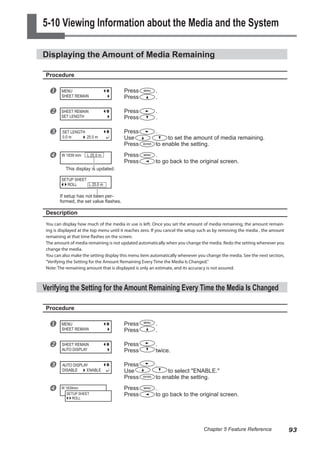
Printing the Amount of Remaining Media
Procedure
u Press .
Press .
v Press .
Press to perform printing.
w Press .
Press to go back to the original screen.
Description
This prints the amount of media remaining that is displayed at the top menu. You use this when you want to make a record
of the remaining length of the media now in use. Printing the amount of media remaining before you change the media
enables you to refer to the printed record and use the value to make the setting for the remaining amount the next time
you use the media.
Printing a System Report
Procedure
u Press .
Press several times.
v Press .
Press several times.
Press to start printing.
w Press .
Press to go back to the original screen.
MENU
SHEET REMAIN
SHHET REMAIN
PRINT MEMO
W 1839 mm L 25.0 m
MENU
SUB MENU
SUB MENU
SYSTEM REPORT
W 1839mm
SETUP SHEET
ROLL
5-10 Viewing Information about the Media and the System
94 Chapter 5 Feature Reference](https://image.slidesharecdn.com/xj-740640540usermanual-210909124322/85/Xj-740-640-540_user-manual-96-320.jpg)
![Description
This prints system information, including a list of setting values.
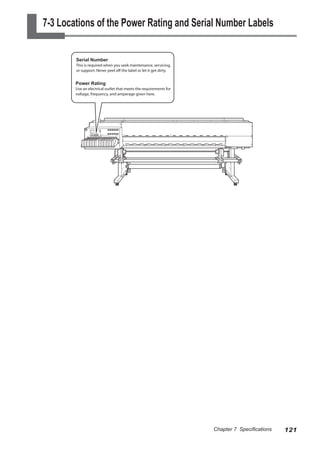
Viewing the Serial Number, Firmware Version, and Other Information
Procedure
u Press .
Press several times.
v Press .
Use to choose the information you want to view.
w Press .
x Press .
Press to go back to the original screen.
Description
You can view the following information.
[MODEL]: Model name
[SERIAL NO.]: Serial number
[INK]: Ink type
[FIRMWARE]: Firmware version
Viewing the Network Settings
Procedure
u Press .
Press several times.
v Press .
Press .
w Press .
Use to choose the information you want to view.
x Press .
y Press .
Press to go back to the original screen.
MENU
SYSTEM INFO.
SYSTEM INFO.
SERIAL NO.
SERIAL NO.
ZS00001
W 1839mm
SETUP SHEET
ROLL
MENU
SYSTEM INFO.
SYSTEM INFO.
NETWORK
NETWORK
IP ADDRESS
IP ADDRESS
192 . 168 . 000 . 003
W 1839mm
SETUP SHEET
ROLL
5-10 Viewing Information about the Media and the System
95
Chapter 5 Feature Reference](https://image.slidesharecdn.com/xj-740640540usermanual-210909124322/85/Xj-740-640-540_user-manual-97-320.jpg)
![Description
You can view the following information.
[IP ADDRESS]: IP address
[SUBNET MASK]: Subnet mask
[GATEWAY ADDR.]: Gateway address
[MAC ADDRESS]: MAC address
5-10 Viewing Information about the Media and the System
96 Chapter 5 Feature Reference](https://image.slidesharecdn.com/xj-740640540usermanual-210909124322/85/Xj-740-640-540_user-manual-98-320.jpg)
![5-12 Menu List
Main Menu
MENU
PRESET
PRESET
LOAD
PRESET
SAVE
LOAD
NAME1
LOAD
NAME2
To [SHEET REMAIN] To [NAME]
LOAD
NAME4
LOAD
NAME6
To [NAME8]
To [NAME1]
SAVE
NAME1
SAVE
NAME2
SAVE
NAME4
SAVE
NAME6
To [NAME8]
To [NAME1]
Continued
Continued
Press
LOAD
NAME3
LOAD
NAME5
LOAD
NAME7
LOAD
NAME8
SAVE
NAME3
SAVE
NAME5
SAVE
NAME7
SAVE
NAME8
Continued
? P. 90
? P. 91
98 Chapter 5 Feature Reference](https://image.slidesharecdn.com/xj-740640540usermanual-210909124322/85/Xj-740-640-540_user-manual-100-320.jpg)
![PRESET
NAME
NAME
_
NAME
NAME3
NAME
NAME5
NAME
NAME7
NAME
NAME8
To [NAME1]
To [LOAD]
NAME
_
NAME
_
NAME
_
NAME
_
NAME
_
NAME
_
NAME
_
Continued
Continued
MENU
ADJUST BI-DIR
ADJUST BI-DIR
SIMPLE SETTING
ADJUST BI-DIR
DETAIL SETTING
ADJUST BI-DIR
TEST PRINT
SIMPLE SETTING
0 0
DETAIL SETTING
SETTING NO.1
DETAIL SETTING
TEST PRINT
To [DETAIL SETTING]
To [TEST PRINT]
To [SETTING NO.4]
To [TEST PRINT]
MENU
CALIBRATION
CALIBRATION
SETTING
CALIBRATION
TEST PRINT
SETTING
0.00% 0.00%
To [SETTING]
To [TEST PRINT]
To [NAME8]
DETAIL SETTING
SETTING NO.2
DETAIL SETTING
SETTING NO.3
DETAIL SETTING
SETTING NO.4
H4 H5 H6
0 0 0
H1 H2 H3
0 0 0
H4 H5 H6
0 0 0
H1 H2 H3
0 0 0
H4 H5 H6
0 0 0
H1 H2 H3
0 0 0
H4 H5 H6
0 0 0
H1 H2 H3
0 0 0
NAME
NAME1
NAME
NAME2
NAME
NAME4
NAME
NAME6
Continued
Continued
? P. 82, 83
? P. 91
? P. 82
? P. 83
? P. 85
5-12 Menu List
99
Chapter 5 Feature Reference](https://image.slidesharecdn.com/xj-740640540usermanual-210909124322/85/Xj-740-640-540_user-manual-101-320.jpg)
![Continued
Continued
SUB MENU
SLEEP
SLEEP
INTERVAL
SLEEP
SETTING
SETTING
ENABLE ENABLE
SUB MENU
FACTORY DEFAULT
SUB MENU
SYSTEM REPORT
INTERVAL
30 min 30 min
To [SETTING]
To [INTERVAL]
PERIODIC CL.
NONE NONE
SUB MENU
PERIODIC CL.
SUB MENU
ALTERNATE HEAD
FULL WIDTH S
FULL FULL
ALTERNATE HEAD
DISABLE DISABLE
SUB MENU
FULL WIDTH S
MENU
HEAD HEIGHT
MENU
SUB MENU
HEAD HEIGHT
LOW LOW
SUB MENU
SHEET TYPE
SUB MENU
SCAN INTERVAL
SUB MENU
VACUUM POWER
SHEET TYPE
OPAQUE OPAQUE
SCAN INTERVAL
OFF OFF
To [MAINTENANCE]
SHEET POS.
SAVE
SUB MENU
SIDE MARGIN
SHEET POS.
CANCEL
SIDE MARGIN
10 mm 10 mm
SUB MENU
SHEET WIDTH
SUB MENU
SHEET POS.
SHEET WIDTH
1879 mm 1879 mm
To [SAVE]
To [CANCEL]
VACUUM POWER.
AUTO AUTO
SUB MENU
MEDIA RELEASE
MEDIA RELEASE
DISABLE DISABLE
Continued Continued
? P. 73
? P. 72
? P. 70
? P. 71
? P. 71
? P. 71
? P. 81
? P. 73
? P. 79
? P. 74
? P. 78
? P. 75
? P. 80
? P. 78
? P. 94
? P. 74
5-12 Menu List
100 Chapter 5 Feature Reference](https://image.slidesharecdn.com/xj-740640540usermanual-210909124322/85/Xj-740-640-540_user-manual-102-320.jpg)
![? P. 77
? P. 97
? P. 97
? P. 77
? P. 56
? P. 95
? P. 95
? P. 95
? P. 92, 95
? P. 95
? P. 92, 95
? P. 92, 95
? P. 60
? P. 62
? P. 50
? P. 95
SYSTEM INFO.
MODEL
SYSTEM INFO.
INK
SYSTEM INFO.
FIRMWARE
Continued
MENU
SYSTEM INFO.
MODEL
XJ-740
SYSTEM INFO.
SERIAL NO.
SERIAL NO.
ZS00001
INK
E-SOL Max LcLm
FIRMWARE
Ver.2.00
To [NETWORK]
To [MODEL]
SYSTEM INFO.
NETWORK
SUBNET MASK
255 . 255 . 255 . 255
SUBNET MASK
255 . 255 . 255 . 255
NETWORK
SUBNET MASK
GATEWAY ADDR.
255 . 255 . 255 . 255
GATEWAY ADDR.
255 . 255 . 255 . 255
NETWORK
GATEWAY ADDR.
MAC ADDRESS
000086148C5F
NETWORK
MAC ADDRESS
IP ADDRESS
255 . 255 . 255 . 255
IP ADDRESS
255 . 255 . 255 . 255
To [MAC ADDRESS]
To [IP ADDRESS]
NETWORK
IP ADDRESS
INK CONTROL
EMPTY MODE
SUB MENU
INK CONTROL
EMPTY MODE
STOP STOP
CHANGE INK SET
E-SOL Max LcLm
INK CONTROL
PUMP UP
INK CONTROL
HEAD WASH
MAINTENANCE
REPLACE WIPER
INK CONTROL
CHANGE INK SET
To [CHANGE INK SET]
To [EMPTY MODE]
SUB MENU
MAINTENANCE
MAINTENANCE
CLEANING
MAINTENANCE
REPLACE KNIFE
MAINTENANCE
DRAIN BOTTLE
To [CLEANING]
To [DRAIN BOTTLE]
Continued Continued
Continued
To [SHEET TYPE]
5-12 Menu List
101
Chapter 5 Feature Reference](https://image.slidesharecdn.com/xj-740640540usermanual-210909124322/85/Xj-740-640-540_user-manual-103-320.jpg)
![Continued
MENU
INK REMAINING
SHEET REMAIN
SET LENGTH
MENU
SHEET REMAIN
SHEET REMAIN
PRINT MEMO
SET LENGTH
0.0 m 0.0 m
To [AUTO DISPLAY]
To [PRINT MEMO]
SHEET REMAIN
AUTO DISPLAY
AUTO DISPLAY
DISABLE DISABLE
1 2 3 4
5 6 7 8
HEATER MENU
FEED FOR DRY
HEATER MENU
OPTION DRYER
HEATER MENU
BLOWER FAN
MENU
HEATER MENU
HEATER MENU
PREHEATING
FEED FOR DRY
DISABLE DISABLE
PREHEATING
30 C 30 C
OPTION DRYER
DISABLE DISABLE
BLOWER FAN
DISABLE DISABLE
To [BLOWER FAN]
To [FEED FOR DRY]
9 10 11 12
To [PRESET]
(*1)
Holding down , and pressing dis-
plays this menu item.
(*1)
? P. 88
? P. 87
? P. 89
? P. 89
? P. 39
? P. 94
? P. 93
? P. 93
5-12 Menu List
102 Chapter 5 Feature Reference](https://image.slidesharecdn.com/xj-740640540usermanual-210909124322/85/Xj-740-640-540_user-manual-104-320.jpg)
![Language and Unit Menu
Cleaning Menu
Heater Configuration Menu
MENU LANGUAGE
ENGLISH
Hold down and switch on the sub power.
LENGTH UNIT
mm mm
TEMP. UNIT
C
Press .
PRE 35 PRINT 35
DRYER 50
PRE 35
35
35
PRINT 35
35
35
DRYER 50
50
50
? P. 79
? P. 79
? P. 79
CLEANING
NORMAL CL.
CLEANING
MEDIUM CL.
To [POWERFUL CL.]
To [NORMAL CL.]
NORMAL CL.
ABC
MEDIUM CL.
ABC
CLEANING
POWERFUL CL.
POWERFUL CL.
ABC
Press .
Hold down for one second or longer.
Head cleaning for all groups
? P. 38, "When you want to clean all heads
simultaneously"
? P. 38
? P. 54
? P. 54
? P. 34
? P. 34
5-12 Menu List
103
Chapter 5 Feature Reference](https://image.slidesharecdn.com/xj-740640540usermanual-210909124322/85/Xj-740-640-540_user-manual-105-320.jpg)


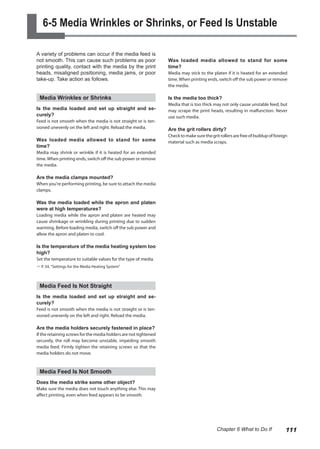
![6-2 Attractive Printing Is Impossible
Printed Results Are Coarse or Contain Horizontal Stripes
Do the print heads show dot drop-out?
Carryoutaprintingtestandmakesurenodotdrop-outoccurs.
If dot drop-out is present, perform head cleaning.
? P. 37, "Printing Tests and Cleaning"
? P. 54, "When Head Cleaning Is Not Effective"
Is the head height appropriate?
Printing when the [HEAD HEIGHT] menu item is set to "HIGH"
is coarser than when set to "LOW." Keep this set to "LOW"
except when changing it is necessary, such as when you're
using thick media.
? P. 81, "Adjusting Head Height to Match Media Thickness"
Have you carried out feed correction?
Large misalignment in the amount of feed of the media may
result in printing that seems coarse or contains horizontal
stripes. Either make the setting on the computer to match the
type of media you're using, or make the setting for correction
on the printer.
? P. 85, "Performing Feed Correction to Alleviate Horizontal Bands and
the Like"
Did the media become slack during feed correc-
tion?
Slackness of the media during feed correction makes accurate
correctionimpossible.Carryoutfeedcorrectionwiththemedia
pulled taut.
? P. 85, "Performing Feed Correction to Alleviate Horizontal Bands and
the Like"
After feed correction, was the media pulled back?
Never pull the media back after carrying out feed correction.
Doing so may cause the correction results not to be applied
properly and result in horizontal stripes.
? P. 85, "Performing Feed Correction to Alleviate Horizontal Bands and
the Like"
Have you carried out bidirectional correction?
When you are performing bidirectional printing, use the [AD-
JUST BI-DIR] menu item to carry out correction. The optimal
adjustment value may vary, depending mainly
onthethicknessofthemedia.Setorselectanadjustmentvalue
that is suited to the media.
? P. 82, "Correcting for Misalignment in Bidirectional Printing"
? P. 83, "Correcting for Misalignment in Bidirectional Printing More
Precisely"
Is the media heating system at a suitable tempera-
ture?
If the ink forms lumps or smudges, raise the temperature. Note,
however, that a temperature that is too high may degrade the
media or cause it to wrinkle.
? P. 34, "Settings for the Media Heating System"
Is the temperature of the room too low?
The media heating system may not warm up sufficiently when
the ambient temperature is less than 20˚C (68˚F). Also, even
when the media heating system reaches its preset tempera-
tures,adequateeffectivenessmaynotbeapparentifthemedia
is thoroughly chilled. Before printing, allow the media to come
to room temperature.
Is the print mode suitable?
If attractive printing is impossible even when the media heat-
ing system is at a high temperature, try using a higher-quality
print mode.
Depending on the media, smudging may occur when using
a high-quality print mode, and results may also vary greatly
depending on the settings of your software RIP (such as the
color-profile selection). Make settings suited to the media
you're using.
Is the printer installed in a level and stable loca-
tion?
Neverinstallthemachineinalocationwhereitistiltedorwhere
it may wobble or experience vibration. Also make sure that the
print heads are not exposed to moving air. These factors may
lead to missing dots or reduced printing quality.
Is the media loaded and set up correctly?
If the media is not loaded and set up correctly, media feed may
not be smooth, or printing may be adversely affected.
? P. 111, "Media Wrinkles or Shrinks, or Feed Is Unstable"
Are the settings for the [PRESET] menu item ap-
propriate?
If the settings selected with the [PRESET] menu item are not
suitable for the type of media, printing may be adversely af-
fected. Choose settings optimized to the media you're using.
? P. 90, "Saving Optimized Media Settings As Preset Values"
? P. 91, "Loading a Saved Preset"
Colors Are Unstable or Uneven
Did you shake the ink cartridges gently before in-
stalling them?
Before you install a new ink cartridge, gently shake the car-
tridge.
Is the media wrinkled?
Ifthemediaiswrinkledandcomesloosefromtheplaten,colors
may be uneven or printing quality may suffer.
? P. 111, "Media Wrinkles or Shrinks, or Feed Is Unstable"
Is the media sagging?
Performing printing using sagging roll media makes uneven
107
Chapter 6 What to Do If](https://image.slidesharecdn.com/xj-740640540usermanual-210909124322/85/Xj-740-640-540_user-manual-109-320.jpg)
![colors more likely.
Was printing paused partway through?
When printing is paused, the coloring at the seam may be al-
tered when printing resumes. Avoid pausing printing.With the
factory-default settings, printing pauses when an ink cartridge
runs empty. Before you perform lengthy printing, check the
amount of ink remaining in the ink cartridges.
Printing may also pause when data is not sent from the com-
puter quickly enough.
Are the operating parameters set to appropriate
values?
Depending on the settings for such menu items as [FULL
WIDTH S] and [PERIODIC CL.], uneven colors may occur. If
the settings have been changed, try restoring them to their
default values.
? P. 74, "Speeding Up Printing for Narrow Media"
? P. 74, "Preventing Soiling of the Media and Dot Drop-out During
Printing"
Is the printer installed in a level and stable loca-
tion?
Neverinstallthemachineinalocationwhereitistiltedorwhere
it may wobble or experience vibration. Also, ensure that the
print heads are not exposed to wind or blown air.These factors
may lead to missing dots or reduced printing quality.
Is the printer being used in a location subject to
severe changes in the operating environment?
Large fluctuations in temperature or humidity while printing is
in progress may cause the colors to change partway through.
Whenyou'reperformingprinting,usethemachineinalocation
where temperature and humidity are stable.
Are the settings for the [PRESET] menu item ap-
propriate?
If the settings selected with the [PRESET] menu item are not
suitable for the type of media, printing may be adversely af-
fected. Choose settings optimized to the media you're using.
? P. 90, "Saving Optimized Media Settings As Preset Values"
? P. 91, "Loading a Saved Preset"
The Media Becomes Soiled When Printed
Do the print heads contact the media?
The height of the print heads may be too low. Also, if the media
is not loaded and set up correctly, it may wrinkle or come loose
and strike the heads.
? P. 81, "Adjusting Head Height to Match Media Thickness"
? P. 111, "Media Wrinkles or Shrinks, or Feed Is Unstable"
Are the print heads dirty?
The following may cause ink to drip on the media during
printing.
• Buildup of fibrous dust (lint) around the heads.
• Ink transferred to the heads due to rubbing against
the media.
If this happens, clean the heads using the cleaning kit. We
recommend carrying out periodic head cleaning.
? P. 56, "Cleaning the Heads Using the Cleaning Kit"
Are the pinch rollers dirty?
Periodically clean the pinch rollers.
? P. 52, "Cleaning"
6-2 Attractive Printing Is Impossible
108 Chapter 6 What to Do If](https://image.slidesharecdn.com/xj-740640540usermanual-210909124322/85/Xj-740-640-540_user-manual-110-320.jpg)
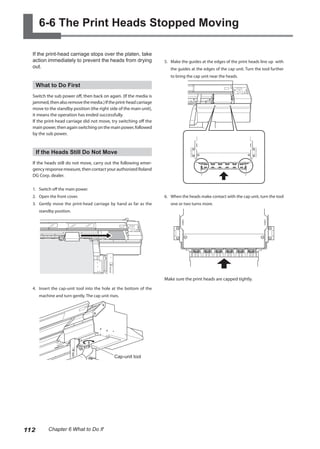
![6-3 The Media Jams
The Media Jams
If an error message is displayed because the media
has jammed, immediately correct the problem. Fail-
ure to do so may damage the print heads.
? P. 114, [MOTOR ERROR TURN POWER OFF]
Is the media warped or wrinkled?
Many factors can cause warping or wrinkling. Refer to the fol-
lowing and correct the problem.
? P. 111, "Media Wrinkles or Shrinks, or Feed Is Unstable"
Is the height of the print heads too low?
Try raising the heads higher. Media may inevitably warp or
wrinkle slightly, so adjust the height of the heads to take this
into account.
? P. 81, "Adjusting Head Height to Match Media Thickness"
109
Chapter 6 What to Do If](https://image.slidesharecdn.com/xj-740640540usermanual-210909124322/85/Xj-740-640-540_user-manual-111-320.jpg)
![6-7 If a Message Appears
These are the main messages that appear on the
machine's display to prompt correct operation. They
do not indicate any error. Follow the prompts and take
action accordingly.
[1■ 2■ 3■ 4■ ...]
Only a small amount of ink remains. Replace the cartridge
indicated by the flashing number with a new cartridge.
[CHECK DRAIN BOTTLE]
This appears when a certain amount of discharged fluid col-
lects in the drain bottle. To clear the message, press
. If this screen appears, go to the [DRAIN BOTTLE] menu item
and discard the discharged fluid in the bottle.
? P. 50, "Disposing of Discharged Ink"
[CLOSE THE FRONT COVER]
Close the front cover. For safety, the carriage does not operate
while a cover is open.
[END OF THE SHEET]
The trailing edge of the media was detected during operation.
Press any key on the operation panel to clear the message.
Load new media.
[INSTALL DRAIN BOTTLE]
Check whether the drain bottle is installed. Install the drain
bottle, then press .
[NOW HEATING...]
Wait until the media heating system reach the preset tempera-
ture. Printing starts when lights up.
You can stop printing by holding down for one sec-
ond or longer while this is displayed. Pressing makes
printing start immediately, without waiting to reach the preset
temperature.
[PRESS POWER KEY TO CLEAN]
Thisappearswhenthemachinehasbeenunusedforaboutone
month. Switch on the sub power once a month.
? P. 64, "When Not in Use for a Prolonged Period"
[REMOVE MEDIA CLAMPS]
This appears when media cutoff is attempted without first
removing the media clamps. Execute media cutoff only after
first detaching the media clamps. Pressing while this
message is displayed quits cutoff.
[REMOVE SOLCL-LIQUID]
Remove the cleaning cartridge indicated by the flashing
number. This message appears at times such as during head
cleaning.
[REMOVE SOL CRT.]
Remove the ink cartridge indicated by the flashing number.
This message appears at times such as during cartridge re-
placement.
[SET CARTRIDGE.]
Insert the ink cartridge indicated by the flashing number. This
message appears at times such as during cartridge replace-
ment.
[SET SOLCL-LIQUID]
Insert the cleaning cartridge indicated by the flashing number.
This message appears at times such as during head cleaning.
[SET SOL CRT.]
Insert the ink cartridge indicated by the flashing number. This
message appears at times such as during cartridge replace-
ment.
[SET HEAD HEIGHT TO xxx]
The height of the print heads is lower than the height specified
on the computer.
The heads move to a location where you can operate the
height-adjustment lever. Adjust to the displayed height, then
press .
[SHEET NOT LOADED PRESS SETUP KEY]
Load media and press .This message appears when an
attempt to perform a printing test was made while no media
was loaded.
[TIME FOR MAINTENANCE]
It is time to clean the heads using the cleaning kit. After
verifying, press .
? P. 56, "Cleaning the Heads Using the Cleaning Kit"
[TIME FOR WIPER REPLACE]
It is time to replace the wipers. After verifying, press .
? P. 60, "Replacing the Wipers"
113
Chapter 6 What to Do If](https://image.slidesharecdn.com/xj-740640540usermanual-210909124322/85/Xj-740-640-540_user-manual-115-320.jpg)
![6-8 If an Error Message Appears
This describes the error messages that may appear
on the machine's display, and how to take action to
remedy the problem. If the action described here
does not correct the problem, or if an error message
not described here appears, contact your authorized
Roland DG Corp. dealer.
[AVOIDING DRY-UP TURN OFF POWER]
The print heads were forced to standby position to
prevent them from drying out.
Operationcannotbecontinued.Switchthesubpoweroff,then
back on. Opening the front cover while printing is in progress
causes an emergency stop. Never allow the print heads to
remain in this state.
[DATA ERROR CANCELING...]
Printing was stopped because a problem was found
in the data received.
Operation cannot be continued. Check whether the data
contains errors. Also, check for a problem with the connector
cable or the computer, and redo the operation from the step
of loading the media.
[HEAD HEIGHT ERROR]
The height-adjustment lever for the print heads was
operated improperly.
Operationcannotbecontinued.Switchthesubpoweroff,then
back on. To change the head height, use the [HEAD HEIGHT]
menu item.
? P. 81, "Adjusting Head Height to Match Media Thickness"
[HEATING TIMEOUT CONTINUE?]
The media heating system did not reach the preset
temperature.
This occurs because the temperature of the location where
the machine is installed is too low. We recommend raising the
temperature. To quit printing, hold down for one sec-
ond or longer. To continue waiting for the temperature of the
media heating system to rise, press . To start printing
immediately, press .
[MOTOR ERROR TURN POWER OFF]
A motor error occurred.
Operation cannot be continued. Switch off the sub power.
Next, eliminate the cause of the error, then immediately switch
on the sub power. If the machine is allowed to stand with the
error uncorrected, the print heads may dry out and become
damaged.
Thiserrormaybecausedbysuchfactorsasamistakeinloading
the media, a media jam, or an operation that pulls the media
with excessive force.
The media has jammed.
Carefully remove the jammed media.The print heads may also
be damaged. Perform head cleaning, then perform a printing
test and check the results.
The media was pulled with excessive force.
Excessive tension was applied to the media, and additional
action is necessary to recover from this state. First, move the
loading lever to the rear and adjust the media to create a small
amount of slack, then switch on the sub power.
[OPTION-DRYER IS NOT CONNECTED]
The optional auxiliary drying unit is not con-
nected.
The [OPTION DRYER] menu item was set to "ENABLE" while the
optionally available auxiliary drying unit was not connected.
Turnoffthesubpowerandmainpowerswitches,thencorrectly
connect the auxiliary drying unit.
[PINCHROLL ERROR LOWER PINCHROLL]
was pressed without first lowering the pinch
rollers.
Press any key to clear the error. Pull back the loading lever,
then press .
The pinch rollers were raised while was il-
luminated.
Theerrorisclearedautomaticallyafterashortwait.Nevermove
the loading lever while printing is in progress.
[SERVICE CALL xxxx]
An unrecoverable error occurred, or part replace-
ment that must be performed by a service technician
is required.
Notethenumberdisplayed,thenswitchoffthesubpower.After
you switch off the power, inform your authorized Roland DG
Corp. dealer of the number that appeared on the display.
[SHEET SET ERROR SET AGAIN]
was pressed even though no media is
loaded.
Press any key to clear the error. Load media and pull back the
loading lever, then press .
The [SHEET TYPE] menu item is set to "OPAQUE,"
but transparent media was loaded.
Pressanykeytocleartheerror.Setthe[SHEETTYPE]menuitem
to "CLEAR," then reload the media.
? P. 71, "Using Transparent Media"
114 Chapter 6 What to Do If](https://image.slidesharecdn.com/xj-740640540usermanual-210909124322/85/Xj-740-640-540_user-manual-116-320.jpg)
![[TEMPERATURE IS TOO HIGH **°C]
The temperature of the location where the machine
is installed has risen above the ambient temperature
at which the machine can operate.
Operation cannot be continued. Switch off the sub power.The
displayed temperature is the current ambient temperature
of the installation location. Bring the installed location to a
temperature at which operation is possible (15 to 32°C (59 to
90°F)) and allow the machine to come to room temperature,
then turn on the power.
[TEMPERATURE IS TOO LOW **°C]
The temperature of the location where the machine
is installed has fallen below the ambient temperature
at which the machine can operate.
Operation cannot be continued. Switch off the sub power.The
displayed temperature is the current ambient temperature
of the installation location. Bring the installed location to a
temperature at which operation is possible (15 to 32°C (59 to
90°F)) and allow the machine to come to room temperature,
then turn on the power.
[WRONG CARTRIDGE]
A cartridge that cannot be used was installed.
Remove the cartridge to clear the error. Use a cartridge of the
specified type.
6-8 If an Error Message Appears
115
Chapter 6 What to Do If](https://image.slidesharecdn.com/xj-740640540usermanual-210909124322/85/Xj-740-640-540_user-manual-117-320.jpg)

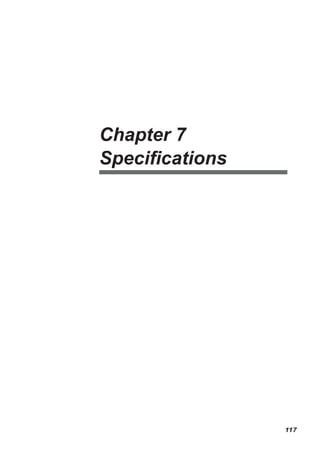
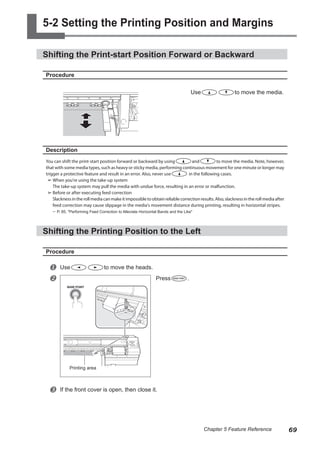
![7-2 Printing Area
Printing Area and Margins
A: Setting of the [SIDE MARGIN] menu item (10 mm or 5 mm; 10 mm by default)
B: Width clamped by the media clamp (approx. 5 mm)
*1The amount of the left and right margins is the total of A and B. In the following cases, however, the setting for A becomes
the amount of margin without change.
➢ When media has been loaded without installing the media clamps and has been pressed
➢ When the [SHEET TYPE] menu item is set to [CLEAR] (regardless of whether the media clamps are present)
*2 The amount of margin can be changed by using .
*3 Margin length required by the media take-up and feed systems is approximately 1,100 mm (43 in.).
Right margin
(*1) (*2)
Left margin
(*1)
A
A
B
90 mm (3.5 in.)
75 mm (3 in.) (*3)
Media
Media clamp
Media clamp
Printing area
B
119
Chapter 7 Specifications](https://image.slidesharecdn.com/xj-740640540usermanual-210909124322/85/Xj-740-640-540_user-manual-121-320.jpg)
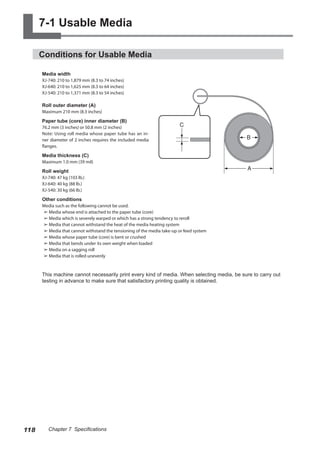
![7-4 Specifications
XJ-740 XJ-640 XJ-540
Printing technology Piezoelectric inkjet
Media Width 210 to 1,879 mm
(8.3 to 74 in.)
210 to 1,625 mm
(8.3 to 64 in.)
210 to 1,371 mm
(8.3 to 54 in.)
Thickness Maximum 1.0 mm (39 mil) with liner
Roll outer diameter Maximum 210 mm (8.3 in.)
Roll weight Maximum 47 kg (103 lb.) Maximum 40 kg (88 lb.) Maximum 30 kg (66 lb.)
Core diameter 76.2 mm (3 in.) or 50.8 mm (2 in.)
Printing width (*1) Maximum 1,869 mm
(73.6 in.)
Maximum 1,615 mm
(63.6 in.)
Maximum 1,361 mm
(53.6 in.)
Ink cartridges Types 220-cc cartridge / 440-cc cartridge
Colors 6 colors (cyan, magenta, yellow, black, light-cyan, and light-magenta) or
4 colors (cyan, magenta, yellow, and black)
Printing resolution (dots per inch) Maximum 1,440 dpi
Distance accuracy (*2) (*3) Error of less than ±0.3% of distance traveled, or ±0.3 mm, whichever is
greater
Media heating system (*4) Preheater and print heater, setting range for the preset temperature: 30
to 50°C (86 to 122°F)
Dryer, setting range for the preset temperature: 30 to 55°C (86 to 130°F)
Media take-up
system
Roll outer diam-
eter
Maximum 250 mm (9.8 in.)
Roll weight Maximum 50 kg (110 lb.)
Connectivity Ethernet (10BASE-T/100BASE-TX, automatic switching)
Power-saving function Automatic sleep feature
Power requirements AC 100 to 120 V ±10%, 13 A, 50/60 Hz or AC 220 to 240 V ±10%, 7 A, 50/60 Hz
Power consump-
tion
During operation Approx. 1,600 W
During standby Approx. 47 W
Acoustic noise lev-
el
During operation 64 dB (A) or less
During standby 45 dB (A) or less
Dimensions (with stand) 3,169 (W) x 1,103 (D) x
1,260 (H) mm
(124.8 (W) x 43.4 (D) x
49.6 (H) in.)
2,948 (W) x 1,103 (D) x
1,260 (H) mm
(116 (W) x 43.4 (D) x
49.6 (H) in.)
2,694(W) x 1,103 (D) x
1,260 (H) mm
(106 (W) x 43.4 (D) x
49.6 (H) in.)
Weight (with stand) 225 kg (495 lb.) 213 kg (469 lb.) 200 kg (440 lb.)
Environmental Power on (*5) Temperature: 15 to 32˚C (59 to 90˚F) (20˚C [68˚F] or more recommended),
Relative humidity: 20 to 80%RH (non-condensing)
Power off Temperature: 5 to 40˚C (41 to 104˚F), Relative humidity: 20 to 80%RH (non-
condensing)
Accessories Exclusive stands, power cord, media clamps, media flanges, replacement
blade for separating knife, cleaning kit, software RIP, User's Manual, etc.
*1
The length of printing is subject to the limitations of the program.
*2
➢ With Roland PET film, print travel: 1 m
➢ Temperature: 25°C (77°F), Relative humidity: 50%
*3
Not assured when the print heater or dryer is used.
*4
➢ Warm-up is required after powerup. This may require 5 to 20 minutes, depending on the operating environment.
➢ Depending on the ambient temperature and media width, the preset temperature may fail to be reached.
*5
Operating environment
Temperature
(59) (69) (81) (90)
Humidity(%)
(no condensation)
(°)
F
15 20 27 32 ℃
80
55
35
Use in an operating envi-
ronment with this range.
122 Chapter 7 Specifications](https://image.slidesharecdn.com/xj-740640540usermanual-210909124322/85/Xj-740-640-540_user-manual-124-320.jpg)


This user's manual provides instructions for safely using a printer product. It explains how to power on and off the printer, load and cut media, set the media heating system temperature, start printing, and replace ink cartridges when empty. Additional chapters cover operation of the printer's media take-up system and maintenance/cleaning procedures. The manual emphasizes reading it fully to understand the printer's performance and functions.


