Working with Apache Web Server
Time Required: 35 minutes
Objective: Explore basic settings and tasks in Apache Web Server.
Description: Without a doubt, youll run across Apache Web Server systems when conducting a
security test. Because Apache is a sophisticated, modular Web server, mastering its features and
options can take considerable time. Apaches layout varies, depending on the OS. For example,
Apache in Fedora Linux is different from Apache in Ubuntu Linux. In this activity, you explore
basic Apache Web Server commands and learn how to find and modify some configuration
options (called Apache directives). The goal of this activity is to configure a Web server with a
directory that requires authentication.
1.
Boot your computer into Linux with the Kali Linux DVD.
2.
Open a Terminal shell. At the command prompt, type apache2ctl start and press Enter. You can
safely ignore the Could not reliably determine the servers fully qualified domain name error.
3.
Start the Iceweasel Web browser. In the address bar, type localhost and press Enter. The Web
site displays instructions on how to manipulate the default apache configuration. Read over this
page.
4.
Open a Terminal shell. At the command prompt, type apache2ctl stop and press Enter.
5.
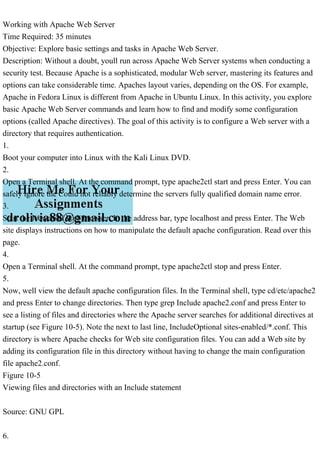
Now, well view the default apache configuration files. In the Terminal shell, type cd/etc/apache2
and press Enter to change directories. Then type grep Include apache2.conf and press Enter to
see a listing of files and directories where the Apache server searches for additional directives at
startup (see Figure 10-5). Note the next to last line, IncludeOptional sites-enabled/*.conf. This
directory is where Apache checks for Web site configuration files. You can add a Web site by
adding its configuration file in this directory without having to change the main configuration
file apache2.conf.
Figure 10-5
Viewing files and directories with an Include statement
Source: GNU GPL
6.
Type cd /etc/apache2/sites-enabled && ls and press Enter.
7.
Open the file in the gvim editor by typing gvim 000-default.conf and pressing Enter.
8.
Enter the following lines at the end of the file, below the line :
9.
Save your changes and exit the gvim editor by pressing Esc, typing :wq, and pressing Enter.
10.
In the Terminal shell, create a new directory by typing mkdir /var/www/html/restricted and
pressing Enter.
11.
Type cd /var/www/html/restricted to change to the directory you created in Step 12 and press
Enter. Then type touch secret.txt and press Enter to create a file in this directory.
12.
Next, you create the .htaccess file in the same directory. This file is the local directory
configuration file specified in apache2.conf by the AccessFileName directive. If .htaccess exists
in any Web site directory, Apache checks it first. In this .htaccess file, you point Apache to the
location of AuthUserFile (essentially, a password file). Type gvim.htaccess and press Enter.
Type the following for the files contents:
13.
Exit and save.
I need the screen shote and part2 Part 1 Using the fedora a.pdfadianantsolutions
I need the screen shote and part2
Part 1
Using the fedora and ubuntu to do this project
set up an Apache server after set up the Apache on the /etc/httpd/conf/httpd.conf file, add in the
following lines:
UserDir enabled
UserDir public_html
and restart httpd:
systemctl restart httpd.service
Create a user with your Fatima name
Login to Fatima create the directory of public_html;
Under public_html, create your homepage file: index.html --- introduction of in the file to show that
it's your work;
Now, try to access your homepage file on Windows VM:
http://your_Apache_server_IP_address/~fatima
Links to an external site. Does that work? Probably not. You need to troubleshoot to make it work.
Some hints are as follows:
a. Your user Fatma directory must be executable for all users, and you may do it this way:
chmod a+x /home/Fatma
b. the public_html directory must be readable and executable by all users:
chmod a+rx /home/fatima /public_html
c. also make sure the index.html files is readable and executable by all users;
Try to access your homepage on Windows VM, does it work now? If it still doesn't work, you may
examine the server access log file carefully (Yes, you're going to use this log file a lot for
troubleshooting and server administrations), and the filename is /var/log/messages. Most likely
you will find out that the issues are with SeLinux, which restricts services on the server. In that
case, you will need to set it up so that the SeLinux allows access to user web sites, by running the
following command:
setsebool -P httpd_enable_homedirs true
and restart the Apache service (httpd).
Now, if everything is correct, you should be able to access your alice123 homepage from your
Windows VM. Of course, if it still doesn't work, it will be your time to research, discuss, and
practice troubleshooting to make it work -- That's the time you will really learn.
Under public_html, you may create your web page files, with your homepage file as index.html.
Take a screenshot of the Windows VM showing that it successfully displaying your user's (your
UW user name) homepage with the correct webserver URL, along with your name and the
Windows VM name at the top. (10 points)
Part 2
At the end of task 2, write a brief summary about what you have done and what you have learned.
Within MySQL Workbench, create a new table. This table will be used .pdfamikoenterprises
Within MySQL Workbench, create a new table. This table will be used to manage the data
behind a simple feedback sharing system. Within this table store the following data items:
A primary key,
The first name of the contributor,
The last name of the contributor,
The username of the contributor
The email address of the contributor,
The first name of the intended recipient, The last name of the intended recipient,
The username of the intended recipient, The email address of the intended recipient,
The date and time at which the feedback was submitted to the table (which should be set
automatically to the current time and date if not explicitly specified), and
The text of the feedback message itself (which may be several lines of text).
Add at least ten (10) different rows to the table, representing various exchanges of feedback
amongst four (4) unique users.
Display all of the contents of your table,
Display the recipient information, submission date/time, and the first forty (40) characters of the
feedback text of all the rows representing feedback submitted by a single contributor (pick one
who has made multiple submissions),
Display the contributor information, submission date/time, and complete feedback text of all the
rows representing feedback submitted to a single recipient (pick one for whom there are multiple
submissions),
Display the contributor information, recipient information, submission date/time, and complete
feedback text of all the rows representing feedback submitted by a single contributor to a single
recipient (choose a contributor and recipient for whom there are multiple submissions), and
Display the contributor information, recipient information, and submission date/time (but not the
feedback text) of all the rows representing feedback submitted within the past forty-eight (48)
hours.
Implement at least five (5) different updates targeting at least three (3) different rows.
Add a new row, display the table in its entirety to show the new row, delete that row, and show
the table in its entirety again to demonstrate that the row has been removed..
Within the unethical leadership presentation, I talked a lot about t.pdfamikoenterprises
Within the unethical leadership presentation, I talked a lot about the dark side of leadership and
what causes it. One concept that contributes to the dark side is the romance of leadership (the
concept that people love leadership and have a need to put their future in a leader's "capable"
hands). What can we do about this romance of leadership and people's over reliance on
leadership? or should we?.
More Related Content
Similar to Working with Apache Web ServerTime Required 35 minutesObjective.pdf
Within MySQL Workbench, create a new table. This table will be used .pdfamikoenterprises
Within MySQL Workbench, create a new table. This table will be used to manage the data
behind a simple feedback sharing system. Within this table store the following data items:
A primary key,
The first name of the contributor,
The last name of the contributor,
The username of the contributor
The email address of the contributor,
The first name of the intended recipient, The last name of the intended recipient,
The username of the intended recipient, The email address of the intended recipient,
The date and time at which the feedback was submitted to the table (which should be set
automatically to the current time and date if not explicitly specified), and
The text of the feedback message itself (which may be several lines of text).
Add at least ten (10) different rows to the table, representing various exchanges of feedback
amongst four (4) unique users.
Display all of the contents of your table,
Display the recipient information, submission date/time, and the first forty (40) characters of the
feedback text of all the rows representing feedback submitted by a single contributor (pick one
who has made multiple submissions),
Display the contributor information, submission date/time, and complete feedback text of all the
rows representing feedback submitted to a single recipient (pick one for whom there are multiple
submissions),
Display the contributor information, recipient information, submission date/time, and complete
feedback text of all the rows representing feedback submitted by a single contributor to a single
recipient (choose a contributor and recipient for whom there are multiple submissions), and
Display the contributor information, recipient information, and submission date/time (but not the
feedback text) of all the rows representing feedback submitted within the past forty-eight (48)
hours.
Implement at least five (5) different updates targeting at least three (3) different rows.
Add a new row, display the table in its entirety to show the new row, delete that row, and show
the table in its entirety again to demonstrate that the row has been removed..
Within the unethical leadership presentation, I talked a lot about t.pdfamikoenterprises
Within the unethical leadership presentation, I talked a lot about the dark side of leadership and
what causes it. One concept that contributes to the dark side is the romance of leadership (the
concept that people love leadership and have a need to put their future in a leader's "capable"
hands). What can we do about this romance of leadership and people's over reliance on
leadership? or should we?.
Write a C program to create two user-defined functions; first functi.pdfamikoenterprises
Write a C program to create two user-defined functions; first function name as Input() and
second function Print(). Call Input() function from main function and Input() function will take 6
integer as an array input from user. Next pass the array to Print() function, then print all odd
index elements inside Print() function.
Example: Input from user in input() function : { 1, 4, 7, 23, 35, 15} then output printed by.
Write a C# program that demonstrate your multi-level inheritance und.pdfamikoenterprises
Write a C# program that demonstrate your multi-level inheritance understanding. Your program
should have a grandfather class called Shape, father class Circle and child class called Triangle.
The Circle class must have a method with arguments that calculate the area of a circle, the
triangle class must have a method with arguments that calculate the area of a triangle. The
program should calculate and output the area of a circle and the area of a triangle..
With reference to the above case, please answer all of the followi.pdfamikoenterprises
With reference to the above case, please answer all of the following questions:
1. Draw the functional dependency diagram in the First Normal Form (1NF). List out all partial
and transitive dependencies. Indicate the primary key.
2. Create 2NF and 3NF, showing the intermediate steps in the normalization process. Write the
relational schemas and indicate all primary keys and foreign keys..
WR Grace Company fue fundada por, s�, un hombre llamado WR Grace. Er.pdfamikoenterprises
WR Grace Company fue fundada por, s, un hombre llamado WR Grace. Era irlands y fue una
empresa naviera la que trajo a Nueva York en 1865. Enrgico y ambicioso, mientras su empresa
creca por un lado, l se involucraba cvicamente por el otro. Quince aos despus de su llegada, fue
elegido alcaldede la ciudad de Nueva York. Cinco aos despus, acept personalmente un regalo de
una delegacin que representaba al pueblo de Francia. Era la Estatua de la Libertad.
Grace fue una filntropa legendaria. Proporcion donaciones masivas de alimentos a su Irlanda
natal para aliviar la hambruna. En casa, su atencin se centr en su Grace Institute sin fines de
lucro, una escuela gratuita para mujeres inmigrantes pobres. Las clases que se ofrecan all
enseaban habilidades bsicas (taquigrafa, mecanografa, tenedura de libros)que ayudaban a los
estudiantes a incorporarse al mundo laboral. Ms de cien mil mujeres jvenes han pasado por la
escuela, que perdura hasta el da de hoy.
En 1945, el nieto J. Peter Grace tom el control de la compaa naviera ahora en todo el mundo.
Una dcada ms tarde, se convirti en una corporacin que cotiza en bolsa en la Bolsa de Valores de
Nueva York. El negocio comenz a pasar del transporte martimo a la produccin de productos
qumicos.
En la dcada de 1980, WR Grace se haba convertido en una empresa de productos qumicos y
materiales, y sali a la luz que una de sus plantas haba estado vertiendo toxinas en el suelo y el
agua debajo de la pequea ciudad de Woburn, Massachusetts. Los venenos llegaron al suministro
de agua de la ciudad y luego a la gente del pueblo. Causaba leucemia en los recin nacidos. Las
demandas en los tribunales civiles y las investigaciones posteriores de la Agencia de Proteccin
Ambiental le costaron millones a la corporacin.
J. Peter Grace se jubil como director ejecutivo en 1992. Despus de cuarenta y ocho aos en el
cargo, se convirti en el director ejecutivo con ms tiempo en el cargo en la historia de las
empresas pblicas. Durante ese tiempo, tambin se desempe como presidente del Grace Institute.
La novela de no ficcin A Civil Action se public en 1996. La crnica galardonada y superventas
deldesastre de Woburn pronto se convirti en una pelcula de Hollywood. La pelcula,
protagonizada por John Travolta, contina apareciendo en televisin con cierta regularidad.
En honor al Instituto Grace, el 28 de octubre fue designado como el Da de la Gracia por la
ciudad de Nueva York en 2009. Ese da, el instituto defini su misin de esta manera: En la tradicin
de su familia fundadora, el Instituto Grace se dedica al desarrollo de las habilidades personales y
comerciales necesarias para la autosuficiencia, la empleabilidad y una mejor calidad de vida.
Preguntas:
1. De qu manera la estructura de una corporacin C protege a sus propietarios de asumir
responsabilidad tica por las acciones de la compaa?
2. El resultado final triple es una forma de responsabilidad social corporativa donde los lderes
analizan los resultados finales. Adems, los efectos de la em.
William Short is chief executive officer (CEO) of Benton Memorial Ho.pdfamikoenterprises
William Short is chief executive officer (CEO) of Benton Memorial Hospital, a 120-bed
institution. He has been in his position for 8 months. Before his arrival the hospital operated for 4
months without a CEO after the abrupt and unexplained departure of the former CEO. The
previous CEO appeared to have been extremely well liked by his management group but at the
same time was at constant odds with the hospitals board of trustees. This former CEO had been
considered easygoing, low-key in style, and relatively slow to act in many matters. William
Short stands in stark contrast to his predecessor; his pace is rapid, his manner is brusque and
forceful, and many find his size and demeanor to be intimidating. It is generally believed he has
brought into the organization to apply pressure to the management team and perhaps to weed out
certain individuals. It is, then, no surprise that his arrival was greeted with some apprehension
and resentment, and his personal style has only supported those initial impressions.
Word facilita el formato de texto usando negrita, cursiva y subrayad.pdfamikoenterprises
Word facilita el formato de texto usando negrita, cursiva y subrayado.
Cundo es apropiado utilizar cada uno de estos formatos?
Qu puede pasar si abusa de uno o ms de estos formatos en su documento?
El cuadro de dilogo Nmero de palabras proporciona informacin sobre su documento, incluida la
cantidad de pginas, palabras, caracteres (con y sin espacios), prrafos y lneas. Cundo sera til la
informacin? Por qu sera importante contar caracteres con y sin espacios?.
wo populations of beetles have different reproductive organs that ar.pdfamikoenterprises
wo populations of beetles have different reproductive organs that are incompatible (they do not
lock together) with one another. What is this an example of? Select all that apply.
None of the other answers fit
post-zygotic isolation
pre-zygotic isolation
temporal isolation
zygote mortality
mechanical isolationa.
None of the other answers fitb.
post-zygotic isolationc.
pre-zygotic isolationd.
temporal isolatione.
zygote mortalityf.
mechanical isolation.
Wittes Tasty Fishes� Wittes Tasty Fishes� is an aquaculture compan.pdfamikoenterprises
Witte's Tasty Fishes Witte's Tasty Fishes is an aquaculture company specializing in ocean pouts.
Pouts from both populations are grown together. As observant aquaculturists, the WTF team
notices that pouts from different populations are reproducing. Witte is concerned that these
offspring will not grow as quickly as their parents, but he's wrong. The hybrids even reproduce
in the next generation.
Describe how this observation impacts our understanding of the data from Ocean Pout above.
Identify the species concept being applied here..
Write the necessary SQL Queries for the following functions.A,Addi.pdfamikoenterprises
Write the necessary SQL Queries for the following functions.
A,Adding a new Professor
B.Changing a specific Professor's Professor_Name
C.Removing a Flub by ID
D.Show a portfolio of the Flubs by a Professor in reverse chronological order
E.Show how many Bounces and how many Citations a Flub of particular ID has
F.Show a portfolio of all Flubs and Bounces (the Flubs bounced) by all of a Professor's
Colleagues in reverse chronological order
(Should run in MySQL. If using a different database, specify which).
Write the necessary SQL Queries for the following functions.A. Add.pdfamikoenterprises
Write the necessary SQL Queries for the following functions.
A. Adding a new Professor
B. Changing a specific Professor's Professor_Name
C. Removing a Flub by ID
D. Show a portfolio of the Flubs by a Professor in reverse chronological order
E. Show how many Bounces and how many Citations a Flub of particular ID has
F. Show a portfolio of all Flubs and Bounces (the Flubs bounced) by all of a Professor's
Colleagues in reverse chronological order
(Should run in MySQL. If using a different database, specify which).
Write the class named Student which has the following data members.pdfamikoenterprises
Write the class named Student which has the following data members
and methods:
In the main function :
Create an array of 10 student objects named std.
Use the below table to fill the array with students' information.
Print student names which belong to level
1.student10student9student8student7student6student5student4 student2
student3student111101119111811171116111511141113 11121111student
idleenfrahlayanfaimonaabeeramalmanalnorname116251321level.
Write program in C language to sort the given array using merge sort.pdfamikoenterprises
Write program in C language to sort the given array using merge sort, quick sort, insertion sort
and selection sort based on the input from the user which sorting technique they wanted to use.
Get the array size, array elements from the user andalso display the sorted array along with the
name of the sorting technique used.
Note: give proper comments, indentation, and naming convention in the program..
Write notes on the following areas as related to tax investigations .pdfamikoenterprises
Write notes on the following areas as related to tax investigations administration in Kenya: (18
marks)
i. Objectives of tax investigations
ii. Tax evasion, tax avoidance and fraud
iii. Anti avoidance provision (Section 23 of the income tax Act)
iv. Events which may trigger an investigation
v. Back duty and in-depth examinations vi. VAT refunds, false claims and accountants certificate
vii. Capital statements and ascertainment of income omitted or understated
viii. Customs and excise investigations
ix. Tax Audit.
Write it in Assembly codeWrite it in Assembly codeWrite it in As.pdfamikoenterprises
Write it in Assembly code
Write it in Assembly code
Write it in Assembly code Task 2 [2 marks] Take the 2's complement of number
1111101100001010 and store the result in Destination Register R1. After performing the 2's
complement perform following operation on R2 R2R1 after 2's complement of the 2nd hex digits
from left R3R2 after clearing the 3rd hex digits from right What is the final value stored in R3?.
Write MATLAB code to solve this summation in general, where you can .pdfamikoenterprises
Write MATLAB code to solve this summation in general, where you can plug in values for each
variable. It is the general solution to the heat transfer equation.
(x,y)T2T1TT1=2n=1n(1)n+1+1sin(Lnx)sinh(LnW)sinh(Lny).
William es due�o de un solo barco. El barco vale 200 millones de d�l.pdfamikoenterprises
William es dueo de un solo barco. El barco vale 200 millones de dlares. Si el barco se hunde,
William pierde $200 millones. La probabilidad de que se hunda es 0,02. La riqueza total de
Williams, incluido el valor del barco, es de 225 millones de dlares. Es un maximizador de la
utilidad esperada con una utilidad () igual a la raz cuadrada de W. Cul es la cantidad mxima que
William estara dispuesto a pagar para estar completamente asegurado contra el riesgo de perder
su barco?.
2024.06.01 Introducing a competency framework for languag learning materials ...Sandy Millin
http://sandymillin.wordpress.com/iateflwebinar2024
Published classroom materials form the basis of syllabuses, drive teacher professional development, and have a potentially huge influence on learners, teachers and education systems. All teachers also create their own materials, whether a few sentences on a blackboard, a highly-structured fully-realised online course, or anything in between. Despite this, the knowledge and skills needed to create effective language learning materials are rarely part of teacher training, and are mostly learnt by trial and error.
Knowledge and skills frameworks, generally called competency frameworks, for ELT teachers, trainers and managers have existed for a few years now. However, until I created one for my MA dissertation, there wasn’t one drawing together what we need to know and do to be able to effectively produce language learning materials.
This webinar will introduce you to my framework, highlighting the key competencies I identified from my research. It will also show how anybody involved in language teaching (any language, not just English!), teacher training, managing schools or developing language learning materials can benefit from using the framework.
Model Attribute Check Company Auto PropertyCeline George
In Odoo, the multi-company feature allows you to manage multiple companies within a single Odoo database instance. Each company can have its own configurations while still sharing common resources such as products, customers, and suppliers.
How to Make a Field invisible in Odoo 17Celine George
It is possible to hide or invisible some fields in odoo. Commonly using “invisible” attribute in the field definition to invisible the fields. This slide will show how to make a field invisible in odoo 17.
Palestine last event orientationfvgnh .pptxRaedMohamed3
An EFL lesson about the current events in Palestine. It is intended to be for intermediate students who wish to increase their listening skills through a short lesson in power point.
Introduction to AI for Nonprofits with Tapp NetworkTechSoup
Dive into the world of AI! Experts Jon Hill and Tareq Monaur will guide you through AI's role in enhancing nonprofit websites and basic marketing strategies, making it easy to understand and apply.
Instructions for Submissions thorugh G- Classroom.pptxJheel Barad
This presentation provides a briefing on how to upload submissions and documents in Google Classroom. It was prepared as part of an orientation for new Sainik School in-service teacher trainees. As a training officer, my goal is to ensure that you are comfortable and proficient with this essential tool for managing assignments and fostering student engagement.
Synthetic Fiber Construction in lab .pptxPavel ( NSTU)
Synthetic fiber production is a fascinating and complex field that blends chemistry, engineering, and environmental science. By understanding these aspects, students can gain a comprehensive view of synthetic fiber production, its impact on society and the environment, and the potential for future innovations. Synthetic fibers play a crucial role in modern society, impacting various aspects of daily life, industry, and the environment. ynthetic fibers are integral to modern life, offering a range of benefits from cost-effectiveness and versatility to innovative applications and performance characteristics. While they pose environmental challenges, ongoing research and development aim to create more sustainable and eco-friendly alternatives. Understanding the importance of synthetic fibers helps in appreciating their role in the economy, industry, and daily life, while also emphasizing the need for sustainable practices and innovation.
A Strategic Approach: GenAI in EducationPeter Windle
Artificial Intelligence (AI) technologies such as Generative AI, Image Generators and Large Language Models have had a dramatic impact on teaching, learning and assessment over the past 18 months. The most immediate threat AI posed was to Academic Integrity with Higher Education Institutes (HEIs) focusing their efforts on combating the use of GenAI in assessment. Guidelines were developed for staff and students, policies put in place too. Innovative educators have forged paths in the use of Generative AI for teaching, learning and assessments leading to pockets of transformation springing up across HEIs, often with little or no top-down guidance, support or direction.
This Gasta posits a strategic approach to integrating AI into HEIs to prepare staff, students and the curriculum for an evolving world and workplace. We will highlight the advantages of working with these technologies beyond the realm of teaching, learning and assessment by considering prompt engineering skills, industry impact, curriculum changes, and the need for staff upskilling. In contrast, not engaging strategically with Generative AI poses risks, including falling behind peers, missed opportunities and failing to ensure our graduates remain employable. The rapid evolution of AI technologies necessitates a proactive and strategic approach if we are to remain relevant.
Unit 8 - Information and Communication Technology (Paper I).pdfThiyagu K
This slides describes the basic concepts of ICT, basics of Email, Emerging Technology and Digital Initiatives in Education. This presentations aligns with the UGC Paper I syllabus.
Unit 8 - Information and Communication Technology (Paper I).pdf
Working with Apache Web ServerTime Required 35 minutesObjective.pdf
1. Working with Apache Web Server
Time Required: 35 minutes
Objective: Explore basic settings and tasks in Apache Web Server.
Description: Without a doubt, youll run across Apache Web Server systems when conducting a
security test. Because Apache is a sophisticated, modular Web server, mastering its features and
options can take considerable time. Apaches layout varies, depending on the OS. For example,
Apache in Fedora Linux is different from Apache in Ubuntu Linux. In this activity, you explore
basic Apache Web Server commands and learn how to find and modify some configuration
options (called Apache directives). The goal of this activity is to configure a Web server with a
directory that requires authentication.
1.
Boot your computer into Linux with the Kali Linux DVD.
2.
Open a Terminal shell. At the command prompt, type apache2ctl start and press Enter. You can
safely ignore the Could not reliably determine the servers fully qualified domain name error.
3.
Start the Iceweasel Web browser. In the address bar, type localhost and press Enter. The Web
site displays instructions on how to manipulate the default apache configuration. Read over this
page.
4.
Open a Terminal shell. At the command prompt, type apache2ctl stop and press Enter.
5.
Now, well view the default apache configuration files. In the Terminal shell, type cd/etc/apache2
and press Enter to change directories. Then type grep Include apache2.conf and press Enter to
see a listing of files and directories where the Apache server searches for additional directives at
startup (see Figure 10-5). Note the next to last line, IncludeOptional sites-enabled/*.conf. This
directory is where Apache checks for Web site configuration files. You can add a Web site by
adding its configuration file in this directory without having to change the main configuration
file apache2.conf.
Figure 10-5
Viewing files and directories with an Include statement
Source: GNU GPL
6.
2. Type cd /etc/apache2/sites-enabled && ls and press Enter.
7.
Open the file in the gvim editor by typing gvim 000-default.conf and pressing Enter.
8.
Enter the following lines at the end of the file, below the line :
9.
Save your changes and exit the gvim editor by pressing Esc, typing :wq, and pressing Enter.
10.
In the Terminal shell, create a new directory by typing mkdir /var/www/html/restricted and
pressing Enter.
11.
Type cd /var/www/html/restricted to change to the directory you created in Step 12 and press
Enter. Then type touch secret.txt and press Enter to create a file in this directory.
12.
Next, you create the .htaccess file in the same directory. This file is the local directory
configuration file specified in apache2.conf by the AccessFileName directive. If .htaccess exists
in any Web site directory, Apache checks it first. In this .htaccess file, you point Apache to the
location of AuthUserFile (essentially, a password file). Type gvim.htaccess and press Enter.
Type the following for the files contents:
13.
Exit and save the file by pressing Esc and then pressing : (a colon). At the : prompt, type wq and
press Enter. In the Terminal shell, create a password file by typing htpasswd -c
/etc/apache2/.htpasswd tester and pressing Enter. When prompted, enter a password and confirm,
and then make note of the password. The .htaccess file you created in Step 12 tells Apache to
look in the .htpasswd file for the tester users password. You can run the command
cat/etc/apache2/.htpasswd to view the password hash for your new user.
14.
Restart Apache by typing apache2ctl restart and pressing Enter. In Iceweasel, go to
http://localhost/restricted, and enter the username tester and the password you confirmed in Step
13. What file is displayed? If you want to be prompted again for a password, youll have to close
and reopen your browser.
15.
See whether others in the class can access your restricted folder by having them enter
http://yourIPaddress/restricted in their browsers (replacing yourIPaddress with your IP address).
3. If necessary, type ifconfig eth0 and press Enter to find your IP address.
16.
Why is entering your credentials on a Web site not secured with SSL, such as this site, a
problem? What is the fix for this problem?
17.
Close the Terminal shell, exit Firefox, and log off Linux for the next activity.
Question 14 and 16