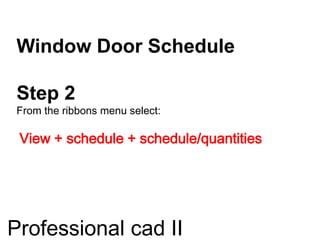
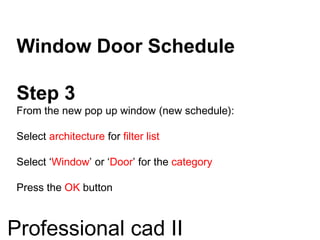
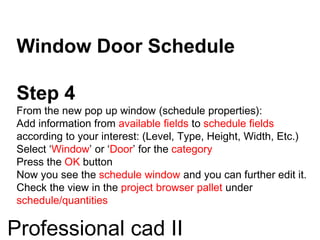
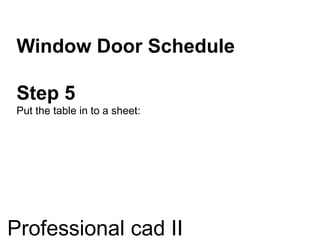
Professional cad II
Chair of Computer Aided Design and Geo-
Informatics
Arch4032 - Year Group III - Semester II
May10, 2014
Professional cad II
Window-Door Schedule
Professional cad II
Window Door Schedule
This tutorial shows how to make a window door schedule and
insert the schedule to a sheet.
The tutorial uses a small house project that has two levels as
an example but you can use your own projects to follow
through.
Professional cad II
Window Door Schedule
This tutorial shows how to make a window door schedule and
insert the schedule to a sheet.
The tutorial uses a small house project that has two levels as
an example but you can use your own projects to follow
through.
Professional cad II
Window-Door Schedule
Step 1
Go to level 1 (ground floor) view using your project browser.
Label your doors and windows: D1,D1, W1, W2, etc.
To do so:
Annotate + tag by category
Professional cad II
Window Door Schedule
Step 2
From the ribbons menu select:
View + schedule + schedule/quantities
Professional cad II
Window Door Schedule
Step 3
From the new pop up window (new schedule):
Select architecture for filter list
Select ‘Window’ or ‘Door’ for the category
Press the OK button
Professional cad II
Window Door Schedule
Step 4
From the new pop up window (schedule properties):
Add information from available fields to schedule fields
according to your interest: (Level, Type, Height, Width, Etc.)
Select ‘Window’ or ‘Door’ for the category
Press the OK button
Now you see the schedule window and you can further edit it.
Check the view in the project browser pallet under
schedule/quantities
Professional cad II
Window Door Schedule
Step 5
Put the table in to a sheet:
Professional cad II
Window Door Schedule
The table only has number and text information about the
windows and doors.
If you want to add a plan and elevation drawing to the
schedule follow the next steps:
Professional cad II
Window Door Schedule
Step 6
From the ribbons menu select:
View + Legends + legend
On the new pop up window new legend view fill the name
with Window-Door
Press the OK button
Now you see the Legend window and you can further edit it
Check the view in the project browser pallet under Legends
Professional cad II
Window Door Schedule
Step 7
To Start adding the door and window drawings from the
ribbons menu select:
Annotate+ components + legend component
Go to the option bar and select the type op component
(door)you want to work on and place it in to the legend
window.
You will see the door in plan view. Copy it down and select the
new copy and by going to the option bar change the view to
elevation
Professional cad II
Window Door Schedule
Step 8
After arranging and adding texts to the plan and elevation
drawing of your windows and doors place the add the view to
the window door sheet next to the window door schedule.
Professional cad II

Window door schedule on revit architecture 2014

  • 1.
  • 2.
    Chair of ComputerAided Design and Geo- Informatics Arch4032 - Year Group III - Semester II May10, 2014 Professional cad II
  • 3.
  • 4.
    Window Door Schedule Thistutorial shows how to make a window door schedule and insert the schedule to a sheet. The tutorial uses a small house project that has two levels as an example but you can use your own projects to follow through. Professional cad II
  • 5.
    Window Door Schedule Thistutorial shows how to make a window door schedule and insert the schedule to a sheet. The tutorial uses a small house project that has two levels as an example but you can use your own projects to follow through. Professional cad II
  • 6.
    Window-Door Schedule Step 1 Goto level 1 (ground floor) view using your project browser. Label your doors and windows: D1,D1, W1, W2, etc. To do so: Annotate + tag by category Professional cad II
  • 7.
    Window Door Schedule Step2 From the ribbons menu select: View + schedule + schedule/quantities Professional cad II
  • 8.
    Window Door Schedule Step3 From the new pop up window (new schedule): Select architecture for filter list Select ‘Window’ or ‘Door’ for the category Press the OK button Professional cad II
  • 9.
    Window Door Schedule Step4 From the new pop up window (schedule properties): Add information from available fields to schedule fields according to your interest: (Level, Type, Height, Width, Etc.) Select ‘Window’ or ‘Door’ for the category Press the OK button Now you see the schedule window and you can further edit it. Check the view in the project browser pallet under schedule/quantities Professional cad II
  • 10.
    Window Door Schedule Step5 Put the table in to a sheet: Professional cad II
  • 11.
    Window Door Schedule Thetable only has number and text information about the windows and doors. If you want to add a plan and elevation drawing to the schedule follow the next steps: Professional cad II
  • 12.
    Window Door Schedule Step6 From the ribbons menu select: View + Legends + legend On the new pop up window new legend view fill the name with Window-Door Press the OK button Now you see the Legend window and you can further edit it Check the view in the project browser pallet under Legends Professional cad II
  • 13.
    Window Door Schedule Step7 To Start adding the door and window drawings from the ribbons menu select: Annotate+ components + legend component Go to the option bar and select the type op component (door)you want to work on and place it in to the legend window. You will see the door in plan view. Copy it down and select the new copy and by going to the option bar change the view to elevation Professional cad II
  • 14.
    Window Door Schedule Step8 After arranging and adding texts to the plan and elevation drawing of your windows and doors place the add the view to the window door sheet next to the window door schedule. Professional cad II