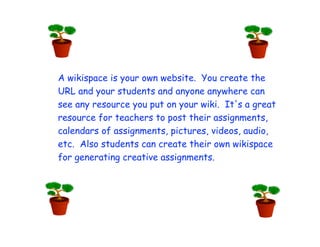
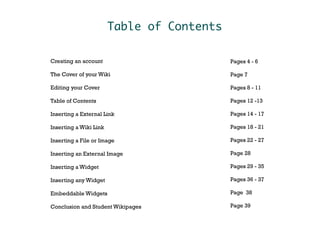
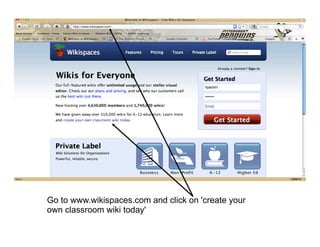
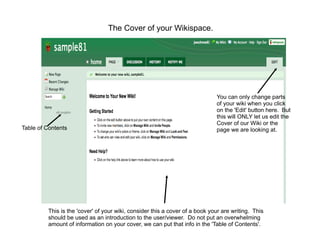
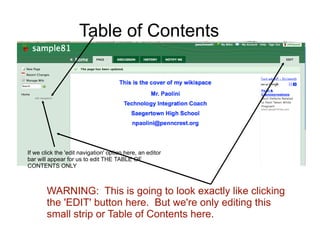
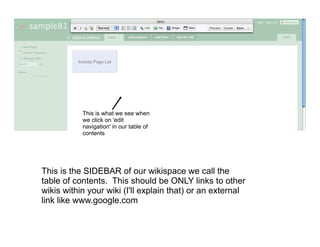
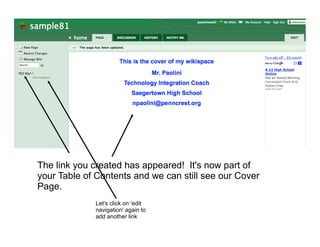
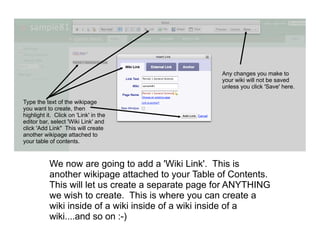
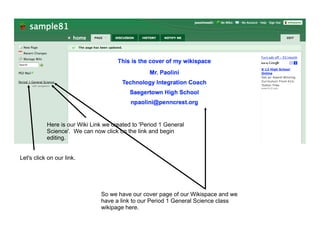
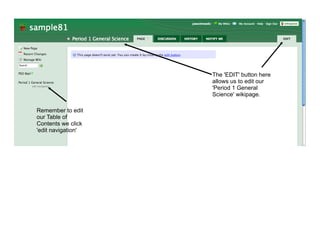
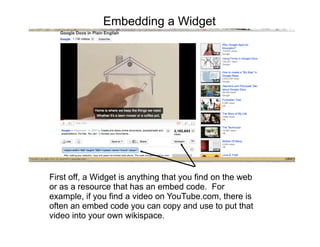
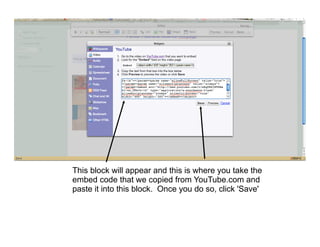
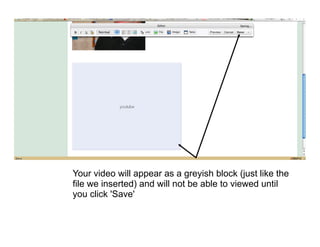
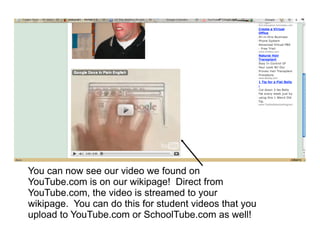
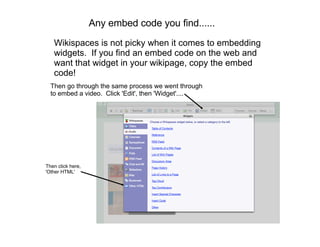
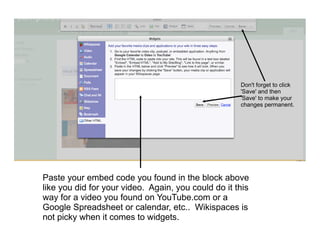
A wikispace is your own website. You create the
URL and your students and anyone anywhere can
see any resource you put on your wiki. It's a great
resource for teachers to post their assignments,
calendars of assignments, pictures, videos, audio,
etc. Also students can create their own wikispace
for generating creative assignments.
Table of Contents

Creating an account                         Pages 4 - 6

The Cover of your Wiki                      Page 7

Editing your Cover                          Pages 8 - 11

Table of Contents                           Pages 12 -13

Inserting a External Link                   Pages 14 - 17

Inserting a Wiki Link                       Pages 18 - 21

Inserting a File or Image                   Pages 22 - 27

Inserting an External Image                 Page 28

Inserting a Widget                          Pages 29 - 35

Inserting any Widget                        Pages 36 - 37

Embeddable Widgets                          Page 38

Conclusion and Student Wikipages            Page 39
Go to www.wikispaces.com and click on 'create your
own classroom wiki today'
Remember this! Write it down. You'll need it to log
          into wikispaces and to make changes to your wiki in
          the future!!


This will be the actual name of your
website. For example, if you put
MrPaolini, the URL of your wikispace
will be http://mrpaolini.wikispaces.com


 Make sure to select "Protected" and
 check the box that it'll be used for
 K-12 education.


                                                                Now click 'Join'
You're in! NOW you must verify your
wikispace by checking the email you
put in when you created your wiki.
Wikispaces will send you an email
with a link, simply click on the link to
verify and start your wiki!
The Cover of your Wikispace.


                                                                             You can only change parts
                                                                             of your wiki when you click
                                                                             on the 'Edit' button here. But
                                                                             this will ONLY let us edit the
                                                                             Cover of our Wiki or the
Table of Contents                                                            page we are looking at.


         This is the 'cover' of your wiki, consider this a cover of a book your are writing. This
         should be used as an introduction to the user/viewer. Do not put an overwhelming
         amount of information on your cover, we can put that info in the 'Table of Contents'.
To Edit your Cover                       Editor bar


                                     Click on the 'Edit' button in the
                                     upper right hand corner and the
                                     editor bar will appear. This is the
                                     backbone of your wiki. If you
                                     want to make any changes, you
                                     HAVE to click on the 'edit' button
                                     first.


                            Any changes you
                            make to your wiki will
Once you click 'edit' you
can then type and do        not be saved unless
whatever you wish to the
space provided              you click 'Save' here.
Editing
                                                                   Any changes you
                                                                   make to your wiki will
                                                                   not be saved unless
                                                                   you click 'Save' here.


            You can simply type what you want on the cover of
            your book. I like to include contact information and
            other important info.


REMINDER: Keep it simple! Maybe a photo and
your class you each....it's a cover of a wikispace...
Highlight the
text you wish
to edit and
                Editing Text
then click on
the "T" with
painters
pallet


                       Make certain
                       to click on
                       'Apply Styles'
                       at the bottom.


                Take a moment to get familiar with the options within
                the 'Color and Style' option.
You can also 'Bold,                                                  Any changes you
Italicize, and Underline'                                            make to your wiki
your text by highlighting                                            will not be saved
it and clicking on these                                             unless you click
options.                                                             'Save' here.

                 You can also make         There is also a spot to
                 your text a 'Header' by   create numbers and
                 clicking on this drop     bullets as well as a
                 down option.              divider here.
Table of Contents


If we click the 'edit navigation' option here, an editor
bar will appear for us to edit THE TABLE OF
CONTENTS ONLY


        WARNING: This is going to look exactly like clicking
        the 'EDIT' button here. But we're only editing this
        small strip or Table of Contents here.
This is what we see when
           we click on 'edit
           navigation' in our table of
           contents


This is the SIDEBAR of our wikispace we call the
table of contents. This should be ONLY links to other
wikis within your wiki (I'll explain that) or an external
link like www.google.com
If you type the generic name to an
EXTERNAL link, then highlight it,
click on 'Link' in the editor bar and
you will see this block appear.


                                        You have 2 options, a 'Wiki Link' or an 'External Link'.
                                        Since PSD mail is an external link outside of
                                        wikispaces, we will click on this tab
You need to know the URL or copy the URL from the
site you want to link to. Above is the URL to PSD
mail for students. I pasted it into here. Now we can
click on 'Add Link'


            Doing so will create the highlighted text into an
            external link in our Table of Contents to PSD mail.
Click 'Save'
And after you click 'Save', your Table of
Contents on the left hand side will show
the new link you made to the external link
The link you created has appeared! It's now part of
your Table of Contents and we can still see our Cover
Page.
             Let's click on 'edit
             navigation' again to
             add another link
Any changes you make to
                                                   your wiki will not be saved
                                                   unless you click 'Save' here.

Type the text of the wikipage
you want to create, then
highlight it. Click on 'Link' in the
editor bar, select 'Wiki Link' and
click 'Add Link" This will create
another wikipage attached to
your table of contents.


           We now are going to add a 'Wiki Link'. This is
           another wikipage attached to your Table of Contents.
           This will let us create a separate page for ANYTHING
           we wish to create. This is where you can create a
           wiki inside of a wiki inside of a wiki inside of a
           wiki....and so on :-)
Here is our Wiki Link we created to 'Period 1 General
           Science'. We can now click on the link and begin
           editing.


Let's click on our link.


                               So we have our cover page of our Wikispace and we
                               have a link to our Period 1 General Science class
                               wikipage here.
The 'EDIT' button here
                    allows us to edit our
                    'Period 1 General
                    Science' wikipage.

Remember to edit
our Table of
Contents we click
'edit navigation'
Since we clicked the
 'EDIT' button, we are
 now editing our 'Period 1
 General Science'
 Wikipage


EXACTLY like the cover of our Wikispace, you can
type and put just about any content here by simply
typing. We are going to get a little more advanced by
inserting files and widgets next. Please click on 'File'
in the editor bar
Inserting a File


                      Click on the "EDIT" button to
                      bring up your editing bar and
                      then click on 'File'
IMPORTANT: Put your
cursor where you
want the file or
image to go.
Inserting a File


This block will appear
when you click on 'File'.
You MUST have the
image or file saved on
your computer, network or                Click on 'Upload Files' here and select the file to
flash drive to insert it.                upload. This is similar to the 'Browse' button a user
You can use an 'external                 would use to find a file for uploading or attaching to an
link' which we'll get to in a            email.
moment
Select the file and click
                                                   'Select' or 'Upload' on a PC
                                                   and wikispaces will upload
                                                   your file to your space.


Select the file you wish to place on your
wikipage. Remember not all visitors of your
wikipage may have Notebook, or Word, or
Excel. A safe bet is to turn your files into PDF
format before uploading
Your file or image you've selected was uploaded and now
appears here as a thumbnail. Double click on the thumbnail
to insert the image for file. REMEMBER TO HAVE YOUR
CURSOR WHERE YOU WANT THE FILE OR IMAGE TO
BE PLACED
Your image or file will appear as a light grey block
that looks like this. It will not look like this once you
click 'Save'. Go ahead and click 'Save'
Once you've clicked 'Save' your grey blocks and
images will appear in final format on your page. I
inserted an image the SAME EXACT way we inserted
a file. Remember you have to have the image saved
to your X-drive or desktop or somewhere you can
easily retrieve.........oooorrrrrrrr
Inserting an Image from an External Link


                                                            Remember to
                                                            click 'Save' to
                                                            make
                                                            permanent
If you find an image on                                     changes to
the web and just want to                                    your space
copy the URL of that
image, you can insert an
image that way.


               Click on the 'EDIT' button, the editor bar appears,
               click on 'File' like we are inserting an image or file,
               and when this block appears, click on the tab
               'External Image' and paste the URL of the image and
               click 'Load'. You will then need to double click the
               image to insert it into your page
Embedding a Widget


First off, a Widget is anything that you find on the web
or as a resource that has an embed code. For
example, if you find a video on YouTube.com, there is
often an embed code you can copy and use to put that
video into your own wikispace.
Embedding a Widget

There are lots of audio resources, podcasts, videos,
calendars, etc. out on the web that have an embed
code. So if you ever find something that you want to
put on our wikispace, look for an embed code. If it
has one, you're in luck!


 Ok.....let's start simple with embedding a video.
Let's click
on 'Video'
right here.


              Click on the 'EDIT' button, and your editor bar
              appears, click on 'Widget' and this block appears.
              DONT PANIC! This block shows how many different
              embeddable widget kinds are out there.
This screen will appear for you to select the resource
you got your video from. THIS REALLY DOESNT
MATTER!! As long as you have the embed code, you
can select any of the above. Click on 'YouTube'
This block will appear and this is where you take the
embed code that we copied from YouTube.com and
paste it into this block. Once you do so, click 'Save'
Your video will appear as a greyish block (just like the
file we inserted) and will not be able to viewed until
you click 'Save'
You can now see our video we found on
YouTube.com is on our wikipage! Direct from
YouTube.com, the video is streamed to your
wikipage. You can do this for student videos that you
upload to YouTube.com or SchoolTube.com as well!
Any embed code you find......
   Wikispaces is not picky when it comes to embedding
   widgets. If you find an embed code on the web and
   want that widget in your wikipage, copy the embed
   code!
  Then go through the same process we went through
  to embed a video. Click 'Edit', then 'Widget'....


Then click here,
'Other HTML'
Don't forget to click
                                                     'Save' and then
                                                     'Save' to make your
                                                     changes permanent.


Paste your embed code you found in the block above
like you did for your video. Again, you could do it this
way for a video you found on YouTube.com or a
Google Spreadsheet or calendar, etc.. Wikispaces is
not picky when it comes to widgets.
I am not going to cover EACH widget that
         wikispaces puts on their options. Just
         know that if you find an embed code on
         something, you can put it in your
         wikispace.
Here is a list of some things that have embed codes
available for embedding in your wiki.

     ·   Google Spreadsheet/Calendar/Docs/Presentation/Forms
     ·   RSS Feeds
     ·   Audio (Podcasts)
     ·   Videos
     ·   Slideshows
     ·   Maps
     ·   Chats and Instant Messengers
     ·   Bookmark Sites (Delicious)
Conclusion
I am here to help. I do not expect anyone to feel lost or helpless. DO NOT
HESITATE TO CONTACT ME FOR ANY HELP! There is a learning curve with anything new.
Hopefully this packet will ease that transition into using a wikispace in your classroom.


  Student created wikispaces
  Don't forget that I can help you have your students create their own wikispace.
  I've worked with teachers who instead of having their students create a
  PowerPoint or type a paper, they have them create their own wikispace and
  the teacher grades their work right from the students wikispace.


Created by:
Nick Paolini
Saegertown High School Technology Integration Coach
npaolini@penncrest.org
Skype: nickpaolini81
814.337.1658
724.333.4120

Wikispaces

  • 2.
    A wikispace isyour own website. You create the URL and your students and anyone anywhere can see any resource you put on your wiki. It's a great resource for teachers to post their assignments, calendars of assignments, pictures, videos, audio, etc. Also students can create their own wikispace for generating creative assignments.
  • 3.
    Table of Contents Creatingan account Pages 4 - 6 The Cover of your Wiki Page 7 Editing your Cover Pages 8 - 11 Table of Contents Pages 12 -13 Inserting a External Link Pages 14 - 17 Inserting a Wiki Link Pages 18 - 21 Inserting a File or Image Pages 22 - 27 Inserting an External Image Page 28 Inserting a Widget Pages 29 - 35 Inserting any Widget Pages 36 - 37 Embeddable Widgets Page 38 Conclusion and Student Wikipages Page 39
  • 4.
    Go to www.wikispaces.comand click on 'create your own classroom wiki today'
  • 5.
    Remember this! Writeit down. You'll need it to log into wikispaces and to make changes to your wiki in the future!! This will be the actual name of your website. For example, if you put MrPaolini, the URL of your wikispace will be http://mrpaolini.wikispaces.com Make sure to select "Protected" and check the box that it'll be used for K-12 education. Now click 'Join'
  • 6.
    You're in! NOWyou must verify your wikispace by checking the email you put in when you created your wiki. Wikispaces will send you an email with a link, simply click on the link to verify and start your wiki!
  • 7.
    The Cover ofyour Wikispace. You can only change parts of your wiki when you click on the 'Edit' button here. But this will ONLY let us edit the Cover of our Wiki or the Table of Contents page we are looking at. This is the 'cover' of your wiki, consider this a cover of a book your are writing. This should be used as an introduction to the user/viewer. Do not put an overwhelming amount of information on your cover, we can put that info in the 'Table of Contents'.
  • 8.
    To Edit yourCover Editor bar Click on the 'Edit' button in the upper right hand corner and the editor bar will appear. This is the backbone of your wiki. If you want to make any changes, you HAVE to click on the 'edit' button first. Any changes you make to your wiki will Once you click 'edit' you can then type and do not be saved unless whatever you wish to the space provided you click 'Save' here.
  • 9.
    Editing Any changes you make to your wiki will not be saved unless you click 'Save' here. You can simply type what you want on the cover of your book. I like to include contact information and other important info. REMINDER: Keep it simple! Maybe a photo and your class you each....it's a cover of a wikispace...
  • 10.
    Highlight the text youwish to edit and Editing Text then click on the "T" with painters pallet Make certain to click on 'Apply Styles' at the bottom. Take a moment to get familiar with the options within the 'Color and Style' option.
  • 11.
    You can also'Bold, Any changes you Italicize, and Underline' make to your wiki your text by highlighting will not be saved it and clicking on these unless you click options. 'Save' here. You can also make There is also a spot to your text a 'Header' by create numbers and clicking on this drop bullets as well as a down option. divider here.
  • 12.
    Table of Contents Ifwe click the 'edit navigation' option here, an editor bar will appear for us to edit THE TABLE OF CONTENTS ONLY WARNING: This is going to look exactly like clicking the 'EDIT' button here. But we're only editing this small strip or Table of Contents here.
  • 13.
    This is whatwe see when we click on 'edit navigation' in our table of contents This is the SIDEBAR of our wikispace we call the table of contents. This should be ONLY links to other wikis within your wiki (I'll explain that) or an external link like www.google.com
  • 14.
    If you typethe generic name to an EXTERNAL link, then highlight it, click on 'Link' in the editor bar and you will see this block appear. You have 2 options, a 'Wiki Link' or an 'External Link'. Since PSD mail is an external link outside of wikispaces, we will click on this tab
  • 15.
    You need toknow the URL or copy the URL from the site you want to link to. Above is the URL to PSD mail for students. I pasted it into here. Now we can click on 'Add Link' Doing so will create the highlighted text into an external link in our Table of Contents to PSD mail.
  • 16.
    Click 'Save' And afteryou click 'Save', your Table of Contents on the left hand side will show the new link you made to the external link
  • 17.
    The link youcreated has appeared! It's now part of your Table of Contents and we can still see our Cover Page. Let's click on 'edit navigation' again to add another link
  • 18.
    Any changes youmake to your wiki will not be saved unless you click 'Save' here. Type the text of the wikipage you want to create, then highlight it. Click on 'Link' in the editor bar, select 'Wiki Link' and click 'Add Link" This will create another wikipage attached to your table of contents. We now are going to add a 'Wiki Link'. This is another wikipage attached to your Table of Contents. This will let us create a separate page for ANYTHING we wish to create. This is where you can create a wiki inside of a wiki inside of a wiki inside of a wiki....and so on :-)
  • 19.
    Here is ourWiki Link we created to 'Period 1 General Science'. We can now click on the link and begin editing. Let's click on our link. So we have our cover page of our Wikispace and we have a link to our Period 1 General Science class wikipage here.
  • 20.
    The 'EDIT' buttonhere allows us to edit our 'Period 1 General Science' wikipage. Remember to edit our Table of Contents we click 'edit navigation'
  • 21.
    Since we clickedthe 'EDIT' button, we are now editing our 'Period 1 General Science' Wikipage EXACTLY like the cover of our Wikispace, you can type and put just about any content here by simply typing. We are going to get a little more advanced by inserting files and widgets next. Please click on 'File' in the editor bar
  • 22.
    Inserting a File Click on the "EDIT" button to bring up your editing bar and then click on 'File' IMPORTANT: Put your cursor where you want the file or image to go.
  • 23.
    Inserting a File Thisblock will appear when you click on 'File'. You MUST have the image or file saved on your computer, network or Click on 'Upload Files' here and select the file to flash drive to insert it. upload. This is similar to the 'Browse' button a user You can use an 'external would use to find a file for uploading or attaching to an link' which we'll get to in a email. moment
  • 24.
    Select the fileand click 'Select' or 'Upload' on a PC and wikispaces will upload your file to your space. Select the file you wish to place on your wikipage. Remember not all visitors of your wikipage may have Notebook, or Word, or Excel. A safe bet is to turn your files into PDF format before uploading
  • 25.
    Your file orimage you've selected was uploaded and now appears here as a thumbnail. Double click on the thumbnail to insert the image for file. REMEMBER TO HAVE YOUR CURSOR WHERE YOU WANT THE FILE OR IMAGE TO BE PLACED
  • 26.
    Your image orfile will appear as a light grey block that looks like this. It will not look like this once you click 'Save'. Go ahead and click 'Save'
  • 27.
    Once you've clicked'Save' your grey blocks and images will appear in final format on your page. I inserted an image the SAME EXACT way we inserted a file. Remember you have to have the image saved to your X-drive or desktop or somewhere you can easily retrieve.........oooorrrrrrrr
  • 28.
    Inserting an Imagefrom an External Link Remember to click 'Save' to make permanent If you find an image on changes to the web and just want to your space copy the URL of that image, you can insert an image that way. Click on the 'EDIT' button, the editor bar appears, click on 'File' like we are inserting an image or file, and when this block appears, click on the tab 'External Image' and paste the URL of the image and click 'Load'. You will then need to double click the image to insert it into your page
  • 29.
    Embedding a Widget Firstoff, a Widget is anything that you find on the web or as a resource that has an embed code. For example, if you find a video on YouTube.com, there is often an embed code you can copy and use to put that video into your own wikispace.
  • 30.
    Embedding a Widget Thereare lots of audio resources, podcasts, videos, calendars, etc. out on the web that have an embed code. So if you ever find something that you want to put on our wikispace, look for an embed code. If it has one, you're in luck! Ok.....let's start simple with embedding a video.
  • 31.
    Let's click on 'Video' righthere. Click on the 'EDIT' button, and your editor bar appears, click on 'Widget' and this block appears. DONT PANIC! This block shows how many different embeddable widget kinds are out there.
  • 32.
    This screen willappear for you to select the resource you got your video from. THIS REALLY DOESNT MATTER!! As long as you have the embed code, you can select any of the above. Click on 'YouTube'
  • 33.
    This block willappear and this is where you take the embed code that we copied from YouTube.com and paste it into this block. Once you do so, click 'Save'
  • 34.
    Your video willappear as a greyish block (just like the file we inserted) and will not be able to viewed until you click 'Save'
  • 35.
    You can nowsee our video we found on YouTube.com is on our wikipage! Direct from YouTube.com, the video is streamed to your wikipage. You can do this for student videos that you upload to YouTube.com or SchoolTube.com as well!
  • 36.
    Any embed codeyou find...... Wikispaces is not picky when it comes to embedding widgets. If you find an embed code on the web and want that widget in your wikipage, copy the embed code! Then go through the same process we went through to embed a video. Click 'Edit', then 'Widget'.... Then click here, 'Other HTML'
  • 37.
    Don't forget toclick 'Save' and then 'Save' to make your changes permanent. Paste your embed code you found in the block above like you did for your video. Again, you could do it this way for a video you found on YouTube.com or a Google Spreadsheet or calendar, etc.. Wikispaces is not picky when it comes to widgets.
  • 38.
    I am notgoing to cover EACH widget that wikispaces puts on their options. Just know that if you find an embed code on something, you can put it in your wikispace. Here is a list of some things that have embed codes available for embedding in your wiki. · Google Spreadsheet/Calendar/Docs/Presentation/Forms · RSS Feeds · Audio (Podcasts) · Videos · Slideshows · Maps · Chats and Instant Messengers · Bookmark Sites (Delicious)
  • 39.
    Conclusion I am hereto help. I do not expect anyone to feel lost or helpless. DO NOT HESITATE TO CONTACT ME FOR ANY HELP! There is a learning curve with anything new. Hopefully this packet will ease that transition into using a wikispace in your classroom. Student created wikispaces Don't forget that I can help you have your students create their own wikispace. I've worked with teachers who instead of having their students create a PowerPoint or type a paper, they have them create their own wikispace and the teacher grades their work right from the students wikispace. Created by: Nick Paolini Saegertown High School Technology Integration Coach npaolini@penncrest.org Skype: nickpaolini81 814.337.1658 724.333.4120