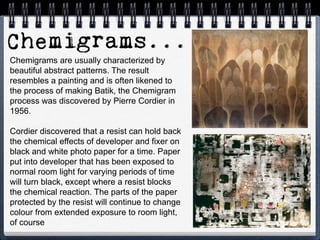
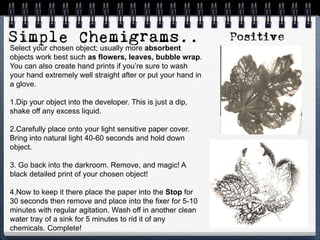
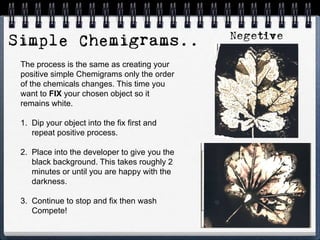
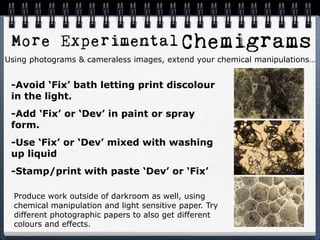
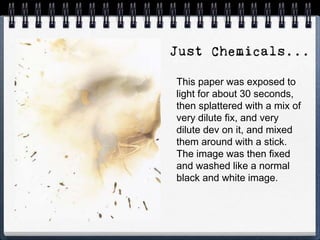
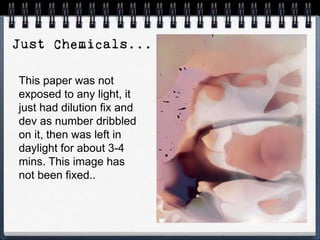
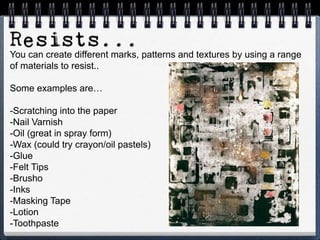
Chemigrams are usually characterized by
beautiful abstract patterns. The result
resembles a painting and is often likened to
the process of making Batik, the Chemigram
process was discovered by Pierre Cordier in
1956.
Cordier discovered that a resist can hold back
the chemical effects of developer and fixer on
black and white photo paper for a time. Paper
put into developer that has been exposed to
normal room light for varying periods of time
will turn black, except where a resist blocks
the chemical reaction. The parts of the paper
protected by the resist will continue to change
colour from extended exposure to room light,
of course
Select your chosen object; usually more absorbent
objects work best such as flowers, leaves, bubble wrap.
You can also create hand prints if you’re sure to wash
your hand extremely well straight after or put your hand in
a glove.
1.Dip your object into the developer. This is just a dip,
shake off any excess liquid.
2.Carefully place onto your light sensitive paper cover.
Bring into natural light 40-60 seconds and hold down
object.
3. Go back into the darkroom. Remove, and magic! A
black detailed print of your chosen object!
4.Now to keep it there place the paper into the Stop for
30 seconds then remove and place into the fixer for 5-10
minutes with regular agitation. Wash off in another clean
water tray of a sink for 5 minutes to rid it of any
chemicals. Complete!
The process is the same as creating your
positive simple Chemigrams only the order
of the chemicals changes. This time you
want to FIX your chosen object so it
remains white.
1. Dip your object into the fix first and
repeat positive process.
2. Place into the developer to give you the
black background. This takes roughly 2
minutes or until you are happy with the
darkness.
3. Continue to stop and fix then wash
Compete!
-Avoid ‘Fix’ bath letting print discolour
in the light.
-Add ‘Fix’ or ‘Dev’ in paint or spray
form.
-Use ‘Fix’ or ‘Dev’ mixed with washing
up liquid
-Stamp/print with paste ‘Dev’ or ‘Fix’
Using photograms & cameraless images, extend your chemical manipulations…
Produce work outside of darkroom as well, using
chemical manipulation and light sensitive paper. Try
different photographic papers to also get different
colours and effects.
This paper was exposed to
light for about 30 seconds,
then splattered with a mix of
very dilute fix, and very
dilute dev on it, and mixed
them around with a stick.
The image was then fixed
and washed like a normal
black and white image.
This paper was not
exposed to any light, it
just had dilution fix and
dev as number dribbled
on it, then was left in
daylight for about 3-4
mins. This image has
not been fixed..
You can create different marks, patterns and textures by using a range
of materials to resist..
Some examples are…
-Scratching into the paper
-Nail Varnish
-Oil (great in spray form)
-Wax (could try crayon/oil pastels)
-Glue
-Felt Tips
-Brusho
-Inks
-Masking Tape
-Lotion
-Toothpaste
This week……
Deadline: Monday 25th September
-Present summer work shoots (artist inspirations,
contacts, enlargements)
-Create a Chemigram inspiration page and annotate
(explain what a Chemigram is on this page maybe
write a little about the history of the Chemigram)
-Research Artist/Photographer who have either used
the technique or produces work that reminds you of
visual qualities of the process.
-Produce 2xA2 pages (min) in your workbook of
‘Chemigrams’. These should be annotated with how
you created them and your opinions and must
include a variety of techniques
- Write two more paragraphs of your essay
-Take a new shoot that links to your project. Print at least one image in negative form onto
accetate for next week.

Week 3 13 photo

  • 2.
    Chemigrams are usuallycharacterized by beautiful abstract patterns. The result resembles a painting and is often likened to the process of making Batik, the Chemigram process was discovered by Pierre Cordier in 1956. Cordier discovered that a resist can hold back the chemical effects of developer and fixer on black and white photo paper for a time. Paper put into developer that has been exposed to normal room light for varying periods of time will turn black, except where a resist blocks the chemical reaction. The parts of the paper protected by the resist will continue to change colour from extended exposure to room light, of course
  • 3.
    Select your chosenobject; usually more absorbent objects work best such as flowers, leaves, bubble wrap. You can also create hand prints if you’re sure to wash your hand extremely well straight after or put your hand in a glove. 1.Dip your object into the developer. This is just a dip, shake off any excess liquid. 2.Carefully place onto your light sensitive paper cover. Bring into natural light 40-60 seconds and hold down object. 3. Go back into the darkroom. Remove, and magic! A black detailed print of your chosen object! 4.Now to keep it there place the paper into the Stop for 30 seconds then remove and place into the fixer for 5-10 minutes with regular agitation. Wash off in another clean water tray of a sink for 5 minutes to rid it of any chemicals. Complete!
  • 4.
    The process isthe same as creating your positive simple Chemigrams only the order of the chemicals changes. This time you want to FIX your chosen object so it remains white. 1. Dip your object into the fix first and repeat positive process. 2. Place into the developer to give you the black background. This takes roughly 2 minutes or until you are happy with the darkness. 3. Continue to stop and fix then wash Compete!
  • 5.
    -Avoid ‘Fix’ bathletting print discolour in the light. -Add ‘Fix’ or ‘Dev’ in paint or spray form. -Use ‘Fix’ or ‘Dev’ mixed with washing up liquid -Stamp/print with paste ‘Dev’ or ‘Fix’ Using photograms & cameraless images, extend your chemical manipulations… Produce work outside of darkroom as well, using chemical manipulation and light sensitive paper. Try different photographic papers to also get different colours and effects.
  • 6.
    This paper wasexposed to light for about 30 seconds, then splattered with a mix of very dilute fix, and very dilute dev on it, and mixed them around with a stick. The image was then fixed and washed like a normal black and white image.
  • 7.
    This paper wasnot exposed to any light, it just had dilution fix and dev as number dribbled on it, then was left in daylight for about 3-4 mins. This image has not been fixed..
  • 8.
    You can createdifferent marks, patterns and textures by using a range of materials to resist.. Some examples are… -Scratching into the paper -Nail Varnish -Oil (great in spray form) -Wax (could try crayon/oil pastels) -Glue -Felt Tips -Brusho -Inks -Masking Tape -Lotion -Toothpaste
  • 9.
    This week…… Deadline: Monday25th September -Present summer work shoots (artist inspirations, contacts, enlargements) -Create a Chemigram inspiration page and annotate (explain what a Chemigram is on this page maybe write a little about the history of the Chemigram) -Research Artist/Photographer who have either used the technique or produces work that reminds you of visual qualities of the process. -Produce 2xA2 pages (min) in your workbook of ‘Chemigrams’. These should be annotated with how you created them and your opinions and must include a variety of techniques - Write two more paragraphs of your essay -Take a new shoot that links to your project. Print at least one image in negative form onto accetate for next week.