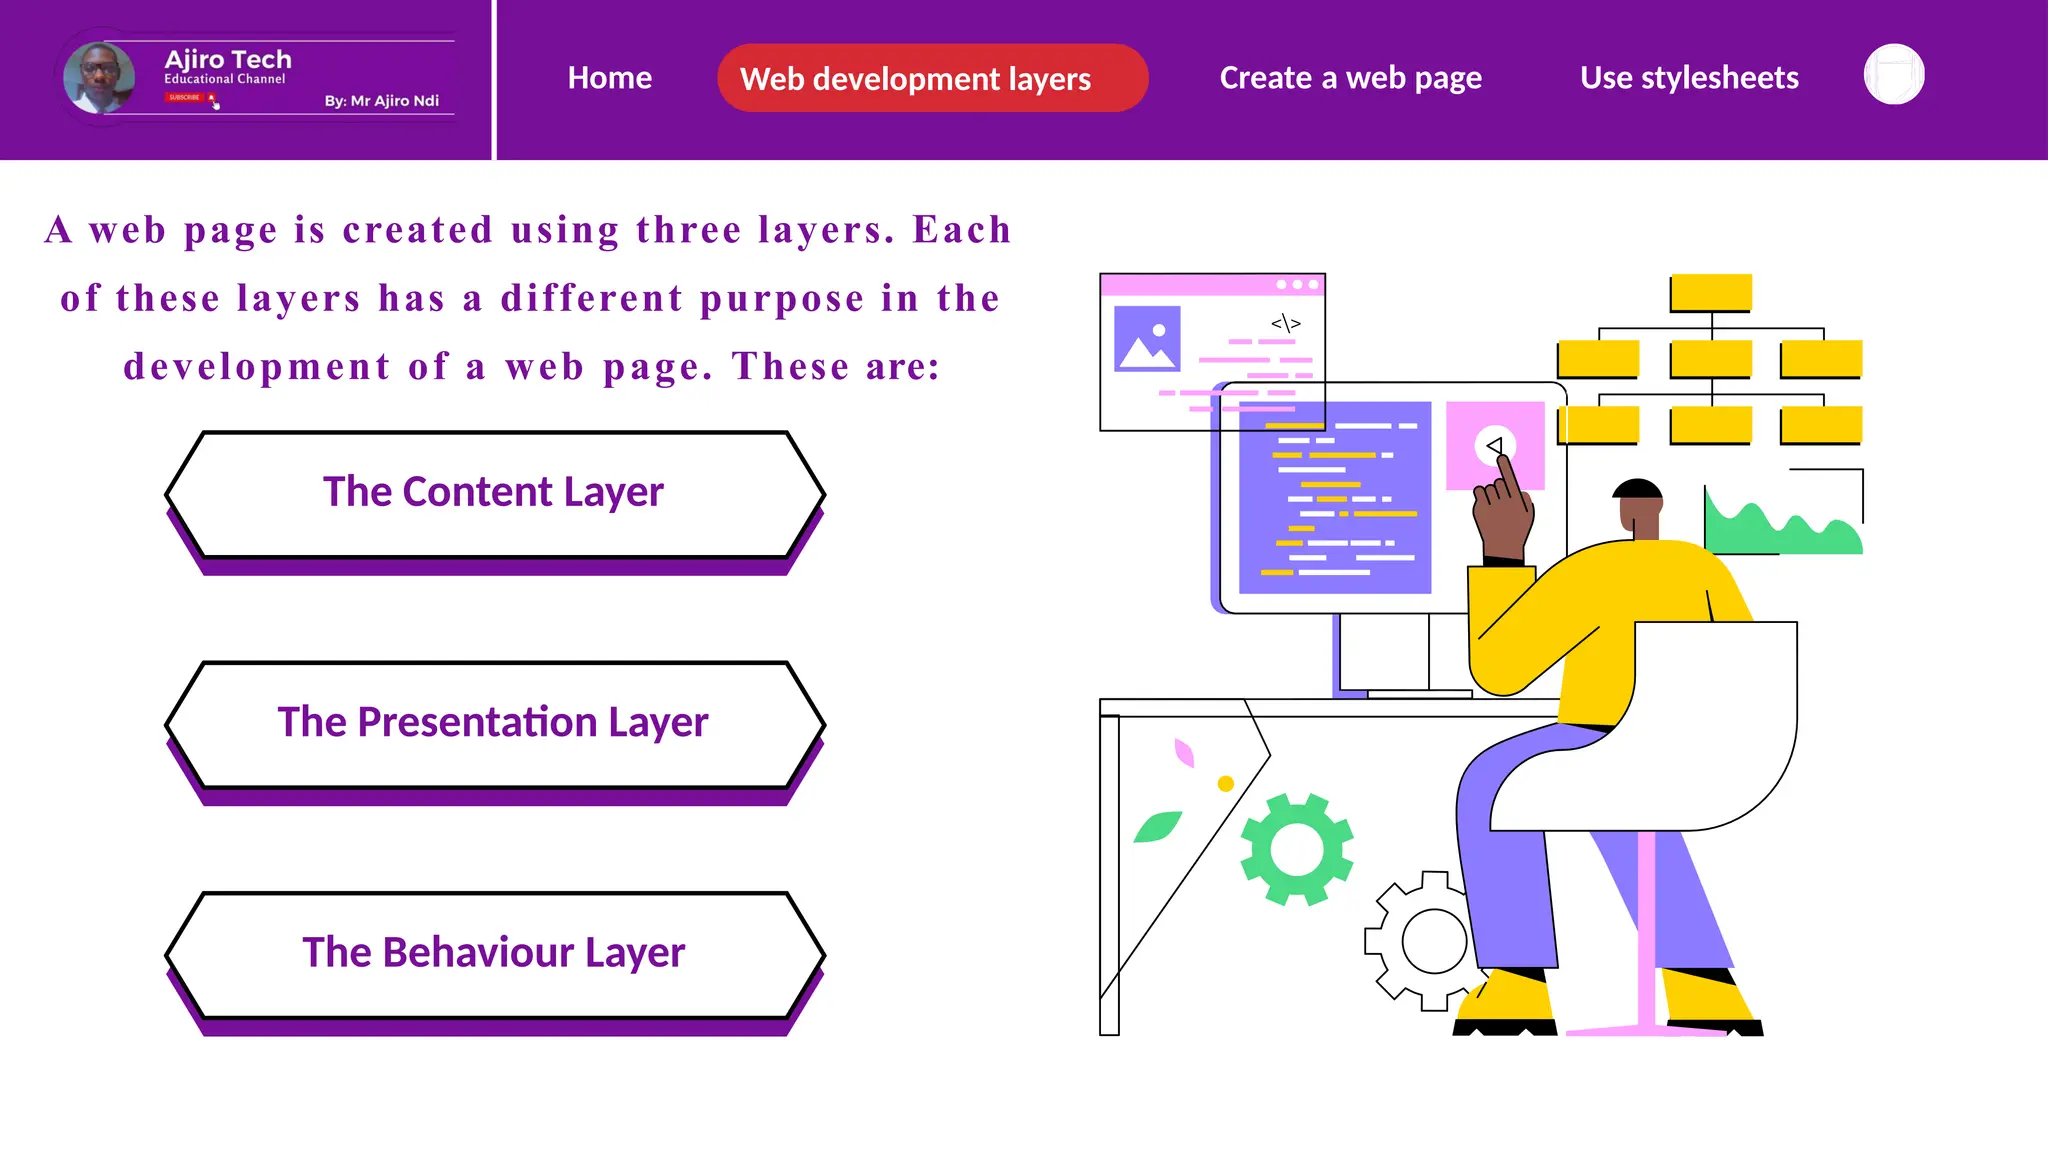
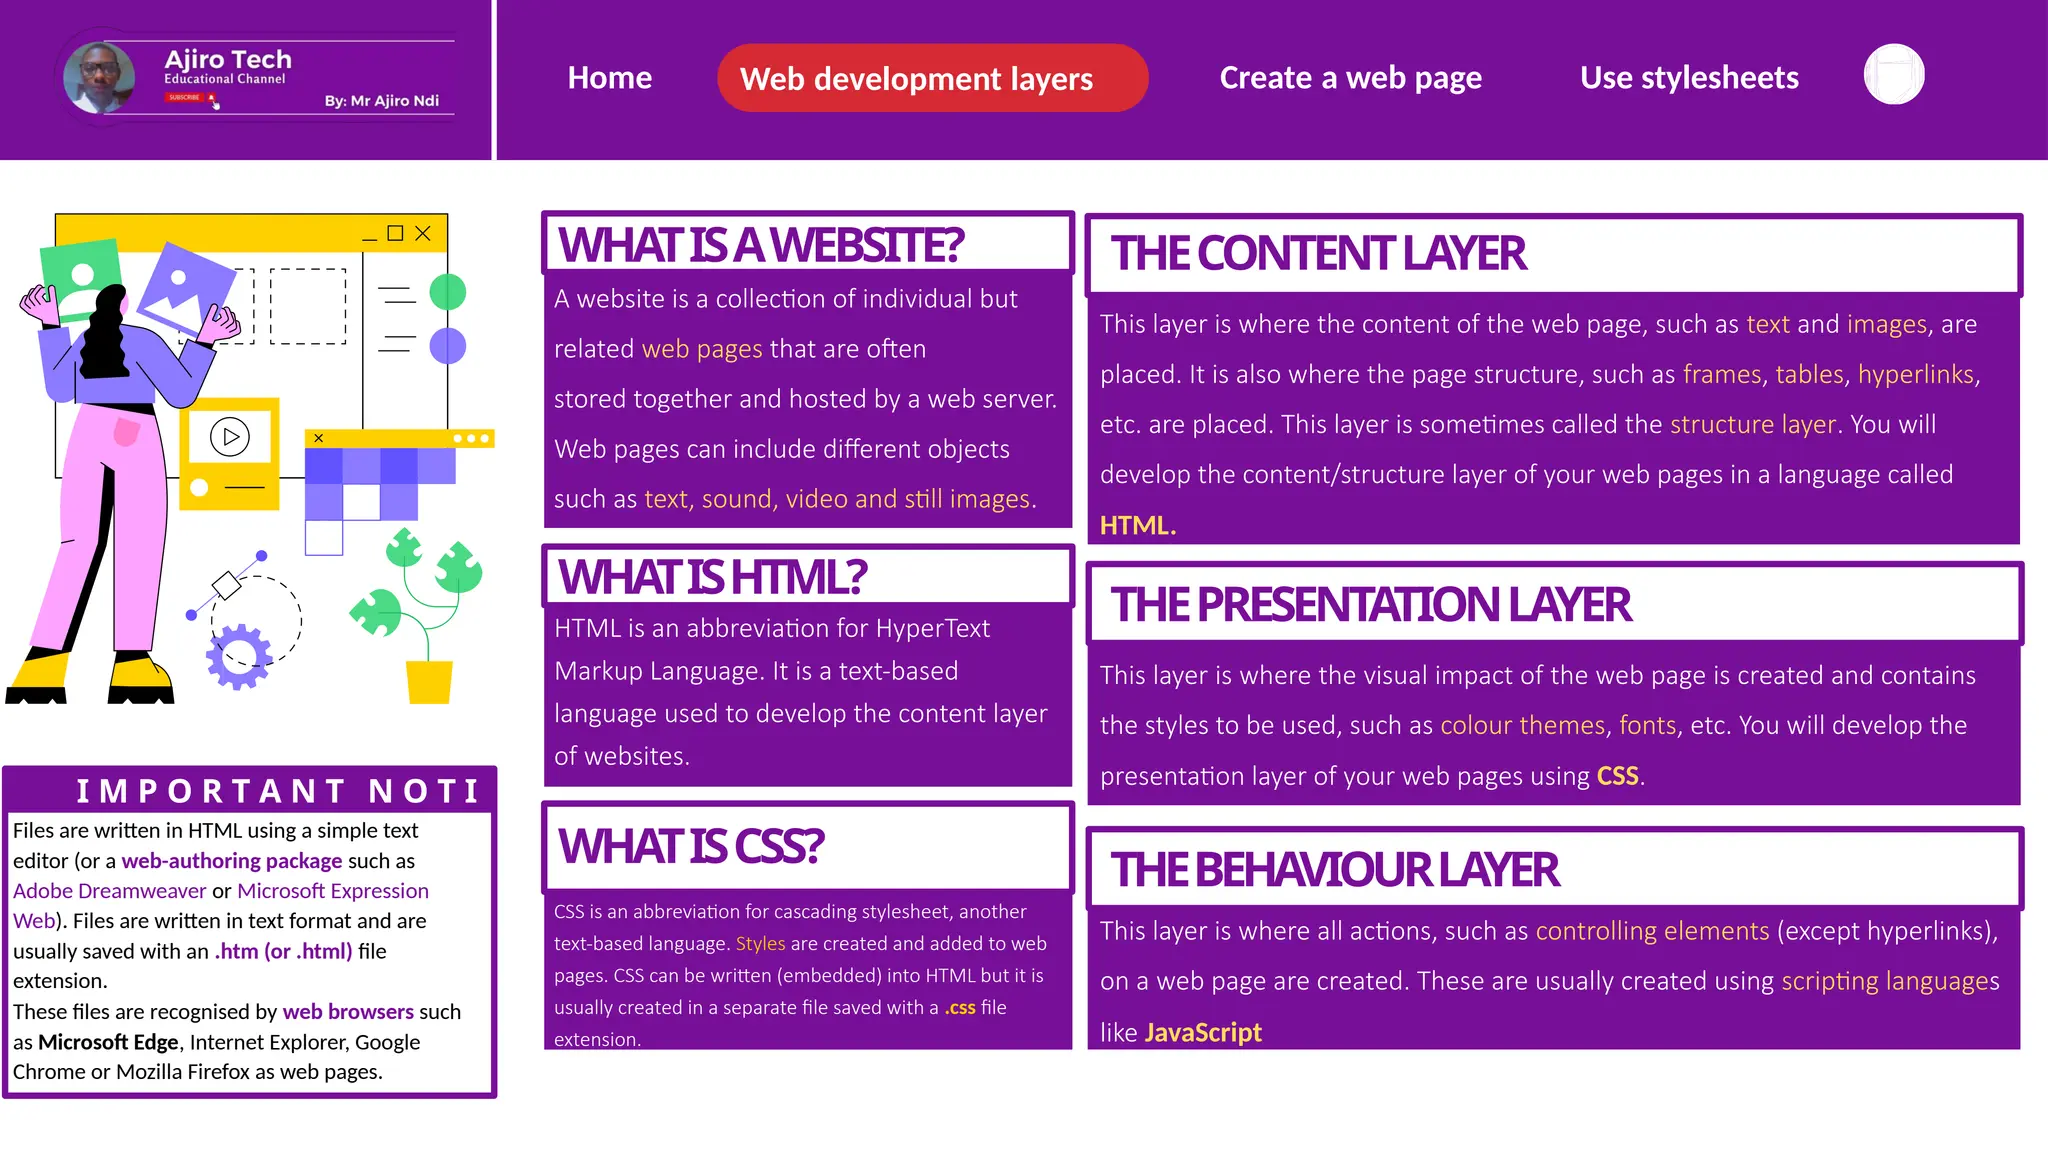
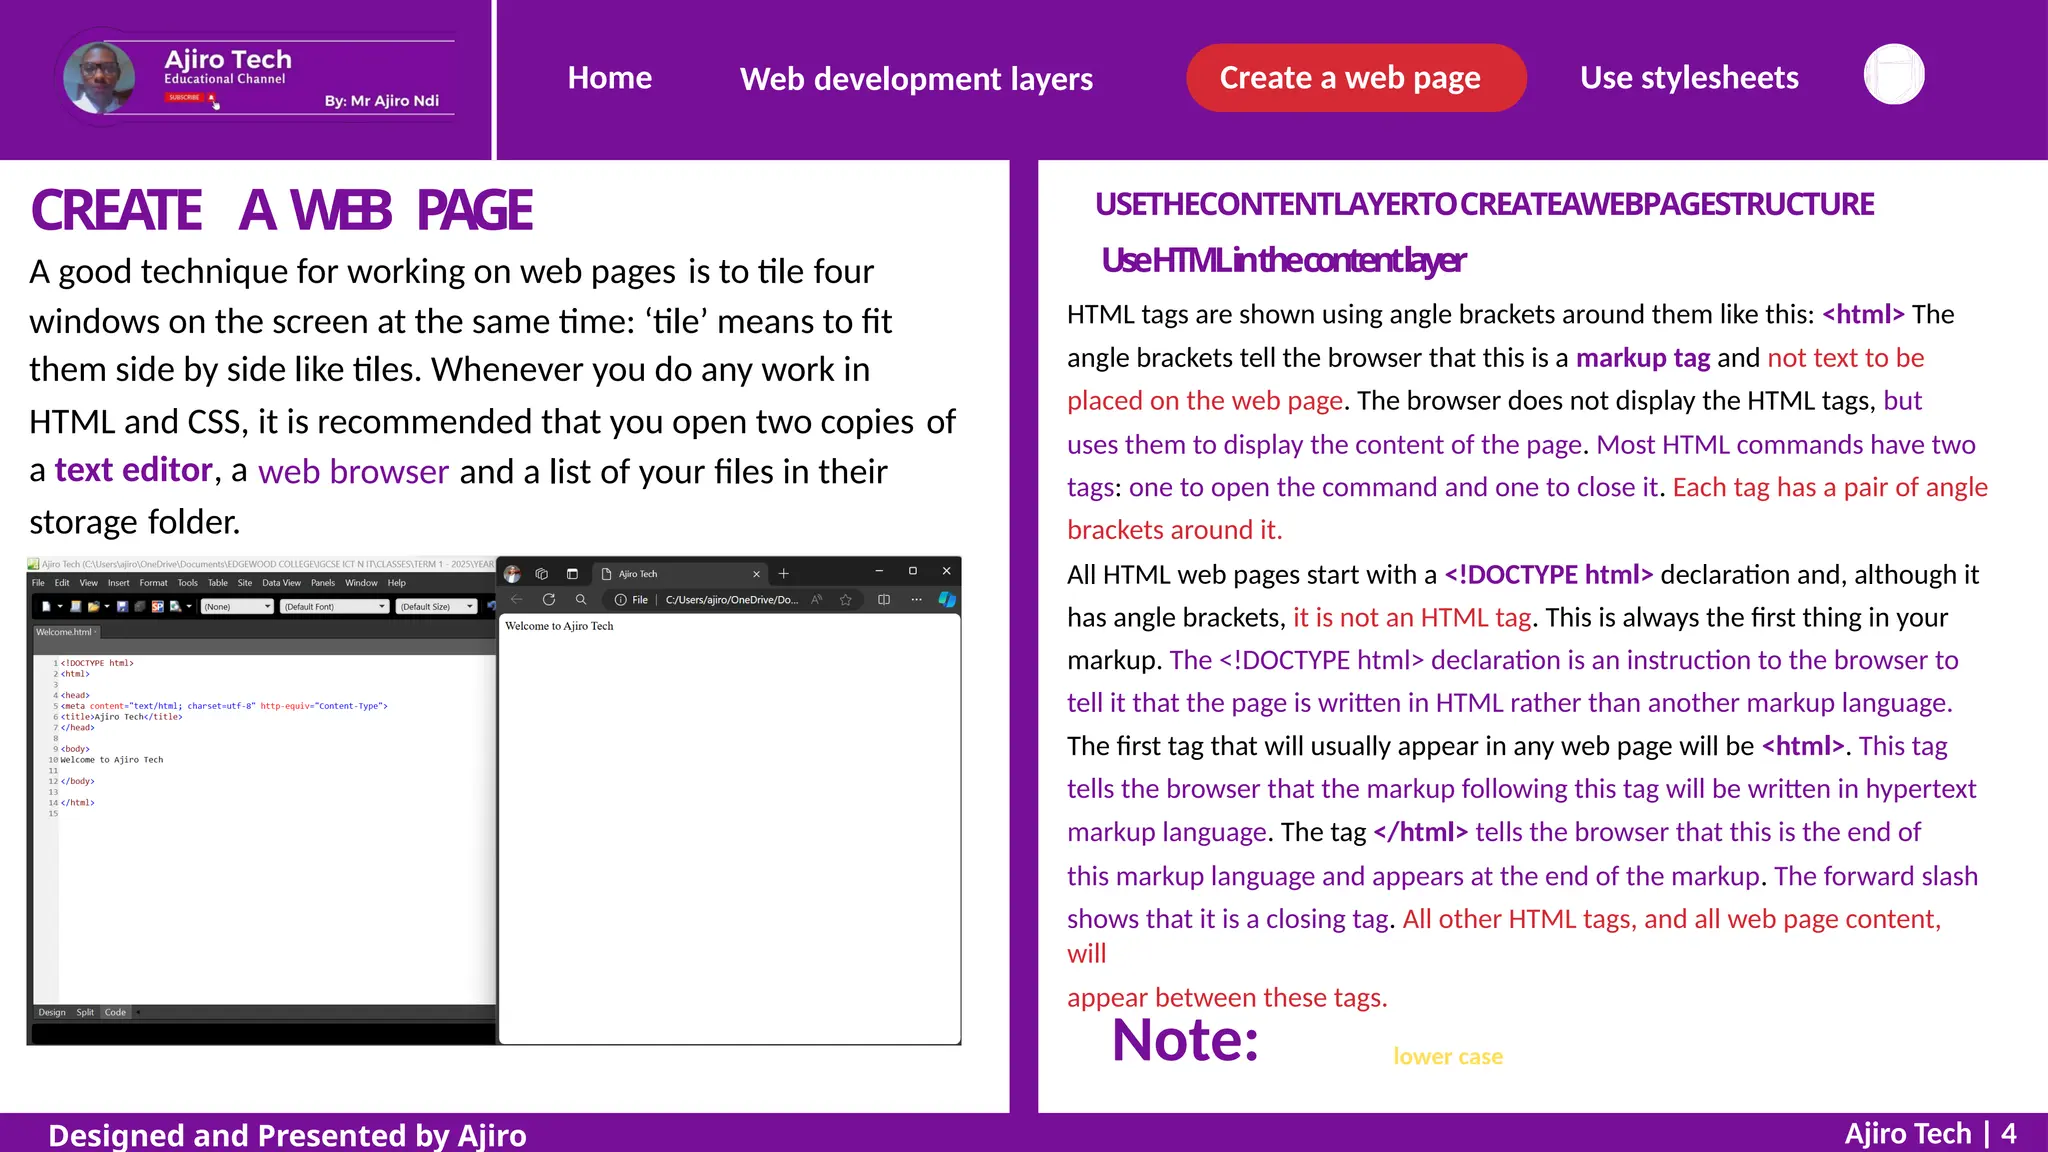
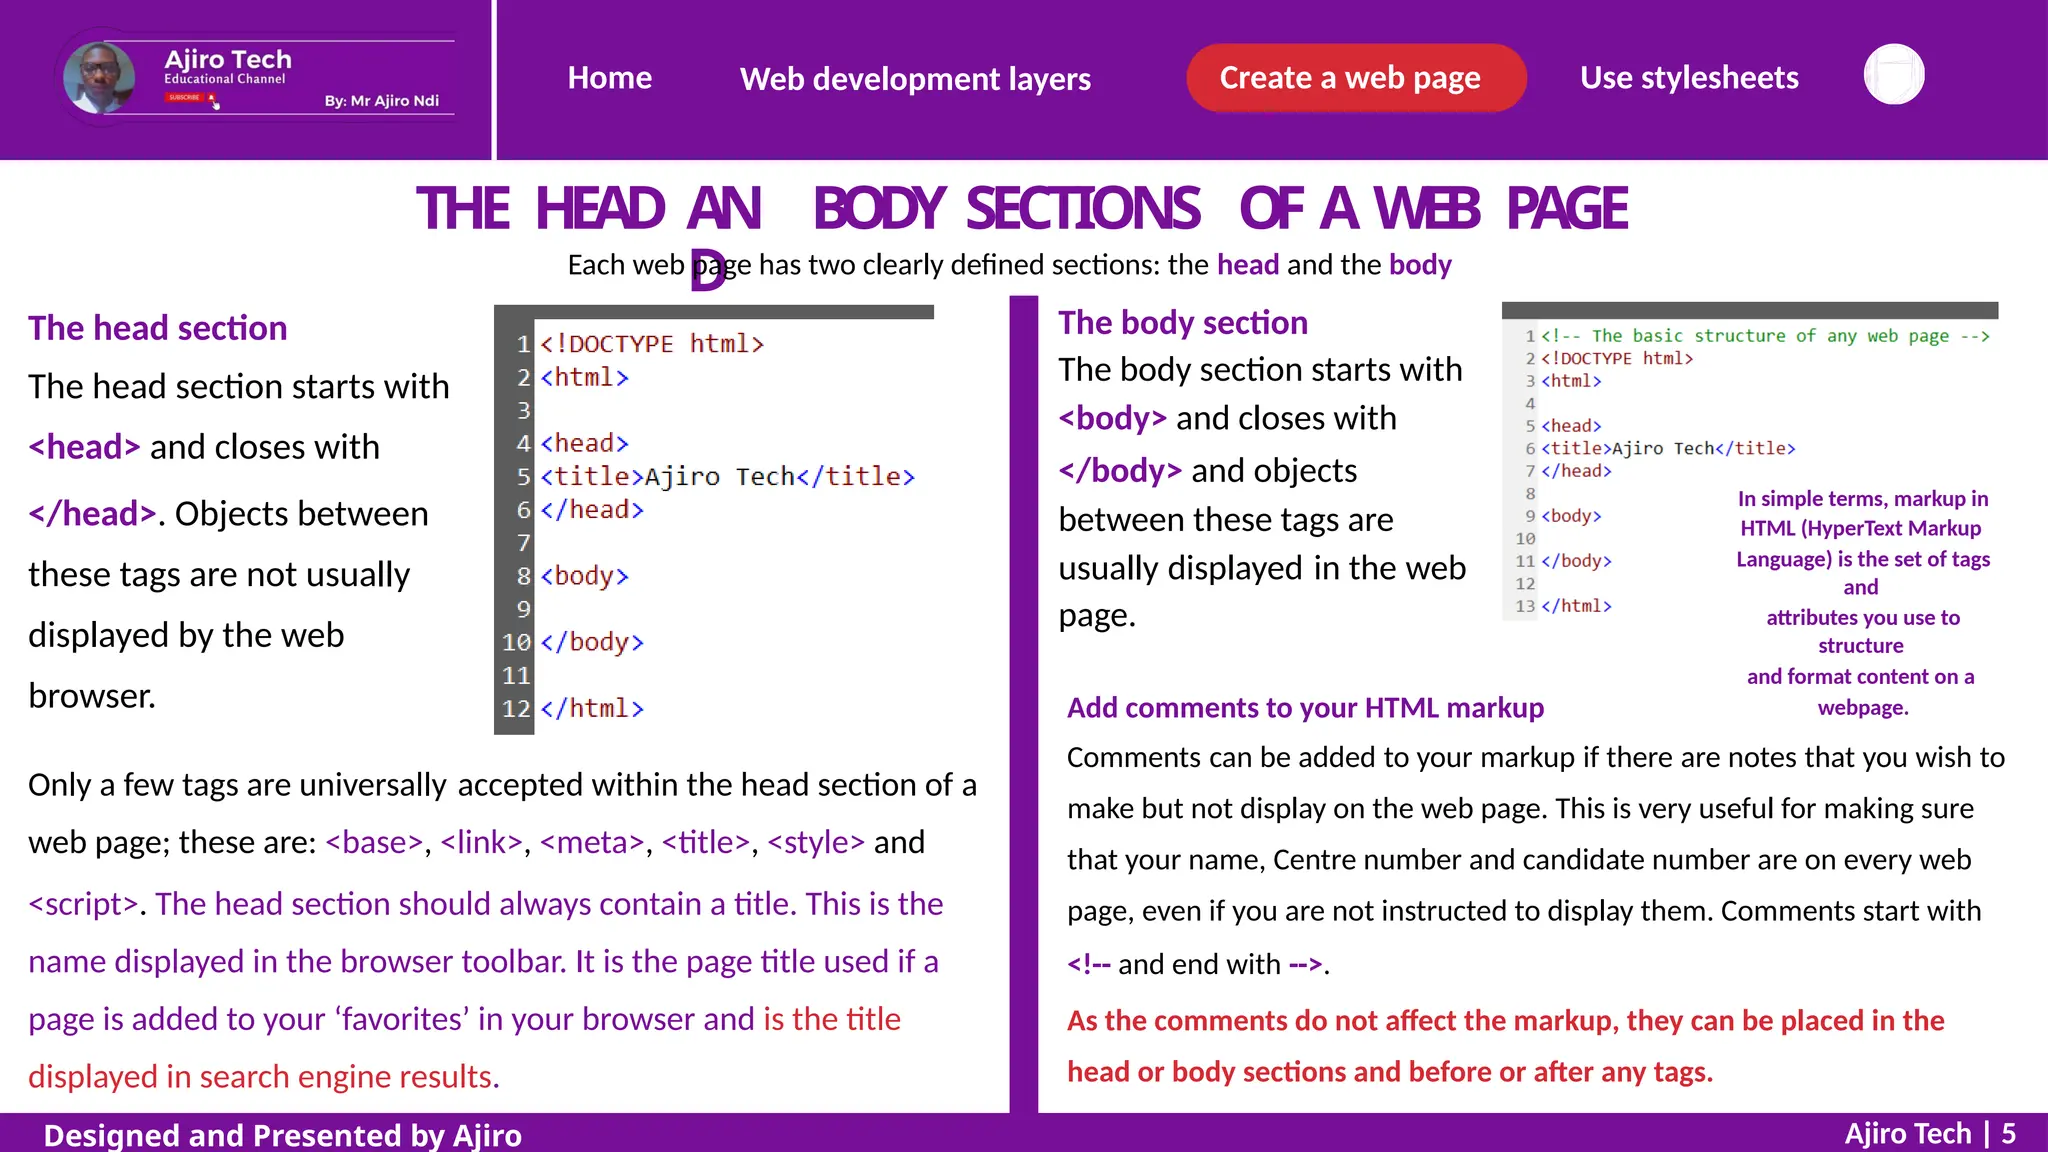
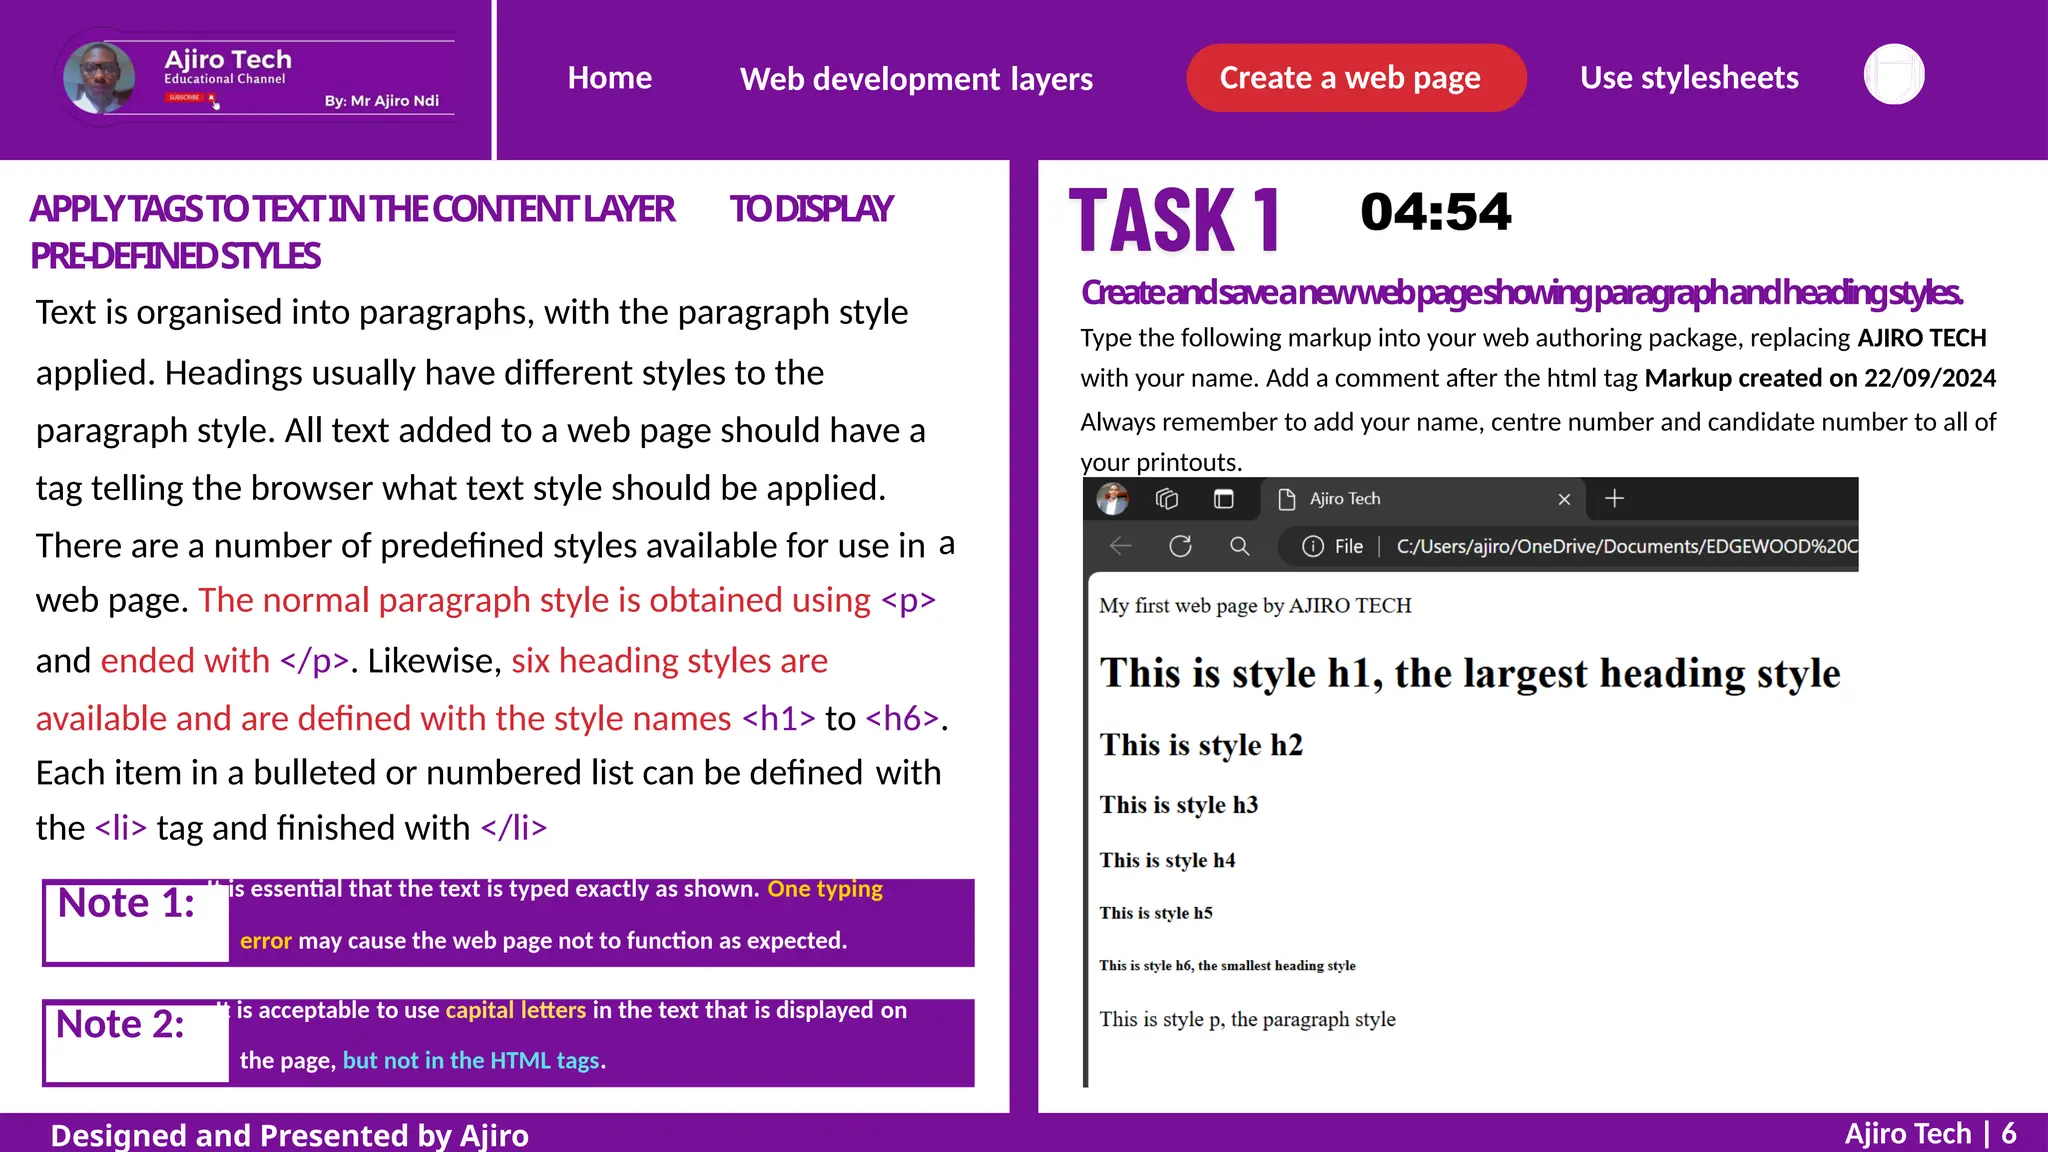
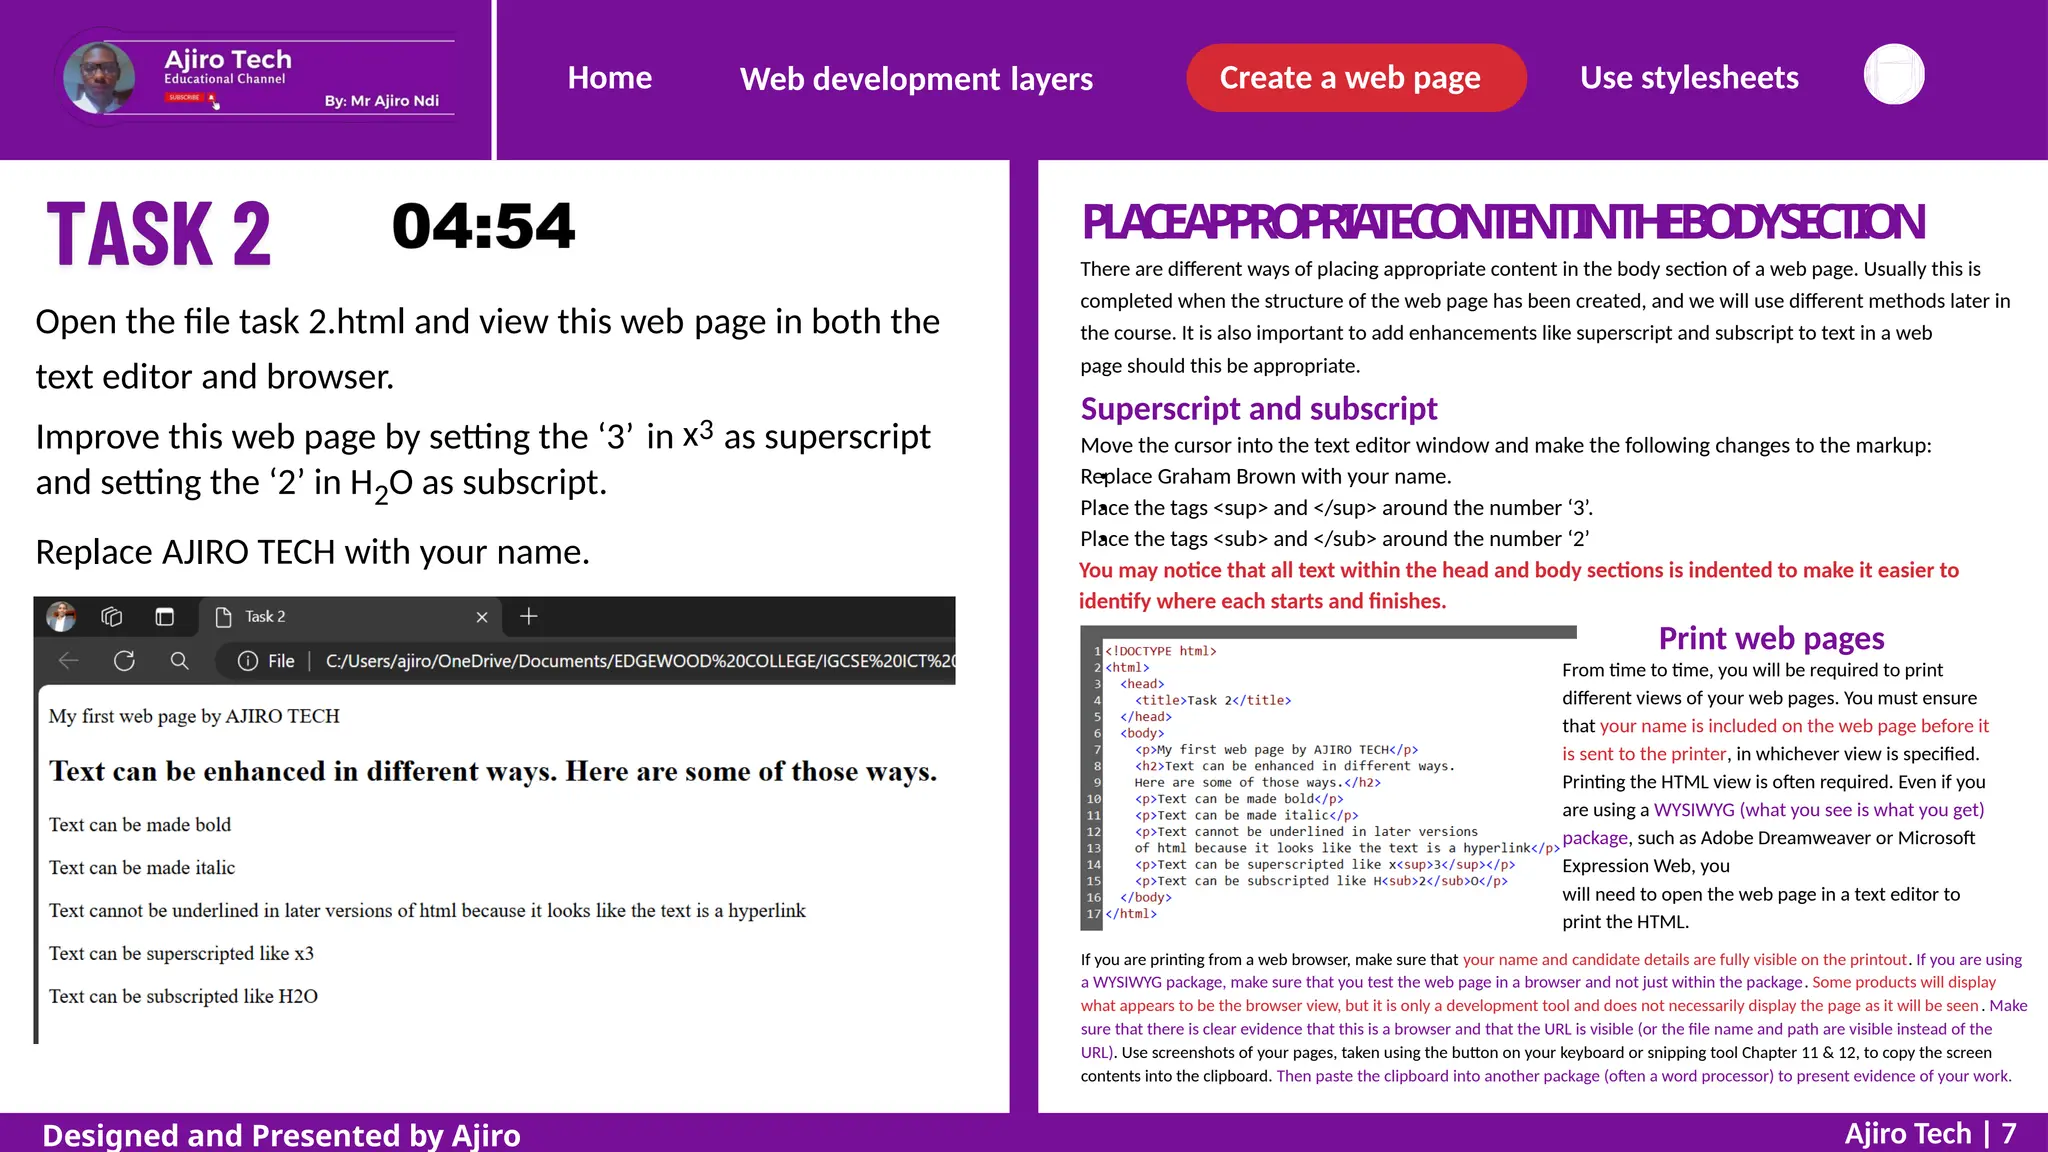
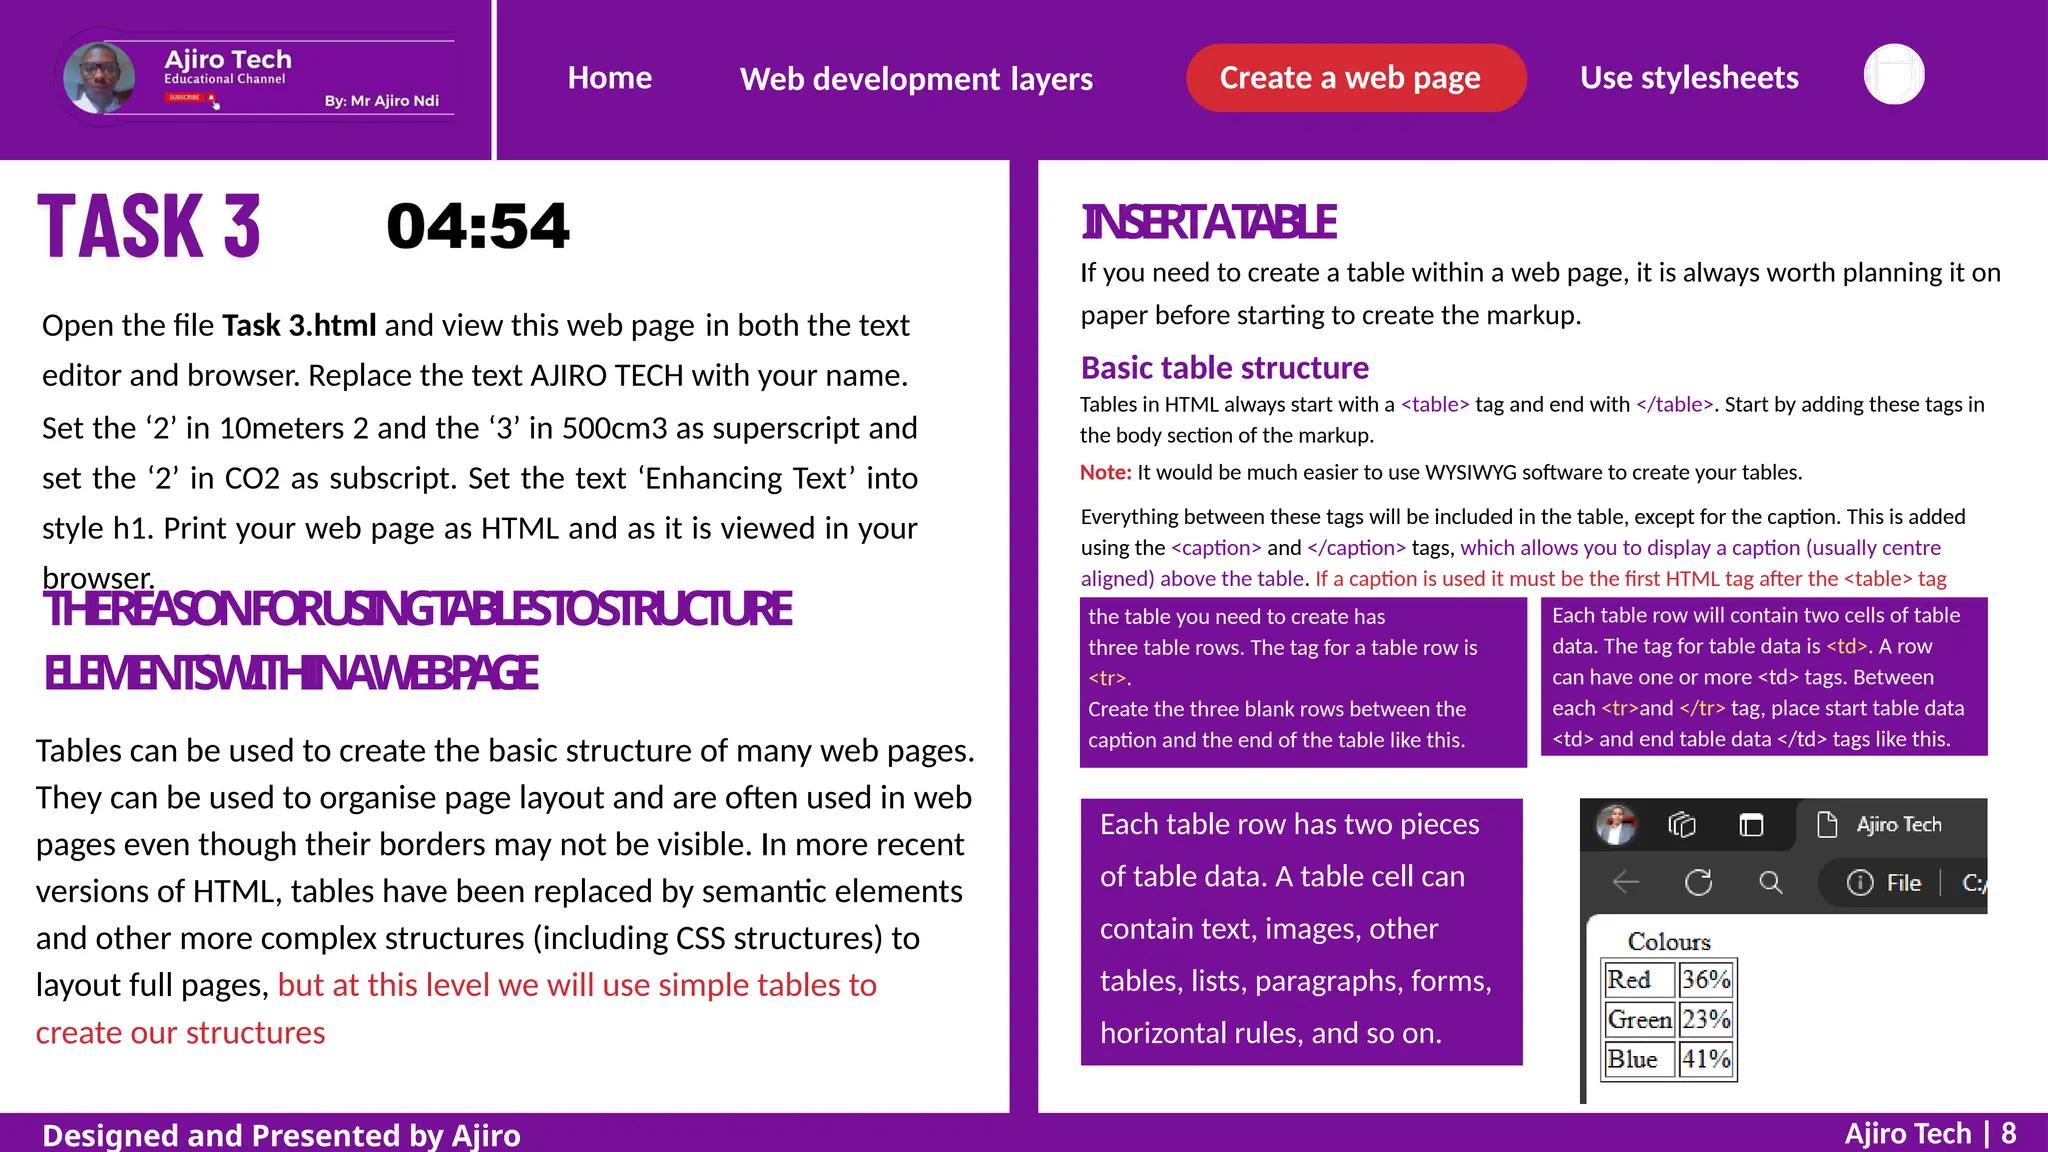
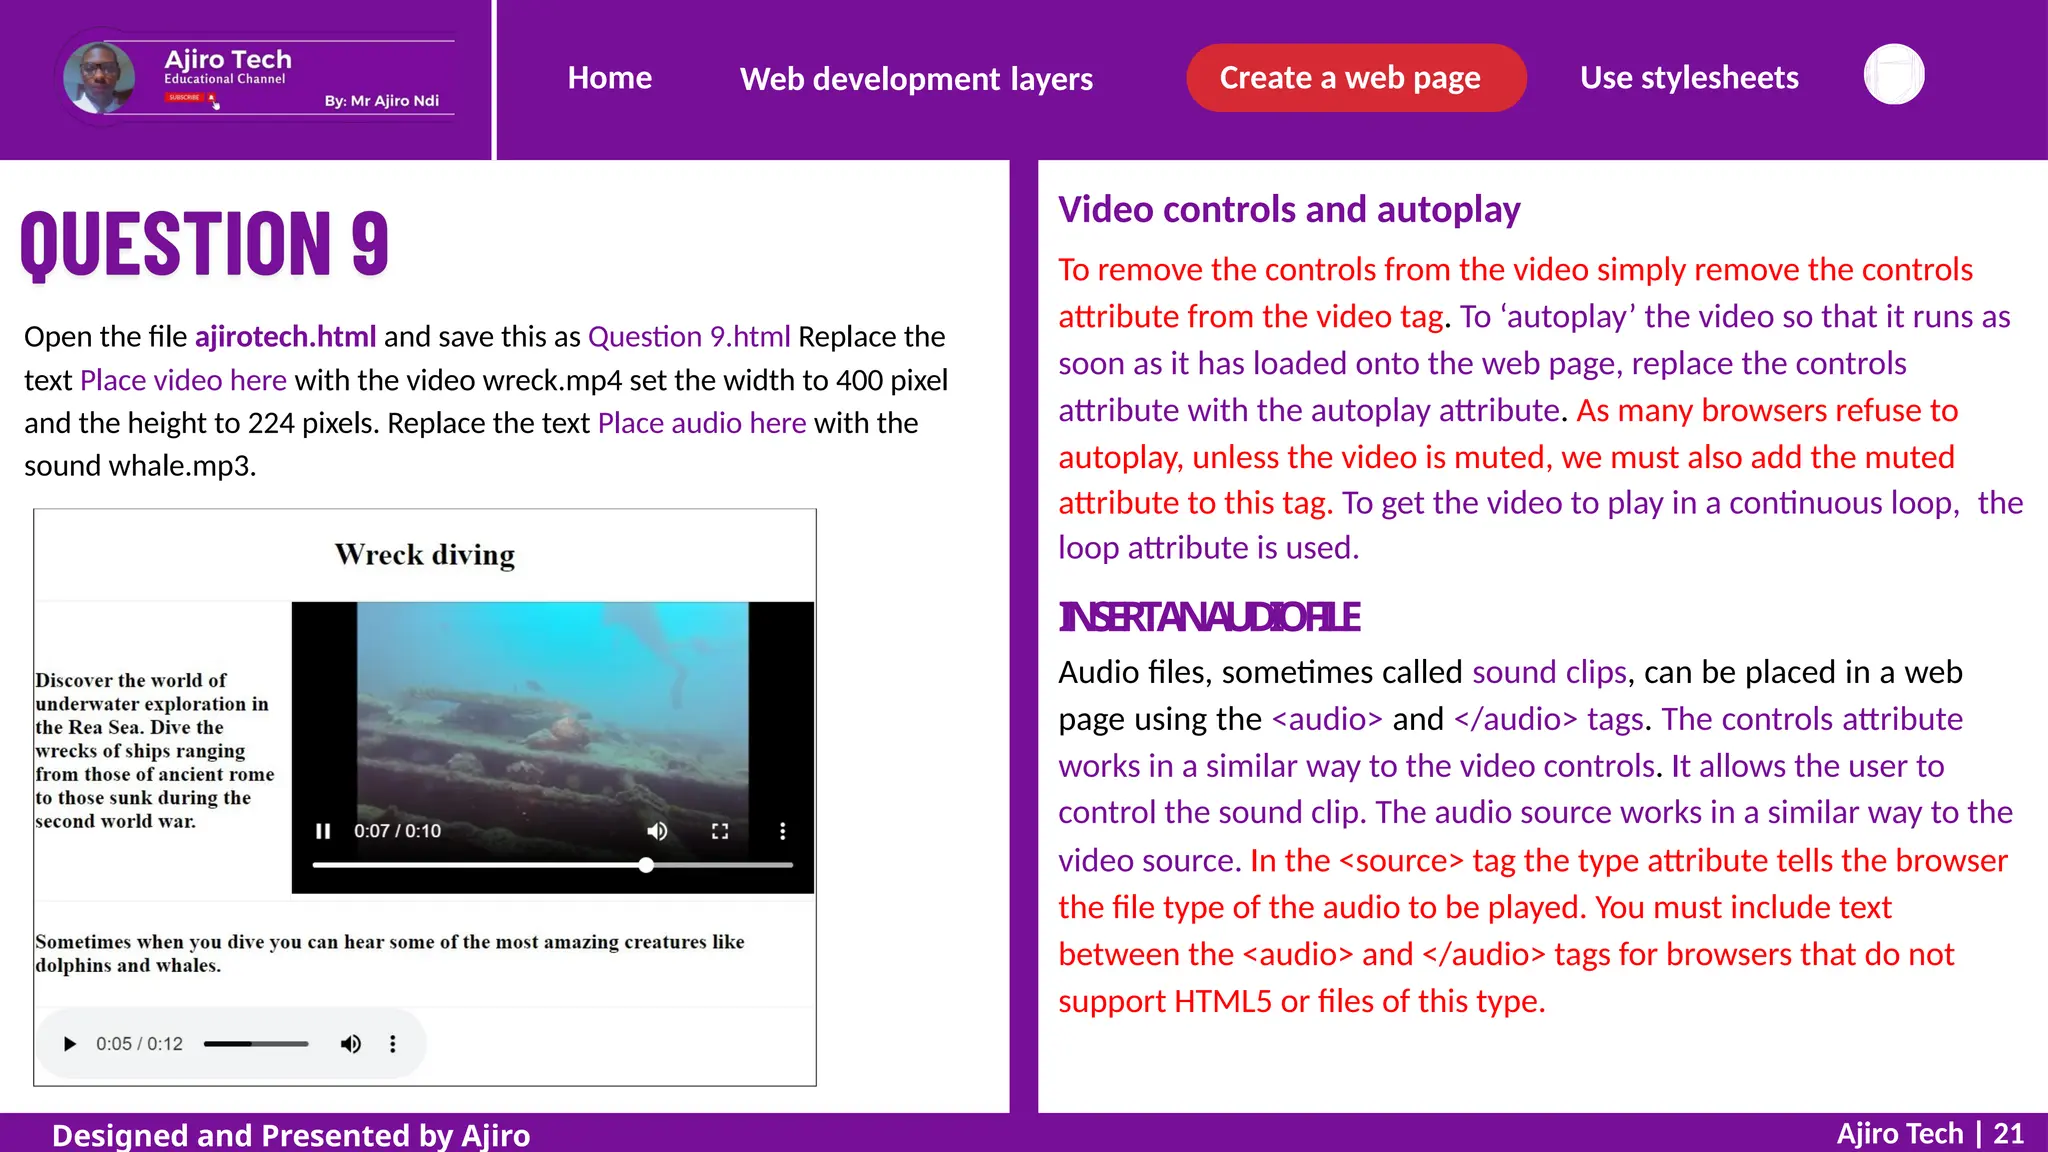
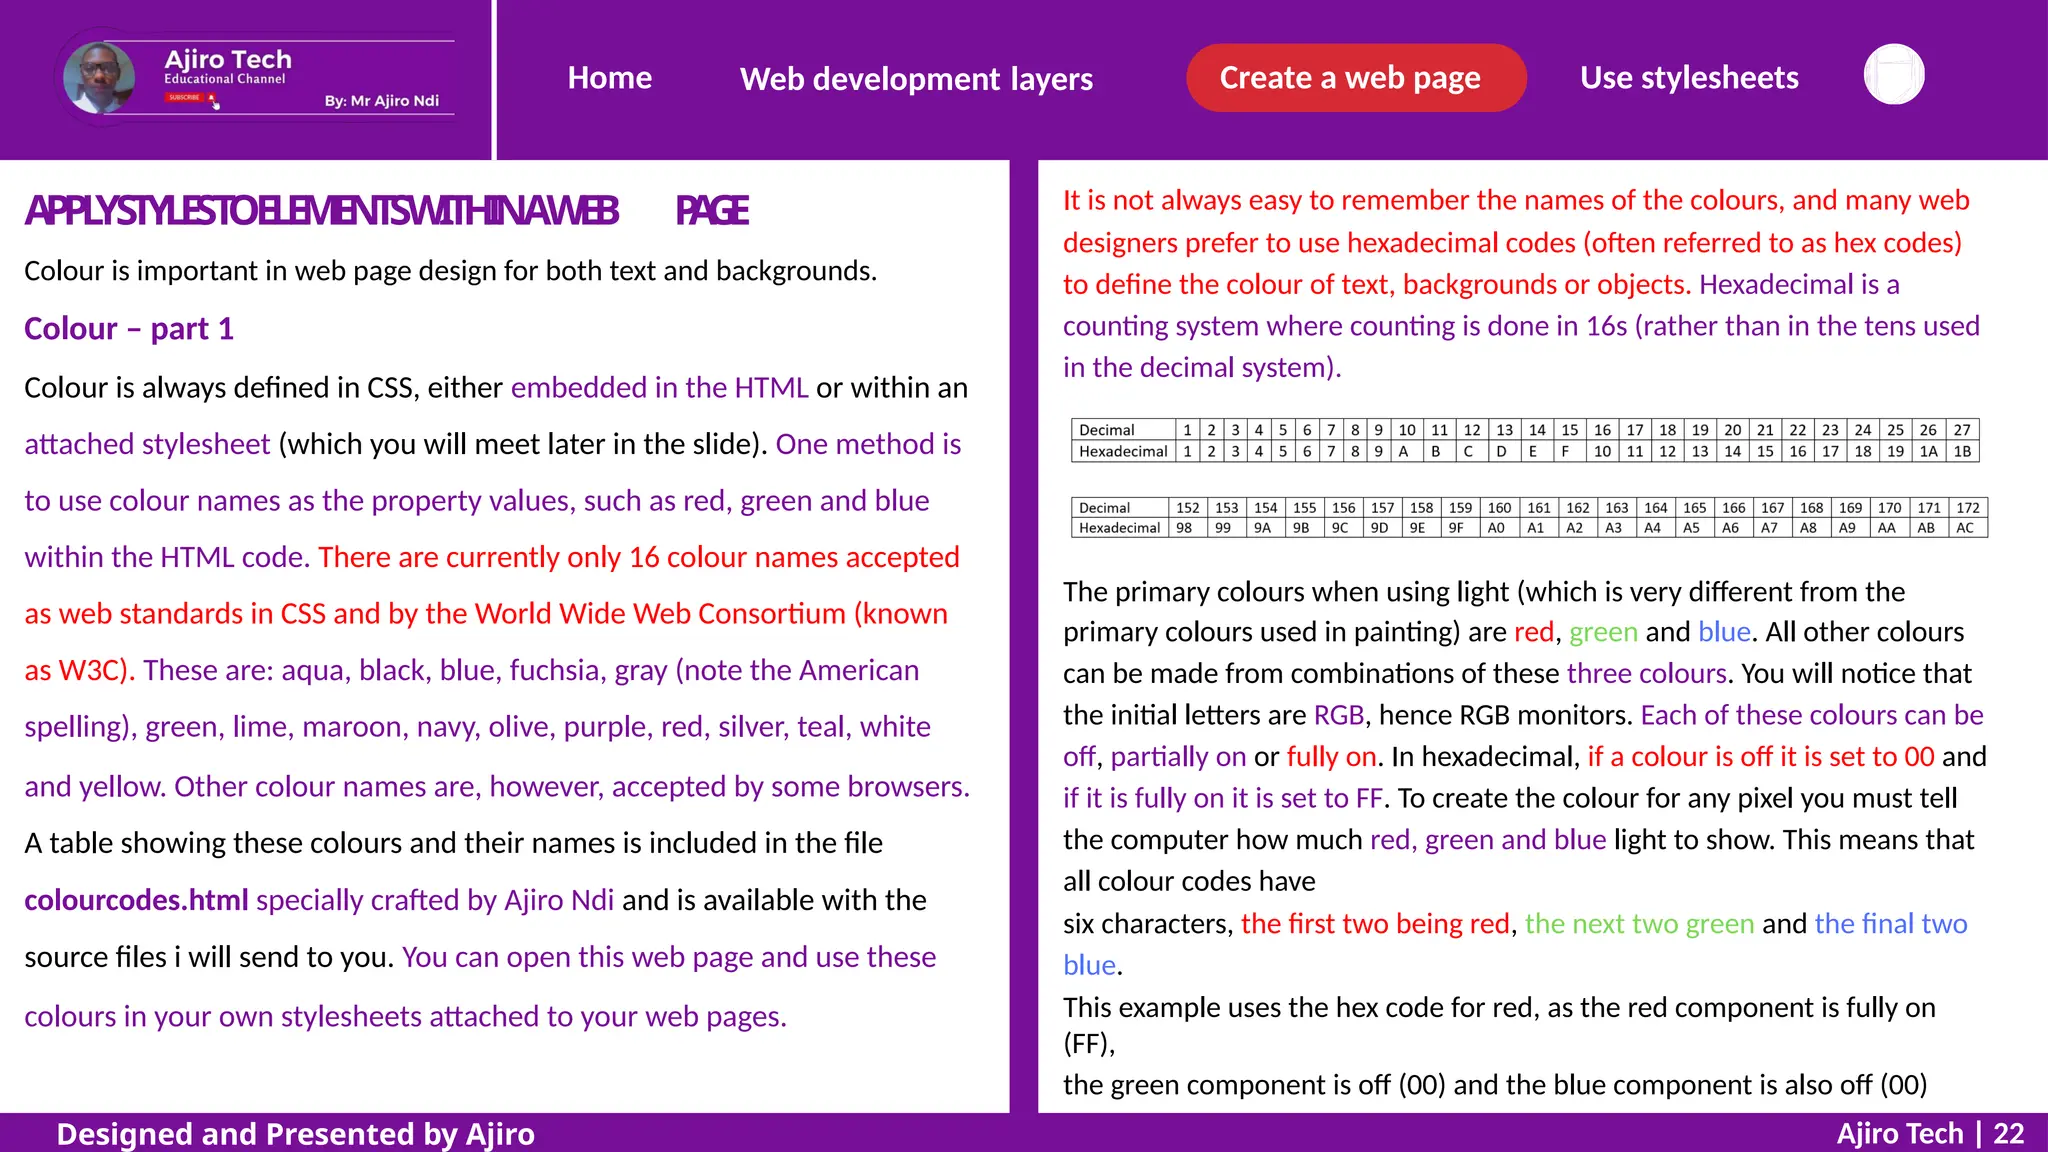
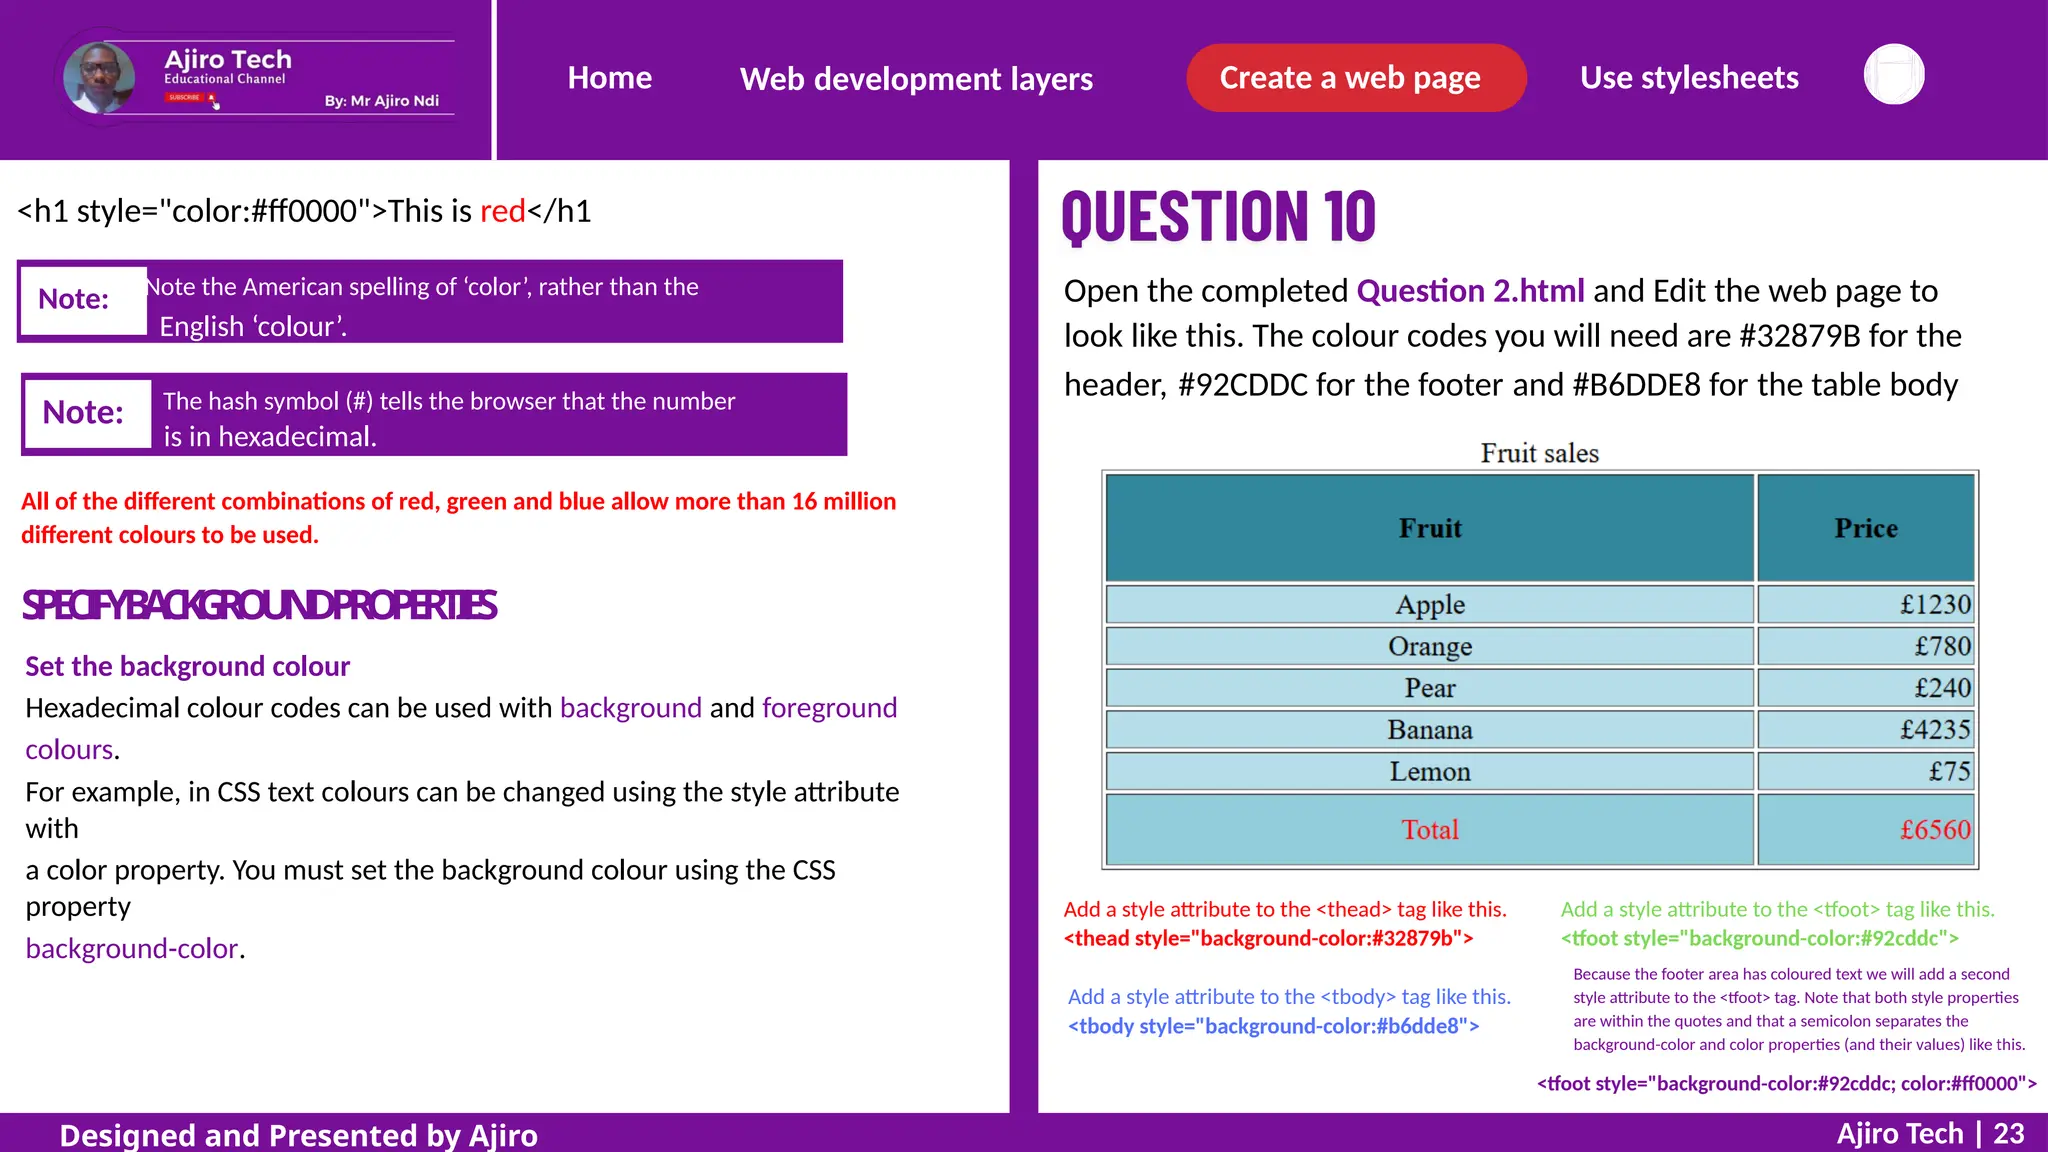
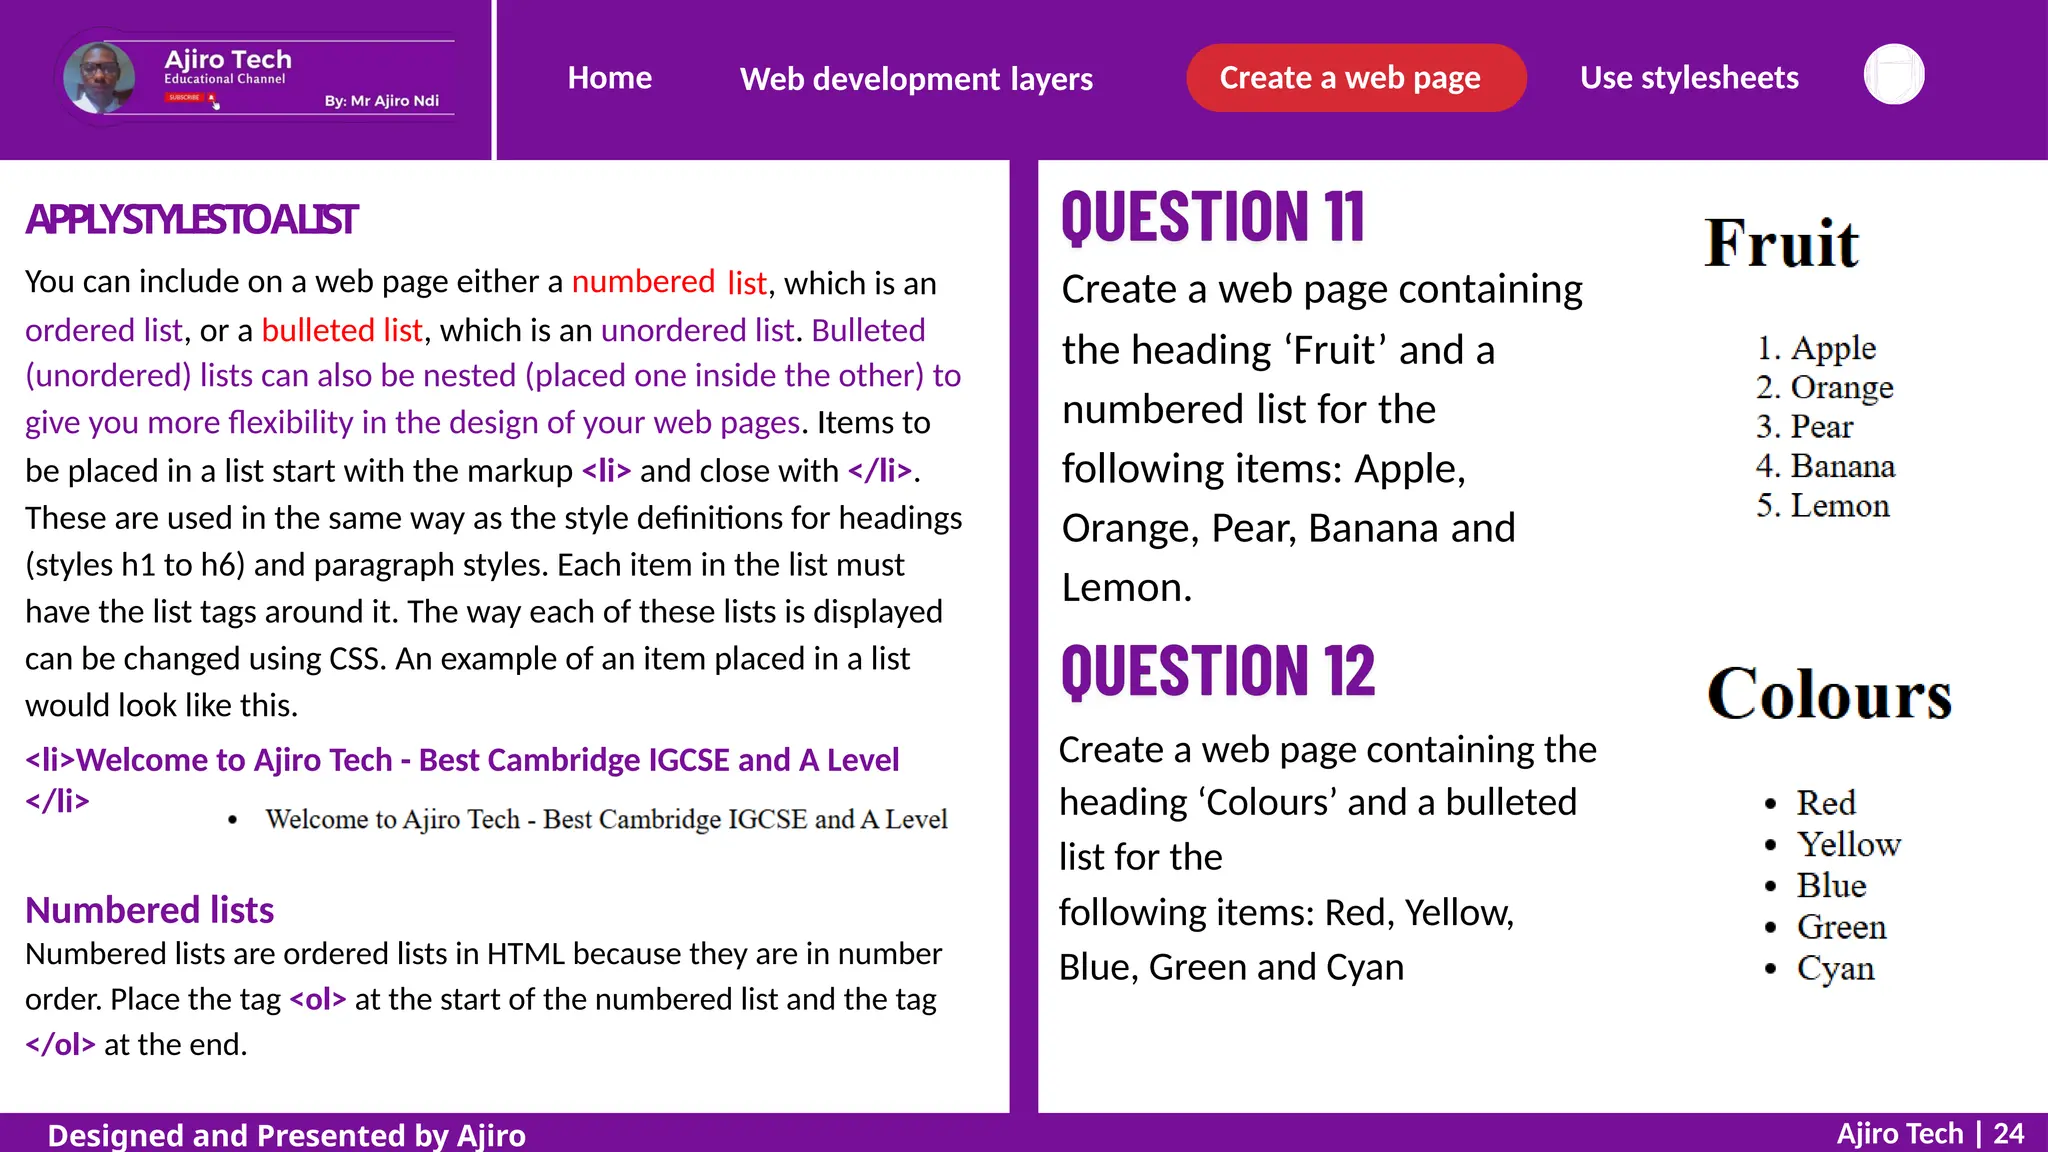
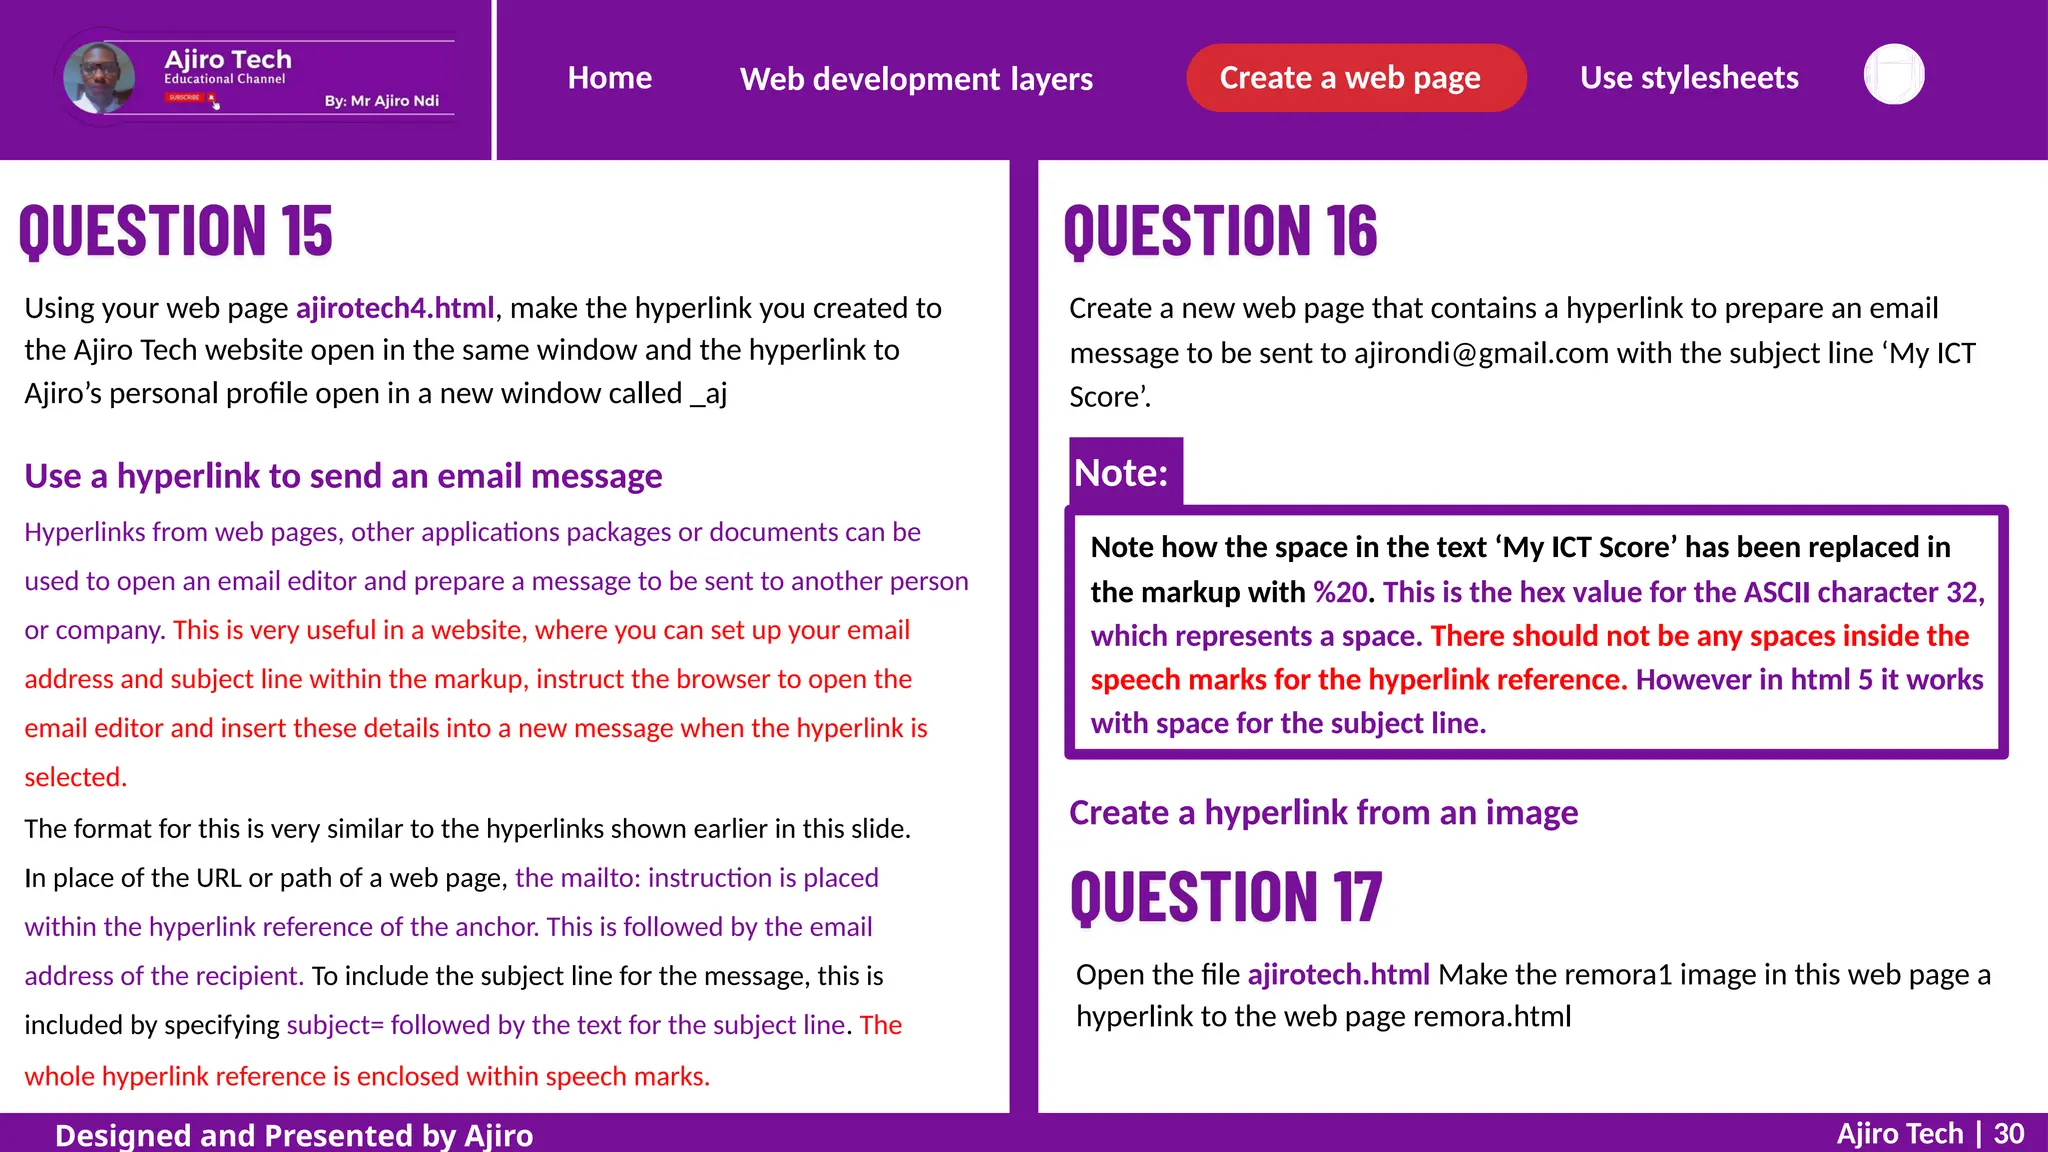
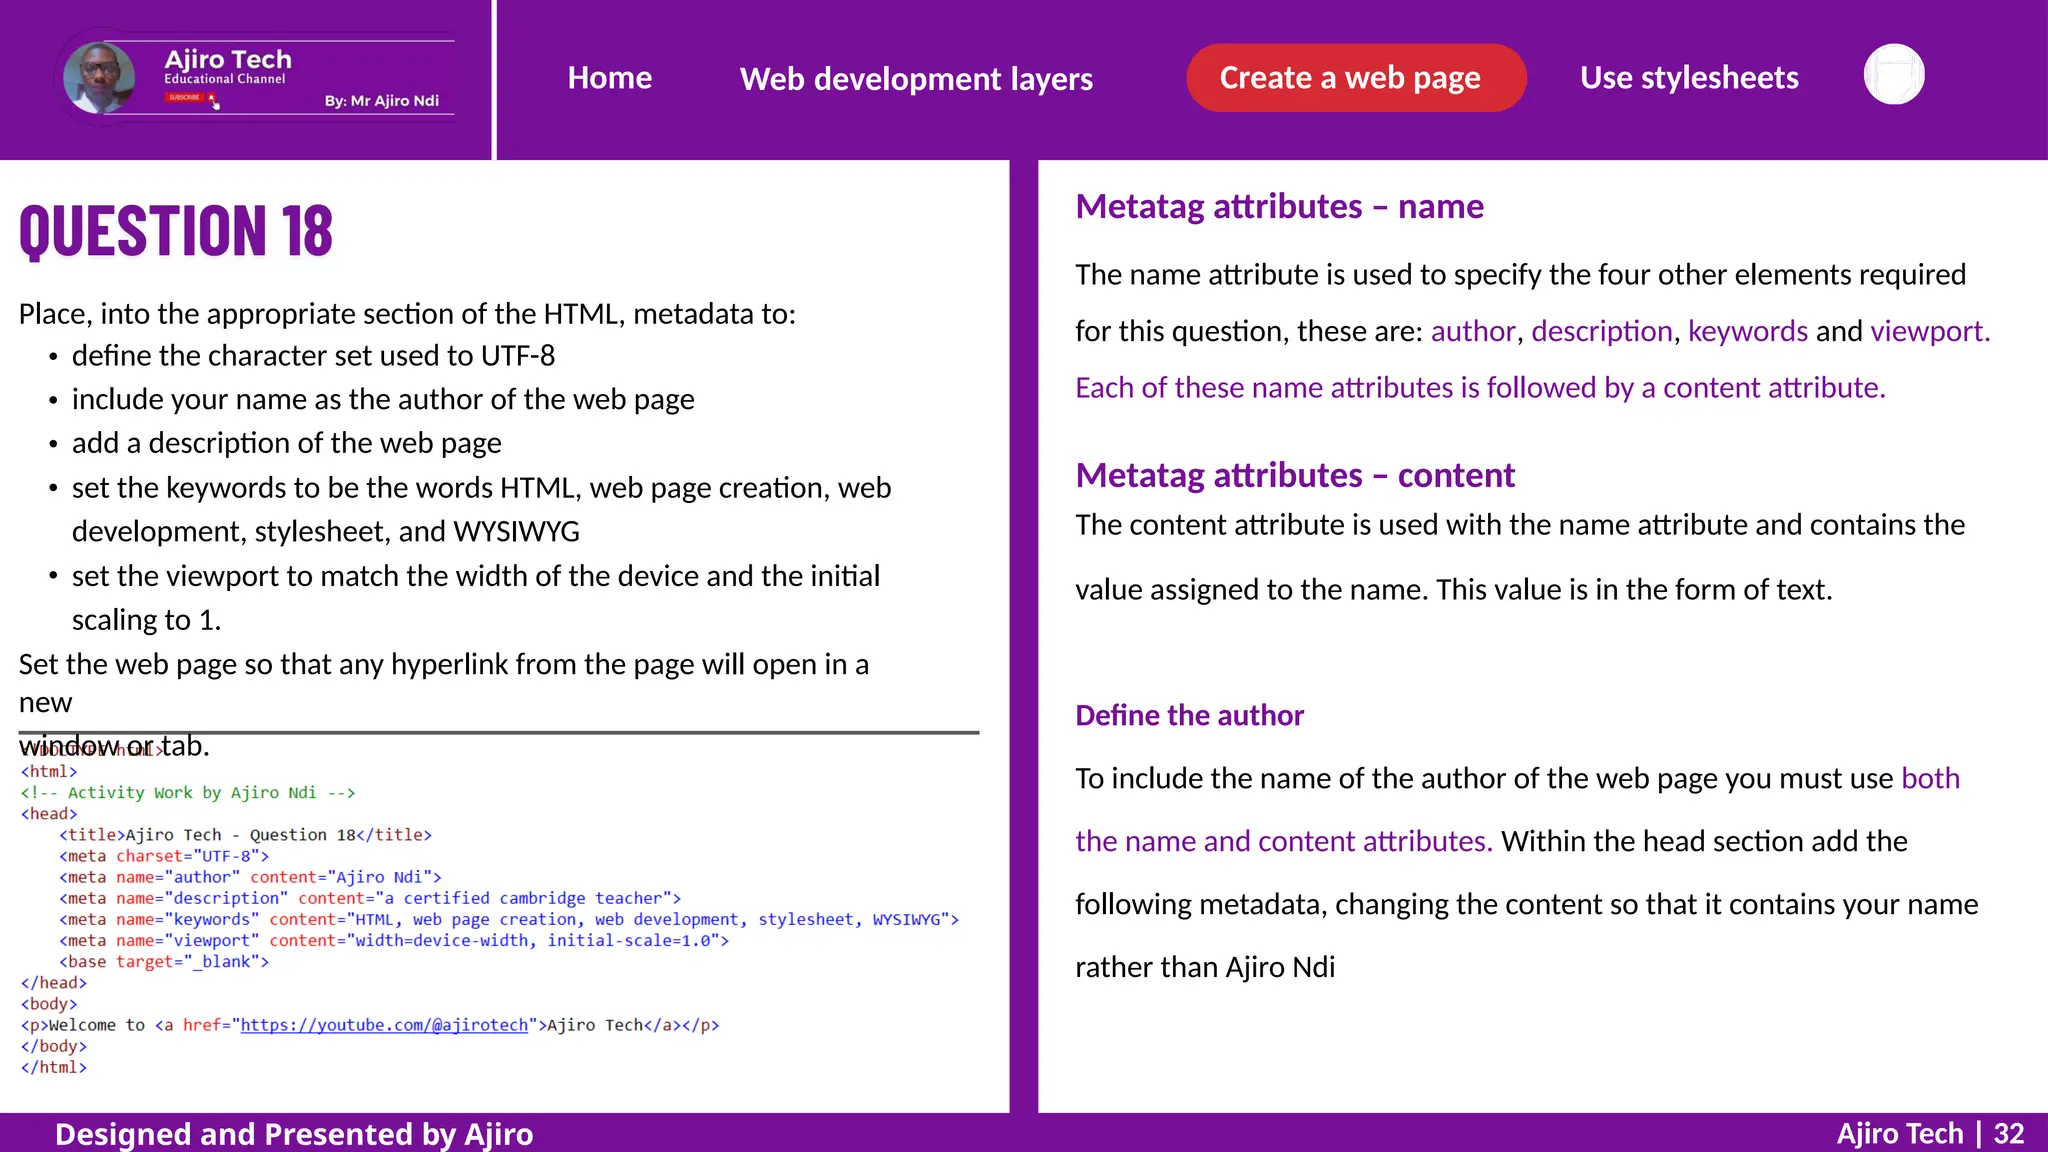
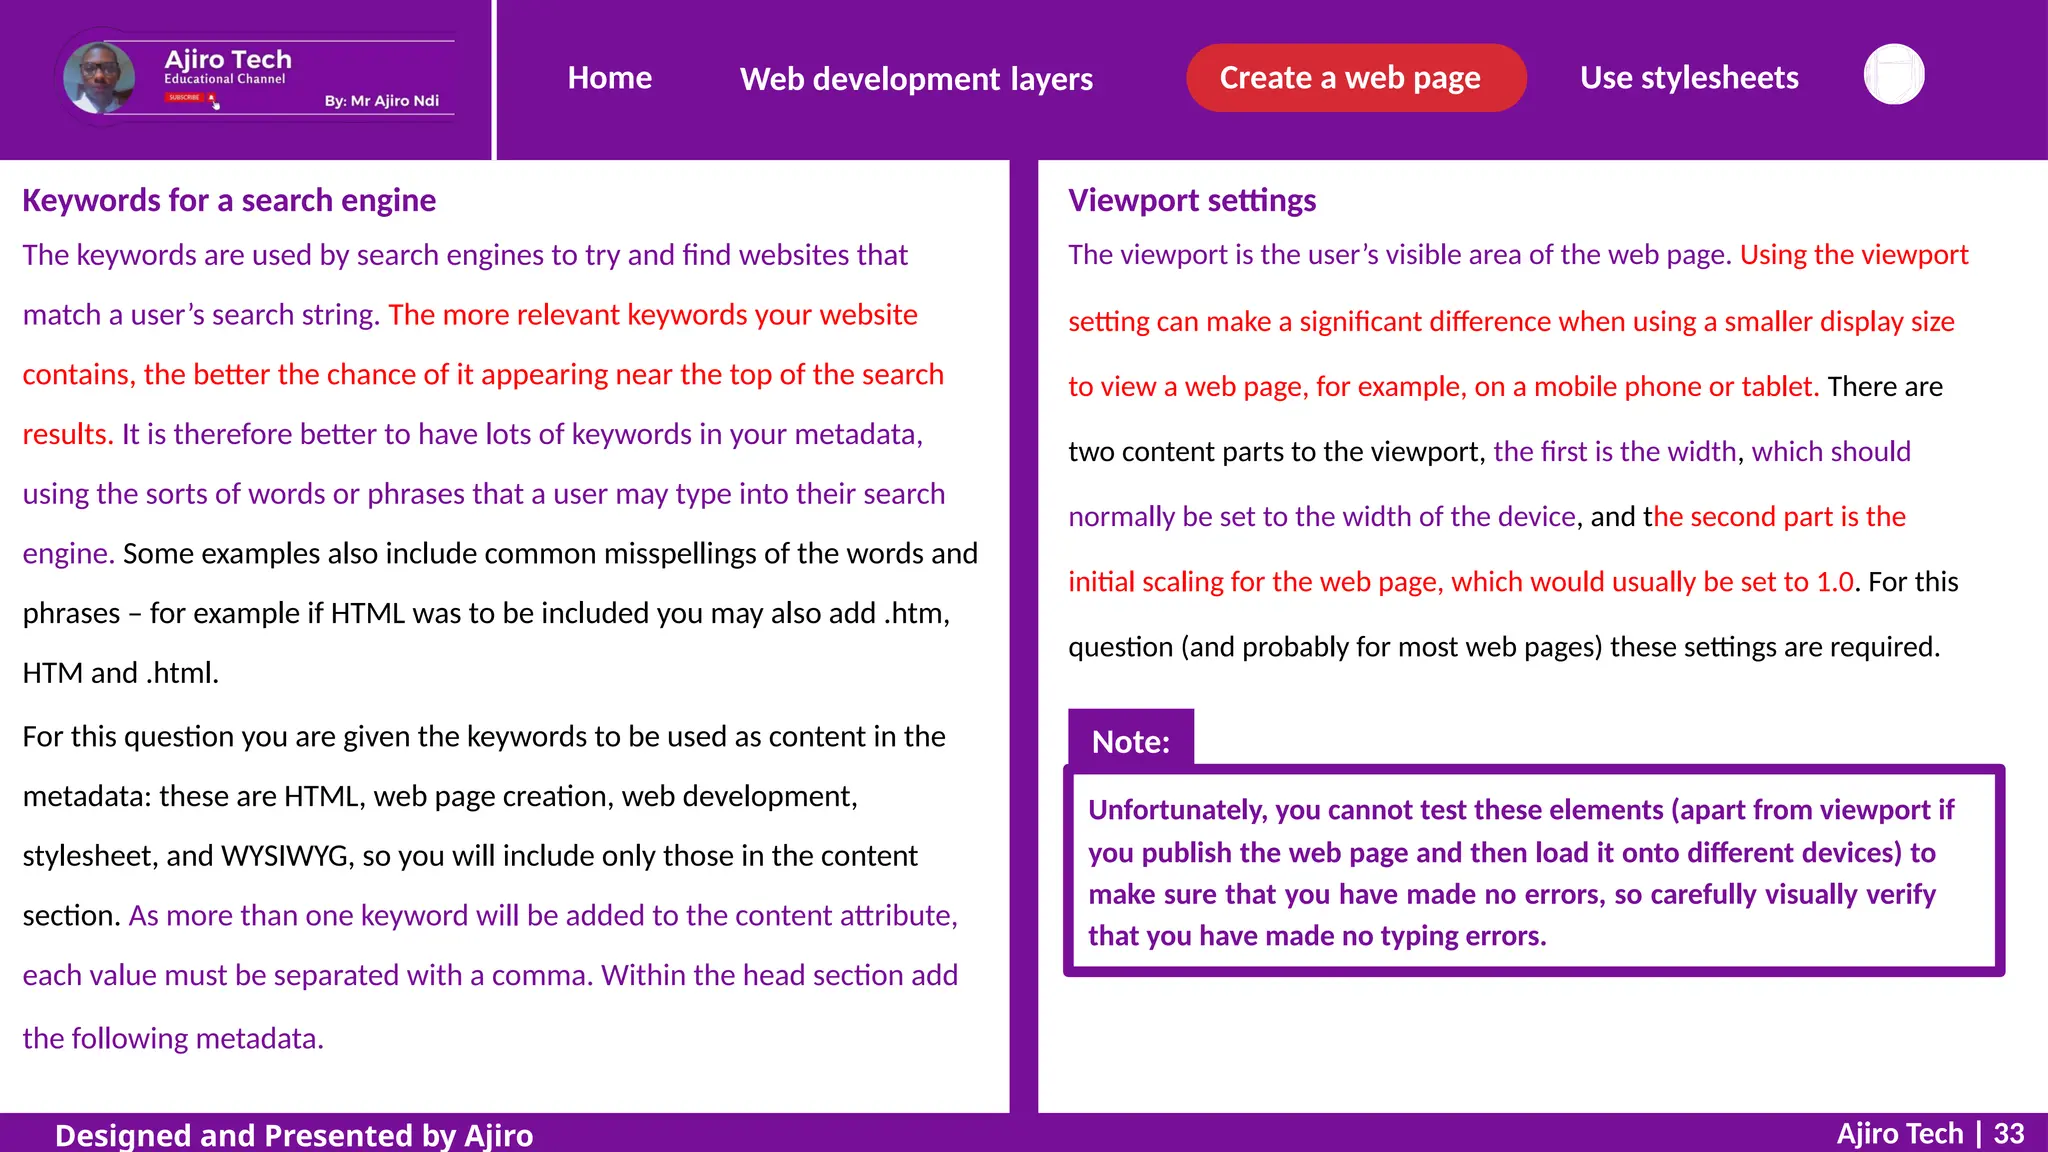
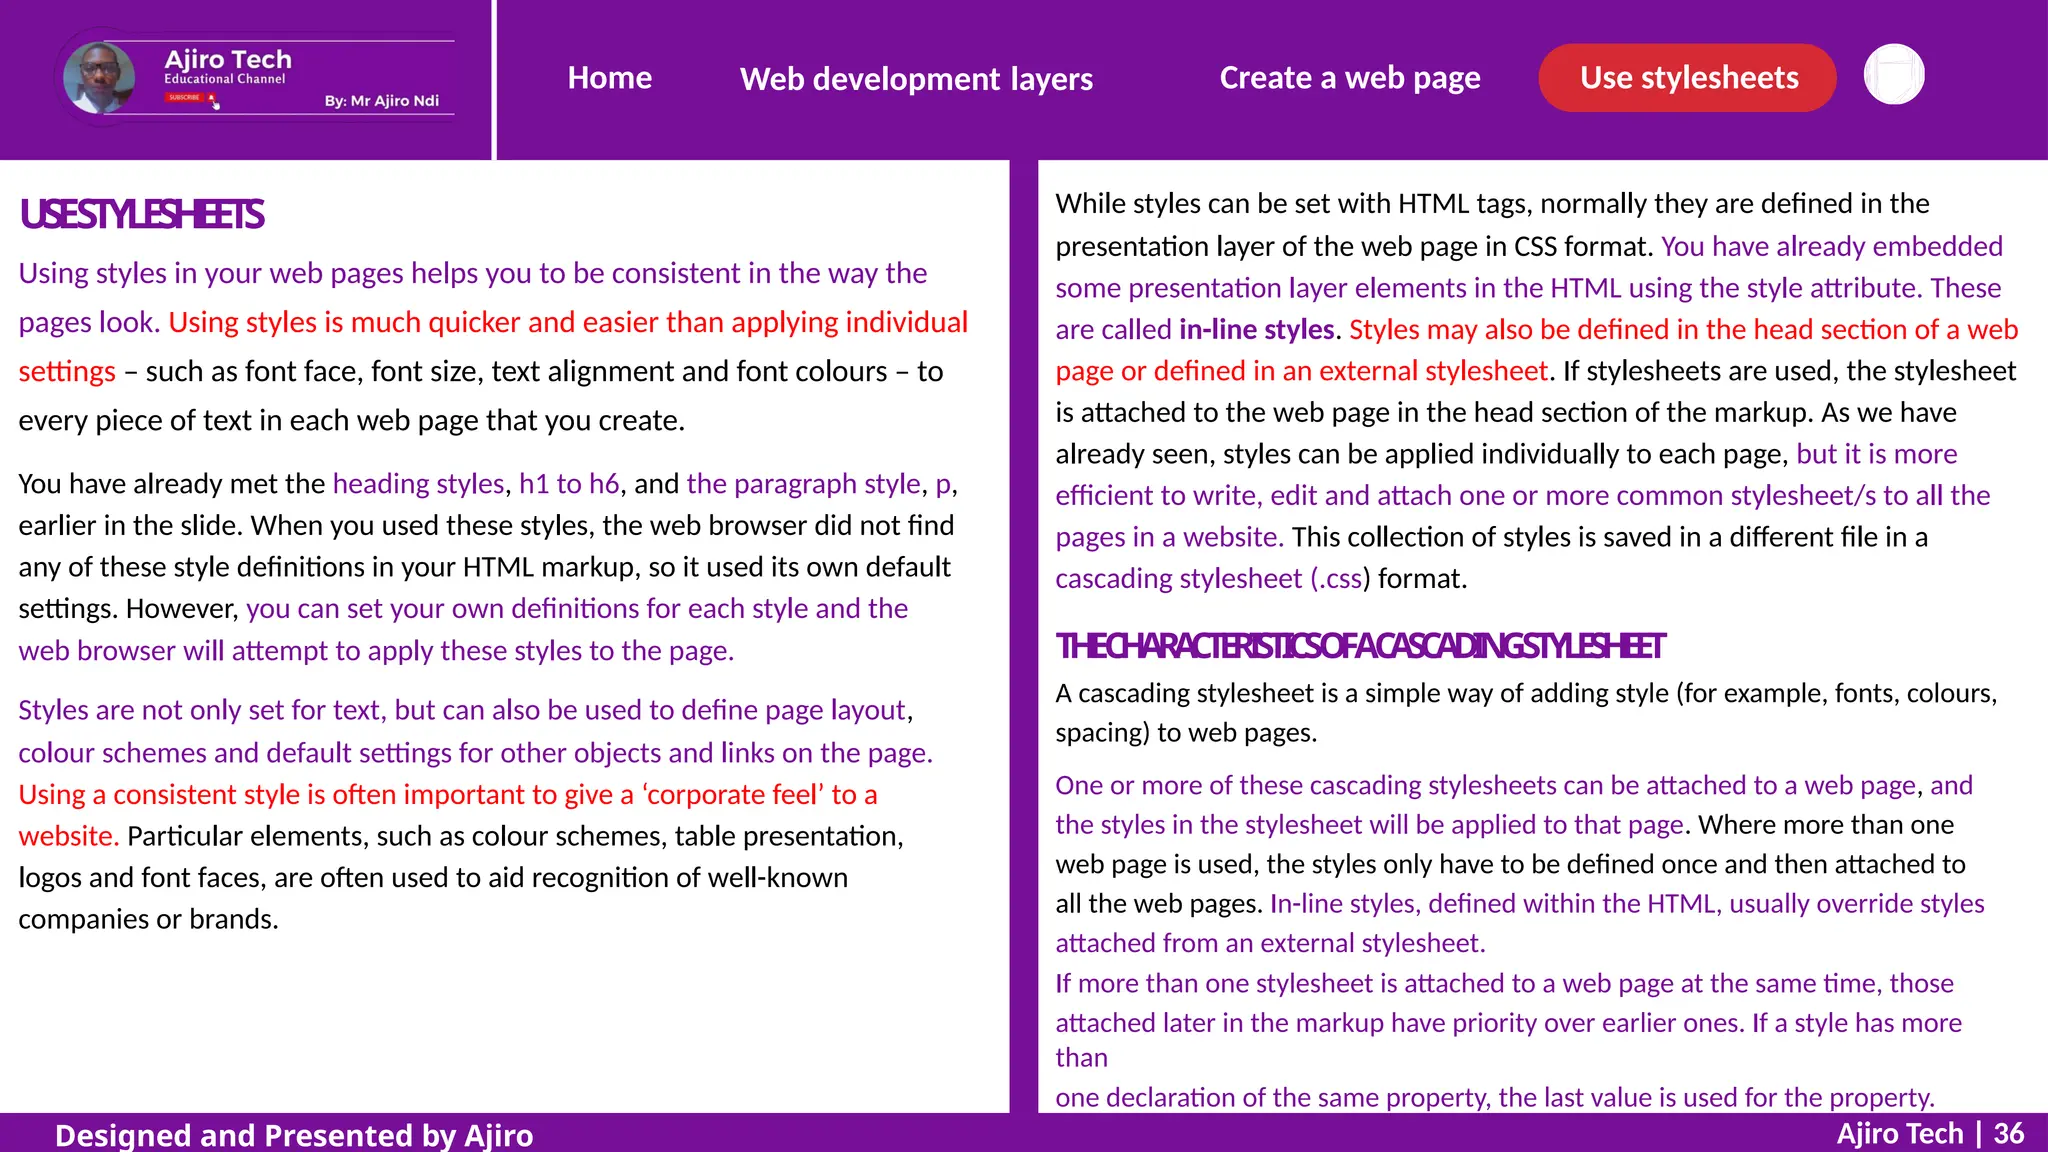
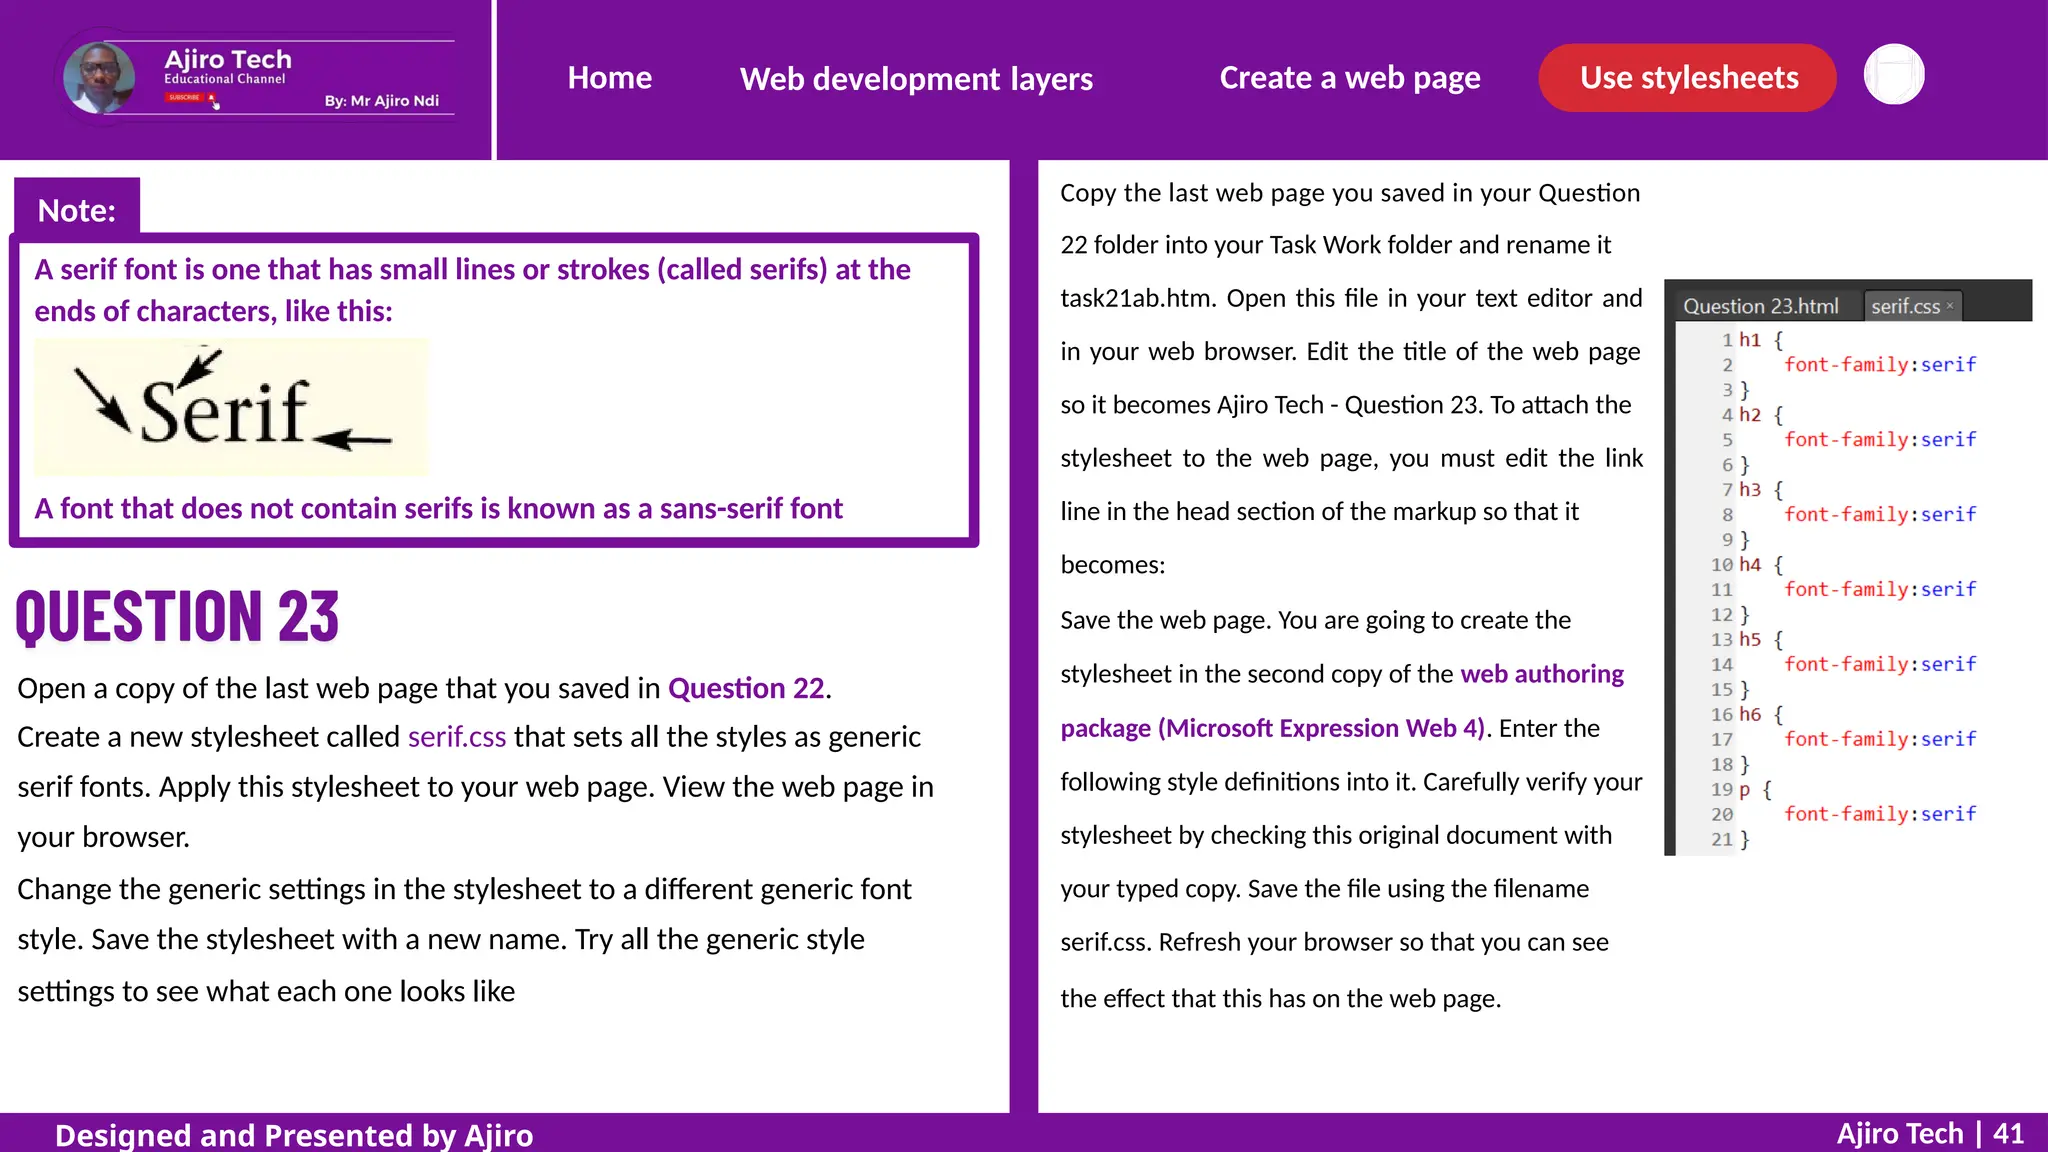
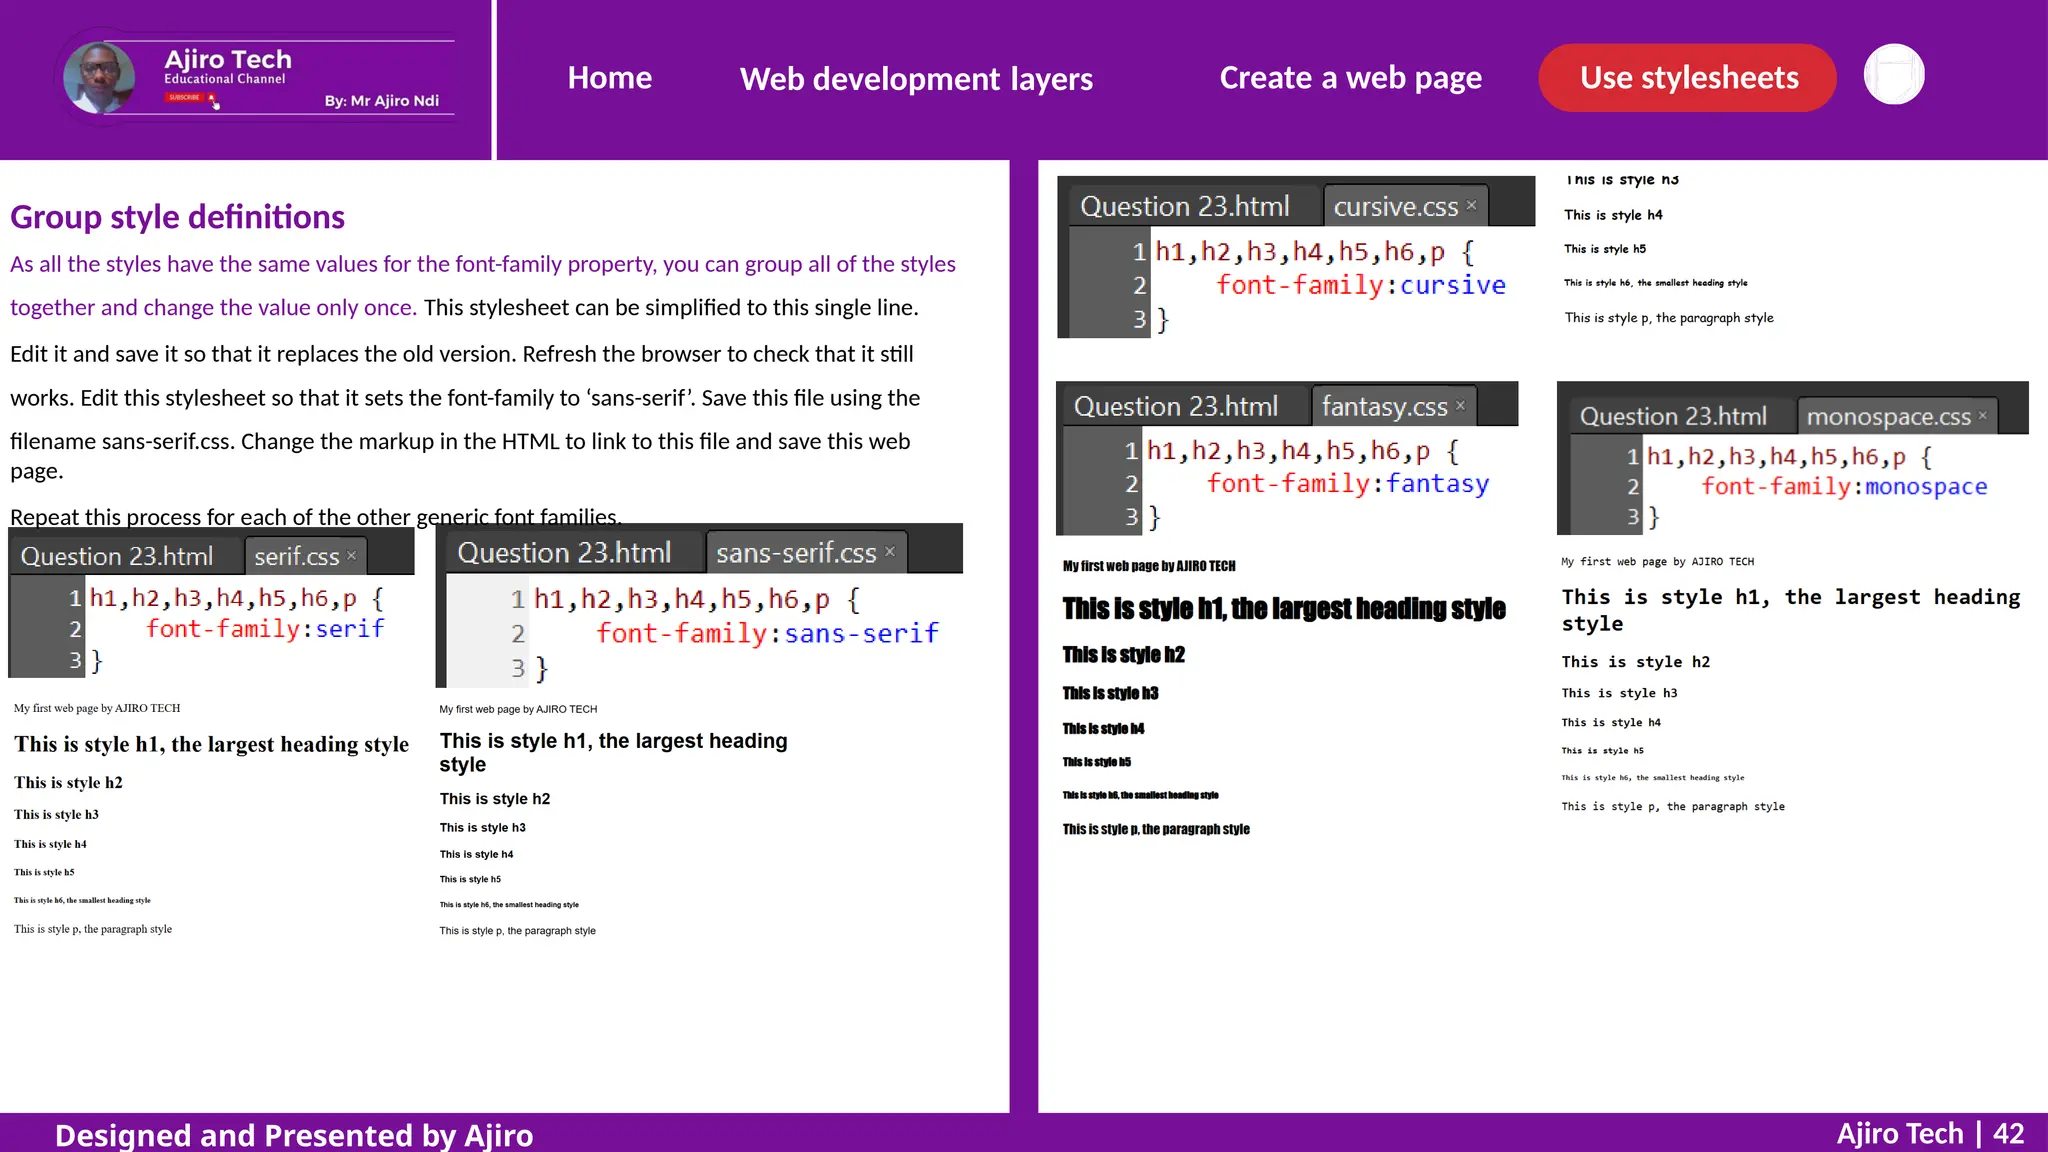
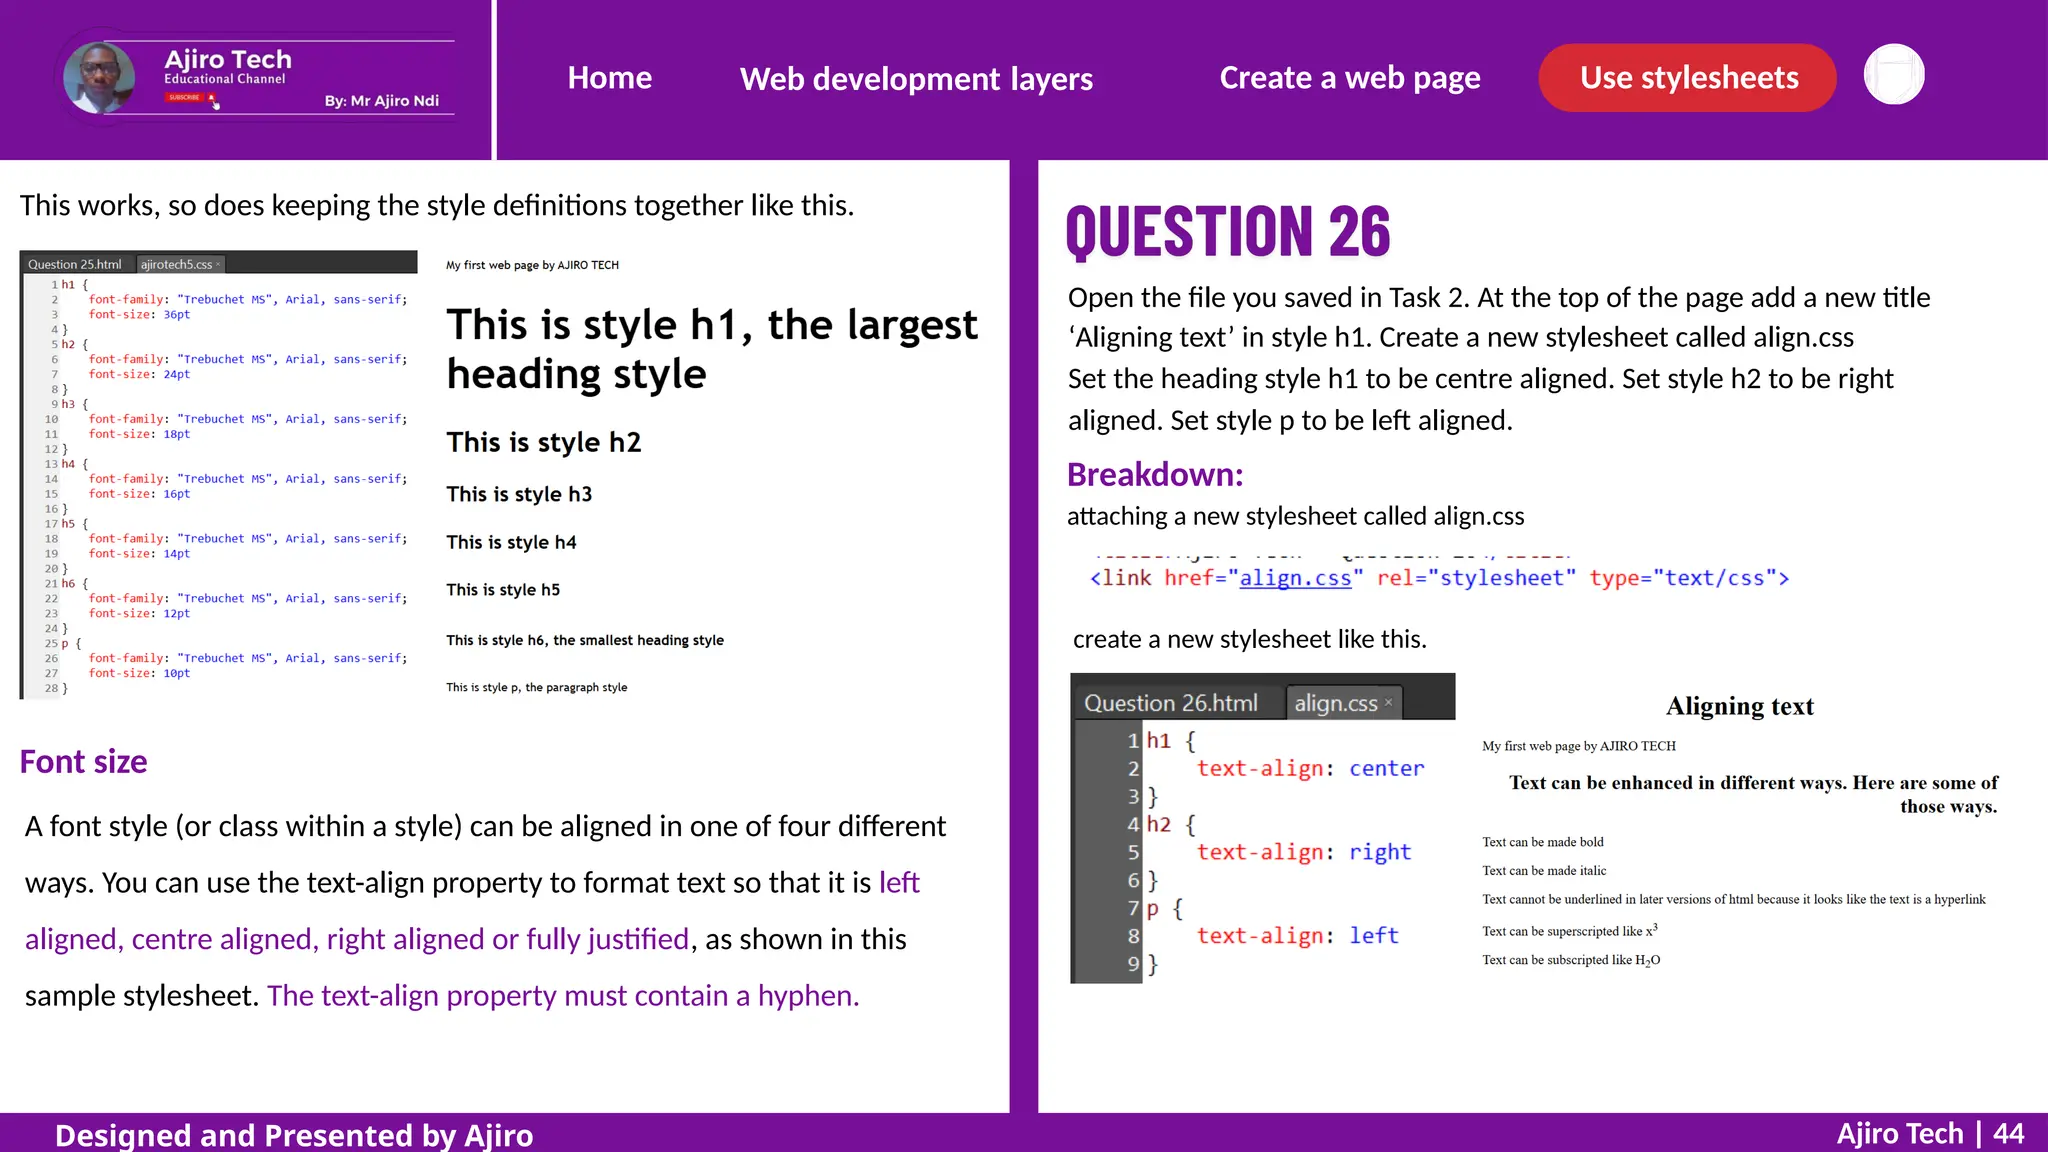
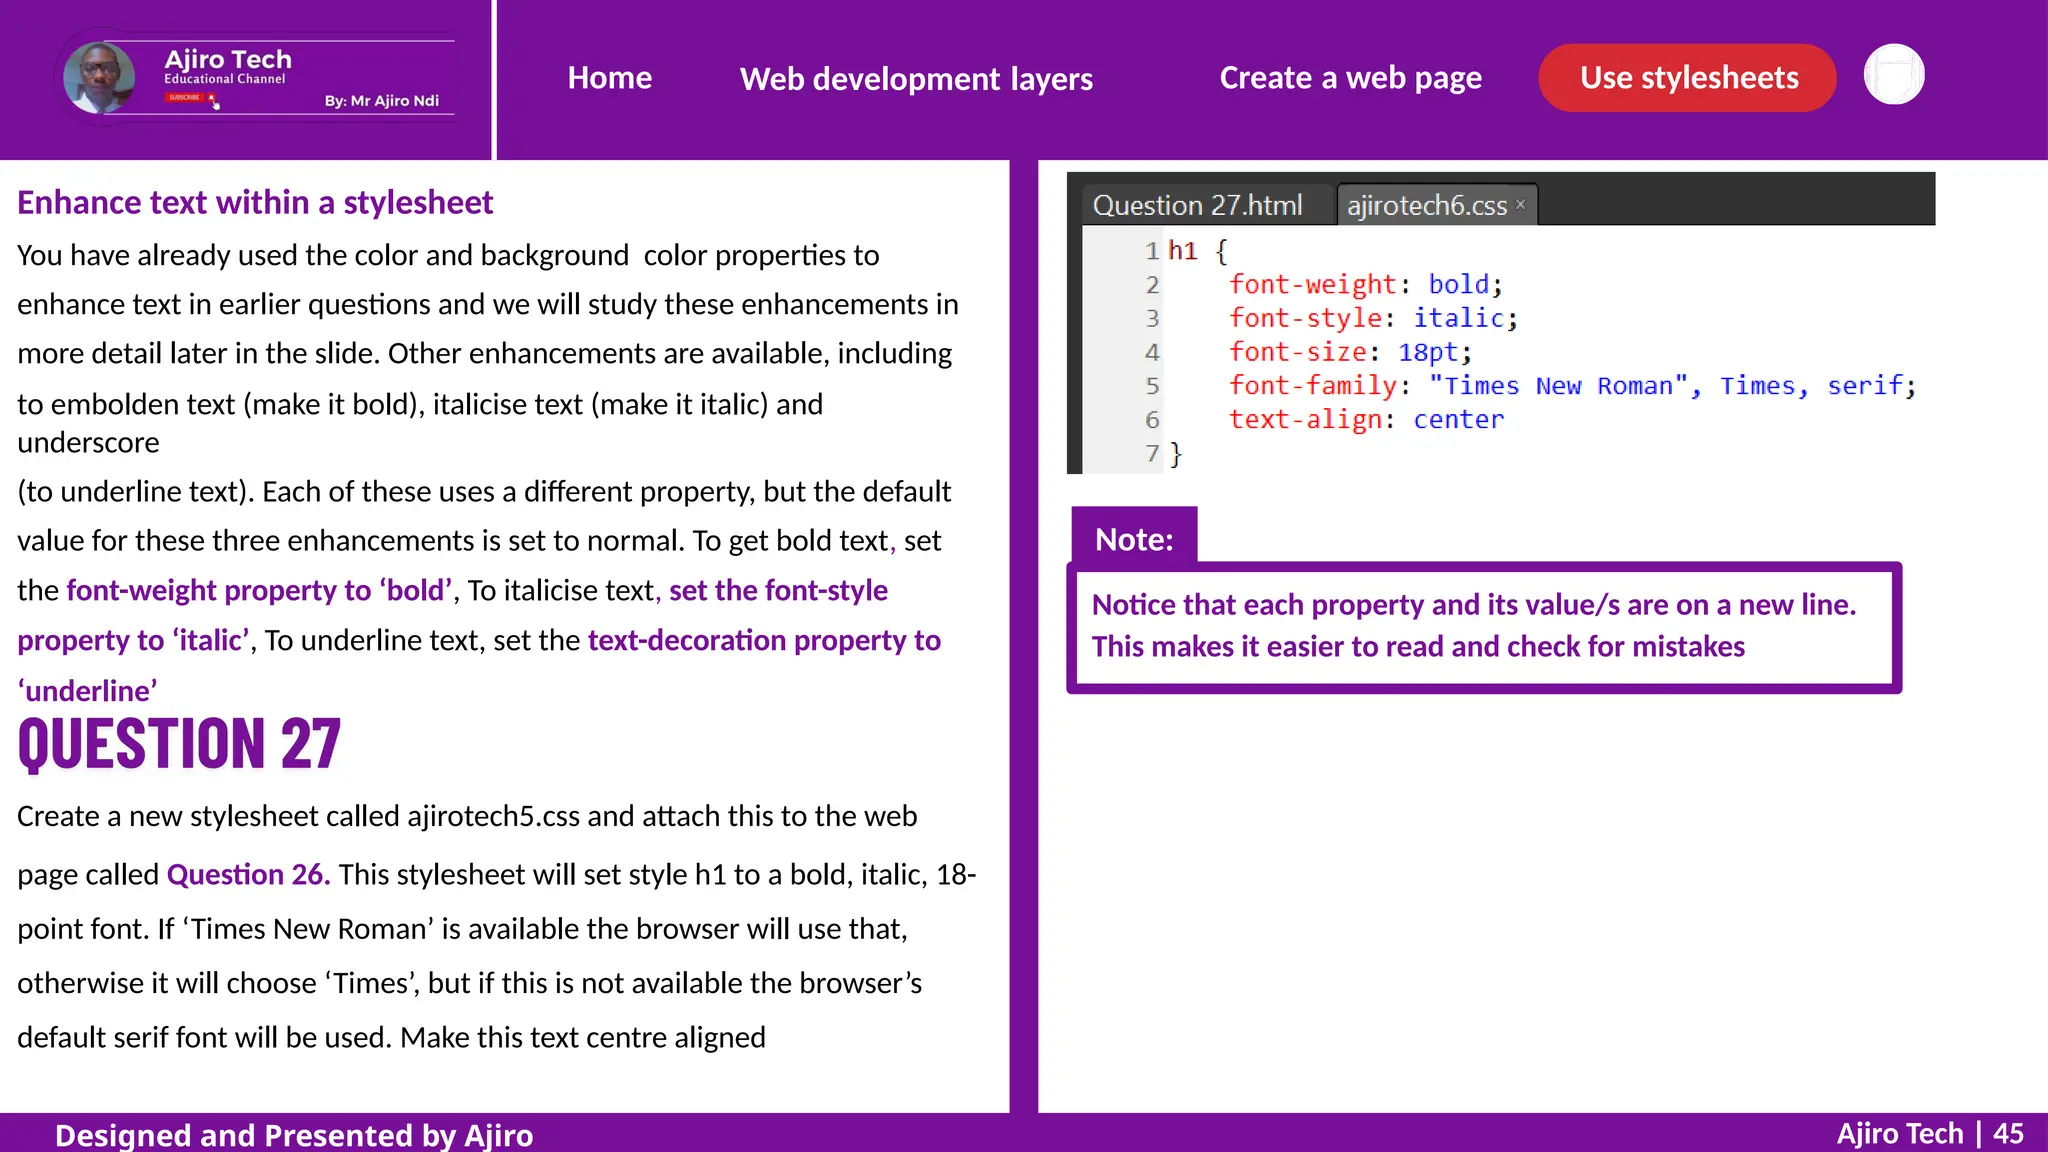
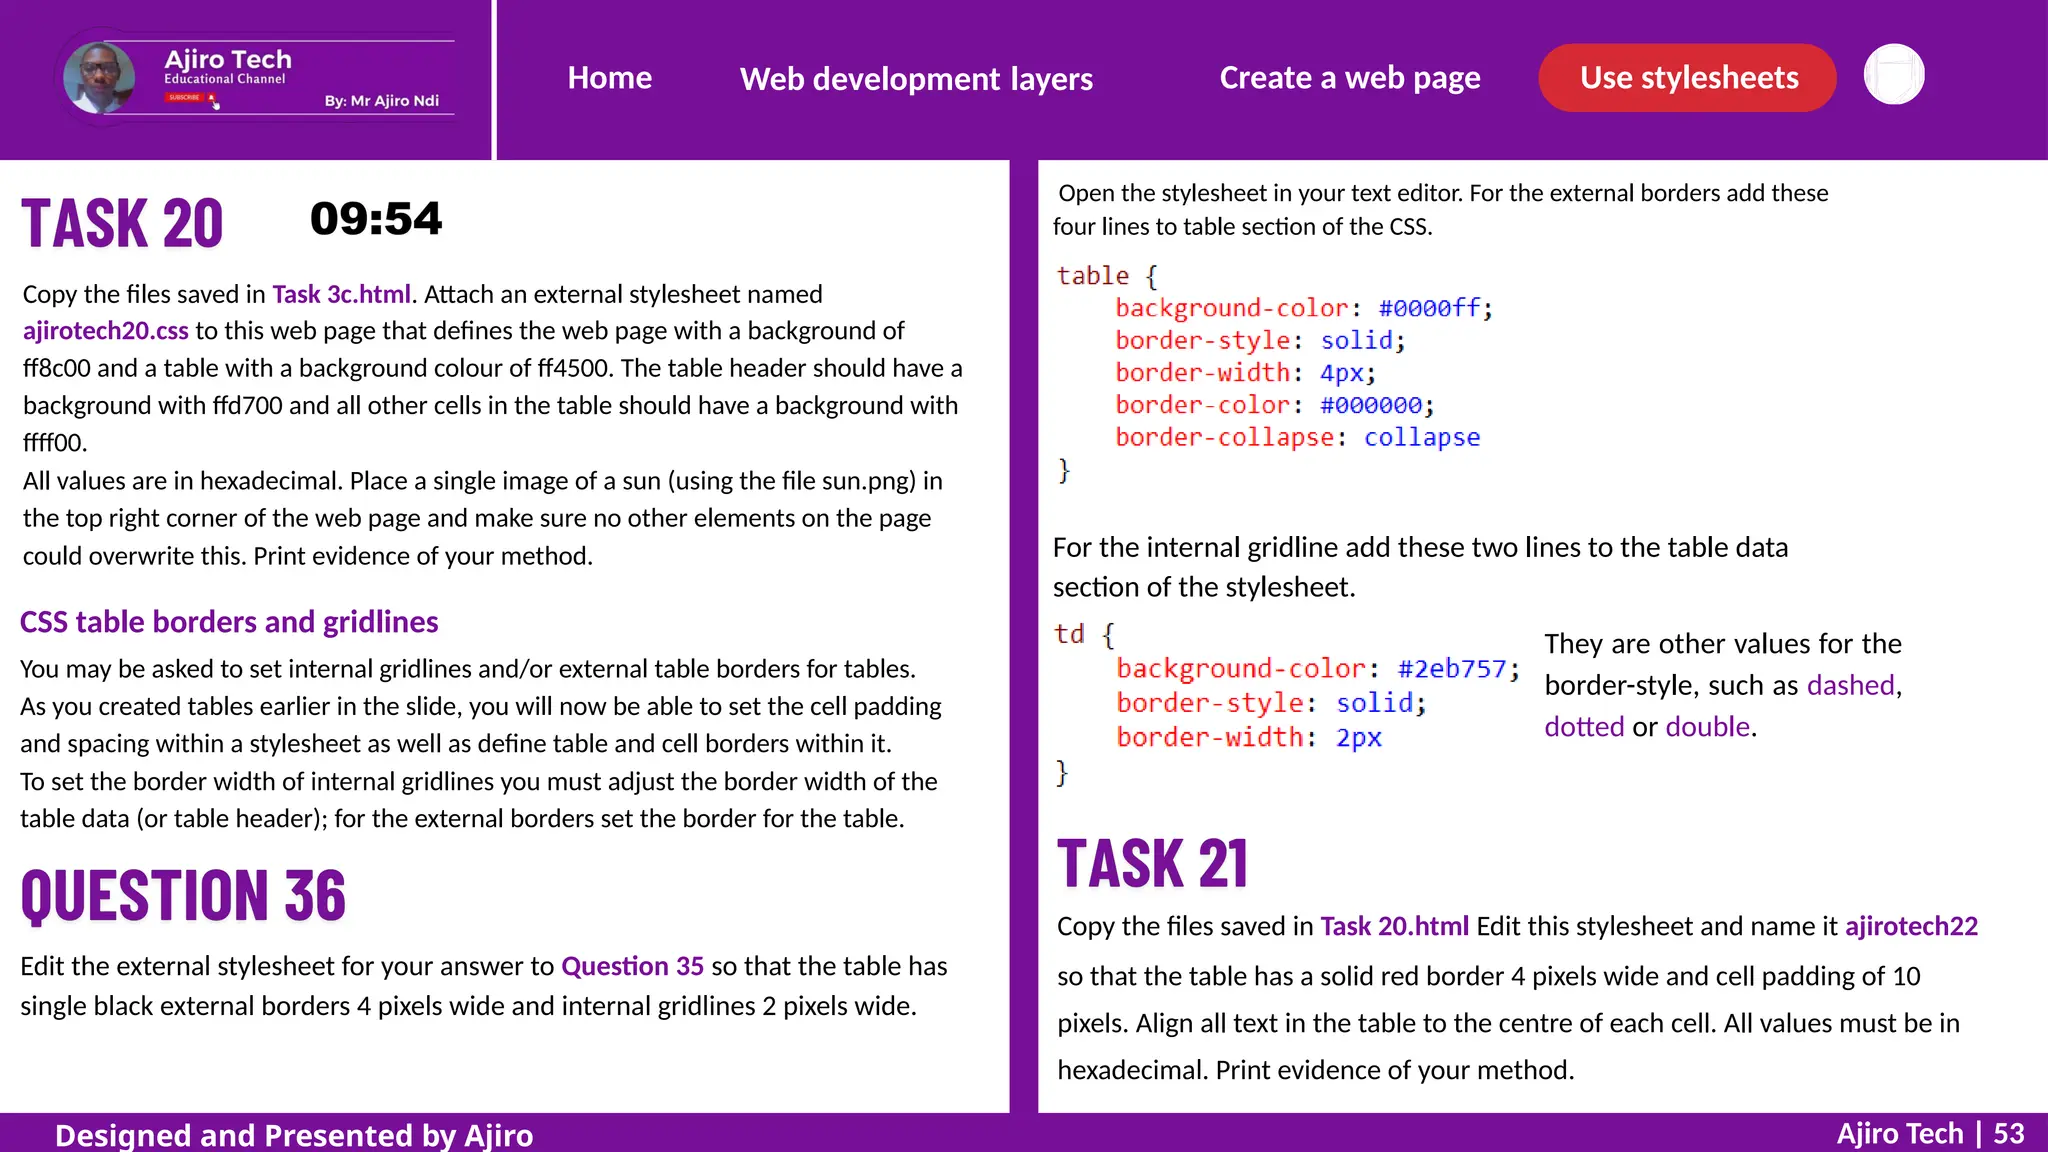
Home Create a web page Use stylesheets
Web development layers
WEBSITE
AUTHORING
Designed by Ajiro Ndi
Year 10 Term 1 - Week 9 to 10
Home Create a web page Use stylesheets
Web development layers
A web page is created using three layers. Each
of these layers has a different purpose in the
development of a web page. These are:
The Content Layer
The Presentation Layer
The Behaviour Layer
Designed and Presented by Ajiro Ndi Ajiro
Home Create a web page Use stylesheets
Web development layers
Designed and Presented by Ajiro Ndi Ajiro
THEBEHAVIOURLAYER
This layer is where all actions, such as controlling elements (except hyperlinks),
on a web page are created. These are usually created using scripting languages
like JavaScript
WHATISCSS?
CSS is an abbreviation for cascading stylesheet, another
text-based language. Styles are created and added to web
pages. CSS can be written (embedded) into HTML but it is
usually created in a separate file saved with a .css file
extension.
I M P O R T A N T N O T I
C E
Files are written in HTML using a simple text
editor (or a web-authoring package such as
Adobe Dreamweaver or Microsoft Expression
Web). Files are written in text format and are
usually saved with an .htm (or .html) file
extension.
These files are recognised by web browsers such
as Microsoft Edge, Internet Explorer, Google
Chrome or Mozilla Firefox as web pages.
THEPRESENTATIONLAYER
This layer is where the visual impact of the web page is created and contains
the styles to be used, such as colour themes, fonts, etc. You will develop the
presentation layer of your web pages using CSS.
WHATISHTML?
HTML is an abbreviation for HyperText
Markup Language. It is a text-based
language used to develop the content layer
of websites.
THECONTENTLAYER
This layer is where the content of the web page, such as text and images, are
placed. It is also where the page structure, such as frames, tables, hyperlinks,
etc. are placed. This layer is sometimes called the structure layer. You will
develop the content/structure layer of your web pages in a language called
HTML.
WHATISAWEBSITE?
A website is a collection of individual but
related web pages that are often
stored together and hosted by a web server.
Web pages can include different objects
such as text, sound, video and still images.
Home Create a web page Use stylesheets
Web development layers
CREATE A WEB PAGE USETHECONTENTLAYERTOCREATEAWEBPAGESTRUCTURE
UseHTMLinthecontentlayer
HTML tags are shown using angle brackets around them like this: <html> The
angle brackets tell the browser that this is a markup tag and not text to be
placed on the web page. The browser does not display the HTML tags, but
uses them to display the content of the page. Most HTML commands have two
tags: one to open the command and one to close it. Each tag has a pair of angle
brackets around it.
All HTML web pages start with a <!DOCTYPE html> declaration and, although it
has angle brackets, it is not an HTML tag. This is always the first thing in your
markup. The <!DOCTYPE html> declaration is an instruction to the browser to
tell it that the page is written in HTML rather than another markup language.
The first tag that will usually appear in any web page will be <html>. This tag
tells the browser that the markup following this tag will be written in hypertext
markup language. The tag </html> tells the browser that this is the end of
this markup language and appears at the end of the markup. The forward slash
shows that it is a closing tag. All other HTML tags, and all web page content,
will
appear between these tags.
A good technique for working on web pages is to tile four
windows on the screen at the same time: ‘tile’ means to fit
them side by side like tiles. Whenever you do any work in
HTML and CSS,
a text editor, a
it is recommended that you open two copies of
web browser and a list of your files in their
storage folder.
with the exception of the DOCTYPE statement, all text in HTML tags
should be in lower case.
Ajiro Tech | 4
Designed and Presented by Ajiro
Note:
Home Create a web page Use stylesheets
Web development layers
THE HEAD AN
D
BODY SECTIONS OF A WEB PAGE
Each web page has two clearly defined sections: the head and the body
The body section
The body section starts with
<body> and closes with
</body> and objects
between these tags are
The head section
The head section starts with
<head> and closes with
</head>. Objects between
these tags are not usually
displayed by the web
browser.
In simple terms, markup in
HTML (HyperText Markup
Language) is the set of tags
and
attributes you use to
structure
and format content on a
webpage.
usually
page.
displayed in the web
Add comments to your HTML markup
Comments can be added to your markup if there are notes that you wish to
make but not display on the web page. This is very useful for making sure
that your name, Centre number and candidate number are on every web
page, even if you are not instructed to display them. Comments start with
<!-- and end with -->.
As the comments do not affect the markup, they can be placed in the
head or body sections and before or after any tags.
Only a few tags are universally accepted within the head section of a
web page; these are: <base>, <link>, <meta>, <title>, <style> and
<script>. The head section should always contain a title. This is the
name displayed in the browser toolbar. It is the page title used if a
page is added to your ‘favorites’ in your browser and is the title
displayed in search engine results.
Ajiro Tech | 5
Designed and Presented by Ajiro
Home Create a web page Use stylesheets
Web development layers
APPLYTAGSTOTEXTINTHECONTENTLAYER
PRE-DEFINEDSTYLES
TODISPLAY
Createandsaveanewwebpageshowingparagraphandheadingstyles.
Type the following markup into your web authoring package, replacing AJIRO TECH
with your name. Add a comment after the html tag Markup created on 22/09/2024
Always remember to add your name, centre number and candidate number to all of
your printouts.
Text is organised into paragraphs, with the paragraph style
applied. Headings usually have different styles to the
paragraph style. All text added to a web page should have a
tag telling the browser what text style should be applied.
There are a number of predefined styles available for use in a
web page. The normal paragraph style is obtained using <p>
and ended with </p>. Likewise, six heading styles are
available and are defined with the style names <h1> to <h6>.
Each item in a bulleted or numbered list can be defined
the <li> tag and finished with </li>
with
error may cause the web page not to function as expected.
the page, but not in the HTML tags.
Ajiro Tech | 6
Designed and Presented by Ajiro
Note 2: It is acceptable to use capital letters in the text that is displayed on
Note 1: It is essential that the text is typed exactly as shown. One typing
Home Create a web page Use stylesheets
Web development layers
P
L
A
C
EA
P
P
R
O
P
R
I
A
T
EC
O
N
T
E
N
TI
NT
H
EB
O
D
YS
E
C
T
I
O
N
There are different ways of placing appropriate content in the body section of a web page. Usually this is
completed when the structure of the web page has been created, and we will use different methods later in
the course. It is also important to add enhancements like superscript and subscript to text in a web
page should this be appropriate.
Superscript and subscript
Move the cursor into the text editor window and make the following changes to the markup:
Replace Graham Brown with your name.
Place the tags <sup> and </sup> around the number ‘3’.
Place the tags <sub> and </sub> around the number ‘2’
You may notice that all text within the head and body sections is indented to make it easier to
identify where each starts and finishes.
Print web pages
From time to time, you will be required to print
different views of your web pages. You must ensure
that your name is included on the web page before it
is sent to the printer, in whichever view is specified.
Printing the HTML view is often required. Even if you
are using a WYSIWYG (what you see is what you get)
package, such as Adobe Dreamweaver or Microsoft
Expression Web, you
will need to open the web page in a text editor to
print the HTML.
Open the file task 2.html and view this web
text editor and browser.
page in both the
x3
Improve this web page by setting the ‘3’
and setting the ‘2’ in H2O as subscript.
in as superscript
Replace AJIRO TECH with your name.
If you are printing from a web browser, make sure that your name and candidate details are fully visible on the printout. If you are using
a WYSIWYG package, make sure that you test the web page in a browser and not just within the package. Some products will display
what appears to be the browser view, but it is only a development tool and does not necessarily display the page as it will be seen. Make
sure that there is clear evidence that this is a browser and that the URL is visible (or the file name and path are visible instead of the
URL). Use screenshots of your pages, taken using the button on your keyboard or snipping tool Chapter 11 & 12, to copy the screen
contents into the clipboard. Then paste the clipboard into another package (often a word processor) to present evidence of your work.
Ajiro Tech | 7
Designed and Presented by Ajiro
Home Create a web page Use stylesheets
Web development layers
INSERTAT
ABLE
If you need to create a table within a web page, it is always worth planning it on
paper before starting to create the markup.
Basic table structure
Tables in HTML always start with a <table> tag and end with </table>. Start by adding these tags in
the body section of the markup.
Note: It would be much easier to use WYSIWYG software to create your tables.
Everything between these tags will be included in the table, except for the caption. This is added
using the <caption> and </caption> tags, which allows you to display a caption (usually centre
aligned) above the table. If a caption is used it must be the first HTML tag after the <table> tag
Open the file Task 3.html and view this web page in both the text
editor and browser. Replace the text AJIRO TECH with your name.
Set the ‘2’ in 10meters 2 and the ‘3’ in 500cm3 as superscript and
set the ‘2’ in CO2 as subscript. Set the text ‘Enhancing Text’ into
style h1. Print your web page as HTML and as it is viewed in your
browser.
T
HER
E
A
S
O
NF
O
RU
SI
N
GT
A
B
LE
ST
OS
TR
UC
T
U
RE
E
L
E
M
E
N
T
SW
I
T
H
I
NAW
E
BP
A
G
E
Tables can be used to create the basic structure of many web pages.
They can be used to organise page layout and are often used in web
pages even though their borders may not be visible. In more recent
versions of HTML, tables have been replaced by semantic elements
and other more complex structures (including CSS structures) to
layout full pages, but at this level we will use simple tables to
create our structures
Ajiro Tech | 8
Designed and Presented by Ajiro
Each table row has two pieces
of table data. A table cell can
contain text, images, other
tables, lists, paragraphs, forms,
horizontal rules, and so on.
Each table row will contain two cells of table
data. The tag for table data is <td>. A row
can have one or more <td> tags. Between
each <tr>and </tr> tag, place start table data
<td> and end table data </td> tags like this.
the table you need to create has
three table rows. The tag for a table row is
<tr>.
Create the three blank rows between the
caption and the end of the table like this.
Home Create a web page Use stylesheets
Web development layers
Table borders
This table has been created but does not have a visible border. The word ‘border’ is an
attribute. To show the table gridlines you must add a border attribute with a value of
"1". An attribute is something that is added to one of the markup commands to give
further information/instructions to the browser. Attributes should be in lower case
and attribute values should always be enclosed in quotes.
Change your markup like this.
The only valid border values in HTML5 are "1" and "":
"1" makes the border visible.
"" hides the table border, yet allows the table to control the structure of the page.
Create a new web page with a table that looks like
this and has the caption ‘Hours of sunshine last
week’. Make sure the top row of the table is in the
header section and the bottom row is in the footer
section. Print your web page as HTML and as it is
viewed in your browser.
H
E
A
D
E
R
SA
N
DF
O
O
T
E
R
SI
NT
A
B
LE
S
Tables can have three sections: a header, a body section and a
footer.
These are defined using the <thead>, <tbody> and <tfoot> tags,
and closed with </thead>, </tbody> and </tfoot> respectively.
Notice how these all begin with t (for table). In HTML you must
define the table header, footer and then body (in that order) if
all three sections are to be included.
You can add the table data sections to the footer and body of
the table using the tags <td> and </td>. Do not use these tags in
the table header.
In the table header, create heading cells (which are bold and
centre aligned) using the tags <th> and </th> rather than the
table data tags. These will set the column headings in heading
style.
U
S
EE
M
B
E
D
D
E
DC
S
SI
NH
T
M
L
Styles can be applied to tables and other HTML elements by
placing CSS instructions in a style attribute within the HTML tag.
This is called embedded CSS.
SETT
ABLEANDCELLSIZESINTERMSOFPIXELS
Resize a table
To avoid tables expanding with data, set fixed or browser-related widths for
tables, rows, and columns using the embedded CSS style attribute in the
<table>, <tr>, or <td> tags.
Ajiro Tech | 9
Designed and Presented by Ajiro
Home Create a web page Use stylesheets
Web development layers
SETT
ABLEANDCELLSIZESINTERMS
Resize a table
OFPIXELS
Set the table to fit to 80% of the browser window and the left
column to be 75% of the width of the table. Set the top row to be 60
pixels high and the bottom row to be 40 pixels high. Align the table
in the centre of the browser window. Set the names of the fruit to be
centre aligned and the prices in the right column to be right aligned.
To prevent tables from resizing based on cell data, set fixed widths for tables, rows, and
columns. Add an embedded CSS style attribute to the <table>, <tr>, or <td> tags with a
style attribute to control their width
Use px for pixels and do not put a space between the digits and px
for example, name:value
example, name1:value; name2:value
Set the table to be 400 pixels wide and
each row to be 50 pixels high. Set the
left column to be 280 pixels wide.
Ajiro Tech | 10
Designed and Presented by Ajiro
Note 3:
If more than one property is to be applied these are separated with semicolons, for
Note 2: The syntax for CSS elements is the property name, colon, the value to be applied,
Note 1:
Home Create a web page Use stylesheets
Web development layers
SETT
ABLEANDCELLSIZESINTERMS O
F%V
A
L
U
E
S
Set a style attribute for the table tag with the width property and a value of 80%. Use a
similar 75% property for the style attribute in any table data (or table header) tag in the
left column
Create a new web page with a table that looks like this and has the
caption ‘AjiroTech visitors 2024’.
APPL
YSTYLESTOT
ABLES
Centre align a table in a window
To centre align the table within the window, two more style properties must be used with the
table tag. These are to set the margin to the left to automatic and the margin to the right to
automatic. In CSS, if more than one property is used, the semicolon (;) is used between one
property and value and the next
Set the row height of the table header (the first row) to 60 pixels and the bottom row to
40 pixels. Use <tr style="height: 60px"> and <tr style="height: 40px">
Horizontally align cell contents
To align the text to the centre in the left column, add the style attribute to each table data tag in
the table footer and table body, so that the style has the property and value "text-align:center".
Make the company name, Ajiro Tech, bold. Make sure the top row of the table is in
the header section and the bottom row is in the footer section. Set the table to fit
to
70% of the browser window and the left column to be 200 pixels wide. Set the
top row to be 60 pixels high. Align the table in the centre of the browser
window.
Set the contents of row 1 and the names of the countries to be centre aligned,
total visitors and the number of visitors and its total to be right aligned. Print your
web
To align the text to the right in the right column, add the style attribute to the table data for each cell in
this column (except the table header) so that the style has the property and value "text-align:right"
Ajiro Tech | 11
Designed and Presented by Ajiro
Note: Note the American spelling of ‘center’ rather than the English spelling ‘centre’.
Home Create a web page Use stylesheets
Web development layers
Table borders
You have already learnt how to set the table borders on or off with a border attribute for
the table tag. To set table borders to appear as you want them you can change the
border settings in the whole table or parts of the table. You will notice that all of the
tables that you have created so far have a double border because the table and the table
header/table data parts have separate borders.
Display the table on Question 2 with a single, solid border 4 pixels wide,
and with internal gridlines 2 pixels wide.
Create a single table border
Set a style attribute for the table tag with the border-collapse property and
a value collapse
Set table border widths
Table borders can be set using the embedded CSS style attribute with the
border property and values.
To set the outside border of a table, the style attribute is added to the
table
tag. The values assigned to this tag must set the border to solid ?px. To
set
internal gridlines style, attributes are added to the <th> and <td>
tags; each of these tags must have the style attribute with border:solid ?px
which is only used to show if borders are visible or invisible.
Later in this chapter you will learn how to fix styles for all table cells without repeatedly
entering the same style attribute for each tag.
Ajiro Tech | 12
Designed and Presented by Ajiro
Note 1:
Table border settings in CSS are different from the border attribute for the table,
Home Create a web page Use stylesheets
Web development layers
Create a new web page that looks like this. Set the width to 80% of the
browser window, set both row heights to 60 pixels. Centre align the
contents of all cells. Vertically align to the top, centre and bottom of the
cell as shown.
Edit the web page you created for Task 5 so that: the table has a single
border of 6 pixels, the table header and footer have a single border of
4 pixels, and the table data has a single border of 2 pixels. Print your
web page as HTML and as it is viewed in your browser.
Vertically align table cell contents
Data held in table cells can be vertically aligned with embedded CSS so that
it fits in the top, middle or bottom of the cell. The style attribute is added to
the <td> tag with a property of vertical-align and a value of top, middle or
bottom.
value to middle.
Ajiro Tech | 13
Designed and Presented by Ajiro
Note: If you need to vertically align to the centre of the cell, always set the property
Home Create a web page Use stylesheets
Web development layers
Create a new web page to look like this. Table width is 80%, Table and
header borders must be 6 pixels and all other gridlines must be 3 pixels.
The 1st column must be 40%, 2nd column must be 10%, 3rd column
must be 50% of the width of the table. the first row should be 60 pixels
high. The webpage should look like this
Create a new web page that has a table with two rows. set the width of
the table to 80%, set both row heights to 60 pixels, a single solid border of
2px. In the top row include one piece of table data and, in the second row,
include three pieces of table data. It should look like this.
ADJ
USTCELLST
OS
P
ANMORETH
ANONET
ABLEC
OL
UM
N
To create a single cell that spans across all three columns in the top row of the
table, you need to add a colspan attribute to the table data <td> tag
ADJUSTCELLST
OS
P
ANMORETHANONET
ABLERO
W
To merge cells vertically use the rowspan attribute in the same way as you used
colspan
Ajiro Tech | 14
Designed and Presented by Ajiro
Home Create a web page Use stylesheets
Web development layers
Cell padding
Cell padding is the space between the cell contents and the border of the cell. It can be applied to both the
table tag <table> and/or to each item of table cell using table data <td> or table header <th>
Open Task 3c.html Copy the table so that there are three tables, one above
the other, on the page. Change the captions from ‘Fruit Sales’ to ‘No padding’
for the top table, ‘Padding set to 25 pixels’ for the middle table and ‘Variable
padding’ for the lower table. Set the cell padding for both the table, header,
footer and table data of the middle table to 25 pixels and the padding of the
lower table to have a top padding of 25 pixels, bottom padding of 20 pixels
and left and right padding of 15 pixels.
Hint in creating Question 5
Copy the table and paste it twice. Place a <br> tag between each table to set a line break. The <br> tag does
not have a close tag. Add an ID attribute to each table so we can identify them: they will be called top,
middle and bottom
In the <table> tag for the middle table, add the single CSS style padding property with a value of 25 pixels
For the bottom table we can set the different padding by stating all four values, starting at the top and
rotating clockwise
in full, for each side
This has only set the padding for the table borders. To change each cell the same style attributes,
properties and values will need copying and pasting into every <th> and <td> tag.
Border spacing
The spacing between the borders (border spacing) of individual cells is set in the
<table> tag. The style attribute is used with the border-spacing property. Two
values can be passed to this property: the horizontal spacing first, then the
vertical spacing like this.
<body>
<table border="1" id="top" style="border-spacing:20px 10px;">
<caption>No padding</caption>
If the horizontal and vertical border spacing are the same, you can
use a single value
Ajiro Tech | 15
Designed and Presented by Ajiro
Note:
Note: Shortened version of the CSS padding properties. Where padding should be specified
Home Create a web page Use stylesheets
Web development layers
Create the basic markup as you did with the earlier question, starting with the table tags,
the table attributes to show the borders, the caption, the header and body sections of the
table, then insert the table rows.
Open your finished web page from Task 4 For each table cell, set the
padding to have a top value of 8 pixels, bottom of 12 pixels, a left value of
20 pixels and a right value of 16 pixels. Set internal and border spacing for
the table to 20 pixels. Your final web page should look like this
When creating a new table like this, it is wise to add a single letter as the contents of each cell
when you create it. In this case a single letter ‘A’ has been added to the top left cell, the letter
‘B’ to the next cell and so on. This is because some web browsers do not display a table cell if
it is empty. By adding these single letters it allows you to test the table as you are creating it.
The top row of the table header has only two cells. The first of these is a cell that covers two
rows. For this you use a rowspan attribute to tell the browser this cell is going to span the
first two rows.
The second cell in the top row is a cell that covers three columns. Use the colspan
attribute to tell the browser that this cell is going to span three columns.
I
N
S
E
R
TA
NI
M
A
G
E
Images (such as pictures or icons) are often used in web pages and are often used for
hyperlinks. To complete the web page for Question 5, you need to replace the letter ‘A’ in
the top left cell of the table with the image turtle.jpg. To do this you have to tell the web
browser the name of the image source, which should be stored in the same folder as your
web page. Make sure that you have copied the file turtle.jpg into your Task Work folder. Add
the following to the markup. As some browsers may not display the image, you can tell the
browser to replace the image with alternative text. This usually describes the image so that
the user can still understand what is being shown even though they cannot see the image.
Create a new web page with a table that looks
like this and has the caption ‘Sales team’. The
image that you require is called turtle.jpg.
Ajiro Tech | 16
Designed and Presented by Ajiro
Note:
Home Create a web page Use stylesheets
Web development layers
Where to store an image
Images must be stored in the same folder as the web page. This is called the current
folder. Notice in the markup how the filename turtle.jpg is given as the image source.
This does not contain any reference to which folder the image is stored in. Because
there is no absolute reference to a folder, the browser automatically looks in the
current folder for the image. This means that if this web page is opened on another
computer, as long as the image is stored in the same folder as the web page, it will
work properly.
If an absolute reference had been used for a file, for example:
<img src="C:/My websites/My pictures/turtle.jpg" alt="Company Logo"></td>
File types for images
Raster or bitmap graphics
There are three common file types for bitmap images used in websites. These
are JPEG files, GIF files or PNG files. You can use a graphics package such as
Adobe Photoshop or GIMP or Paint.Net to change images from one format to
another by opening them and using Save As… to change the file format for the
new image.
Vector graphics
Another file type that is growing in popularity is the SVG file type. This is a
vector graphic rather than a raster graphic and is created in another markup
language called XML, so images can be created without the use of a graphics
package (although many people use packages such as Inkscape to create them).
These are fully scalable, so there is no loss of quality if they are expanded. This
can make it easier for the visually impaired when using zoom features as the
graphics do not become pixelated. Many other vector graphics formats do not
work in web pages.
Apply alternate text
The image has been replaced by the text ‘Company Logo’ defined by the alt text
attribute to tell the user what the missing image should be. This text is also used
in some browsers by text readers. An image (<img>) tag must have an alternative
(alt="") text attribute added for all browsers to display the image as expected.
This must have a ‘value’ attached to it within quotation marks, even if this is left
empty (although it is bad practice to leave it empty). For any image that you
place on a web page it is advisable to always include the alt attribute. Copy the
image into your Task Work folder. When the image file is stored in the current
folder, this will be displayed.
images, stylesheets, etc.
Ajiro Tech | 17
Designed and Presented by Ajiro
Note: A common mistake made is to use absolute pathways for files, such as
Image files added to web pages are usually in bitmap graphics formats such as
Note: .jpg, .gif or .png format. Many other image formats, for example, vector graphics
such as .tif, will not work in a web page.
Home Create a web page Use stylesheets
Web development layers
A
DJ
USTA
NIM
A
G
ESIZ
E
Images can be resized using two methods:
The first method is to change the size of the displayed image in
the markup. This is the easier of the two methods, but often uses
large image files, which are slower to upload and can delay the
display of a completed web page.
The second method is to physically resize the image in a graphics
package. This method has the advantage of being able to reduce
the file size of an image so that a web page will be displayed
more quickly. It has the disadvantage of using lower-resolution
images, which can appear pixelated, particularly if you wish to
enlarge them.
Create a new web page with a table that looks like this and has the caption
‘Last week’. The image that you require is called ptct.jpg. Print your web
page as HTML and as it is viewed in your browser
Open the file ajirotech1.html Use both methods to resize this image
to 80 pixels wide and compare the relative file sizes of the two
images. Save both versions of your web page.
Ajiro Tech | 18
Designed and Presented by Ajiro
Home Create a web page Use stylesheets
Web development layers
Adjust an image size in the markup
Copy the web page and supporting files remora.htm, remora.jpg and turtle.jpg
into your Task Work folder. To change the size of an image in the markup use either
the width or height attributes within the image tag. For this question the width
needs setting to 80 pixels.
Resampling an image
This process of changing the image quality is called resampling. Images can be
downsampled, meaning fewer pixels are used for the image, as you have just done
by reducing the image quality. Images can also be upsampled by adding more
pixels. Downsampling reduces the file size which helps web pages load more
quickly.
Image aspect ratio
If you change the width of the image to 80 pixels and do not specify a height for
the image, it will maintain its aspect ratio. This means that it will keep the same
proportions. Sometimes you may be asked to distort an image to give a different
effect within a web page. This is done by specifying both width and height but
not keeping the aspect ratio of the original image. Find the markup for the image
remora.jpg, in the file ajirotech1.html, which looks like this.
Comparing the two method
Adjust an image size an external package
Copy the image that you resized and called remora1.jpg from your into
your Task Work folder. When using this technique it is useful to have a
small, low-resolution image (called a thumbnail) on a web page. If the
user wants to see more detail, they can click on the image and a new
window will open containing a high-resolution version of the same
image.
The web page needs to be amended so that the width attribute is no
longer present, and the source attribute within the image tag points to
the new filename.
This folder contains the two image files and shows you the difference in file
sizes between the two methods. Your image sizes may vary from this
depending on the resolution you selected when you saved the file. As can be
seen here, in this case the new image should load in about 60 per cent of the
time the original will take.
Ajiro Tech | 19
Designed and Presented by Ajiro
Home Create a web page Use stylesheets
Web development layers
Insert an animated image
There are two different methods used to place an animated image on a web page.
If the file is an animated GIF, the method is the same as inserting a still image.
INSERTAVIDEOFILE
Videos can be placed in a web page using the <video> and </video>
tags. You must include width and height attributes within the <video>
tag, so that the correct space is saved on the page for the video. The
controls attribute shows the video controls and allows the user to
control (start/pause/maximise/adjust volume, etc.) the video.
The video source is different from other HTML elements as it uses a
<source> tag as well as the src attribute. In the <source> tag the type
attribute tells the browser the file type of the video to be shown. You
must include text between the <video> and
</video> tags for browsers that do not support HTML5 or videos of
Edit the web page saved in Question 5 to replace the image with the moving
image turtlelogo.gif
this type.
video formats, such as .wmv, will not work with the <video> tag.
Ajiro Tech | 20
Designed and Presented by Ajiro
Note: Accepted video formats are .mp4, .webm and .ogg. Many other
Home Create a web page Use stylesheets
Web development layers
Video controls and autoplay
To remove the controls from the video simply remove the controls
attribute from the video tag. To ‘autoplay’ the video so that it runs as
soon as it has loaded onto the web page, replace the controls
attribute with the autoplay attribute. As many browsers refuse to
autoplay, unless the video is muted, we must also add the muted
Open the file ajirotech.html and save this as Question 9.html Replace the
text Place video here with the video wreck.mp4 set the width to 400 pixel
and the height to 224 pixels. Replace the text Place audio here with the
sound whale.mp3.
attribute to this tag. To get the video to play in a continuous loop,
loop attribute is used.
I
N
S
E
R
TA
NA
U
D
I
OF
I
L
E
Audio files, sometimes called sound clips, can be placed in a web
page using the <audio> and </audio> tags. The controls attribute
works in a similar way to the video controls. It allows the user to
the
control the sound clip. The audio source works in a similar way to the
video source. In the <source> tag the type attribute tells the browser
the file type of the audio to be played. You must include text
between the <audio> and </audio> tags for browsers that do not
support HTML5 or files of this type.
Ajiro Tech | 21
Designed and Presented by Ajiro
Home Create a web page Use stylesheets
Web development layers
It is not always easy to remember the names of the colours, and many web
designers prefer to use hexadecimal codes (often referred to as hex codes)
to define the colour of text, backgrounds or objects. Hexadecimal is a
counting system where counting is done in 16s (rather than in the tens used
in the decimal system).
APPL
YSTYLEST
OELEMENTSWITHINAWEB P
A
G
E
Colour is important in web page design for both text and backgrounds.
Colour – part 1
Colour is always defined in CSS, either embedded in the HTML or within an
attached stylesheet (which you will meet later in the slide). One method is
to use colour names as the property values, such as red, green and blue
within the HTML code. There are currently only 16 colour names accepted
as web standards in CSS and by the World Wide Web Consortium (known
as W3C). These are: aqua, black, blue, fuchsia, gray (note the American
spelling), green, lime, maroon, navy, olive, purple, red, silver, teal, white
and yellow. Other colour names are, however, accepted by some browsers.
A table showing these colours and their names is included in the file
colourcodes.html specially crafted by Ajiro Ndi and is available with the
source files i will send to you. You can open this web page and use these
colours in your own stylesheets attached to your web pages.
The primary colours when using light (which is very different from the
primary colours used in painting) are red, green and blue. All other colours
can be made from combinations of these three colours. You will notice that
the initial letters are RGB, hence RGB monitors. Each of these colours can be
off, partially on or fully on. In hexadecimal, if a colour is off it is set to 00 and
if it is fully on it is set to FF. To create the colour for any pixel you must tell
the computer how much red, green and blue light to show. This means that
all colour codes have
six characters, the first two being red, the next two green and the final two
blue.
This example uses the hex code for red, as the red component is fully on
(FF),
the green component is off (00) and the blue component is also off (00)
Ajiro Tech | 22
Designed and Presented by Ajiro
Home Create a web page Use stylesheets
Web development layers
<h1 style="color:#ff0000">This is red</h1
Open the completed Question 2.html and Edit the web page to
look like this. The colour codes you will need are #32879B for the
header, #92CDDC for the footer and #B6DDE8 for the table body
is in hexadecimal.
All of the different combinations of red, green and blue allow more than 16 million
different colours to be used.
S
P
E
C
I
F
YB
A
C
K
G
R
O
U
N
DP
R
O
P
E
R
T
I
E
S
Set the background colour
Hexadecimal colour codes can be used with background and foreground
colours.
For example, in CSS text colours can be changed using the style attribute
with
a color property. You must set the background colour using the CSS
property
background-color.
Add a style attribute to the <thead> tag like this.
<thead style="background-color:#32879b">
Add a style attribute to the <tfoot> tag like this.
<tfoot style="background-color:#92cddc">
Because the footer area has coloured text we will add a second
style attribute to the <tfoot> tag. Note that both style properties
are within the quotes and that a semicolon separates the
background-color and color properties (and their values) like this.
Add a style attribute to the <tbody> tag like this.
<tbody style="background-color:#b6dde8">
<tfoot style="background-color:#92cddc; color:#ff0000">
Ajiro Tech | 23
Designed and Presented by Ajiro
Note: The hash symbol (#) tells the browser that the number
Note: Note the American spelling of ‘color’, rather than the
English ‘colour’.
Home Create a web page Use stylesheets
Web development layers
APPLYSTYLESTOALIST
You can include on a web page either a numbered list, which is an Create a web page containing
the heading ‘Fruit’ and a
numbered list for the
following items: Apple,
Orange, Pear, Banana and
Lemon.
ordered list, or a bulleted list, which is an unordered list. Bulleted
(unordered) lists can also be nested (placed one inside the other) to
give you more flexibility in the design of your web pages. Items to
be placed in a list start with the markup <li> and close with </li>.
These are used in the same way as the style definitions for headings
(styles h1 to h6) and paragraph styles. Each item in the list must
have the list tags around it. The way each of these lists is displayed
can be changed using CSS. An example of an item placed in a list
would look like this.
<li>Welcome to Ajiro Tech - Best Cambridge IGCSE and A Level
</li>
Web page:
Create a web page containing the
heading ‘Colours’ and a bulleted
list for the
following items: Red, Yellow,
Blue, Green and Cyan
Numbered lists
Numbered lists are ordered lists in HTML because they are in number
order. Place the tag <ol> at the start of the numbered list and the tag
</ol> at the end.
Ajiro Tech | 24
Designed and Presented by Ajiro
Home Create a web page Use stylesheets
Web development layers
Nested lists
Bulleted lists can be nested by having sub-lists. These are created by placing
one unordered list within another list.
Create a new web page containing the
heading ‘Subjects Offered’, a brief
introduction and an unordered list of
the following subjects offered: ICT,
Physics, History. For each subjects
offered, make a sub-list of the
students offering the subjects. Set
these sub-lists as unordered lists.
Print the web page as viewed in your
browser and as HTML.
Change these sub-lists to ordered
lists. Again, print the web page as
viewed in your browser and as HTML.
Create a web page containing the names of two students as a bulleted
list. These students are Iyanuoluwa Balogun, Sochi Ogwo. it should
contain the subjects their most proficient with it should include the
heading “Subject Performance”. Your web page should look like this.
Bookmarks
A bookmark is a named reference point in an electronic document. It is often
used to hyperlink to that point from other locations. Bookmarks can be useful if
a web page is very long. Links can then be created to the bookmark and when a
link is clicked the page will scroll down or up to the bookmark location. You can
also add links to bookmarks on other pages. A bookmark can be added to most
HTML elements.
Ajiro Tech | 25
Designed and Presented by Ajiro
Home Create a web page Use stylesheets
Web development layers
Bookmarks
A bookmark is a named reference point in an electronic
Division tags
The <div> tag is short for a division or section of an HTML document
or page. It is also used as a container for HTML elements that can be
styled with CSS (or manipulated with JavaScript, but this will not be
covered in this textbook). A division starts with a <div> tag and ends
with a </div> tag. Any content can be placed in a <div> tag.
document. It is
often used to hyperlink to that point from other locations. Bookmarks
can be useful if a web page is very long. Links can then be created to the
bookmark and when a link is clicked the page will scroll down or up to the
bookmark location. You can also add links to bookmarks on other pages.
A bookmark can be added to most HTML elements.
Hyperlinks
A hyperlink is a method of accessing another document or resource from your
current application. Hyperlinks do not just relate to web pages: other
application software can also use them. Hyperlinks are often used to create
menu options with web pages, using either text or images. When you select a
hyperlink (usually by clicking the left mouse button), the hyperlink will
perform an action. It may move your position within a page, open another
page either locally or on the internet, or open your email editor so that you
can send an email to a specified place or company. The colour of the
hyperlink
gives us information about its use.
All browsers, using their default settings, display links like this:
blue and underlined – a link that has not yet been used
purple – a link that has been previously used
red – an active link
Anchors
An anchor is used to create a hyperlink to allow you to navigate within
the page or navigate to an external page. An anchor starts with an <a>
tag and closes with an </a> tag. Although there are many attributes that
can be used with anchors, we will only use the href (Hypertext
REFerence) attribute with tells the browser where to create a hyperlink
to, and the target attribute which tells the browser in which window to
open the linked document or page. You will use these in the next
section.
Ajiro Tech | 26
Designed and Presented by Ajiro
Note: Browsers place a line break before and after the <div> element.
Home Create a web page Use stylesheets
Web development layers
C
R
E
A
T
EAB
O
O
K
M
A
R
K
Start by copying `ajirotech3.html` to your Task Work
text editor and browser. Add unique, meaningful IDs
folder. Open it in
(`top`, `html`,
a Edit the web page
ajirotech3.html so that each
new section contains an
anchor.
Use these anchors to create
hyperlinks from the appropriate
text in the first
paragraph. Make the word ‘top’
in the last line a hyperlink to
the top of the page.
Make the words ‘IGCSE ICT
YouTube Channel’ a hyperlink
to the website
https://youtube.com/@ajirotec
h.
`WYSIWYGs`, `right terms`, `stylesheets`, `tables`, `ajiro tech`) to each
section. Create bookmarks before linking them.
<h1 id="top">Website Authoring</h1><hr
You can see that the id attribute is inside the tag defining the style for
the text. The value for this attribute (the bookmark name) is placed in
speech marks. This ID will be used in all hyperlinks to navigate this
point. The <hr> tag used in this example is another single tag (it does
not have a closing tag) that draws a horizontal line across the page.
This is not part of the bookmark. Add the other bookmarks to the
markup, one for each section of the document
structure of the markup, often in the opening or closing speech
Ajiro Tech | 27
Designed and Presented by Ajiro
If the anchor name is visible in the browser view of the page it
Note: often means that you have made a syntax error (an error in the
marks around the value).
Home Create a web page Use stylesheets
Web development layers
THEUSEOFRELA
TIVEFILEP
A
THS
When creating a hyperlink reference to another file, particularly
one stored locally, it is really important to use a relative file path,
such as:
<a href ="next _ page.htm">
This is better than using an absolute file path such as:
<a href ="C:my documents/my folder/html/next _ page.htm">
CREA
TEAHYPERLINK
Hyperlinks within a web page
In the final sentence, find the word ‘Back to the top’. This will be used
to create a hyperlink to the bookmark with the name ‘top’ that you
created earlier. The hyperlink is created using an anchor. The two
anchor tags are placed each side of the word ‘Back to the top’. The
markup includes a hyperlink reference (the markup attribute for this is
href) and the name of the destination anchor. This
always inside speech marks and preceded by the #
Hyperlinks to other web pages
anchor name is
symbol
While either of these is likely to work on your computer, other
computers
Therefore,
would not
are unlikely to have the same folder structure and filename.
if you used an absolute file path, the file ajirotech2.html
be found on another computer system and the hyperlink
Hyperlinks can be created to another web page stored locally, usually
in the same folder as the current web page, or to an external website
on the internet. The markup for both of these links has the same
syntax (structure). The only difference is the address of the web page
that the hyperlink is to go to.
References to pages stored in the same folder as your web page just
have an address without the URL. To link to a local file called
‘ajirotech2.html’
would not work. The same reasoning applies to images and other objects
included in your web page where relative references must be used
rather than absolute references.
Ajiro Tech | 28
Designed and Presented by Ajiro
Home Create a web page Use stylesheets
Web development layers
Open a web page in a new browser window
When a web page is opened, it may open in the current window or it may open in
Open the web page
ajirotech4.html and replace the
text YOUR NAME after Last Edited
by with your name. Edit the web
page so that each new section
contains an anchor. Use these
anchors to create hyperlinks from
the appropriate text in the first
section. Make the word ‘top’ in the
last line a hyperlink to the top of
the page. Make the words ‘Ajiro
Tech’ a hyperlink to the website
https://youtube.com/@ajirotech.
Print the HTML view of this web
page
a new window. This is set using the target attribute. This attribute is part of the
anchor and tells the browser which window to use for the web page that you are
going to open. The target attribute can either be set as a default setting in the
head section of the markup or as an individual setting for a hyperlink within the
body section. If the target attribute is not used, the browser will decide where
to open a web page. To set a target window for a single hyperlink, add the target
attribute to the first anchor. Some target attributes have specific functions.
If a target name of _blank is applied, this will open in a new browser window.
If _self is applied it will open in the current window. Other target names, such
as _parent and _top, are reserved and perform different functions with frames,
which are beyond the scope of this book. Any other target name that you use will
open the specified web page in a window with that target name, if it exists, or
open it in a new window with that target name.
Ajiro Tech | 29
Designed and Presented by Ajiro
Home Create a web page Use stylesheets
Web development layers
Using your web page ajirotech4.html, make the hyperlink you created to
the Ajiro Tech website open in the same window and the hyperlink to
Ajiro’s personal profile open in a new window called _aj
Create a new web page that contains a hyperlink to prepare an email
message to be sent to ajirondi@gmail.com with the subject line ‘My ICT
Score’.
Use a hyperlink to send an email message
Hyperlinks from web pages, other applications packages or documents can be
used to open an email editor and prepare a message to be sent to another person
or company. This is very useful in a website, where you can set up your email
address and subject line within the markup, instruct the browser to open the
email editor and insert these details into a new message when the hyperlink is
selected.
The format for this is very similar to the hyperlinks shown earlier in this slide.
In place of the URL or path of a web page, the mailto: instruction is placed
within the hyperlink reference of the anchor. This is followed by the email
address of the recipient. To include the subject line for the message, this is
included by specifying subject= followed by the text for the subject line. The
whole hyperlink reference is enclosed within speech marks.
Note how the space in the text ‘My ICT Score’ has been replaced in
the markup with %20. This is the hex value for the ASCII character 32,
which represents a space. There should not be any spaces inside the
speech marks for the hyperlink reference. However in html 5 it works
with space for the subject line.
Create a hyperlink from an image
Open the file ajirotech.html Make the remora1 image in this web page a
hyperlink to the web page remora.html
Ajiro Tech | 30
Designed and Presented by Ajiro
Note:
Home Create a web page Use stylesheets
Web development layers
Images can be used as hyperlinks in the same way as text. To create a The function of metatags
Metatags are not displayed in the browser but hold important information
that the browser requires, such as specifying the character set, page
description, keywords, author of the document, and the viewport settings.
These functions tell browsers how to display the page and they tell search
engines about keywords, which helps them list the page in the results of
relevant searches. Further explanation of all these follow.
hyperlink to the web page remora.htm, add this anchor tag with its href
attribute and value so that it surrounds the image tab remora1
The head section
At the start of the slide we stated there are two parts to every web page,
the head section and the body section. The head section is a container
for all the head elements, such as titles, stylesheets and metadata. The
word metadata means data about other data. The head section is always
placed between the <html> tag and <body> tag. The metadata about the
HTML document is not displayed in the browser. We will study some of
the tags used for the metadata later in this slide – these are called
metatags.
Use metatags
As we have already learned, a metatag is a tag that holds metadata. It
uses the <meta> tag to open it and no closing tag, it is a self-closing tag.
We will use only three attributes with the <meta> tag, these are: charset,
name and content.
Metatag attributes – charset
To define the character set used by a web page, we use the charset attribute.
This specifies the type of characters (called the character encoding) that are
displayed. There are hundreds of character sets, but no browser can contain
them all, so we will use only one of two common examples that are used for
English. These are UTF-8, which is for Unicode, and ISO-8859-1, which is for
the Latin alphabet.
Insert a page title
This is added to the web page to define the title for the page. You have
already added this to all of the web pages you have worked on so far, but
have not explained what it does. It can contain only text and is displayed
in the web page tab or the browser’s title bar when the page is opened
by a web browser.
Ajiro Tech | 31
Designed and Presented by Ajiro
Home Create a web page Use stylesheets
Web development layers
Metatag attributes – name
The name attribute is used to specify the four other elements required
for this question, these are: author, description, keywords and viewport.
Each of these name attributes is followed by a content attribute.
Place, into the appropriate section of the HTML, metadata to:
define the character set used to UTF-8
include your name as the author of the web page
add a description of the web page
set the keywords to be the words HTML, web page creation, web
development, stylesheet, and WYSIWYG
set the viewport to match the width of the device and the initial
scaling to 1.
Set the web page so that any hyperlink from the page will open in a
new
window or tab.
Metatag attributes – content
The content attribute is used with the name attribute and contains the
value assigned to the name. This value is in the form of text.
Define the author
To include the name of the author of the web page you must use both
the name and content attributes. Within the head section add the
following metadata, changing the content so that it contains your name
rather than Ajiro Ndi
Ajiro Tech | 32
Designed and Presented by Ajiro
Home Create a web page Use stylesheets
Web development layers
Keywords for a search engine
The keywords are used by search engines to try and find websites that
match a user’s search string. The more relevant keywords your website
contains, the better the chance of it appearing near the top of the search
results. It is therefore better to have lots of keywords in your metadata,
using the sorts of words or phrases that a user may type into their search
engine. Some examples also include common misspellings of the words and
phrases – for example if HTML was to be included you may also add .htm,
HTM and .html.
For this question you are given the keywords to be used as content in the
metadata: these are HTML, web page creation, web development,
stylesheet, and WYSIWYG, so you will include only those in the content
section. As more than one keyword will be added to the content attribute,
each value must be separated with a comma. Within the head section add
the following metadata.
Viewport settings
The viewport is the user’s visible area of the web page. Using the viewport
setting can make a significant difference when using a smaller display size
to view a web page, for example, on a mobile phone or tablet. There are
two content parts to the viewport, the first is the width, which should
normally be set to the width of the device, and the second part is the
initial scaling for the web page, which would usually be set to 1.0. For this
question (and probably for most web pages) these settings are required.
Unfortunately, you cannot test these elements (apart from viewport if
you publish the web page and then load it onto different devices) to
make sure that you have made no errors, so carefully visually verify
that you have made no typing errors.
Ajiro Tech | 33
Designed and Presented by Ajiro
Note:
Home Create a web page Use stylesheets
Web development layers
Make the image a hyperlink to send an email message to ajirotech@gmail.com.
with the subject line ‘Expenses’ and the body text ‘Please send me updated
expenses details.’
Place meta data to:
define the character set used to ISO-8859-1
include your name as the author of the web page
set the keywords to the words PTC, travel, and expenses
set the viewport to match the width of the device and the initial scaling to 2.
Set the web page so that any hyperlink from the page will open in the same
window or tab.
Print your web page as HTML and as it is viewed in your browser
S
ETAD
E
F
A
U
L
TT
A
R
G
ETW
I
N
D
O
W
You have already studied how to use the target attribute within an anchor tag
to open a web page in a new browser window, or in the same window, etc. If you have a
web page with several hyperlinks that require the same type of action (same target
window/tab or a new window/tab) you can make this the default setting for the page. To
complete the task, you must set the web page so that any hyperlink from the page will open
in a new window or tab. The default settings for this are also in the head section and are
added using the <base> tag.
Edit the web page that
you saved for Task 10.
Set the background
colour for the
table to #FFFF00 and
an outside border of 4
pixels, so it looks like
this.
Edit the html in the file ajirotech6.htm so that:
the text Ajiro Ndi is set in style h1
each paragraph style with an ID is set in style h2
the hyperlinked items between ‘What is HTML?...’ and ‘…Other resources’
becomes a bulleted list and this bulleted list is indented by 50 pixels from the left
edge
each occurrence of the text ‘HTML’, after the bulleted list, is set to the class
called red
the final sentence is set in style h3
the whole table is formatted to be centre aligned.
Ajiro Tech | 34
Designed and Presented by Ajiro
Home Create a web page Use stylesheets
Web development layers
Keywords for a search engine
When this is saved and opened in a browser the bulleted list appears over to the
left of the body text and you have been instructed to indent this bulleted list by
50 pixels from the left edge. This could be completed by adding a style attribute
to each <li> tag, but that would require you to enter the style information six
times. Rather than do this repeatedly, you can use a single division <div> tag.
Place the <div> and </div> tags around the bulleted list and add the style
attribute, its declaration (margin-left:) and value (50px) to the <div> tag
APPL
YSTYLESANDCLASSEST
OTHEHTML
Copy the files ajirotech6.htm and ajirotech1.css into your Task Work folder.
From your Task Work folder, open the file ajirotech6.htm in editor. Locate, at
the start of the body section, the markup for the text ‘Ajiro Ndi’. Change the
style from paragraph style <p> and </p> to style h1
Locate throughout the document each paragraph tag that has an ID
attribute, like this. For each of these seven opening and closing tags,
change the style from paragraph style <p> and </p> to style h2 Apply a class to elements within a web page
To set each occurrence of the text HTML to the class called red we cannot
use the <div> tag, as this would place a line break in the text and each time
the text ‘HTML’ appears it is within a sentence. Find the first ‘HTML’ in the
document. To make the text go red, place anchor tags <a> and </a> around
‘HTML’ and use the class attribute followed by the class name red
Locate the hyperlinked items in paragraph tags between ‘What is
HTML?...’ and ‘…Other resources’. Change each of these items from
paragraph style to list style by replacing the <p> and </p> tags with <li>
and </li>
Locate the final sentence and change the tags from paragraph tags to
style h3
Ajiro Tech | 35
Designed and Presented by Ajiro
Home Create a web page Use stylesheets
Web development layers
While styles can be set with HTML tags, normally they are defined in the
presentation layer of the web page in CSS format. You have already embedded
some presentation layer elements in the HTML using the style attribute. These
are called in-line styles. Styles may also be defined in the head section of a web
page or defined in an external stylesheet. If stylesheets are used, the stylesheet
is attached to the web page in the head section of the markup. As we have
already seen, styles can be applied individually to each page, but it is more
efficient to write, edit and attach one or more common stylesheet/s to all the
pages in a website. This collection of styles is saved in a different file in a
cascading stylesheet (.css) format.
USESTYLESHEETS
Using styles in your web pages helps you to be consistent in the way the
pages look. Using styles is much quicker and easier than applying individual
settings – such as font face, font size, text alignment and font colours – to
every piece of text in each web page that you create.
You have already met the heading styles, h1 to h6, and the paragraph style, p,
earlier in the slide. When you used these styles, the web browser did not find
any of these style definitions in your HTML markup, so it used its own default
settings. However, you can set your own definitions for each style and the
web browser will attempt to apply these styles to the page. T
HEC
HAR
A
C
T
E
RI
STI
CSOFAC
ASC
ADIN
GSTYLESHEET
A cascading stylesheet is a simple way of adding style (for example, fonts, colours,
spacing) to web pages.
One or more of these cascading stylesheets can be attached to a web page, and
the styles in the stylesheet will be applied to that page. Where more than one
web page is used, the styles only have to be defined once and then attached to
all the web pages. In-line styles, defined within the HTML, usually override styles
attached from an external stylesheet.
If more than one stylesheet is attached to a web page at the same time, those
attached later in the markup have priority over earlier ones. If a style has more
than
one declaration of the same property, the last value is used for the property.
Styles are not only set for text, but can also be used to define page layout,
colour schemes and default settings for other objects and links on the page.
Using a consistent style is often important to give a ‘corporate feel’ to a
website. Particular elements, such as colour schemes, table presentation,
logos and font faces, are often used to aid recognition of well-known
companies or brands.
Ajiro Tech | 36
Designed and Presented by Ajiro
Home Create a web page Use stylesheets
Web development layers
CSSSYNT
AX
CSS rules have a selector and a declaration block like this.
Open a copy of the web page that you saved in Question 3. Add an
external stylesheet to this page to define the table header and table data
so that they each have a solid border 4 pixels wide.
Each element has one or more declarations, each separated by a semicolon.
Each declaration has a property name and a value, separated by a colon.
Each declaration block is surrounded by curly brackets. The element name/s, in this case td and th, are followed by curly brackets {}.
In this example: you have set each piece of table data and each table header
so that its border property has a solid border that is 4 pixels thick. By defining
the two elements td and th at the same time, you have saved yourself extra
work.
To make the CSS easier to read, you can put one declaration on each line, like
this.
h1 {color:#ff0000;
font-size:14px;}
Ajiro Tech | 37
Designed and Presented by Ajiro
Home Create a web page Use stylesheets
Web development layers
Save styles in cascading stylesheet format
Save this file using the filename ajirotech2.css in the same folder as your
web page. Note: Make sure that you use the .css file extension and not
.htm or .txt.
Using external stylesheets saves you lots of time. One stylesheet can
be attached to many web pages and one style can be attached to
every element on those pages with little effort.
A
TT
A
CHANEXTERNALSTYLESHEETT
OAWEBP
A
GE
In the HTML window, add this line of text below the title tags in the head
section.
<link href="ajirotech2.css" rel="stylesheet" type="text/css"> Edit the web page that you saved for Task 13 so that the styles in the
table, table head and table data are removed and edited to become a
new external stylesheet called ajirotech3. Attach this stylesheet to your
web page. Print your stylesheet, and your web page, both as HTML and
as it is viewed in your browser.
USERELA
TIVEFILEP
A
THSFORA
TT
A
CHEDSTYLESHEETS
Make sure that you do not put an absolute address in a hyperlink reference, for
example:
A
D
DC
O
M
M
E
N
T
ST
OAST
Y
L
E
SH
E
E
T
Although you will often be told to place your name and candidate details
as text on the web page, this is not as easy in a stylesheet. Text placed in a
stylesheet will often stop the styles from working.
Any text must have /* before it and */ after it, so that the browser knows
to ignore it
<link href ="C:/my documents/my folder/css/ajirotech2.css"
rel="stylesheet" type="text/css">
as this is only likely to work on your computer. Other computers are unlikely to have the
same folder structure and filename. The link (with the relative file path) is attached to the
web page so when the page is opened or refreshed, the browser searches for the file
ajirotech2.css and applies the styles from this file to the web page. The filename in this line
of markup must match the name of the CSS file that you saved.
Ajiro Tech | 38
Designed and Presented by Ajiro
Note:
Home Create a web page Use stylesheets
Web development layers
Select the folder called Task Work in your Documents
window. Copy the file Question 22.htm into this folder.
Open this file in your text editor and in your web
browser. Copy the files style1.css and
style2.css into this folder.
Change the title of the web page to Ajiro Tech - Question
22. To apply the styles from the
stylesheet style1.css, you must attach it to the web
page. Move the cursor to the text editor containing the
HTML and add this line of text below the title tags
in the head section of the markup, like this. Save this
web
page. View this web page in your browser.
Open a copy of the web page and stylesheet that you saved in Question 20.
Add your name and a brief description of the stylesheet as comments to the
stylesheet.
The page content has not changed but the styles
applied to the page are very different. Notice that
the font face, sizes, colours and alignment have all
been specified in the stylesheet. This stylesheet
is a poor example because it contains too many
variations. If you change the markup to attach
style2.css to the page rather than style1.css, you
should see something like this.
This is the same web page again, but with the
slightly improved stylesheet style2.css, which has
a background colour defined in the stylesheet.
You will discover how to create and amend these
stylesheets later on this
You can see that the comments can be on a single line or on more than one
line. Only one /* and */ are required for each comment. Check that the
stylesheet still works with the web page.
Open a copy of the web page that you saved in Task 1.html. Change the title of this
page to Ajiro Tech - Question 22. Apply the stylesheet style1.css to this page and save
this web page. Change the attached stylesheet to style2.css and save this with a new
filename.
Ajiro Tech | 39
Designed and Presented by Ajiro
Home Create a web page Use stylesheets
Web development layers
If a value within a style contains more than one word, it must be placed in speech
marks like this.
h2 {font-family: "Times New Roman", serif}
If a value within a style contains more than one word, it must be placed in speech
marks like this. Stylesheets are saved in .css format (in a similar way to saving in
.htm or .html format) from the text editor.
S
P
E
C
I
F
YF
O
N
TPR
O
P
E
R
T
I
E
S
Font families
Individual fonts can be specified, but these are not always available in all browsers, so there
are a number of generic font families, including serif and sans-serif fonts, which can also be
used. These font families include ‘serif’, ‘sans-serif’, ‘cursive’, ‘fantasy’ and ‘monospace’,
which has proportional spacing.
The generic font family must always be listed after the other preferred font/s. The
font-family property must contain a hyphen. In the example above, font-family is set so that
the browser will look at the list of fonts installed in the machine and will try to find Times
New Roman first (it is in speech marks in the stylesheet because there are spaces in the font
name); if it cannot find it, it will find any generic serif font that is available. It is good practice
to offer the browser two (or more) different font families and a generic font type. These are
usually a Windows font, a MAC OS font and a generic font type. The order that these values
are placed within the font-family declaration is important as the browser will try to locate the
first font in the list. If that is not available in the system being used then it looks for the next
font in the list, until, if none of the specified fonts are available,
it will finally reach the generic font type. When this happens, the browser will display the
font-family that it has stored for this generic font type.
CSS text
It is very easy to create a cascading stylesheet in your text editor. The structure
of a .css file has a few very simple rules.
Stylesheets do not have tags in them as they are not a markup language.
Each style has a style name, which is called a selector.
The selector is followed by curly brackets {}.
Inside these curly brackets are the property for the style, followed by a
colon, then the property’s value.
For example, if you want to set the text in style h1 to be centre aligned, it
would appear like this.
h1 {text-align: center}
Note the American spelling of ‘center’.
Each style can have a number of properties and values. If there is more than
one property then each property is followed by a semicolon.
For example, if you want to set the text in style h1 to be centre
aligned, 16-point high and bold, it must appear like this.
h1 {text-align: center;
font-size: 16pt;
font-weight: bold;
}
Ajiro Tech | 40
Designed and Presented by Ajiro
Home Create a web page Use stylesheets
Web development layers
Copy the last web page you saved in your Question
22 folder into your Task Work folder and rename it
task21ab.htm. Open this file in your text editor and
in your web browser. Edit the title of the web page
so it becomes Ajiro Tech - Question 23. To attach the
stylesheet to the web page, you must edit the link
line in the head section of the markup so that it
becomes:
Save the web page. You are going to create the
stylesheet in the second copy of the web authoring
package (Microsoft Expression Web 4). Enter the
following style definitions into it. Carefully verify your
stylesheet by checking this original document with
your typed copy. Save the file using the filename
serif.css. Refresh your browser so that you can see
the effect that this has on the web page.
A serif font is one that has small lines or strokes (called serifs) at the
ends of characters, like this:
A font that does not contain serifs is known as a sans-serif font
Open a copy of the last web page that you saved in Question 22.
Create a new stylesheet called serif.css that sets all the styles as generic
serif fonts. Apply this stylesheet to your web page. View the web page in
your browser.
Change the generic settings in the stylesheet to a different generic font
style. Save the stylesheet with a new name. Try all the generic style
settings to see what each one looks like
Ajiro Tech | 41
Designed and Presented by Ajiro
Note:
Home Create a web page Use stylesheets
Web development layers
Group style definitions
As all the styles have the same values for the font-family property, you can group all of the styles
together and change the value only once. This stylesheet can be simplified to this single line.
Edit it and save it so that it replaces the old version. Refresh the browser to check that it still
works. Edit this stylesheet so that it sets the font-family to ‘sans-serif’. Save this file using the
filename sans-serif.css. Change the markup in the HTML to link to this file and save this web
page.
Repeat this process for each of the other generic font families.
Ajiro Tech | 42
Designed and Presented by Ajiro
Home Create a web page Use stylesheets
Web development layers
Open a copy of the web page that you saved in Question 23.
Create a new stylesheet called ajirotech4.css that sets all the styles so that the font
Trebuchet MS is used, if this is not available then set it so Arial is used, if this is not
available then use the browser’s default sans-serif font.
Open a copy of the web page and stylesheet that you saved in Question
24. Edit this stylesheet so that style h1 is 36 point, h2 is 24 point, h3 18
point, h4 16 point, h5 14 point, h6 12 point and the paragraph style is 10
point. Save this stylesheet as ajirotech5.css.
Change these settings to try and get similar results using the settings for
pixels (the number will depend on your monitor display settings), picas,
inches centimetres and millimetres.
Breakdown:
You will notice that the Trebuchet MS has been included in speech marks (as it is more
than one word) and that there is a comma used to separate each value within the font-
family declaration.
Carefully verify your stylesheet by checking this original document with your typed
copy.
Save the file using the filename ajirotech4.css
Because all of the font settings
are different in this case, it is
more sensible to keep all of the
settings for each style together.
It is possible to produce a
stylesheet giving these results
like this.
Font size
The font-size property must contain a hyphen and can be followed by absolute heights, by
setting values relative to each other, or a mixture of both.
Absolute values can be used to set the number of points, picas, or pixels high, for each
character. The sizes specified are set as numbers with ‘pt’ to show it is in points, for
example an 18-point font is written as 18pt. Alternatively, font size can be measured in
picas, which is abbreviated as ‘pc’. The abbreviation for pixels is ‘px’.
Other absolute values include ‘in’ to show the measurement in inches, ‘cm’ for
centimetres
or ‘mm’ for millimetres. Do not place a space between the number and the
abbreviation:
24px sets a 24-pixel height, but 24 px will not set the value to pixels. Ajiro Tech | 43
Designed and Presented by Ajiro
Home Create a web page Use stylesheets
Web development layers
This works, so does keeping the style definitions together like this.
Open the file you saved in Task 2. At the top of the page add a new title
‘Aligning text’ in style h1. Create a new stylesheet called align.css
Set the heading style h1 to be centre aligned. Set style h2 to be right
aligned. Set style p to be left aligned.
Breakdown:
attaching a new stylesheet called align.css
create a new stylesheet like this.
Font size
A font style (or class within a style) can be aligned in one of four different
ways. You can use the text-align property to format text so that it is left
aligned, centre aligned, right aligned or fully justified, as shown in this
sample stylesheet. The text-align property must contain a hyphen.
Ajiro Tech | 44
Designed and Presented by Ajiro
Home Create a web page Use stylesheets
Web development layers
Enhance text within a stylesheet
You have already used the color and background color properties to
enhance text in earlier questions and we will study these enhancements in
more detail later in the slide. Other enhancements are available, including
to embolden text (make it bold), italicise text (make it italic) and
underscore
(to underline text). Each of these uses a different property, but the default
value for these three enhancements is set to normal. To get bold text, set
the font-weight property to ‘bold’, To italicise text, set the font-style
property to ‘italic’, To underline text, set the text-decoration property to
‘underline’
Notice that each property and its value/s are on a new line.
This makes it easier to read and check for mistakes
Create a new stylesheet called ajirotech5.css and attach this to the web
page called Question 26. This stylesheet will set style h1 to a bold, italic, 18-
point font. If ‘Times New Roman’ is available the browser will use that,
otherwise it will choose ‘Times’, but if this is not available the browser’s
default serif font will be used. Make this text centre aligned
Ajiro Tech | 45
Designed and Presented by Ajiro
Note:
Home Create a web page Use stylesheets
Web development layers
Text colour
You can use the color property to change the colour of text within a style. Earlier in the slide you
changed text colour with an embedded CSS color property in the HTML. As mentioned earlier, it is
usual to work with hex colour codes. These are always preceded by a hash (#) symbol.
Create a new stylesheet called ajirotech7.css and attach this to the web page
called task15.html
This stylesheet will set:
h1 as an italic, centre aligned, 24-point font – if ‘Helvetica’ is available the
browser will use that, otherwise it will choose ‘Arial Narrow’ but, if this is
not available, the browser’s default sans-serif font will be used
h2 as a bold, right aligned, 16-point font – if ‘Courier Narrow’ is available
the browser will use that, otherwise it will choose ‘Courier’ but, if this is
not available, the browser’s default proportional spaced font will be used
h3 as an underlined, left aligned, 16-point font – if ‘Courier Narrow’ is
available the browser will use that, otherwise it will choose ‘Courier’ but,
if
this is not available, the browser’s default proportional spaced font will
be
used
p as a 14-point, left aligned, serif font.
Edit your files for Question 27 so that style h1 is red.
Breakdown:
The first two characters (ff)
are red, 00 for green and 00
for blue.
Edit your files for Question 28 so that style h1 contains the following
colour hexadecimal components: red 0, blue ff and green 00.
Breakdown:
The value #0000ff is correct: the single
0 for the red component has been turned
into 00, and the colours have been
placed in the correct RGB (red-green-
blue)
order.
Print evidence of your stylesheet, the HTML source and the browser view of
the
web page with the stylesheet attached.
Ajiro Tech | 46
Designed and Presented by Ajiro
Home Create a web page Use stylesheets
Web development layers
Edit your files for Question 2 so that the web page has a khaki (f0e68c)
background colour.
Add a new selector to define the
body section of the web page. Use
the background-color property to
have a new value like this.
Copy the files saved in Task 15. Edit the stylesheet so that each
style has the following colours. All values are in hexadecimal, and
only hexadecimal codes should be used in your stylesheet:
h1
h2
h3
h4
is blue
has
has
has
a full red component, green is 45 and blue is 0
8B blue, 3D green and 48 red
8B for red and blue, and 0 green
p is half red and no other colour.
Print evidence of your stylesheet and
page with the stylesheet attached
the browser view of the web
The background-color property must contain a hyphen. Save the stylesheet and
refresh the browser to test it.
The background colour can be applied to the whole page (like this), or to tables,
table rows, headers or footers with a single definition in the stylesheet.
S
P
E
C
I
F
YB
A
C
K
G
R
O
U
N
DP
R
O
P
E
R
T
I
E
S
Background colour
In Question 10 you set the background colour of a table using an in-line
(embedded) CSS style. It is possible to do this for each element, but is
much easier to define it once in an external stylesheet that can be applied
to all pages and will set all elements on the page.
The background-color declaration can also be used with other styles to
give different effects. Try defining the CSS for different styles like this.
h1 {background-color: #0000FF}
Ajiro Tech | 47
Designed and Presented by Ajiro
Note:
Home Create a web page Use stylesheets
Web development layers
Add to the body section of the stylesheet ajirotech13.css new
background-image and background-repeat properties with these
values.
Each of these properties must contain a hyphen. Save the
stylesheet
Copy the files saved in Task 16. Edit the stylesheet so that the web page has a
background colour with a red component of f2, a blue component of 8e, and
e8 green. All values are in hexadecimal, and only hexadecimal codes should be
used in your stylesheet.
Print evidence of your stylesheet and the browser view of the web page with
the stylesheet attached.
and refresh the browser to test it. The page will look like this.
Background images
Background images can be applied to the body section of a web page using the
background-image property with a value containing the Uniform Resource Locator
(which is often shortened to URL) followed by the image’s address or filename.
This can be used to place either a single background image in the centre of the
page or can be repeated to place lots of copies of an image tiled to make the
background.
Tiled background images
Try changing the value for the
to this.
background-repeat: repeat
background-repeat declaration
Edit your files for Question 30 so that the web page has the file
ajirotech_star.png as a single background image placed in the top right of the
window.
Ajiro Tech | 48
Designed and Presented by Ajiro
Home Create a web page Use stylesheets
Web development layers
Position a background image
A single background image can be positioned within the browser window.
Add a new background-position declaration like this to the body style in
ajirotech13.css.
Although this positions the
image into
the top right corner of the
window, some
of the text overwrites the
background
image. In some cases, this effect can
be very
useful (for example, a watermark) but
in this case it is difficult to read all of
the text, as shown here.
By adding a margin-right definition like this, you can force the contents
away from the image. The page now looks like this.
Open the stylesheet ajirotech.css
and the web page
question32.html. Edit the
stylesheet so that the web page
has a tiled background image
using
the file brick.png. Print evidence
of
your stylesheet and the browser
view of the web page with the
stylesheet attached.
Copy the files saved in Question 32. Replace the background image with the file
wall.png. Repeat this image down the left side of the web page only. Do not allow
any of the text to overlap these images.
Ajiro Tech | 49
Designed and Presented by Ajiro
Home Create a web page Use stylesheets
Web development layers
SPECIFYT
ABLEPROPERTIES
You have already created and styled tables in the content layer earlier in this
slide. You embedded style attributes for the table, table rows, table headers,
table footers and table data, including setting the padding and border spacing.
To revise each of these skills and place the table properties in an external
stylesheet you will try one more question on tables.
Open the files question33.html and ajirotech16.css. Edit the stylesheet so that the
table is aligned centrally within, and 70% the width of the browser window. Set all
borders and gridlines to be collapsed, 3 pixels wide and coloured with no blue or
green components and a red component of 99 in hexadecimal. Set the background
colour for the whole table to ffff99. Set all text to be aligned centrally both
horizontally and vertically within the table.
Breakdown:
To set the table to be aligned
centrally within the window and to
70% the width of the window, add
this CSS to the end of the
stylesheet.
Breakdown:
The background-color property and
properties to align text vertically and
horizontally within the table can also
be added, again making sure the
curly brackets are only at the end of
the final value, like this.
To set the borders to be collapsed add,
in the table section, the border-collapse
property and value like this.
Note how the closed curly bracket has
now
moved to the end of this declaration. To
make sure that all other elements for the
borders are applied to both the table and
table data, create another block with two
selectors and a shortcut border
declaration like this.
If a table header was present this could also be added here,
separated by another comma.
Ajiro Tech | 50
Designed and Presented by Ajiro
Home Create a web page Use stylesheets
Web development layers
STYLESANDCLASSES
You have defined styles for elements within a web page, such as a paragraph.
But suppose you wanted just one paragraph in a web page to have some additional
formatting, such as different coloured text? You can easily do this using classes.
These are useful for adding to or changing styles without defining a completely new
style.
You can define a class in the stylesheet by using the dot or full stop (.) symbol.
For example, this stylesheet defines the style h1 in the normal way.
CREA
TEANDAPPL
YACLASS
You will create two new classes in the
stylesheet. You will call these b_row and
right.
When you define a class it has a full stop
at the start of the class name. Everything
else in terms of structure and
declarations
is the same as a CSS style. In the
stylesheet, add the following text.
It also defines a class called right that can be used with any style to
change the colour and alignment of the style that it is applied to. This is
also useful within tables as you may define the layout of all tables in the
same way, using the table and td styles, yet add variations to this by
adding a class.
h1 {text-align:left}
.right {color:#0000ff;
text-align:right} These two classes need to be applied to the HTML. We will start with setting the table
footer as red text. (We could also apply these styles to the table row, or to the table
data). It might appear easier to apply only one of these, to the <tr> tag, but as the right
cell of this row will also need to be right aligned, we will apply the class separately to
the table data. Edit the markup for the table footer to look like this.
Edit your files for Question 33 so that the right column of the table is right aligned
and the bottom row of the table is coloured #a00000.
A common error is to include a full stop before the right and b_row class,
note that there is no full stop here, that is only used when defining the style.
When it is added to the right cell in the footer
there will be two classes added to the same <p>
(paragraph tag) and both are held within the
quotes, so the markup looks like this.
Ajiro Tech | 51
Designed and Presented by Ajiro
Note:
Home Create a web page Use stylesheets
Web development layers
Open the stylesheet called ajirotech18.css and add a new class within this stylesheet
that changes the default style to be right aligned and blue. Open the web page called
task 19.html and apply this class to each line of text that starts with the word ‘This’.
CSST
ABLES
Table definitions can be set in external stylesheets. The selector can be set for
the whole table or for elements, such as the table header, table rows and
individual cells of table data.
For the first style the selector says the whole web
section
page. This is the same as the body
Add to the stylesheet the background colour for all of the table
Add an external stylesheet to your answer to Task 4.html to set the following
styles:
To change the table cells, add the td selector and a background-color property with
a value of #2eb757
You will see that the table background is still visible between the cells with the
table data, but the table data is now a green colour.
Now add the thead selector and a background-color property with a value of
#cfcf00
save the stylesheet as ajirotech19. All values are in hexadecimal. Show evidence of your method.
Ajiro Tech | 52
Designed and Presented by Ajiro
Home Create a web page Use stylesheets
Web development layers
Open the stylesheet in your text editor. For the external borders add these
four lines to table section of the CSS.
Copy the files saved in Task 3c.html. Attach an external stylesheet named
ajirotech20.css to this web page that defines the web page with a background of
ff8c00 and a table with a background colour of ff4500. The table header should have a
background with ffd700 and all other cells in the table should have a background with
ffff00.
All values are in hexadecimal. Place a single image of a sun (using the file sun.png) in
the top right corner of the web page and make sure no other elements on the page
could overwrite this. Print evidence of your method. For the internal gridline add these two lines to the table data
section of the stylesheet.
They are other values for the
border-style, such as dashed,
dotted or double.
CSS table borders and gridlines
You may be asked to set internal gridlines and/or external table borders for tables.
As you created tables earlier in the slide, you will now be able to set the cell padding
and spacing within a stylesheet as well as define table and cell borders within it.
To set the border width of internal gridlines you must adjust the border width of the
table data (or table header); for the external borders set the border for the table.
Copy the files saved in Task 20.html Edit this stylesheet and name it ajirotech22
so that the table has a solid red border 4 pixels wide and cell padding of 10
pixels. Align all text in the table to the centre of each cell. All values must be in
hexadecimal. Print evidence of your method.
Edit the external stylesheet for your answer to Question 35 so that the table has
single black external borders 4 pixels wide and internal gridlines 2 pixels wide.
Ajiro Tech | 53
Designed and Presented by Ajiro
OUR TEAM @ AJIRO TECH
Experienced and Certified Cambridge Tutors
Samuel Ayodeji
Physics & Mechanics
Adedayo Jimoh
Mathematics
Gideon Sunday
Chemistry
Ajiro Ndi
ICT & IT
CONTACT US
ajirotech@gmail.com
https://youtube.com/@ajirotech

WEB AUTHORING PRESENTATION FOR IGCSEpptx

  • 1.
    Home Create aweb page Use stylesheets Web development layers WEBSITE AUTHORING Designed by Ajiro Ndi Year 10 Term 1 - Week 9 to 10
  • 2.
    Home Create aweb page Use stylesheets Web development layers A web page is created using three layers. Each of these layers has a different purpose in the development of a web page. These are: The Content Layer The Presentation Layer The Behaviour Layer Designed and Presented by Ajiro Ndi Ajiro
  • 3.
    Home Create aweb page Use stylesheets Web development layers Designed and Presented by Ajiro Ndi Ajiro THEBEHAVIOURLAYER This layer is where all actions, such as controlling elements (except hyperlinks), on a web page are created. These are usually created using scripting languages like JavaScript WHATISCSS? CSS is an abbreviation for cascading stylesheet, another text-based language. Styles are created and added to web pages. CSS can be written (embedded) into HTML but it is usually created in a separate file saved with a .css file extension. I M P O R T A N T N O T I C E Files are written in HTML using a simple text editor (or a web-authoring package such as Adobe Dreamweaver or Microsoft Expression Web). Files are written in text format and are usually saved with an .htm (or .html) file extension. These files are recognised by web browsers such as Microsoft Edge, Internet Explorer, Google Chrome or Mozilla Firefox as web pages. THEPRESENTATIONLAYER This layer is where the visual impact of the web page is created and contains the styles to be used, such as colour themes, fonts, etc. You will develop the presentation layer of your web pages using CSS. WHATISHTML? HTML is an abbreviation for HyperText Markup Language. It is a text-based language used to develop the content layer of websites. THECONTENTLAYER This layer is where the content of the web page, such as text and images, are placed. It is also where the page structure, such as frames, tables, hyperlinks, etc. are placed. This layer is sometimes called the structure layer. You will develop the content/structure layer of your web pages in a language called HTML. WHATISAWEBSITE? A website is a collection of individual but related web pages that are often stored together and hosted by a web server. Web pages can include different objects such as text, sound, video and still images.
  • 4.
    Home Create aweb page Use stylesheets Web development layers CREATE A WEB PAGE USETHECONTENTLAYERTOCREATEAWEBPAGESTRUCTURE UseHTMLinthecontentlayer HTML tags are shown using angle brackets around them like this: <html> The angle brackets tell the browser that this is a markup tag and not text to be placed on the web page. The browser does not display the HTML tags, but uses them to display the content of the page. Most HTML commands have two tags: one to open the command and one to close it. Each tag has a pair of angle brackets around it. All HTML web pages start with a <!DOCTYPE html> declaration and, although it has angle brackets, it is not an HTML tag. This is always the first thing in your markup. The <!DOCTYPE html> declaration is an instruction to the browser to tell it that the page is written in HTML rather than another markup language. The first tag that will usually appear in any web page will be <html>. This tag tells the browser that the markup following this tag will be written in hypertext markup language. The tag </html> tells the browser that this is the end of this markup language and appears at the end of the markup. The forward slash shows that it is a closing tag. All other HTML tags, and all web page content, will appear between these tags. A good technique for working on web pages is to tile four windows on the screen at the same time: ‘tile’ means to fit them side by side like tiles. Whenever you do any work in HTML and CSS, a text editor, a it is recommended that you open two copies of web browser and a list of your files in their storage folder. with the exception of the DOCTYPE statement, all text in HTML tags should be in lower case. Ajiro Tech | 4 Designed and Presented by Ajiro Note:
  • 5.
    Home Create aweb page Use stylesheets Web development layers THE HEAD AN D BODY SECTIONS OF A WEB PAGE Each web page has two clearly defined sections: the head and the body The body section The body section starts with <body> and closes with </body> and objects between these tags are The head section The head section starts with <head> and closes with </head>. Objects between these tags are not usually displayed by the web browser. In simple terms, markup in HTML (HyperText Markup Language) is the set of tags and attributes you use to structure and format content on a webpage. usually page. displayed in the web Add comments to your HTML markup Comments can be added to your markup if there are notes that you wish to make but not display on the web page. This is very useful for making sure that your name, Centre number and candidate number are on every web page, even if you are not instructed to display them. Comments start with <!-- and end with -->. As the comments do not affect the markup, they can be placed in the head or body sections and before or after any tags. Only a few tags are universally accepted within the head section of a web page; these are: <base>, <link>, <meta>, <title>, <style> and <script>. The head section should always contain a title. This is the name displayed in the browser toolbar. It is the page title used if a page is added to your ‘favorites’ in your browser and is the title displayed in search engine results. Ajiro Tech | 5 Designed and Presented by Ajiro
  • 6.
    Home Create aweb page Use stylesheets Web development layers APPLYTAGSTOTEXTINTHECONTENTLAYER PRE-DEFINEDSTYLES TODISPLAY Createandsaveanewwebpageshowingparagraphandheadingstyles. Type the following markup into your web authoring package, replacing AJIRO TECH with your name. Add a comment after the html tag Markup created on 22/09/2024 Always remember to add your name, centre number and candidate number to all of your printouts. Text is organised into paragraphs, with the paragraph style applied. Headings usually have different styles to the paragraph style. All text added to a web page should have a tag telling the browser what text style should be applied. There are a number of predefined styles available for use in a web page. The normal paragraph style is obtained using <p> and ended with </p>. Likewise, six heading styles are available and are defined with the style names <h1> to <h6>. Each item in a bulleted or numbered list can be defined the <li> tag and finished with </li> with error may cause the web page not to function as expected. the page, but not in the HTML tags. Ajiro Tech | 6 Designed and Presented by Ajiro Note 2: It is acceptable to use capital letters in the text that is displayed on Note 1: It is essential that the text is typed exactly as shown. One typing
  • 7.
    Home Create aweb page Use stylesheets Web development layers P L A C EA P P R O P R I A T EC O N T E N TI NT H EB O D YS E C T I O N There are different ways of placing appropriate content in the body section of a web page. Usually this is completed when the structure of the web page has been created, and we will use different methods later in the course. It is also important to add enhancements like superscript and subscript to text in a web page should this be appropriate. Superscript and subscript Move the cursor into the text editor window and make the following changes to the markup: Replace Graham Brown with your name. Place the tags <sup> and </sup> around the number ‘3’. Place the tags <sub> and </sub> around the number ‘2’ You may notice that all text within the head and body sections is indented to make it easier to identify where each starts and finishes. Print web pages From time to time, you will be required to print different views of your web pages. You must ensure that your name is included on the web page before it is sent to the printer, in whichever view is specified. Printing the HTML view is often required. Even if you are using a WYSIWYG (what you see is what you get) package, such as Adobe Dreamweaver or Microsoft Expression Web, you will need to open the web page in a text editor to print the HTML. Open the file task 2.html and view this web text editor and browser. page in both the x3 Improve this web page by setting the ‘3’ and setting the ‘2’ in H2O as subscript. in as superscript Replace AJIRO TECH with your name. If you are printing from a web browser, make sure that your name and candidate details are fully visible on the printout. If you are using a WYSIWYG package, make sure that you test the web page in a browser and not just within the package. Some products will display what appears to be the browser view, but it is only a development tool and does not necessarily display the page as it will be seen. Make sure that there is clear evidence that this is a browser and that the URL is visible (or the file name and path are visible instead of the URL). Use screenshots of your pages, taken using the button on your keyboard or snipping tool Chapter 11 & 12, to copy the screen contents into the clipboard. Then paste the clipboard into another package (often a word processor) to present evidence of your work. Ajiro Tech | 7 Designed and Presented by Ajiro
  • 8.
    Home Create aweb page Use stylesheets Web development layers INSERTAT ABLE If you need to create a table within a web page, it is always worth planning it on paper before starting to create the markup. Basic table structure Tables in HTML always start with a <table> tag and end with </table>. Start by adding these tags in the body section of the markup. Note: It would be much easier to use WYSIWYG software to create your tables. Everything between these tags will be included in the table, except for the caption. This is added using the <caption> and </caption> tags, which allows you to display a caption (usually centre aligned) above the table. If a caption is used it must be the first HTML tag after the <table> tag Open the file Task 3.html and view this web page in both the text editor and browser. Replace the text AJIRO TECH with your name. Set the ‘2’ in 10meters 2 and the ‘3’ in 500cm3 as superscript and set the ‘2’ in CO2 as subscript. Set the text ‘Enhancing Text’ into style h1. Print your web page as HTML and as it is viewed in your browser. T HER E A S O NF O RU SI N GT A B LE ST OS TR UC T U RE E L E M E N T SW I T H I NAW E BP A G E Tables can be used to create the basic structure of many web pages. They can be used to organise page layout and are often used in web pages even though their borders may not be visible. In more recent versions of HTML, tables have been replaced by semantic elements and other more complex structures (including CSS structures) to layout full pages, but at this level we will use simple tables to create our structures Ajiro Tech | 8 Designed and Presented by Ajiro Each table row has two pieces of table data. A table cell can contain text, images, other tables, lists, paragraphs, forms, horizontal rules, and so on. Each table row will contain two cells of table data. The tag for table data is <td>. A row can have one or more <td> tags. Between each <tr>and </tr> tag, place start table data <td> and end table data </td> tags like this. the table you need to create has three table rows. The tag for a table row is <tr>. Create the three blank rows between the caption and the end of the table like this.
  • 9.
    Home Create aweb page Use stylesheets Web development layers Table borders This table has been created but does not have a visible border. The word ‘border’ is an attribute. To show the table gridlines you must add a border attribute with a value of "1". An attribute is something that is added to one of the markup commands to give further information/instructions to the browser. Attributes should be in lower case and attribute values should always be enclosed in quotes. Change your markup like this. The only valid border values in HTML5 are "1" and "": "1" makes the border visible. "" hides the table border, yet allows the table to control the structure of the page. Create a new web page with a table that looks like this and has the caption ‘Hours of sunshine last week’. Make sure the top row of the table is in the header section and the bottom row is in the footer section. Print your web page as HTML and as it is viewed in your browser. H E A D E R SA N DF O O T E R SI NT A B LE S Tables can have three sections: a header, a body section and a footer. These are defined using the <thead>, <tbody> and <tfoot> tags, and closed with </thead>, </tbody> and </tfoot> respectively. Notice how these all begin with t (for table). In HTML you must define the table header, footer and then body (in that order) if all three sections are to be included. You can add the table data sections to the footer and body of the table using the tags <td> and </td>. Do not use these tags in the table header. In the table header, create heading cells (which are bold and centre aligned) using the tags <th> and </th> rather than the table data tags. These will set the column headings in heading style. U S EE M B E D D E DC S SI NH T M L Styles can be applied to tables and other HTML elements by placing CSS instructions in a style attribute within the HTML tag. This is called embedded CSS. SETT ABLEANDCELLSIZESINTERMSOFPIXELS Resize a table To avoid tables expanding with data, set fixed or browser-related widths for tables, rows, and columns using the embedded CSS style attribute in the <table>, <tr>, or <td> tags. Ajiro Tech | 9 Designed and Presented by Ajiro
  • 10.
    Home Create aweb page Use stylesheets Web development layers SETT ABLEANDCELLSIZESINTERMS Resize a table OFPIXELS Set the table to fit to 80% of the browser window and the left column to be 75% of the width of the table. Set the top row to be 60 pixels high and the bottom row to be 40 pixels high. Align the table in the centre of the browser window. Set the names of the fruit to be centre aligned and the prices in the right column to be right aligned. To prevent tables from resizing based on cell data, set fixed widths for tables, rows, and columns. Add an embedded CSS style attribute to the <table>, <tr>, or <td> tags with a style attribute to control their width Use px for pixels and do not put a space between the digits and px for example, name:value example, name1:value; name2:value Set the table to be 400 pixels wide and each row to be 50 pixels high. Set the left column to be 280 pixels wide. Ajiro Tech | 10 Designed and Presented by Ajiro Note 3: If more than one property is to be applied these are separated with semicolons, for Note 2: The syntax for CSS elements is the property name, colon, the value to be applied, Note 1:
  • 11.
    Home Create aweb page Use stylesheets Web development layers SETT ABLEANDCELLSIZESINTERMS O F%V A L U E S Set a style attribute for the table tag with the width property and a value of 80%. Use a similar 75% property for the style attribute in any table data (or table header) tag in the left column Create a new web page with a table that looks like this and has the caption ‘AjiroTech visitors 2024’. APPL YSTYLESTOT ABLES Centre align a table in a window To centre align the table within the window, two more style properties must be used with the table tag. These are to set the margin to the left to automatic and the margin to the right to automatic. In CSS, if more than one property is used, the semicolon (;) is used between one property and value and the next Set the row height of the table header (the first row) to 60 pixels and the bottom row to 40 pixels. Use <tr style="height: 60px"> and <tr style="height: 40px"> Horizontally align cell contents To align the text to the centre in the left column, add the style attribute to each table data tag in the table footer and table body, so that the style has the property and value "text-align:center". Make the company name, Ajiro Tech, bold. Make sure the top row of the table is in the header section and the bottom row is in the footer section. Set the table to fit to 70% of the browser window and the left column to be 200 pixels wide. Set the top row to be 60 pixels high. Align the table in the centre of the browser window. Set the contents of row 1 and the names of the countries to be centre aligned, total visitors and the number of visitors and its total to be right aligned. Print your web To align the text to the right in the right column, add the style attribute to the table data for each cell in this column (except the table header) so that the style has the property and value "text-align:right" Ajiro Tech | 11 Designed and Presented by Ajiro Note: Note the American spelling of ‘center’ rather than the English spelling ‘centre’.
  • 12.
    Home Create aweb page Use stylesheets Web development layers Table borders You have already learnt how to set the table borders on or off with a border attribute for the table tag. To set table borders to appear as you want them you can change the border settings in the whole table or parts of the table. You will notice that all of the tables that you have created so far have a double border because the table and the table header/table data parts have separate borders. Display the table on Question 2 with a single, solid border 4 pixels wide, and with internal gridlines 2 pixels wide. Create a single table border Set a style attribute for the table tag with the border-collapse property and a value collapse Set table border widths Table borders can be set using the embedded CSS style attribute with the border property and values. To set the outside border of a table, the style attribute is added to the table tag. The values assigned to this tag must set the border to solid ?px. To set internal gridlines style, attributes are added to the <th> and <td> tags; each of these tags must have the style attribute with border:solid ?px which is only used to show if borders are visible or invisible. Later in this chapter you will learn how to fix styles for all table cells without repeatedly entering the same style attribute for each tag. Ajiro Tech | 12 Designed and Presented by Ajiro Note 1: Table border settings in CSS are different from the border attribute for the table,
  • 13.
    Home Create aweb page Use stylesheets Web development layers Create a new web page that looks like this. Set the width to 80% of the browser window, set both row heights to 60 pixels. Centre align the contents of all cells. Vertically align to the top, centre and bottom of the cell as shown. Edit the web page you created for Task 5 so that: the table has a single border of 6 pixels, the table header and footer have a single border of 4 pixels, and the table data has a single border of 2 pixels. Print your web page as HTML and as it is viewed in your browser. Vertically align table cell contents Data held in table cells can be vertically aligned with embedded CSS so that it fits in the top, middle or bottom of the cell. The style attribute is added to the <td> tag with a property of vertical-align and a value of top, middle or bottom. value to middle. Ajiro Tech | 13 Designed and Presented by Ajiro Note: If you need to vertically align to the centre of the cell, always set the property
  • 14.
    Home Create aweb page Use stylesheets Web development layers Create a new web page to look like this. Table width is 80%, Table and header borders must be 6 pixels and all other gridlines must be 3 pixels. The 1st column must be 40%, 2nd column must be 10%, 3rd column must be 50% of the width of the table. the first row should be 60 pixels high. The webpage should look like this Create a new web page that has a table with two rows. set the width of the table to 80%, set both row heights to 60 pixels, a single solid border of 2px. In the top row include one piece of table data and, in the second row, include three pieces of table data. It should look like this. ADJ USTCELLST OS P ANMORETH ANONET ABLEC OL UM N To create a single cell that spans across all three columns in the top row of the table, you need to add a colspan attribute to the table data <td> tag ADJUSTCELLST OS P ANMORETHANONET ABLERO W To merge cells vertically use the rowspan attribute in the same way as you used colspan Ajiro Tech | 14 Designed and Presented by Ajiro
  • 15.
    Home Create aweb page Use stylesheets Web development layers Cell padding Cell padding is the space between the cell contents and the border of the cell. It can be applied to both the table tag <table> and/or to each item of table cell using table data <td> or table header <th> Open Task 3c.html Copy the table so that there are three tables, one above the other, on the page. Change the captions from ‘Fruit Sales’ to ‘No padding’ for the top table, ‘Padding set to 25 pixels’ for the middle table and ‘Variable padding’ for the lower table. Set the cell padding for both the table, header, footer and table data of the middle table to 25 pixels and the padding of the lower table to have a top padding of 25 pixels, bottom padding of 20 pixels and left and right padding of 15 pixels. Hint in creating Question 5 Copy the table and paste it twice. Place a <br> tag between each table to set a line break. The <br> tag does not have a close tag. Add an ID attribute to each table so we can identify them: they will be called top, middle and bottom In the <table> tag for the middle table, add the single CSS style padding property with a value of 25 pixels For the bottom table we can set the different padding by stating all four values, starting at the top and rotating clockwise in full, for each side This has only set the padding for the table borders. To change each cell the same style attributes, properties and values will need copying and pasting into every <th> and <td> tag. Border spacing The spacing between the borders (border spacing) of individual cells is set in the <table> tag. The style attribute is used with the border-spacing property. Two values can be passed to this property: the horizontal spacing first, then the vertical spacing like this. <body> <table border="1" id="top" style="border-spacing:20px 10px;"> <caption>No padding</caption> If the horizontal and vertical border spacing are the same, you can use a single value Ajiro Tech | 15 Designed and Presented by Ajiro Note: Note: Shortened version of the CSS padding properties. Where padding should be specified
  • 16.
    Home Create aweb page Use stylesheets Web development layers Create the basic markup as you did with the earlier question, starting with the table tags, the table attributes to show the borders, the caption, the header and body sections of the table, then insert the table rows. Open your finished web page from Task 4 For each table cell, set the padding to have a top value of 8 pixels, bottom of 12 pixels, a left value of 20 pixels and a right value of 16 pixels. Set internal and border spacing for the table to 20 pixels. Your final web page should look like this When creating a new table like this, it is wise to add a single letter as the contents of each cell when you create it. In this case a single letter ‘A’ has been added to the top left cell, the letter ‘B’ to the next cell and so on. This is because some web browsers do not display a table cell if it is empty. By adding these single letters it allows you to test the table as you are creating it. The top row of the table header has only two cells. The first of these is a cell that covers two rows. For this you use a rowspan attribute to tell the browser this cell is going to span the first two rows. The second cell in the top row is a cell that covers three columns. Use the colspan attribute to tell the browser that this cell is going to span three columns. I N S E R TA NI M A G E Images (such as pictures or icons) are often used in web pages and are often used for hyperlinks. To complete the web page for Question 5, you need to replace the letter ‘A’ in the top left cell of the table with the image turtle.jpg. To do this you have to tell the web browser the name of the image source, which should be stored in the same folder as your web page. Make sure that you have copied the file turtle.jpg into your Task Work folder. Add the following to the markup. As some browsers may not display the image, you can tell the browser to replace the image with alternative text. This usually describes the image so that the user can still understand what is being shown even though they cannot see the image. Create a new web page with a table that looks like this and has the caption ‘Sales team’. The image that you require is called turtle.jpg. Ajiro Tech | 16 Designed and Presented by Ajiro Note:
  • 17.
    Home Create aweb page Use stylesheets Web development layers Where to store an image Images must be stored in the same folder as the web page. This is called the current folder. Notice in the markup how the filename turtle.jpg is given as the image source. This does not contain any reference to which folder the image is stored in. Because there is no absolute reference to a folder, the browser automatically looks in the current folder for the image. This means that if this web page is opened on another computer, as long as the image is stored in the same folder as the web page, it will work properly. If an absolute reference had been used for a file, for example: <img src="C:/My websites/My pictures/turtle.jpg" alt="Company Logo"></td> File types for images Raster or bitmap graphics There are three common file types for bitmap images used in websites. These are JPEG files, GIF files or PNG files. You can use a graphics package such as Adobe Photoshop or GIMP or Paint.Net to change images from one format to another by opening them and using Save As… to change the file format for the new image. Vector graphics Another file type that is growing in popularity is the SVG file type. This is a vector graphic rather than a raster graphic and is created in another markup language called XML, so images can be created without the use of a graphics package (although many people use packages such as Inkscape to create them). These are fully scalable, so there is no loss of quality if they are expanded. This can make it easier for the visually impaired when using zoom features as the graphics do not become pixelated. Many other vector graphics formats do not work in web pages. Apply alternate text The image has been replaced by the text ‘Company Logo’ defined by the alt text attribute to tell the user what the missing image should be. This text is also used in some browsers by text readers. An image (<img>) tag must have an alternative (alt="") text attribute added for all browsers to display the image as expected. This must have a ‘value’ attached to it within quotation marks, even if this is left empty (although it is bad practice to leave it empty). For any image that you place on a web page it is advisable to always include the alt attribute. Copy the image into your Task Work folder. When the image file is stored in the current folder, this will be displayed. images, stylesheets, etc. Ajiro Tech | 17 Designed and Presented by Ajiro Note: A common mistake made is to use absolute pathways for files, such as Image files added to web pages are usually in bitmap graphics formats such as Note: .jpg, .gif or .png format. Many other image formats, for example, vector graphics such as .tif, will not work in a web page.
  • 18.
    Home Create aweb page Use stylesheets Web development layers A DJ USTA NIM A G ESIZ E Images can be resized using two methods: The first method is to change the size of the displayed image in the markup. This is the easier of the two methods, but often uses large image files, which are slower to upload and can delay the display of a completed web page. The second method is to physically resize the image in a graphics package. This method has the advantage of being able to reduce the file size of an image so that a web page will be displayed more quickly. It has the disadvantage of using lower-resolution images, which can appear pixelated, particularly if you wish to enlarge them. Create a new web page with a table that looks like this and has the caption ‘Last week’. The image that you require is called ptct.jpg. Print your web page as HTML and as it is viewed in your browser Open the file ajirotech1.html Use both methods to resize this image to 80 pixels wide and compare the relative file sizes of the two images. Save both versions of your web page. Ajiro Tech | 18 Designed and Presented by Ajiro
  • 19.
    Home Create aweb page Use stylesheets Web development layers Adjust an image size in the markup Copy the web page and supporting files remora.htm, remora.jpg and turtle.jpg into your Task Work folder. To change the size of an image in the markup use either the width or height attributes within the image tag. For this question the width needs setting to 80 pixels. Resampling an image This process of changing the image quality is called resampling. Images can be downsampled, meaning fewer pixels are used for the image, as you have just done by reducing the image quality. Images can also be upsampled by adding more pixels. Downsampling reduces the file size which helps web pages load more quickly. Image aspect ratio If you change the width of the image to 80 pixels and do not specify a height for the image, it will maintain its aspect ratio. This means that it will keep the same proportions. Sometimes you may be asked to distort an image to give a different effect within a web page. This is done by specifying both width and height but not keeping the aspect ratio of the original image. Find the markup for the image remora.jpg, in the file ajirotech1.html, which looks like this. Comparing the two method Adjust an image size an external package Copy the image that you resized and called remora1.jpg from your into your Task Work folder. When using this technique it is useful to have a small, low-resolution image (called a thumbnail) on a web page. If the user wants to see more detail, they can click on the image and a new window will open containing a high-resolution version of the same image. The web page needs to be amended so that the width attribute is no longer present, and the source attribute within the image tag points to the new filename. This folder contains the two image files and shows you the difference in file sizes between the two methods. Your image sizes may vary from this depending on the resolution you selected when you saved the file. As can be seen here, in this case the new image should load in about 60 per cent of the time the original will take. Ajiro Tech | 19 Designed and Presented by Ajiro
  • 20.
    Home Create aweb page Use stylesheets Web development layers Insert an animated image There are two different methods used to place an animated image on a web page. If the file is an animated GIF, the method is the same as inserting a still image. INSERTAVIDEOFILE Videos can be placed in a web page using the <video> and </video> tags. You must include width and height attributes within the <video> tag, so that the correct space is saved on the page for the video. The controls attribute shows the video controls and allows the user to control (start/pause/maximise/adjust volume, etc.) the video. The video source is different from other HTML elements as it uses a <source> tag as well as the src attribute. In the <source> tag the type attribute tells the browser the file type of the video to be shown. You must include text between the <video> and </video> tags for browsers that do not support HTML5 or videos of Edit the web page saved in Question 5 to replace the image with the moving image turtlelogo.gif this type. video formats, such as .wmv, will not work with the <video> tag. Ajiro Tech | 20 Designed and Presented by Ajiro Note: Accepted video formats are .mp4, .webm and .ogg. Many other
  • 21.
    Home Create aweb page Use stylesheets Web development layers Video controls and autoplay To remove the controls from the video simply remove the controls attribute from the video tag. To ‘autoplay’ the video so that it runs as soon as it has loaded onto the web page, replace the controls attribute with the autoplay attribute. As many browsers refuse to autoplay, unless the video is muted, we must also add the muted Open the file ajirotech.html and save this as Question 9.html Replace the text Place video here with the video wreck.mp4 set the width to 400 pixel and the height to 224 pixels. Replace the text Place audio here with the sound whale.mp3. attribute to this tag. To get the video to play in a continuous loop, loop attribute is used. I N S E R TA NA U D I OF I L E Audio files, sometimes called sound clips, can be placed in a web page using the <audio> and </audio> tags. The controls attribute works in a similar way to the video controls. It allows the user to the control the sound clip. The audio source works in a similar way to the video source. In the <source> tag the type attribute tells the browser the file type of the audio to be played. You must include text between the <audio> and </audio> tags for browsers that do not support HTML5 or files of this type. Ajiro Tech | 21 Designed and Presented by Ajiro
  • 22.
    Home Create aweb page Use stylesheets Web development layers It is not always easy to remember the names of the colours, and many web designers prefer to use hexadecimal codes (often referred to as hex codes) to define the colour of text, backgrounds or objects. Hexadecimal is a counting system where counting is done in 16s (rather than in the tens used in the decimal system). APPL YSTYLEST OELEMENTSWITHINAWEB P A G E Colour is important in web page design for both text and backgrounds. Colour – part 1 Colour is always defined in CSS, either embedded in the HTML or within an attached stylesheet (which you will meet later in the slide). One method is to use colour names as the property values, such as red, green and blue within the HTML code. There are currently only 16 colour names accepted as web standards in CSS and by the World Wide Web Consortium (known as W3C). These are: aqua, black, blue, fuchsia, gray (note the American spelling), green, lime, maroon, navy, olive, purple, red, silver, teal, white and yellow. Other colour names are, however, accepted by some browsers. A table showing these colours and their names is included in the file colourcodes.html specially crafted by Ajiro Ndi and is available with the source files i will send to you. You can open this web page and use these colours in your own stylesheets attached to your web pages. The primary colours when using light (which is very different from the primary colours used in painting) are red, green and blue. All other colours can be made from combinations of these three colours. You will notice that the initial letters are RGB, hence RGB monitors. Each of these colours can be off, partially on or fully on. In hexadecimal, if a colour is off it is set to 00 and if it is fully on it is set to FF. To create the colour for any pixel you must tell the computer how much red, green and blue light to show. This means that all colour codes have six characters, the first two being red, the next two green and the final two blue. This example uses the hex code for red, as the red component is fully on (FF), the green component is off (00) and the blue component is also off (00) Ajiro Tech | 22 Designed and Presented by Ajiro
  • 23.
    Home Create aweb page Use stylesheets Web development layers <h1 style="color:#ff0000">This is red</h1 Open the completed Question 2.html and Edit the web page to look like this. The colour codes you will need are #32879B for the header, #92CDDC for the footer and #B6DDE8 for the table body is in hexadecimal. All of the different combinations of red, green and blue allow more than 16 million different colours to be used. S P E C I F YB A C K G R O U N DP R O P E R T I E S Set the background colour Hexadecimal colour codes can be used with background and foreground colours. For example, in CSS text colours can be changed using the style attribute with a color property. You must set the background colour using the CSS property background-color. Add a style attribute to the <thead> tag like this. <thead style="background-color:#32879b"> Add a style attribute to the <tfoot> tag like this. <tfoot style="background-color:#92cddc"> Because the footer area has coloured text we will add a second style attribute to the <tfoot> tag. Note that both style properties are within the quotes and that a semicolon separates the background-color and color properties (and their values) like this. Add a style attribute to the <tbody> tag like this. <tbody style="background-color:#b6dde8"> <tfoot style="background-color:#92cddc; color:#ff0000"> Ajiro Tech | 23 Designed and Presented by Ajiro Note: The hash symbol (#) tells the browser that the number Note: Note the American spelling of ‘color’, rather than the English ‘colour’.
  • 24.
    Home Create aweb page Use stylesheets Web development layers APPLYSTYLESTOALIST You can include on a web page either a numbered list, which is an Create a web page containing the heading ‘Fruit’ and a numbered list for the following items: Apple, Orange, Pear, Banana and Lemon. ordered list, or a bulleted list, which is an unordered list. Bulleted (unordered) lists can also be nested (placed one inside the other) to give you more flexibility in the design of your web pages. Items to be placed in a list start with the markup <li> and close with </li>. These are used in the same way as the style definitions for headings (styles h1 to h6) and paragraph styles. Each item in the list must have the list tags around it. The way each of these lists is displayed can be changed using CSS. An example of an item placed in a list would look like this. <li>Welcome to Ajiro Tech - Best Cambridge IGCSE and A Level </li> Web page: Create a web page containing the heading ‘Colours’ and a bulleted list for the following items: Red, Yellow, Blue, Green and Cyan Numbered lists Numbered lists are ordered lists in HTML because they are in number order. Place the tag <ol> at the start of the numbered list and the tag </ol> at the end. Ajiro Tech | 24 Designed and Presented by Ajiro
  • 25.
    Home Create aweb page Use stylesheets Web development layers Nested lists Bulleted lists can be nested by having sub-lists. These are created by placing one unordered list within another list. Create a new web page containing the heading ‘Subjects Offered’, a brief introduction and an unordered list of the following subjects offered: ICT, Physics, History. For each subjects offered, make a sub-list of the students offering the subjects. Set these sub-lists as unordered lists. Print the web page as viewed in your browser and as HTML. Change these sub-lists to ordered lists. Again, print the web page as viewed in your browser and as HTML. Create a web page containing the names of two students as a bulleted list. These students are Iyanuoluwa Balogun, Sochi Ogwo. it should contain the subjects their most proficient with it should include the heading “Subject Performance”. Your web page should look like this. Bookmarks A bookmark is a named reference point in an electronic document. It is often used to hyperlink to that point from other locations. Bookmarks can be useful if a web page is very long. Links can then be created to the bookmark and when a link is clicked the page will scroll down or up to the bookmark location. You can also add links to bookmarks on other pages. A bookmark can be added to most HTML elements. Ajiro Tech | 25 Designed and Presented by Ajiro
  • 26.
    Home Create aweb page Use stylesheets Web development layers Bookmarks A bookmark is a named reference point in an electronic Division tags The <div> tag is short for a division or section of an HTML document or page. It is also used as a container for HTML elements that can be styled with CSS (or manipulated with JavaScript, but this will not be covered in this textbook). A division starts with a <div> tag and ends with a </div> tag. Any content can be placed in a <div> tag. document. It is often used to hyperlink to that point from other locations. Bookmarks can be useful if a web page is very long. Links can then be created to the bookmark and when a link is clicked the page will scroll down or up to the bookmark location. You can also add links to bookmarks on other pages. A bookmark can be added to most HTML elements. Hyperlinks A hyperlink is a method of accessing another document or resource from your current application. Hyperlinks do not just relate to web pages: other application software can also use them. Hyperlinks are often used to create menu options with web pages, using either text or images. When you select a hyperlink (usually by clicking the left mouse button), the hyperlink will perform an action. It may move your position within a page, open another page either locally or on the internet, or open your email editor so that you can send an email to a specified place or company. The colour of the hyperlink gives us information about its use. All browsers, using their default settings, display links like this: blue and underlined – a link that has not yet been used purple – a link that has been previously used red – an active link Anchors An anchor is used to create a hyperlink to allow you to navigate within the page or navigate to an external page. An anchor starts with an <a> tag and closes with an </a> tag. Although there are many attributes that can be used with anchors, we will only use the href (Hypertext REFerence) attribute with tells the browser where to create a hyperlink to, and the target attribute which tells the browser in which window to open the linked document or page. You will use these in the next section. Ajiro Tech | 26 Designed and Presented by Ajiro Note: Browsers place a line break before and after the <div> element.
  • 27.
    Home Create aweb page Use stylesheets Web development layers C R E A T EAB O O K M A R K Start by copying `ajirotech3.html` to your Task Work text editor and browser. Add unique, meaningful IDs folder. Open it in (`top`, `html`, a Edit the web page ajirotech3.html so that each new section contains an anchor. Use these anchors to create hyperlinks from the appropriate text in the first paragraph. Make the word ‘top’ in the last line a hyperlink to the top of the page. Make the words ‘IGCSE ICT YouTube Channel’ a hyperlink to the website https://youtube.com/@ajirotec h. `WYSIWYGs`, `right terms`, `stylesheets`, `tables`, `ajiro tech`) to each section. Create bookmarks before linking them. <h1 id="top">Website Authoring</h1><hr You can see that the id attribute is inside the tag defining the style for the text. The value for this attribute (the bookmark name) is placed in speech marks. This ID will be used in all hyperlinks to navigate this point. The <hr> tag used in this example is another single tag (it does not have a closing tag) that draws a horizontal line across the page. This is not part of the bookmark. Add the other bookmarks to the markup, one for each section of the document structure of the markup, often in the opening or closing speech Ajiro Tech | 27 Designed and Presented by Ajiro If the anchor name is visible in the browser view of the page it Note: often means that you have made a syntax error (an error in the marks around the value).
  • 28.
    Home Create aweb page Use stylesheets Web development layers THEUSEOFRELA TIVEFILEP A THS When creating a hyperlink reference to another file, particularly one stored locally, it is really important to use a relative file path, such as: <a href ="next _ page.htm"> This is better than using an absolute file path such as: <a href ="C:my documents/my folder/html/next _ page.htm"> CREA TEAHYPERLINK Hyperlinks within a web page In the final sentence, find the word ‘Back to the top’. This will be used to create a hyperlink to the bookmark with the name ‘top’ that you created earlier. The hyperlink is created using an anchor. The two anchor tags are placed each side of the word ‘Back to the top’. The markup includes a hyperlink reference (the markup attribute for this is href) and the name of the destination anchor. This always inside speech marks and preceded by the # Hyperlinks to other web pages anchor name is symbol While either of these is likely to work on your computer, other computers Therefore, would not are unlikely to have the same folder structure and filename. if you used an absolute file path, the file ajirotech2.html be found on another computer system and the hyperlink Hyperlinks can be created to another web page stored locally, usually in the same folder as the current web page, or to an external website on the internet. The markup for both of these links has the same syntax (structure). The only difference is the address of the web page that the hyperlink is to go to. References to pages stored in the same folder as your web page just have an address without the URL. To link to a local file called ‘ajirotech2.html’ would not work. The same reasoning applies to images and other objects included in your web page where relative references must be used rather than absolute references. Ajiro Tech | 28 Designed and Presented by Ajiro
  • 29.
    Home Create aweb page Use stylesheets Web development layers Open a web page in a new browser window When a web page is opened, it may open in the current window or it may open in Open the web page ajirotech4.html and replace the text YOUR NAME after Last Edited by with your name. Edit the web page so that each new section contains an anchor. Use these anchors to create hyperlinks from the appropriate text in the first section. Make the word ‘top’ in the last line a hyperlink to the top of the page. Make the words ‘Ajiro Tech’ a hyperlink to the website https://youtube.com/@ajirotech. Print the HTML view of this web page a new window. This is set using the target attribute. This attribute is part of the anchor and tells the browser which window to use for the web page that you are going to open. The target attribute can either be set as a default setting in the head section of the markup or as an individual setting for a hyperlink within the body section. If the target attribute is not used, the browser will decide where to open a web page. To set a target window for a single hyperlink, add the target attribute to the first anchor. Some target attributes have specific functions. If a target name of _blank is applied, this will open in a new browser window. If _self is applied it will open in the current window. Other target names, such as _parent and _top, are reserved and perform different functions with frames, which are beyond the scope of this book. Any other target name that you use will open the specified web page in a window with that target name, if it exists, or open it in a new window with that target name. Ajiro Tech | 29 Designed and Presented by Ajiro
  • 30.
    Home Create aweb page Use stylesheets Web development layers Using your web page ajirotech4.html, make the hyperlink you created to the Ajiro Tech website open in the same window and the hyperlink to Ajiro’s personal profile open in a new window called _aj Create a new web page that contains a hyperlink to prepare an email message to be sent to ajirondi@gmail.com with the subject line ‘My ICT Score’. Use a hyperlink to send an email message Hyperlinks from web pages, other applications packages or documents can be used to open an email editor and prepare a message to be sent to another person or company. This is very useful in a website, where you can set up your email address and subject line within the markup, instruct the browser to open the email editor and insert these details into a new message when the hyperlink is selected. The format for this is very similar to the hyperlinks shown earlier in this slide. In place of the URL or path of a web page, the mailto: instruction is placed within the hyperlink reference of the anchor. This is followed by the email address of the recipient. To include the subject line for the message, this is included by specifying subject= followed by the text for the subject line. The whole hyperlink reference is enclosed within speech marks. Note how the space in the text ‘My ICT Score’ has been replaced in the markup with %20. This is the hex value for the ASCII character 32, which represents a space. There should not be any spaces inside the speech marks for the hyperlink reference. However in html 5 it works with space for the subject line. Create a hyperlink from an image Open the file ajirotech.html Make the remora1 image in this web page a hyperlink to the web page remora.html Ajiro Tech | 30 Designed and Presented by Ajiro Note:
  • 31.
    Home Create aweb page Use stylesheets Web development layers Images can be used as hyperlinks in the same way as text. To create a The function of metatags Metatags are not displayed in the browser but hold important information that the browser requires, such as specifying the character set, page description, keywords, author of the document, and the viewport settings. These functions tell browsers how to display the page and they tell search engines about keywords, which helps them list the page in the results of relevant searches. Further explanation of all these follow. hyperlink to the web page remora.htm, add this anchor tag with its href attribute and value so that it surrounds the image tab remora1 The head section At the start of the slide we stated there are two parts to every web page, the head section and the body section. The head section is a container for all the head elements, such as titles, stylesheets and metadata. The word metadata means data about other data. The head section is always placed between the <html> tag and <body> tag. The metadata about the HTML document is not displayed in the browser. We will study some of the tags used for the metadata later in this slide – these are called metatags. Use metatags As we have already learned, a metatag is a tag that holds metadata. It uses the <meta> tag to open it and no closing tag, it is a self-closing tag. We will use only three attributes with the <meta> tag, these are: charset, name and content. Metatag attributes – charset To define the character set used by a web page, we use the charset attribute. This specifies the type of characters (called the character encoding) that are displayed. There are hundreds of character sets, but no browser can contain them all, so we will use only one of two common examples that are used for English. These are UTF-8, which is for Unicode, and ISO-8859-1, which is for the Latin alphabet. Insert a page title This is added to the web page to define the title for the page. You have already added this to all of the web pages you have worked on so far, but have not explained what it does. It can contain only text and is displayed in the web page tab or the browser’s title bar when the page is opened by a web browser. Ajiro Tech | 31 Designed and Presented by Ajiro
  • 32.
    Home Create aweb page Use stylesheets Web development layers Metatag attributes – name The name attribute is used to specify the four other elements required for this question, these are: author, description, keywords and viewport. Each of these name attributes is followed by a content attribute. Place, into the appropriate section of the HTML, metadata to: define the character set used to UTF-8 include your name as the author of the web page add a description of the web page set the keywords to be the words HTML, web page creation, web development, stylesheet, and WYSIWYG set the viewport to match the width of the device and the initial scaling to 1. Set the web page so that any hyperlink from the page will open in a new window or tab. Metatag attributes – content The content attribute is used with the name attribute and contains the value assigned to the name. This value is in the form of text. Define the author To include the name of the author of the web page you must use both the name and content attributes. Within the head section add the following metadata, changing the content so that it contains your name rather than Ajiro Ndi Ajiro Tech | 32 Designed and Presented by Ajiro
  • 33.
    Home Create aweb page Use stylesheets Web development layers Keywords for a search engine The keywords are used by search engines to try and find websites that match a user’s search string. The more relevant keywords your website contains, the better the chance of it appearing near the top of the search results. It is therefore better to have lots of keywords in your metadata, using the sorts of words or phrases that a user may type into their search engine. Some examples also include common misspellings of the words and phrases – for example if HTML was to be included you may also add .htm, HTM and .html. For this question you are given the keywords to be used as content in the metadata: these are HTML, web page creation, web development, stylesheet, and WYSIWYG, so you will include only those in the content section. As more than one keyword will be added to the content attribute, each value must be separated with a comma. Within the head section add the following metadata. Viewport settings The viewport is the user’s visible area of the web page. Using the viewport setting can make a significant difference when using a smaller display size to view a web page, for example, on a mobile phone or tablet. There are two content parts to the viewport, the first is the width, which should normally be set to the width of the device, and the second part is the initial scaling for the web page, which would usually be set to 1.0. For this question (and probably for most web pages) these settings are required. Unfortunately, you cannot test these elements (apart from viewport if you publish the web page and then load it onto different devices) to make sure that you have made no errors, so carefully visually verify that you have made no typing errors. Ajiro Tech | 33 Designed and Presented by Ajiro Note:
  • 34.
    Home Create aweb page Use stylesheets Web development layers Make the image a hyperlink to send an email message to ajirotech@gmail.com. with the subject line ‘Expenses’ and the body text ‘Please send me updated expenses details.’ Place meta data to: define the character set used to ISO-8859-1 include your name as the author of the web page set the keywords to the words PTC, travel, and expenses set the viewport to match the width of the device and the initial scaling to 2. Set the web page so that any hyperlink from the page will open in the same window or tab. Print your web page as HTML and as it is viewed in your browser S ETAD E F A U L TT A R G ETW I N D O W You have already studied how to use the target attribute within an anchor tag to open a web page in a new browser window, or in the same window, etc. If you have a web page with several hyperlinks that require the same type of action (same target window/tab or a new window/tab) you can make this the default setting for the page. To complete the task, you must set the web page so that any hyperlink from the page will open in a new window or tab. The default settings for this are also in the head section and are added using the <base> tag. Edit the web page that you saved for Task 10. Set the background colour for the table to #FFFF00 and an outside border of 4 pixels, so it looks like this. Edit the html in the file ajirotech6.htm so that: the text Ajiro Ndi is set in style h1 each paragraph style with an ID is set in style h2 the hyperlinked items between ‘What is HTML?...’ and ‘…Other resources’ becomes a bulleted list and this bulleted list is indented by 50 pixels from the left edge each occurrence of the text ‘HTML’, after the bulleted list, is set to the class called red the final sentence is set in style h3 the whole table is formatted to be centre aligned. Ajiro Tech | 34 Designed and Presented by Ajiro
  • 35.
    Home Create aweb page Use stylesheets Web development layers Keywords for a search engine When this is saved and opened in a browser the bulleted list appears over to the left of the body text and you have been instructed to indent this bulleted list by 50 pixels from the left edge. This could be completed by adding a style attribute to each <li> tag, but that would require you to enter the style information six times. Rather than do this repeatedly, you can use a single division <div> tag. Place the <div> and </div> tags around the bulleted list and add the style attribute, its declaration (margin-left:) and value (50px) to the <div> tag APPL YSTYLESANDCLASSEST OTHEHTML Copy the files ajirotech6.htm and ajirotech1.css into your Task Work folder. From your Task Work folder, open the file ajirotech6.htm in editor. Locate, at the start of the body section, the markup for the text ‘Ajiro Ndi’. Change the style from paragraph style <p> and </p> to style h1 Locate throughout the document each paragraph tag that has an ID attribute, like this. For each of these seven opening and closing tags, change the style from paragraph style <p> and </p> to style h2 Apply a class to elements within a web page To set each occurrence of the text HTML to the class called red we cannot use the <div> tag, as this would place a line break in the text and each time the text ‘HTML’ appears it is within a sentence. Find the first ‘HTML’ in the document. To make the text go red, place anchor tags <a> and </a> around ‘HTML’ and use the class attribute followed by the class name red Locate the hyperlinked items in paragraph tags between ‘What is HTML?...’ and ‘…Other resources’. Change each of these items from paragraph style to list style by replacing the <p> and </p> tags with <li> and </li> Locate the final sentence and change the tags from paragraph tags to style h3 Ajiro Tech | 35 Designed and Presented by Ajiro
  • 36.
    Home Create aweb page Use stylesheets Web development layers While styles can be set with HTML tags, normally they are defined in the presentation layer of the web page in CSS format. You have already embedded some presentation layer elements in the HTML using the style attribute. These are called in-line styles. Styles may also be defined in the head section of a web page or defined in an external stylesheet. If stylesheets are used, the stylesheet is attached to the web page in the head section of the markup. As we have already seen, styles can be applied individually to each page, but it is more efficient to write, edit and attach one or more common stylesheet/s to all the pages in a website. This collection of styles is saved in a different file in a cascading stylesheet (.css) format. USESTYLESHEETS Using styles in your web pages helps you to be consistent in the way the pages look. Using styles is much quicker and easier than applying individual settings – such as font face, font size, text alignment and font colours – to every piece of text in each web page that you create. You have already met the heading styles, h1 to h6, and the paragraph style, p, earlier in the slide. When you used these styles, the web browser did not find any of these style definitions in your HTML markup, so it used its own default settings. However, you can set your own definitions for each style and the web browser will attempt to apply these styles to the page. T HEC HAR A C T E RI STI CSOFAC ASC ADIN GSTYLESHEET A cascading stylesheet is a simple way of adding style (for example, fonts, colours, spacing) to web pages. One or more of these cascading stylesheets can be attached to a web page, and the styles in the stylesheet will be applied to that page. Where more than one web page is used, the styles only have to be defined once and then attached to all the web pages. In-line styles, defined within the HTML, usually override styles attached from an external stylesheet. If more than one stylesheet is attached to a web page at the same time, those attached later in the markup have priority over earlier ones. If a style has more than one declaration of the same property, the last value is used for the property. Styles are not only set for text, but can also be used to define page layout, colour schemes and default settings for other objects and links on the page. Using a consistent style is often important to give a ‘corporate feel’ to a website. Particular elements, such as colour schemes, table presentation, logos and font faces, are often used to aid recognition of well-known companies or brands. Ajiro Tech | 36 Designed and Presented by Ajiro
  • 37.
    Home Create aweb page Use stylesheets Web development layers CSSSYNT AX CSS rules have a selector and a declaration block like this. Open a copy of the web page that you saved in Question 3. Add an external stylesheet to this page to define the table header and table data so that they each have a solid border 4 pixels wide. Each element has one or more declarations, each separated by a semicolon. Each declaration has a property name and a value, separated by a colon. Each declaration block is surrounded by curly brackets. The element name/s, in this case td and th, are followed by curly brackets {}. In this example: you have set each piece of table data and each table header so that its border property has a solid border that is 4 pixels thick. By defining the two elements td and th at the same time, you have saved yourself extra work. To make the CSS easier to read, you can put one declaration on each line, like this. h1 {color:#ff0000; font-size:14px;} Ajiro Tech | 37 Designed and Presented by Ajiro
  • 38.
    Home Create aweb page Use stylesheets Web development layers Save styles in cascading stylesheet format Save this file using the filename ajirotech2.css in the same folder as your web page. Note: Make sure that you use the .css file extension and not .htm or .txt. Using external stylesheets saves you lots of time. One stylesheet can be attached to many web pages and one style can be attached to every element on those pages with little effort. A TT A CHANEXTERNALSTYLESHEETT OAWEBP A GE In the HTML window, add this line of text below the title tags in the head section. <link href="ajirotech2.css" rel="stylesheet" type="text/css"> Edit the web page that you saved for Task 13 so that the styles in the table, table head and table data are removed and edited to become a new external stylesheet called ajirotech3. Attach this stylesheet to your web page. Print your stylesheet, and your web page, both as HTML and as it is viewed in your browser. USERELA TIVEFILEP A THSFORA TT A CHEDSTYLESHEETS Make sure that you do not put an absolute address in a hyperlink reference, for example: A D DC O M M E N T ST OAST Y L E SH E E T Although you will often be told to place your name and candidate details as text on the web page, this is not as easy in a stylesheet. Text placed in a stylesheet will often stop the styles from working. Any text must have /* before it and */ after it, so that the browser knows to ignore it <link href ="C:/my documents/my folder/css/ajirotech2.css" rel="stylesheet" type="text/css"> as this is only likely to work on your computer. Other computers are unlikely to have the same folder structure and filename. The link (with the relative file path) is attached to the web page so when the page is opened or refreshed, the browser searches for the file ajirotech2.css and applies the styles from this file to the web page. The filename in this line of markup must match the name of the CSS file that you saved. Ajiro Tech | 38 Designed and Presented by Ajiro Note:
  • 39.
    Home Create aweb page Use stylesheets Web development layers Select the folder called Task Work in your Documents window. Copy the file Question 22.htm into this folder. Open this file in your text editor and in your web browser. Copy the files style1.css and style2.css into this folder. Change the title of the web page to Ajiro Tech - Question 22. To apply the styles from the stylesheet style1.css, you must attach it to the web page. Move the cursor to the text editor containing the HTML and add this line of text below the title tags in the head section of the markup, like this. Save this web page. View this web page in your browser. Open a copy of the web page and stylesheet that you saved in Question 20. Add your name and a brief description of the stylesheet as comments to the stylesheet. The page content has not changed but the styles applied to the page are very different. Notice that the font face, sizes, colours and alignment have all been specified in the stylesheet. This stylesheet is a poor example because it contains too many variations. If you change the markup to attach style2.css to the page rather than style1.css, you should see something like this. This is the same web page again, but with the slightly improved stylesheet style2.css, which has a background colour defined in the stylesheet. You will discover how to create and amend these stylesheets later on this You can see that the comments can be on a single line or on more than one line. Only one /* and */ are required for each comment. Check that the stylesheet still works with the web page. Open a copy of the web page that you saved in Task 1.html. Change the title of this page to Ajiro Tech - Question 22. Apply the stylesheet style1.css to this page and save this web page. Change the attached stylesheet to style2.css and save this with a new filename. Ajiro Tech | 39 Designed and Presented by Ajiro
  • 40.
    Home Create aweb page Use stylesheets Web development layers If a value within a style contains more than one word, it must be placed in speech marks like this. h2 {font-family: "Times New Roman", serif} If a value within a style contains more than one word, it must be placed in speech marks like this. Stylesheets are saved in .css format (in a similar way to saving in .htm or .html format) from the text editor. S P E C I F YF O N TPR O P E R T I E S Font families Individual fonts can be specified, but these are not always available in all browsers, so there are a number of generic font families, including serif and sans-serif fonts, which can also be used. These font families include ‘serif’, ‘sans-serif’, ‘cursive’, ‘fantasy’ and ‘monospace’, which has proportional spacing. The generic font family must always be listed after the other preferred font/s. The font-family property must contain a hyphen. In the example above, font-family is set so that the browser will look at the list of fonts installed in the machine and will try to find Times New Roman first (it is in speech marks in the stylesheet because there are spaces in the font name); if it cannot find it, it will find any generic serif font that is available. It is good practice to offer the browser two (or more) different font families and a generic font type. These are usually a Windows font, a MAC OS font and a generic font type. The order that these values are placed within the font-family declaration is important as the browser will try to locate the first font in the list. If that is not available in the system being used then it looks for the next font in the list, until, if none of the specified fonts are available, it will finally reach the generic font type. When this happens, the browser will display the font-family that it has stored for this generic font type. CSS text It is very easy to create a cascading stylesheet in your text editor. The structure of a .css file has a few very simple rules. Stylesheets do not have tags in them as they are not a markup language. Each style has a style name, which is called a selector. The selector is followed by curly brackets {}. Inside these curly brackets are the property for the style, followed by a colon, then the property’s value. For example, if you want to set the text in style h1 to be centre aligned, it would appear like this. h1 {text-align: center} Note the American spelling of ‘center’. Each style can have a number of properties and values. If there is more than one property then each property is followed by a semicolon. For example, if you want to set the text in style h1 to be centre aligned, 16-point high and bold, it must appear like this. h1 {text-align: center; font-size: 16pt; font-weight: bold; } Ajiro Tech | 40 Designed and Presented by Ajiro
  • 41.
    Home Create aweb page Use stylesheets Web development layers Copy the last web page you saved in your Question 22 folder into your Task Work folder and rename it task21ab.htm. Open this file in your text editor and in your web browser. Edit the title of the web page so it becomes Ajiro Tech - Question 23. To attach the stylesheet to the web page, you must edit the link line in the head section of the markup so that it becomes: Save the web page. You are going to create the stylesheet in the second copy of the web authoring package (Microsoft Expression Web 4). Enter the following style definitions into it. Carefully verify your stylesheet by checking this original document with your typed copy. Save the file using the filename serif.css. Refresh your browser so that you can see the effect that this has on the web page. A serif font is one that has small lines or strokes (called serifs) at the ends of characters, like this: A font that does not contain serifs is known as a sans-serif font Open a copy of the last web page that you saved in Question 22. Create a new stylesheet called serif.css that sets all the styles as generic serif fonts. Apply this stylesheet to your web page. View the web page in your browser. Change the generic settings in the stylesheet to a different generic font style. Save the stylesheet with a new name. Try all the generic style settings to see what each one looks like Ajiro Tech | 41 Designed and Presented by Ajiro Note:
  • 42.
    Home Create aweb page Use stylesheets Web development layers Group style definitions As all the styles have the same values for the font-family property, you can group all of the styles together and change the value only once. This stylesheet can be simplified to this single line. Edit it and save it so that it replaces the old version. Refresh the browser to check that it still works. Edit this stylesheet so that it sets the font-family to ‘sans-serif’. Save this file using the filename sans-serif.css. Change the markup in the HTML to link to this file and save this web page. Repeat this process for each of the other generic font families. Ajiro Tech | 42 Designed and Presented by Ajiro
  • 43.
    Home Create aweb page Use stylesheets Web development layers Open a copy of the web page that you saved in Question 23. Create a new stylesheet called ajirotech4.css that sets all the styles so that the font Trebuchet MS is used, if this is not available then set it so Arial is used, if this is not available then use the browser’s default sans-serif font. Open a copy of the web page and stylesheet that you saved in Question 24. Edit this stylesheet so that style h1 is 36 point, h2 is 24 point, h3 18 point, h4 16 point, h5 14 point, h6 12 point and the paragraph style is 10 point. Save this stylesheet as ajirotech5.css. Change these settings to try and get similar results using the settings for pixels (the number will depend on your monitor display settings), picas, inches centimetres and millimetres. Breakdown: You will notice that the Trebuchet MS has been included in speech marks (as it is more than one word) and that there is a comma used to separate each value within the font- family declaration. Carefully verify your stylesheet by checking this original document with your typed copy. Save the file using the filename ajirotech4.css Because all of the font settings are different in this case, it is more sensible to keep all of the settings for each style together. It is possible to produce a stylesheet giving these results like this. Font size The font-size property must contain a hyphen and can be followed by absolute heights, by setting values relative to each other, or a mixture of both. Absolute values can be used to set the number of points, picas, or pixels high, for each character. The sizes specified are set as numbers with ‘pt’ to show it is in points, for example an 18-point font is written as 18pt. Alternatively, font size can be measured in picas, which is abbreviated as ‘pc’. The abbreviation for pixels is ‘px’. Other absolute values include ‘in’ to show the measurement in inches, ‘cm’ for centimetres or ‘mm’ for millimetres. Do not place a space between the number and the abbreviation: 24px sets a 24-pixel height, but 24 px will not set the value to pixels. Ajiro Tech | 43 Designed and Presented by Ajiro
  • 44.
    Home Create aweb page Use stylesheets Web development layers This works, so does keeping the style definitions together like this. Open the file you saved in Task 2. At the top of the page add a new title ‘Aligning text’ in style h1. Create a new stylesheet called align.css Set the heading style h1 to be centre aligned. Set style h2 to be right aligned. Set style p to be left aligned. Breakdown: attaching a new stylesheet called align.css create a new stylesheet like this. Font size A font style (or class within a style) can be aligned in one of four different ways. You can use the text-align property to format text so that it is left aligned, centre aligned, right aligned or fully justified, as shown in this sample stylesheet. The text-align property must contain a hyphen. Ajiro Tech | 44 Designed and Presented by Ajiro
  • 45.
    Home Create aweb page Use stylesheets Web development layers Enhance text within a stylesheet You have already used the color and background color properties to enhance text in earlier questions and we will study these enhancements in more detail later in the slide. Other enhancements are available, including to embolden text (make it bold), italicise text (make it italic) and underscore (to underline text). Each of these uses a different property, but the default value for these three enhancements is set to normal. To get bold text, set the font-weight property to ‘bold’, To italicise text, set the font-style property to ‘italic’, To underline text, set the text-decoration property to ‘underline’ Notice that each property and its value/s are on a new line. This makes it easier to read and check for mistakes Create a new stylesheet called ajirotech5.css and attach this to the web page called Question 26. This stylesheet will set style h1 to a bold, italic, 18- point font. If ‘Times New Roman’ is available the browser will use that, otherwise it will choose ‘Times’, but if this is not available the browser’s default serif font will be used. Make this text centre aligned Ajiro Tech | 45 Designed and Presented by Ajiro Note:
  • 46.
    Home Create aweb page Use stylesheets Web development layers Text colour You can use the color property to change the colour of text within a style. Earlier in the slide you changed text colour with an embedded CSS color property in the HTML. As mentioned earlier, it is usual to work with hex colour codes. These are always preceded by a hash (#) symbol. Create a new stylesheet called ajirotech7.css and attach this to the web page called task15.html This stylesheet will set: h1 as an italic, centre aligned, 24-point font – if ‘Helvetica’ is available the browser will use that, otherwise it will choose ‘Arial Narrow’ but, if this is not available, the browser’s default sans-serif font will be used h2 as a bold, right aligned, 16-point font – if ‘Courier Narrow’ is available the browser will use that, otherwise it will choose ‘Courier’ but, if this is not available, the browser’s default proportional spaced font will be used h3 as an underlined, left aligned, 16-point font – if ‘Courier Narrow’ is available the browser will use that, otherwise it will choose ‘Courier’ but, if this is not available, the browser’s default proportional spaced font will be used p as a 14-point, left aligned, serif font. Edit your files for Question 27 so that style h1 is red. Breakdown: The first two characters (ff) are red, 00 for green and 00 for blue. Edit your files for Question 28 so that style h1 contains the following colour hexadecimal components: red 0, blue ff and green 00. Breakdown: The value #0000ff is correct: the single 0 for the red component has been turned into 00, and the colours have been placed in the correct RGB (red-green- blue) order. Print evidence of your stylesheet, the HTML source and the browser view of the web page with the stylesheet attached. Ajiro Tech | 46 Designed and Presented by Ajiro
  • 47.
    Home Create aweb page Use stylesheets Web development layers Edit your files for Question 2 so that the web page has a khaki (f0e68c) background colour. Add a new selector to define the body section of the web page. Use the background-color property to have a new value like this. Copy the files saved in Task 15. Edit the stylesheet so that each style has the following colours. All values are in hexadecimal, and only hexadecimal codes should be used in your stylesheet: h1 h2 h3 h4 is blue has has has a full red component, green is 45 and blue is 0 8B blue, 3D green and 48 red 8B for red and blue, and 0 green p is half red and no other colour. Print evidence of your stylesheet and page with the stylesheet attached the browser view of the web The background-color property must contain a hyphen. Save the stylesheet and refresh the browser to test it. The background colour can be applied to the whole page (like this), or to tables, table rows, headers or footers with a single definition in the stylesheet. S P E C I F YB A C K G R O U N DP R O P E R T I E S Background colour In Question 10 you set the background colour of a table using an in-line (embedded) CSS style. It is possible to do this for each element, but is much easier to define it once in an external stylesheet that can be applied to all pages and will set all elements on the page. The background-color declaration can also be used with other styles to give different effects. Try defining the CSS for different styles like this. h1 {background-color: #0000FF} Ajiro Tech | 47 Designed and Presented by Ajiro Note:
  • 48.
    Home Create aweb page Use stylesheets Web development layers Add to the body section of the stylesheet ajirotech13.css new background-image and background-repeat properties with these values. Each of these properties must contain a hyphen. Save the stylesheet Copy the files saved in Task 16. Edit the stylesheet so that the web page has a background colour with a red component of f2, a blue component of 8e, and e8 green. All values are in hexadecimal, and only hexadecimal codes should be used in your stylesheet. Print evidence of your stylesheet and the browser view of the web page with the stylesheet attached. and refresh the browser to test it. The page will look like this. Background images Background images can be applied to the body section of a web page using the background-image property with a value containing the Uniform Resource Locator (which is often shortened to URL) followed by the image’s address or filename. This can be used to place either a single background image in the centre of the page or can be repeated to place lots of copies of an image tiled to make the background. Tiled background images Try changing the value for the to this. background-repeat: repeat background-repeat declaration Edit your files for Question 30 so that the web page has the file ajirotech_star.png as a single background image placed in the top right of the window. Ajiro Tech | 48 Designed and Presented by Ajiro
  • 49.
    Home Create aweb page Use stylesheets Web development layers Position a background image A single background image can be positioned within the browser window. Add a new background-position declaration like this to the body style in ajirotech13.css. Although this positions the image into the top right corner of the window, some of the text overwrites the background image. In some cases, this effect can be very useful (for example, a watermark) but in this case it is difficult to read all of the text, as shown here. By adding a margin-right definition like this, you can force the contents away from the image. The page now looks like this. Open the stylesheet ajirotech.css and the web page question32.html. Edit the stylesheet so that the web page has a tiled background image using the file brick.png. Print evidence of your stylesheet and the browser view of the web page with the stylesheet attached. Copy the files saved in Question 32. Replace the background image with the file wall.png. Repeat this image down the left side of the web page only. Do not allow any of the text to overlap these images. Ajiro Tech | 49 Designed and Presented by Ajiro
  • 50.
    Home Create aweb page Use stylesheets Web development layers SPECIFYT ABLEPROPERTIES You have already created and styled tables in the content layer earlier in this slide. You embedded style attributes for the table, table rows, table headers, table footers and table data, including setting the padding and border spacing. To revise each of these skills and place the table properties in an external stylesheet you will try one more question on tables. Open the files question33.html and ajirotech16.css. Edit the stylesheet so that the table is aligned centrally within, and 70% the width of the browser window. Set all borders and gridlines to be collapsed, 3 pixels wide and coloured with no blue or green components and a red component of 99 in hexadecimal. Set the background colour for the whole table to ffff99. Set all text to be aligned centrally both horizontally and vertically within the table. Breakdown: To set the table to be aligned centrally within the window and to 70% the width of the window, add this CSS to the end of the stylesheet. Breakdown: The background-color property and properties to align text vertically and horizontally within the table can also be added, again making sure the curly brackets are only at the end of the final value, like this. To set the borders to be collapsed add, in the table section, the border-collapse property and value like this. Note how the closed curly bracket has now moved to the end of this declaration. To make sure that all other elements for the borders are applied to both the table and table data, create another block with two selectors and a shortcut border declaration like this. If a table header was present this could also be added here, separated by another comma. Ajiro Tech | 50 Designed and Presented by Ajiro
  • 51.
    Home Create aweb page Use stylesheets Web development layers STYLESANDCLASSES You have defined styles for elements within a web page, such as a paragraph. But suppose you wanted just one paragraph in a web page to have some additional formatting, such as different coloured text? You can easily do this using classes. These are useful for adding to or changing styles without defining a completely new style. You can define a class in the stylesheet by using the dot or full stop (.) symbol. For example, this stylesheet defines the style h1 in the normal way. CREA TEANDAPPL YACLASS You will create two new classes in the stylesheet. You will call these b_row and right. When you define a class it has a full stop at the start of the class name. Everything else in terms of structure and declarations is the same as a CSS style. In the stylesheet, add the following text. It also defines a class called right that can be used with any style to change the colour and alignment of the style that it is applied to. This is also useful within tables as you may define the layout of all tables in the same way, using the table and td styles, yet add variations to this by adding a class. h1 {text-align:left} .right {color:#0000ff; text-align:right} These two classes need to be applied to the HTML. We will start with setting the table footer as red text. (We could also apply these styles to the table row, or to the table data). It might appear easier to apply only one of these, to the <tr> tag, but as the right cell of this row will also need to be right aligned, we will apply the class separately to the table data. Edit the markup for the table footer to look like this. Edit your files for Question 33 so that the right column of the table is right aligned and the bottom row of the table is coloured #a00000. A common error is to include a full stop before the right and b_row class, note that there is no full stop here, that is only used when defining the style. When it is added to the right cell in the footer there will be two classes added to the same <p> (paragraph tag) and both are held within the quotes, so the markup looks like this. Ajiro Tech | 51 Designed and Presented by Ajiro Note:
  • 52.
    Home Create aweb page Use stylesheets Web development layers Open the stylesheet called ajirotech18.css and add a new class within this stylesheet that changes the default style to be right aligned and blue. Open the web page called task 19.html and apply this class to each line of text that starts with the word ‘This’. CSST ABLES Table definitions can be set in external stylesheets. The selector can be set for the whole table or for elements, such as the table header, table rows and individual cells of table data. For the first style the selector says the whole web section page. This is the same as the body Add to the stylesheet the background colour for all of the table Add an external stylesheet to your answer to Task 4.html to set the following styles: To change the table cells, add the td selector and a background-color property with a value of #2eb757 You will see that the table background is still visible between the cells with the table data, but the table data is now a green colour. Now add the thead selector and a background-color property with a value of #cfcf00 save the stylesheet as ajirotech19. All values are in hexadecimal. Show evidence of your method. Ajiro Tech | 52 Designed and Presented by Ajiro
  • 53.
    Home Create aweb page Use stylesheets Web development layers Open the stylesheet in your text editor. For the external borders add these four lines to table section of the CSS. Copy the files saved in Task 3c.html. Attach an external stylesheet named ajirotech20.css to this web page that defines the web page with a background of ff8c00 and a table with a background colour of ff4500. The table header should have a background with ffd700 and all other cells in the table should have a background with ffff00. All values are in hexadecimal. Place a single image of a sun (using the file sun.png) in the top right corner of the web page and make sure no other elements on the page could overwrite this. Print evidence of your method. For the internal gridline add these two lines to the table data section of the stylesheet. They are other values for the border-style, such as dashed, dotted or double. CSS table borders and gridlines You may be asked to set internal gridlines and/or external table borders for tables. As you created tables earlier in the slide, you will now be able to set the cell padding and spacing within a stylesheet as well as define table and cell borders within it. To set the border width of internal gridlines you must adjust the border width of the table data (or table header); for the external borders set the border for the table. Copy the files saved in Task 20.html Edit this stylesheet and name it ajirotech22 so that the table has a solid red border 4 pixels wide and cell padding of 10 pixels. Align all text in the table to the centre of each cell. All values must be in hexadecimal. Print evidence of your method. Edit the external stylesheet for your answer to Question 35 so that the table has single black external borders 4 pixels wide and internal gridlines 2 pixels wide. Ajiro Tech | 53 Designed and Presented by Ajiro
  • 54.
    OUR TEAM @AJIRO TECH Experienced and Certified Cambridge Tutors Samuel Ayodeji Physics & Mechanics Adedayo Jimoh Mathematics Gideon Sunday Chemistry Ajiro Ndi ICT & IT
  • 55.