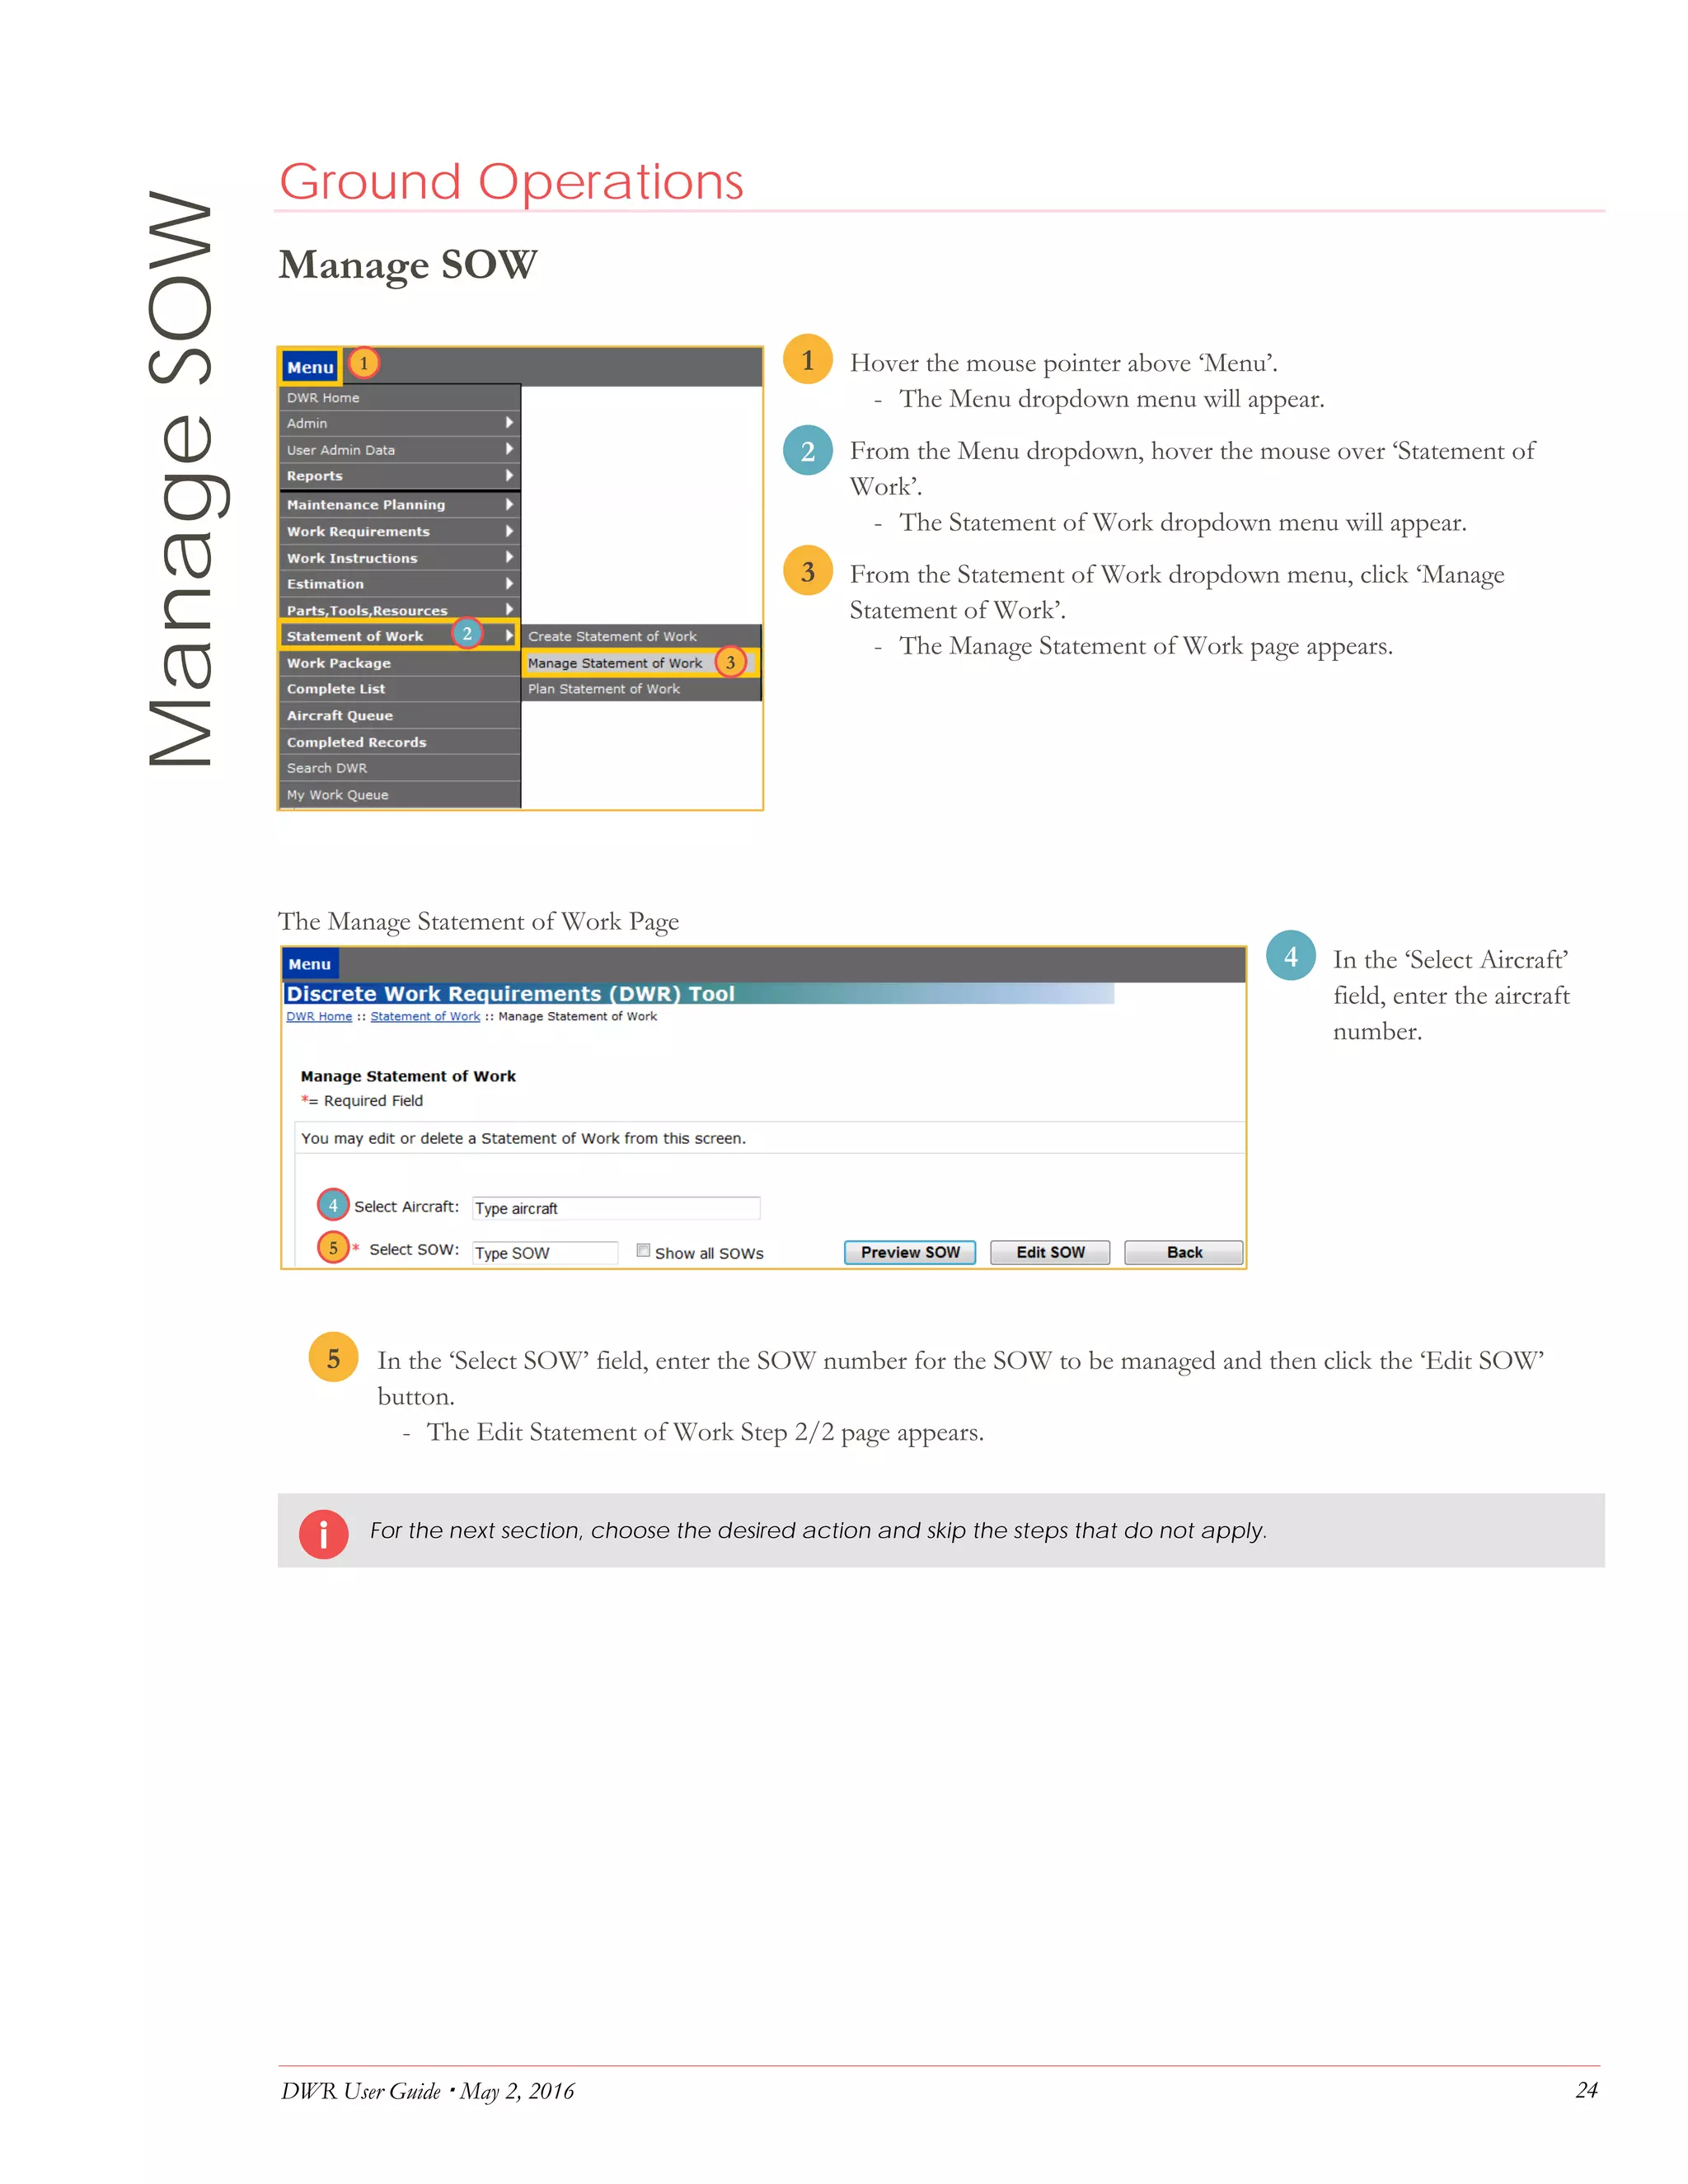
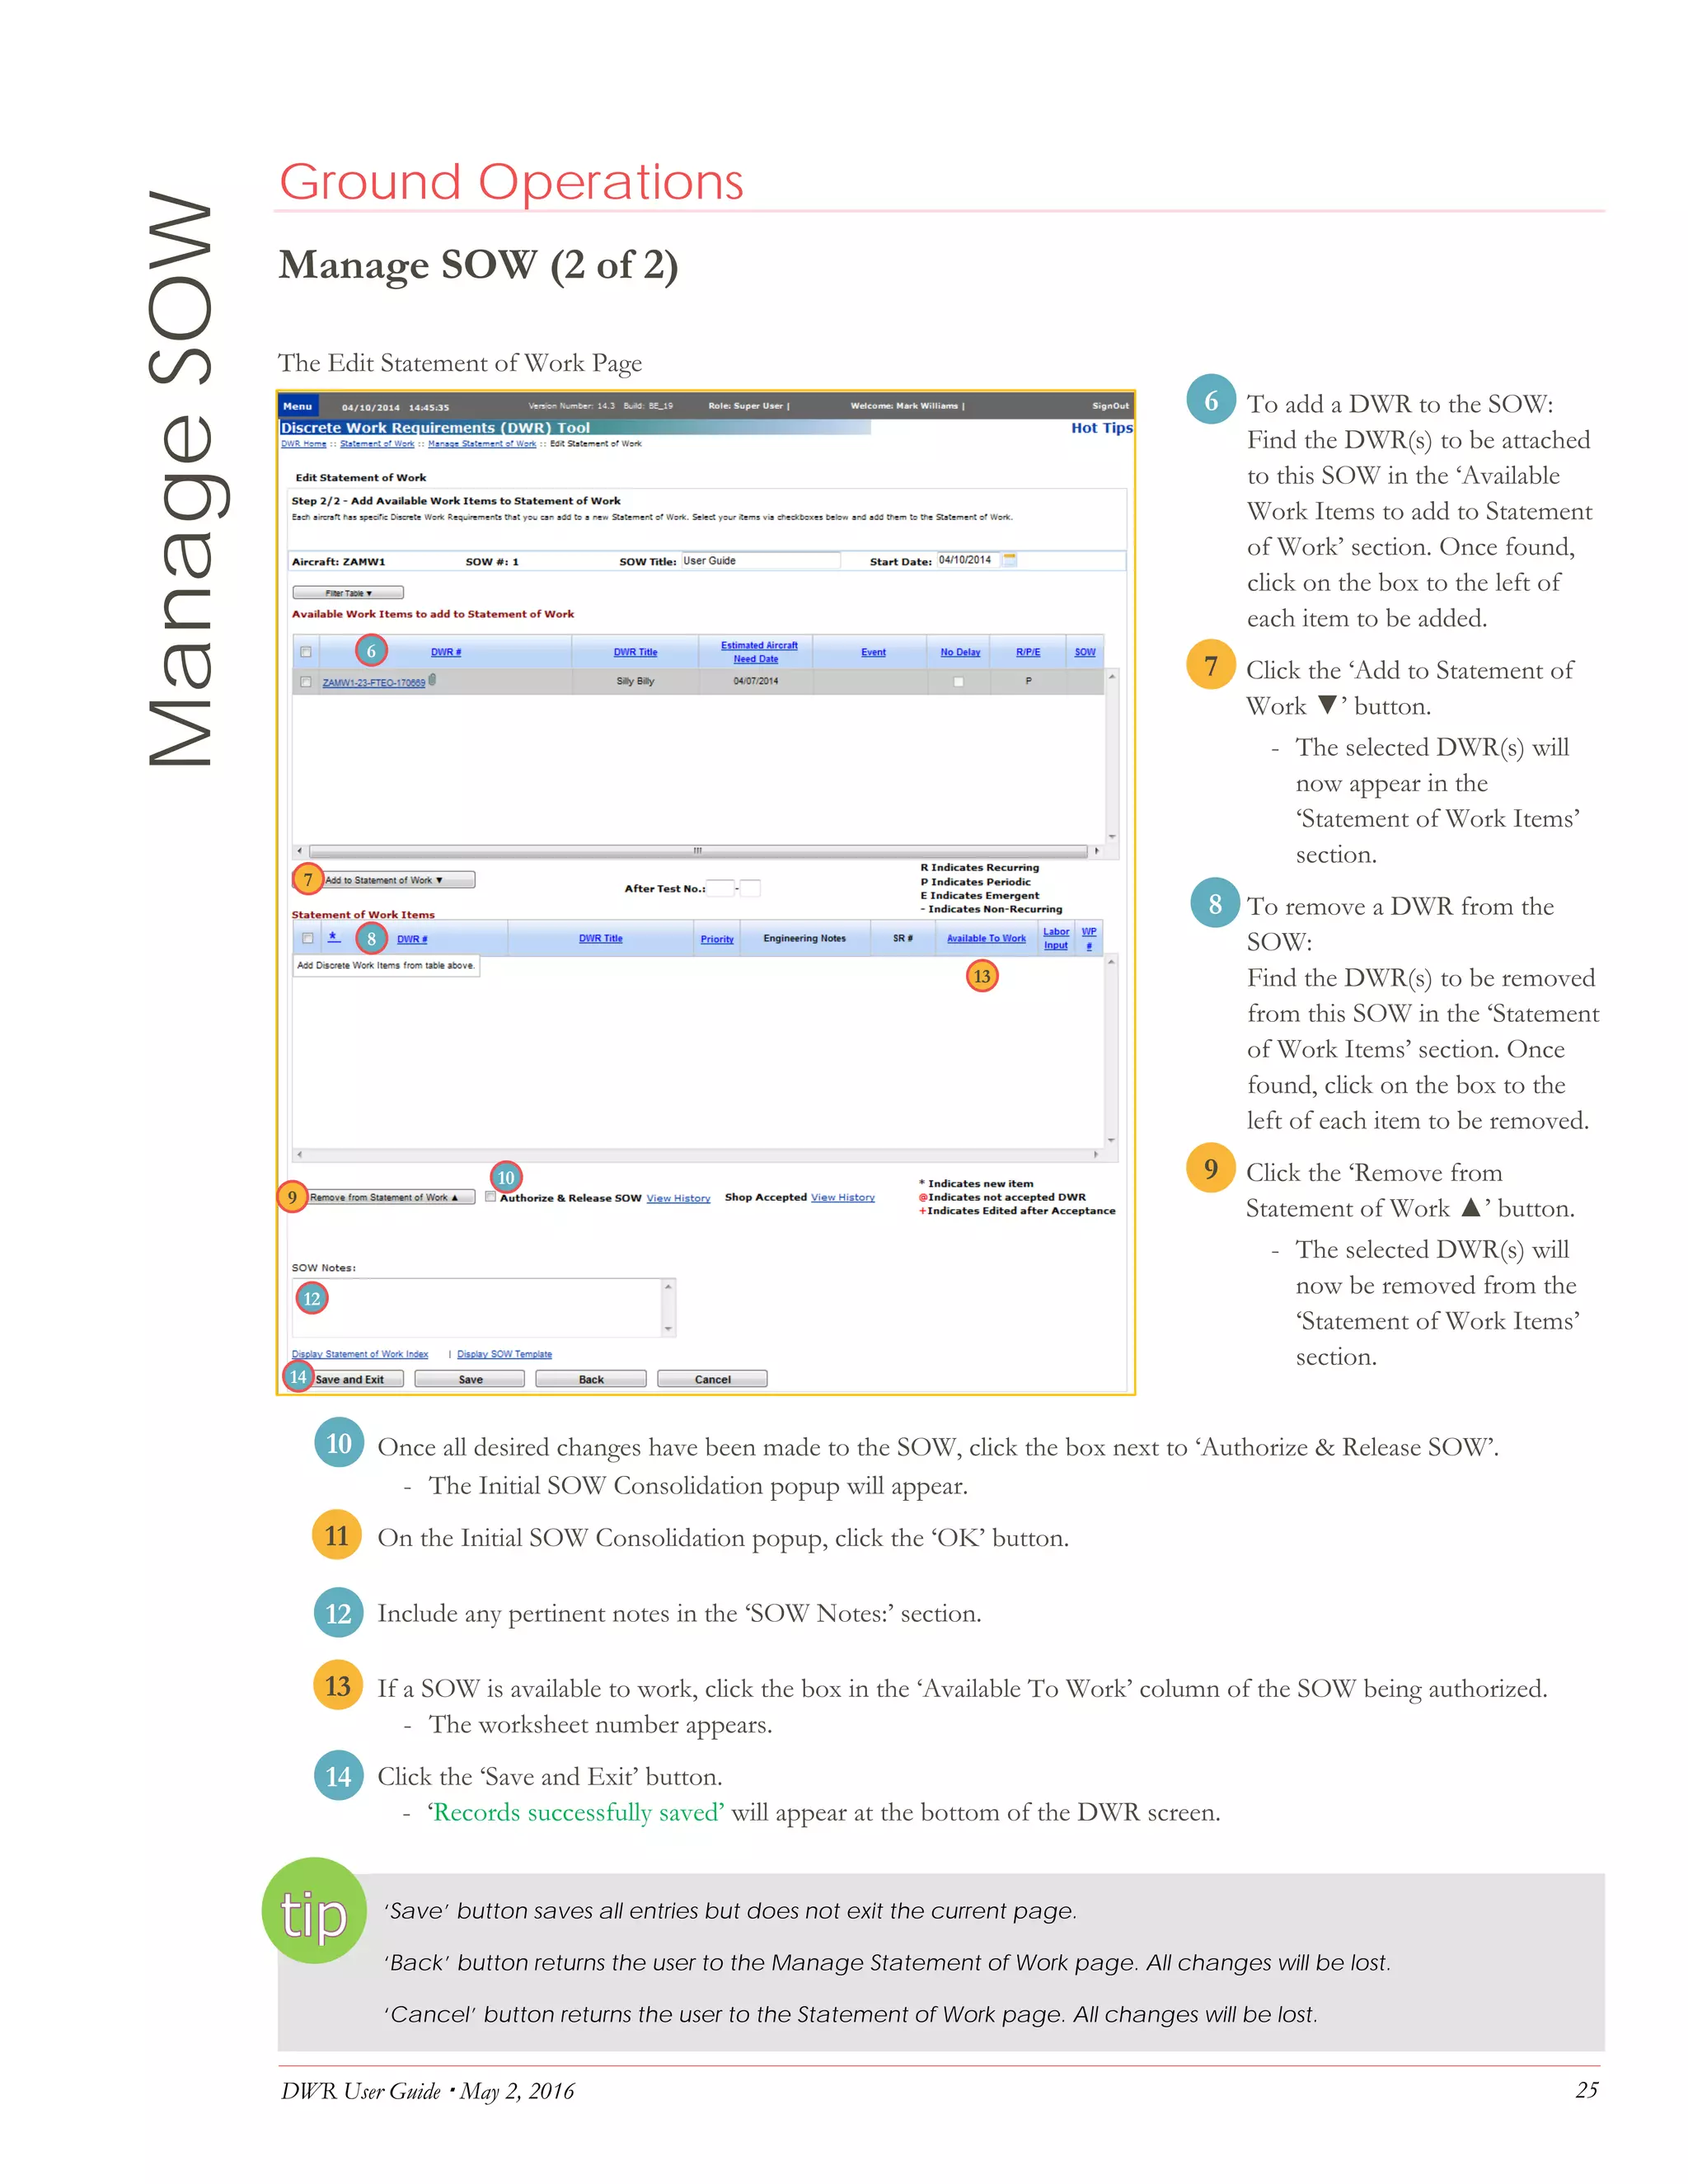
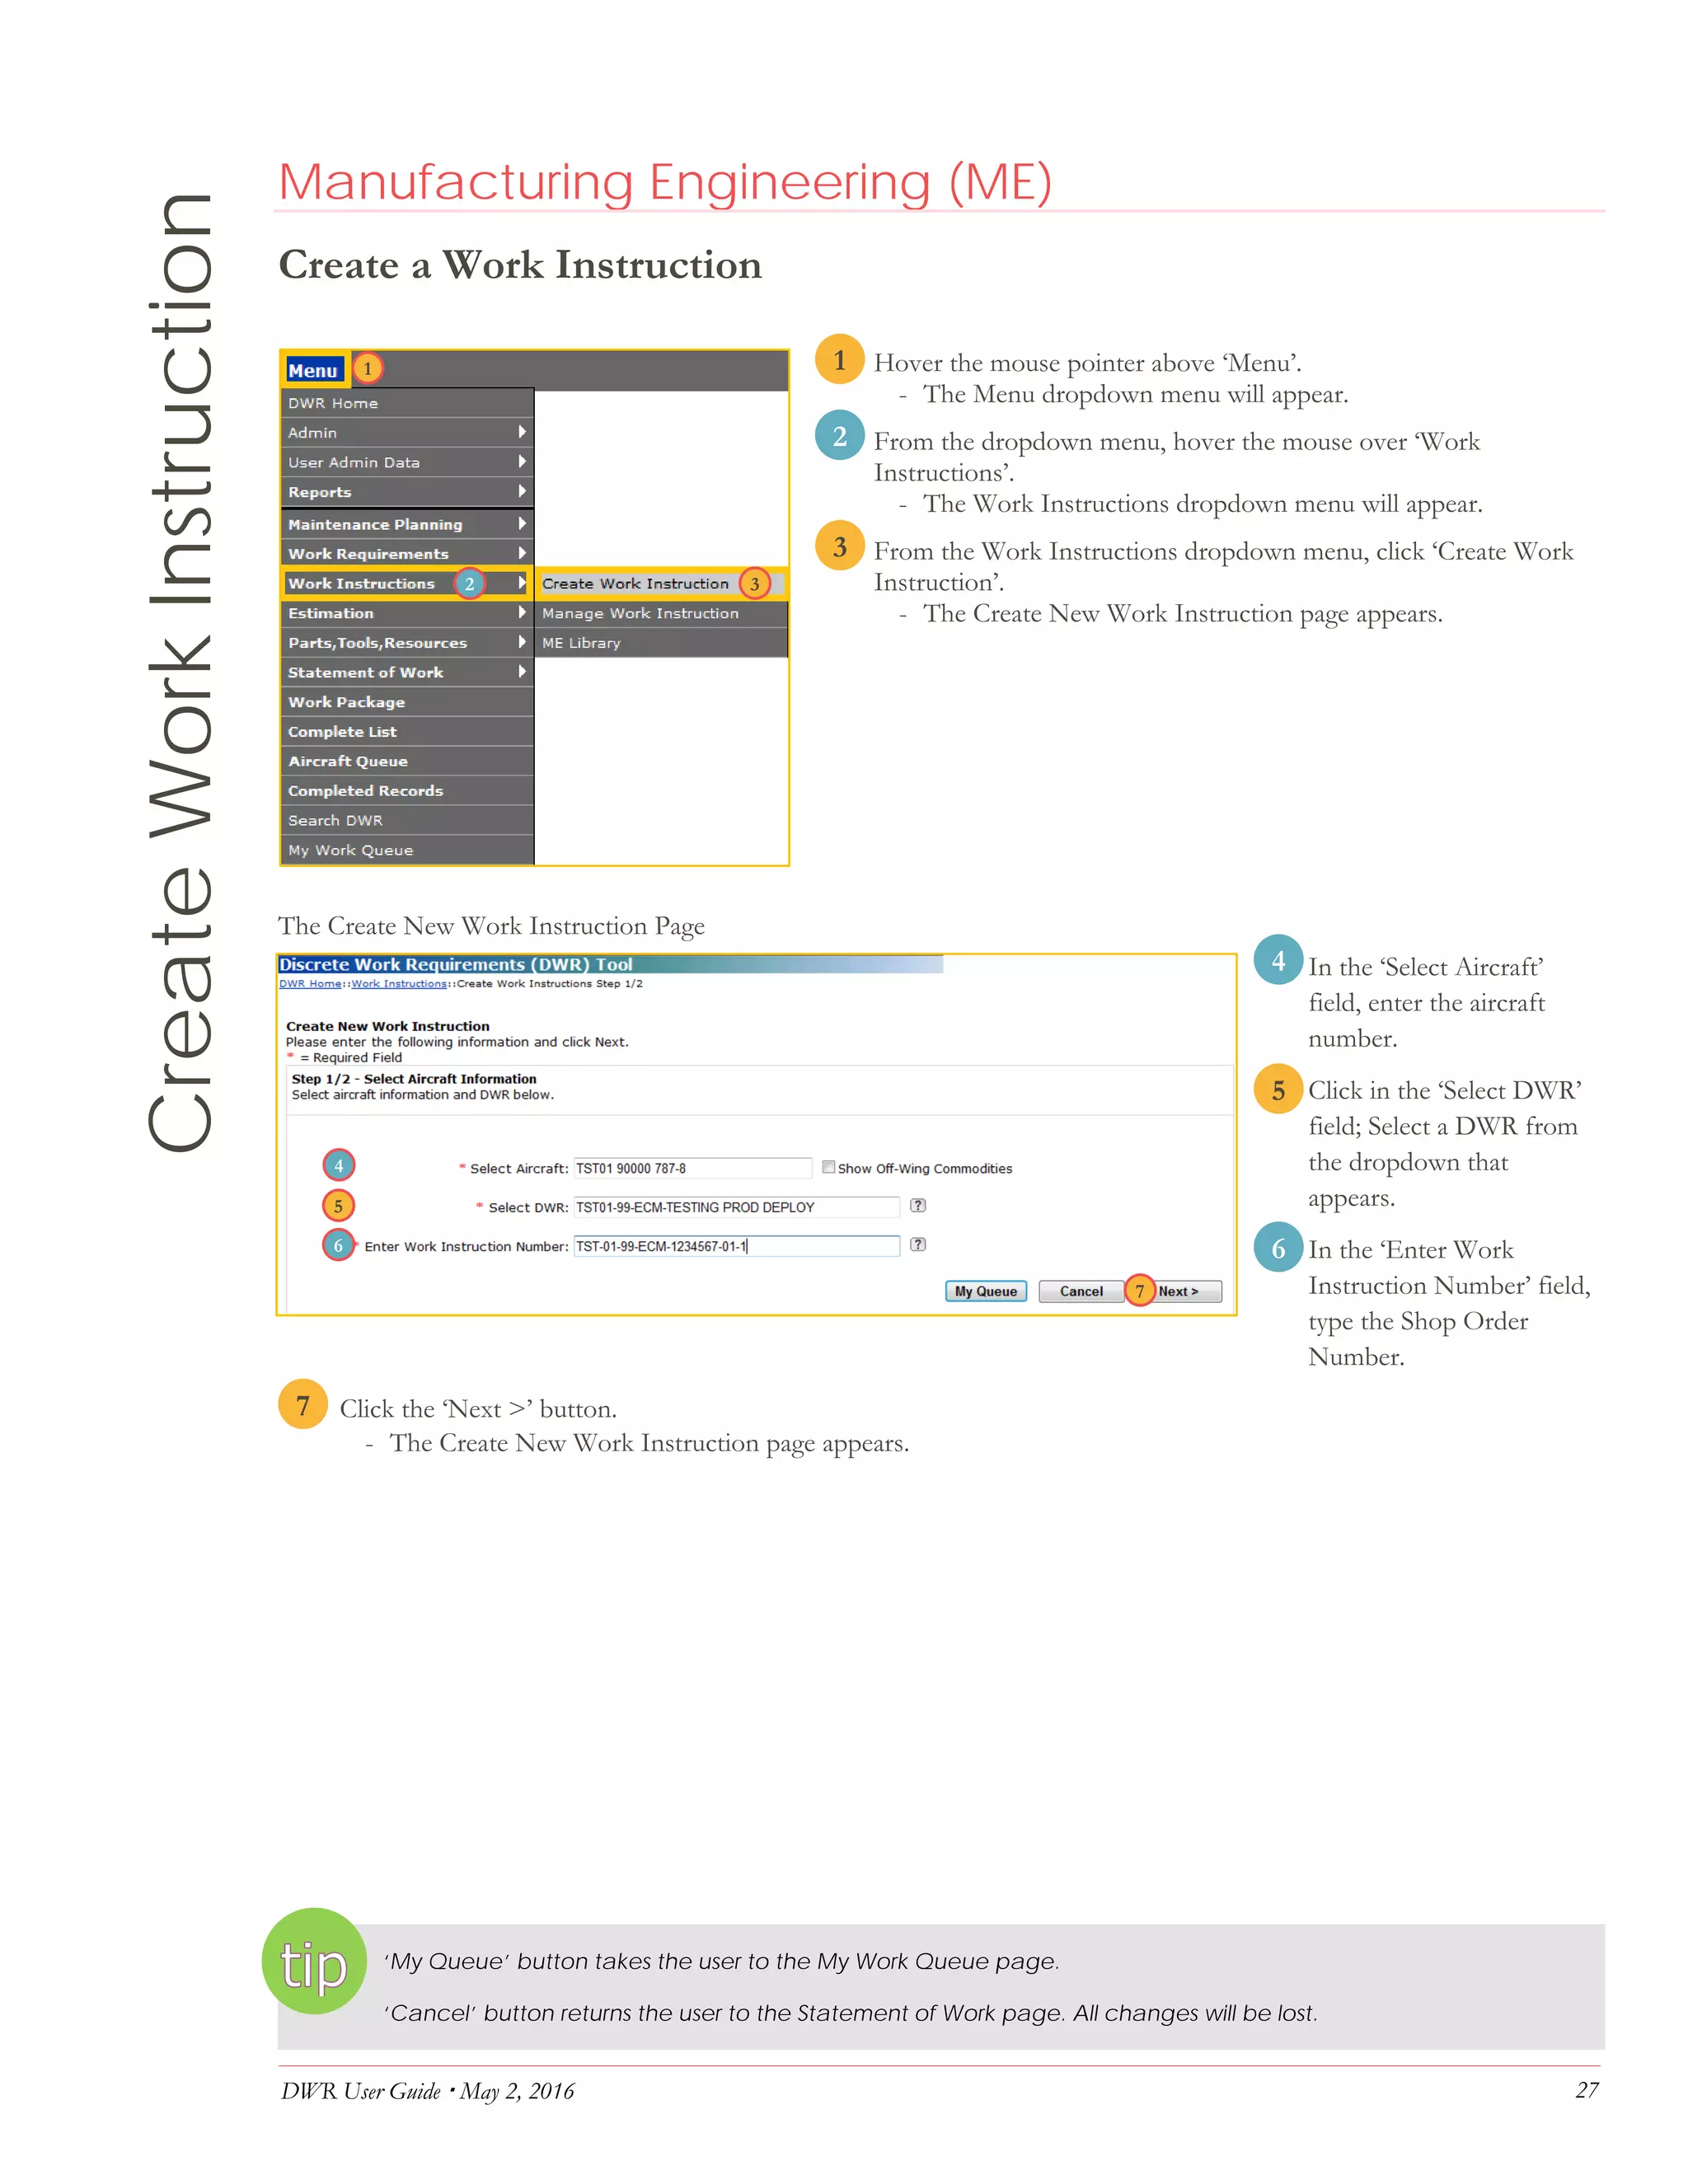
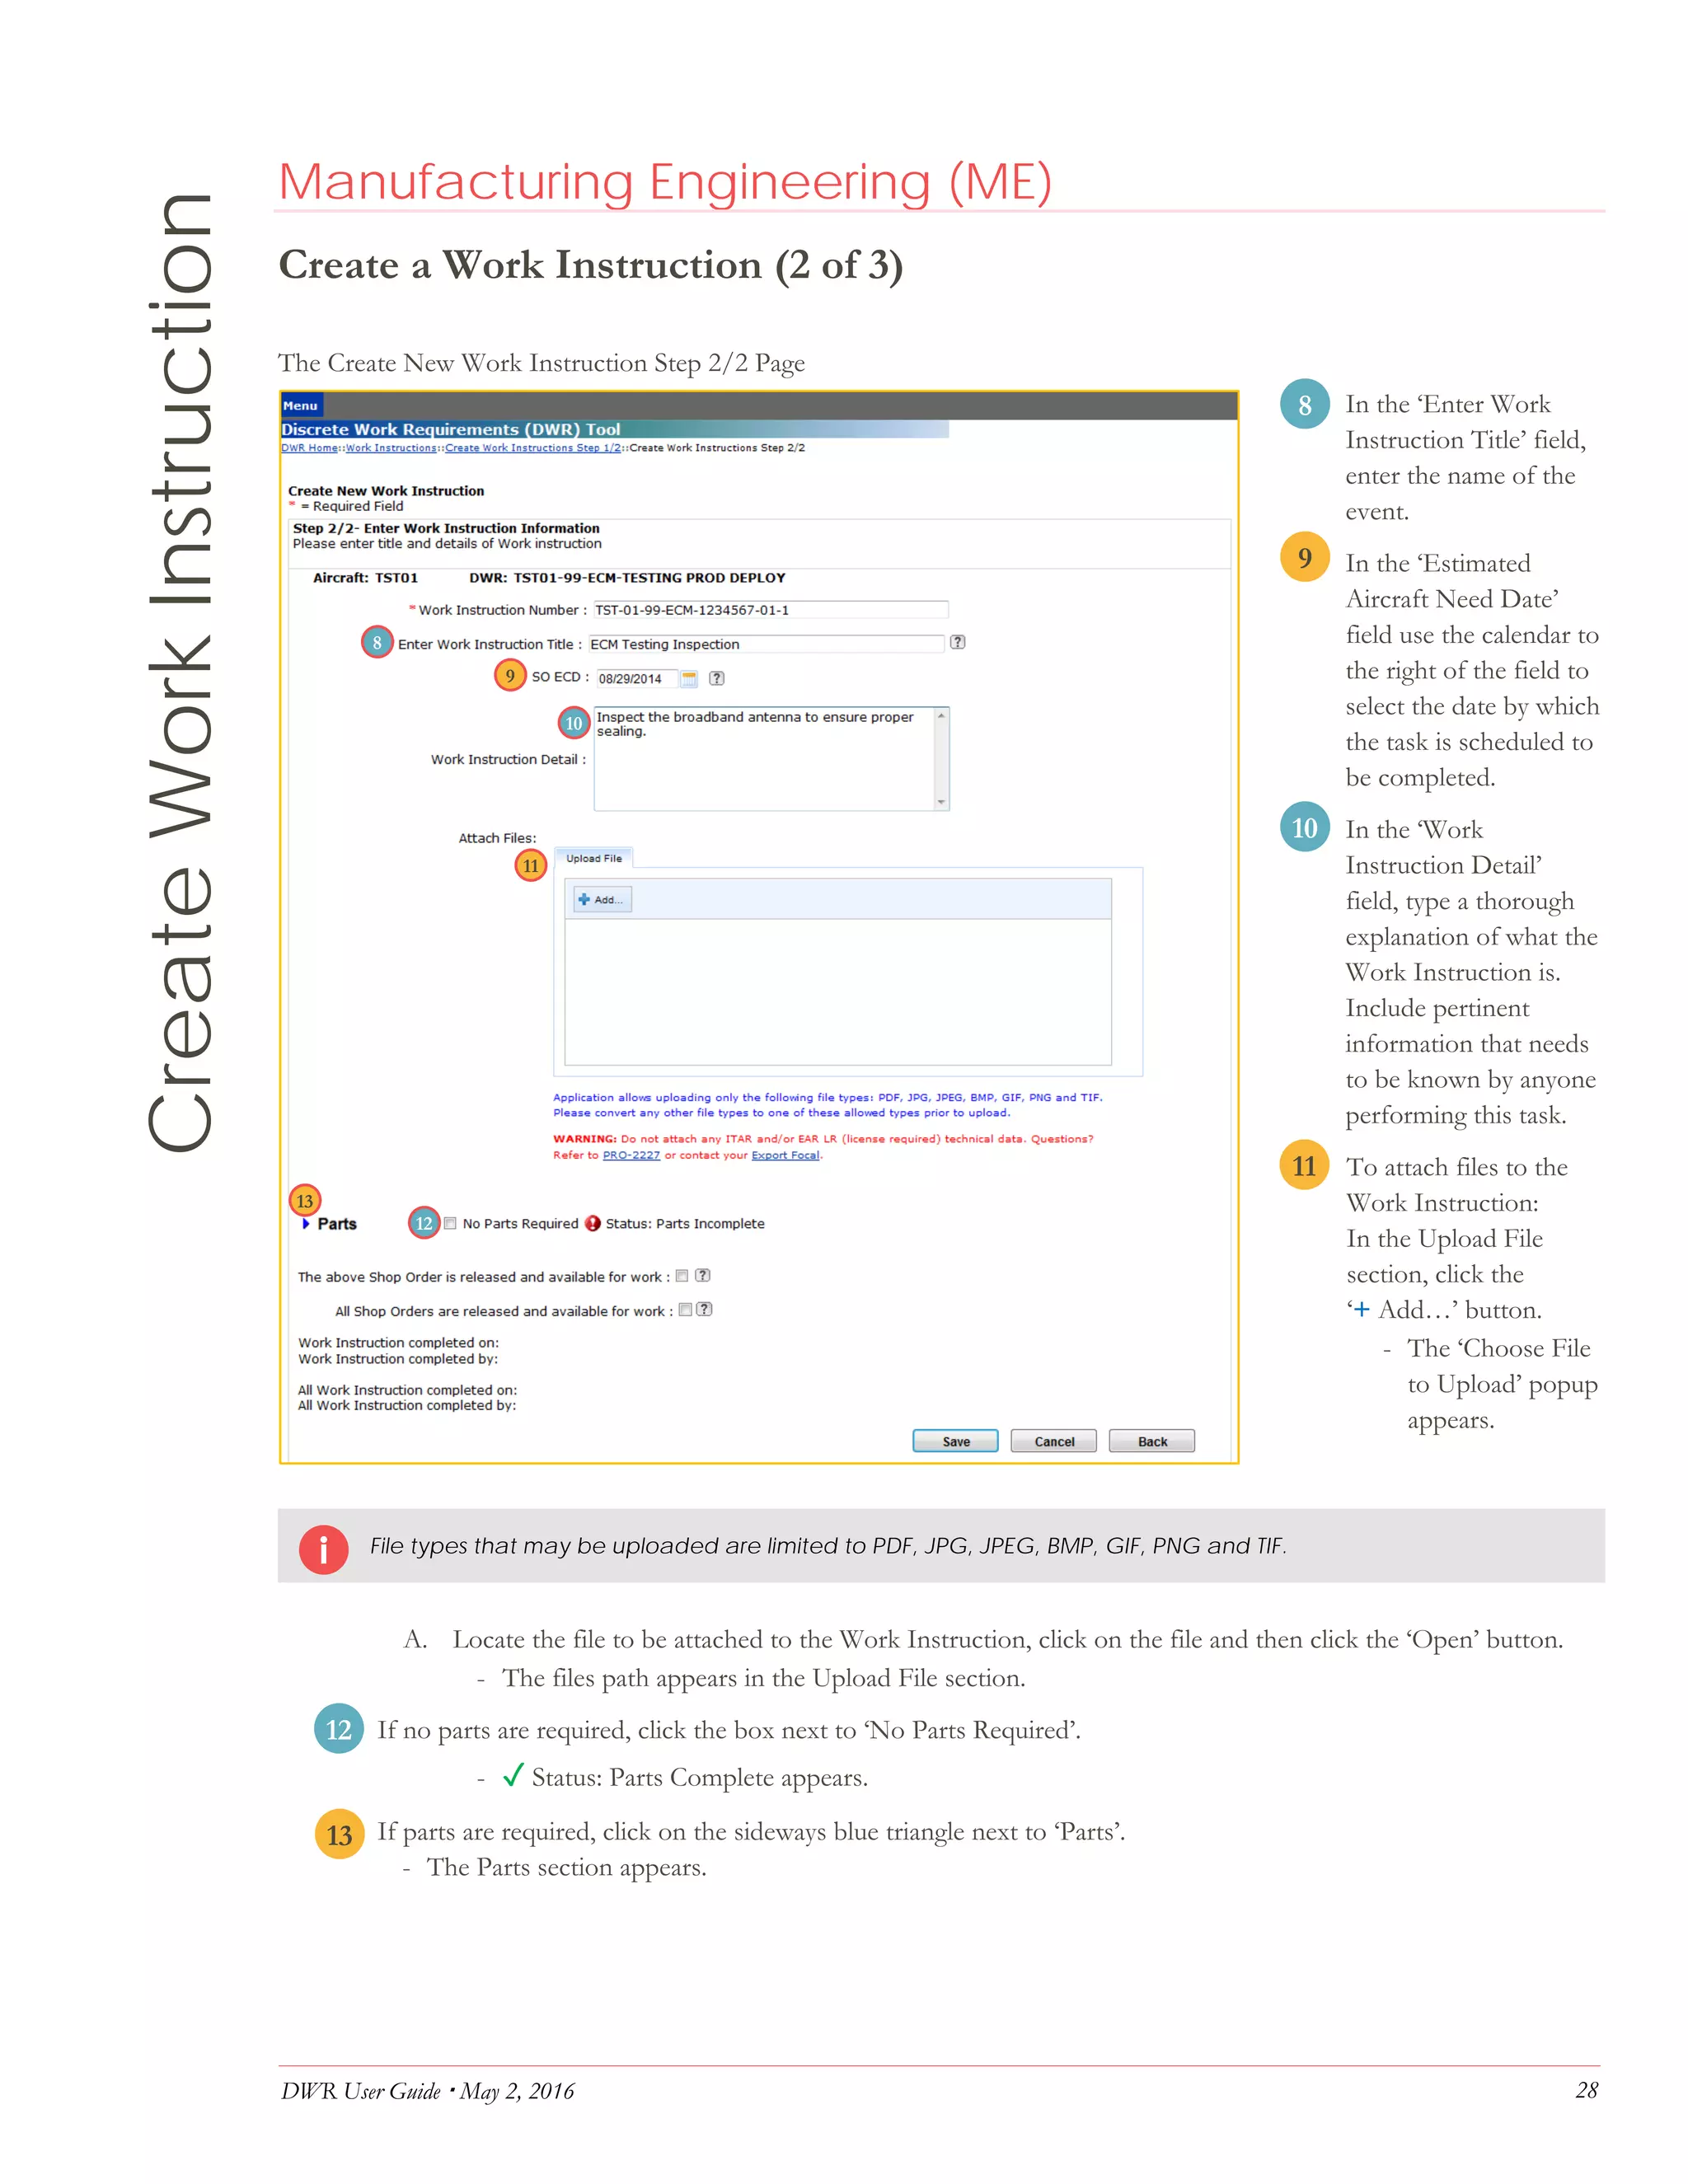
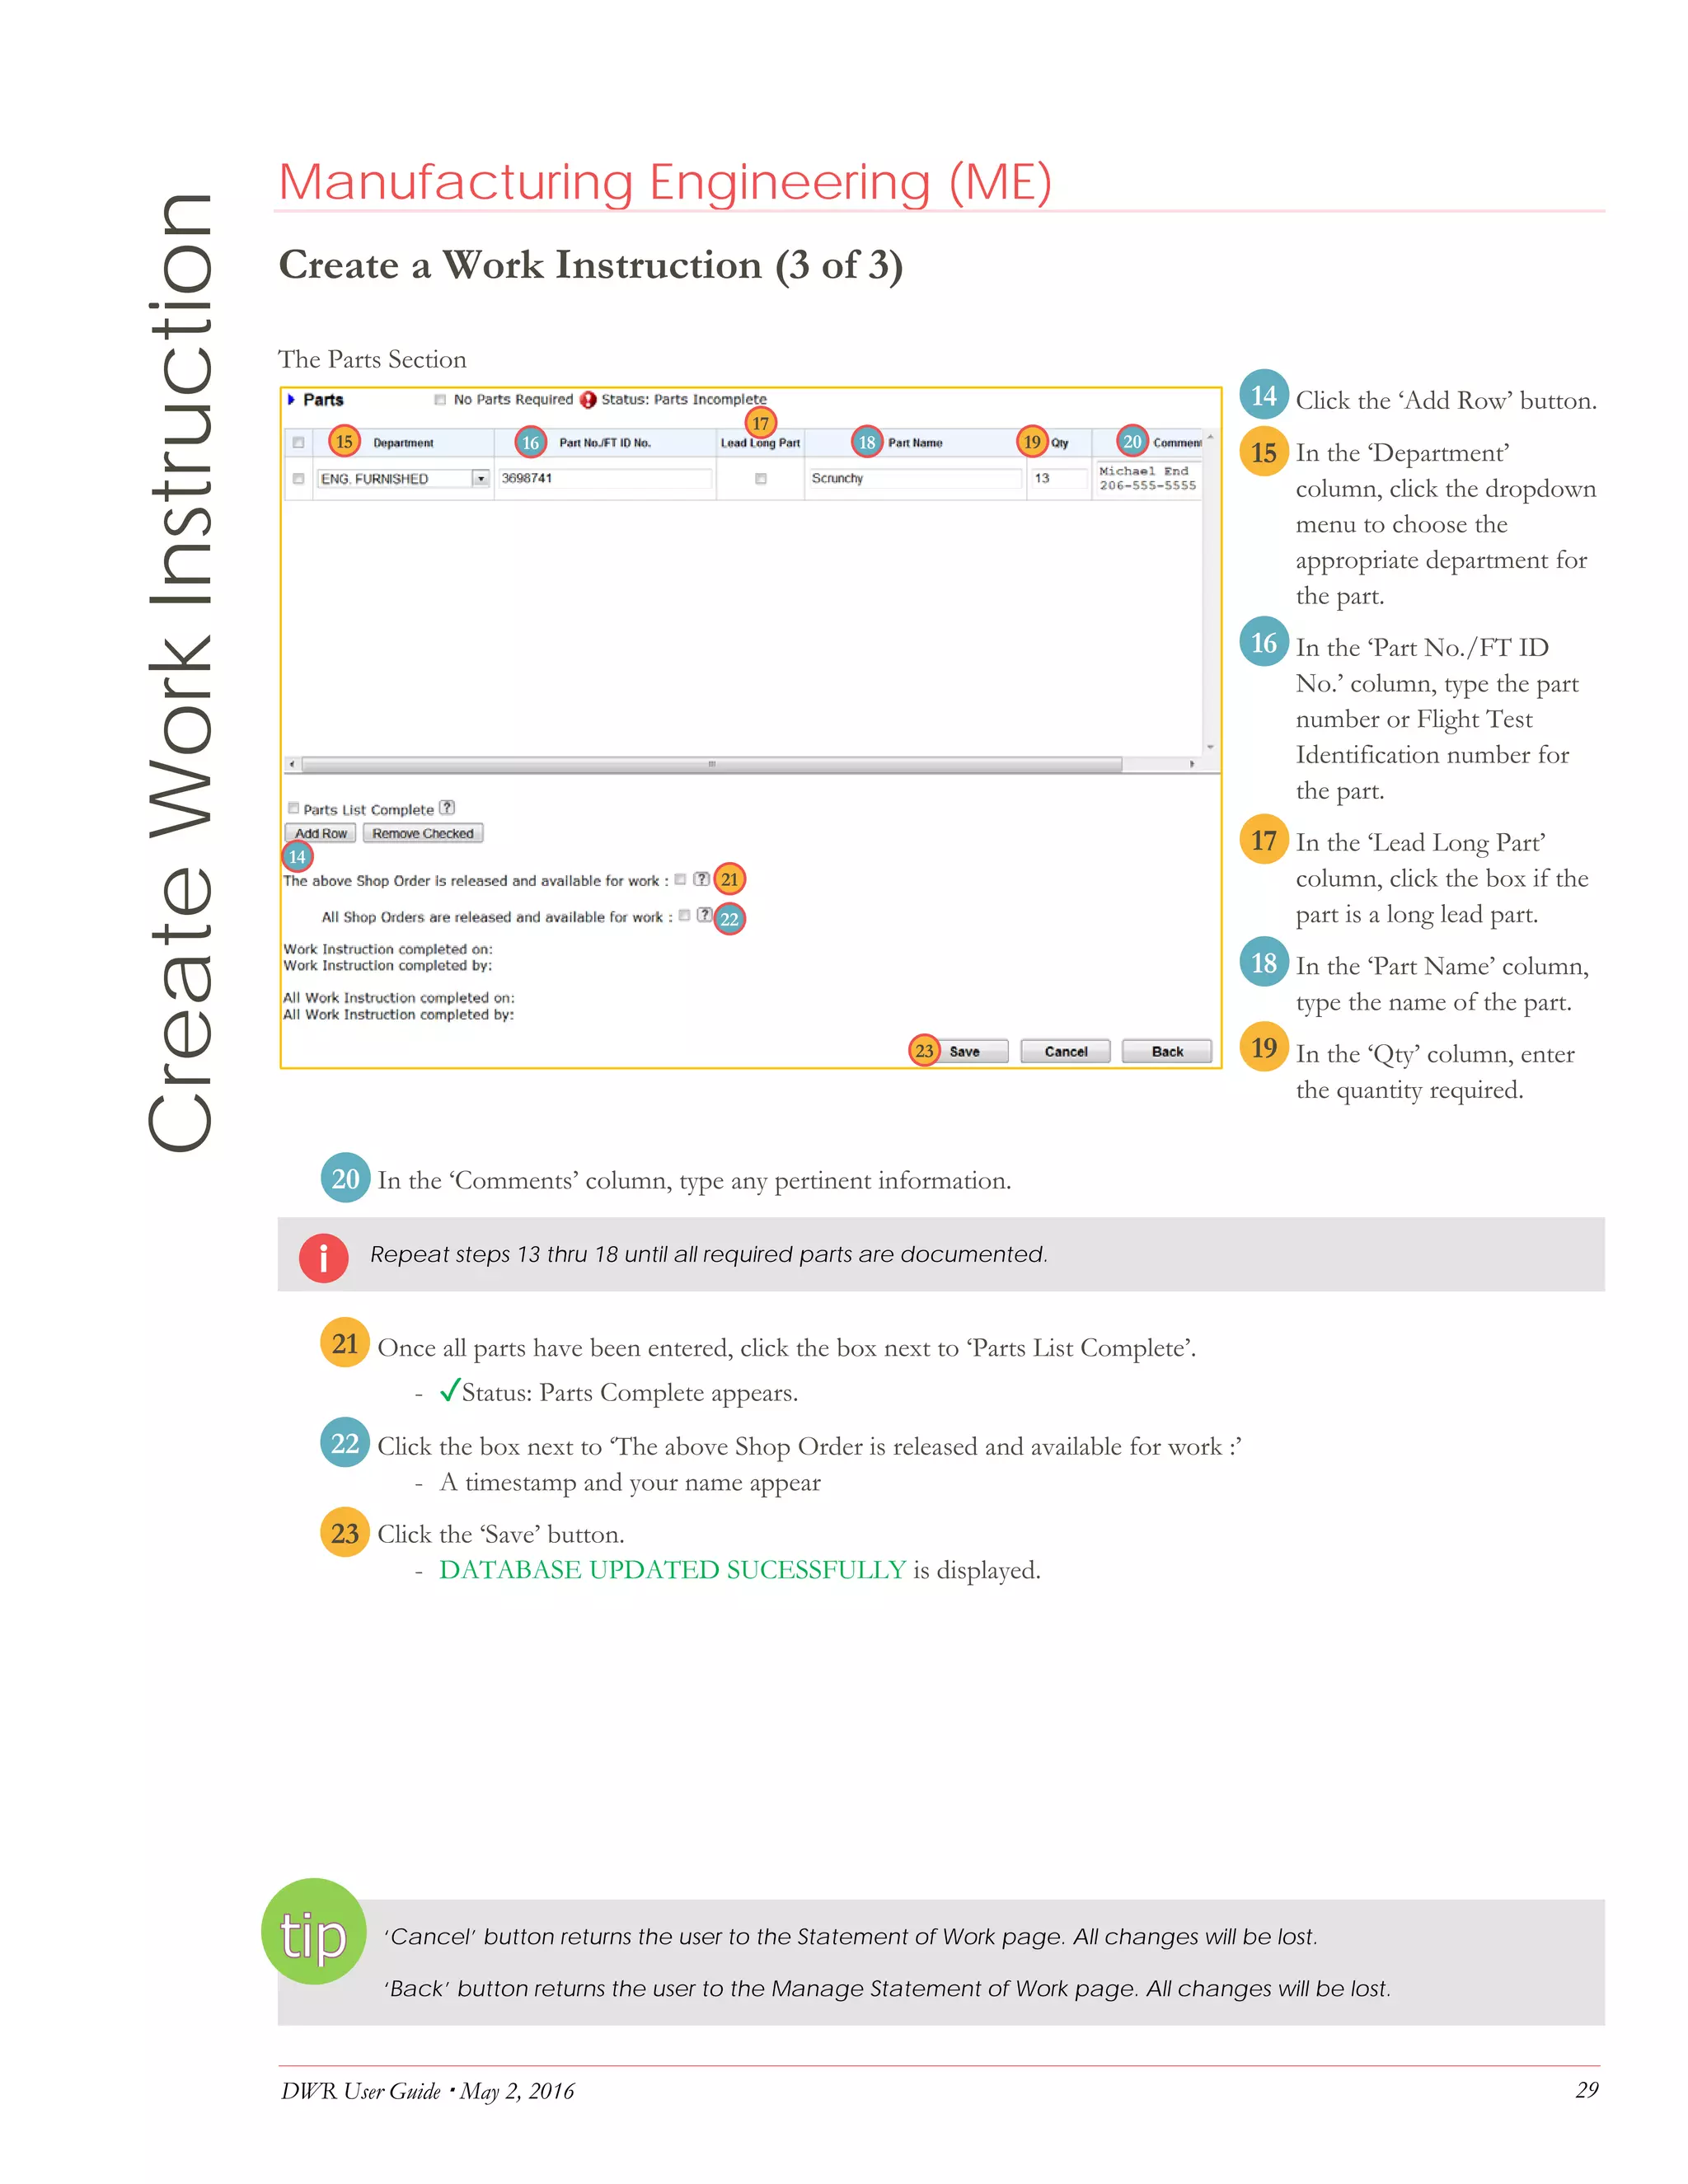
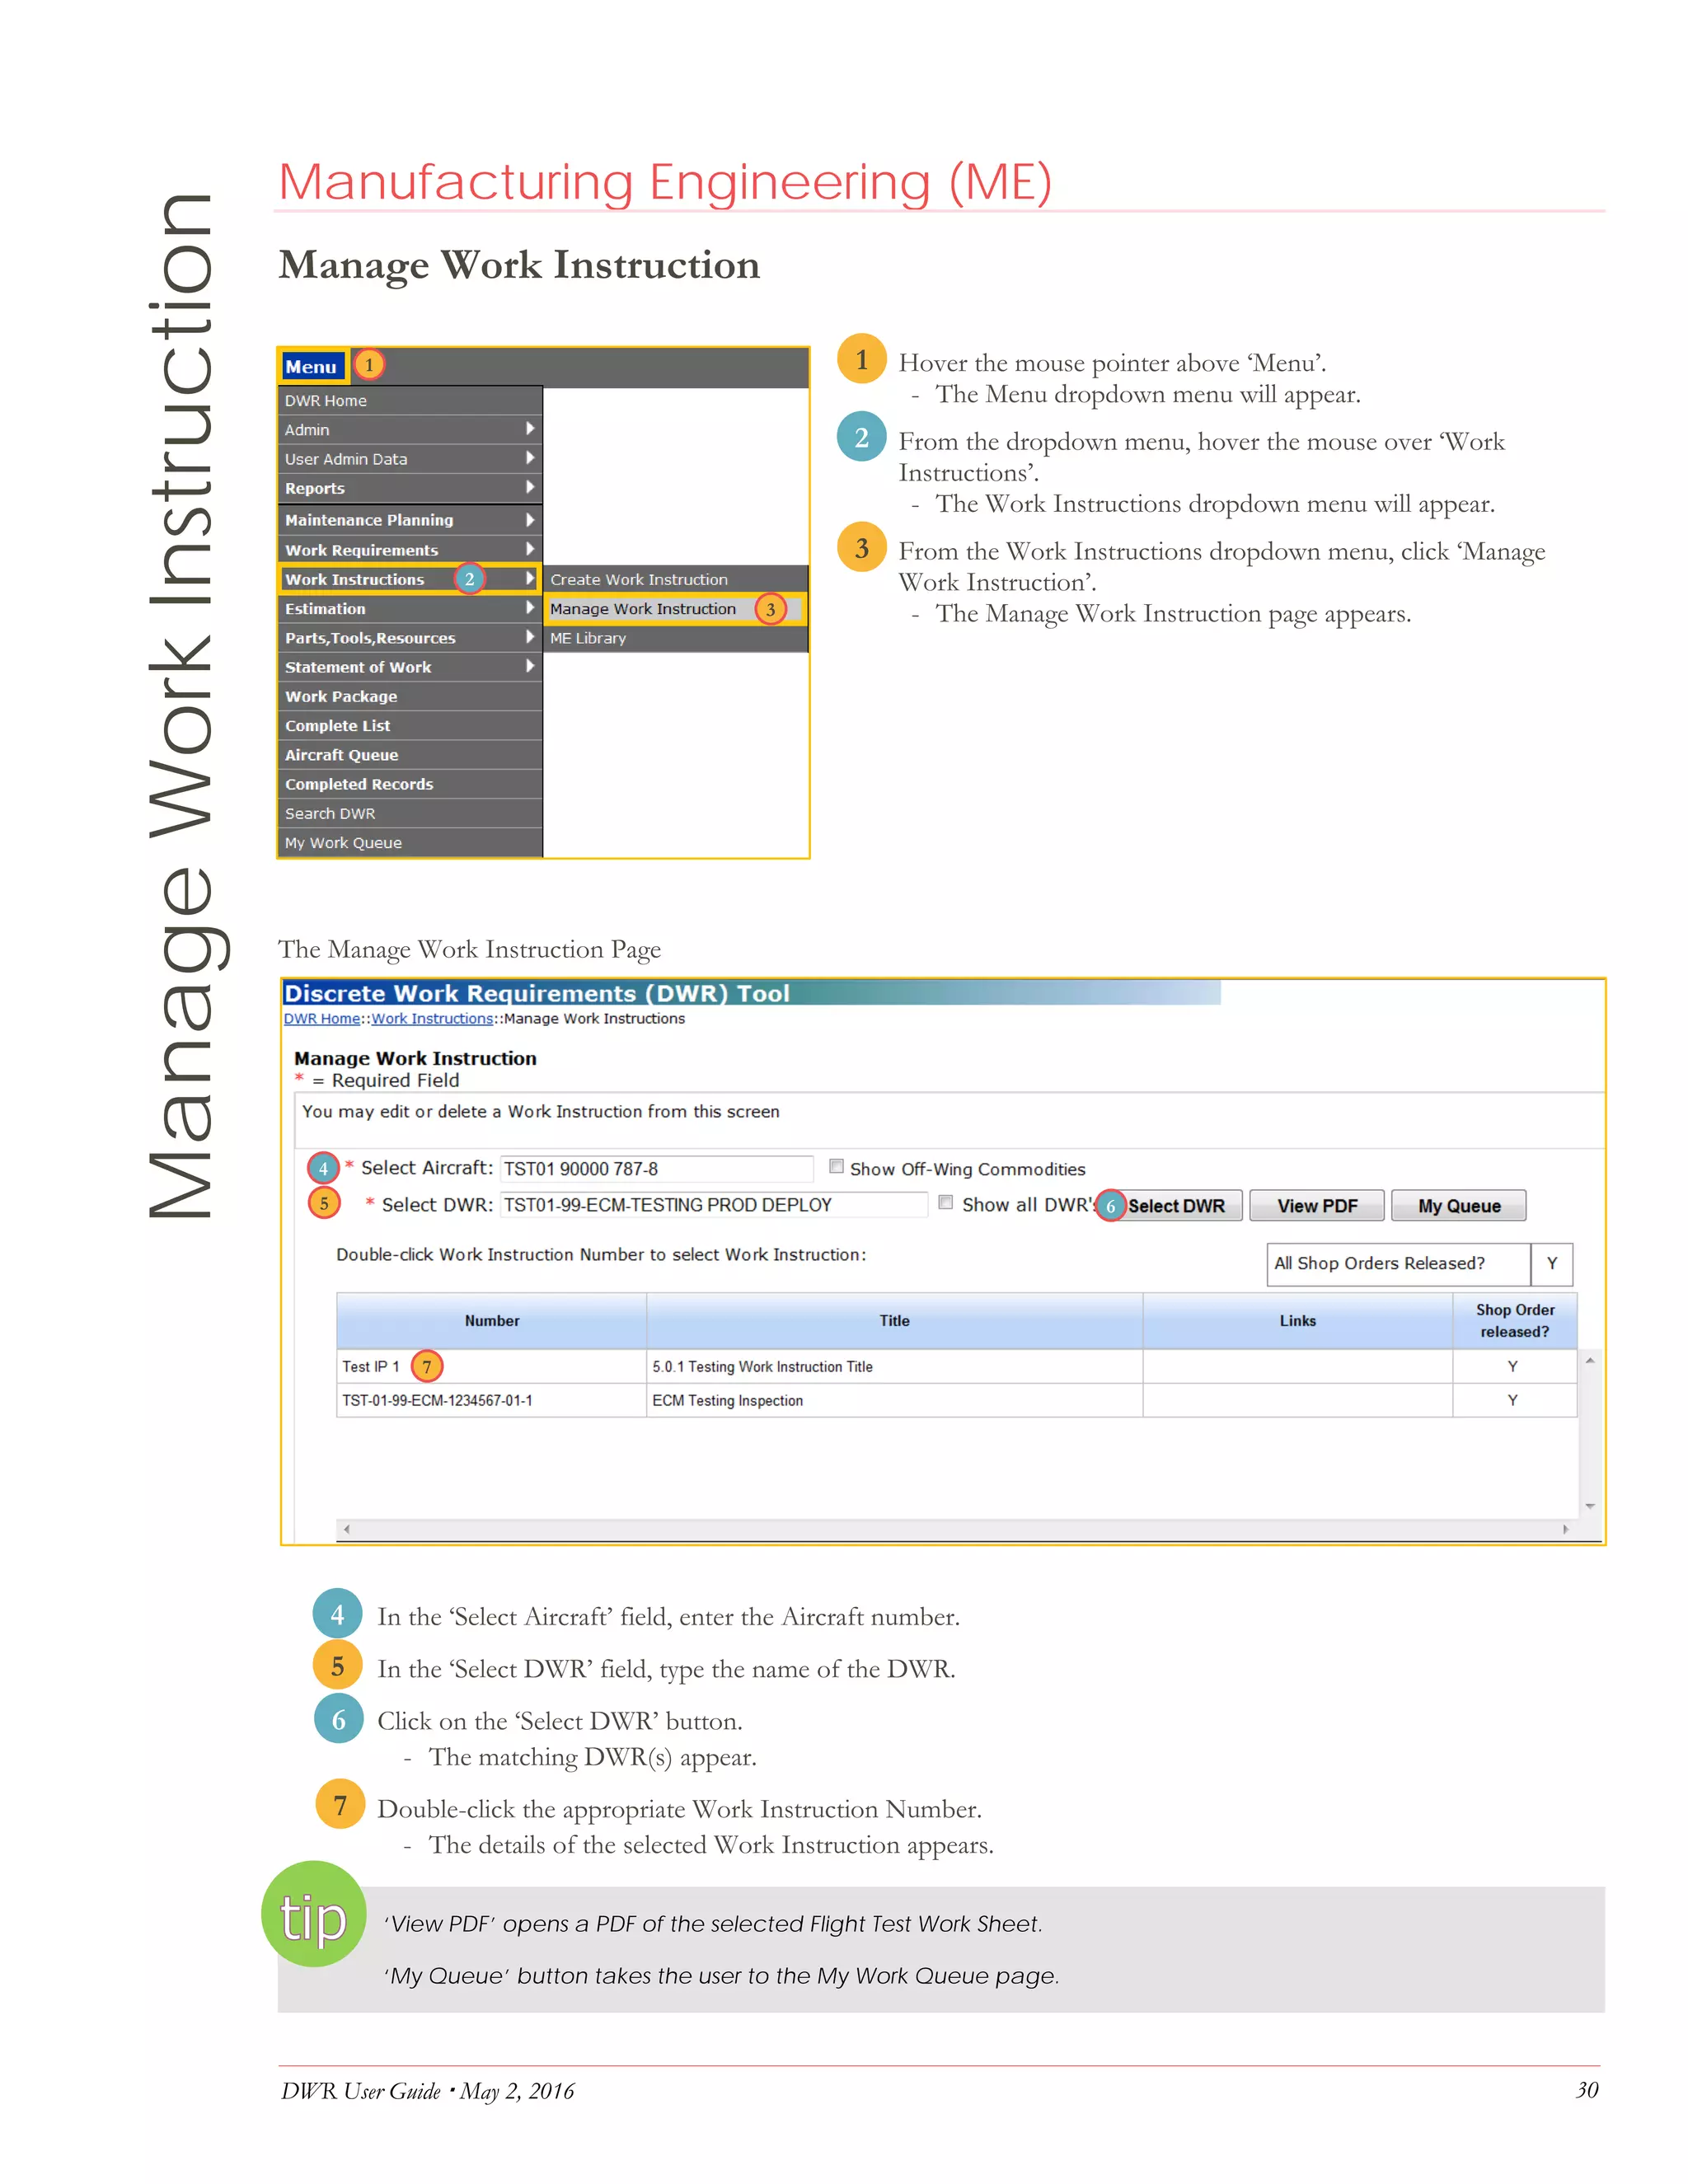
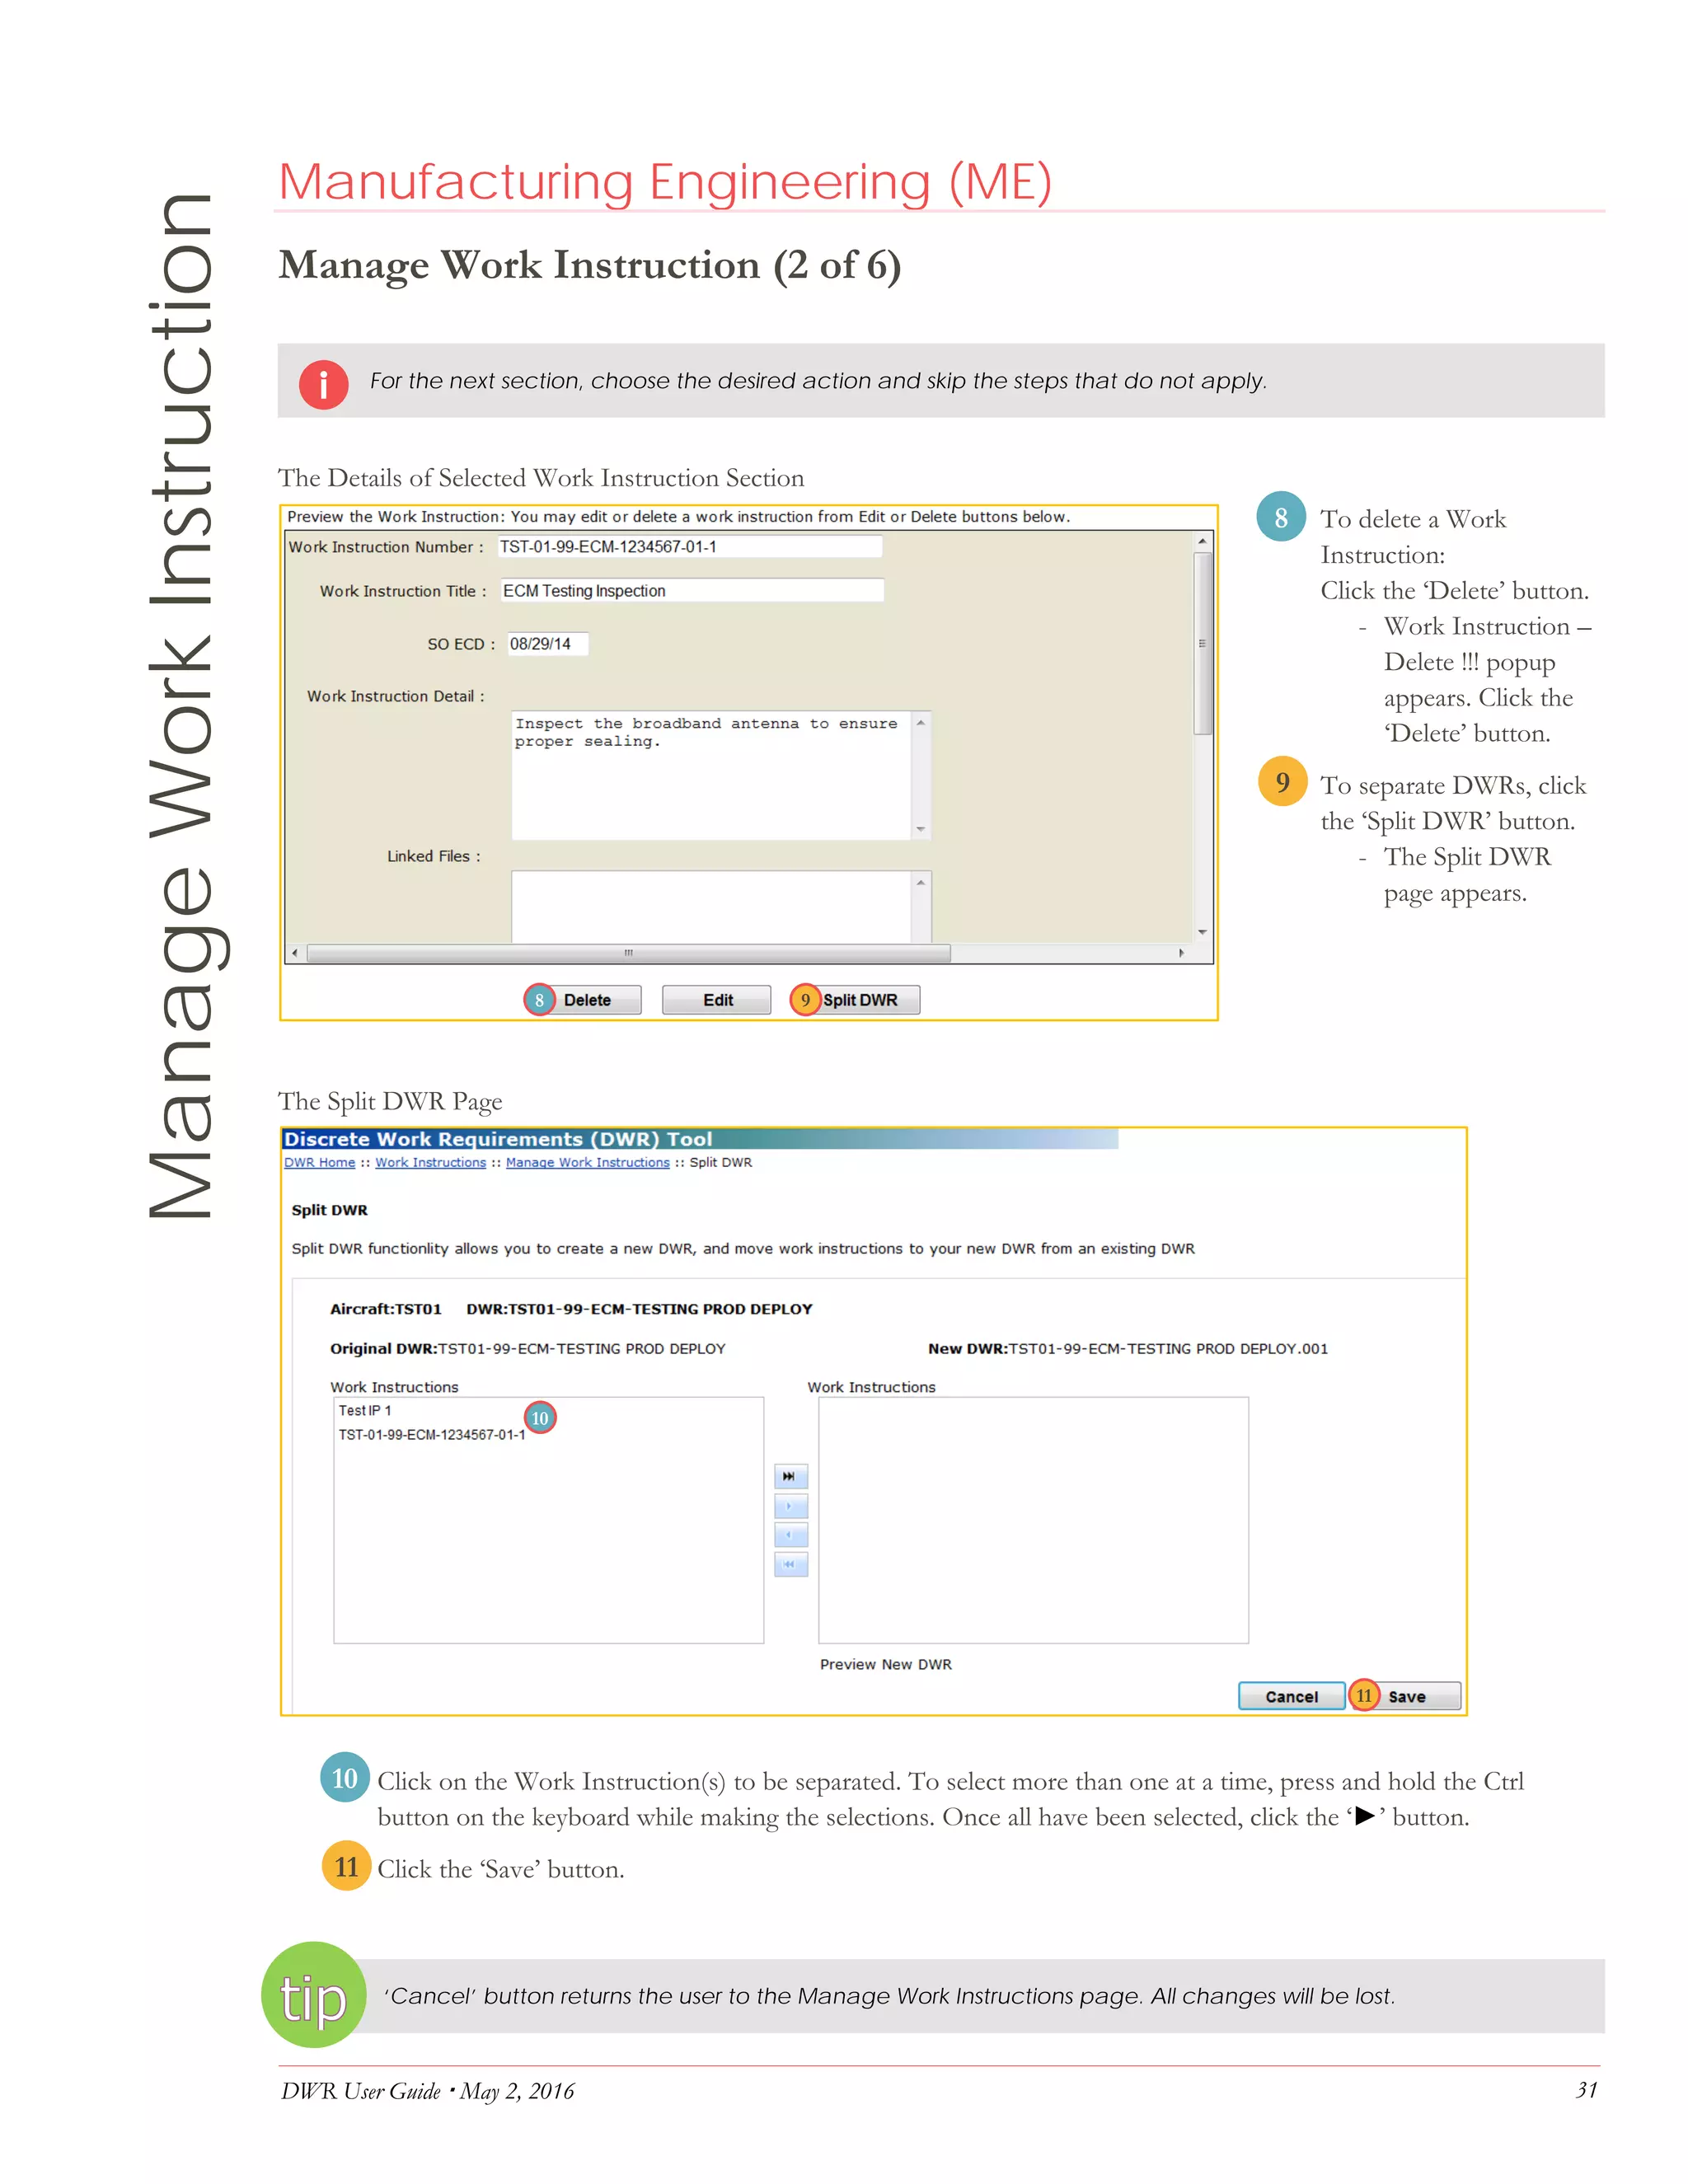
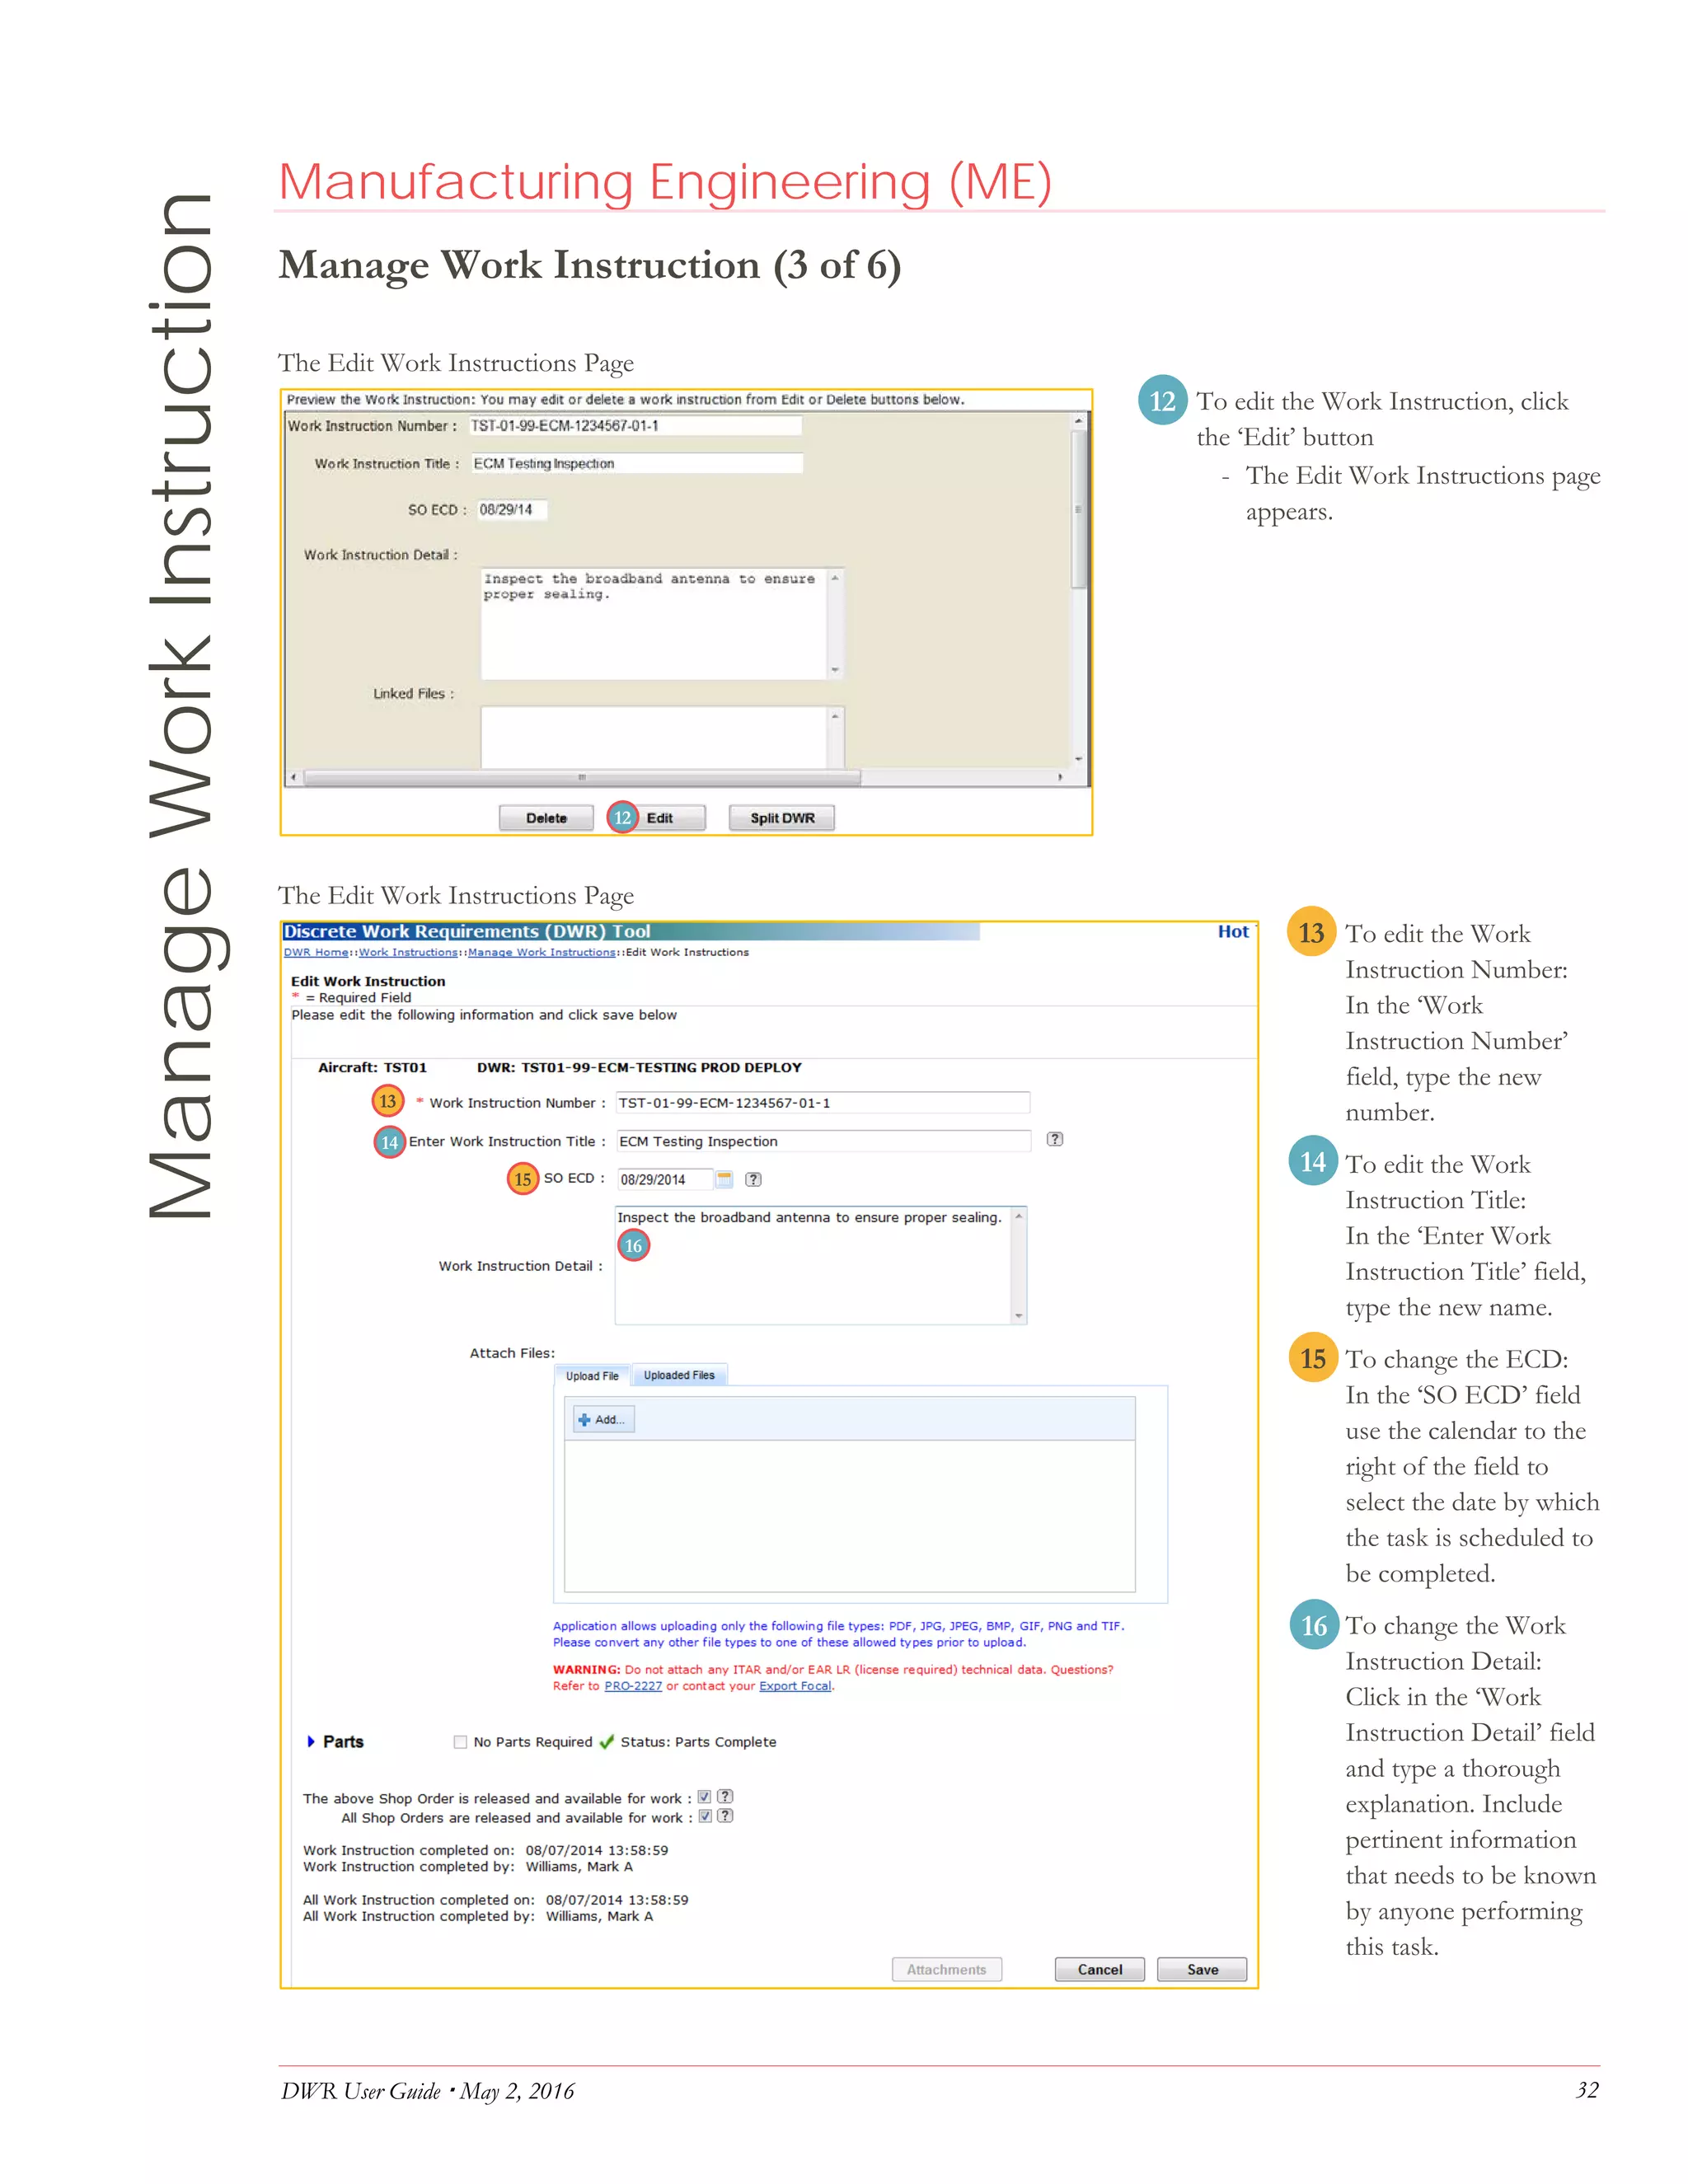
This document provides instructions for creating, managing, and editing Discreet Work Requirements (DWRs) and associated work instructions in a software system. It outlines steps for creating events and statements of work to which DWRs can be added. It also describes how to generate work instructions from DWRs and manage parts lists. The guide is intended to help users efficiently navigate relevant software menus and pages to complete tasks.
Sentrifugo 2.1 HRMS application finds you a simple and effective way to enter time, track employees' activities, time offs & vacations and generate accurate time reports.
Easy to configure your company's projects and clients, enabling the employees to fill in their Time sheets.
Improves the productivity by enabling managers to monitor the time & project utilization of each employee and the efficiency of their teams
For any queries write to us at : support@sentrifugo.com
Sentrifugo import format Guide for 2.0 beta
Best Installation Guide for Windows,Mac,Android
These gives the detailed explanation of how to import the application of Sentrifugo version 2.0 beta
Sentrifugo HRMS is a solution for all startups and organisation who want to manage there employees or organisation in an efficient way from attendance to leave tracking.Sentrifugo 2.1 opensource HRMS is a full featured web application/software which will solve all your Human resource needs of managing your employees.
Sentrifugo's Time Module is a unique Timesheet Management tool. Managers can configure projects details and add employees to projects. They can view timesheets of the employees reporting to them in a daily, weekly or monthly view format. Employees can enter the hours spent on an assigned project. Employee and project based time reports can be generated based on the details entered by the employees.
Intro to RxJava/RxAndroid - GDG Munich AndroidEgor Andreevich
The RX libraries have gained great popularity among developers lately. RX solves asynchronous programming elegantly based on the Observer pattern. This is especially helpful on Android where lots of interactions are asynchronous to the UI. Speaker: Egor Andreevici
GEIT 3341 DATABASE I LAB 2
GEIT 3341 Database I
Lab 2
Web Development with Apex
Due Date:
Submission Method: Project Link, Username & Password
Objective(s) Target CLO(s) Reference
How to develop a web database
application using Oracle Application
Express. In today’s lab, you will learn
how to develop a web application from
a spreadsheet.
5 Instructor Demo Any
book and/or tutorial
on Oracle
Application Express
Name ID Section
Instructions:
This is a hands-on step-by-step lab that will teach you how to
• Build your first app through uploading a Spreadsheet
• Improve the Search and Report pages
GEIT 3341 DATABASE I LAB 2
PART 1: Create an app from Spreadsheet
You will build in this part a simple application based on a spreadsheet.
1. From your APEX workspace home page, click App Builder.
2. Click on Create a New App
GEIT 3341 DATABASE I LAB 2
4. Click the Copy and Paste option at the top and Select Project and Tasks from the sample
data set list and then click Next.
5. Set Table Name to PROJECT_TASKS and click Load Data.
7. Click Create App
3. Click From a File
6. Click on View Table
GEIT 3341 DATABASE I LAB 2
8. On the Create Application page, click Create App.
9. On the Create Application page, you can see all the listed pages. Click on Edit for more
details for a page.
10. Next to Feature, click Check all then click on Create Application
11. Now, you are redirected to the application's home page in the App Builder.
12. Click on Run Application to see how end users will see the app (a new web browser will
open). You have to enter your username and password you used to sign in into the APEX
workspace.
13. Explore the application by clicking on all the available buttons. (Click on Home button to
go back to the main page)
14. Click on Administration to review the options if needed
GEIT 3341 DATABASE I LAB 2
PART 2: Improve the Faceted Search
This part gives you a first-hand experience with enhancing the application by improving the
faceted search page for better clarity and improved usability.
1. For the runtime application, click on Project Tasks Search
2. In the toolbar (bottom of the page), click Edit page 3 (Note - End users who log directly
into the app will not see this toolbar.)
3. Alternatively, you can also navigate back to the APEX App Builder tab in your browser
manually by selecting the appropriate browser tab or window. Once in the App Builder
click 3 - Project Tasks Search.
4. You will have this window (The page should consist of three panes).
GEIT 3341 DATABASE I LAB 2
5. Under Search (from the left pane), within Facets then P3_STATUS
6. Currently the Status facet is a series of checkboxes. However, it is unlikely that users will
want to select more than one a ...
This CIM and automation laboratory manual covers the G-Codes and M-codes for CNC Turning and Milling operations. Some concepts of Robot programming are also introduced.
WinEst As 1. Es2. Tassignment stInfo (Esti.docxalanfhall8953
WinEst As
1. Es
2. Ta
ssignment
stInfo (Estim
a. Name
b. Due:
c. Estima
d. Start
e. Estima
f. Rate
i.
ii.
ake Off (Ite
mate Inform
e: Driveway
1 month fro
ate Type: B
Date: Toda
ate Status:
Tables:
Sample L
Sample E
ems)
P
C
mation)
y Proposal
om today
udgetary
ay
Submitted
abor Rates
quipment R
Page 1 of 2
COMPU
Rates
TERS FO
Engi
OR CONS
TEC
neering Tec
Un
Colleg
STRUCTI
CHNOLO
hnology Pro
niversity of To
ge of Engine
ON
OGY
gram
oledo
eering
Page 2 of 2
3. Adding Markups
a. Add Net Markup
i. Name: Overhead and Profit
ii. Type: 15%
b. Add Sales Tax
i. Name: Sales Tax
ii. Type: 6.5%
iii. Restrict this Tax Markup to: Material
4. Print Report
a. Report 1:
i. Sheet View, set Filter to “’95 Div Details”
ii. File -> Print Preview -> Style
1. Layout: Landscape
2. Header/Footer -> Custom Header
a. Left Text (Use Field Tags…)
i. Est Info – Project Name
ii. Est Info – Start Date
iii. Est Info – Due Date
b. Center Text (Use Field Tags…)
i. Est Info – Type
ii. Est Info – Status
c. Right Text
i. Name
ii. Professor Name
iii. Class
iv. Date
b. Report 2:
i. Totals View
ii. File -> Print Preview
1. Ensure the Layout and Headers match Report 1
5. DUE: Monday, April 7, 2014 by 5:00 pm
1
Getting Started with WinEst
Sample Exercise v10.1
Professional Cost Estimating and Budgeting
Things you need to know about WinEst
Pull Down Menus & Tool Bars
There are different ways to view your toolbar in WinEst. Here are 2 examples. If you prefer large toolbar buttons,
select ‘Preferences’ from the ‘Tools’ menu option. Now select the Toolbars option from the displayed list of
preferences. To the right, under ‘Style’, change the Images to ‘Large’. Click OK.
Toolbar - Small Images with Short Text
Toolbar - Large Images with Text
WinEst has pull down menus for each of the following - File, Edit, View, Filters, Tables, Tools, Database, Reports,
Custom, Window and Help. When the mouse is clicked on one of these menu items, a list drops down and the
available commands display for that menu. Scan the menus to see the features available in the WinEst program.
Help
Help is always available. You can select the Contents command on the Help menu or press the F1 key to view
help.
2
Navigating in WinEst
WinEst has three main views. These enable you to follow a structured method for building and reviewing your
estimates. You can move from view to view at any time by clicking one of the corresponding toolbar buttons
(‘Takeoff’, ‘Sheet’ and ‘Totals’) or by making selections from the ‘View’ Menu.
Takeoff View
This view is for adding items to your estimate from the price book Database. From here you can:
• Lookup items in the database
• Perform takeoff calculations
• Assign Work Breakdown Structures (WBS) to items
• Analyze the Item takeoff audit trail
• Enter unique, “one time” items
• Add notes to it.
1. DWR User Guide May 2, 2016 1
DWR User Guide
Mark A. Williams
By
2. DWR User Guide May 2, 2016 2
AcronymList Acronyms
Acronym Definition
ATA Air Transport Association specification that numerically
classifies by topic
BCA Boeing Commercial Airplane
BDS Boeing Defense System
CMT Conformity Maintenance Tool
DWR Discreet Work Requirement
ECM Engineering Change Memo
FTEI Flight Test Engineering Instrumentation
FTEO Flight Test Engineering Operations
FTWS Flight Test Work Sheet
LBL Left Buttock Line
MESCI Manufacturing Execution System Common Image
MRSA Material Required Segregation Area
OWC Off Wing Commodity
OWI Operational Work Instruction
PCA Parts Control Area
RBL Right Buttock Line
SOW Statement of Work
STA Station
TC Task Card
TOC Test Operation Center
WL Water Line
3. DWR User Guide May 2, 2016 4
CreateanEvent Ground Operations
Create an Event
1. Hover the mouse pointer above ‘Menu’.
- The Menu dropdown menu appears.
2. From the Menu dropdown, hover the mouse over
‘Work Requirements’.
- The Work Requirements dropdown menu
appears.
3. From the Work Requirements dropdown menu
hover the mouse above ‘Events’.
- The Events dropdown menu appears.
4. From the Events dropdown menu, click ‘Create
Event’.
- The Create Event page appears.
The Create Event Page
5. In the ‘Aircraft’ field, enter the aircraft number for which the event is being created.
6. In the ‘Title’ field, enter the name of this event.
7. In the ‘Estimated Aircraft Need Date’ field use the calendar to the right of the field to select the date by which the
task is scheduled to be completed.
8. In the ‘Type’ field use the dropdown menu to select the type of event being created.
9. In the ‘Notes’ field type pertinent information about the event being created.
10. On the Create Event page, click the ‘ADD’ button to create the event.
- Event has been created.
‘Cancel’ button returns the user to the Statement of Work page. All changes will be lost.
‘Back’ button returns the user to the Manage Statement of Work page. All changes will be lost.
1
2
3
4
5
6
7
8
9
10
10
9
8
7
6
5
43
2
1
4. DWR User Guide May 2, 2016 5
CreateaStatementofWork Ground Operations
Create a Statement of Work
1. Hover the mouse pointer above ‘Menu’.
- The Menu dropdown menu will appear.
2. From the dropdown menu, hover the mouse over ‘Statement of Work’.
- The Statement of Work dropdown menu will appear.
3. From the Statement of Work dropdown menu, click ‘Create Statement
of Work’.
- The Create New Statement of Work Step 1/2 - Add Aircraft
Information page appears.
Create New Statement of Work Step 1/2 – Add Aircraft Information Page
4. In the ‘Select Aircraft’ field, enter the aircraft number for which the SOW is being created.
5. In the ‘SOW Title’ field, enter a title that relates to the work that will be performed.
6. In the ‘Start Date’ field use the calendar to the right of the field to select the date by which the SOW is scheduled to
start.
7. In the ‘After Test No.’ field, enter the test after which this SOW is to be started. This step is not required unless the
SOW must start after a particular test.
8. Click the ‘Create SOW >’ button on the bottom of the page to create the Statement of Work.
- The Create New Statement of Work Step 2/2 – Add Available Work Items to Statement of Work page appears.
1
2
3
4
5
6
7
8
32
1
4
7
6
5
8
5. DWR User Guide May 2, 2016 6
CreateaStatementofWork Ground Operations
Create a Statement of Work (2 of 2)
The Create New Statement of Work Step 2/2 Page
9. In the ‘Available Work
Items to add to
Statement of Work’
section, find the
DWR(s) to attach to
this SOW. Once found,
click on the box to the
left of each item to be
added.
10. Click the ‘Add to
Statement of Work ▼’
button.
- The selected
DWR(s) will now
appear in the
‘Statement of
Work Items’
section.
11. To remove a DWR
from the SOW:
In the ‘Statement of
Work Items’ section,
find the DWR(s) to be
removed from this
SOW. Once found,
click on the box to the
left of each item to be
removed.
12. Click the ‘Remove from Statement of Work ▲’ button.
- The selected DWR(s) will now be removed from the ‘Statement of Work Items’ section.
13. Click the ‘Save and Exit’ button on the bottom of the page.
- Records successfully saved indication appears.
‘Save’ button saves all entries but does not exit the current page.
‘Back’ button returns the user to the Manage Statement of Work page. All changes will be lost.
‘Cancel’ button returns the user to the Statement of Work page. All changes will be lost.
10
9
11
13
12
13
9
10
11
12
6. DWR User Guide May 2, 2016 24
ManageSOW Ground Operations
Manage SOW
1. Hover the mouse pointer above ‘Menu’.
- The Menu dropdown menu will appear.
2. From the Menu dropdown, hover the mouse over ‘Statement of
Work’.
- The Statement of Work dropdown menu will appear.
3. From the Statement of Work dropdown menu, click ‘Manage
Statement of Work’.
- The Manage Statement of Work page appears.
The Manage Statement of Work Page
4. In the ‘Select Aircraft’
field, enter the aircraft
number.
5. In the ‘Select SOW’ field, enter the SOW number for the SOW to be managed and then click the ‘Edit SOW’
button.
- The Edit Statement of Work Step 2/2 page appears.
For the next section, choose the desired action and skip the steps that do not apply.
1
2
3
4
5
4
3
2
1
5
7. DWR User Guide May 2, 2016 25
ManageSOW Ground Operations
Manage SOW (2 of 2)
The Edit Statement of Work Page
6. To add a DWR to the SOW:
Find the DWR(s) to be attached
to this SOW in the ‘Available
Work Items to add to Statement
of Work’ section. Once found,
click on the box to the left of
each item to be added.
7. Click the ‘Add to Statement of
Work ▼’ button.
- The selected DWR(s) will
now appear in the
‘Statement of Work Items’
section.
8. To remove a DWR from the
SOW:
Find the DWR(s) to be removed
from this SOW in the ‘Statement
of Work Items’ section. Once
found, click on the box to the
left of each item to be removed.
9. Click the ‘Remove from
Statement of Work ▲’ button.
- The selected DWR(s) will
now be removed from the
‘Statement of Work Items’
section.
10. Once all desired changes have been made to the SOW, click the box next to ‘Authorize & Release SOW’.
- The Initial SOW Consolidation popup will appear.
11. On the Initial SOW Consolidation popup, click the ‘OK’ button.
12. Include any pertinent notes in the ‘SOW Notes:’ section.
13. If a SOW is available to work, click the box in the ‘Available To Work’ column of the SOW being authorized.
- The worksheet number appears.
12. Click the ‘Save and Exit’ button.
- ‘Records successfully saved’ will appear at the bottom of the DWR screen.
‘Save’ button saves all entries but does not exit the current page.
‘Back’ button returns the user to the Manage Statement of Work page. All changes will be lost.
‘Cancel’ button returns the user to the Statement of Work page. All changes will be lost.
6
7
8
9
7
6
8
9
11
12
10
13
10
13
14
12
14
8. DWR User Guide May 2, 2016 27
CreateWorkInstruction Manufacturing Engineering (ME)
Create a Work Instruction
1. Hover the mouse pointer above ‘Menu’.
- The Menu dropdown menu will appear.
2. From the dropdown menu, hover the mouse over ‘Work
Instructions’.
- The Work Instructions dropdown menu will appear.
3. From the Work Instructions dropdown menu, click ‘Create Work
Instruction’.
- The Create New Work Instruction page appears.
The Create New Work Instruction Page
4. In the ‘Select Aircraft’
field, enter the aircraft
number.
5. Click in the ‘Select DWR’
field; Select a DWR from
the dropdown that
appears.
6. In the ‘Enter Work
Instruction Number’ field,
type the Shop Order
Number.
7. Click the ‘Next >’ button.
- The Create New Work Instruction page appears.
‘My Queue’ button takes the user to the My Work Queue page.
‘Cancel’ button returns the user to the Statement of Work page. All changes will be lost.
32
1
2
3
5
4
6
7
4
32
1
5
6
7
9. DWR User Guide May 2, 2016 28
CreateWorkInstruction Manufacturing Engineering (ME)
Create a Work Instruction (2 of 3)
The Create New Work Instruction Step 2/2 Page
8. In the ‘Enter Work
Instruction Title’ field,
enter the name of the
event.
9. In the ‘Estimated
Aircraft Need Date’
field use the calendar to
the right of the field to
select the date by which
the task is scheduled to
be completed.
10. In the ‘Work
Instruction Detail’
field, type a thorough
explanation of what the
Work Instruction is.
Include pertinent
information that needs
to be known by anyone
performing this task.
11. To attach files to the
Work Instruction:
In the Upload File
section, click the
‘+ Add…’ button.
- The ‘Choose File
to Upload’ popup
appears.
File types that may be uploaded are limited to PDF, JPG, JPEG, BMP, GIF, PNG and TIF.
A. Locate the file to be attached to the Work Instruction, click on the file and then click the ‘Open’ button.
- The files path appears in the Upload File section.
12. If no parts are required, click the box next to ‘No Parts Required’.
- ✓ Status: Parts Complete appears.
13. If parts are required, click on the sideways blue triangle next to ‘Parts’.
- The Parts section appears.
11
12
13
9
8
10
8
9
10
11
12
13
10. DWR User Guide May 2, 2016 29
CreateWorkInstruction Manufacturing Engineering (ME)
Create a Work Instruction (3 of 3)
The Parts Section
14. Click the ‘Add Row’ button.
15. In the ‘Department’
column, click the dropdown
menu to choose the
appropriate department for
the part.
16. In the ‘Part No./FT ID
No.’ column, type the part
number or Flight Test
Identification number for
the part.
17. In the ‘Lead Long Part’
column, click the box if the
part is a long lead part.
18. In the ‘Part Name’ column,
type the name of the part.
18. In the ‘Qty’ column, enter
the quantity required.
19. In the ‘Comments’ column, type any pertinent information.
Repeat steps 13 thru 18 until all required parts are documented.
20. Once all parts have been entered, click the box next to ‘Parts List Complete’.
- ✓Status: Parts Complete appears.
21. Click the box next to ‘The above Shop Order is released and available for work :’
- A timestamp and your name appear
22. Click the ‘Save’ button.
- DATABASE UPDATED SUCESSFULLY is displayed.
‘Cancel’ button returns the user to the Statement of Work page. All changes will be lost.
‘Back’ button returns the user to the Manage Statement of Work page. All changes will be lost.
15
14
16
17
18
19
20
21
22
23
14
15 16
17
201918
22
21
23
11. DWR User Guide May 2, 2016 30
ManageWorkInstruction Manufacturing Engineering (ME)
Manage Work Instruction
1 Hover the mouse pointer above ‘Menu’.
- The Menu dropdown menu will appear.
2. From the dropdown menu, hover the mouse over ‘Work
Instructions’.
- The Work Instructions dropdown menu will appear.
3. From the Work Instructions dropdown menu, click ‘Manage
Work Instruction’.
- The Manage Work Instruction page appears.
The Manage Work Instruction Page
4. In the ‘Select Aircraft’ field, enter the Aircraft number.
5. In the ‘Select DWR’ field, type the name of the DWR.
6. Click on the ‘Select DWR’ button.
- The matching DWR(s) appear.
7. Double-click the appropriate Work Instruction Number.
- The details of the selected Work Instruction appears.
‘View PDF’ opens a PDF of the selected Flight Test Work Sheet.
‘My Queue’ button takes the user to the My Work Queue page.
2
3
3
2
11
5
4
7
6
6
7
5
4
12. DWR User Guide May 2, 2016 31
ManageWorkInstruction Manufacturing Engineering (ME)
Manage Work Instruction (2 of 6)
For the next section, choose the desired action and skip the steps that do not apply.
The Details of Selected Work Instruction Section
8. To delete a Work
Instruction:
Click the ‘Delete’ button.
- Work Instruction –
Delete !!! popup
appears. Click the
‘Delete’ button.
9 To separate DWRs, click
the ‘Split DWR’ button.
- The Split DWR
page appears.
The Split DWR Page
10. Click on the Work Instruction(s) to be separated. To select more than one at a time, press and hold the Ctrl
button on the keyboard while making the selections. Once all have been selected, click the ‘►’ button.
11. Click the ‘Save’ button.
‘Cancel’ button returns the user to the Manage Work Instructions page. All changes will be lost.
98
11
10
8
9
10
11
13. DWR User Guide May 2, 2016 32
ManageWorkInstruction Manufacturing Engineering (ME)
Manage Work Instruction (3 of 6)
The Edit Work Instructions Page
12. To edit the Work Instruction, click
the ‘Edit’ button
- The Edit Work Instructions page
appears.
The Edit Work Instructions Page
13. To edit the Work
Instruction Number:
In the ‘Work
Instruction Number’
field, type the new
number.
14. To edit the Work
Instruction Title:
In the ‘Enter Work
Instruction Title’ field,
type the new name.
15. To change the ECD:
In the ‘SO ECD’ field
use the calendar to the
right of the field to
select the date by which
the task is scheduled to
be completed.
16. To change the Work
Instruction Detail:
Click in the ‘Work
Instruction Detail’ field
and type a thorough
explanation. Include
pertinent information
that needs to be known
by anyone performing
this task.
12
12
13
14
15
16
13
14
15
16
14. DWR User Guide May 2, 2016 33
ManageWorkInstruction Manufacturing Engineering (ME)
Manage Work Instruction (4 of 6)
The Edit Work Instructions Page
17. To attach files to the Work Instruction:
In the Upload File section, click the ‘+ Add…’ button.
File types that may be uploaded are limited to PDF, JPG, JPEG, BMP, GIF, PNG and TIF.
A. Locate the file to be attached to the Work Instruction, click on the file and then click the ‘Open’ button.
- The files path appears in the Upload File section.
18. To delete attachments from the Work Instruction:
Click on the Uploaded Files Tab. Find the attachment to be deleted and in the Delete File column, click the
‘Delete’ link.
- The Attachment Delete Confirmation !!! popup appears. Click the ‘Delete’ button.
- ‘File name DELETED SUCCESFULLY’ appears at the bottom of the screen.
18
17
17
18
19
15. DWR User Guide May 2, 2016 34
ManageWorkInstruction Manufacturing Engineering (ME)
Manage Work Instruction (5 of 6)
The Parts Section
19. To add parts to the
Instruction:
20. If there is a checkmark next
to ‘The above Shop Order
is released and available for
work :’, click the box with
the checkmark.
- The checkmark will
disappear and the time
and name stamp will
disappear.
21. If there is a checkmark next
to ‘No Parts Required’, click
the box with the
checkmark.
- The checkmark will
disappear and Status:
Parts Incomplete will
be displayed.
22. Click on the sideways blue triangle next to ‘Parts’.
- The Parts section appears.
23. If there is a checkmark next to ‘Parts List Complete’, click the box with the checkmark.
- The checkmark will disappear. The Parts Estimate Status popup appears. Click ‘OK’.
24. Click the ‘Add Row’ button.
- A blank row appears in the Parts section.
25. In the ‘Department’ column, click the dropdown menu to choose the appropriate department for the part.
26. In the ‘Part No./FT ID No.’ column, type the part number or Flight Test Identification number for the part.
27. In the ‘Lead Long Part’ column, click the box if the part is a long lead part.
28. In the ‘Part Name’ column, type the name of the part.
29. In the ‘Qty’ column, enter the quantity required.
30. In the ‘Comments’ column, type any pertinent information.
Repeat steps 24 thru 30 until all required parts are documented.
31. Once all parts have been entered, click the box next to ‘Parts List Complete’.
- ✓Status: Parts Complete appears.
32. To remove part(s) from the Work Instruction:
If there is a checkmark next to ‘The above Shop Order is released and available for work :’, click the box with the
checkmark.
- The checkmark will disappear and the time and name stamp will disappear.
21
20
22
23
24
25
26
27
28
29
20
21
22
23
2625
24
28
27
29
19
30
31
32
30
31
16. DWR User Guide May 2, 2016 35
ManageWorkInstruction Manufacturing Engineering (ME)
Manage Work Instruction (6 of 6)
The Parts Section
33. Click on the sideways blue
triangle next to ‘Parts’.
- The Parts section
appears.
34. If there is a checkmark next
to ‘Parts List Complete’,
click the box with the
checkmark.
- The checkmark will
disappear. The Parts
Estimate Status popup
appears. Click ‘OK’.
35. Click the box next to the
part(s) to be deleted.
36. Click the ‘Remove Checked’
button.
- The part(s)are deleted
from the Parts section.
37. Once all parts have been
entered, click the box next
to ‘Parts List Complete’.
- ✓Status: Parts
Complete appears.
38. Click the box next to ‘The above Shop Order is released and available for work :’.
- A timestamp and your name appear.
39. Click the box next to ‘All Shop Orders are released and available for work :’.
- A timestamp and your name appear.
40. Once all changes to the Work Instruction have been made, click the ‘Save’ button.
- DATABASE UPDATED SUCESSFULLY is displayed.
‘Cancel’ button returns the user to the Statement of Work page. All changes will be lost.
‘Back’ button returns the user to the Manage Statement of Work page. All changes will be lost.
32
34
33
33
34
35
36
37
38
39
35
36
37
38
40
39