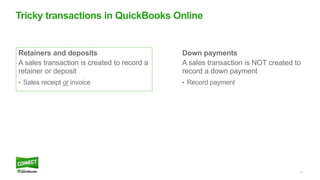
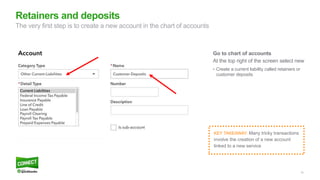
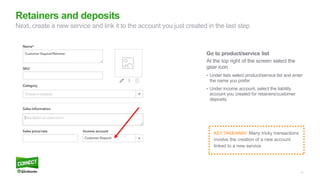
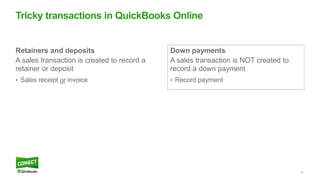
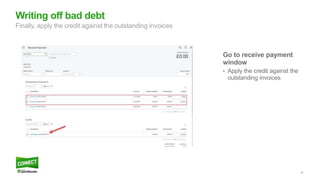
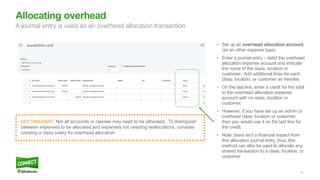
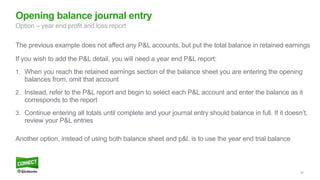
SlideShare a Scribd company logo
1 of 59
Annette Pettitt
Founder, Leigh Park Accountancy Ltd
Tricky transactions in
QuickBooks Online
WiFi: QBConnect No password required#QBConnect
Take a few moments
to Connect with
your neighbor
3
Annette Pettitt
Director, Leigh Park Accountancy Ltd
Today’s speaker
4
Member of Intuit’s trainer/writer network
Advanced trainer for Quickbooks Online
Previous business owner
Accountant in practice
About today’s speaker
Annette Pettitt
Leigh Park Accountancy Ltd
Tricky transactions
• Retainers, deposits, and down payments
• Writing off bad debt
• Allocating overhead
• Zero pound transactions
• Recording loan payments
• Daily sales summary
Troubleshooting
• Bank reconciliation
• Audit log
• Opening balance journal entry
Agenda
Tricky transactions
7
What is a tricky transaction?
Transactions that are generally not done on a daily basis
• Manipulations of other transactions
• Workarounds to accomplish a specific task
Tricky transactions in QuickBooks Online
8
Down payments
A sales transaction is NOT created to
record a down payment
• Record payment
Retainers and deposits
A sales transaction is created to record a
retainer or deposit
• Sales receipt or invoice
Tricky transactions in QuickBooks Online
Retainers
and deposits
10
Go to chart of accounts
At the top right of the screen select new
• Create a current liability called retainers or
customer deposits
Retainers and deposits
The very first step is to create a new account in the chart of accounts
KEY TAKEAWAY: Many tricky transactions
involve the creation of a new account
linked to a new service
11
Go to product/service list
At the top right of the screen select the
gear icon
• Under lists select product/service list and enter
the name you prefer
• Under income account, select the liability
account you created for retainers/customer
deposits
Retainers and deposits
Next, create a new service and link it to the account you just created in the last step
KEY TAKEAWAY: Many tricky transactions
involve the creation of a new account
linked to a new service
12
Go to quick create +
Select invoice or sales receipt
• Record the deposit on sales transactions
like a sales receipt or invoice.
• Use the customer deposit service item to
record the payment.
Retainers and deposits
Last, record the retainer/customer deposit on a sales transaction
KEY TAKEAWAY: Let the transaction
type match what’s happening in real
life. If the retainer is to be billed now
and paid by the customer at a later
date, use an invoice transaction. If
the charge for the retainer and the
payment of it are happening at the
same time, use a sales receipt
transaction.
13
Go to transaction report
• Run a balance sheet.
• Click on customer deposits account.
• Filter the report by the customer to view
the report by customer.
Retainers and deposits
View the customer deposits on an account report
14
• After the work or services are complete,
your client will create sales transactions
as per usual.
• After the services or items have been
added, add the customer
deposit/retainer item that you just
created on another line.
• Enter the amount of the deposit to be
applied as a negative. This will apply the
amount to the transaction reducing the
balance owed, and affect the balance in
the customer deposits account
accurately.
Retainers and deposits
Apply the deposit or retainer
15
Retainers and deposits
The updated customer deposit report displays the updated balance
KEY TAKEAWAY: Keep it clean! Reconcile this account on a regular basis to make sure you are applying all
outstanding retainers and deposits against sales transactions as appropriate.
16
Down payments
A sales transaction is NOT created to
record a down payment
• Record payment
Retainers and deposits
A sales transaction is created to record a
retainer or deposit
• Sales receipt or invoice
Tricky transactions in QuickBooks Online
Down payments
18
• A down payment may be received from a customer before an invoice is
ever generated
• An easy way to track this is record a payment from the customer without
applying it to an invoice
• A credit will sit in accounts receivable in their account in the customer centre
• You can apply this credit against a future invoice using the receive
payments screen
Down payments
KEY TAKEAWAY: Keep it clean! Since it is not good practice to have negative balances on sub-ledgers at year end, and since QBO
allows multiple AR and/or AP Lines on a journal entry, clear any unused down payments at year end. Simply create one reversing
journal entry moving the negative balances with a credit to AR to a customer deposits current liability account.
Writing off bad debt
20
QBOA includes a feature in the accountant toolbox called Write
Off Invoices
This can be used if you are not VAT registered
If you are VAT registered use the following steps to write off
bad debt and claim back sales tax at the same time
Writing off bad debt
21
Go to settings
• Click advanced
• Click automation
• Clear the checkmark from
automatically apply credits
Writing off bad debt
First, turn off the automatically apply credits feature
22
Go to chart of accounts
• Create an expense account
called bad debt expense
Writing off bad debt
Then, create an account to track bad debt
KEY TAKEAWAY: Many tricky transactions
involve the creation of a new account
linked to a new service
23
Go to product/service information
• Click the gear icon.
• Click on products and services.
• Create a service item linked to the bad
debt expense.
• Then create a credit memo for the
outstanding amounts for the bad debts.
• Use the bad debt service item created
above
Writing off bad debt
Then, create an item (service) linked to the bad debt expense and create a credit memo
KEY TAKEAWAY: Many tricky transactions
involve the creation of a new account
linked to a new service
24
Go to receive payment
window
• Apply the credit against the
outstanding invoices
Writing off bad debt
Finally, apply the credit against the outstanding invoices
Allocating overhead
26
• For some clients, you may want to allocate an overhead or payroll
expenses to a class, location, or customer
• This is done by entering a journal entry that balances with a zero
pound effect on the accounts involved
Allocating overhead
27
• Set up an overhead allocation account
(as an other expense type)
• Enter a journal entry – debit the overhead
allocation expense account and indicate
the name of the class, location or
customer. Add additional lines for each
class, location, or customer as needed.
• On the last line, enter a credit for the total
to the overhead allocation expense
account with no class, location or
customer.
• However, if you have set up an admin or
overhead class, location or customer,
then you would use it on the last line for
the credit.
• Note: there isn’t a financial impact from
this allocation journal entry, thus, this
method can also be used to allocate any
shared transaction to a class, location, or
customer
Allocating overhead
A journal entry is used as an overhead allocation transaction
KEY TAKEAWAY: Not all accounts or classes may need to be allocated. To distinguish
between expenses to be allocated and expenses not needing reallocations, consider
creating a class solely for overhead allocation
Zero pound
transactions
29
• There are some things you cannot adjust using a journal entry like
items or billable expenses
• In these situations, using a zero pound expense (where the net total
is zero) allows us to make the adjustment because you can enter
items on an expense and make things billable too
Zero pound transactions
30
Issue a new expense
• Set up the expense as usual for an
account or item
• The credit part of the entry (to offset
so the expense totals zero) should be
entered as a negative amount to an
account or item.
Zero pound transactions
Create a zero pound expense
KEY TAKEAWAY: Let your
imagination be your guide to how
you can use zero pound
transactions. For example, using
zero pound expenses to turn
individual items into an “assembly”
item for an inventory workaround,
or writing off multiple inventory
items to damaged goods COGS
instead of standard inventory
adjustments, etc.
Recording loan
payments
32
• A common transaction, but can be more complex than an everyday
transaction
• This transaction may vary depending on the type of loan the client has
• Our example is based on a declining loan balance, and the principal
and interest will change each month according to a schedule provided
by the bank
Recording loan payments
33
Open the expense transaction
• Enter the account and date of the transaction
• Enter the total amount of the payment
• In the account details section, choose the loan
account
• In the amount, enter the principal amount of the
payment
• Add a line to the expense and choose interest
expense account
• Enter the amount of the interest. The total of the
principal and interest amounts should add up to
the amount of the payment
Recording loan payments
First, create an expense transaction
34
• Click save
• Click make recurring
• Enter the template name. Make it something
meaningful for your client
• Under type choose reminder. This lets you change
the amount for the principal and interest amount
instead of the transaction automatically entering every
month with the same amounts
• Choose the interval for the date of the entry
• Enter the start date and end date
• Save the entry
• NOTE: to make changes to recurring transactions,
click the GEAR icon, and then click recurring
transactions. Click edit to make changes to the
template
Recording loan payments
Next, make loan payment recurring
KEY TAKEAWAY: Some small businesses have been advised to put the total loan amount to the loan’s liability account
and only worry about the adjustments for interest at year end. But if the interest is recorded throughout the year you
won’t overstate the client’s net income, or overstate the client’s liabilities. The goal is to have the client’s books as
accurate as possible throughout the year and not only at year end.
Daily sales summary
36
• There are many small businesses who use a cash register or POS
system that is not integrated with QBO
• To record summary sales transactions in QBO you can follow a
detailed procedure
Daily sales summary
37
• Create a POS or cash register daily sales report (this
may be less frequent, but it is best entered daily).
• Create sales items in QBO that represent the items or
categories of sales your client wants to track sales on
and report on.
• Link the items to appropriate sales accounts (you may
have to create an item for discounts or coupons)
• Select the appropriate default sales tax code
• Repeat these steps for all items in the POS report
Daily sales summary
First, create sales items in QBO that matches the daily POS report
KEY TAKEAWAY: Use the client’s POS report as your
guide to create the items and template they can
simply populate
38
• Create a current asset account as a
clearing account (i.e. daily sales clearing)
• Create a customer called
daily/weekly/monthly sales.
Daily sales summary
Then, create a current asset account and a customer called sales
KEY TAKEAWAY: Do NOT use the
undeposited funds account for this
transaction, but create a new current
asset account as mentioned above. This
keeps the make deposit window easier to
manage.
39
• Create a sales receipt with the following details:
– Customer is daily sales
– Date is date of sales report you are posting
– Payment method is irrelevant
– Deposit-to is daily sales clearing account (from
previous step)
– List the items on the sales receipt in the order
they appear on the POS report and set the
appropriate sales tax item
• Click make recurring and set up based on
personal preference (choose reminder to help your
clients make daily entries)
• Balance the sales receipt to the total sales on POS
report. Make sure taxes balance
Daily sales summary
Then, create a sales receipt
40
• To record daily payments (Visa/MC/debit/cash):
– Do a bank transfer between the daily sales
clearing and bank for each payment method as
per POS report (which should also balance to
daily settlement report)
Daily sales summary
Finally, record daily payments
KEY TAKEAWAY: Reconcile the daily sales
clearing account regularly. Write off amounts
to cash over/short when needed. The only
balance in daily sales clearing should be the
difference in timing on credit cards between
charge and deposit.
Troubleshooting
42
There are common problems that often require
troubleshooting help
Troubleshooting in QuickBooks Online
Bank reconciliations
44
• There are several reconciliation problems that clients cause
• Bank reconciliation problems are often caused by editing, deleting, or
making other changes to reconciled transactions
• A common problem is when the beginning balance does not match the
previous month’s ending balance
Bank reconciliation
45
Go to bank reconcile window
QBO records any changes in the
changes column.
• Click the link to review the change
• Click on the transaction
Bank reconciliations
Use reports and built in tools to discover the problems
46
Bank reconciliations
Edit the transaction
• Edit the transaction to re-create the
original transaction if it is simple as an
edited transaction
• QuickBooks highlights the changes
needed
47
Bank Reconciliations
To correct a deleted transaction
• You will be able to see a deleted
transaction in the change column.
• A deleted action cannot be opened.
• To correct the error, recreate the
transaction and re-reconcile for the
transaction to correct the beginning
balance
KEY TAKEAWAY: Use the bank
register to flag a transaction as
reconciled without having to undo
and redo reconciliations.
Audit log
49
• The Audit Log contains all of the changes made to the company data
• The Audit Log cannot be disabled
• Lines displaying changes to transactions within the log cannot be deleted
• Dates and times in the Audit Log reflect when events occurred and are
displayed in your local time. On the QuickBooks servers, the events are
recorded in GMT (Greenwich Mean Time) and the software on your computer
converts the GMT time to your time zone
• Voided/Deleted Transactions Report is a pre-filtered version of audit log
Audit log
Opening balance
journal entry
51
• Instead of doing a full QB desktop to QBO conversion (their file is too
large or messy), or if your client is starting to use QBO after using a
different accounting software, one method to get them started is referred
to as a “fresh start”
• Customer, supplier, product & services, and chart of accounts lists can all
be imported to QBO using excel or CSV files
• Then make the opening balance journal entries as follows
Opening balance journal entry
52
Concern Method Pros Cons
Subledger balances
are correct per contact
Use customer balance or supplier
balance reports (or AR or AP aging
summaries but the totals only) enter
balances directly in journal entry
• Sub-ledger will balance to
account
• Most time effective
• May be difficult to identify
payments against bills/invoices
• Will not maintain aging
integrity – everyone will start at
0 days overdue
Itemized balances for
each transaction within
a contact
Use customer balance or supplier
balance reports (or AR or AP aging
detail) enter each transaction line as
a separate line in the journal entry,
identifying transaction details in the
memo
• Sub-ledger will balance to
account
• Will better identify payments
against bills/invoices
• Will not maintain aging
integrity – everyone will start at
0 days overdue
• More time consuming than
option above
Recreate aging detail Use customer balance or supplier
balance reports, and/or AR or AP
aging detail and follow instructions
detailed later
• Sub-ledger will balance to
account
• Will easily identify payments
against bills/invoices
• Will maintain aging integrity
• Most “correct” option
• Most time consuming option
Opening balance journal entry
How detailed do you want to get for a “fresh start”?
53
Opening balance journal entry
The “fresh start” conversion method Opening balance journal entry:
1. From the quick create menu select journal entry
2. The date of the journal entry should be the last date
of the prior financial year
3. Enter an appropriate description
4. Select the account at the top of your balance sheet
and enter the balance in the journal entry in the
same way it appears in the balance sheet
5. Continue working your way down the statement,
selecting accounts and entering balances as you go
6. When you arrive at the AR section, refer to the
customer balance listing and select debtors as the
account and select the appropriate customer and
their balance
7. Continue working your way down the AR list and
then commence with the remaining balance sheet
accounts
8. When you reach the AP account, refer to the
supplier balance listing and enter the details in the
same manner for AR
9. Continue working your way down the AP list and
then commence with the remaining balance sheet
accounts
54
Opening balance journal entry options
Create
Account Enter journal Create item
Enter
transactions Reminder
Create an Other
Current Asset account
in your Chart of
Accounts called
Receivable Clearing
When entering your
Balance Sheet, when
you get to the AR
account, enter the
Receivable Clearing
account instead with
the full balance
Create a service or
Non-Inventory item
called Open Balance
AR and link it to your
Receivable Clearing
account with the
default tax code of NO
VAT
Create each
outstanding invoice
and credit note in QBO
with the proper
transaction type,
reference number,
date and amount
The item used in these
transactions is the
Open Balance AR item
and will be the full
amount of the invoice
or credit memo. Do
not split out the
detail or taxes
KEY TAKEAWAY: When complete, the balance in your receivable clearing account will be zero. If it’s not, review the entries of your
aging detail.
Option – if you want to recreate your accounts receivable aging
55
Opening balance journal entry options
Create
Account Enter journal
Enter
transactions Reminder Review
Create an Other
Current Liabilities
account in your Chart
of Accounts called
Payable Clearing
When entering your
Balance Sheet, when
you get to the AP
account, enter the
Payable Clearing
account instead with
the full balance
Create each
outstanding bill and
supplier credit in QBO
with the proper
transaction type,
reference number,
date and amount
Post the full amount
of the bill or supplier
credit directly to the
Payable Clearing
account you created.
Do not split out the
detail or taxes
When complete, the
balance in your
Payable Clearing
account will be zero. If
it’s not, review the
entries of your aging
detail
KEY TAKEAWAY: Since accounts payable transactions can be posted directly to an account, you do not need to create a new account
and link it to a new service
Option – if you want to recreate your accounts payable aging
56
Opening balance journal entry
Option – year end profit and loss report
The previous example does not affect any P&L accounts, but put the total balance in retained earnings
If you wish to add the P&L detail, you will need a year end P&L report:
1. When you reach the retained earnings section of the balance sheet you are entering the opening
balances from, omit that account
2. Instead, refer to the P&L report and begin to select each P&L account and enter the balance as it
corresponds to the report
3. Continue entering all totals until complete and your journal entry should balance in full. If it doesn’t,
review your P&L entries
Another option, instead of using both balance sheet and p&l, is to use the year end trial balance
Questions?
Access the presentation materials via:
The QuickBooks Connect 2017 Conference App
or
Slideshare at: http://www.slideshare.com/tag/QBCUK17
Tricky Transactions in QuickBooks Online

More Related Content

What's hot

Introduction to accounting
Introduction to accountingIntroduction to accounting
Introduction to accountingVishal Kukreja
 
Cash and Receivable Management.pptx
Cash and Receivable Management.pptxCash and Receivable Management.pptx
Cash and Receivable Management.pptxAbhayKhane1
 
Introduction to financial modeling
Introduction to financial modelingIntroduction to financial modeling
Introduction to financial modelingAldo Baietti
 
Bank reconciliation
Bank reconciliationBank reconciliation
Bank reconciliationKhalid Aziz
 
CPT Accounts Model MCQs for All chapters
CPT Accounts Model MCQs for All chaptersCPT Accounts Model MCQs for All chapters
CPT Accounts Model MCQs for All chaptersVXplain
 
Brs presentation
Brs presentationBrs presentation
Brs presentationAwaisRiaz14
 
Basic Concepts of Financial Accounting
Basic Concepts of Financial AccountingBasic Concepts of Financial Accounting
Basic Concepts of Financial AccountingAbdullah Kareem
 
Introduction to accounting
Introduction to accountingIntroduction to accounting
Introduction to accountingVishal Kukreja
 
Trial balance
Trial balanceTrial balance
Trial balancebadsharc
 
L'essentiel du diagnostic financier
L'essentiel du diagnostic financierL'essentiel du diagnostic financier
L'essentiel du diagnostic financierJeyo52529B
 
Introduction to Accounting
Introduction to AccountingIntroduction to Accounting
Introduction to AccountingAditya Kapoor
 
Fiscalite maroc fiscalité et comptabilité
Fiscalite maroc  fiscalité et comptabilitéFiscalite maroc  fiscalité et comptabilité
Fiscalite maroc fiscalité et comptabilitéAllaeddine Makhlouk
 
Ch 19 share-based compensation and eps
Ch 19   share-based compensation and epsCh 19   share-based compensation and eps
Ch 19 share-based compensation and epsMarcusHuang6
 
Comment mesurer la performance d'une agence bancaire ?
Comment mesurer la performance d'une agence bancaire ? Comment mesurer la performance d'une agence bancaire ?
Comment mesurer la performance d'une agence bancaire ? slim Oueslati
 
Single entry system 1.1
Single entry system 1.1Single entry system 1.1
Single entry system 1.1LeenaKP
 
Bank Reconciliation Statement
Bank Reconciliation StatementBank Reconciliation Statement
Bank Reconciliation StatementAnkit Sand
 

What's hot (20)

Introduction to accounting
Introduction to accountingIntroduction to accounting
Introduction to accounting
 
Recording business transactions
Recording business transactionsRecording business transactions
Recording business transactions
 
Cash and Receivable Management.pptx
Cash and Receivable Management.pptxCash and Receivable Management.pptx
Cash and Receivable Management.pptx
 
Introduction to financial modeling
Introduction to financial modelingIntroduction to financial modeling
Introduction to financial modeling
 
Bank reconciliation
Bank reconciliationBank reconciliation
Bank reconciliation
 
CPT Accounts Model MCQs for All chapters
CPT Accounts Model MCQs for All chaptersCPT Accounts Model MCQs for All chapters
CPT Accounts Model MCQs for All chapters
 
Brs presentation
Brs presentationBrs presentation
Brs presentation
 
Basic Concepts of Financial Accounting
Basic Concepts of Financial AccountingBasic Concepts of Financial Accounting
Basic Concepts of Financial Accounting
 
Introduction to accounting
Introduction to accountingIntroduction to accounting
Introduction to accounting
 
Introduction to accounting
Introduction to accountingIntroduction to accounting
Introduction to accounting
 
Trial balance
Trial balanceTrial balance
Trial balance
 
L'essentiel du diagnostic financier
L'essentiel du diagnostic financierL'essentiel du diagnostic financier
L'essentiel du diagnostic financier
 
Introduction to Accounting
Introduction to AccountingIntroduction to Accounting
Introduction to Accounting
 
Financial accounting
Financial accountingFinancial accounting
Financial accounting
 
Book Keeping For Beginners
Book Keeping For BeginnersBook Keeping For Beginners
Book Keeping For Beginners
 
Fiscalite maroc fiscalité et comptabilité
Fiscalite maroc  fiscalité et comptabilitéFiscalite maroc  fiscalité et comptabilité
Fiscalite maroc fiscalité et comptabilité
 
Ch 19 share-based compensation and eps
Ch 19   share-based compensation and epsCh 19   share-based compensation and eps
Ch 19 share-based compensation and eps
 
Comment mesurer la performance d'une agence bancaire ?
Comment mesurer la performance d'une agence bancaire ? Comment mesurer la performance d'une agence bancaire ?
Comment mesurer la performance d'une agence bancaire ?
 
Single entry system 1.1
Single entry system 1.1Single entry system 1.1
Single entry system 1.1
 
Bank Reconciliation Statement
Bank Reconciliation StatementBank Reconciliation Statement
Bank Reconciliation Statement
 

Similar to Tricky Transactions in QuickBooks Online

Quick books tutorials
Quick books tutorialsQuick books tutorials
Quick books tutorialsAwais Aftab
 
Financial accounting
Financial accountingFinancial accounting
Financial accountingReba Das
 
Recording Changes in QuickBooks
Recording Changes in QuickBooksRecording Changes in QuickBooks
Recording Changes in QuickBooksSikich LLP
 
Atlantic DataSystems: Sage Web Chat for Accounts Receivable
Atlantic DataSystems: Sage Web Chat for Accounts Receivable Atlantic DataSystems: Sage Web Chat for Accounts Receivable
Atlantic DataSystems: Sage Web Chat for Accounts Receivable Atlantic DataSystems
 
Subscribed 2017: Answers To Commonly Asked Finance Operations Questions
Subscribed 2017: Answers To Commonly Asked Finance Operations QuestionsSubscribed 2017: Answers To Commonly Asked Finance Operations Questions
Subscribed 2017: Answers To Commonly Asked Finance Operations QuestionsZuora, Inc.
 
Bim business accounting-1-02.08.11 (1)
Bim business accounting-1-02.08.11 (1)Bim business accounting-1-02.08.11 (1)
Bim business accounting-1-02.08.11 (1)Aditya Narang
 
Identify a credit note!
Identify a credit note!Identify a credit note!
Identify a credit note!MarkupBox
 
GAME PLANS TO MAINTAIN POSITIVE BUSINESS CASH FLOW?
GAME PLANS TO MAINTAIN POSITIVE BUSINESS CASH FLOW?GAME PLANS TO MAINTAIN POSITIVE BUSINESS CASH FLOW?
GAME PLANS TO MAINTAIN POSITIVE BUSINESS CASH FLOW?Arikrishnan Subramanian
 
Accounts Payable.pdf
Accounts Payable.pdfAccounts Payable.pdf
Accounts Payable.pdfMastersIndia2
 
Startup Allghenies Bootcamp: Introductions to Financials
Startup Allghenies Bootcamp: Introductions to FinancialsStartup Allghenies Bootcamp: Introductions to Financials
Startup Allghenies Bootcamp: Introductions to FinancialsStartupAlleghenies
 
Trial balance and rectification of errors
Trial balance and rectification of errorsTrial balance and rectification of errors
Trial balance and rectification of errorsItisha Sharma
 
Accounting for Startups: What You Need to Know
Accounting for Startups: What You Need to KnowAccounting for Startups: What You Need to Know
Accounting for Startups: What You Need to KnowDavid Ehrenberg
 
Chapter 11: Long Term Assets
Chapter 11: Long Term AssetsChapter 11: Long Term Assets
Chapter 11: Long Term AssetsTara Kissel, M.Ed
 
Qs2 um en_10_supplier_payment_management
Qs2 um en_10_supplier_payment_managementQs2 um en_10_supplier_payment_management
Qs2 um en_10_supplier_payment_managementkhayer
 
Principle of Accounting.pptx
Principle of  Accounting.pptxPrinciple of  Accounting.pptx
Principle of Accounting.pptxRobbia Rana
 

Similar to Tricky Transactions in QuickBooks Online (20)

Quick books tutorials
Quick books tutorialsQuick books tutorials
Quick books tutorials
 
Financial accounting
Financial accountingFinancial accounting
Financial accounting
 
Powerpoint 3rev1
Powerpoint 3rev1Powerpoint 3rev1
Powerpoint 3rev1
 
MODULE 2.pptx
MODULE 2.pptxMODULE 2.pptx
MODULE 2.pptx
 
Recording Changes in QuickBooks
Recording Changes in QuickBooksRecording Changes in QuickBooks
Recording Changes in QuickBooks
 
Atlantic DataSystems: Sage Web Chat for Accounts Receivable
Atlantic DataSystems: Sage Web Chat for Accounts Receivable Atlantic DataSystems: Sage Web Chat for Accounts Receivable
Atlantic DataSystems: Sage Web Chat for Accounts Receivable
 
Payroll accounting
Payroll accountingPayroll accounting
Payroll accounting
 
Subscribed 2017: Answers To Commonly Asked Finance Operations Questions
Subscribed 2017: Answers To Commonly Asked Finance Operations QuestionsSubscribed 2017: Answers To Commonly Asked Finance Operations Questions
Subscribed 2017: Answers To Commonly Asked Finance Operations Questions
 
Bim business accounting-1-02.08.11 (1)
Bim business accounting-1-02.08.11 (1)Bim business accounting-1-02.08.11 (1)
Bim business accounting-1-02.08.11 (1)
 
Tally training in chandigarh
Tally training in chandigarhTally training in chandigarh
Tally training in chandigarh
 
Identify a credit note!
Identify a credit note!Identify a credit note!
Identify a credit note!
 
GAME PLANS TO MAINTAIN POSITIVE BUSINESS CASH FLOW?
GAME PLANS TO MAINTAIN POSITIVE BUSINESS CASH FLOW?GAME PLANS TO MAINTAIN POSITIVE BUSINESS CASH FLOW?
GAME PLANS TO MAINTAIN POSITIVE BUSINESS CASH FLOW?
 
Basics of accounting
Basics of accountingBasics of accounting
Basics of accounting
 
Accounts Payable.pdf
Accounts Payable.pdfAccounts Payable.pdf
Accounts Payable.pdf
 
Startup Allghenies Bootcamp: Introductions to Financials
Startup Allghenies Bootcamp: Introductions to FinancialsStartup Allghenies Bootcamp: Introductions to Financials
Startup Allghenies Bootcamp: Introductions to Financials
 
Trial balance and rectification of errors
Trial balance and rectification of errorsTrial balance and rectification of errors
Trial balance and rectification of errors
 
Accounting for Startups: What You Need to Know
Accounting for Startups: What You Need to KnowAccounting for Startups: What You Need to Know
Accounting for Startups: What You Need to Know
 
Chapter 11: Long Term Assets
Chapter 11: Long Term AssetsChapter 11: Long Term Assets
Chapter 11: Long Term Assets
 
Qs2 um en_10_supplier_payment_management
Qs2 um en_10_supplier_payment_managementQs2 um en_10_supplier_payment_management
Qs2 um en_10_supplier_payment_management
 
Principle of Accounting.pptx
Principle of  Accounting.pptxPrinciple of  Accounting.pptx
Principle of Accounting.pptx
 

More from Intuit Inc.

State of Small Business – Growth and Success Report
State of Small Business – Growth and Success ReportState of Small Business – Growth and Success Report
State of Small Business – Growth and Success ReportIntuit Inc.
 
The State of Small Business Cash Flow
The State of Small Business Cash FlowThe State of Small Business Cash Flow
The State of Small Business Cash FlowIntuit Inc.
 
Small Business in the Age of AI
Small Business in the Age of AI Small Business in the Age of AI
Small Business in the Age of AI Intuit Inc.
 
Get financially Fit: Tips for Using QuickBooks
Get financially Fit: Tips for Using QuickBooksGet financially Fit: Tips for Using QuickBooks
Get financially Fit: Tips for Using QuickBooksIntuit Inc.
 
SEO, Social, and More: Digital Marketing for your Business
SEO, Social, and More: Digital Marketing for your BusinessSEO, Social, and More: Digital Marketing for your Business
SEO, Social, and More: Digital Marketing for your BusinessIntuit Inc.
 
Why Building Your Brand is Key to Getting Customers
Why Building Your Brand is Key to Getting CustomersWhy Building Your Brand is Key to Getting Customers
Why Building Your Brand is Key to Getting CustomersIntuit Inc.
 
Get Found Fast: Google AdWords Strategies for Growth
Get Found Fast: Google AdWords Strategies for GrowthGet Found Fast: Google AdWords Strategies for Growth
Get Found Fast: Google AdWords Strategies for GrowthIntuit Inc.
 
Giving Clients What They Want
Giving Clients What They WantGiving Clients What They Want
Giving Clients What They WantIntuit Inc.
 
What Accounting Will Look Like in 2030
What Accounting Will Look Like in 2030What Accounting Will Look Like in 2030
What Accounting Will Look Like in 2030Intuit Inc.
 
Pricing in the Digital Age
Pricing in the Digital Age Pricing in the Digital Age
Pricing in the Digital Age Intuit Inc.
 
Handbook: Power Panel on Apps you need to give you more time to serve your cl...
Handbook: Power Panel on Apps you need to give you more time to serve your cl...Handbook: Power Panel on Apps you need to give you more time to serve your cl...
Handbook: Power Panel on Apps you need to give you more time to serve your cl...Intuit Inc.
 
Advanced QuickBooks Online - Handling Tricky Transactions
Advanced QuickBooks Online - Handling Tricky TransactionsAdvanced QuickBooks Online - Handling Tricky Transactions
Advanced QuickBooks Online - Handling Tricky TransactionsIntuit Inc.
 
Handling tricky transactions in QuickBooks Online
Handling tricky transactions in QuickBooks OnlineHandling tricky transactions in QuickBooks Online
Handling tricky transactions in QuickBooks OnlineIntuit Inc.
 
Social media is social business
Social media is social business  Social media is social business
Social media is social business Intuit Inc.
 
Conversation guide: Forming deep relationships with your clients
Conversation guide: Forming deep relationships with your clientsConversation guide: Forming deep relationships with your clients
Conversation guide: Forming deep relationships with your clientsIntuit Inc.
 
Making tax digital
Making tax digital  Making tax digital
Making tax digital Intuit Inc.
 
Giving clients what they want
Giving clients what they want Giving clients what they want
Giving clients what they want Intuit Inc.
 
100 percent cloud your action plan for success
100 percent cloud your action plan for success 100 percent cloud your action plan for success
100 percent cloud your action plan for success Intuit Inc.
 
Attracting and retaining top talent
Attracting and retaining top talent Attracting and retaining top talent
Attracting and retaining top talent Intuit Inc.
 
Sales strategies to help you close the deal
Sales strategies to help you close the dealSales strategies to help you close the deal
Sales strategies to help you close the dealIntuit Inc.
 

More from Intuit Inc. (20)

State of Small Business – Growth and Success Report
State of Small Business – Growth and Success ReportState of Small Business – Growth and Success Report
State of Small Business – Growth and Success Report
 
The State of Small Business Cash Flow
The State of Small Business Cash FlowThe State of Small Business Cash Flow
The State of Small Business Cash Flow
 
Small Business in the Age of AI
Small Business in the Age of AI Small Business in the Age of AI
Small Business in the Age of AI
 
Get financially Fit: Tips for Using QuickBooks
Get financially Fit: Tips for Using QuickBooksGet financially Fit: Tips for Using QuickBooks
Get financially Fit: Tips for Using QuickBooks
 
SEO, Social, and More: Digital Marketing for your Business
SEO, Social, and More: Digital Marketing for your BusinessSEO, Social, and More: Digital Marketing for your Business
SEO, Social, and More: Digital Marketing for your Business
 
Why Building Your Brand is Key to Getting Customers
Why Building Your Brand is Key to Getting CustomersWhy Building Your Brand is Key to Getting Customers
Why Building Your Brand is Key to Getting Customers
 
Get Found Fast: Google AdWords Strategies for Growth
Get Found Fast: Google AdWords Strategies for GrowthGet Found Fast: Google AdWords Strategies for Growth
Get Found Fast: Google AdWords Strategies for Growth
 
Giving Clients What They Want
Giving Clients What They WantGiving Clients What They Want
Giving Clients What They Want
 
What Accounting Will Look Like in 2030
What Accounting Will Look Like in 2030What Accounting Will Look Like in 2030
What Accounting Will Look Like in 2030
 
Pricing in the Digital Age
Pricing in the Digital Age Pricing in the Digital Age
Pricing in the Digital Age
 
Handbook: Power Panel on Apps you need to give you more time to serve your cl...
Handbook: Power Panel on Apps you need to give you more time to serve your cl...Handbook: Power Panel on Apps you need to give you more time to serve your cl...
Handbook: Power Panel on Apps you need to give you more time to serve your cl...
 
Advanced QuickBooks Online - Handling Tricky Transactions
Advanced QuickBooks Online - Handling Tricky TransactionsAdvanced QuickBooks Online - Handling Tricky Transactions
Advanced QuickBooks Online - Handling Tricky Transactions
 
Handling tricky transactions in QuickBooks Online
Handling tricky transactions in QuickBooks OnlineHandling tricky transactions in QuickBooks Online
Handling tricky transactions in QuickBooks Online
 
Social media is social business
Social media is social business  Social media is social business
Social media is social business
 
Conversation guide: Forming deep relationships with your clients
Conversation guide: Forming deep relationships with your clientsConversation guide: Forming deep relationships with your clients
Conversation guide: Forming deep relationships with your clients
 
Making tax digital
Making tax digital  Making tax digital
Making tax digital
 
Giving clients what they want
Giving clients what they want Giving clients what they want
Giving clients what they want
 
100 percent cloud your action plan for success
100 percent cloud your action plan for success 100 percent cloud your action plan for success
100 percent cloud your action plan for success
 
Attracting and retaining top talent
Attracting and retaining top talent Attracting and retaining top talent
Attracting and retaining top talent
 
Sales strategies to help you close the deal
Sales strategies to help you close the dealSales strategies to help you close the deal
Sales strategies to help you close the deal
 

Recently uploaded

办昆士兰大学UQ毕业证书/成绩单GPA修改 - 留学买假毕业证
办昆士兰大学UQ毕业证书/成绩单GPA修改 - 留学买假毕业证办昆士兰大学UQ毕业证书/成绩单GPA修改 - 留学买假毕业证
办昆士兰大学UQ毕业证书/成绩单GPA修改 - 留学买假毕业证0622mpom
 
(8264348440) 🔝 Call Girls In Safdarjung Enclave 🔝 Delhi NCR
(8264348440) 🔝 Call Girls In Safdarjung Enclave 🔝 Delhi NCR(8264348440) 🔝 Call Girls In Safdarjung Enclave 🔝 Delhi NCR
(8264348440) 🔝 Call Girls In Safdarjung Enclave 🔝 Delhi NCRsoniya singh
 
(8264348440) 🔝 Call Girls In Khanpur 🔝 Delhi NCR
(8264348440) 🔝 Call Girls In Khanpur 🔝 Delhi NCR(8264348440) 🔝 Call Girls In Khanpur 🔝 Delhi NCR
(8264348440) 🔝 Call Girls In Khanpur 🔝 Delhi NCRsoniya singh
 
About Entrepreneur ELON MUSK .pptx...
About  Entrepreneur  ELON  MUSK .pptx...About  Entrepreneur  ELON  MUSK .pptx...
About Entrepreneur ELON MUSK .pptx...lahiruherath654
 
Viet Nam Inclusive Business Accreditation System
Viet Nam Inclusive Business Accreditation SystemViet Nam Inclusive Business Accreditation System
Viet Nam Inclusive Business Accreditation SystemTri Dung, Tran
 
(8264348440) 🔝 Call Girls In Green Park 🔝 Delhi NCR
(8264348440) 🔝 Call Girls In Green Park 🔝 Delhi NCR(8264348440) 🔝 Call Girls In Green Park 🔝 Delhi NCR
(8264348440) 🔝 Call Girls In Green Park 🔝 Delhi NCRsoniya singh
 
(8264348440) 🔝 Call Girls In Babarpur 🔝 Delhi NCR
(8264348440) 🔝 Call Girls In Babarpur 🔝 Delhi NCR(8264348440) 🔝 Call Girls In Babarpur 🔝 Delhi NCR
(8264348440) 🔝 Call Girls In Babarpur 🔝 Delhi NCRsoniya singh
 
Call Girls At-( Nearby )-Bhikaji Cama Place, Delhi | ⑧③77⓿⑧76⓿7
Call Girls At-( Nearby )-Bhikaji Cama Place, Delhi | ⑧③77⓿⑧76⓿7Call Girls At-( Nearby )-Bhikaji Cama Place, Delhi | ⑧③77⓿⑧76⓿7
Call Girls At-( Nearby )-Bhikaji Cama Place, Delhi | ⑧③77⓿⑧76⓿7dollysharma2066
 
Model Call Girl in Bawana Delhi reach out to us at 🔝8264348440🔝
Model Call Girl in Bawana Delhi reach out to us at 🔝8264348440🔝Model Call Girl in Bawana Delhi reach out to us at 🔝8264348440🔝
Model Call Girl in Bawana Delhi reach out to us at 🔝8264348440🔝soniya singh
 
Report about the AHIABGA-UnityNet UNDRIPDay / Earth-Day 2024 Gathering in Mar...
Report about the AHIABGA-UnityNet UNDRIPDay / Earth-Day 2024 Gathering in Mar...Report about the AHIABGA-UnityNet UNDRIPDay / Earth-Day 2024 Gathering in Mar...
Report about the AHIABGA-UnityNet UNDRIPDay / Earth-Day 2024 Gathering in Mar...LHelferty
 
TDC Health Limited Nigeria Business Plan Opportunity Presentation 2024
TDC Health Limited Nigeria Business Plan Opportunity Presentation 2024TDC Health Limited Nigeria Business Plan Opportunity Presentation 2024
TDC Health Limited Nigeria Business Plan Opportunity Presentation 2024Fikrie Omar
 
Product Catalog Bandung Home Decor Design Furniture
Product Catalog Bandung Home Decor Design FurnitureProduct Catalog Bandung Home Decor Design Furniture
Product Catalog Bandung Home Decor Design Furniturem3resolve
 
Guwahati Call Girls 7001305949 WhatsApp Number 24x7 Best Services
Guwahati Call Girls 7001305949 WhatsApp Number 24x7 Best ServicesGuwahati Call Girls 7001305949 WhatsApp Number 24x7 Best Services
Guwahati Call Girls 7001305949 WhatsApp Number 24x7 Best Servicesnajka9823
 

Recently uploaded (20)

Why Powderless DTF Printer is T-shirt Printing Game Changer.pptx
Why Powderless DTF Printer is T-shirt Printing Game Changer.pptxWhy Powderless DTF Printer is T-shirt Printing Game Changer.pptx
Why Powderless DTF Printer is T-shirt Printing Game Changer.pptx
 
办昆士兰大学UQ毕业证书/成绩单GPA修改 - 留学买假毕业证
办昆士兰大学UQ毕业证书/成绩单GPA修改 - 留学买假毕业证办昆士兰大学UQ毕业证书/成绩单GPA修改 - 留学买假毕业证
办昆士兰大学UQ毕业证书/成绩单GPA修改 - 留学买假毕业证
 
Cheap Rate ➥8448380779 ▻Call Girls In Sector 56 Gurgaon
Cheap Rate ➥8448380779 ▻Call Girls In Sector 56 GurgaonCheap Rate ➥8448380779 ▻Call Girls In Sector 56 Gurgaon
Cheap Rate ➥8448380779 ▻Call Girls In Sector 56 Gurgaon
 
Pakistani Jumeirah Call Girls # +971559085003 # Pakistani Call Girls In Jumei...
Pakistani Jumeirah Call Girls # +971559085003 # Pakistani Call Girls In Jumei...Pakistani Jumeirah Call Girls # +971559085003 # Pakistani Call Girls In Jumei...
Pakistani Jumeirah Call Girls # +971559085003 # Pakistani Call Girls In Jumei...
 
(8264348440) 🔝 Call Girls In Safdarjung Enclave 🔝 Delhi NCR
(8264348440) 🔝 Call Girls In Safdarjung Enclave 🔝 Delhi NCR(8264348440) 🔝 Call Girls In Safdarjung Enclave 🔝 Delhi NCR
(8264348440) 🔝 Call Girls In Safdarjung Enclave 🔝 Delhi NCR
 
(8264348440) 🔝 Call Girls In Khanpur 🔝 Delhi NCR
(8264348440) 🔝 Call Girls In Khanpur 🔝 Delhi NCR(8264348440) 🔝 Call Girls In Khanpur 🔝 Delhi NCR
(8264348440) 🔝 Call Girls In Khanpur 🔝 Delhi NCR
 
Cheap Rate ➥8448380779 ▻Call Girls In Sector 54 Gurgaon
Cheap Rate ➥8448380779 ▻Call Girls In Sector 54 GurgaonCheap Rate ➥8448380779 ▻Call Girls In Sector 54 Gurgaon
Cheap Rate ➥8448380779 ▻Call Girls In Sector 54 Gurgaon
 
About Entrepreneur ELON MUSK .pptx...
About  Entrepreneur  ELON  MUSK .pptx...About  Entrepreneur  ELON  MUSK .pptx...
About Entrepreneur ELON MUSK .pptx...
 
Viet Nam Inclusive Business Accreditation System
Viet Nam Inclusive Business Accreditation SystemViet Nam Inclusive Business Accreditation System
Viet Nam Inclusive Business Accreditation System
 
(8264348440) 🔝 Call Girls In Green Park 🔝 Delhi NCR
(8264348440) 🔝 Call Girls In Green Park 🔝 Delhi NCR(8264348440) 🔝 Call Girls In Green Park 🔝 Delhi NCR
(8264348440) 🔝 Call Girls In Green Park 🔝 Delhi NCR
 
Hot Sexy call girls in Rajouri Garden🔝 9953056974 🔝 Delhi escort Service
Hot Sexy call girls in  Rajouri Garden🔝 9953056974 🔝 Delhi escort ServiceHot Sexy call girls in  Rajouri Garden🔝 9953056974 🔝 Delhi escort Service
Hot Sexy call girls in Rajouri Garden🔝 9953056974 🔝 Delhi escort Service
 
Presentation on Paytm mobile application
Presentation on Paytm mobile applicationPresentation on Paytm mobile application
Presentation on Paytm mobile application
 
(8264348440) 🔝 Call Girls In Babarpur 🔝 Delhi NCR
(8264348440) 🔝 Call Girls In Babarpur 🔝 Delhi NCR(8264348440) 🔝 Call Girls In Babarpur 🔝 Delhi NCR
(8264348440) 🔝 Call Girls In Babarpur 🔝 Delhi NCR
 
Call Girls At-( Nearby )-Bhikaji Cama Place, Delhi | ⑧③77⓿⑧76⓿7
Call Girls At-( Nearby )-Bhikaji Cama Place, Delhi | ⑧③77⓿⑧76⓿7Call Girls At-( Nearby )-Bhikaji Cama Place, Delhi | ⑧③77⓿⑧76⓿7
Call Girls At-( Nearby )-Bhikaji Cama Place, Delhi | ⑧③77⓿⑧76⓿7
 
Model Call Girl in Bawana Delhi reach out to us at 🔝8264348440🔝
Model Call Girl in Bawana Delhi reach out to us at 🔝8264348440🔝Model Call Girl in Bawana Delhi reach out to us at 🔝8264348440🔝
Model Call Girl in Bawana Delhi reach out to us at 🔝8264348440🔝
 
Report about the AHIABGA-UnityNet UNDRIPDay / Earth-Day 2024 Gathering in Mar...
Report about the AHIABGA-UnityNet UNDRIPDay / Earth-Day 2024 Gathering in Mar...Report about the AHIABGA-UnityNet UNDRIPDay / Earth-Day 2024 Gathering in Mar...
Report about the AHIABGA-UnityNet UNDRIPDay / Earth-Day 2024 Gathering in Mar...
 
TDC Health Limited Nigeria Business Plan Opportunity Presentation 2024
TDC Health Limited Nigeria Business Plan Opportunity Presentation 2024TDC Health Limited Nigeria Business Plan Opportunity Presentation 2024
TDC Health Limited Nigeria Business Plan Opportunity Presentation 2024
 
Product Catalog Bandung Home Decor Design Furniture
Product Catalog Bandung Home Decor Design FurnitureProduct Catalog Bandung Home Decor Design Furniture
Product Catalog Bandung Home Decor Design Furniture
 
young call girls in kailash Nagar, 🔝 9953056974 🔝 escort Service
young call girls in kailash Nagar, 🔝 9953056974 🔝 escort Serviceyoung call girls in kailash Nagar, 🔝 9953056974 🔝 escort Service
young call girls in kailash Nagar, 🔝 9953056974 🔝 escort Service
 
Guwahati Call Girls 7001305949 WhatsApp Number 24x7 Best Services
Guwahati Call Girls 7001305949 WhatsApp Number 24x7 Best ServicesGuwahati Call Girls 7001305949 WhatsApp Number 24x7 Best Services
Guwahati Call Girls 7001305949 WhatsApp Number 24x7 Best Services
 

Tricky Transactions in QuickBooks Online

  • 1. Annette Pettitt Founder, Leigh Park Accountancy Ltd Tricky transactions in QuickBooks Online WiFi: QBConnect No password required#QBConnect
  • 2. Take a few moments to Connect with your neighbor
  • 3. 3 Annette Pettitt Director, Leigh Park Accountancy Ltd Today’s speaker
  • 4. 4 Member of Intuit’s trainer/writer network Advanced trainer for Quickbooks Online Previous business owner Accountant in practice About today’s speaker Annette Pettitt Leigh Park Accountancy Ltd
  • 5. Tricky transactions • Retainers, deposits, and down payments • Writing off bad debt • Allocating overhead • Zero pound transactions • Recording loan payments • Daily sales summary Troubleshooting • Bank reconciliation • Audit log • Opening balance journal entry Agenda
  • 7. 7 What is a tricky transaction? Transactions that are generally not done on a daily basis • Manipulations of other transactions • Workarounds to accomplish a specific task Tricky transactions in QuickBooks Online
  • 8. 8 Down payments A sales transaction is NOT created to record a down payment • Record payment Retainers and deposits A sales transaction is created to record a retainer or deposit • Sales receipt or invoice Tricky transactions in QuickBooks Online
  • 10. 10 Go to chart of accounts At the top right of the screen select new • Create a current liability called retainers or customer deposits Retainers and deposits The very first step is to create a new account in the chart of accounts KEY TAKEAWAY: Many tricky transactions involve the creation of a new account linked to a new service
  • 11. 11 Go to product/service list At the top right of the screen select the gear icon • Under lists select product/service list and enter the name you prefer • Under income account, select the liability account you created for retainers/customer deposits Retainers and deposits Next, create a new service and link it to the account you just created in the last step KEY TAKEAWAY: Many tricky transactions involve the creation of a new account linked to a new service
  • 12. 12 Go to quick create + Select invoice or sales receipt • Record the deposit on sales transactions like a sales receipt or invoice. • Use the customer deposit service item to record the payment. Retainers and deposits Last, record the retainer/customer deposit on a sales transaction KEY TAKEAWAY: Let the transaction type match what’s happening in real life. If the retainer is to be billed now and paid by the customer at a later date, use an invoice transaction. If the charge for the retainer and the payment of it are happening at the same time, use a sales receipt transaction.
  • 13. 13 Go to transaction report • Run a balance sheet. • Click on customer deposits account. • Filter the report by the customer to view the report by customer. Retainers and deposits View the customer deposits on an account report
  • 14. 14 • After the work or services are complete, your client will create sales transactions as per usual. • After the services or items have been added, add the customer deposit/retainer item that you just created on another line. • Enter the amount of the deposit to be applied as a negative. This will apply the amount to the transaction reducing the balance owed, and affect the balance in the customer deposits account accurately. Retainers and deposits Apply the deposit or retainer
  • 15. 15 Retainers and deposits The updated customer deposit report displays the updated balance KEY TAKEAWAY: Keep it clean! Reconcile this account on a regular basis to make sure you are applying all outstanding retainers and deposits against sales transactions as appropriate.
  • 16. 16 Down payments A sales transaction is NOT created to record a down payment • Record payment Retainers and deposits A sales transaction is created to record a retainer or deposit • Sales receipt or invoice Tricky transactions in QuickBooks Online
  • 18. 18 • A down payment may be received from a customer before an invoice is ever generated • An easy way to track this is record a payment from the customer without applying it to an invoice • A credit will sit in accounts receivable in their account in the customer centre • You can apply this credit against a future invoice using the receive payments screen Down payments KEY TAKEAWAY: Keep it clean! Since it is not good practice to have negative balances on sub-ledgers at year end, and since QBO allows multiple AR and/or AP Lines on a journal entry, clear any unused down payments at year end. Simply create one reversing journal entry moving the negative balances with a credit to AR to a customer deposits current liability account.
  • 20. 20 QBOA includes a feature in the accountant toolbox called Write Off Invoices This can be used if you are not VAT registered If you are VAT registered use the following steps to write off bad debt and claim back sales tax at the same time Writing off bad debt
  • 21. 21 Go to settings • Click advanced • Click automation • Clear the checkmark from automatically apply credits Writing off bad debt First, turn off the automatically apply credits feature
  • 22. 22 Go to chart of accounts • Create an expense account called bad debt expense Writing off bad debt Then, create an account to track bad debt KEY TAKEAWAY: Many tricky transactions involve the creation of a new account linked to a new service
  • 23. 23 Go to product/service information • Click the gear icon. • Click on products and services. • Create a service item linked to the bad debt expense. • Then create a credit memo for the outstanding amounts for the bad debts. • Use the bad debt service item created above Writing off bad debt Then, create an item (service) linked to the bad debt expense and create a credit memo KEY TAKEAWAY: Many tricky transactions involve the creation of a new account linked to a new service
  • 24. 24 Go to receive payment window • Apply the credit against the outstanding invoices Writing off bad debt Finally, apply the credit against the outstanding invoices
  • 26. 26 • For some clients, you may want to allocate an overhead or payroll expenses to a class, location, or customer • This is done by entering a journal entry that balances with a zero pound effect on the accounts involved Allocating overhead
  • 27. 27 • Set up an overhead allocation account (as an other expense type) • Enter a journal entry – debit the overhead allocation expense account and indicate the name of the class, location or customer. Add additional lines for each class, location, or customer as needed. • On the last line, enter a credit for the total to the overhead allocation expense account with no class, location or customer. • However, if you have set up an admin or overhead class, location or customer, then you would use it on the last line for the credit. • Note: there isn’t a financial impact from this allocation journal entry, thus, this method can also be used to allocate any shared transaction to a class, location, or customer Allocating overhead A journal entry is used as an overhead allocation transaction KEY TAKEAWAY: Not all accounts or classes may need to be allocated. To distinguish between expenses to be allocated and expenses not needing reallocations, consider creating a class solely for overhead allocation
  • 29. 29 • There are some things you cannot adjust using a journal entry like items or billable expenses • In these situations, using a zero pound expense (where the net total is zero) allows us to make the adjustment because you can enter items on an expense and make things billable too Zero pound transactions
  • 30. 30 Issue a new expense • Set up the expense as usual for an account or item • The credit part of the entry (to offset so the expense totals zero) should be entered as a negative amount to an account or item. Zero pound transactions Create a zero pound expense KEY TAKEAWAY: Let your imagination be your guide to how you can use zero pound transactions. For example, using zero pound expenses to turn individual items into an “assembly” item for an inventory workaround, or writing off multiple inventory items to damaged goods COGS instead of standard inventory adjustments, etc.
  • 32. 32 • A common transaction, but can be more complex than an everyday transaction • This transaction may vary depending on the type of loan the client has • Our example is based on a declining loan balance, and the principal and interest will change each month according to a schedule provided by the bank Recording loan payments
  • 33. 33 Open the expense transaction • Enter the account and date of the transaction • Enter the total amount of the payment • In the account details section, choose the loan account • In the amount, enter the principal amount of the payment • Add a line to the expense and choose interest expense account • Enter the amount of the interest. The total of the principal and interest amounts should add up to the amount of the payment Recording loan payments First, create an expense transaction
  • 34. 34 • Click save • Click make recurring • Enter the template name. Make it something meaningful for your client • Under type choose reminder. This lets you change the amount for the principal and interest amount instead of the transaction automatically entering every month with the same amounts • Choose the interval for the date of the entry • Enter the start date and end date • Save the entry • NOTE: to make changes to recurring transactions, click the GEAR icon, and then click recurring transactions. Click edit to make changes to the template Recording loan payments Next, make loan payment recurring KEY TAKEAWAY: Some small businesses have been advised to put the total loan amount to the loan’s liability account and only worry about the adjustments for interest at year end. But if the interest is recorded throughout the year you won’t overstate the client’s net income, or overstate the client’s liabilities. The goal is to have the client’s books as accurate as possible throughout the year and not only at year end.
  • 36. 36 • There are many small businesses who use a cash register or POS system that is not integrated with QBO • To record summary sales transactions in QBO you can follow a detailed procedure Daily sales summary
  • 37. 37 • Create a POS or cash register daily sales report (this may be less frequent, but it is best entered daily). • Create sales items in QBO that represent the items or categories of sales your client wants to track sales on and report on. • Link the items to appropriate sales accounts (you may have to create an item for discounts or coupons) • Select the appropriate default sales tax code • Repeat these steps for all items in the POS report Daily sales summary First, create sales items in QBO that matches the daily POS report KEY TAKEAWAY: Use the client’s POS report as your guide to create the items and template they can simply populate
  • 38. 38 • Create a current asset account as a clearing account (i.e. daily sales clearing) • Create a customer called daily/weekly/monthly sales. Daily sales summary Then, create a current asset account and a customer called sales KEY TAKEAWAY: Do NOT use the undeposited funds account for this transaction, but create a new current asset account as mentioned above. This keeps the make deposit window easier to manage.
  • 39. 39 • Create a sales receipt with the following details: – Customer is daily sales – Date is date of sales report you are posting – Payment method is irrelevant – Deposit-to is daily sales clearing account (from previous step) – List the items on the sales receipt in the order they appear on the POS report and set the appropriate sales tax item • Click make recurring and set up based on personal preference (choose reminder to help your clients make daily entries) • Balance the sales receipt to the total sales on POS report. Make sure taxes balance Daily sales summary Then, create a sales receipt
  • 40. 40 • To record daily payments (Visa/MC/debit/cash): – Do a bank transfer between the daily sales clearing and bank for each payment method as per POS report (which should also balance to daily settlement report) Daily sales summary Finally, record daily payments KEY TAKEAWAY: Reconcile the daily sales clearing account regularly. Write off amounts to cash over/short when needed. The only balance in daily sales clearing should be the difference in timing on credit cards between charge and deposit.
  • 42. 42 There are common problems that often require troubleshooting help Troubleshooting in QuickBooks Online
  • 44. 44 • There are several reconciliation problems that clients cause • Bank reconciliation problems are often caused by editing, deleting, or making other changes to reconciled transactions • A common problem is when the beginning balance does not match the previous month’s ending balance Bank reconciliation
  • 45. 45 Go to bank reconcile window QBO records any changes in the changes column. • Click the link to review the change • Click on the transaction Bank reconciliations Use reports and built in tools to discover the problems
  • 46. 46 Bank reconciliations Edit the transaction • Edit the transaction to re-create the original transaction if it is simple as an edited transaction • QuickBooks highlights the changes needed
  • 47. 47 Bank Reconciliations To correct a deleted transaction • You will be able to see a deleted transaction in the change column. • A deleted action cannot be opened. • To correct the error, recreate the transaction and re-reconcile for the transaction to correct the beginning balance KEY TAKEAWAY: Use the bank register to flag a transaction as reconciled without having to undo and redo reconciliations.
  • 49. 49 • The Audit Log contains all of the changes made to the company data • The Audit Log cannot be disabled • Lines displaying changes to transactions within the log cannot be deleted • Dates and times in the Audit Log reflect when events occurred and are displayed in your local time. On the QuickBooks servers, the events are recorded in GMT (Greenwich Mean Time) and the software on your computer converts the GMT time to your time zone • Voided/Deleted Transactions Report is a pre-filtered version of audit log Audit log
  • 51. 51 • Instead of doing a full QB desktop to QBO conversion (their file is too large or messy), or if your client is starting to use QBO after using a different accounting software, one method to get them started is referred to as a “fresh start” • Customer, supplier, product & services, and chart of accounts lists can all be imported to QBO using excel or CSV files • Then make the opening balance journal entries as follows Opening balance journal entry
  • 52. 52 Concern Method Pros Cons Subledger balances are correct per contact Use customer balance or supplier balance reports (or AR or AP aging summaries but the totals only) enter balances directly in journal entry • Sub-ledger will balance to account • Most time effective • May be difficult to identify payments against bills/invoices • Will not maintain aging integrity – everyone will start at 0 days overdue Itemized balances for each transaction within a contact Use customer balance or supplier balance reports (or AR or AP aging detail) enter each transaction line as a separate line in the journal entry, identifying transaction details in the memo • Sub-ledger will balance to account • Will better identify payments against bills/invoices • Will not maintain aging integrity – everyone will start at 0 days overdue • More time consuming than option above Recreate aging detail Use customer balance or supplier balance reports, and/or AR or AP aging detail and follow instructions detailed later • Sub-ledger will balance to account • Will easily identify payments against bills/invoices • Will maintain aging integrity • Most “correct” option • Most time consuming option Opening balance journal entry How detailed do you want to get for a “fresh start”?
  • 53. 53 Opening balance journal entry The “fresh start” conversion method Opening balance journal entry: 1. From the quick create menu select journal entry 2. The date of the journal entry should be the last date of the prior financial year 3. Enter an appropriate description 4. Select the account at the top of your balance sheet and enter the balance in the journal entry in the same way it appears in the balance sheet 5. Continue working your way down the statement, selecting accounts and entering balances as you go 6. When you arrive at the AR section, refer to the customer balance listing and select debtors as the account and select the appropriate customer and their balance 7. Continue working your way down the AR list and then commence with the remaining balance sheet accounts 8. When you reach the AP account, refer to the supplier balance listing and enter the details in the same manner for AR 9. Continue working your way down the AP list and then commence with the remaining balance sheet accounts
  • 54. 54 Opening balance journal entry options Create Account Enter journal Create item Enter transactions Reminder Create an Other Current Asset account in your Chart of Accounts called Receivable Clearing When entering your Balance Sheet, when you get to the AR account, enter the Receivable Clearing account instead with the full balance Create a service or Non-Inventory item called Open Balance AR and link it to your Receivable Clearing account with the default tax code of NO VAT Create each outstanding invoice and credit note in QBO with the proper transaction type, reference number, date and amount The item used in these transactions is the Open Balance AR item and will be the full amount of the invoice or credit memo. Do not split out the detail or taxes KEY TAKEAWAY: When complete, the balance in your receivable clearing account will be zero. If it’s not, review the entries of your aging detail. Option – if you want to recreate your accounts receivable aging
  • 55. 55 Opening balance journal entry options Create Account Enter journal Enter transactions Reminder Review Create an Other Current Liabilities account in your Chart of Accounts called Payable Clearing When entering your Balance Sheet, when you get to the AP account, enter the Payable Clearing account instead with the full balance Create each outstanding bill and supplier credit in QBO with the proper transaction type, reference number, date and amount Post the full amount of the bill or supplier credit directly to the Payable Clearing account you created. Do not split out the detail or taxes When complete, the balance in your Payable Clearing account will be zero. If it’s not, review the entries of your aging detail KEY TAKEAWAY: Since accounts payable transactions can be posted directly to an account, you do not need to create a new account and link it to a new service Option – if you want to recreate your accounts payable aging
  • 56. 56 Opening balance journal entry Option – year end profit and loss report The previous example does not affect any P&L accounts, but put the total balance in retained earnings If you wish to add the P&L detail, you will need a year end P&L report: 1. When you reach the retained earnings section of the balance sheet you are entering the opening balances from, omit that account 2. Instead, refer to the P&L report and begin to select each P&L account and enter the balance as it corresponds to the report 3. Continue entering all totals until complete and your journal entry should balance in full. If it doesn’t, review your P&L entries Another option, instead of using both balance sheet and p&l, is to use the year end trial balance
  • 58. Access the presentation materials via: The QuickBooks Connect 2017 Conference App or Slideshare at: http://www.slideshare.com/tag/QBCUK17

Editor's Notes

  1. This is a sample INTRODUCTION using the 1-Column layout. Placeholder text boxes that appear as part of the selected layout have predefined fonts, sizes and colors. To change the appearance of any line of text, on the Home tab, in the Paragraph group, click Increase Indent or Decrease Indent. The selected text will reformat to the predefined size according to its indent level. Note: Any changes to the color, size, spacing or font in the placeholder text box will break its connection to the Master style. It will no longer automatically conform when switching between layouts or when imported into another presentation.
  2. This is a sample COMPARISON using the 2-Column layout. Placeholder text boxes that appear as part of the selected layout have predefined fonts, sizes and colors. To change the appearance of any line of text, on the Home tab, in the Paragraph group, click Increase Indent or Decrease Indent. The selected text will reformat to the predefined size according to its indent level. Note: Any changes to the color, size, spacing or font in the placeholder text box will break its connection to the Master style. It will no longer automatically conform when switching between layouts or when imported into another presentation.
  3. This is a sample CAPTIONED VISUAL using the Subtitle Captioned Visual layout. Select the type of visual you wish to show in the placeholder on the left by choosing and clicking on one of the icons shown it the center of box. You can choose between Tables, Charts, SmartArt, Pictures, Movies or Text, Note: If the same layout is reapplied, the placeholder boxes reset to their default positions. Your content will all still remain but would need to be readjusted from the default (again).
  4. This is a sample CAPTIONED VISUAL using the Subtitle Captioned Visual layout. Select the type of visual you wish to show in the placeholder on the left by choosing and clicking on one of the icons shown it the center of box. You can choose between Tables, Charts, SmartArt, Pictures, Movies or Text, Note: If the same layout is reapplied, the placeholder boxes reset to their default positions. Your content will all still remain but would need to be readjusted from the default (again).
  5. This is a sample CAPTIONED VISUAL using the Subtitle Captioned Visual layout. Select the type of visual you wish to show in the placeholder on the left by choosing and clicking on one of the icons shown it the center of box. You can choose between Tables, Charts, SmartArt, Pictures, Movies or Text, Note: If the same layout is reapplied, the placeholder boxes reset to their default positions. Your content will all still remain but would need to be readjusted from the default (again).
  6. This is a sample CAPTIONED VISUAL using the Subtitle Captioned Visual layout. Select the type of visual you wish to show in the placeholder on the left by choosing and clicking on one of the icons shown it the center of box. You can choose between Tables, Charts, SmartArt, Pictures, Movies or Text, Note: If the same layout is reapplied, the placeholder boxes reset to their default positions. Your content will all still remain but would need to be readjusted from the default (again).
  7. This is a sample CAPTIONED VISUAL using the Subtitle Captioned Visual layout. Select the type of visual you wish to show in the placeholder on the left by choosing and clicking on one of the icons shown it the center of box. You can choose between Tables, Charts, SmartArt, Pictures, Movies or Text, Note: If the same layout is reapplied, the placeholder boxes reset to their default positions. Your content will all still remain but would need to be readjusted from the default (again).
  8. This is a sample CAPTIONED VISUAL using the Subtitle Captioned Visual layout. Select the type of visual you wish to show in the placeholder on the left by choosing and clicking on one of the icons shown it the center of box. You can choose between Tables, Charts, SmartArt, Pictures, Movies or Text, Note: If the same layout is reapplied, the placeholder boxes reset to their default positions. Your content will all still remain but would need to be readjusted from the default (again).
  9. This is a sample COMPARISON using the 2-Column layout. Placeholder text boxes that appear as part of the selected layout have predefined fonts, sizes and colors. To change the appearance of any line of text, on the Home tab, in the Paragraph group, click Increase Indent or Decrease Indent. The selected text will reformat to the predefined size according to its indent level. Note: Any changes to the color, size, spacing or font in the placeholder text box will break its connection to the Master style. It will no longer automatically conform when switching between layouts or when imported into another presentation.
  10. This is a sample COMPARISON using the 2-Column layout. Placeholder text boxes that appear as part of the selected layout have predefined fonts, sizes and colors. To change the appearance of any line of text, on the Home tab, in the Paragraph group, click Increase Indent or Decrease Indent. The selected text will reformat to the predefined size according to its indent level. Note: Any changes to the color, size, spacing or font in the placeholder text box will break its connection to the Master style. It will no longer automatically conform when switching between layouts or when imported into another presentation.
  11. This is a sample COMPARISON using the 2-Column layout. Placeholder text boxes that appear as part of the selected layout have predefined fonts, sizes and colors. To change the appearance of any line of text, on the Home tab, in the Paragraph group, click Increase Indent or Decrease Indent. The selected text will reformat to the predefined size according to its indent level. Note: Any changes to the color, size, spacing or font in the placeholder text box will break its connection to the Master style. It will no longer automatically conform when switching between layouts or when imported into another presentation.
  12. This is a sample CAPTIONED VISUAL using the Subtitle Captioned Visual layout. Select the type of visual you wish to show in the placeholder on the left by choosing and clicking on one of the icons shown it the center of box. You can choose between Tables, Charts, SmartArt, Pictures, Movies or Text, Note: If the same layout is reapplied, the placeholder boxes reset to their default positions. Your content will all still remain but would need to be readjusted from the default (again).
  13. This is a sample CAPTIONED VISUAL using the Subtitle Captioned Visual layout. Select the type of visual you wish to show in the placeholder on the left by choosing and clicking on one of the icons shown it the center of box. You can choose between Tables, Charts, SmartArt, Pictures, Movies or Text, Note: If the same layout is reapplied, the placeholder boxes reset to their default positions. Your content will all still remain but would need to be readjusted from the default (again).
  14. This is a sample CAPTIONED VISUAL using the Subtitle Captioned Visual layout. Select the type of visual you wish to show in the placeholder on the left by choosing and clicking on one of the icons shown it the center of box. You can choose between Tables, Charts, SmartArt, Pictures, Movies or Text, Note: If the same layout is reapplied, the placeholder boxes reset to their default positions. Your content will all still remain but would need to be readjusted from the default (again).
  15. This is a sample CAPTIONED VISUAL using the Subtitle Captioned Visual layout. Select the type of visual you wish to show in the placeholder on the left by choosing and clicking on one of the icons shown it the center of box. You can choose between Tables, Charts, SmartArt, Pictures, Movies or Text, Note: If the same layout is reapplied, the placeholder boxes reset to their default positions. Your content will all still remain but would need to be readjusted from the default (again).
  16. This is a sample COMPARISON using the 2-Column layout. Placeholder text boxes that appear as part of the selected layout have predefined fonts, sizes and colors. To change the appearance of any line of text, on the Home tab, in the Paragraph group, click Increase Indent or Decrease Indent. The selected text will reformat to the predefined size according to its indent level. Note: Any changes to the color, size, spacing or font in the placeholder text box will break its connection to the Master style. It will no longer automatically conform when switching between layouts or when imported into another presentation.
  17. This is a sample CAPTIONED VISUAL using the Subtitle Captioned Visual layout. Select the type of visual you wish to show in the placeholder on the left by choosing and clicking on one of the icons shown it the center of box. You can choose between Tables, Charts, SmartArt, Pictures, Movies or Text, Note: If the same layout is reapplied, the placeholder boxes reset to their default positions. Your content will all still remain but would need to be readjusted from the default (again).
  18. This is a sample COMPARISON using the 2-Column layout. Placeholder text boxes that appear as part of the selected layout have predefined fonts, sizes and colors. To change the appearance of any line of text, on the Home tab, in the Paragraph group, click Increase Indent or Decrease Indent. The selected text will reformat to the predefined size according to its indent level. Note: Any changes to the color, size, spacing or font in the placeholder text box will break its connection to the Master style. It will no longer automatically conform when switching between layouts or when imported into another presentation.
  19. This is a sample CAPTIONED VISUAL using the Subtitle Captioned Visual layout. Select the type of visual you wish to show in the placeholder on the left by choosing and clicking on one of the icons shown it the center of box. You can choose between Tables, Charts, SmartArt, Pictures, Movies or Text, Note: If the same layout is reapplied, the placeholder boxes reset to their default positions. Your content will all still remain but would need to be readjusted from the default (again).
  20. This is a sample COMPARISON using the 2-Column layout. Placeholder text boxes that appear as part of the selected layout have predefined fonts, sizes and colors. To change the appearance of any line of text, on the Home tab, in the Paragraph group, click Increase Indent or Decrease Indent. The selected text will reformat to the predefined size according to its indent level. Note: Any changes to the color, size, spacing or font in the placeholder text box will break its connection to the Master style. It will no longer automatically conform when switching between layouts or when imported into another presentation.
  21. This is a sample CAPTIONED VISUAL using the Subtitle Captioned Visual layout. Select the type of visual you wish to show in the placeholder on the left by choosing and clicking on one of the icons shown it the center of box. You can choose between Tables, Charts, SmartArt, Pictures, Movies or Text, Note: If the same layout is reapplied, the placeholder boxes reset to their default positions. Your content will all still remain but would need to be readjusted from the default (again).
  22. This is a sample CAPTIONED VISUAL using the Subtitle Captioned Visual layout. Select the type of visual you wish to show in the placeholder on the left by choosing and clicking on one of the icons shown it the center of box. You can choose between Tables, Charts, SmartArt, Pictures, Movies or Text, Note: If the same layout is reapplied, the placeholder boxes reset to their default positions. Your content will all still remain but would need to be readjusted from the default (again).
  23. This is a sample COMPARISON using the 2-Column layout. Placeholder text boxes that appear as part of the selected layout have predefined fonts, sizes and colors. To change the appearance of any line of text, on the Home tab, in the Paragraph group, click Increase Indent or Decrease Indent. The selected text will reformat to the predefined size according to its indent level. Note: Any changes to the color, size, spacing or font in the placeholder text box will break its connection to the Master style. It will no longer automatically conform when switching between layouts or when imported into another presentation.
  24. This is a sample CAPTIONED VISUAL using the Subtitle Captioned Visual layout. Select the type of visual you wish to show in the placeholder on the left by choosing and clicking on one of the icons shown it the center of box. You can choose between Tables, Charts, SmartArt, Pictures, Movies or Text, Note: If the same layout is reapplied, the placeholder boxes reset to their default positions. Your content will all still remain but would need to be readjusted from the default (again).
  25. This is a sample CAPTIONED VISUAL using the Subtitle Captioned Visual layout. Select the type of visual you wish to show in the placeholder on the left by choosing and clicking on one of the icons shown it the center of box. You can choose between Tables, Charts, SmartArt, Pictures, Movies or Text, Note: If the same layout is reapplied, the placeholder boxes reset to their default positions. Your content will all still remain but would need to be readjusted from the default (again).
  26. This is a sample CAPTIONED VISUAL using the Subtitle Captioned Visual layout. Select the type of visual you wish to show in the placeholder on the left by choosing and clicking on one of the icons shown it the center of box. You can choose between Tables, Charts, SmartArt, Pictures, Movies or Text, Note: If the same layout is reapplied, the placeholder boxes reset to their default positions. Your content will all still remain but would need to be readjusted from the default (again).
  27. This is a sample CAPTIONED VISUAL using the Subtitle Captioned Visual layout. Select the type of visual you wish to show in the placeholder on the left by choosing and clicking on one of the icons shown it the center of box. You can choose between Tables, Charts, SmartArt, Pictures, Movies or Text, Note: If the same layout is reapplied, the placeholder boxes reset to their default positions. Your content will all still remain but would need to be readjusted from the default (again).
  28. This is a sample INTRODUCTION using the 1-Column layout. Placeholder text boxes that appear as part of the selected layout have predefined fonts, sizes and colors. To change the appearance of any line of text, on the Home tab, in the Paragraph group, click Increase Indent or Decrease Indent. The selected text will reformat to the predefined size according to its indent level. Note: Any changes to the color, size, spacing or font in the placeholder text box will break its connection to the Master style. It will no longer automatically conform when switching between layouts or when imported into another presentation.
  29. This is a sample COMPARISON using the 2-Column layout. Placeholder text boxes that appear as part of the selected layout have predefined fonts, sizes and colors. To change the appearance of any line of text, on the Home tab, in the Paragraph group, click Increase Indent or Decrease Indent. The selected text will reformat to the predefined size according to its indent level. Note: Any changes to the color, size, spacing or font in the placeholder text box will break its connection to the Master style. It will no longer automatically conform when switching between layouts or when imported into another presentation.
  30. This is a sample CAPTIONED VISUAL using the Subtitle Captioned Visual layout. Select the type of visual you wish to show in the placeholder on the left by choosing and clicking on one of the icons shown it the center of box. You can choose between Tables, Charts, SmartArt, Pictures, Movies or Text, Note: If the same layout is reapplied, the placeholder boxes reset to their default positions. Your content will all still remain but would need to be readjusted from the default (again).
  31. This is a sample CAPTIONED VISUAL using the Subtitle Captioned Visual layout. Select the type of visual you wish to show in the placeholder on the left by choosing and clicking on one of the icons shown it the center of box. You can choose between Tables, Charts, SmartArt, Pictures, Movies or Text, Note: If the same layout is reapplied, the placeholder boxes reset to their default positions. Your content will all still remain but would need to be readjusted from the default (again).
  32. This is a sample CAPTIONED VISUAL using the Subtitle Captioned Visual layout. Select the type of visual you wish to show in the placeholder on the left by choosing and clicking on one of the icons shown it the center of box. You can choose between Tables, Charts, SmartArt, Pictures, Movies or Text, Note: If the same layout is reapplied, the placeholder boxes reset to their default positions. Your content will all still remain but would need to be readjusted from the default (again).
  33. This is a sample COMPARISON using the 2-Column layout. Placeholder text boxes that appear as part of the selected layout have predefined fonts, sizes and colors. To change the appearance of any line of text, on the Home tab, in the Paragraph group, click Increase Indent or Decrease Indent. The selected text will reformat to the predefined size according to its indent level. Note: Any changes to the color, size, spacing or font in the placeholder text box will break its connection to the Master style. It will no longer automatically conform when switching between layouts or when imported into another presentation.
  34. This is a sample COMPARISON using the 2-Column layout. Placeholder text boxes that appear as part of the selected layout have predefined fonts, sizes and colors. To change the appearance of any line of text, on the Home tab, in the Paragraph group, click Increase Indent or Decrease Indent. The selected text will reformat to the predefined size according to its indent level. Note: Any changes to the color, size, spacing or font in the placeholder text box will break its connection to the Master style. It will no longer automatically conform when switching between layouts or when imported into another presentation.
  35. This is a sample TEXT TABLE using the Subtitle Visual layout. To Customize a TABLE: Change Text in Table: Select text in table. Begin typing desired text. To move from one cell to another, press Tab. Change Fonts, Colors, Sizes, Weights: Select any group of text and adjust using the font setting in the Font group in the Home tab. Select any table object or cell and adjust using the the controls in the Table Design tab. Select desired attributes to change: font, size, boldness, line weight, color, etc. Be sure to select colors from the Theme color palette and fonts from Theme Headings or Theme Body. Insert or Delete Rows in Table: To delete a row place cursor in a cell of the row, right-click for a pop up menu, select Delete Row. To insert a row, place cursor in the row you wish to insert the new row before, right-click for a pop up menu, select Insert and make a selection from the submenu. You can also use the Insert and Delete Rows and Columns tools on the Table Design Layout tab to perform these actions.   Insert or Delete Columns in Table: To delete a column, place cursor above the column (you will see a solid downward pointing arrow) click to select the column, right-click on the selected column, chose Delete Column from the pop up menu. To insert a column, place cursor above the column you wish to insert the new column before (you will see a solid downward pointing arrow) click to select the column, right-click for a pop up menu, select Insert and make a selection from the submenu. You can also use the Insert and Delete Rows and Columns tools on the Table Design Layout tab to perform these actions. Highlight Column or Row (for emphasis): Click to select an individual cell or click and drag through the desired column(s) or row(s). From the Table Design tab, click the arrow next to Shading and choose a Theme color While a table is selected, other formatting options are available on the Table Design and Layout tabs. Customize the Table Style Step 1: Insert a table (select the Light Style 2. Accent 1) Step 2: Select the entire table Step 4: On the Table Design tab, click the arrow next to Borders and choose No Border to turn off (toggle) the borders. Step 5: Repeat step 4 but now choose Inside Horizontal Border to turn on (toggle) the borders. Step 6: On the Table Design tab, click the Pen Color button and select Light Grey (Accent 2) from the Theme palette. Step 7: After selecting a pen color, the Draw Table tool should now be active, drag the cursor over all horizontal lines to lighten them.
  36. This is a sample CAPTIONED VISUAL using the Subtitle Captioned Visual layout. Select the type of visual you wish to show in the placeholder on the left by choosing and clicking on one of the icons shown it the center of box. You can choose between Tables, Charts, SmartArt, Pictures, Movies or Text, Note: If the same layout is reapplied, the placeholder boxes reset to their default positions. Your content will all still remain but would need to be readjusted from the default (again).
  37. This is a sample CAPTIONED VISUAL using the Subtitle Captioned Visual layout. Select the type of visual you wish to show in the placeholder on the left by choosing and clicking on one of the icons shown it the center of box. You can choose between Tables, Charts, SmartArt, Pictures, Movies or Text, Note: If the same layout is reapplied, the placeholder boxes reset to their default positions. Your content will all still remain but would need to be readjusted from the default (again).