PILOT IMPLEMENTATION OFTHE MATATAG K TO 10 CURRICULUM
Lesson Exemplar
for TLE
Lesson
6
8
Quarter 1
2.
Lesson Exemplar forTLE Grade 8
Quarter 1: Lesson 6 (Week 6)
SY 2024-2025
This material is intended exclusively for the use of teachers participating in the pilot implementation of the MATATAG K to 10 Curriculum during the
School Year 2024-2025. It aims to assist in delivering the curriculum content, standards, and lesson competencies. Any unauthorized reproduction, distribution,
modification, or utilization of this material beyond the designated scope is strictly prohibited and may result in appropriate legal actions and disciplinary measures.
Borrowed content included in this material are owned by their respective copyright holders. Every effort has been made to locate and obtain permission
to use these materials from their respective copyright owners. The publisher and development team do not represent nor claim ownership over them.
Every care has been taken to ensure the accuracy of the information provided in this material. For inquiries or feedback, please write or call the Office
of the Director of the Bureau of Learning Resources via telephone numbers (02) 8634-1072 and 8631-6922 or by email at blr.od@deped.gov.ph
Development Team
Writer:
• Ritchfildjay L. Mariscal (Caraga State University Cabadbaran Campus)
Validators:
• Emilio Aguinaldo, MTE (Philippine Normal University)
• Regie Boy B. Fabro, PhD (Mariano Marcos State University)
Management Team
Philippine Normal University
Research Center for Teacher Quality
SiMERR National Research Centre
3.
1
TLE 8/QUARTER 1/GRADE 8
I. CURRICULUM CONTENT, STANDARDS, AND LESSON COMPETENCIES
A. Content
Standards
The learners demonstrate an understanding of video editing tools.
B. Performance
Standards
The learners create videos with graphics design in a safe and responsible manner
C. Learning
Competencies
and Objectives
Learning Competency
The learners will
• Utilize video editing tools with multimedia materials
Learning Objectives
At the end of the lesson, the students are expected to:
1. Define the pre-production phase of video editing;
2. Develop storyboard and shot list to visually represent key scenes in the script;
3. Demonstrate teamwork and collaboration skills during the pre-production phase;
D. Content I. Video Editing
• Pre-production Phase (scriptwriting, shot listing, talent scouting, securing equipment)
E. Integration SDG 4: Quality Education
• Digital Creativity
II. LEARNING RESOURCES
Backstage: How To Become a Location Scout For Movies and TV https://filmlifestyle.com/what-is-a-location-scout/
Boords: Pre-Production Process Explained (Step-by-Step Guide) https://boords.com/blog/pre-production-guide
Cine Gear Themed Buyer's Guide https://www.cinegearexpo.com/
Film Hub North. (2023, July 20). Creative Programming & Talent Scouting. https://filmhubnorth.org.uk/creative-programming-talent-
scouting-july-2023
Film Independent: Budgeting Basics https://www.youtube.com/watch?v=t7HJ-Rbd6bM
4.
2
III. TEACHING ANDLEARNING PROCEDURE NOTES TO TEACHERS
A. Activating Prior
Knowledge
DAY 1
1. Short Review
Activity 1: “Storyboard Your First Edit”
Instruction: Grab a pen, some paper, and unleash your imagination!
1. Pick a Theme: What kind of story do you want to tell? Funny, dramatic, educational,
etc.
2. Imagine the Scenes: Draw simple boxes to represent each scene in your video. Think
about different camera angles and what you want the viewer to see.
3. Action Time! Briefly describe what happens in each scene, Is there dialogue? Music?
Sound Effects? Jot down these ideas within your boxes.
4. Transitions: How will you connect your scenes? Arrows between boxes can represent
smooth transitions like fades.
5. Bonus Round: Sketch any visual elements you want to include - titles, animations,
etc.
Congratulations! You have just created a storyboard - a blueprint for your video edit.
Film Riot: Storyboarding for Filmmakers https://www.youtube.com/watch?v=4uhaJhT25hU
Filmmaker IQ: Location Scouting 101 https://www.youtube.com/watch?v=bIW1eFsJvF8
MasterClass: Guide to Preproduction in Film: 7 Elements of Preproduction - 2024 https://www.masterclass.com/classes/jodie-foster-teaches-
filmmaking/chapters/prepping-and-scheduling
MovieMaker Magazine: Filming Permits: What You Need to Know https://www.moviemaker.com/mediakit/
No Film School: How to Create a Film Production Schedule https://nofilmschool.com/
ScreenCraft: The Importance of Script Development https://screencraft.org/blog/how-to-write-a-screenplay-a-10-step-
guide/?deviceId=1d9ab0df-46ea-4f7f-b8b4-bebc7a0dcbe0
StudioBinder: What is Pre-Production in Film — A Blueprint for Success https://www.studiobinder.com/blog/the-complete-pre-production-
process/
StudioBinder: What Is Storyboarding and Why Is It Important? https://elearningindustry.com/8-reasons-storyboarding-important-jumping-
off-elearning-development
Videomaker: Creating a Shot List https://www.youtube.com/watch?v=Ijr1bpY9NFw
Wolf Crow: Film Crew Positions and Roles Explained https://wolfcrow.com/
Writers Guild of America West: The Screenplay Development Process https://www.wga.org/
5.
3
2. Feedback
The teachermay collect feedback from learners about their previous experiences with video
editing applications. Then, identify common challenges and successes to build on in this
lesson.
B. Establishing
Lesson
Purpose
1. Lesson Purpose
The purpose of the lesson is to introduce students to the pre-production phase where they
learn the importance of scriptwriting, storyboarding, talent scouting, and equipment securing.
In the production phase, students will explore essential concepts like camera operation,
lighting, and sound recording.
2. Unlocking Content Area Vocabulary
• Storyboard is a visual representation of a film sequence and breaks down the action
into individual panels.
• Shot Listing is a document that maps out exactly what will occur and what will be used
in the particular shot, or scene, of the video.
• Scriptwriting is a process of developing a written script or screenplay for a movie,
television program, play, or other performance media.
• Talent Scouting is the process of finding and selecting actors or presenters for the video.
• Securing Equipment is ensuring that all necessary equipment (cameras, lights,
microphones, etc.) is available and ready for use during production.
C. Developing and
Deepening
Understanding
DAY 2
SUB-TOPIC 1: PRE-PRODUCTION PHASE (Scriptwriting and Shot Listing)
1. Explicitation
Pre-production
Pre-production is the foundational stage of filmmaking where all the planning and
groundwork happens before the camera rolls. It is often referred to as the blueprint stage, pre-
production involves transforming your initial creative spark into a detailed, organized plan that
ensures a smooth and efficient filming process.
The pre-production phase includes scriptwriting, shortlisting, talent scouting, and
securing of equipment to be used during the production phase. Pre-production is the
cornerstone of any successful film or video project. Imagine it as the architect meticulously
crafting the blueprints before construction begins on a house. Just like a strong foundation is
Discuss the importance
of a well-written script
in video production.
Explain the key
components of a script:
dialogue, action, scene
descriptions, and
formatting.
Highlight the role of the
script in guiding the
6.
4
crucial for asturdy building, a well-planned pre-production phase lays the groundwork for a
smooth and efficient filmmaking process.
Preproduction phase involves the following key elements:
1. Scriptwriting. The heart of any film lies in its story. Pre-production is the time to
finalize the script, ensuring a clear narrative structure, engaging dialogue, and well-
developed characters. This might involve multiple drafts, incorporating feedback from
collaborators like producers and directors.
entire production
process.
Emphasize how a good
script can enhance
storytelling and ensure
that everyone involved
in the production is on
the same page.
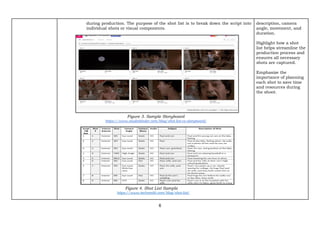
Figure 1. The Pre-production Flow of Filmmaking
https://www.studiobinder.com/blog/the-complete-pre-production-process/
7.
5
Scriptwriting is thefoundation of bringing your film or video idea to life. Here is a quick guide
in writing a script:
a. Brainstorm and Develop your Idea. What kind of story do you want to tell? Who are
your characters? What is the main conflict?
b. Craft a Logline. A one or two-sentence summary that captures your entire story
essence.
c. Develop your Characters. Give your characters depth and personality.
d. Structure your Script. Screenplays have a standard format with scene, headings,
dialogue, and action lines.
e. Write your First Draft. Don’t worry about perfection, just get your story down.
f. Revise and Refine. Polish your script, ensure clarity, and get feedback to improve.
2. Shot Listing or Storyboarding. Storyboarding acts as a visual roadmap for your
film, translating key scenes into a series of comic strip-like illustrations. This
helps visualize the flow of the film and plan camera angles, movements, and shot
composition. A detailed shot list, outlining every shot required for the film, is also
developed during pre-production, providing a clear roadmap for the filming
process. Shot List is a detailed list that outlines all the shots that will be filmed
Explain what a shot list
is and why it is crucial
for organizing a video
shoot.
Discuss the
components of a shot
list: shot number,
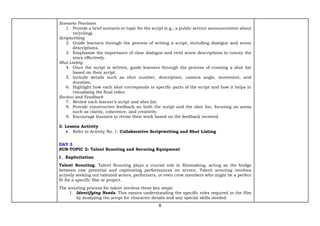
Figure 2. Sample Script Writing format
https://www.studiobinder.com/blog/what-is-script-writing/
8.
6
during production. Thepurpose of the shot list is to break down the script into
individual shots or visual components.
description, camera
angle, movement, and
duration.
Highlight how a shot
list helps streamline the
production process and
ensures all necessary
shots are captured.
Emphasize the
importance of planning
each shot to save time
and resources during
the shoot.
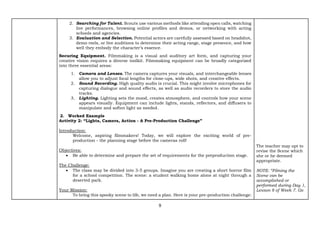
Figure 3. Sample Storyboard
https://www.studiobinder.com/blog/shot-list-vs-storyboard/
Figure 4. Shot List Sample
https://www.techsmith.com/blog/shot-list/
9.
7
Shot List isthe breakdown of all the camera shots needed in your film or video. Here is a quick
summary of the steps to create one:
1. Scene and Shot Number. List the scene number from your script and assign a
unique number to each shot within that scene.
2. Shot Description. Briefly describe what happens in the shot, including the action
and characters involved.
3. Shot Type. Specify the type of shot, like close-up, wide shot, etc.
4. Camera Angle and Movement. Detail the camera angle (low angle, high angle, etc.)
and any planned camera movements (pan, tilt, etc).
5. Additional Notes. Include any extra information relevant to the shot, like props or
sound considerations.
Storyboarding translates your script’s key scenes into a visual comic strip format. Here is a
quick rundown of the steps:
1. Breakdown your script. Identify key scenes that move the story forward.
2. Sketch the Frames. Create a series of simple drawings for each scene, focusing on
capturing the main action and composition.
3. Focus on Clarity, Not Detail. Prioritize conveying the scene’s essence over artistic
perfection.
4. Sequence and Frames. Arrange your storyboard frames in the order they appear
in the film to visualize the story flow.
5. Add Details (Optional). Consider incorporating additional details like camera
angles, character emotions, or lighting notes for further clarity.
2. Worked Example
Scriptwriting and Shot Listing
Title: Writing a Short Script and Creating a Shot List
Objective:
• To practice writing a short script for a 1-minute video and creating a corresponding shot
list.
Instruction:
• Guide the students with this activity.
10.
8
Scenario Provision
1. Providea brief scenario or topic for the script (e.g., a public service announcement about
recycling).
Scriptwriting
2. Guide learners through the process of writing a script, including dialogue and scene
descriptions.
3. Emphasize the importance of clear dialogue and vivid scene descriptions to convey the
story effectively.
Shot Listing
4. Once the script is written, guide learners through the process of creating a shot list
based on their script.
5. Include details such as shot number, description, camera angle, movement, and
duration.
6. Highlight how each shot corresponds to specific parts of the script and how it helps in
visualizing the final video.
Review and Feedback
7. Review each learner's script and shot list.
8. Provide constructive feedback on both the script and the shot list, focusing on areas
such as clarity, coherence, and creativity.
9. Encourage learners to revise their work based on the feedback received.
3. Lesson Activity
• Refer to Activity No. 1: Collaborative Scriptwriting and Shot Listing
DAY 3
SUB-TOPIC 2: Talent Scouting and Securing Equipment
1. Explicitation
Talent Scouting. Talent Scouting plays a crucial role in filmmaking, acting as the bridge
between raw potential and captivating performances on screen. Talent scouting involves
actively seeking out talented actors, performers, or even crew members who might be a perfect
fit for a specific film or project.
The scouting process for talent involves three key steps:
1. Identifying Needs. This means understanding the specific roles required in the film
by analyzing the script for character details and any special skills needed.
11.
9
2. Searching forTalent. Scouts use various methods like attending open calls, watching
live performances, browsing online profiles and demos, or networking with acting
schools and agencies.
3. Evaluation and Selection. Potential actors are carefully assessed based on headshot,
demo reels, or live auditions to determine their acting range, stage presence, and how
well they embody the character’s essence.
Securing Equipment. Filmmaking is a visual and auditory art form, and capturing your
creative vision requires a diverse toolkit. Filmmaking equipment can be broadly categorized
into three essential areas:
1. Camera and Lenses. The camera captures your visuals, and interchangeable lenses
allow you to adjust focal lengths for close-ups, wide shots, and creative effects.
2. Sound Recording. High quality audio is crucial. This might involve microphones for
capturing dialogue and sound effects, as well as audio recorders to store the audio
tracks.
3. Lighting. Lighting sets the mood, creates atmosphere, and controls how your scene
appears visually. Equipment can include lights, stands, reflectors, and diffusers to
manipulate and soften light as needed.
2. Worked Example
Activity 2: “Lights, Camera, Action - A Pre-Production Challenge”
Introduction:
Welcome, aspiring filmmakers! Today, we will explore the exciting world of pre-
production - the planning stage before the cameras roll!
Objectives:
• Be able to determine and prepare the set of requirements for the preproduction stage.
The Challenge:
• The class may be divided into 3-5 groups. Imagine you are creating a short horror film
for a school competition. The scene: a student walking home alone at night through a
deserted park.
Your Mission:
To bring this spooky scene to life, we need a plan. Here is your pre-production challenge:
The teacher may opt to
revise the Scene which
she or he deemed
appropriate.
NOTE: “Filming the
Scene can be
accomplished or
performed during Day 1,
Lesson 8 of Week 7. Go
12.
10
1. Light, Mood,and Atmosphere
1.1. Lighting Sketch. This park scene needs a creepy atmosphere. Using a pencil
and paper, sketch the scene and how you would use lighting to create a sense
of suspense. Will you rely on a single streetlight casting long shadows, or
incorporate flashes of lightning for dramatic effect? Label your sketch with
the type of lights you would use (key light, fill light, backlight). (10 points)
1.2. Sound Design. Spooky sounds are key! List 3 sounds you would use to build
tension in your scene (ex. creaking branches, footsteps, distant howls). Briefly
explain how each sound contributes to the atmosphere. (5 points)
1.3. Mood Board. Collect or create images that capture the overall mood you want
to create for your scene (ex. dark, foggy, deserted park). Copy them onto a
separate sheet of paper or create a digital moodboard. (5 points)
2. Filming the Scene. (20 pts)
2.1. Shot List. This scene needs to be visually engaging. Create a shot list outlining
at least 5 different camera shots you would use to film this scene. Specify the
type of shot (ex. wide shot, close up) and how it would contribute to telling
the story. (10 points)
2.2. Storyboarding. Visualize your scene! Create a storyboard with at least 4
panels that depict key moments in your scene. Each panel includes a sketch
of the scene and a brief description of the action taking place. (10 points)
3. Casting Call (20 points)
3.1. Character Profile. Who is the student in your scene? Describe the personality,
age, and appearance. What emotions should they portray as they walk
through the park? (10 points)
3.2. Casting Notes. Based on your character profile, write a short casting call
description that actors could use to audition for the role. Include details
about the character and the type of performance you are looking for. (10
points)
Bonus Challenge!
● Plot Twist! Add a spooky twist to your scene! Describe what unexpected event
could happen to the student as they walk through the park. How would you
use lighting, sound, and camera angles to capture this twist effectively? (20
points)
to “Worked Sample of
Lesson 8 of Week 7)
13.
11
Scoring Criteria
● Creativityand Effort (20 points)
● Attention to Detail (20 points)
● Understanding of Pre-Production Elements (40 points)
● Bonus Challenge: Originality and Execution (20 points)
Ready, Set, Pre-Produce!
This is just a test of the planning involved in filmmaking. By conducting this pre-
production challenge, students would have gained valuable skills for creating
short videos or films and eventually editing them.
3. Lesson Activity:
• Refer to Activity No. 2
D. Making
Generalizations
DAY 4
1. Learners’ Takeaways
● Ask learners to write down or share their understanding of the pre-production phase,
including scriptwriting, shot listing, talent scouting, and securing equipment.
● Discuss the importance of each step in ensuring a smooth and successful video
production.
2. Reflection on Learning
The teacher will ask a question that will elicit students’ reflections on learning:
● Why do you think Pre-Production Phase elements are important in the filmmaking
process? How does it benefit the actors and directors?
Students may have
varying answers on
their respective
takeaways, but teachers
may be guided on the
possible takeaways.
The teacher will
facilitate the reflection
of learning by asking
questions and
processing them.
14.
12
IV. EVALUATING LEARNING:FORMATIVE ASSESSMENT AND TEACHER’S REFLECTION NOTES TO TEACHERS
A. Evaluating
Learning
1. Formative Assessment
1. Briefly explain the concept of pre-production in filmmaking. Why is it an
important stage?
2. Imagine you have limited resources for filming your sci-fi scene. Describe
some creative solutions you could use to create a futuristic atmosphere
despite the limitations.
This is an open-ended question requiring creative problem-solving.
Answers may vary based on students’ idea, but here is suggested
answer:
● Possible solutions include using everyday objects as futuristic
props, filming in unique locations with interesting architecture, or
creating simple costumes using household items.
3. Working in a group can sometimes be challenging. Describe one strategy you
could use to ensure effective communication and collaboration during the
storyboarding process.
Answers may vary but here is suggested answer:
● One strategy is to actively listen to each other’s ideas, discuss
different options, and come to a consensus on the storyboard
elements. Assigning roles within the group (ex. sketch artist, scene
writer, etc.) can also promote clarity and efficiency.
4. Briefly explain why teamwork is important in the filmmaking process?
Answers may vary but here is suggested answer:
● Filmmaking is a collaborative art form. From scriptwriting and
acting to directing and editing, many people work together to bring
film to life. Teamwork allows for better communication, diverse
perspectives, and a more efficient production process.
2. Homework (Optional)
B. Teacher’s
Remarks
Note observations on
any of the following
areas:
Effective Practices Problems Encountered
The teacher may take note of
some observations related to
the effective practices and
problems encountered after
strategies explored
15.
13
materials used utilizingthe different strategies,
materials used, learner
engagement and other related
stuff.
Teachers may also suggest
ways to improve the different
activities explored/ lesson
exemplar.
learner engagement/
interaction
others
C. Teacher’s
Reflection
Reflection guide or prompt can be on:
▪ principles behind the teaching
What principles and beliefs informed my lesson?
Why did I teach the lesson the way I did?
▪ students
What roles did my students play in my lesson?
What did my students learn? How did they learn?
▪ ways forward
What could I have done differently?
What can I explore in the next lesson?
Teacher’s reflection in every
lesson conducted/ facilitated is
essential and necessary to
improve practice. You may also
consider this as an input for
the LAC/Collab sessions.