Steps how to create active x using visual studio 2008
•
4 likes•8,994 views

Steps to develop activex with .cab file using visual studio C#.

Recommended
Recommended
More Related Content
Similar to Steps how to create active x using visual studio 2008
Similar to Steps how to create active x using visual studio 2008 (20)
More from Yudep Apoi
More from Yudep Apoi (9)
Recently uploaded
Recently uploaded (20)
Steps how to create active x using visual studio 2008
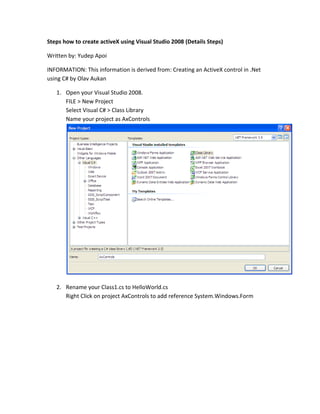
- 1. Steps how to create activeX using Visual Studio 2008 (Details Steps) Written by: Yudep Apoi INFORMATION: This information is derived from: Creating an ActiveX control in .Net using C# by Olav Aukan 1. Open your Visual Studio 2008. FILE > New Project Select Visual C# > Class Library Name your project as AxControls 2. Rename your Class1.cs to HelloWorld.cs Right Click on project AxControls to add reference System.Windows.Form
- 2. 3. Create a new interface that exposes the controls methods and properties to COM interop. Right click the project in Visual Studio and click Add –> New Item Select ‘Interface’ from the list of components, named it as ‘IHelloWorld.cs’ and click add.
- 3. Replace the code with this: using System; using System.Collections.Generic; using System.Text; using System.Runtime.InteropServices; namespace AxControls { [ComVisible(true)] [InterfaceType(ComInterfaceType.InterfaceIsDual)] [Guid("E66C39CB-BB8B-4738-AA0E-5E0D1F2DB230")] public interface IHelloWorld { string GetText(); } } [ComVisible(true)] makes the interface visible to COM. [Guid("E66C39CB-BB8B-4738-AA0E-5E0D1F2DB230")] lets us manually assign a GUID to the interface. Use guidgen.exe to generate your own. 4. Mark the control as safe for scripting and initialization. By default IE will not allow initializing and scripting an ActiveX control unless it is marked as safe. This means that we won’t be able to create instances of our ActiveX class with JavaScript by default. We can get around this by modifying the browser security settings, but a more elegant way would be to mark the control as safe. Before you do this to a “real” control, be sure to understand the consequences. We will mark the control as safe by implementing the IObjectSafety interface. Right click the project in Visual Studio and click Add -> New Item. Select ‘Interface’ from the list of components, name it ‘IObjectSafety.cs’ and click Add.
- 4. Put these lines of codes inside IObjectSafety.cs: using System; using System.Collections.Generic; using System.Text; using System.Runtime.InteropServices; namespace AxControls { [ComImport()] [Guid("51105418-2E5C-4667-BFD6-50C71C5FD15C")] [InterfaceType(ComInterfaceType.InterfaceIsIUnknown)] interface IObjectSafety { [PreserveSig()] int GetInterfaceSafetyOptions(ref Guid riid, out int pdwSupportedOptions, out int pdwEnabledOptions); [PreserveSig()] int SetInterfaceSafetyOptions(ref Guid riid, int dwOptionSetMask, int dwEnabledOptions); } } 5. Go to HelloWorld make the HelloWorld class implement the IObjectSafety interface by replacing HelloWorld.cs with these lines of code:
- 5. using System; using System.Collections.Generic; using System.Text; using System.Windows.Forms; using System.Runtime.InteropServices; namespace AxControls { [ComVisible(true)] [ClassInterface(ClassInterfaceType.None)] [Guid("D100C392-030A-411C-92B6-4DBE9AC7AA5A")] [ProgId("AxControls.HelloWorld")] [ComDefaultInterface(typeof(IHelloWorld))] public class HelloWorld : UserControl, IHelloWorld, IObjectSafety { #region IHelloWorld Members public string GetText() { return "Hello ActiveX World!"; } #endregion #region IObjectSafety Members public enum ObjectSafetyOptions { INTERFACESAFE_FOR_UNTRUSTED_CALLER = 0x00000001, INTERFACESAFE_FOR_UNTRUSTED_DATA = 0x00000002, INTERFACE_USES_DISPEX = 0x00000004, INTERFACE_USES_SECURITY_MANAGER = 0x00000008 }; public int GetInterfaceSafetyOptions(ref Guid riid, out int pdwSupportedOptions, out int pdwEnabledOptions) { ObjectSafetyOptions m_options = ObjectSafetyOptions.INTERFACESAFE_FOR_UNTRUSTED_CALLER | ObjectSafetyOptions.INTERFACESAFE_FOR_UNTRUSTED_DATA; pdwSupportedOptions = (int)m_options; pdwEnabledOptions = (int)m_options; return 0; } public int SetInterfaceSafetyOptions(ref Guid riid, int dwOptionSetMask, int dwEnabledOptions) { return 0; } #endregion } } 6. Create a .msi installer for the control. Before an ActiveX control can be used it must be installed and registered on the client. This can be done in a number of
- 6. ways, from manually editing the registry to using regasm.exe, but we’re going to create a Vistual Studio setup project to handle the installation for us. Right click the Visual Studio solution, select Add -> New Project and select Setup Project under Other Project Types. Call the project ‘AxControlsInstaller’ and click OK. But before that you need to save the project. I named the folder as AxControl1. Then click save. After saved this interface will appear. Right click the ‘AxControlsInstaller’ project, select Add -> Project Output, select ‘Primary output’ from the ‘AxControls’.
- 7. Right click 'Primary output from AxControls (Active)' and select Properties. Change the Register property from 'vsdrpDoNotRegister' to 'vsdrpCOM'. Right click the 'AxControlsInstaller' project and select Build. The installer should now be located in the AxControlsInstaller's output folder (binDebug or binRelease). In the corporate domain this .msi file can de run manually on the client, or automatically with a Group Policy. 7. Package the installer in a .cab file for web deployment. For public web sites we obviously can't deploy our ActiveX control to the client with a Group Policy. In this case we're going to have to use Internet Explores built-in ability to download and install controls that are packaged in .cab files. 1. Download the Microsoft Cabinet Software Development Kit. 2. Unpack the kit to a local folder and copy Cabarc.exe to the 'AxControlsInstaller' folder. 3. Create a new file named 'AxControls.inf' in the 'AxControlsInstaller' folder and add the following content: [version] signature="$CHICAGO$" AdvancedINF=2.0
- 8. [Add.Code] AxControlsInstaller.msi=AxControlsInstaller.msi [AxControlsInstaller.msi] file-win32-x86=thiscab clsid={1FC0D50A-4803-4f97-94FB-2F41717F558D} FileVersion=1,0,0,0 [Setup Hooks] RunSetup=RunSetup [RunSetup] run="""msiexec.exe""" /i """%EXTRACT_DIR%AxControlsInstaller.msi""" /qn 8. Click the AxControlsInstaller project and then click the Properties window (View -> Properties Window if it's not visible). Click the '...' button next to the PostBuildEvent property and add the following content: "$(ProjectDir)CABARC.EXE" N "$(ProjectDir)AxControls.cab" "$(ProjectDir)AxControls.inf" "$(ProjectDir)$(Configuration)AxControlsInstaller.msi" 9. Right click the 'AxControlsInstaller' project and select Build.There should now be a 'AxControls.cab' file in the 'AxControlsInstaller' folder.Take Note: Make sure you use ANSI encoding for the 'AxControls.inf' file or you will be unable to install the control. 10. Initialize and test the control with JavaScript. 1. Right click the AxControls solution, select Add -> New Project and select 'ASP.Net Web Application' under 'Web'. 2. Call the project 'WebAppTest' and click OK. 3. Right click the 'WebAppTest' project, select Add -> New Item and select 'HTML Page'. 4. Call it 'index.html' and click OK. 5. Add the following content to index.html: <html> <head> <object name="axHello" style='display:none' id='axHello' classid='CLSID:1FC0D50A-4803-4f97-94FB-2F41717F558D' codebase='AxControls.cab#version=1,0,0,0'></object> <script language="javascript"> <!-- Load the ActiveX object --> var x = new ActiveXObject("AxControls.HelloWorld"); <!-- Display the String in a messagebox --> alert(x.GetText()); </script>
- 9. </head> <body> </body> </html> Note that 'classid' matches the GUID of the HelloWorld control. 11. Right click 'index.html' and select 'Set as start page'. 12. Right click the 'WebAppTest' project and select 'Set as startup project'. 13. Copy 'AxControls.cab' from the 'AxControlsInstaller' folder to the same folder as index.html. 14. Uninstall the control from the client by going to Control Panel -> Programs and Features, selecting 'AxControlsInstaller' on the list and clicking Uninstall. This forces Internet Explorer to download and install the .cab file and is an important step in case you've already installed the control. 15. Run the application (F5). This will open 'index.html' in Internet Explorer. 16. Internet Explorer will display a security warning, asking if you want to install 'AxControls.cab'. Click Install. 17. When the page loads it should display a message box with the string you defined in HelloWorld's GetText() method. 18. If the message box displayed without any more warnings or errors we've implemented everyting correctly.