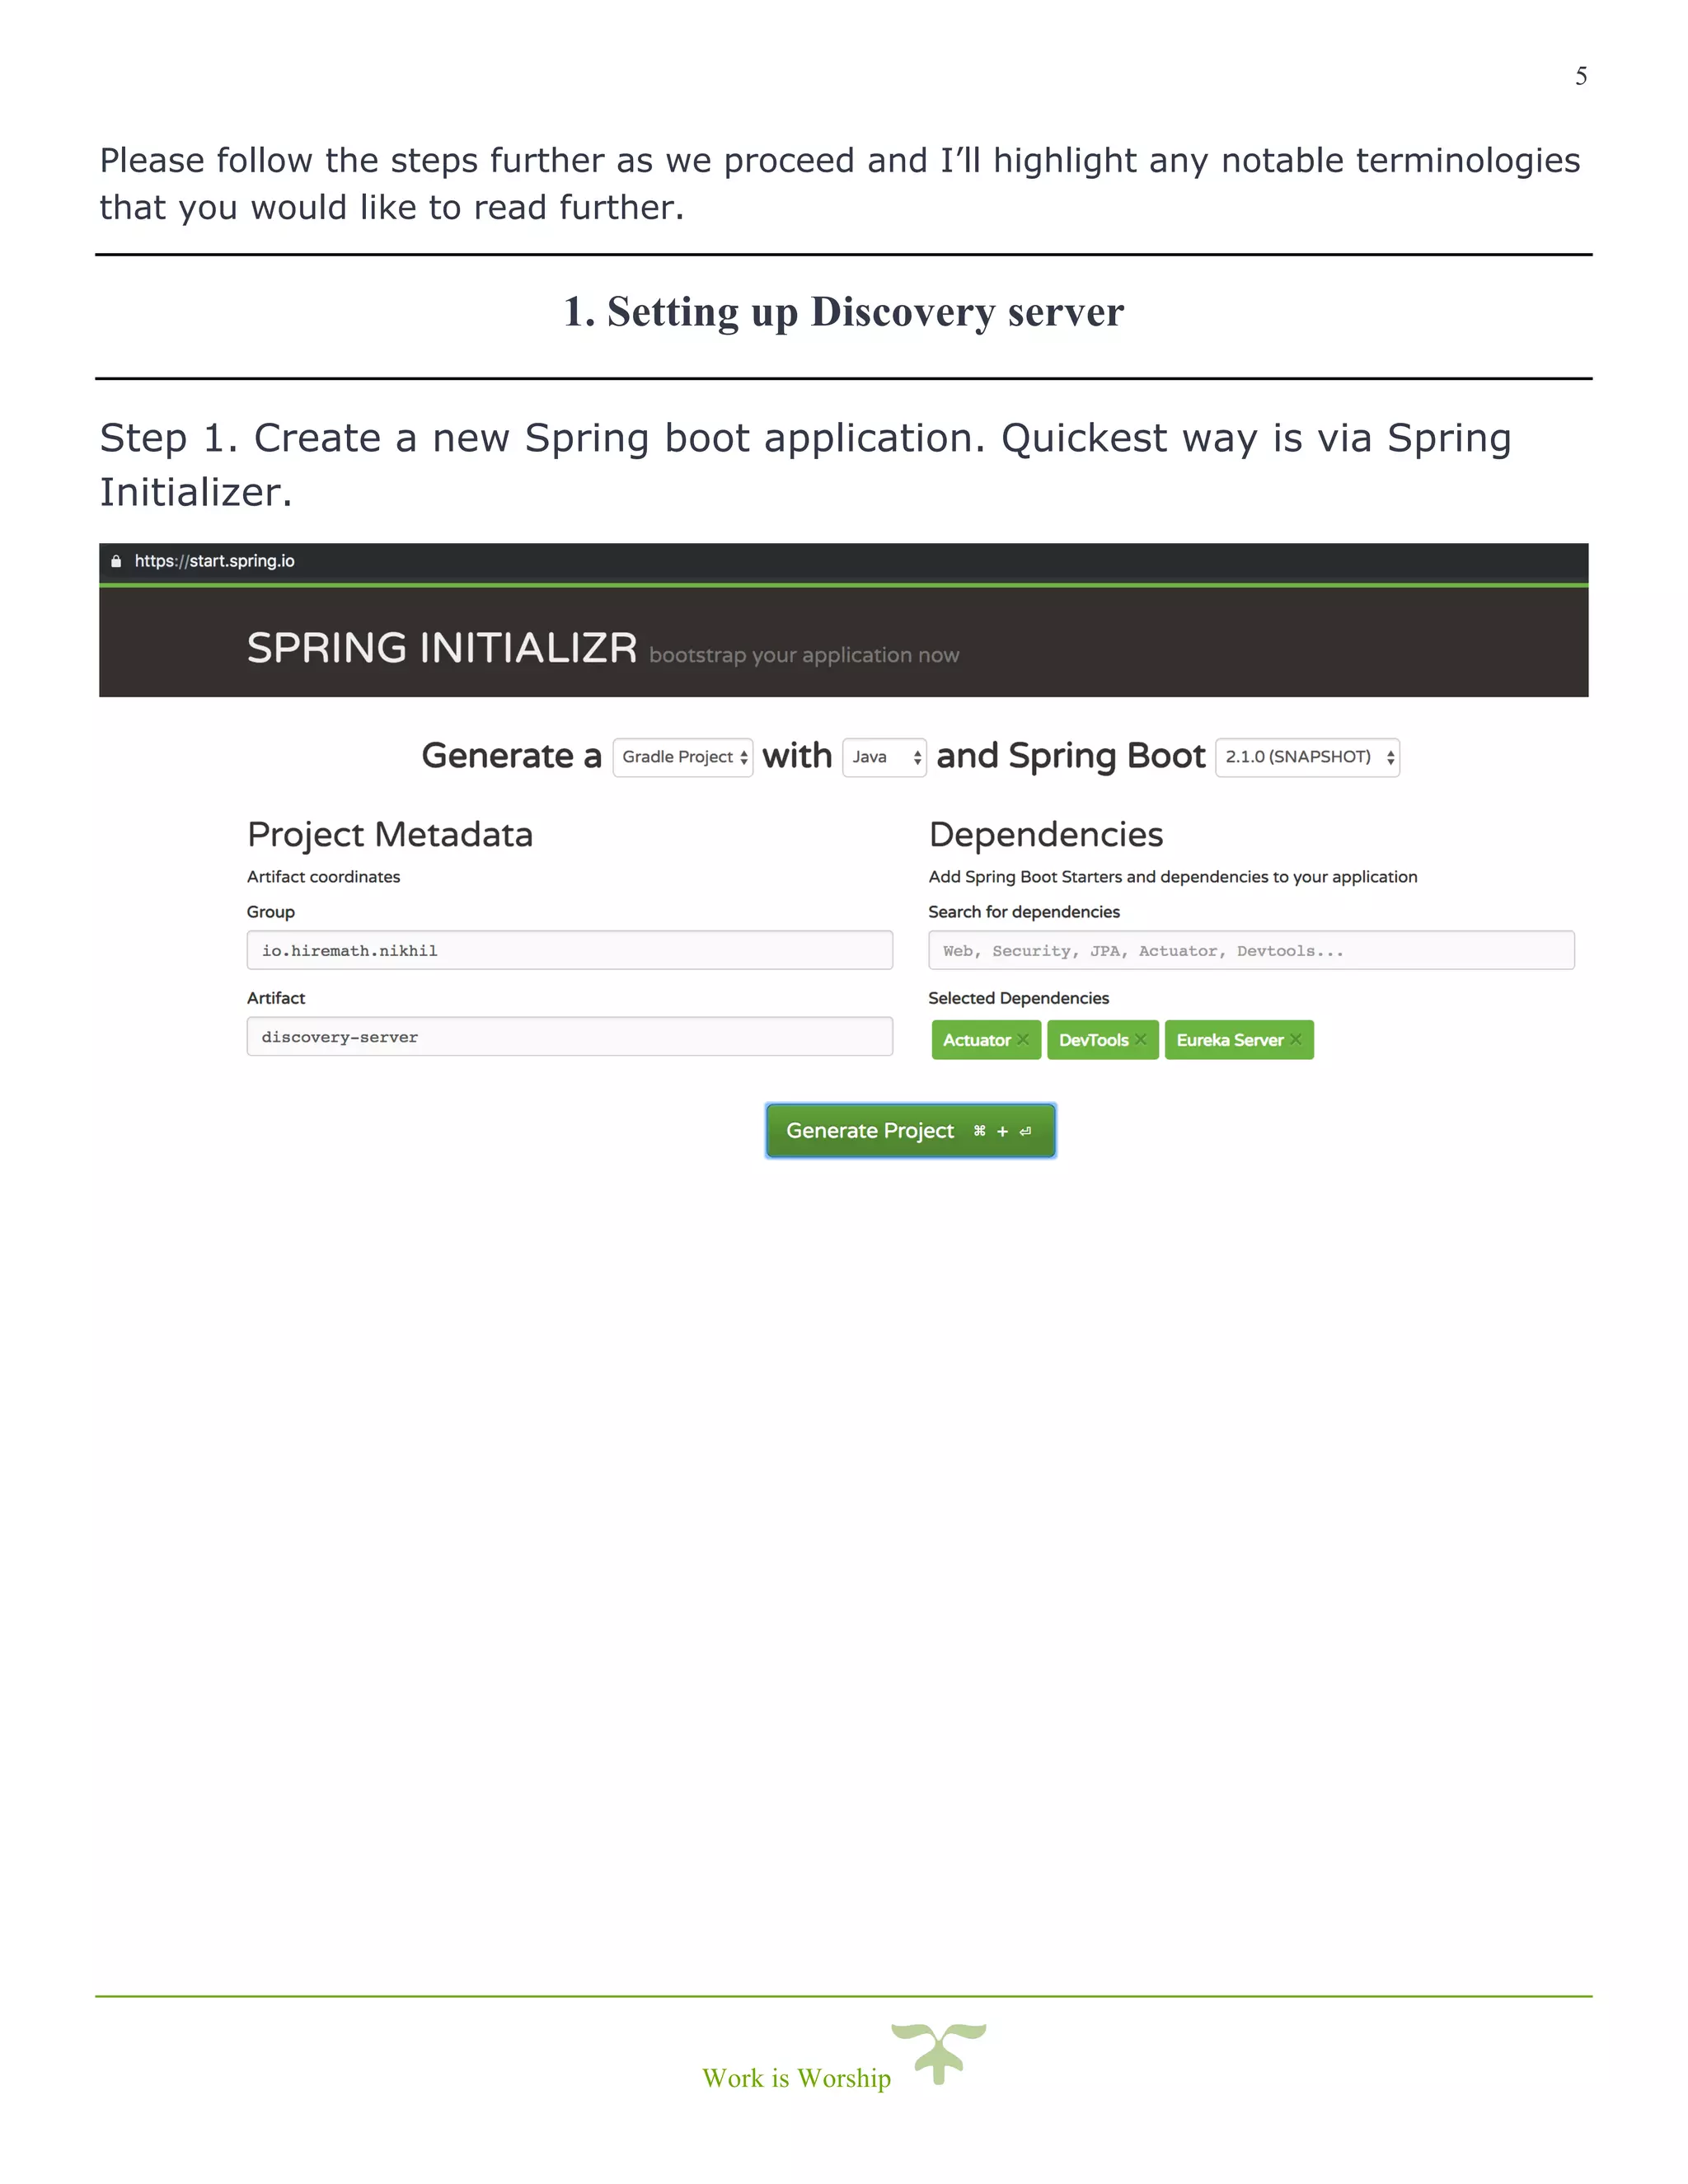
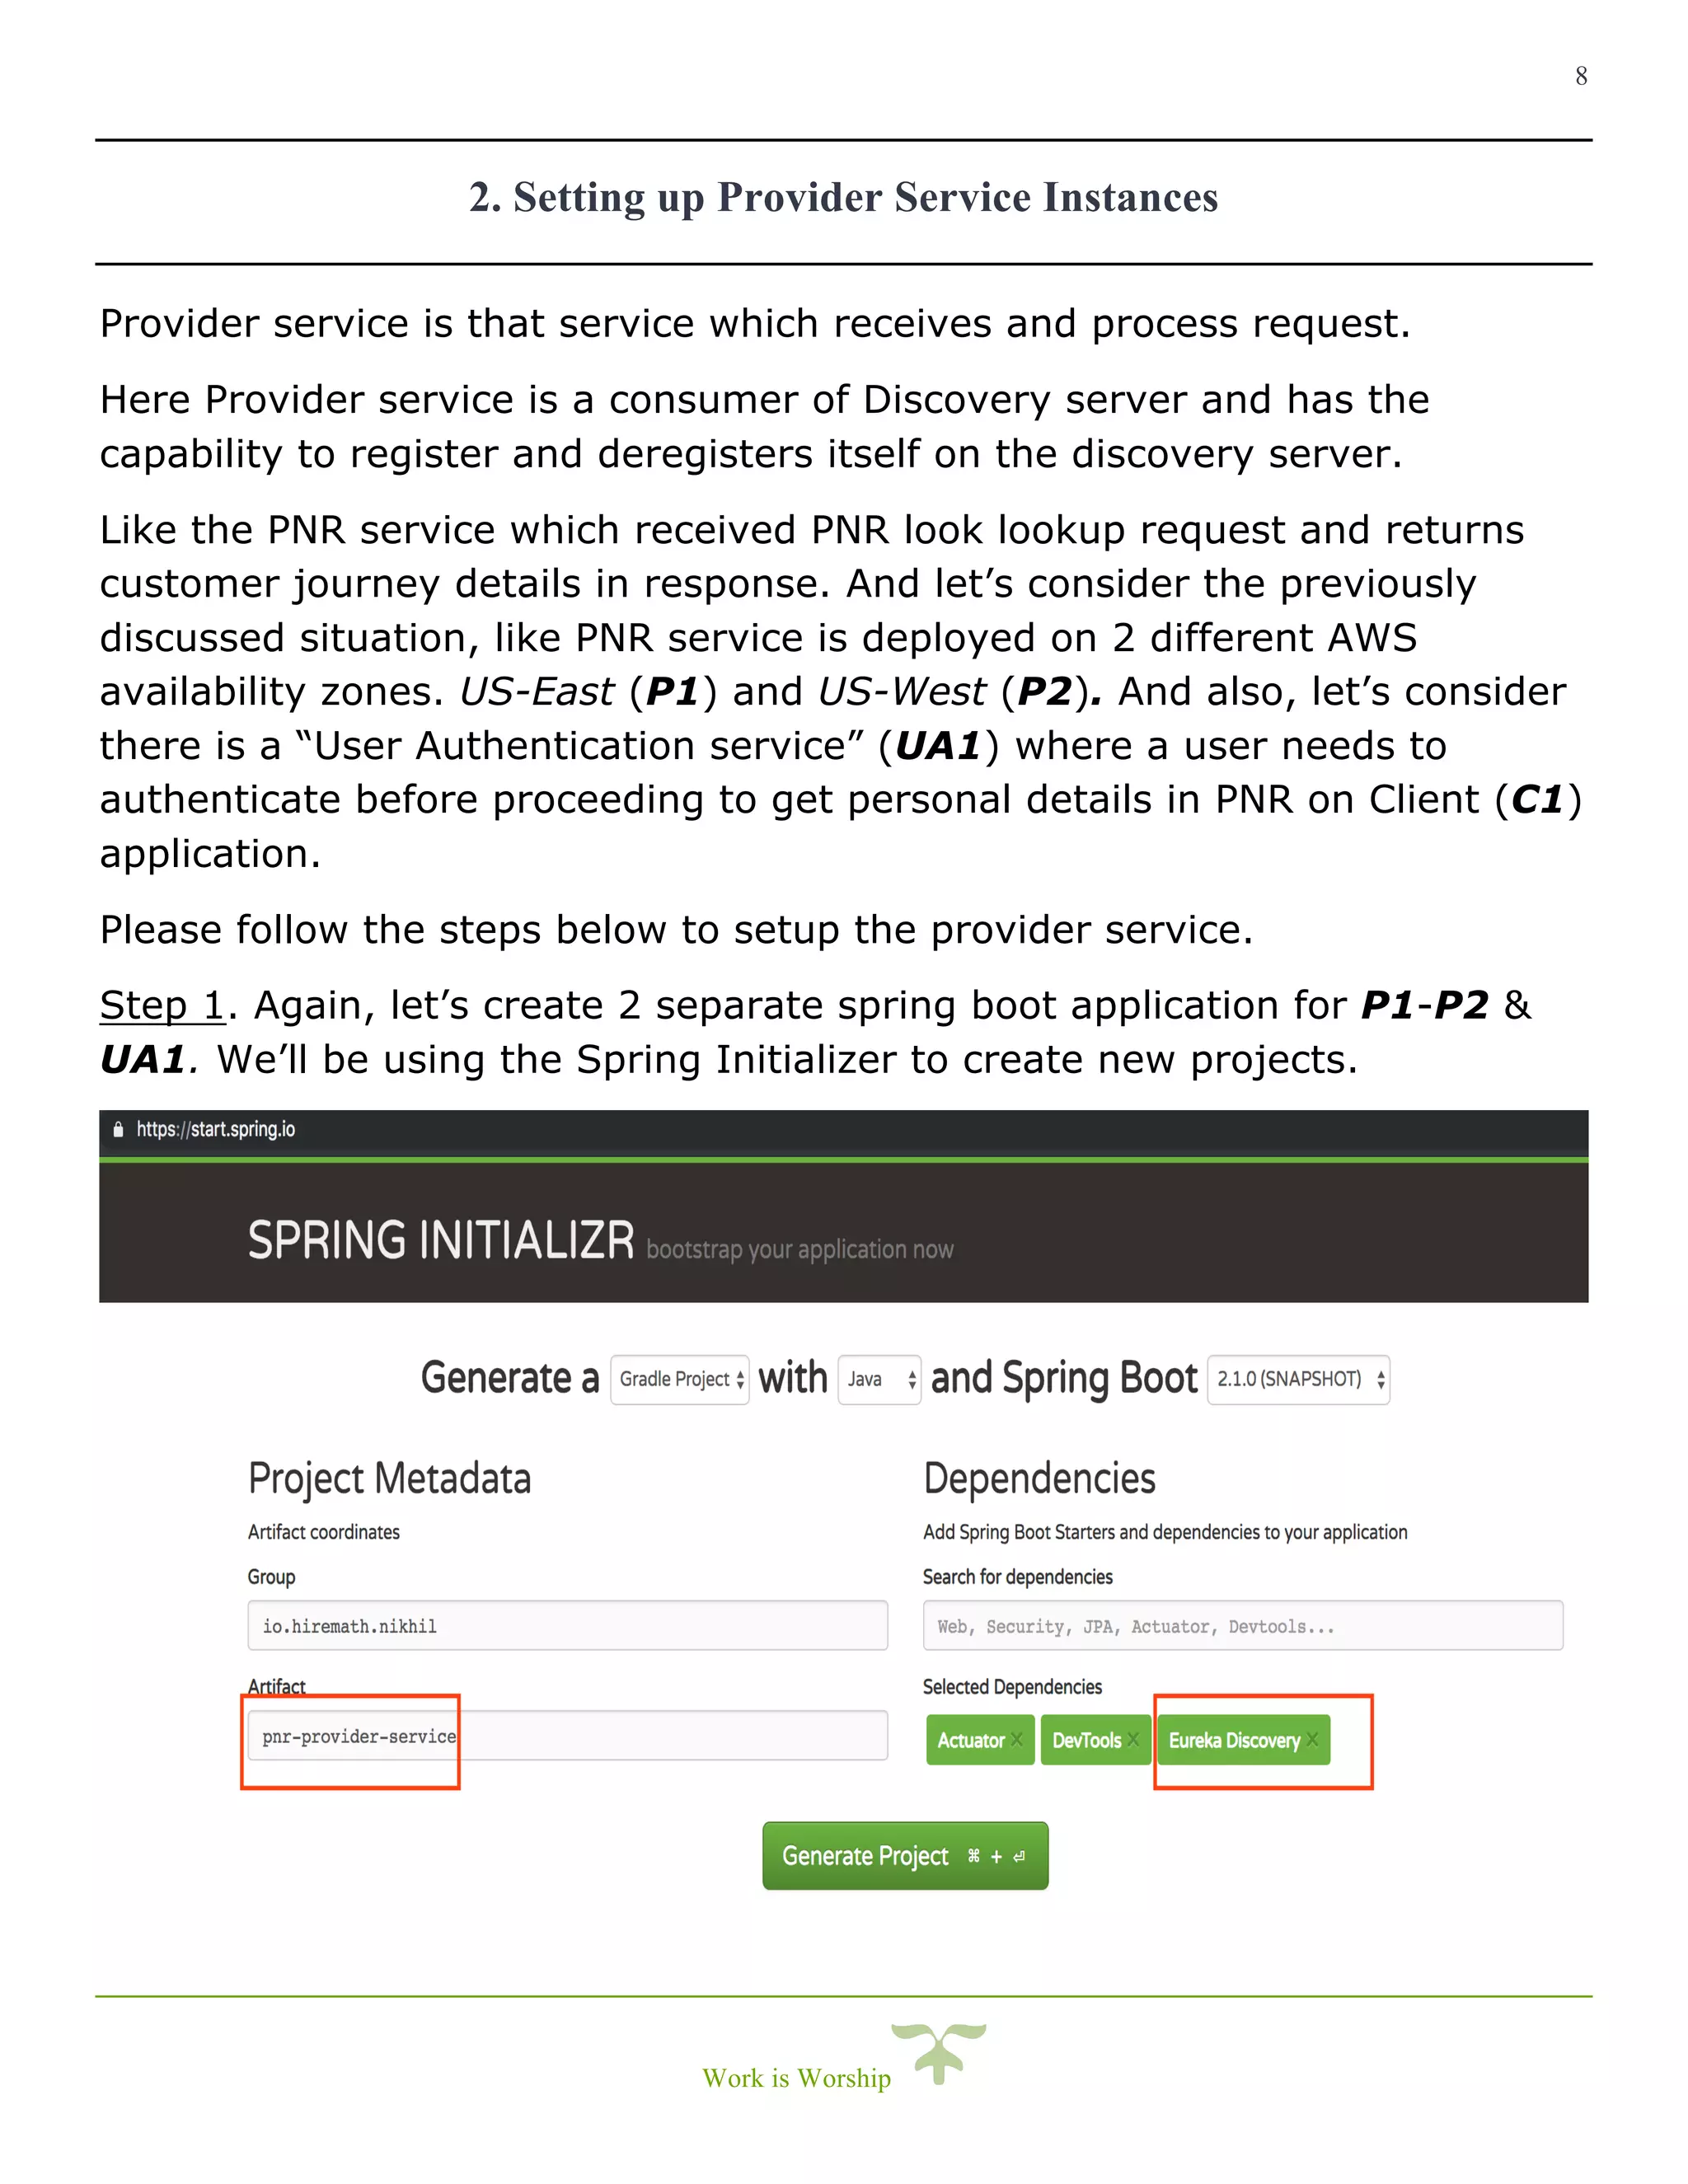
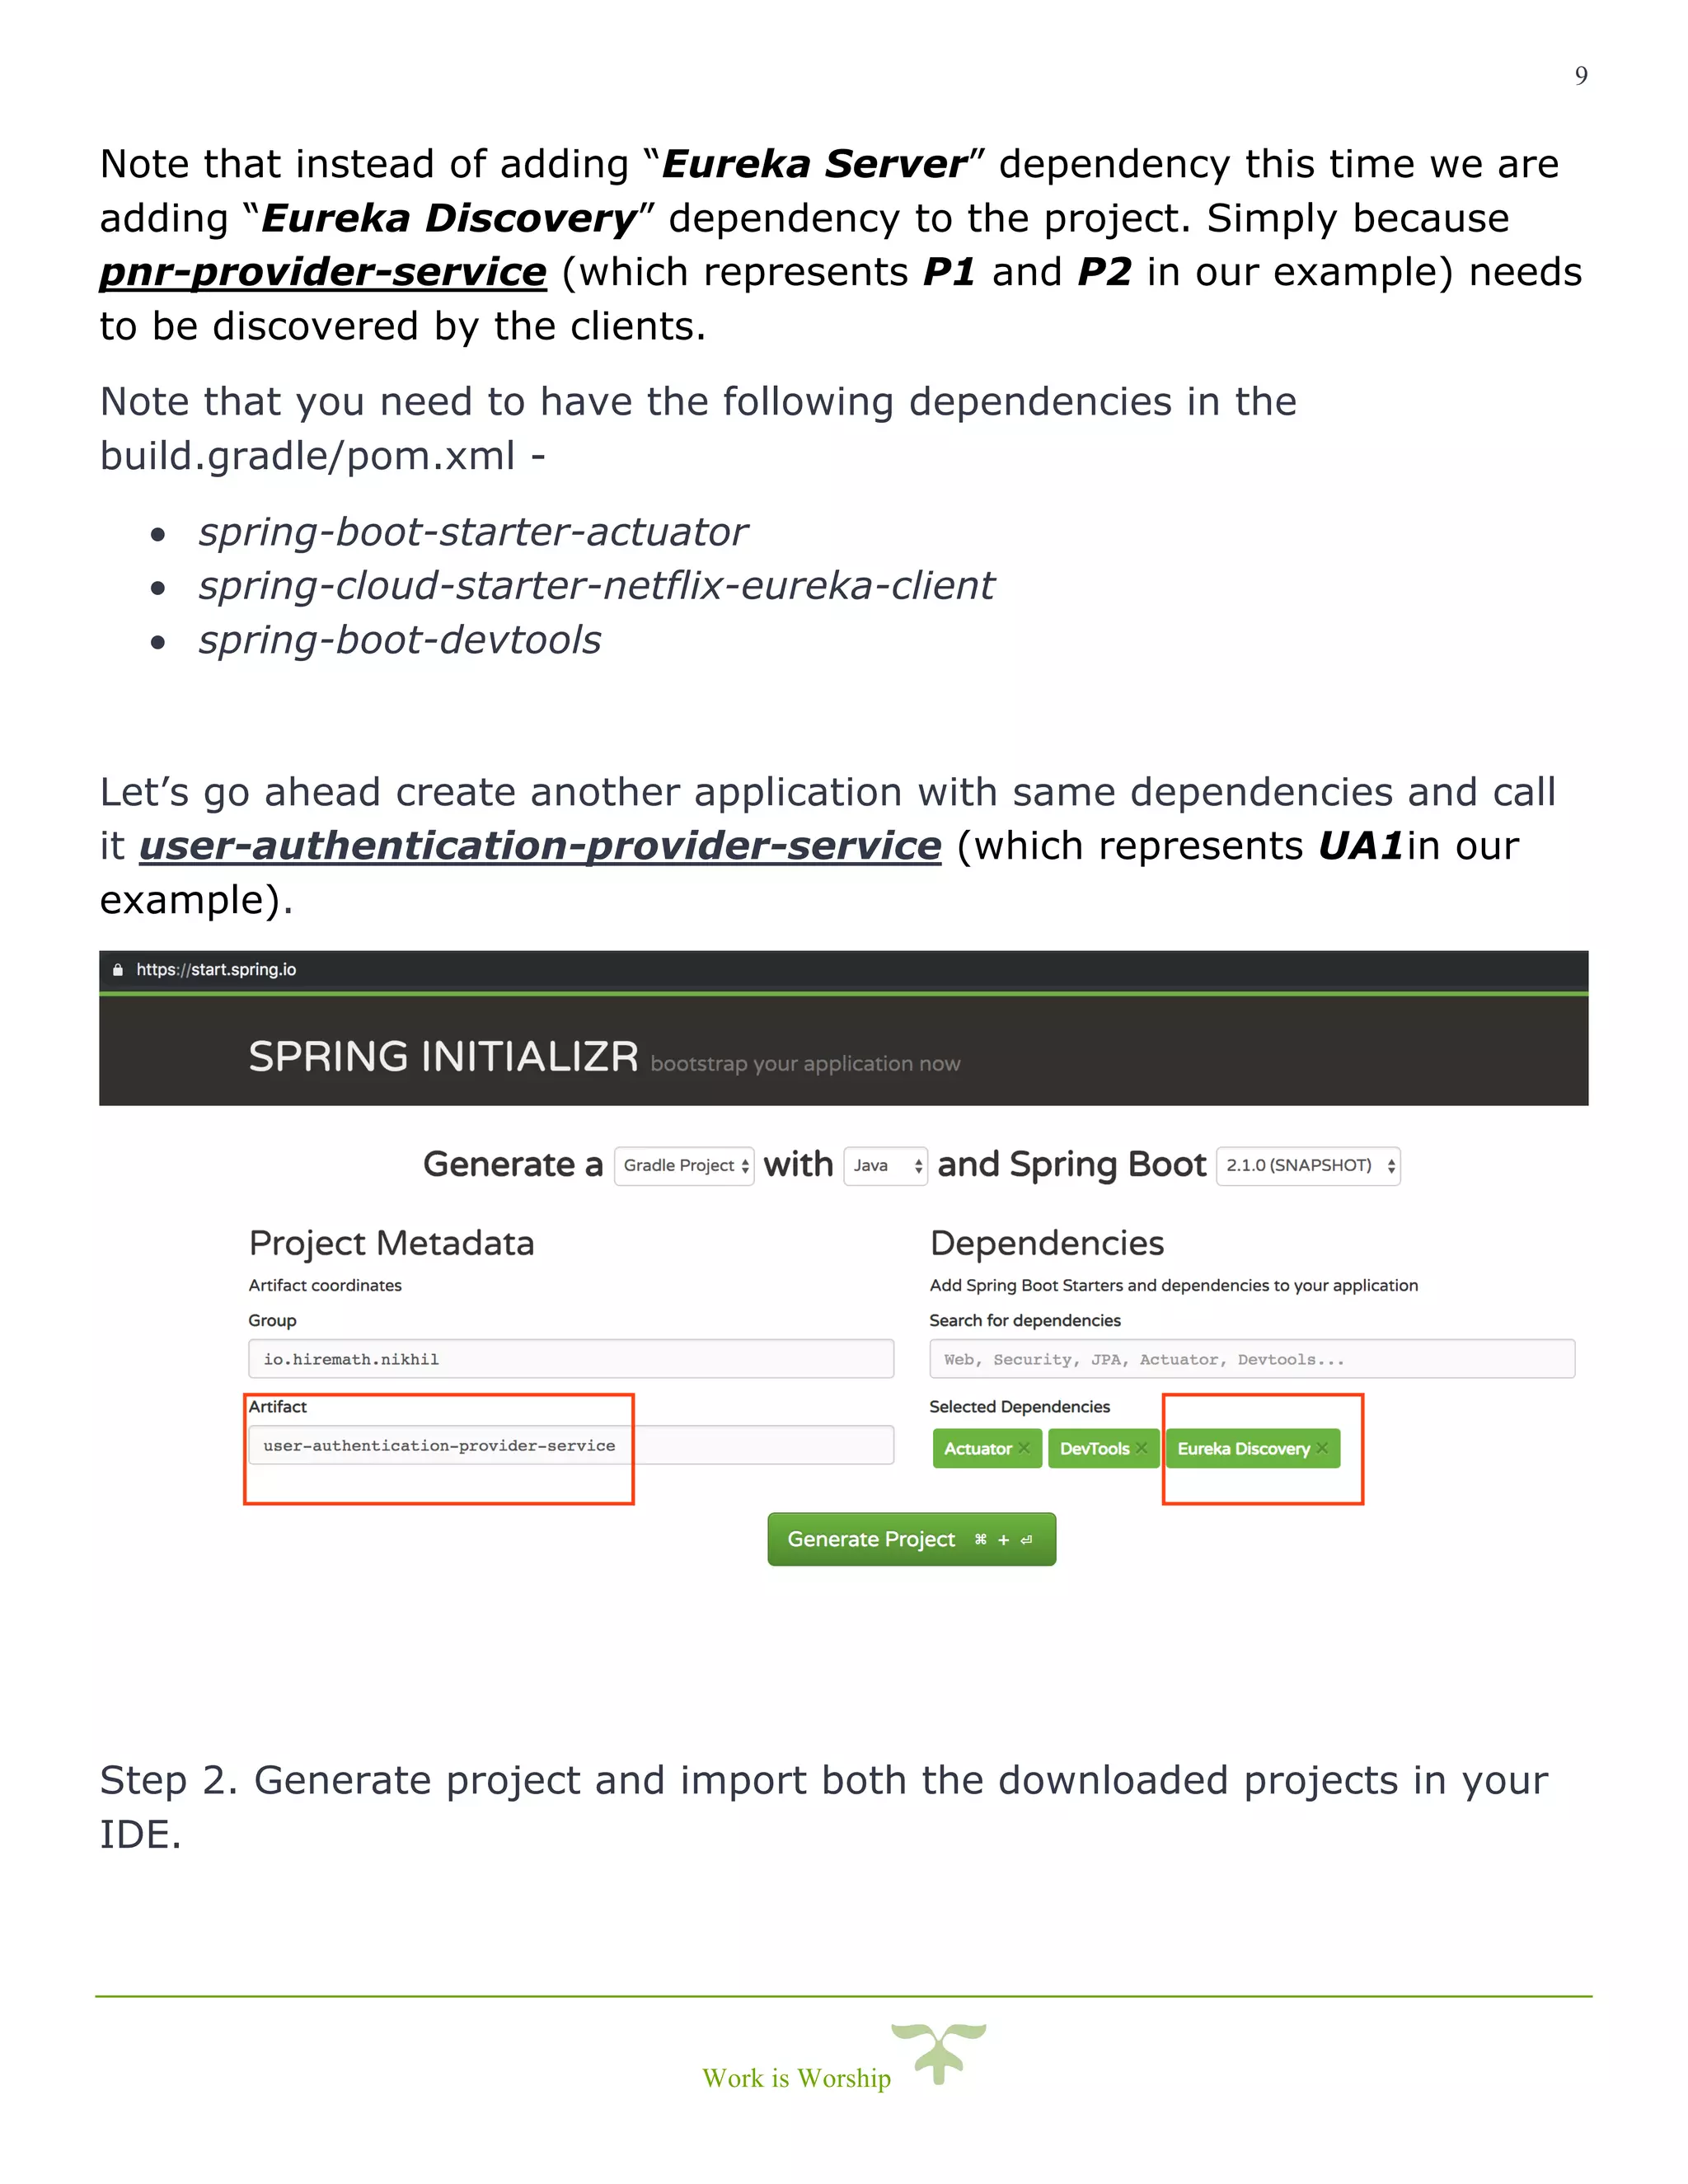
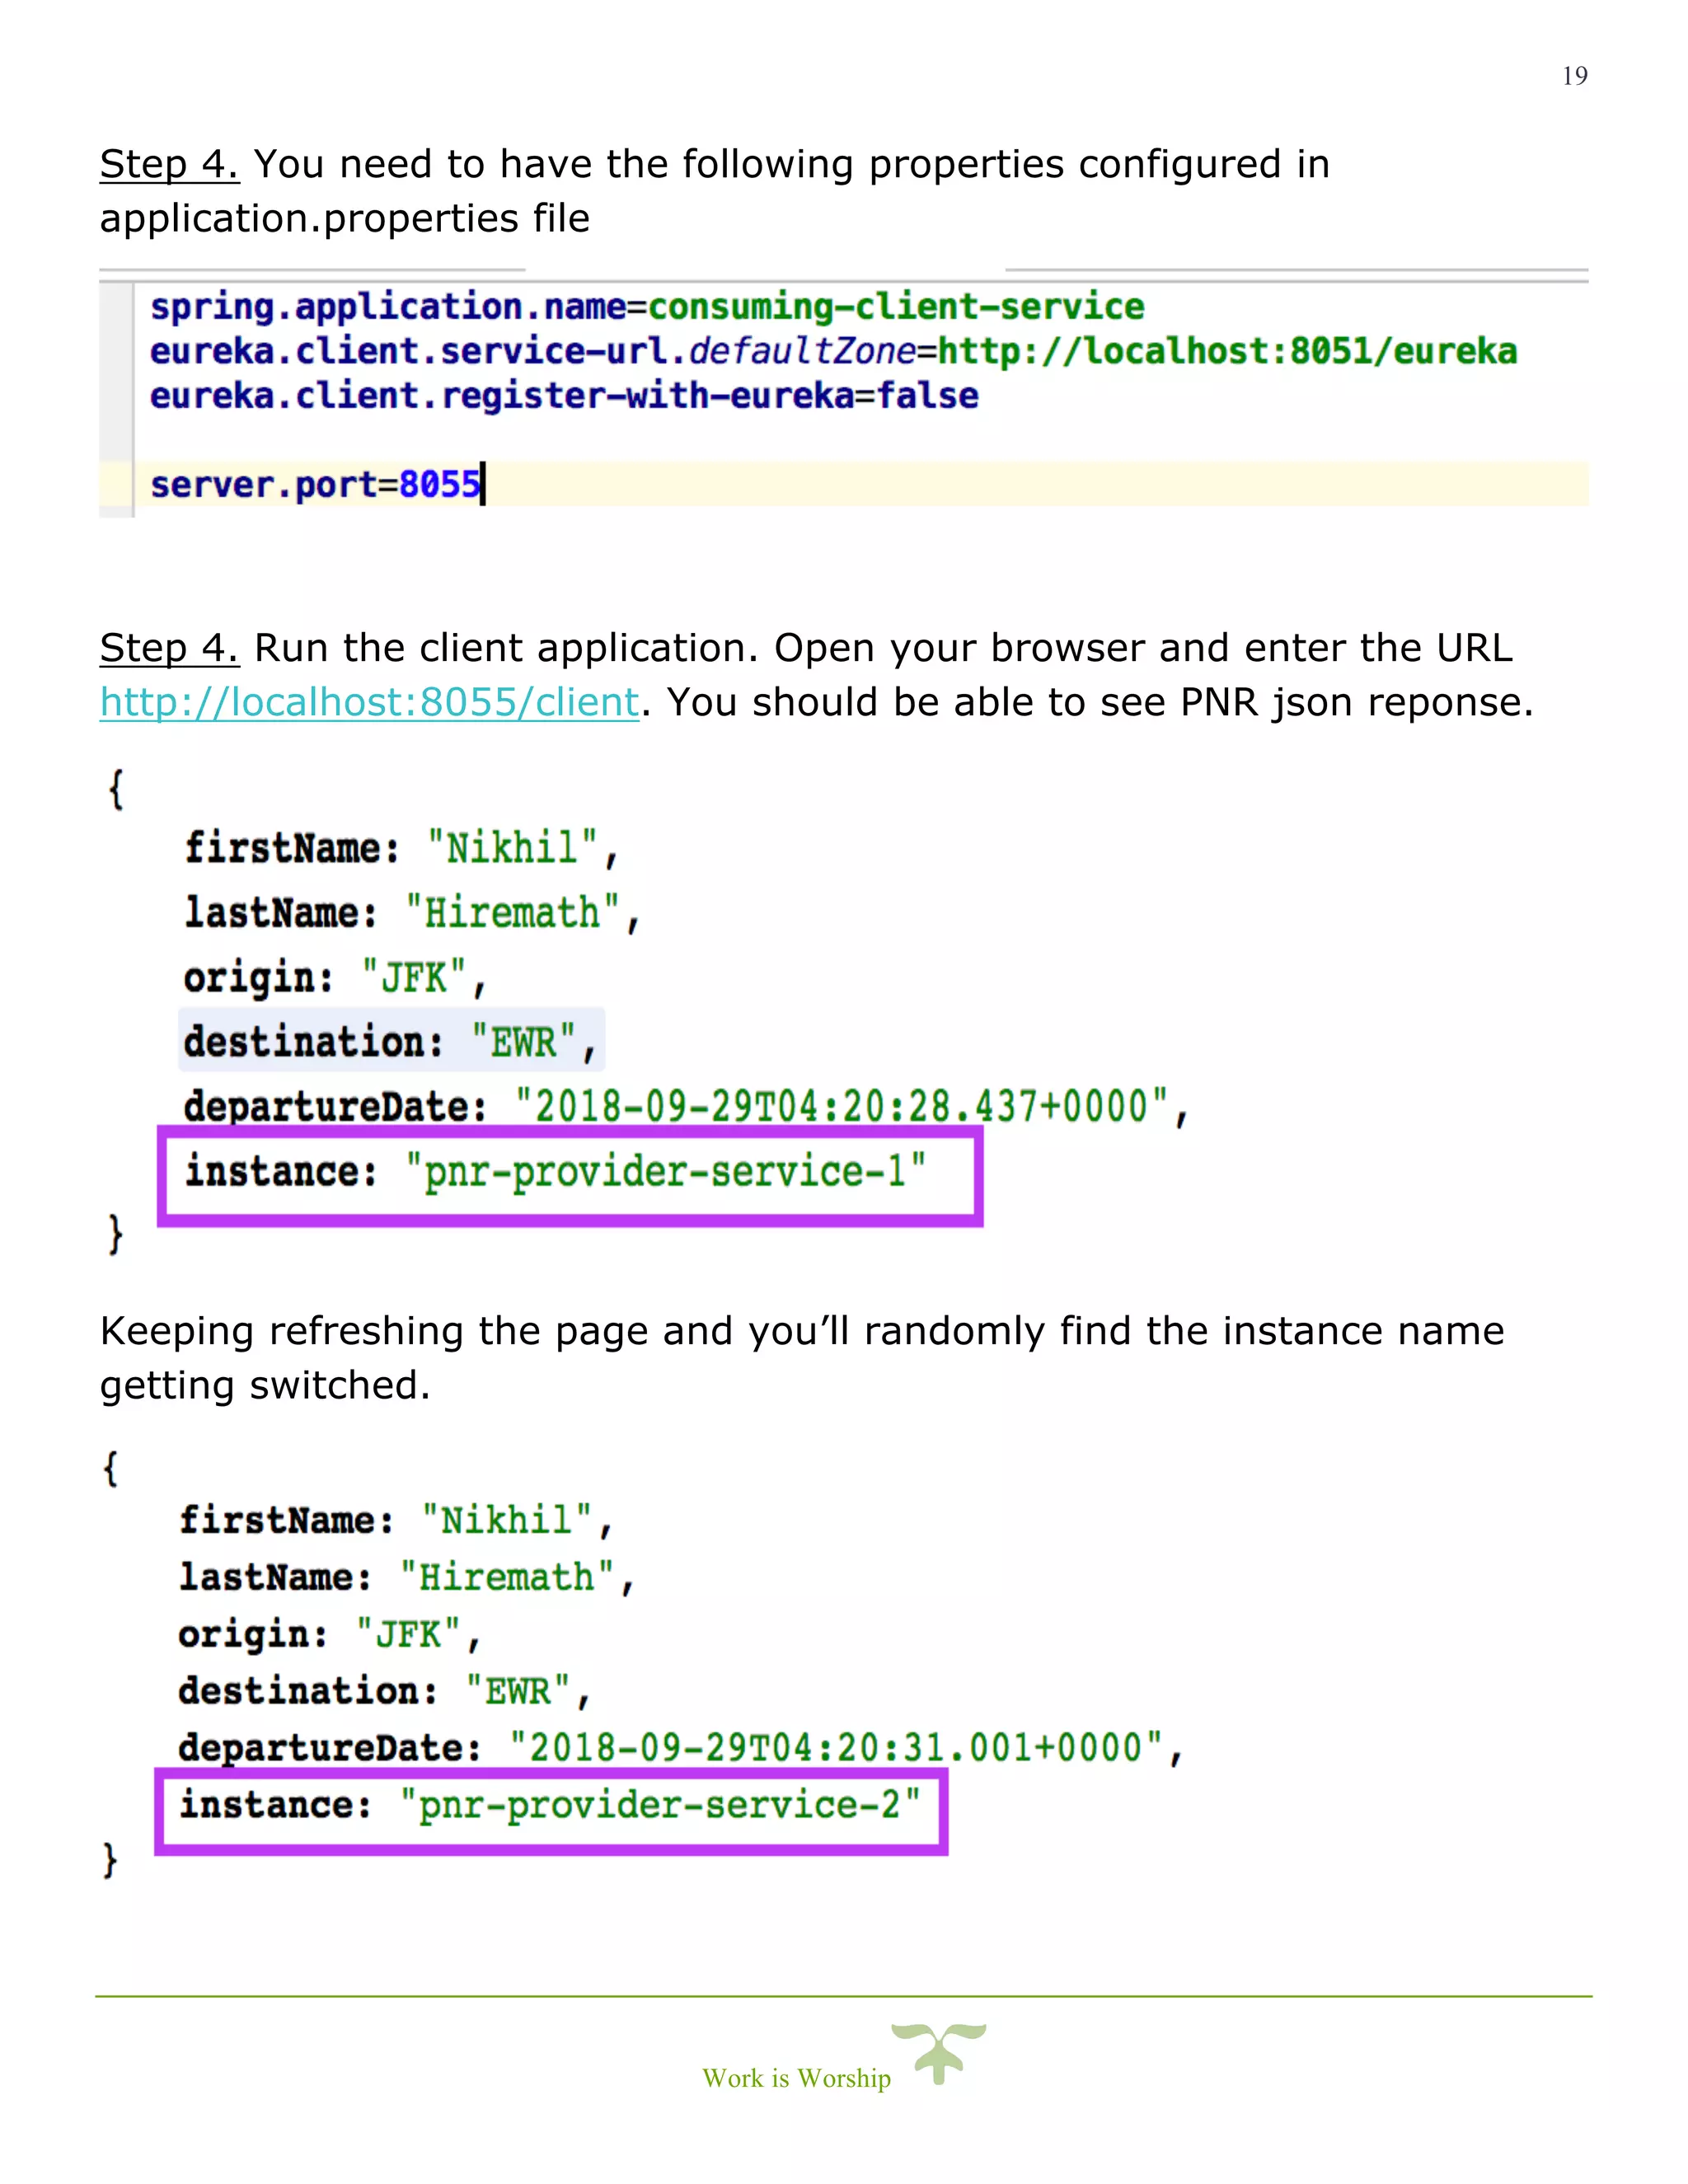
30-minute guide
for learners and
believers
Spring Cloud Series
Service Discovery
Concept
This article focuses on Service Registry and Discovery from the series
of articles under “Spring cloud application development”.
If you are here I presume you have little or basic understanding of
Spring Boot framework, microservices, cloud and cloud based
terminologies although I’ll try to quickly define again wherever and
whenever required.
Understanding	the	necessity of	Service	Discovery	
We generally discover those things which are unknown to us and in
the world of microservices it’s the address/routes to the microservice
that is highly uncertain due to so many reasons including load
balancing, high availability, dynamic routing, etc.
To understand the need, let’s say you have a deployed a PNR
microservice(P1) on a AWS US-East zone and a client
application(C1) will request P1 to fetch PNR details. Now during
blackout days P1 instance is receiving heavy load. To distribute heavy
load, you will spin up another instance(P2) of this microservice in
AWS US-West zone. This leads to 2 different URL of the application
which C1 is completely unaware of.
Now may be C1 is serving request from users across different zones
and in this case, C1 is not aware of second route which is pointing to
AWS US-West zone.
2
Work is Worship
In this situation C1 as a client (front end, backend or a web-service)
should be agnostic about PNR service. The fact that PNR service
instance is overloaded and new route availability should not be known
to C1 because handling multiple routes to multiple instances of PNR
services is not the job of consuming client but rather it should still be
able to send requests to PNR service and leave it up to SERVICE
DISCOVERY to detect new available routes.
All that C1 has to do now is to get the route to PNR service for
Discovery Server and send the request to the respective route/end-
point.
What if the consuming client talks to 20 different microservices for
example PNR-service, Flight-Availability-service, Reservation-
Service, Frequent-Flyer-service, Payment-Service, Loyalty-Program-
service, Special-Service-Request-microservice, Cancellation-Service,
Identity-Service, Authentication-service, Consumer-service, Velocity-
Control-service, Analytics-service and so on and so forth?? If service
discovery is not in place and keeping in mind how huge the travel
industry is, the Consuming client like C1 will end-up configuring more
than 1000 URL in the system. Here Service Discovery is your life-
saver. Further you will discover how quickly we can setup a simple
Spring Cloud Service Discovery practically if you like to code.
3
Work is Worship
Pre-Requisites -
Before we start I prefer readers to be familiar Java 7+, Spring, Spring Boot and bare
minimum understanding/exposure to concepts like REST, Microservice and hands-on
coding. And/or please do some reading around Spring Boot and Spring cloud eco-
system.
Tool and Environment setup/requirements –
• Java 8 (installed on your system)
• Your favorite IDE
• Internet to download dependencies
Service Discovery in Spring Cloud ecosystem can be implemented using following
approaches.
• Spring Cloud Consul
• Spring Cloud Zookeeper
• Spring Cloud Netflix
Spring Cloud Netflix mechanism is the simplest way we can setup fully functional
service discovery. As the name, itself describes that this module/API was built by Netflix
(the online streaming service) called by the name “Eureka”. It was built so that it works
seamlessly with AWS infrastructure out-of-box.
Basically, Service discovery has 3 main actors.
• Discovery Server - acts a service registry
• Service Instance/Instances - is the provider service (For Ex. PNR service)
• Client Instance/Instances - is any consuming service (For Ex. front end
web/mobile application, web-service or any rest client)
4
Work is Worship
How it works??
• When a new service is brought up and in a healthy state, it will go ahead and
register itself on the Discovery Server with a designated service-id.
• Whenever any client wants to invoke and API in provider services (like PNR
service), client will request discovery server to get the route/end-point of the
provider service using the service-id.
• Discovery server will then look up URL from its routing table using the service-id.
Returns to URL of a suitable healthy instance to the requestor.
• Now the Client service will invoke the respective end-point to do its job.
5
Work is Worship
Please follow the steps further as we proceed and I’ll highlight any notable terminologies
that you would like to read further.
1. Setting up Discovery server
Step 1. Create a new Spring boot application. Quickest way is via Spring
Initializer.
6
Work is Worship
Note that you need to have the following dependencies -
• spring-boot-starter-actuator
• spring-cloud-starter-netflix-eureka-server
• spring-boot-devtools
Step 2. Generate project and import in your IDE.
Step 3. Try running the spring-boot application and you will a whole lot of
errors due to following reasons but don’t worry I’ll explain each one of
them.
1. Getting all instance registry info from the eureka server – This is a
discovery-server itself, it keeps the instance registry info rather than
doesn’t getting that information from elsewhere.
2. DiscoveryClient_DISCOVERY-SERVER/<IP_ADDRESS>: discovery-
server:8051 - was unable to refresh its cache! status = Cannot
execute request on any known server – Eureka Discovery-server can
be setup to work in cluster for high availability. Since we are running a
standalone, no-cache based discovery server, we need to disable this
feature.
3. DiscoveryClient_DISCOVERY-SERVER//<IP_ADDRESS>: discovery-
server:8051: registering service... – The Discovery server is trying to
register itself as a providing service instance which receives service
requests from clients. This needs to be disabled as well.
Continued …
7
Work is Worship
Step 4. FIX!! We’ll address all the above 3 issues by setting 2 properties in
“application.properties” or “application.yml” file in discovery-service
spring-boot application.
eureka.client.register-with-eureka=false
eureka.client.fetch-registry=false
Re-run the application and the application should start without any errors.
I recommend to set different server port to avoid port conflicts and also set
application name which will be used as “service-id” for discovery server
spring.application.name=discovery-server
server.port=8051
Step 5. Access the URL http://localhost:8051. You’ll not see anything and
that’s because the we have not yet marked this application to act as Eureka
Discovery server.
Step 6. Important! Add @EnableEurekaServer annotation in the App
Configuration class or in the main class (DiscoveryServerApplication.java).
Access the URL http://localhost:8051 again and you’ll see Eureka Discovery
server dashboard which a suite of the metrics some of which I’ll explain
further.
8
Work is Worship
2. Setting up Provider Service Instances
Provider service is that service which receives and process request.
Here Provider service is a consumer of Discovery server and has the
capability to register and deregisters itself on the discovery server.
Like the PNR service which received PNR look lookup request and returns
customer journey details in response. And let’s consider the previously
discussed situation, like PNR service is deployed on 2 different AWS
availability zones. US-East (P1) and US-West (P2). And also, let’s consider
there is a “User Authentication service” (UA1) where a user needs to
authenticate before proceeding to get personal details in PNR on Client (C1)
application.
Please follow the steps below to setup the provider service.
Step 1. Again, let’s create 2 separate spring boot application for P1-P2 &
UA1. We’ll be using the Spring Initializer to create new projects.
9
Work is Worship
Note that instead of adding “Eureka Server” dependency this time we are
adding “Eureka Discovery” dependency to the project. Simply because
pnr-provider-service (which represents P1 and P2 in our example) needs
to be discovered by the clients.
Note that you need to have the following dependencies in the
build.gradle/pom.xml -
• spring-boot-starter-actuator
• spring-cloud-starter-netflix-eureka-client
• spring-boot-devtools
Let’s go ahead create another application with same dependencies and call
it user-authentication-provider-service (which represents UA1in our
example).
Step 2. Generate project and import both the downloaded projects in your
IDE.
10
Work is Worship
Step 3. Try running any one application and you will not see any errors
because for example pnr-provider-service is not yet trying to register itself
on the discovery-server.
Step 4. Add an annotation @EnableEurekaClient to mark pnr-provider-
service the one that receives requests and needs to be discovered.
Now if you try running the application, again you might run into a bunch of
errors.
1. com.netflix.discovery.DiscoveryClient : Getting all instance registry
info from the eureka server
- Here the pnr-provider-service is trying to locate another running
instance of itself - for example P1 trying to search for P2, but fails
to connect with the discovery server.
2. DiscoveryClient_PNR-PROVIDER-SERVICE/172.20.98.54:pnr-provider-
service:8052 - was unable to refresh its cache! status = Cannot
execute request on any known server
- Results due to un-configured cache since Discovery server URL in
not present in application properties.
3. DiscoveryClient_PNR-PROVIDER-SERVICE/172.20.98.54:pnr-provider-
service:8052: registering service...
DiscoveryClient_PNR-PROVIDER-SERVICE/172.20.98.54:pnr-provider-
service:8052 - registration failed Cannot execute request on any
known server
- This results due to the fact that we have not set Discovery server
URL in application properties. pnr-provider-service is trying to
register itself but fails
11
Work is Worship
Step 5: Add following properties in “application.properties” or yaml.
spring.application.name=pnr-provider-service
eureka.client.service-url.defaultZone=http://localhost:8051/eureka
server.port=8052
Step 6: Start the application and you should be able to see that the
application has gracefully started and ready to receive requests.
On successful startup and registry, you’ll see the following message with a
HttpStatus 204.
Started PnrProviderServiceApplication in 4.598 seconds (JVM running for
5.564)
Jersey HTTP POST http://localhost:8761/eureka//apps/PNR-PROVIDER-SERVICE
with instance /<IP_ADDRESS>:pnr-provider-service:8052; statusCode=204
DiscoveryClient_PNR-PROVIDER-SERVICE/<IP_ADDRESS>:pnr-provider-
service:8052 - registration status: 204
Continued …
12
Work is Worship
To confirm the registration on discovery server, you can open the discovery
server dashboard in your browser and should be able see registered service
instance/s.
Step 7. Remember we spoke about 2 live instances of PNR service in
difference availability zones.
To try that out, all you need to do is remove server.port line from the
application properties and pass server port as VM argument for each
instance of the pnr-provider-service either using “Run with Configurations”
option in your favorite IDE or “Terminal”(quicker way).
Terminal Commands:
gradle bootRun –Dserver.port=8052 –Dservice.instance.name=P1
gradle bootRun –Dserver.port=8053 –Dservice.instance.name=P2
NOTE: service.instance.name is read in a simple rest controller with a Http GET
end-point “/pnr/{pnrId}”. So that when client service sends request to pnr-
provider-service we’ll know which instance is returning the response.
13
Work is Worship
Step 8. Verify that both the instances of same application are registered
with the discovery server its dashboard.
Sample Link à http://localhost:8051
Note that both the instances of pnr-provider-service (P1 and P2) are
registered with their host and port (8052 and 8053). If these apps are
deployed with any IaaS, then it will appear with complete host-name.
Please ignore AMIs indicator for now because as I’ve explained before
Netflix has built Eureka-Client/Server libraries to support AWS
infrastructure and AMIs indicate AWS availability zone.
Step 9. Discovery server receives heartbeat signals/messages from the
registered applications in every 30 seconds. If doesn’t receive any
heartbeat signal, then it updates dashboard with application down status.
Bring down one of the 2 instances P2 running on 8053 and then we’ll see
updated dashboard.
14
Work is Worship
This indicates out of all registered instances of pnr-provider-service in 2
availability zones 1 of them is DOWN (I didn’t edit the above image with red
color this time).
Step 10. When we have 2 instances for pnr-provider-service - P1 and P2
running on port 8052 and 8053 respectively it’s will be really good for us to
know which instance’s response is received when consuming-client-
service makes a request to the URL returned by discovery-server.
Let’s go ahead and create a very basic rest controller in pnr-provider-
service called PNRController.java which returns deserialized PNR json
object.
Let’s also create a simple PNR model object which will hold basic traveler
data and “instance” parameter which is “service.instance.name” for P1/P2.
15
Work is Worship
Step 11. Run P1 and P2. Test expected API responses as shown below.
16
Work is Worship
Step 12. For detailed log, you can set following 2 flags in the discovery-
server/provider-service/consuming-client-service.
logging.level.com.netflix.eureka=TRACE
logging.level.com.netflix.discovery=TRACE
Step 13. Let’s now similarly register single instance of “user-
authentication-provider-service” (UA1) with the discovery server by
following similar step as we’ve performed before.
17
Work is Worship
3. Setting up Client Service
Client Service can be any entity that is requesting or consuming
services/apis from the provider services. It will generally send requests to
the provider service to continue doing its functional and non-functional
tasks.
Therefore, it’s not mandatory for Client service to register itself with
discovery server unless it’s can also act as a provider-service to some other
dependent service, API or cross platform application.
With this understanding, the client service can be implemented using the
same Netflix Eureka library setup like we did in provider setup or use
Spring’s Discovery client library or just any other mechanism where we
should able to call discovery server with ‘provider-service-name or id’ to
fetch corresponding end-point URL.
Step 1. Let’s quickly create a Client Service using Spring boot and Spring
cloud Eureka client dependencies although we’ll set register-with-eureka
flag to false.
18
Work is Worship
Step 2. Annotate consumer client service main class with
@EnableEurekaClient.
This annotation will enable the consuming service to connect with
discovery-server using the URL in application.properties file.
Step 3. Create a rest controller in consumer client application. Call it
ClientTestController.java
The ClientTestController.java will expose a Http GET end-point “/client”.
We’ll autowire “EurekaClient” instance which provides an interface to
retrieve InstanceInfo, Client Health information and local client data.
API end-point method will invoke request to discovery-server via
EurekaClient to retrieve pnr-provider-service InstanceInfo which contains
destination URL.
This lookup is done using service’s virtual host-name as it appears in the
discovery-server dashboard. For Ex- “PNR-PROVIDER_SERVICE”.
Using retrieved URL, we’ll perform a Http GET call using Spring’s
RestTemplate to the remote pnr-provider-service instance and returns
response body which also returns whether it is instance P1 or P2.
19
Work is Worship
Step 4. You need to have the following properties configured in
application.properties file
Step 4. Run the client application. Open your browser and enter the URL
http://localhost:8055/client. You should be able to see PNR json reponse.
Keeping refreshing the page and you’ll randomly find the instance name
getting switched.
20
Work is Worship
This bring us to the end of Spring Cloud Service Discovery concept.
With this course, we are one step ahead towards becoming a Cloud Native
developer.
If you are aware about 12 Factor principles that governs software /
microservice design, development and delivery, then spring cloud service-
discovery taps most aspects of PROCESSES factor in the 12 factors.
It adds a great value to the orchestration layer and client side route
management.
The Discovery server itself can work operate in distributed and clustered
network. Remember the app property “eureka.client.register-with-eureka”
which makes it possible for an instance of discovery server to be aware
another running instance of discovery server for High-Availability.
Spring cloud ecosystem is vast, but Spring team has made it as easy for us
to understand, quickly bootstrap and implement the components involved in
cloud computing.
Spring Boot, actuator, spring cloud project and spring’s variety of
components can be used to spin up any kind of microservices, RESTful web-
services which are completely compatible with the cloud infrastructure.
Alternatively, I suggest readers to try implementing service discovery using
zookeeper and consul. This help us better understand cloud native solutions
like Pivotal Cloud Foundry.
We’ll catch up again with another article on Spring Cloud series.
Good luck and keep exploring.
i
Cheers!

Spring cloud Service-Discovery

  • 1.
    30-minute guide for learnersand believers Spring Cloud Series Service Discovery Concept This article focuses on Service Registry and Discovery from the series of articles under “Spring cloud application development”. If you are here I presume you have little or basic understanding of Spring Boot framework, microservices, cloud and cloud based terminologies although I’ll try to quickly define again wherever and whenever required. Understanding the necessity of Service Discovery We generally discover those things which are unknown to us and in the world of microservices it’s the address/routes to the microservice that is highly uncertain due to so many reasons including load balancing, high availability, dynamic routing, etc. To understand the need, let’s say you have a deployed a PNR microservice(P1) on a AWS US-East zone and a client application(C1) will request P1 to fetch PNR details. Now during blackout days P1 instance is receiving heavy load. To distribute heavy load, you will spin up another instance(P2) of this microservice in AWS US-West zone. This leads to 2 different URL of the application which C1 is completely unaware of. Now may be C1 is serving request from users across different zones and in this case, C1 is not aware of second route which is pointing to AWS US-West zone.
  • 2.
    2 Work is Worship Inthis situation C1 as a client (front end, backend or a web-service) should be agnostic about PNR service. The fact that PNR service instance is overloaded and new route availability should not be known to C1 because handling multiple routes to multiple instances of PNR services is not the job of consuming client but rather it should still be able to send requests to PNR service and leave it up to SERVICE DISCOVERY to detect new available routes. All that C1 has to do now is to get the route to PNR service for Discovery Server and send the request to the respective route/end- point. What if the consuming client talks to 20 different microservices for example PNR-service, Flight-Availability-service, Reservation- Service, Frequent-Flyer-service, Payment-Service, Loyalty-Program- service, Special-Service-Request-microservice, Cancellation-Service, Identity-Service, Authentication-service, Consumer-service, Velocity- Control-service, Analytics-service and so on and so forth?? If service discovery is not in place and keeping in mind how huge the travel industry is, the Consuming client like C1 will end-up configuring more than 1000 URL in the system. Here Service Discovery is your life- saver. Further you will discover how quickly we can setup a simple Spring Cloud Service Discovery practically if you like to code.
  • 3.
    3 Work is Worship Pre-Requisites- Before we start I prefer readers to be familiar Java 7+, Spring, Spring Boot and bare minimum understanding/exposure to concepts like REST, Microservice and hands-on coding. And/or please do some reading around Spring Boot and Spring cloud eco- system. Tool and Environment setup/requirements – • Java 8 (installed on your system) • Your favorite IDE • Internet to download dependencies Service Discovery in Spring Cloud ecosystem can be implemented using following approaches. • Spring Cloud Consul • Spring Cloud Zookeeper • Spring Cloud Netflix Spring Cloud Netflix mechanism is the simplest way we can setup fully functional service discovery. As the name, itself describes that this module/API was built by Netflix (the online streaming service) called by the name “Eureka”. It was built so that it works seamlessly with AWS infrastructure out-of-box. Basically, Service discovery has 3 main actors. • Discovery Server - acts a service registry • Service Instance/Instances - is the provider service (For Ex. PNR service) • Client Instance/Instances - is any consuming service (For Ex. front end web/mobile application, web-service or any rest client)
  • 4.
    4 Work is Worship Howit works?? • When a new service is brought up and in a healthy state, it will go ahead and register itself on the Discovery Server with a designated service-id. • Whenever any client wants to invoke and API in provider services (like PNR service), client will request discovery server to get the route/end-point of the provider service using the service-id. • Discovery server will then look up URL from its routing table using the service-id. Returns to URL of a suitable healthy instance to the requestor. • Now the Client service will invoke the respective end-point to do its job.
  • 5.
    5 Work is Worship Pleasefollow the steps further as we proceed and I’ll highlight any notable terminologies that you would like to read further. 1. Setting up Discovery server Step 1. Create a new Spring boot application. Quickest way is via Spring Initializer.
  • 6.
    6 Work is Worship Notethat you need to have the following dependencies - • spring-boot-starter-actuator • spring-cloud-starter-netflix-eureka-server • spring-boot-devtools Step 2. Generate project and import in your IDE. Step 3. Try running the spring-boot application and you will a whole lot of errors due to following reasons but don’t worry I’ll explain each one of them. 1. Getting all instance registry info from the eureka server – This is a discovery-server itself, it keeps the instance registry info rather than doesn’t getting that information from elsewhere. 2. DiscoveryClient_DISCOVERY-SERVER/<IP_ADDRESS>: discovery- server:8051 - was unable to refresh its cache! status = Cannot execute request on any known server – Eureka Discovery-server can be setup to work in cluster for high availability. Since we are running a standalone, no-cache based discovery server, we need to disable this feature. 3. DiscoveryClient_DISCOVERY-SERVER//<IP_ADDRESS>: discovery- server:8051: registering service... – The Discovery server is trying to register itself as a providing service instance which receives service requests from clients. This needs to be disabled as well. Continued …
  • 7.
    7 Work is Worship Step4. FIX!! We’ll address all the above 3 issues by setting 2 properties in “application.properties” or “application.yml” file in discovery-service spring-boot application. eureka.client.register-with-eureka=false eureka.client.fetch-registry=false Re-run the application and the application should start without any errors. I recommend to set different server port to avoid port conflicts and also set application name which will be used as “service-id” for discovery server spring.application.name=discovery-server server.port=8051 Step 5. Access the URL http://localhost:8051. You’ll not see anything and that’s because the we have not yet marked this application to act as Eureka Discovery server. Step 6. Important! Add @EnableEurekaServer annotation in the App Configuration class or in the main class (DiscoveryServerApplication.java). Access the URL http://localhost:8051 again and you’ll see Eureka Discovery server dashboard which a suite of the metrics some of which I’ll explain further.
  • 8.
    8 Work is Worship 2.Setting up Provider Service Instances Provider service is that service which receives and process request. Here Provider service is a consumer of Discovery server and has the capability to register and deregisters itself on the discovery server. Like the PNR service which received PNR look lookup request and returns customer journey details in response. And let’s consider the previously discussed situation, like PNR service is deployed on 2 different AWS availability zones. US-East (P1) and US-West (P2). And also, let’s consider there is a “User Authentication service” (UA1) where a user needs to authenticate before proceeding to get personal details in PNR on Client (C1) application. Please follow the steps below to setup the provider service. Step 1. Again, let’s create 2 separate spring boot application for P1-P2 & UA1. We’ll be using the Spring Initializer to create new projects.
  • 9.
    9 Work is Worship Notethat instead of adding “Eureka Server” dependency this time we are adding “Eureka Discovery” dependency to the project. Simply because pnr-provider-service (which represents P1 and P2 in our example) needs to be discovered by the clients. Note that you need to have the following dependencies in the build.gradle/pom.xml - • spring-boot-starter-actuator • spring-cloud-starter-netflix-eureka-client • spring-boot-devtools Let’s go ahead create another application with same dependencies and call it user-authentication-provider-service (which represents UA1in our example). Step 2. Generate project and import both the downloaded projects in your IDE.
  • 10.
    10 Work is Worship Step3. Try running any one application and you will not see any errors because for example pnr-provider-service is not yet trying to register itself on the discovery-server. Step 4. Add an annotation @EnableEurekaClient to mark pnr-provider- service the one that receives requests and needs to be discovered. Now if you try running the application, again you might run into a bunch of errors. 1. com.netflix.discovery.DiscoveryClient : Getting all instance registry info from the eureka server - Here the pnr-provider-service is trying to locate another running instance of itself - for example P1 trying to search for P2, but fails to connect with the discovery server. 2. DiscoveryClient_PNR-PROVIDER-SERVICE/172.20.98.54:pnr-provider- service:8052 - was unable to refresh its cache! status = Cannot execute request on any known server - Results due to un-configured cache since Discovery server URL in not present in application properties. 3. DiscoveryClient_PNR-PROVIDER-SERVICE/172.20.98.54:pnr-provider- service:8052: registering service... DiscoveryClient_PNR-PROVIDER-SERVICE/172.20.98.54:pnr-provider- service:8052 - registration failed Cannot execute request on any known server - This results due to the fact that we have not set Discovery server URL in application properties. pnr-provider-service is trying to register itself but fails
  • 11.
    11 Work is Worship Step5: Add following properties in “application.properties” or yaml. spring.application.name=pnr-provider-service eureka.client.service-url.defaultZone=http://localhost:8051/eureka server.port=8052 Step 6: Start the application and you should be able to see that the application has gracefully started and ready to receive requests. On successful startup and registry, you’ll see the following message with a HttpStatus 204. Started PnrProviderServiceApplication in 4.598 seconds (JVM running for 5.564) Jersey HTTP POST http://localhost:8761/eureka//apps/PNR-PROVIDER-SERVICE with instance /<IP_ADDRESS>:pnr-provider-service:8052; statusCode=204 DiscoveryClient_PNR-PROVIDER-SERVICE/<IP_ADDRESS>:pnr-provider- service:8052 - registration status: 204 Continued …
  • 12.
    12 Work is Worship Toconfirm the registration on discovery server, you can open the discovery server dashboard in your browser and should be able see registered service instance/s. Step 7. Remember we spoke about 2 live instances of PNR service in difference availability zones. To try that out, all you need to do is remove server.port line from the application properties and pass server port as VM argument for each instance of the pnr-provider-service either using “Run with Configurations” option in your favorite IDE or “Terminal”(quicker way). Terminal Commands: gradle bootRun –Dserver.port=8052 –Dservice.instance.name=P1 gradle bootRun –Dserver.port=8053 –Dservice.instance.name=P2 NOTE: service.instance.name is read in a simple rest controller with a Http GET end-point “/pnr/{pnrId}”. So that when client service sends request to pnr- provider-service we’ll know which instance is returning the response.
  • 13.
    13 Work is Worship Step8. Verify that both the instances of same application are registered with the discovery server its dashboard. Sample Link à http://localhost:8051 Note that both the instances of pnr-provider-service (P1 and P2) are registered with their host and port (8052 and 8053). If these apps are deployed with any IaaS, then it will appear with complete host-name. Please ignore AMIs indicator for now because as I’ve explained before Netflix has built Eureka-Client/Server libraries to support AWS infrastructure and AMIs indicate AWS availability zone. Step 9. Discovery server receives heartbeat signals/messages from the registered applications in every 30 seconds. If doesn’t receive any heartbeat signal, then it updates dashboard with application down status. Bring down one of the 2 instances P2 running on 8053 and then we’ll see updated dashboard.
  • 14.
    14 Work is Worship Thisindicates out of all registered instances of pnr-provider-service in 2 availability zones 1 of them is DOWN (I didn’t edit the above image with red color this time). Step 10. When we have 2 instances for pnr-provider-service - P1 and P2 running on port 8052 and 8053 respectively it’s will be really good for us to know which instance’s response is received when consuming-client- service makes a request to the URL returned by discovery-server. Let’s go ahead and create a very basic rest controller in pnr-provider- service called PNRController.java which returns deserialized PNR json object. Let’s also create a simple PNR model object which will hold basic traveler data and “instance” parameter which is “service.instance.name” for P1/P2.
  • 15.
    15 Work is Worship Step11. Run P1 and P2. Test expected API responses as shown below.
  • 16.
    16 Work is Worship Step12. For detailed log, you can set following 2 flags in the discovery- server/provider-service/consuming-client-service. logging.level.com.netflix.eureka=TRACE logging.level.com.netflix.discovery=TRACE Step 13. Let’s now similarly register single instance of “user- authentication-provider-service” (UA1) with the discovery server by following similar step as we’ve performed before.
  • 17.
    17 Work is Worship 3.Setting up Client Service Client Service can be any entity that is requesting or consuming services/apis from the provider services. It will generally send requests to the provider service to continue doing its functional and non-functional tasks. Therefore, it’s not mandatory for Client service to register itself with discovery server unless it’s can also act as a provider-service to some other dependent service, API or cross platform application. With this understanding, the client service can be implemented using the same Netflix Eureka library setup like we did in provider setup or use Spring’s Discovery client library or just any other mechanism where we should able to call discovery server with ‘provider-service-name or id’ to fetch corresponding end-point URL. Step 1. Let’s quickly create a Client Service using Spring boot and Spring cloud Eureka client dependencies although we’ll set register-with-eureka flag to false.
  • 18.
    18 Work is Worship Step2. Annotate consumer client service main class with @EnableEurekaClient. This annotation will enable the consuming service to connect with discovery-server using the URL in application.properties file. Step 3. Create a rest controller in consumer client application. Call it ClientTestController.java The ClientTestController.java will expose a Http GET end-point “/client”. We’ll autowire “EurekaClient” instance which provides an interface to retrieve InstanceInfo, Client Health information and local client data. API end-point method will invoke request to discovery-server via EurekaClient to retrieve pnr-provider-service InstanceInfo which contains destination URL. This lookup is done using service’s virtual host-name as it appears in the discovery-server dashboard. For Ex- “PNR-PROVIDER_SERVICE”. Using retrieved URL, we’ll perform a Http GET call using Spring’s RestTemplate to the remote pnr-provider-service instance and returns response body which also returns whether it is instance P1 or P2.
  • 19.
    19 Work is Worship Step4. You need to have the following properties configured in application.properties file Step 4. Run the client application. Open your browser and enter the URL http://localhost:8055/client. You should be able to see PNR json reponse. Keeping refreshing the page and you’ll randomly find the instance name getting switched.
  • 20.
    20 Work is Worship Thisbring us to the end of Spring Cloud Service Discovery concept. With this course, we are one step ahead towards becoming a Cloud Native developer. If you are aware about 12 Factor principles that governs software / microservice design, development and delivery, then spring cloud service- discovery taps most aspects of PROCESSES factor in the 12 factors. It adds a great value to the orchestration layer and client side route management. The Discovery server itself can work operate in distributed and clustered network. Remember the app property “eureka.client.register-with-eureka” which makes it possible for an instance of discovery server to be aware another running instance of discovery server for High-Availability. Spring cloud ecosystem is vast, but Spring team has made it as easy for us to understand, quickly bootstrap and implement the components involved in cloud computing. Spring Boot, actuator, spring cloud project and spring’s variety of components can be used to spin up any kind of microservices, RESTful web- services which are completely compatible with the cloud infrastructure. Alternatively, I suggest readers to try implementing service discovery using zookeeper and consul. This help us better understand cloud native solutions like Pivotal Cloud Foundry. We’ll catch up again with another article on Spring Cloud series. Good luck and keep exploring. i Cheers!