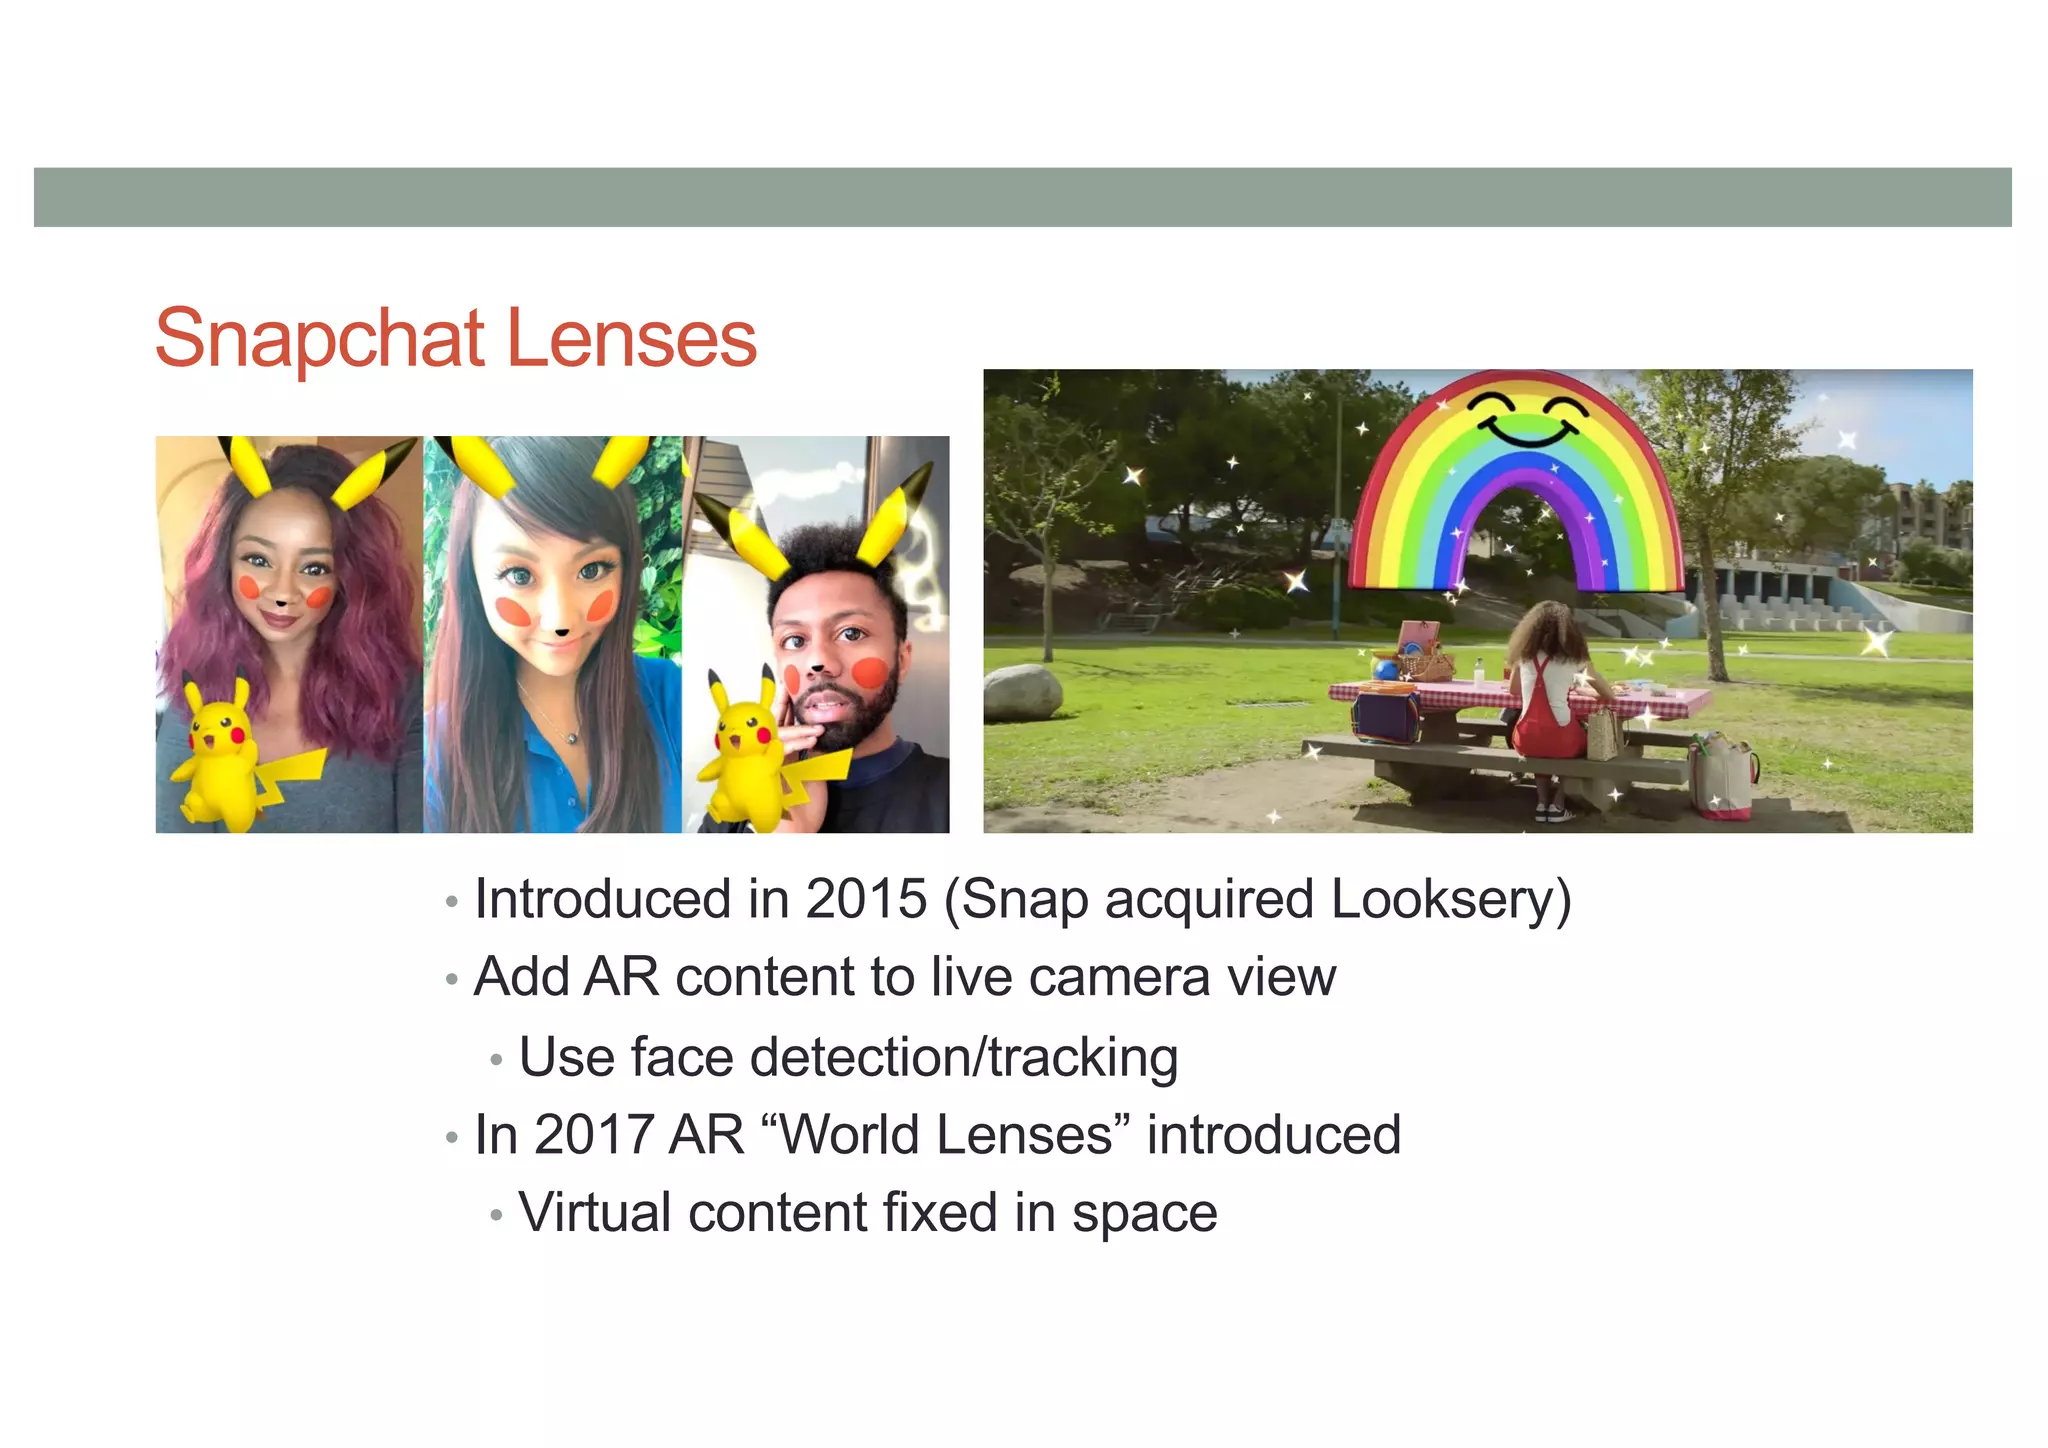
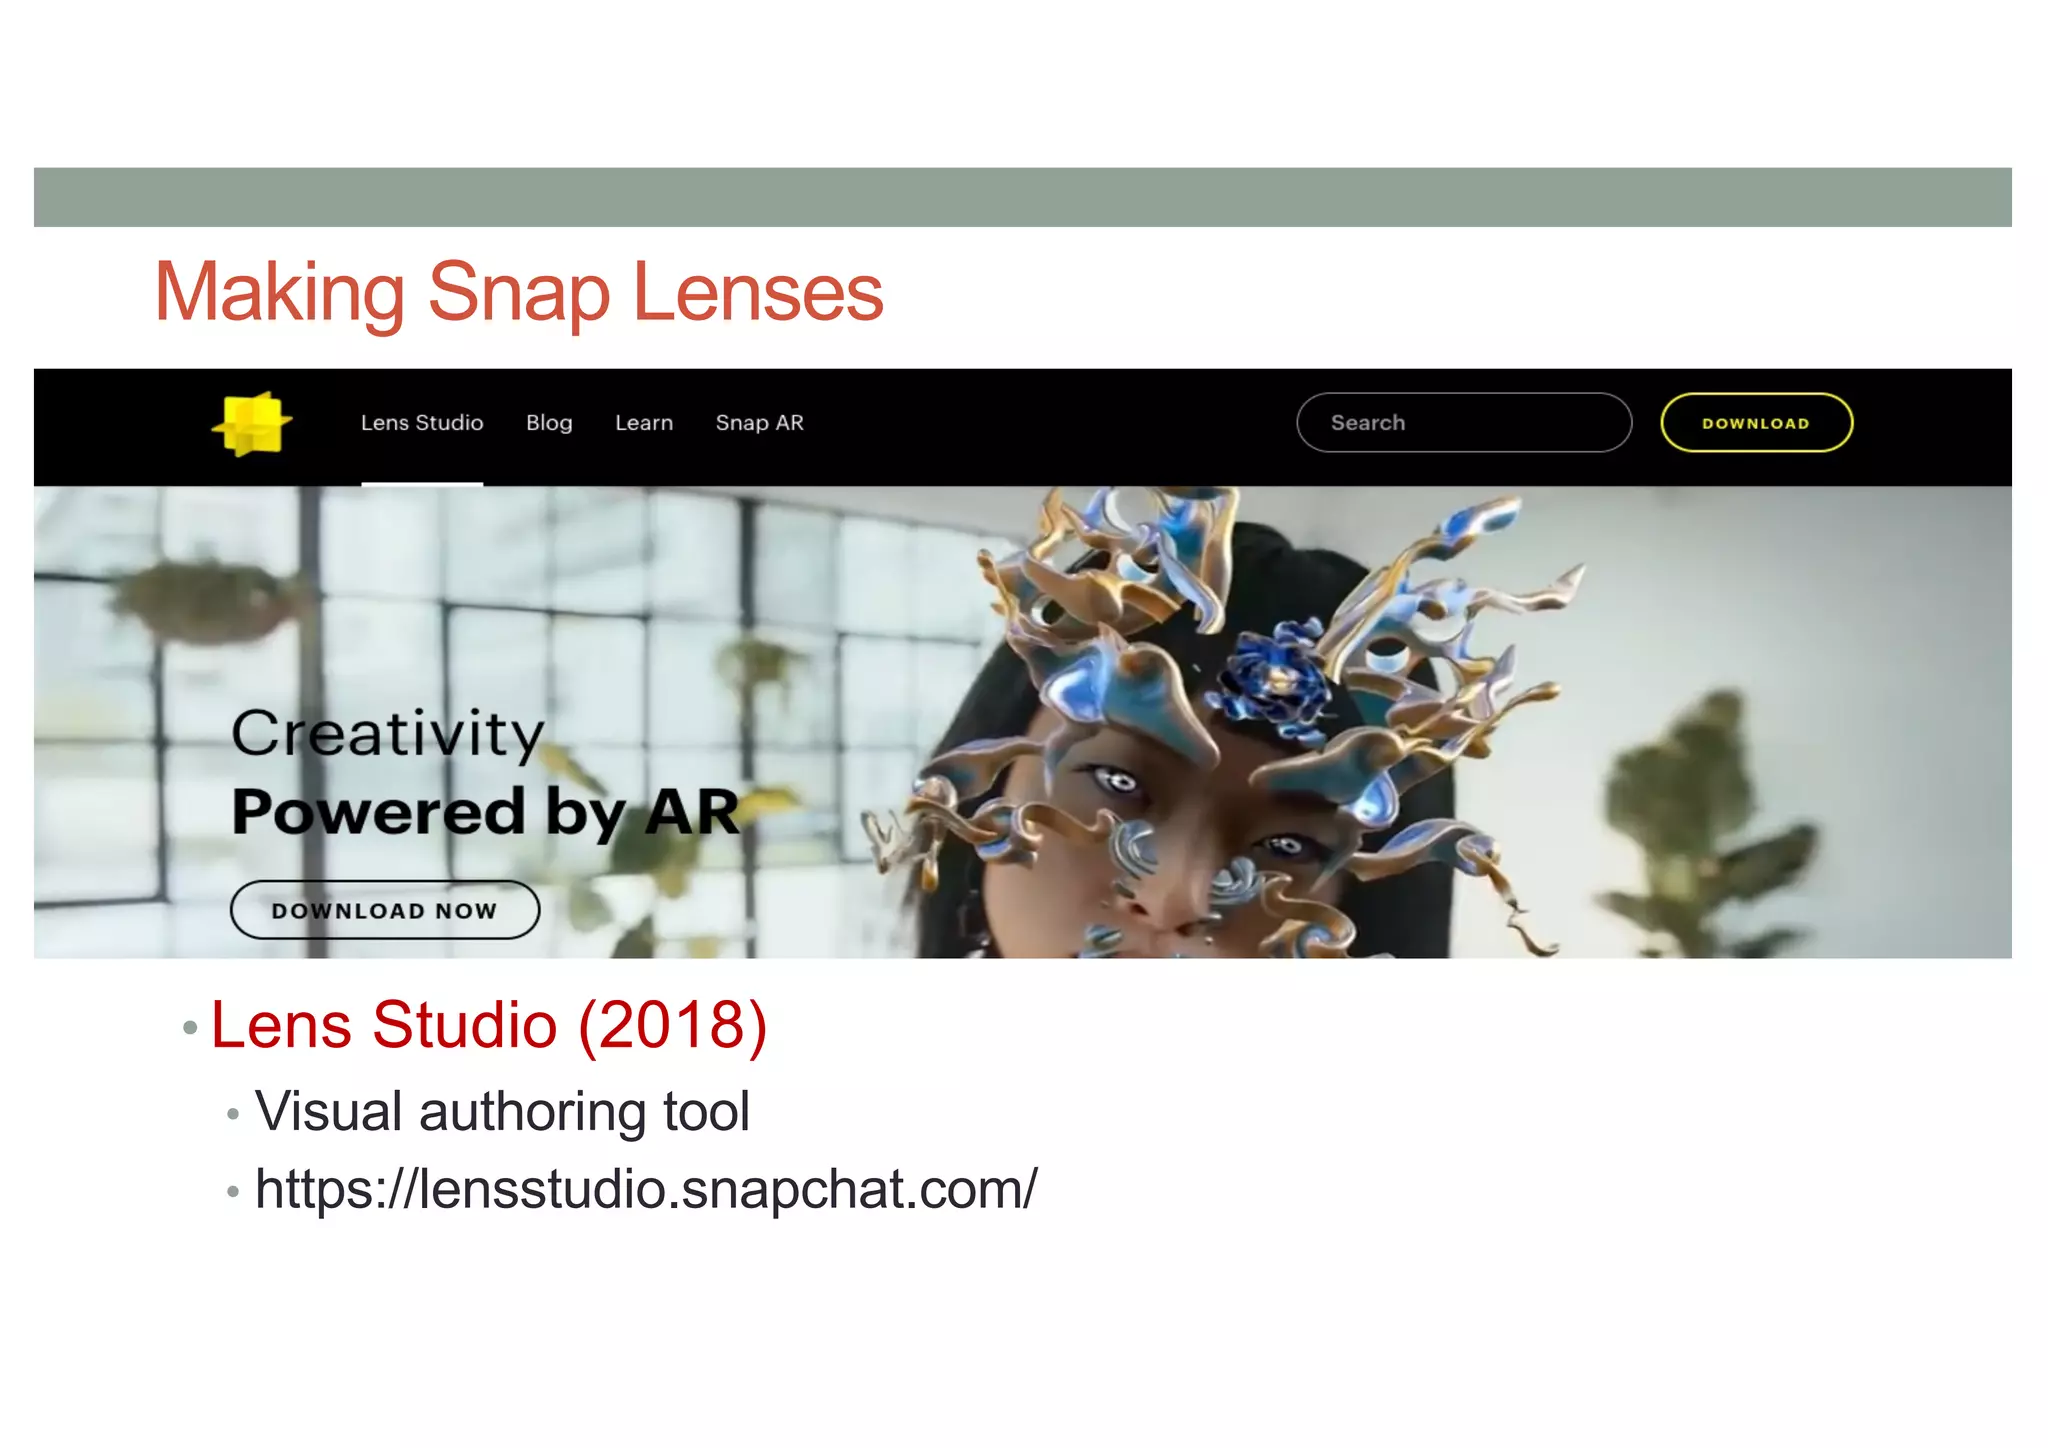
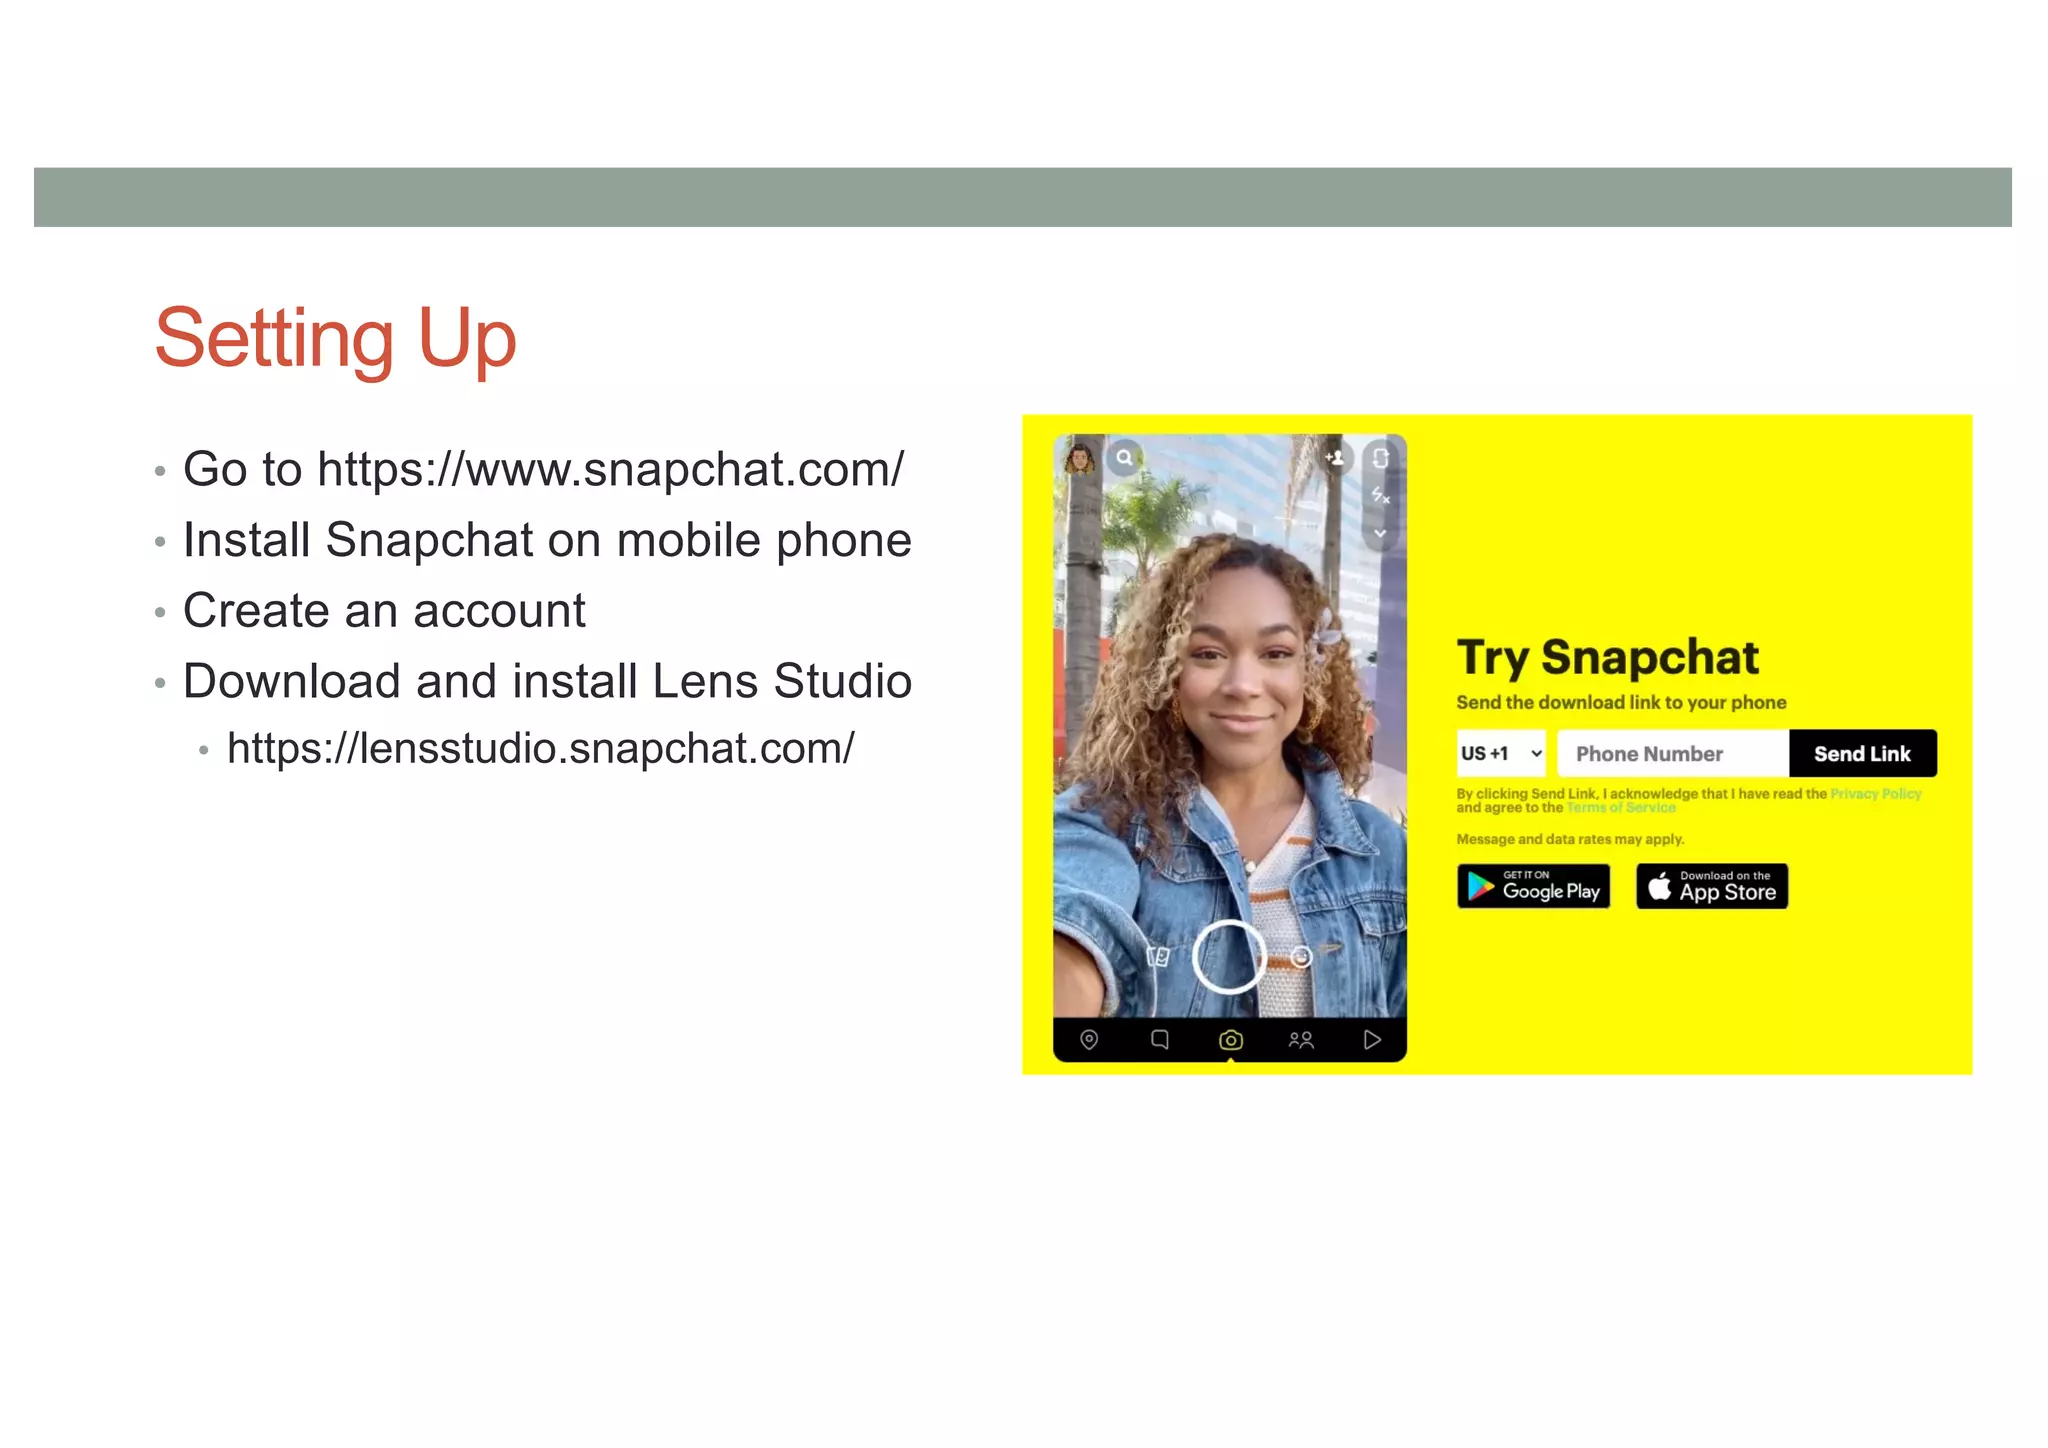
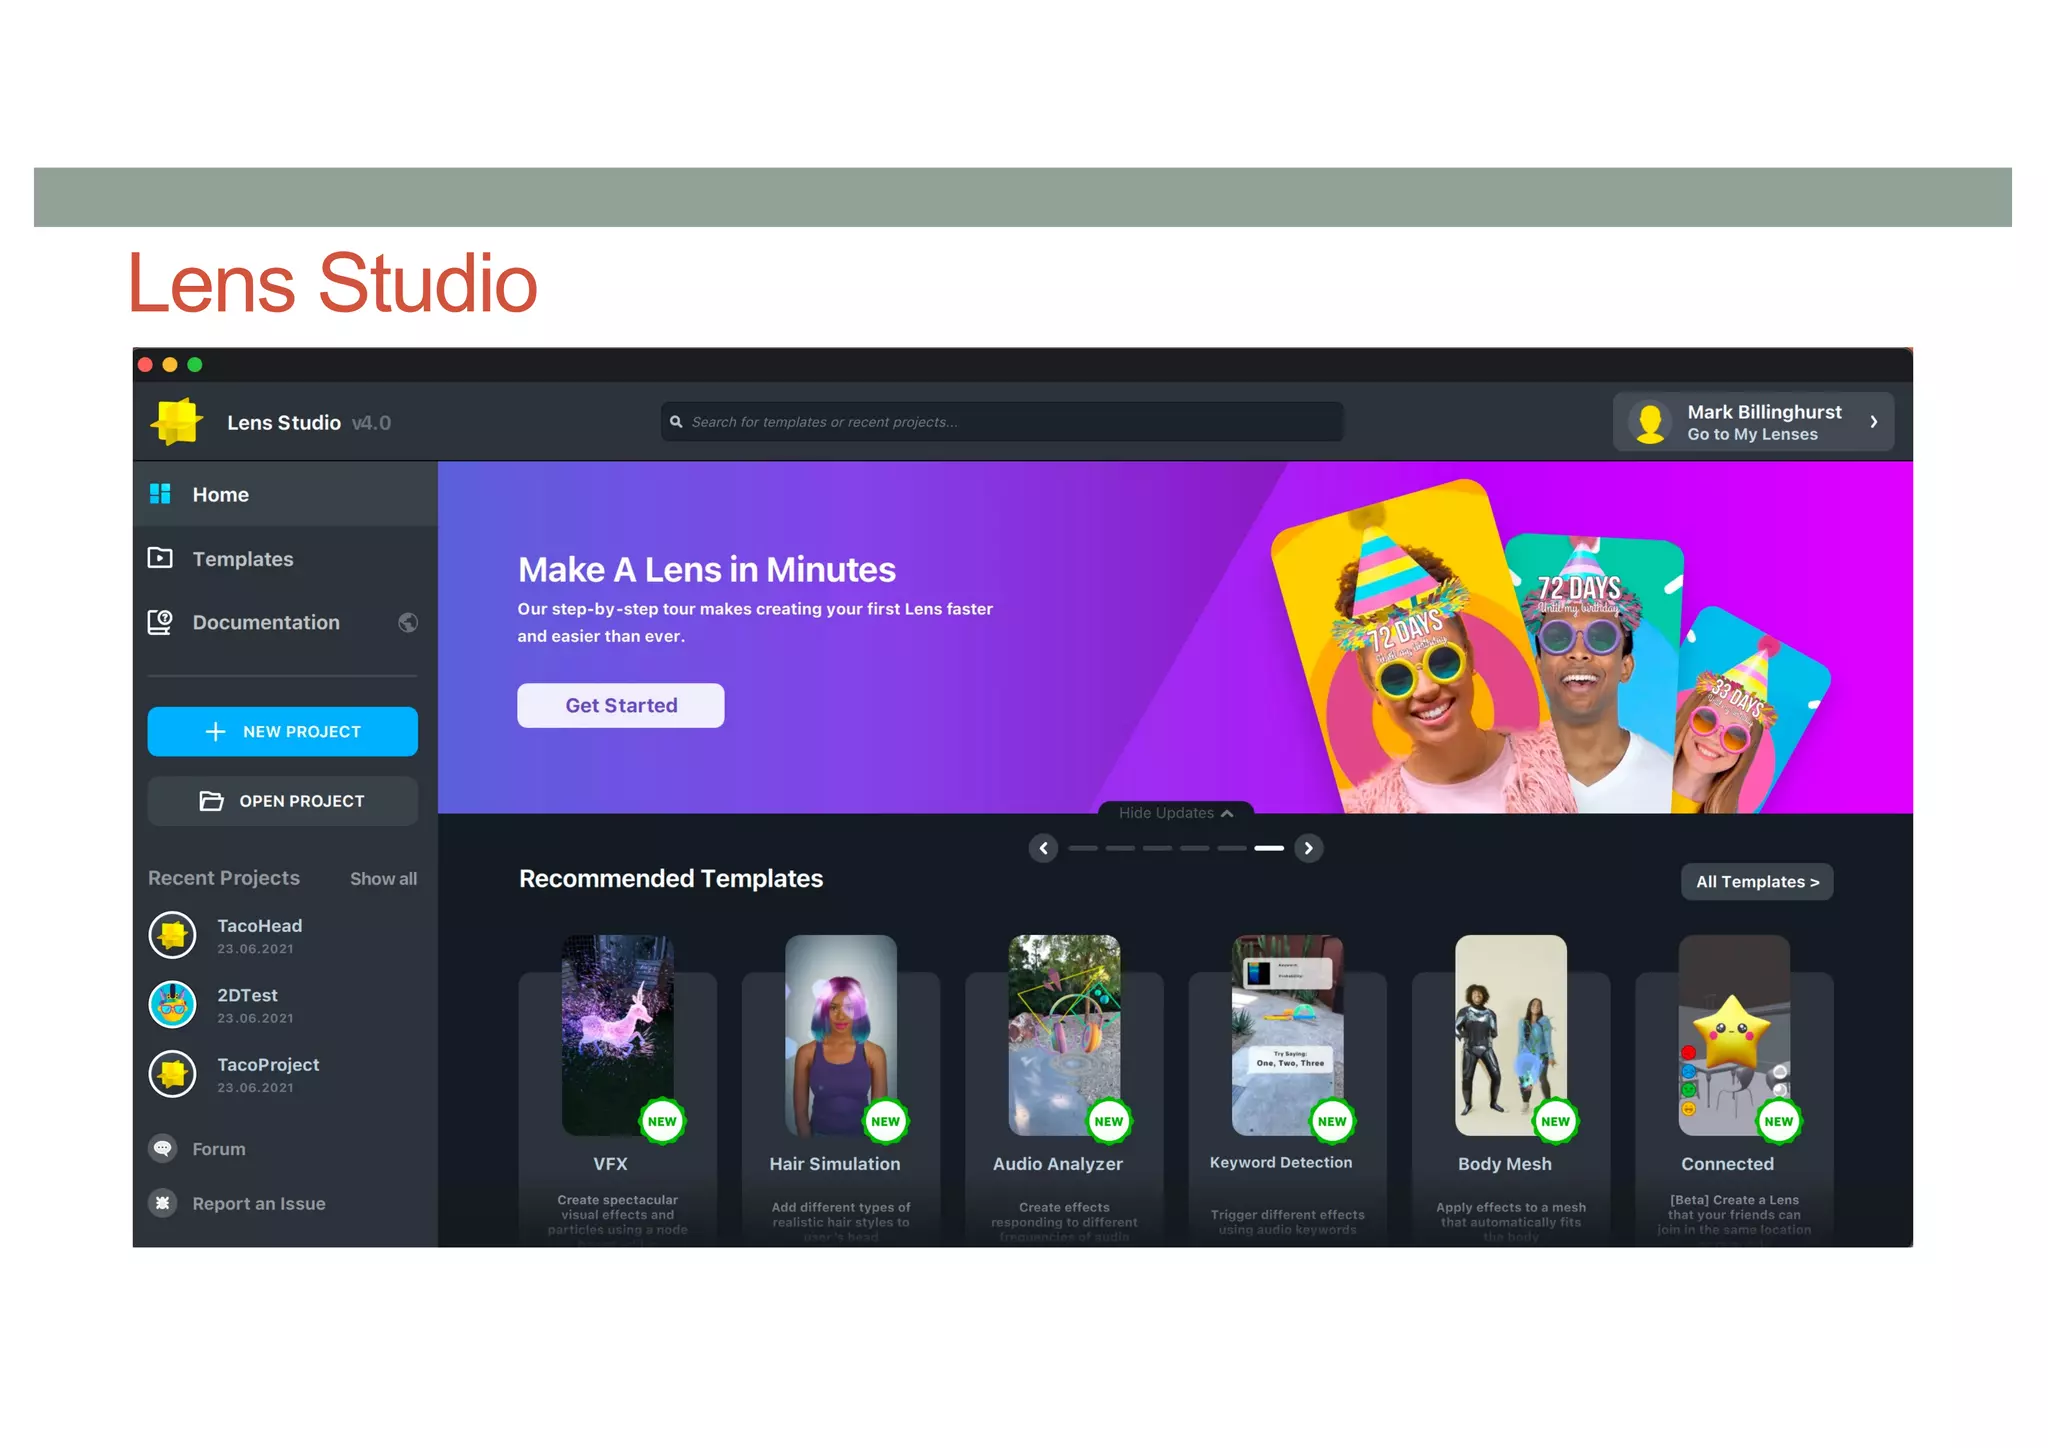
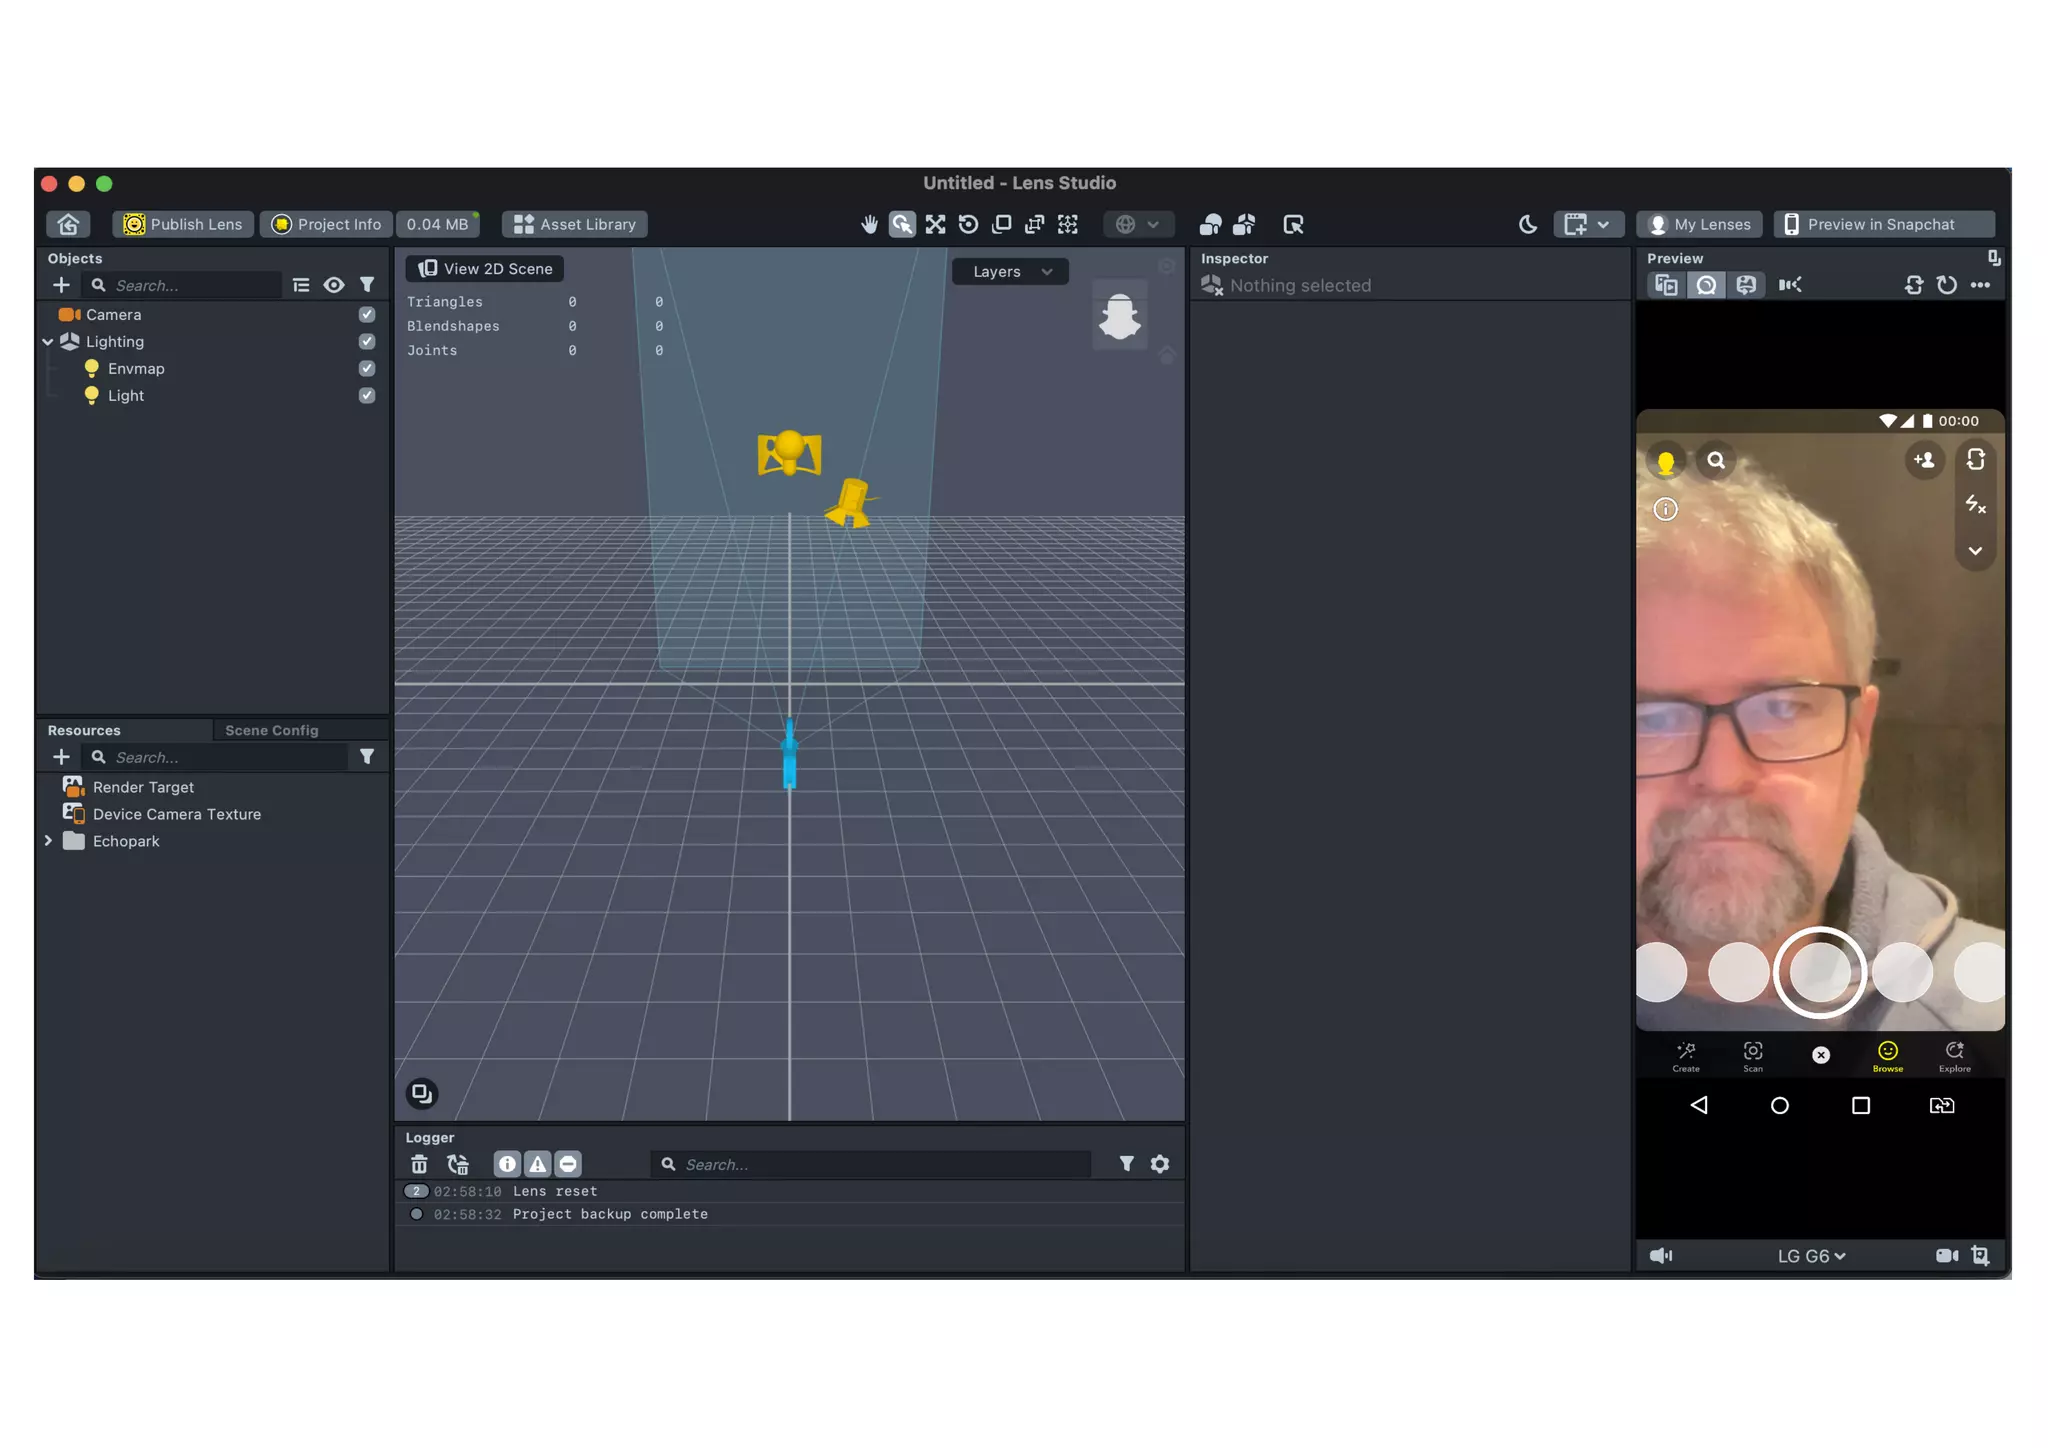
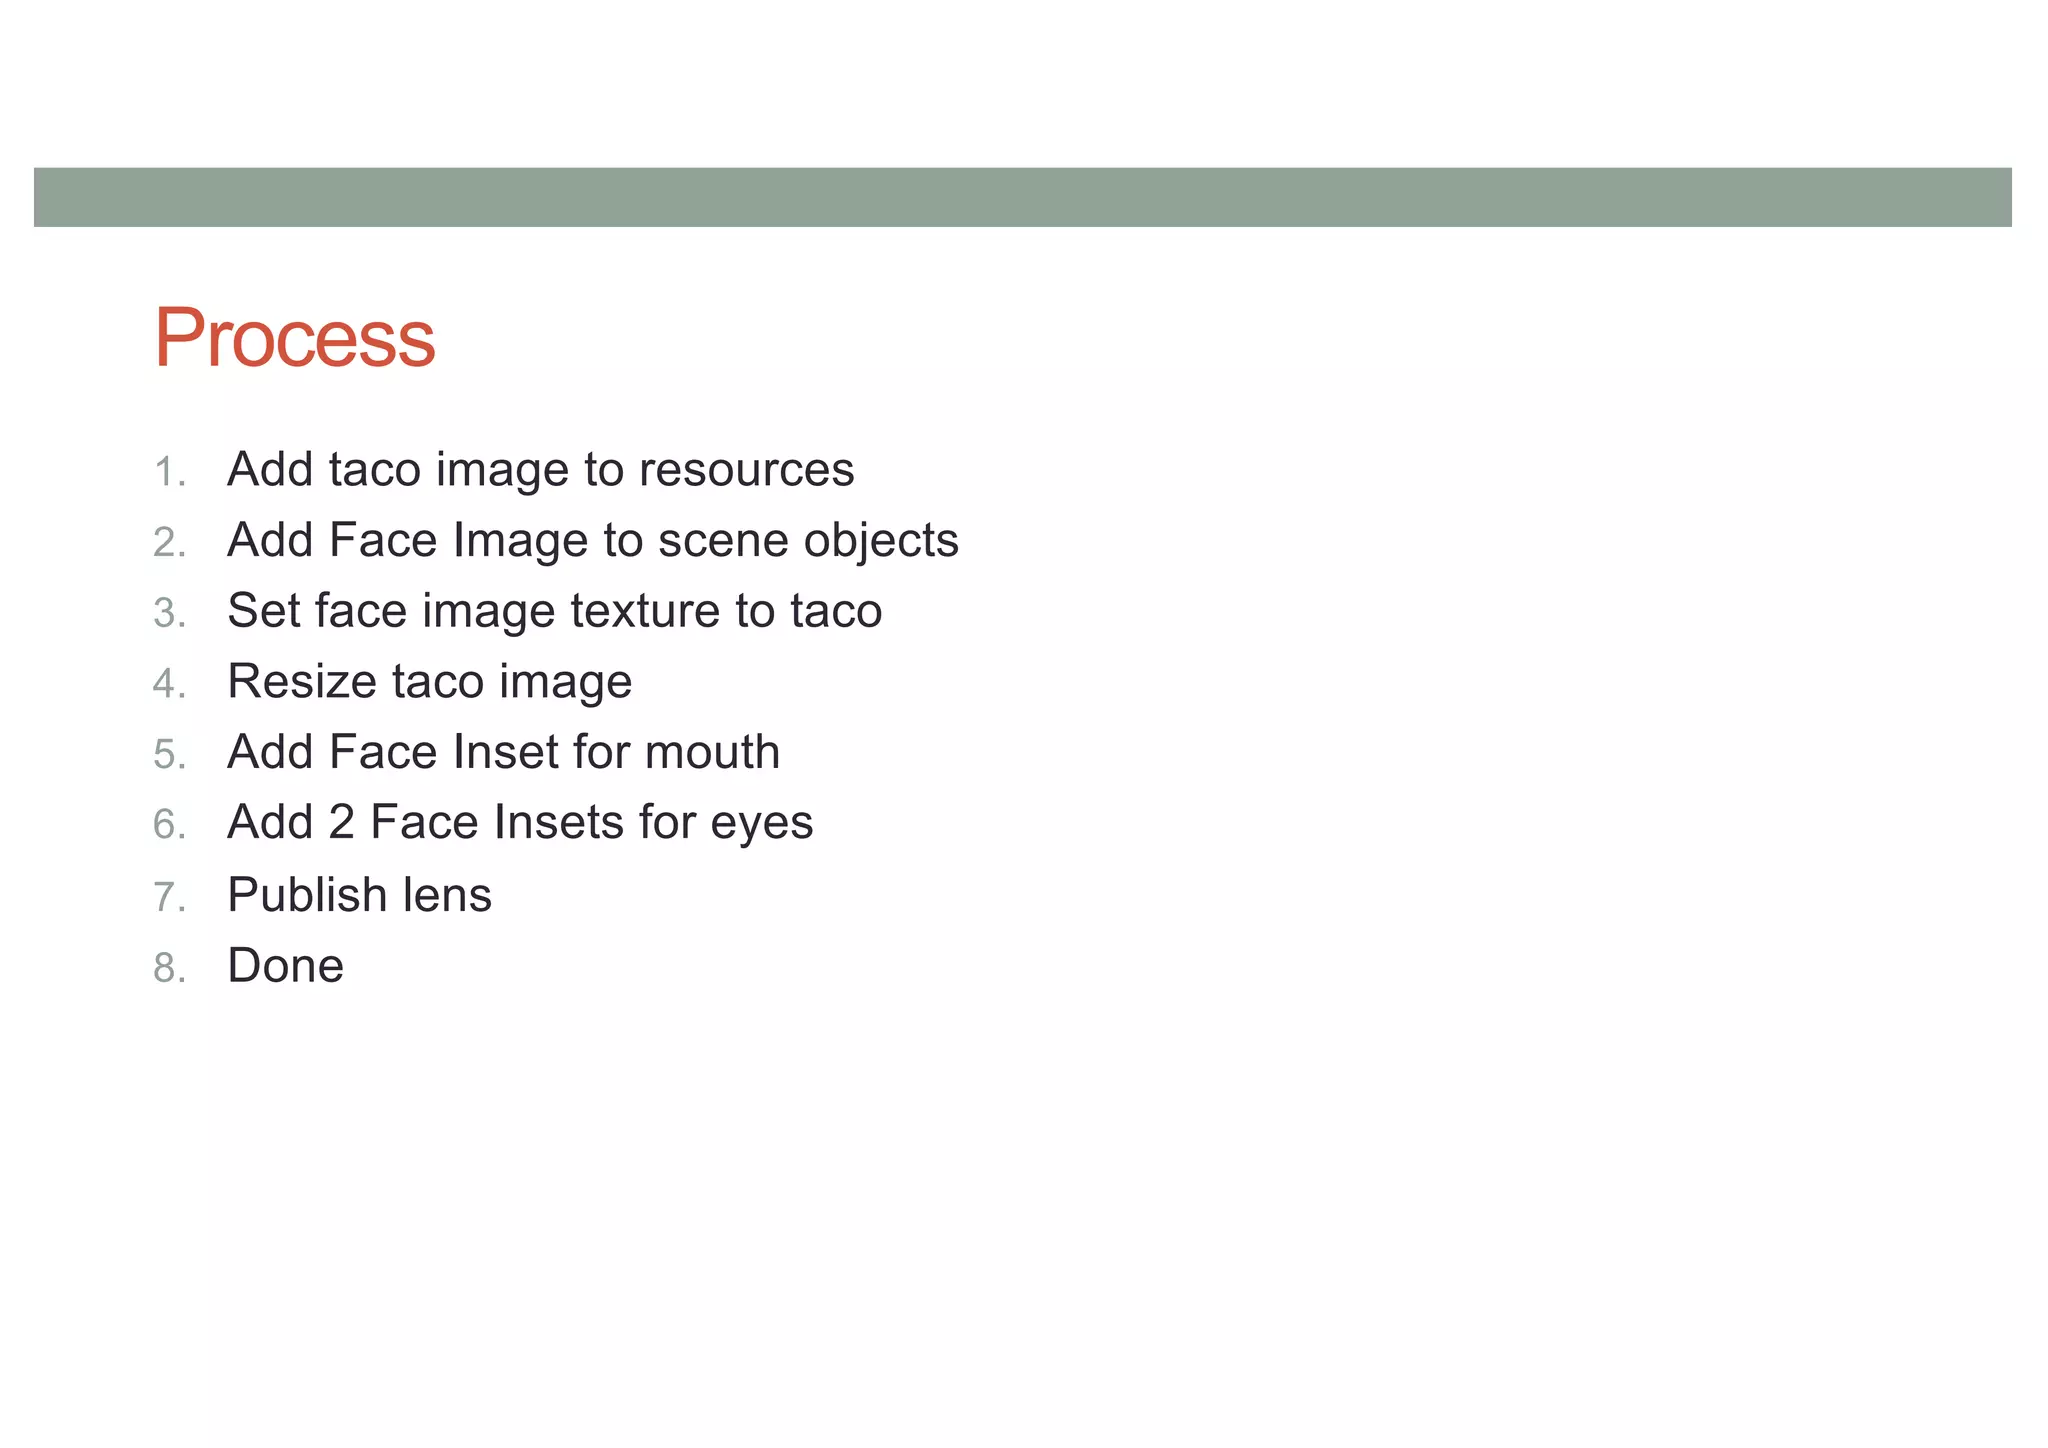
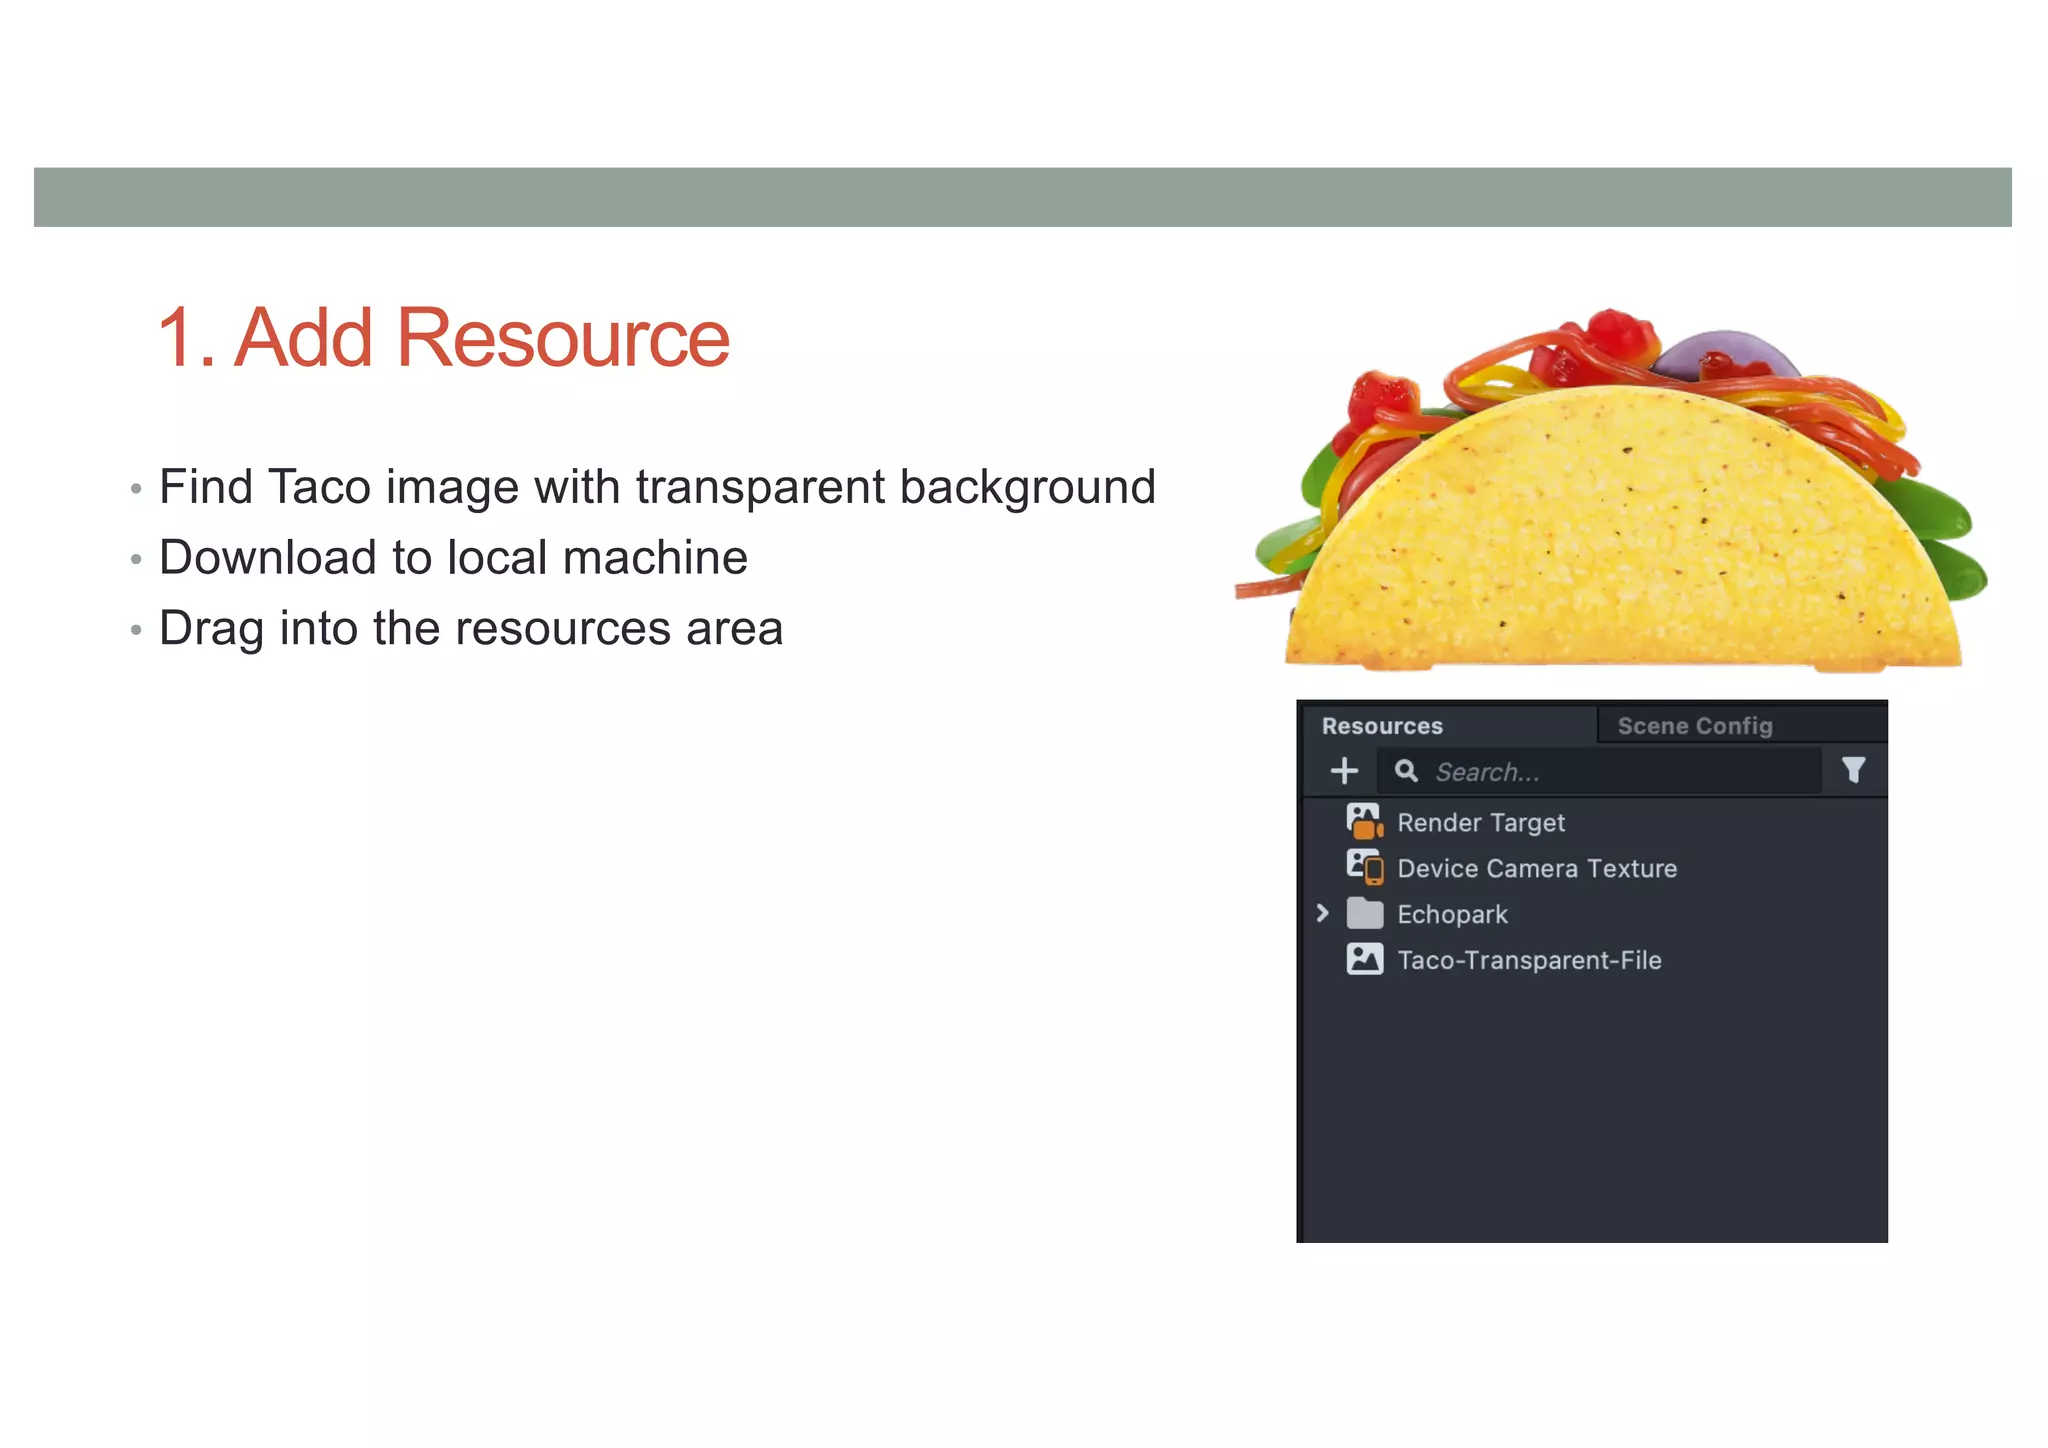
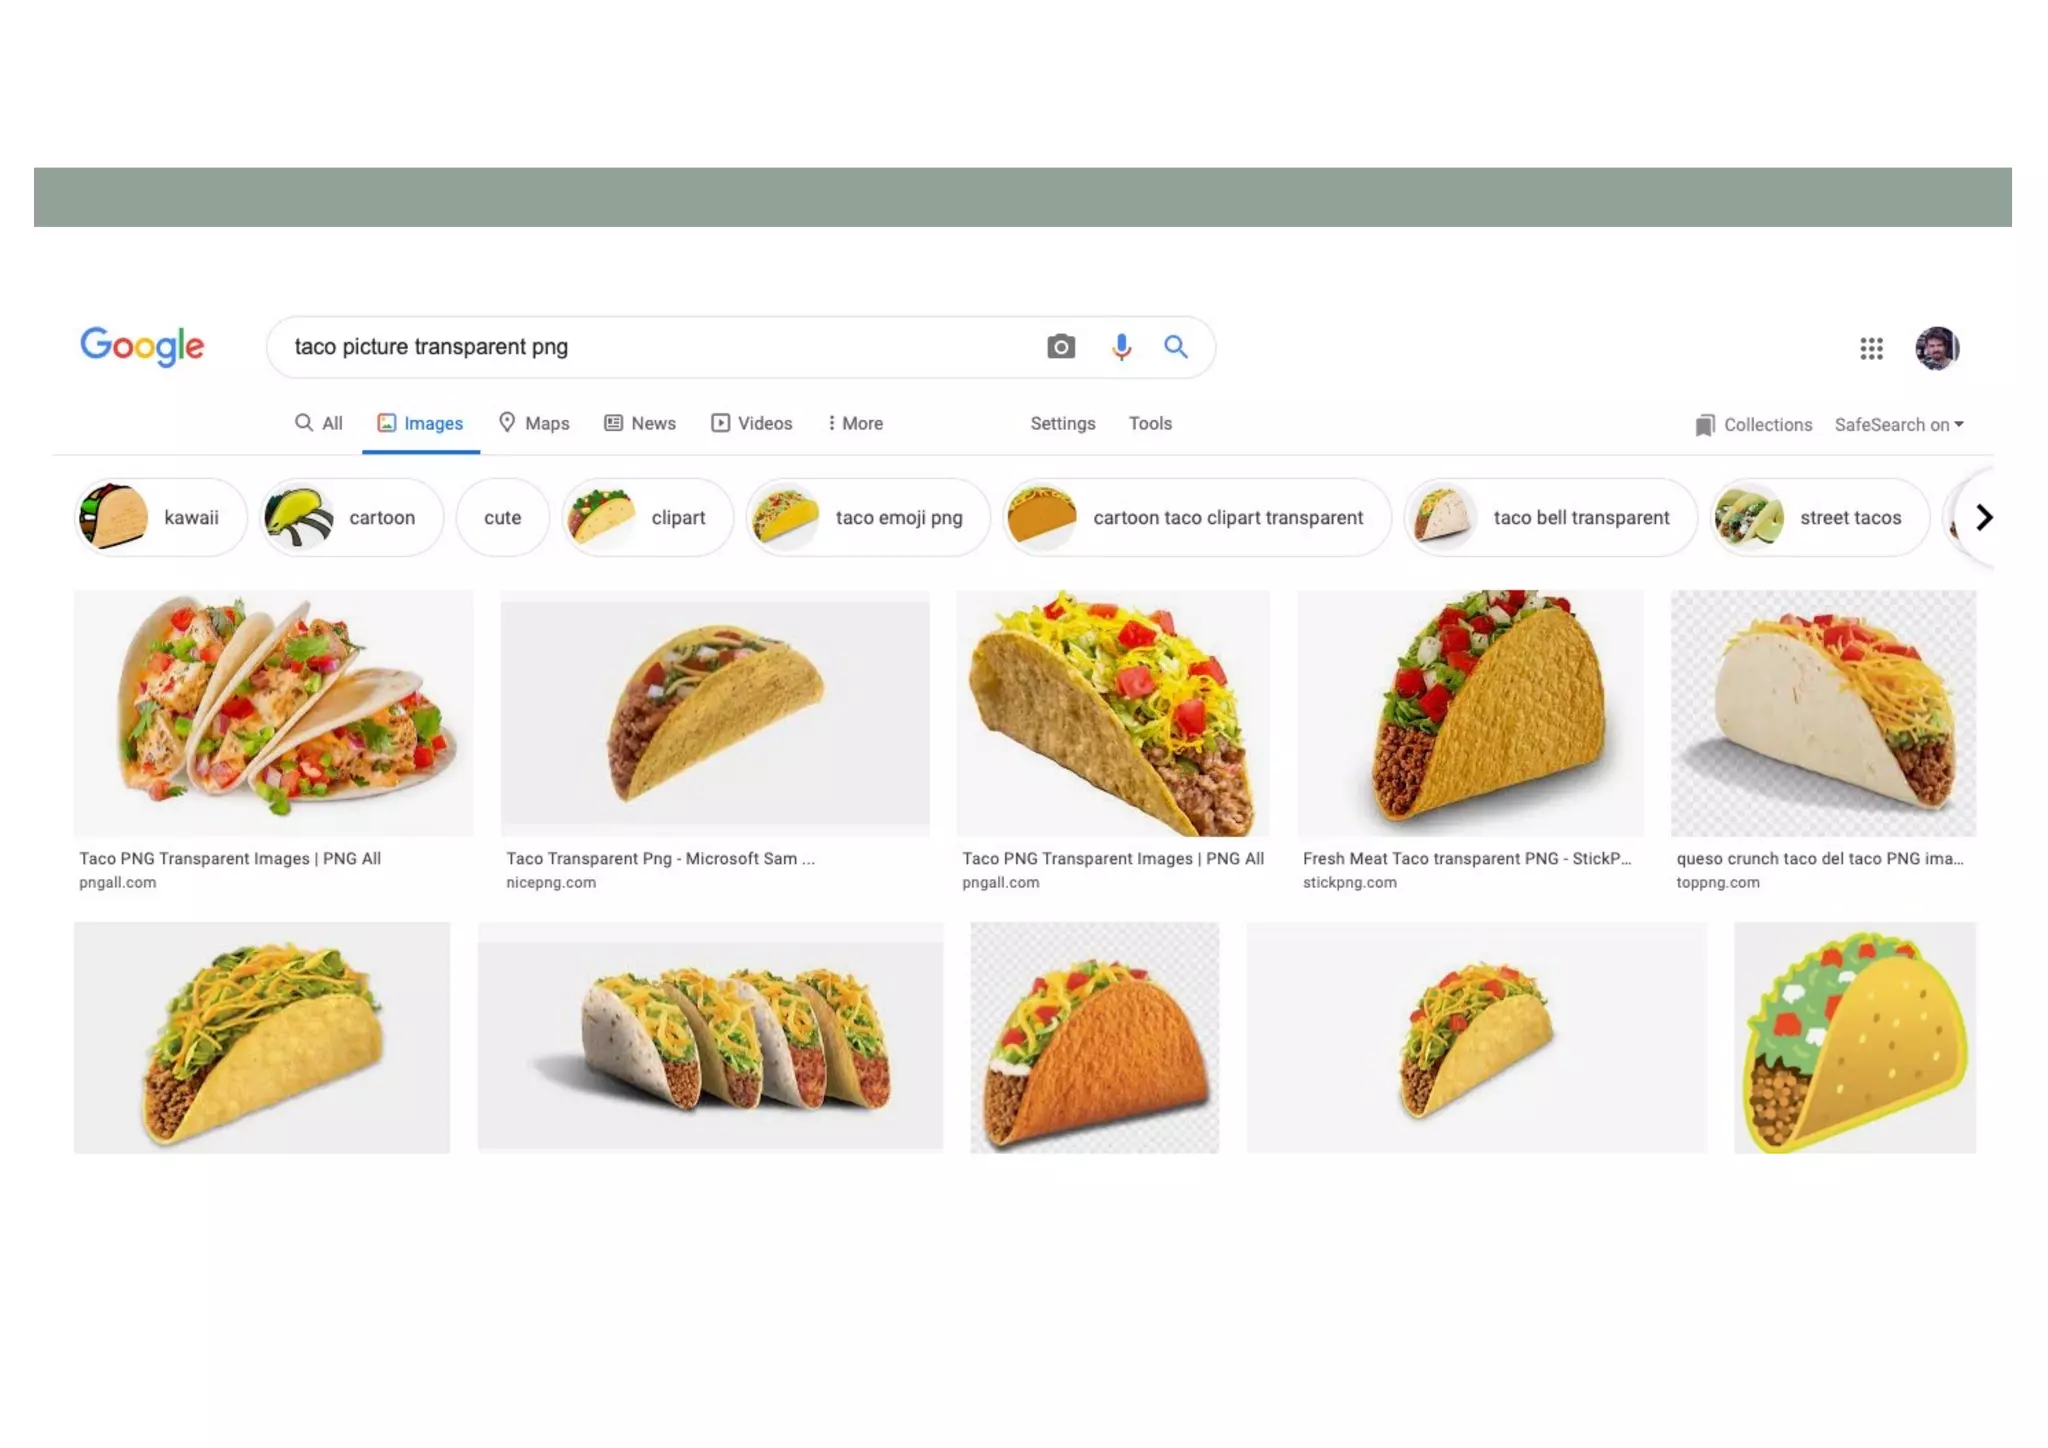
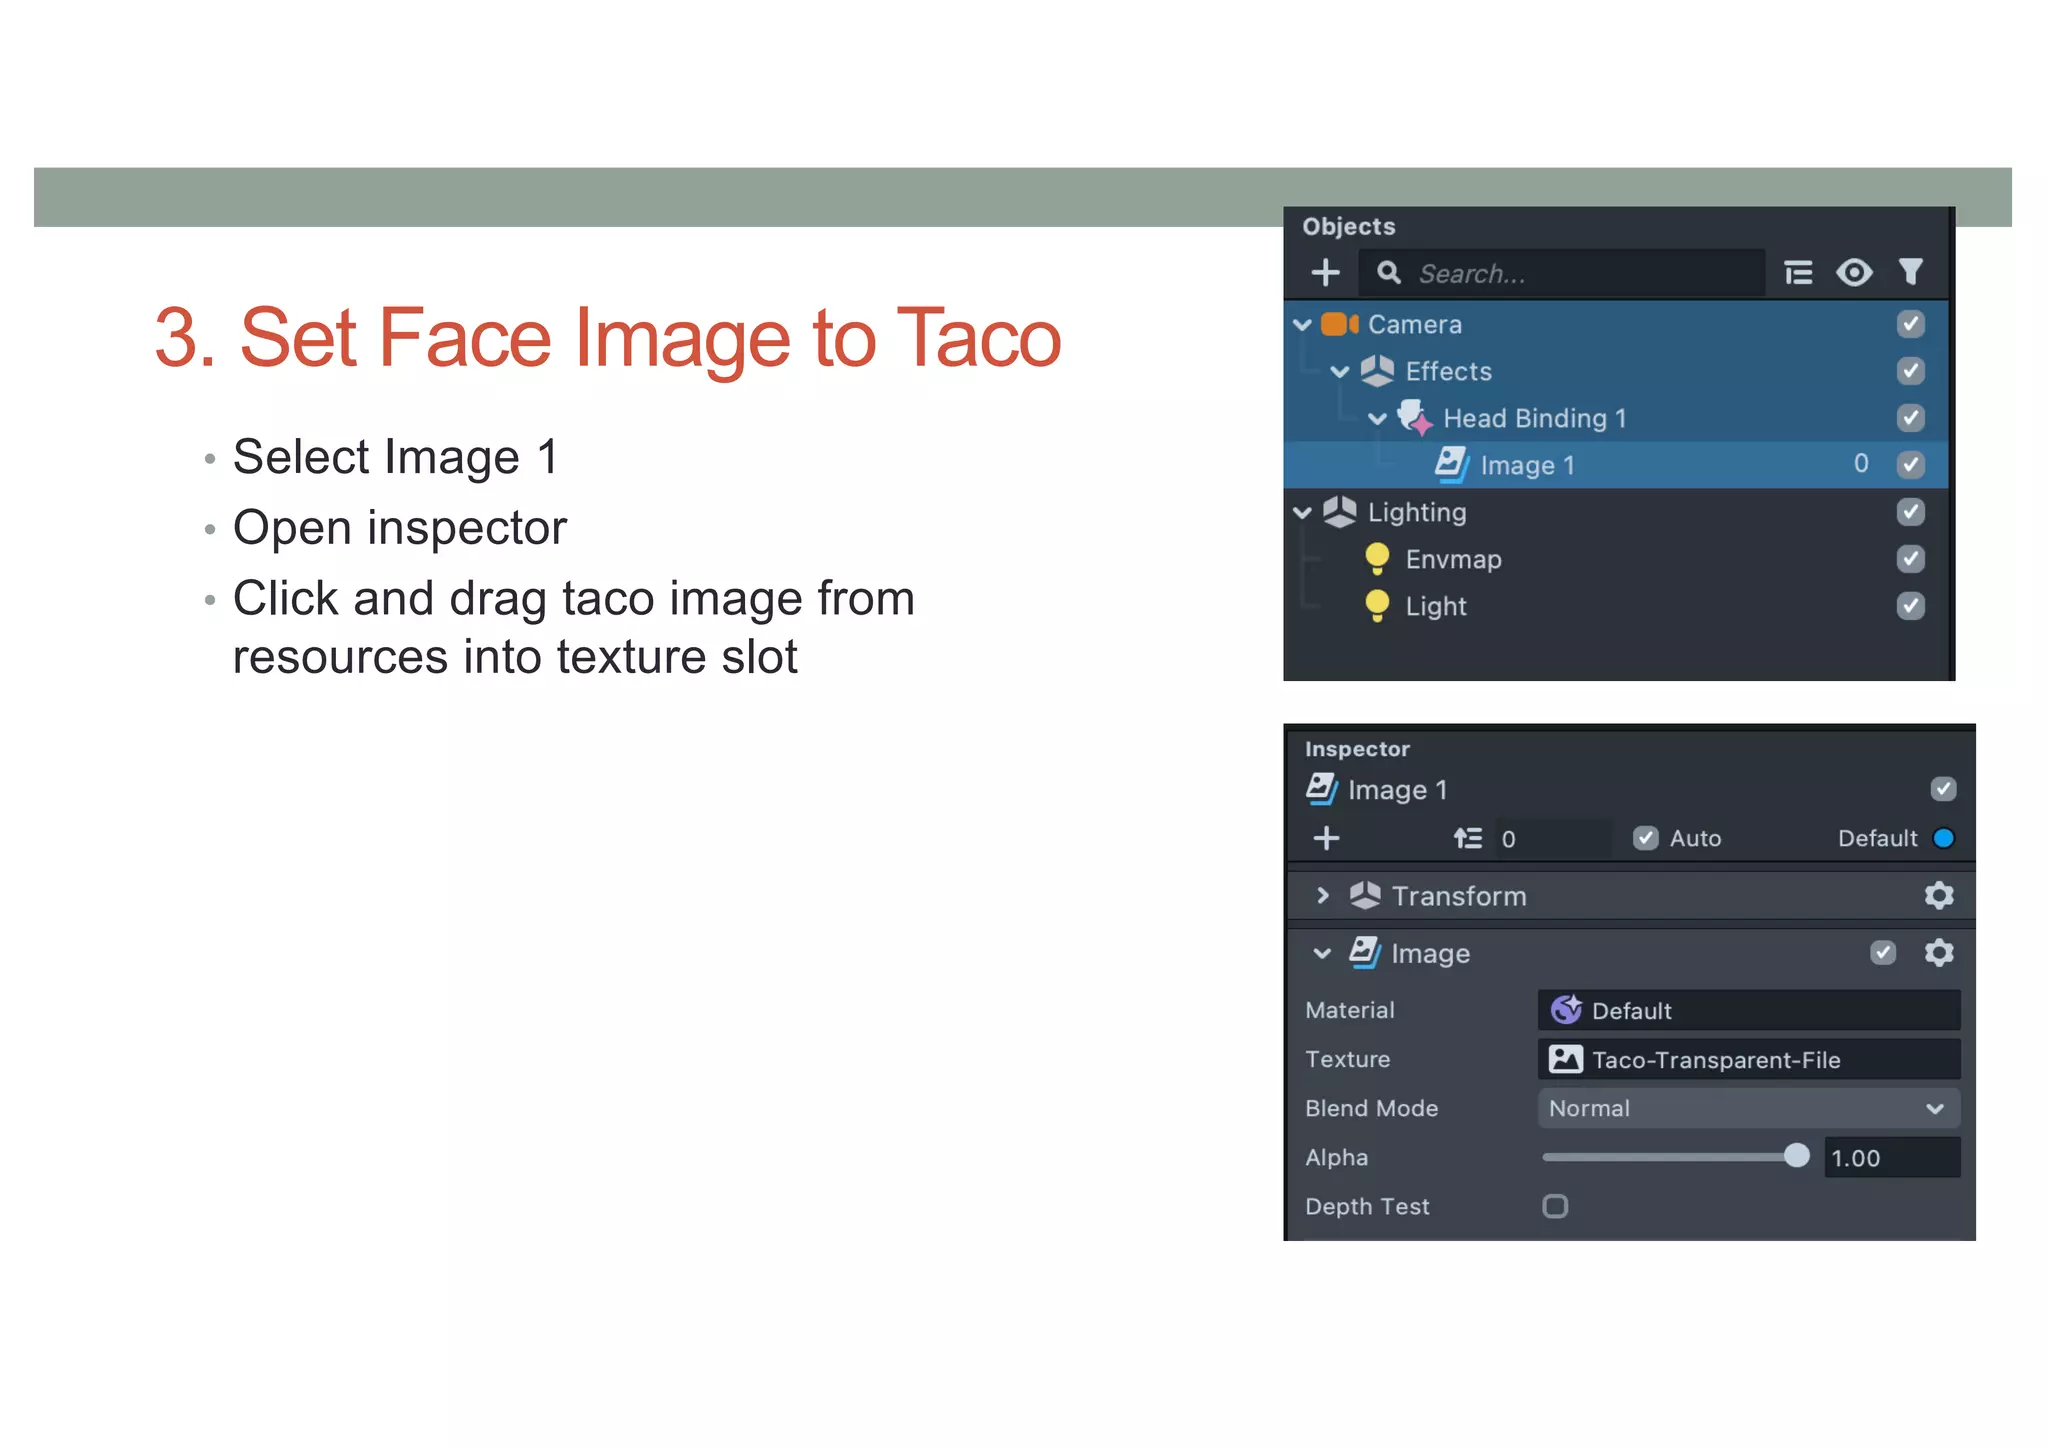
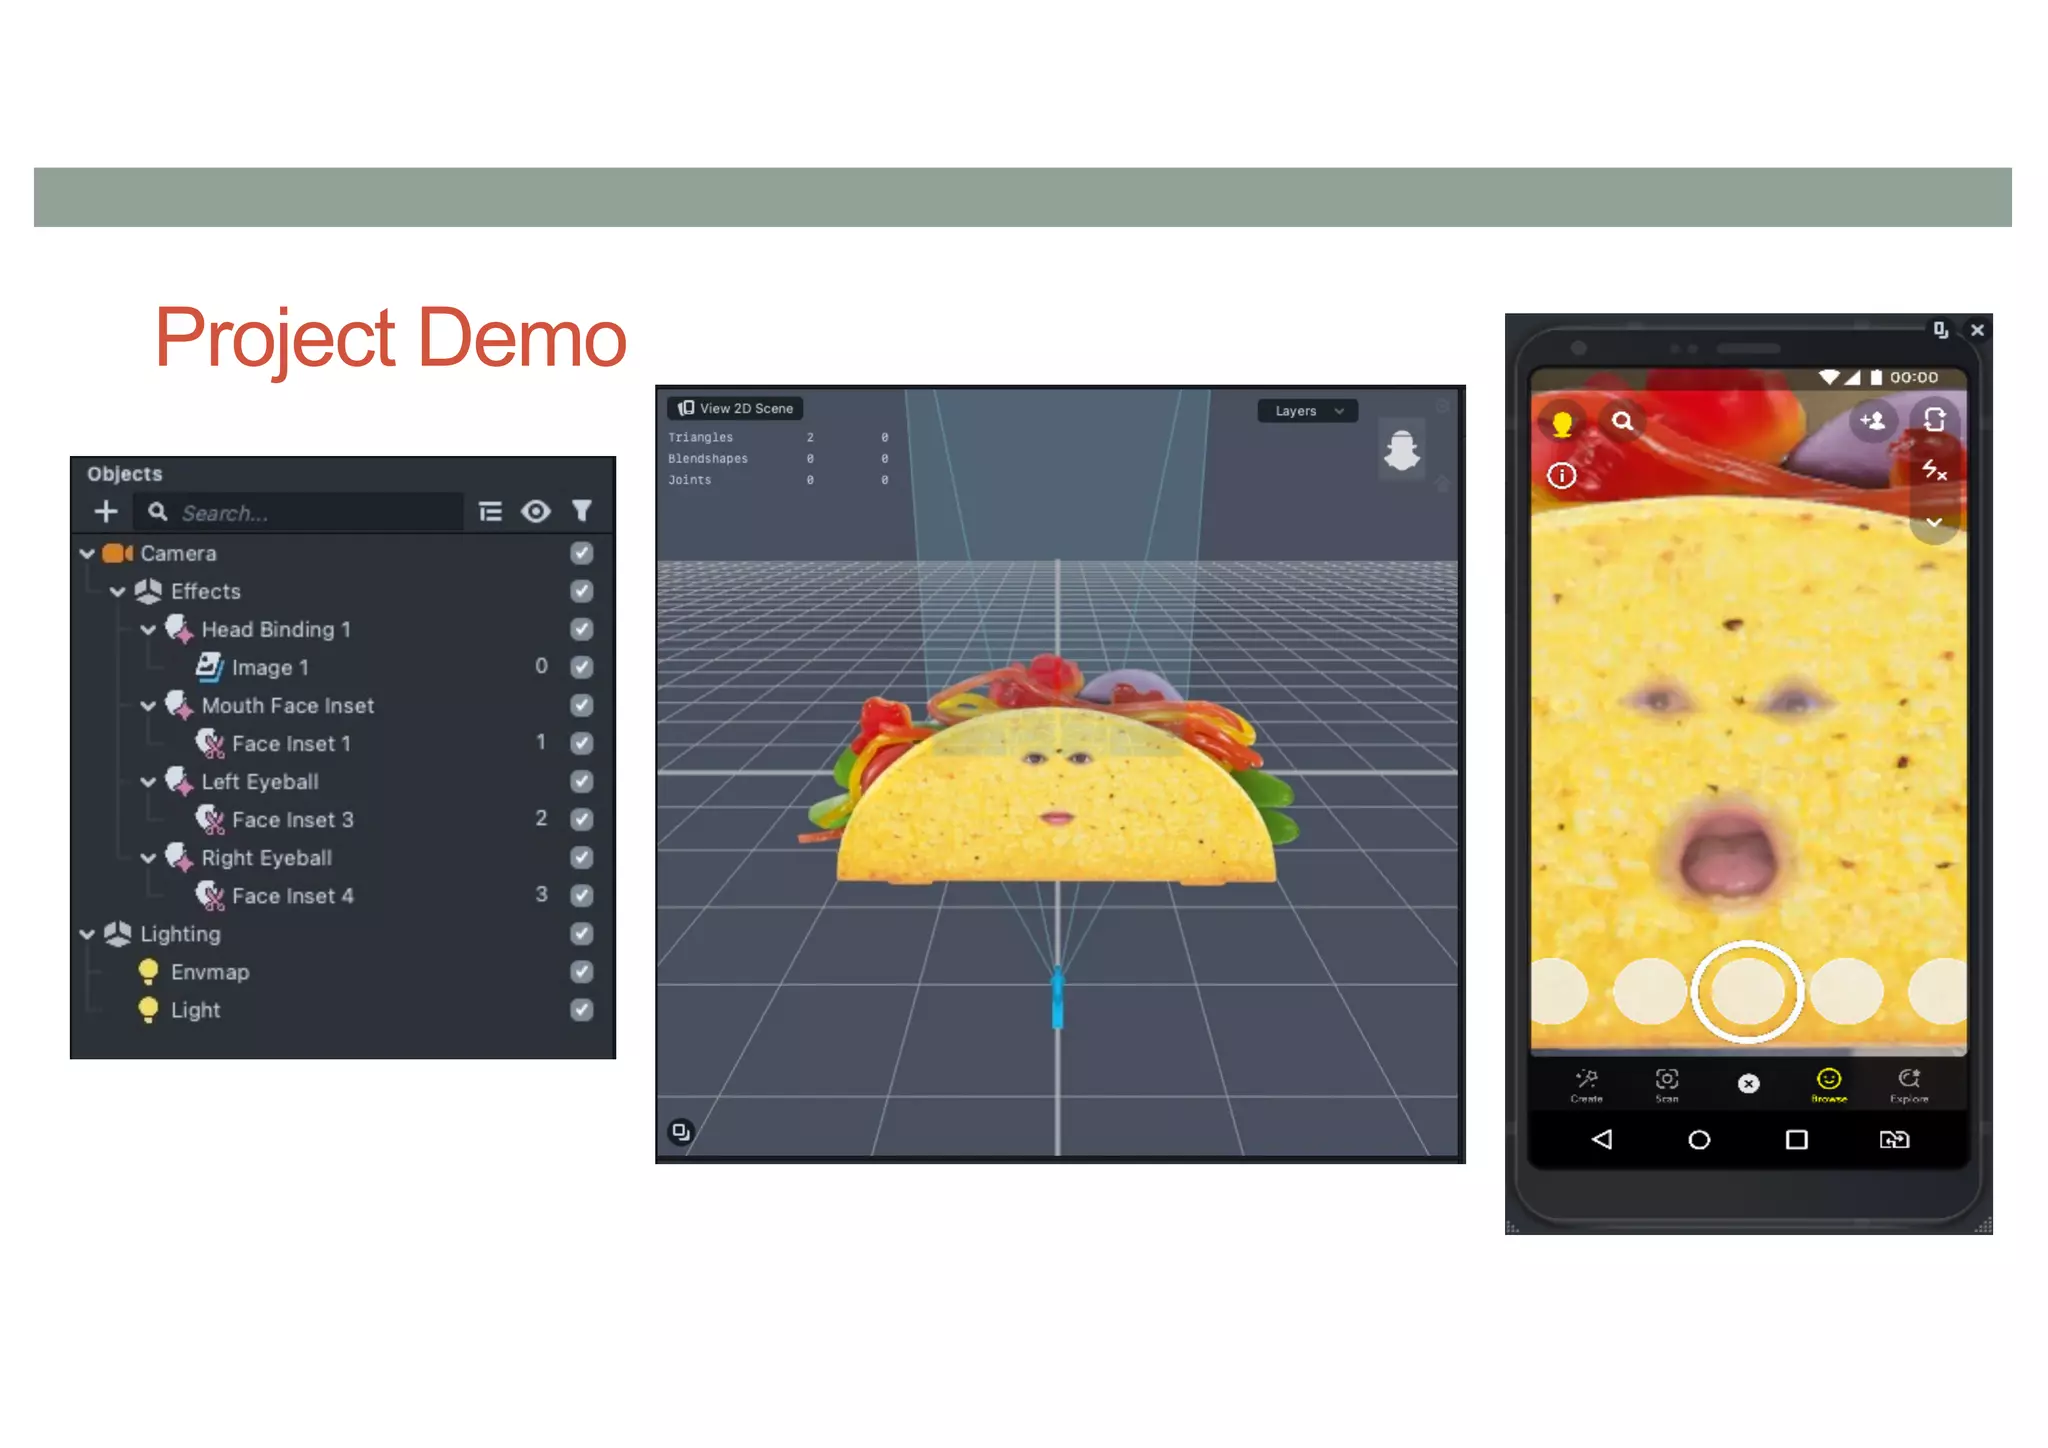
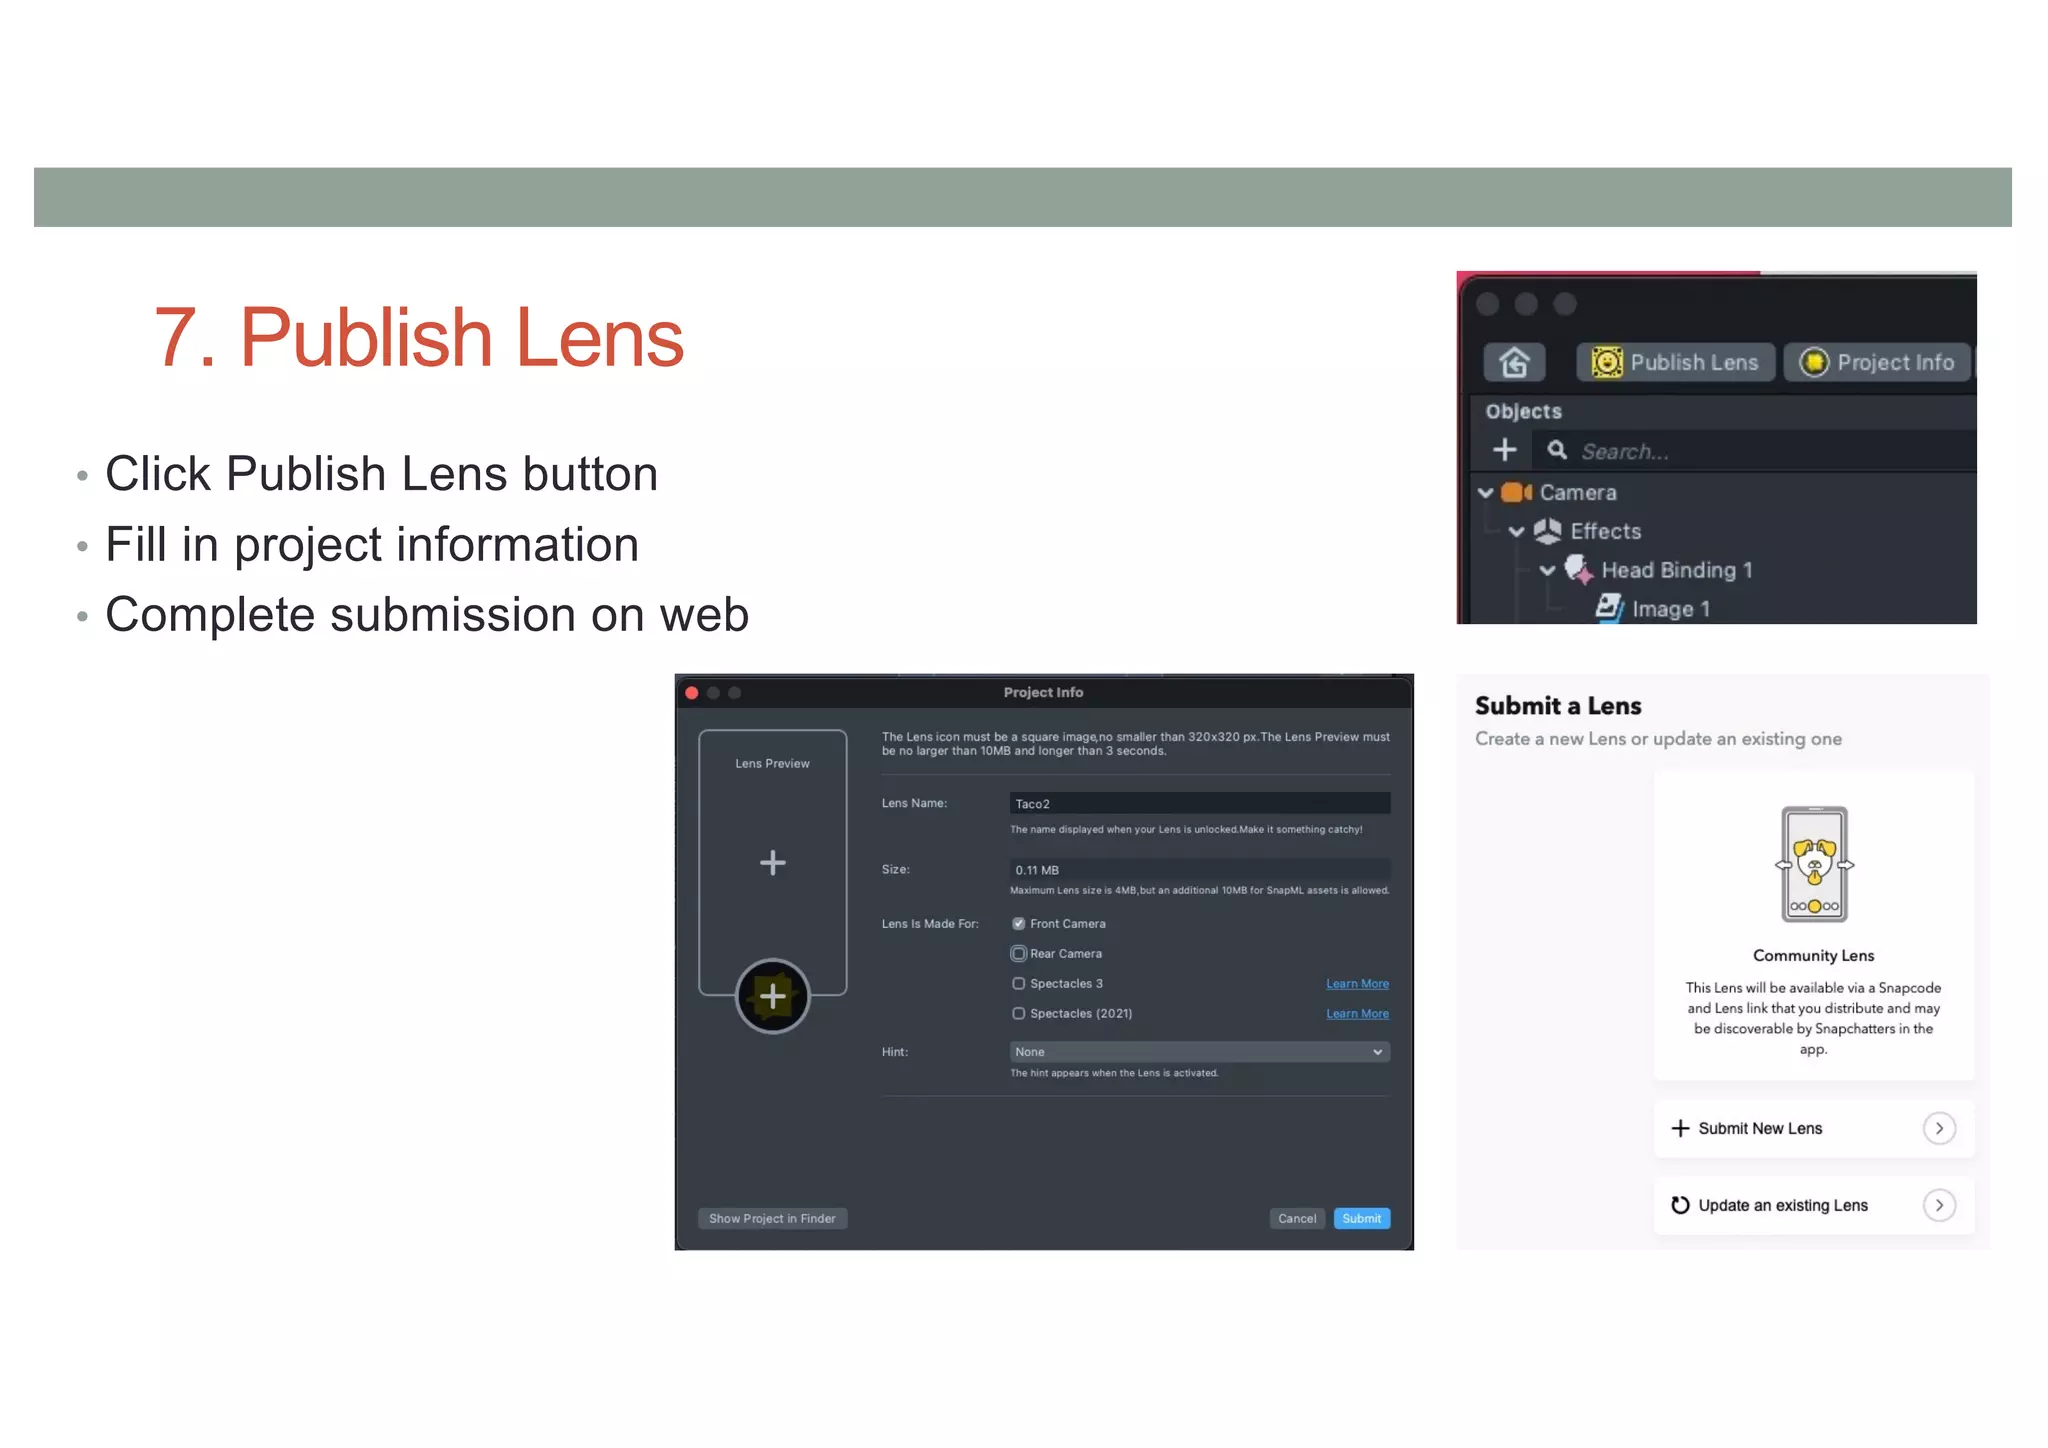
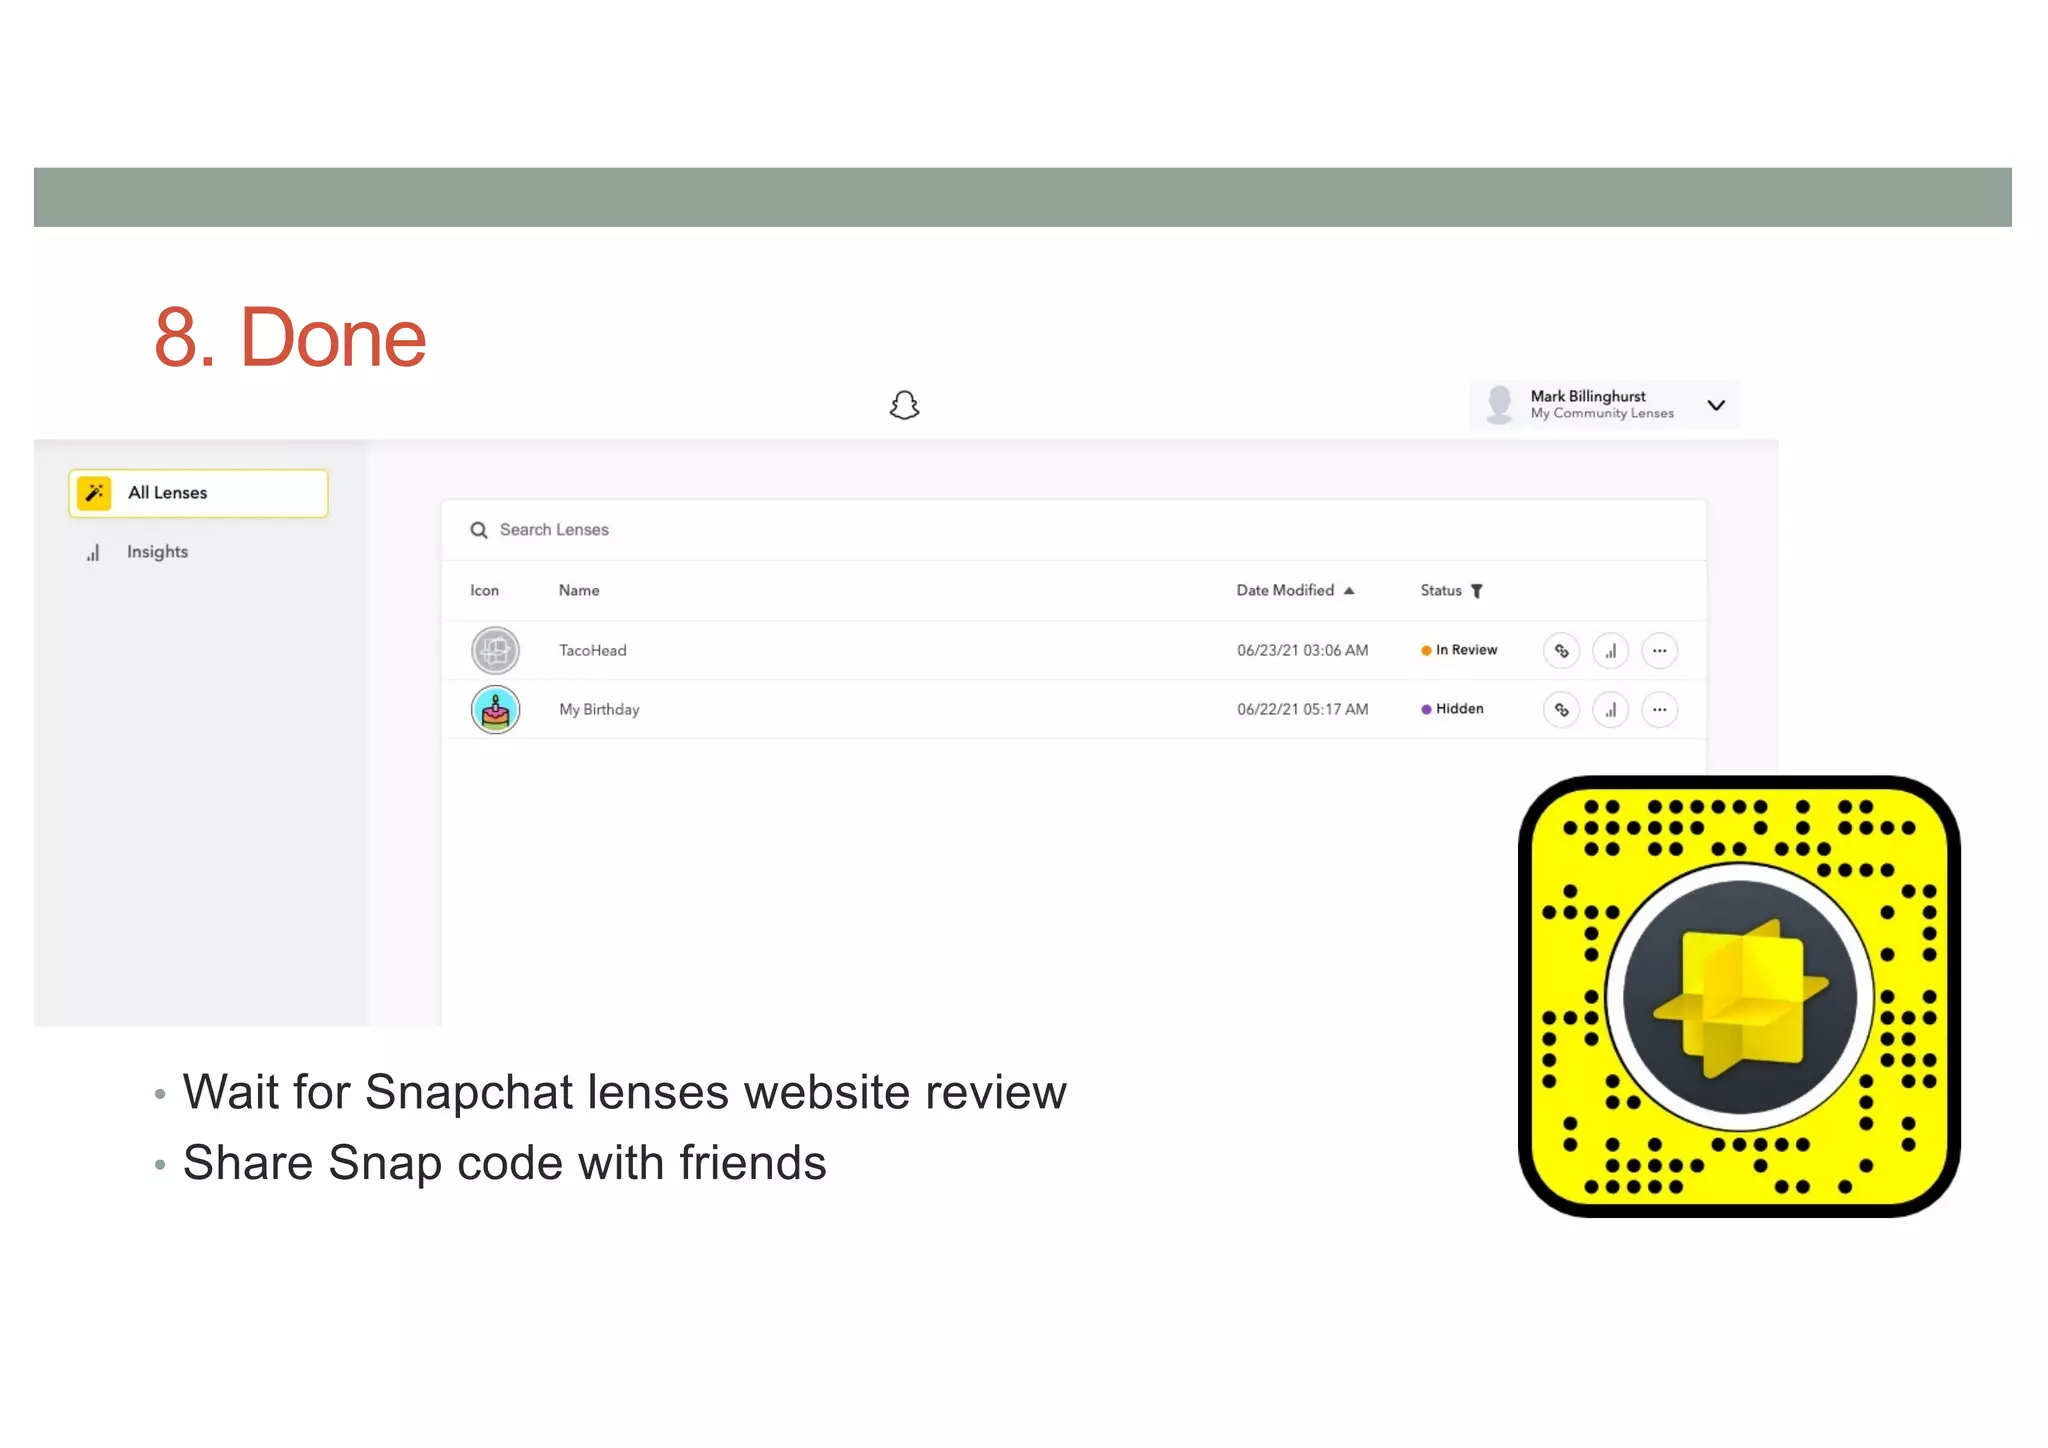
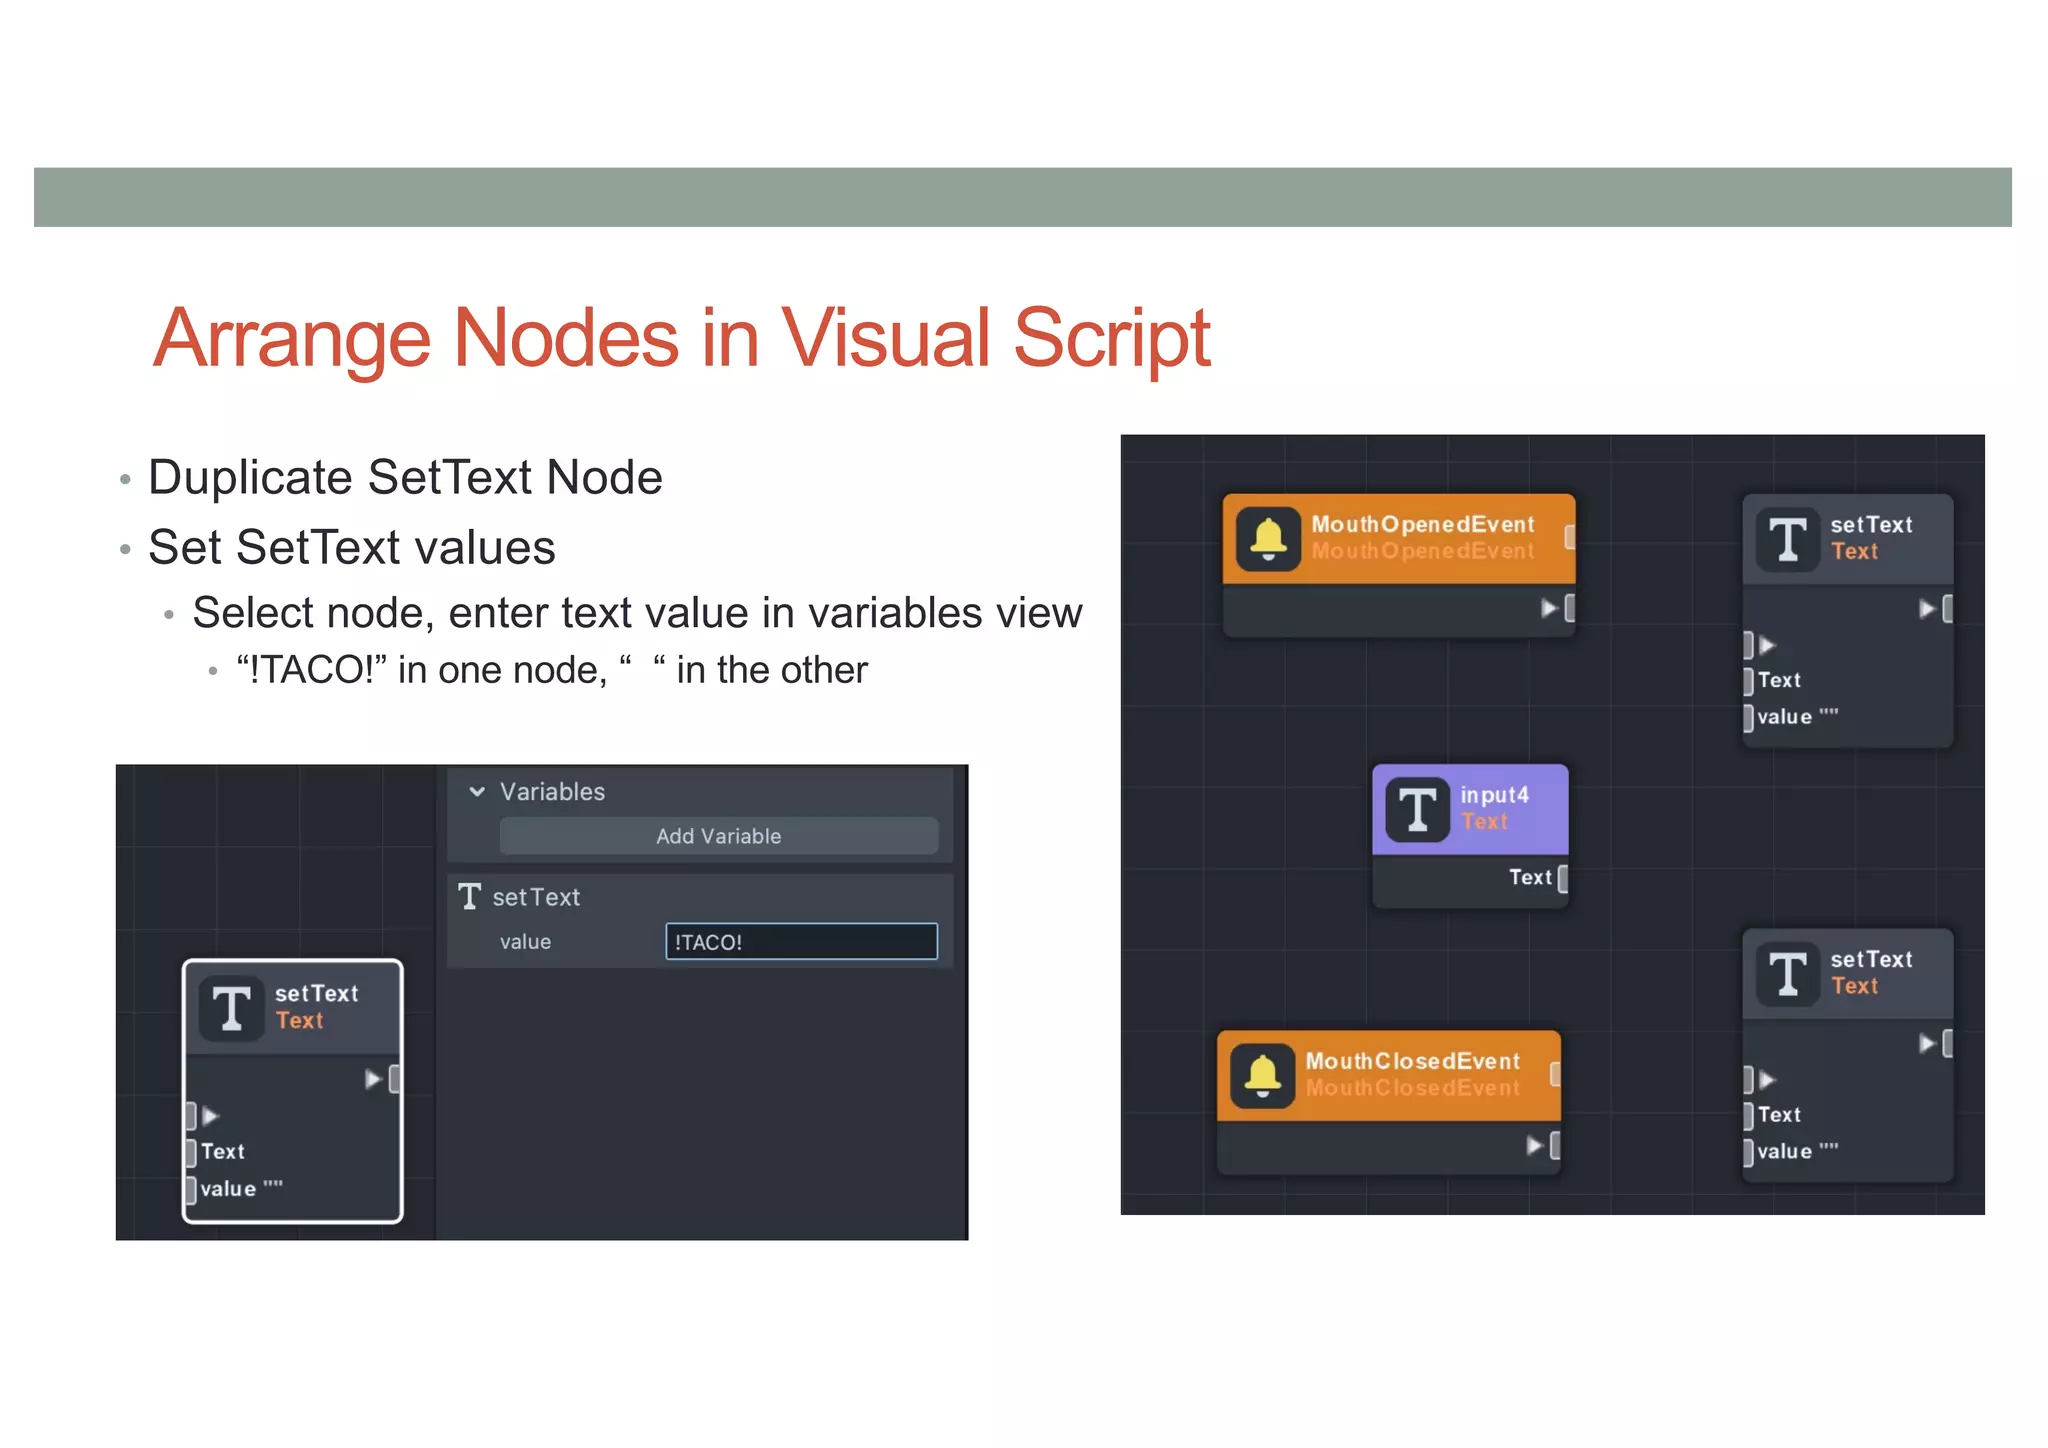
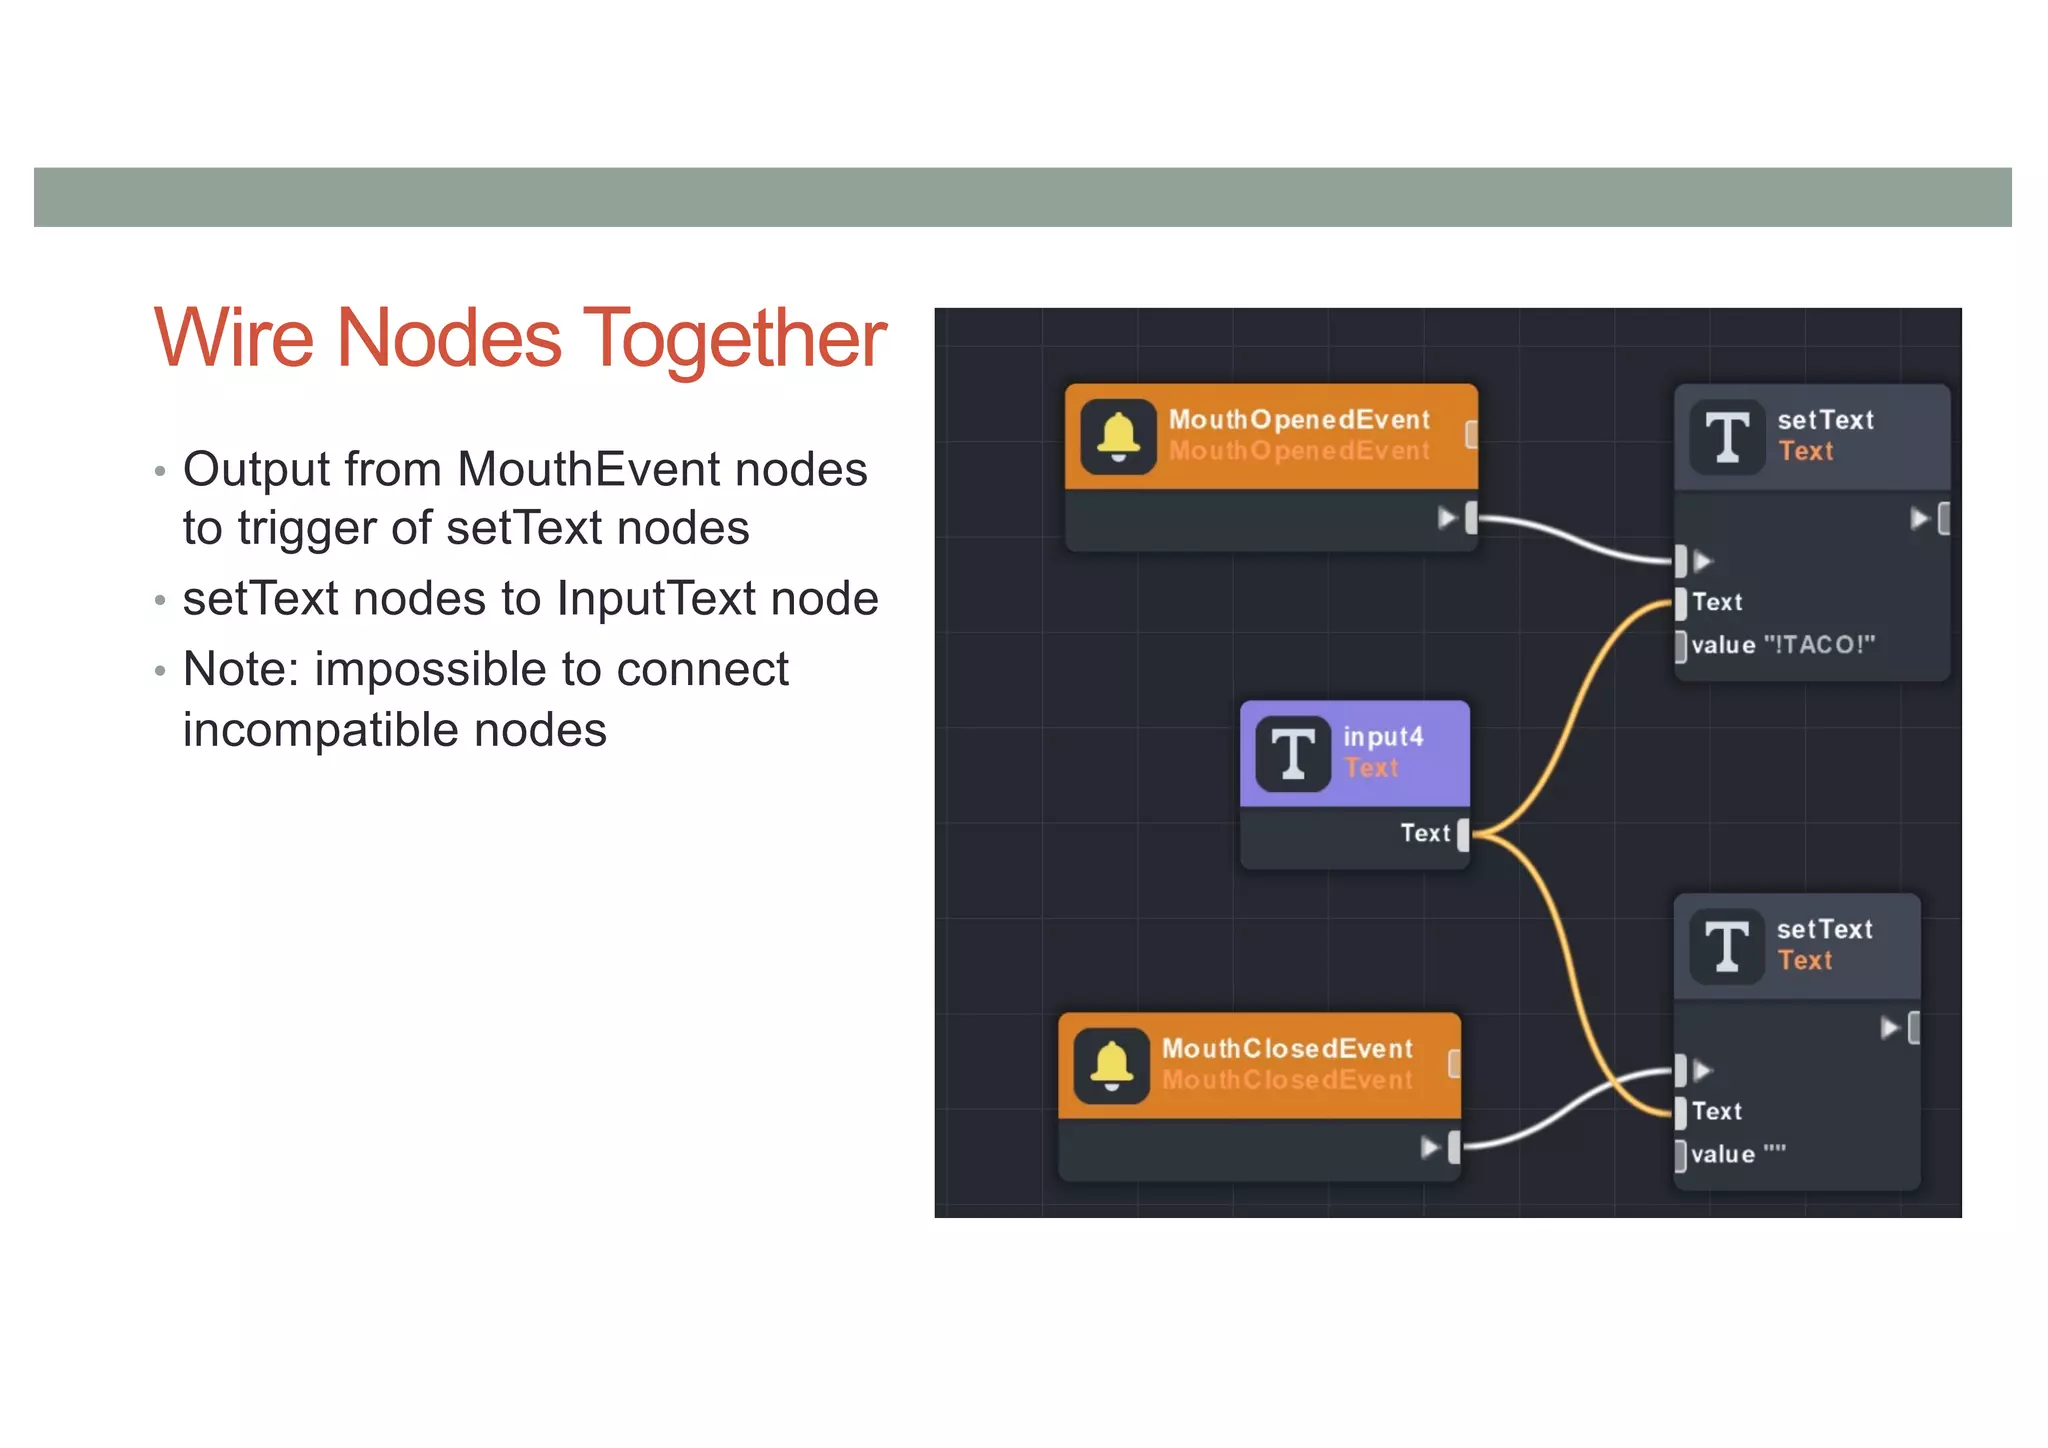
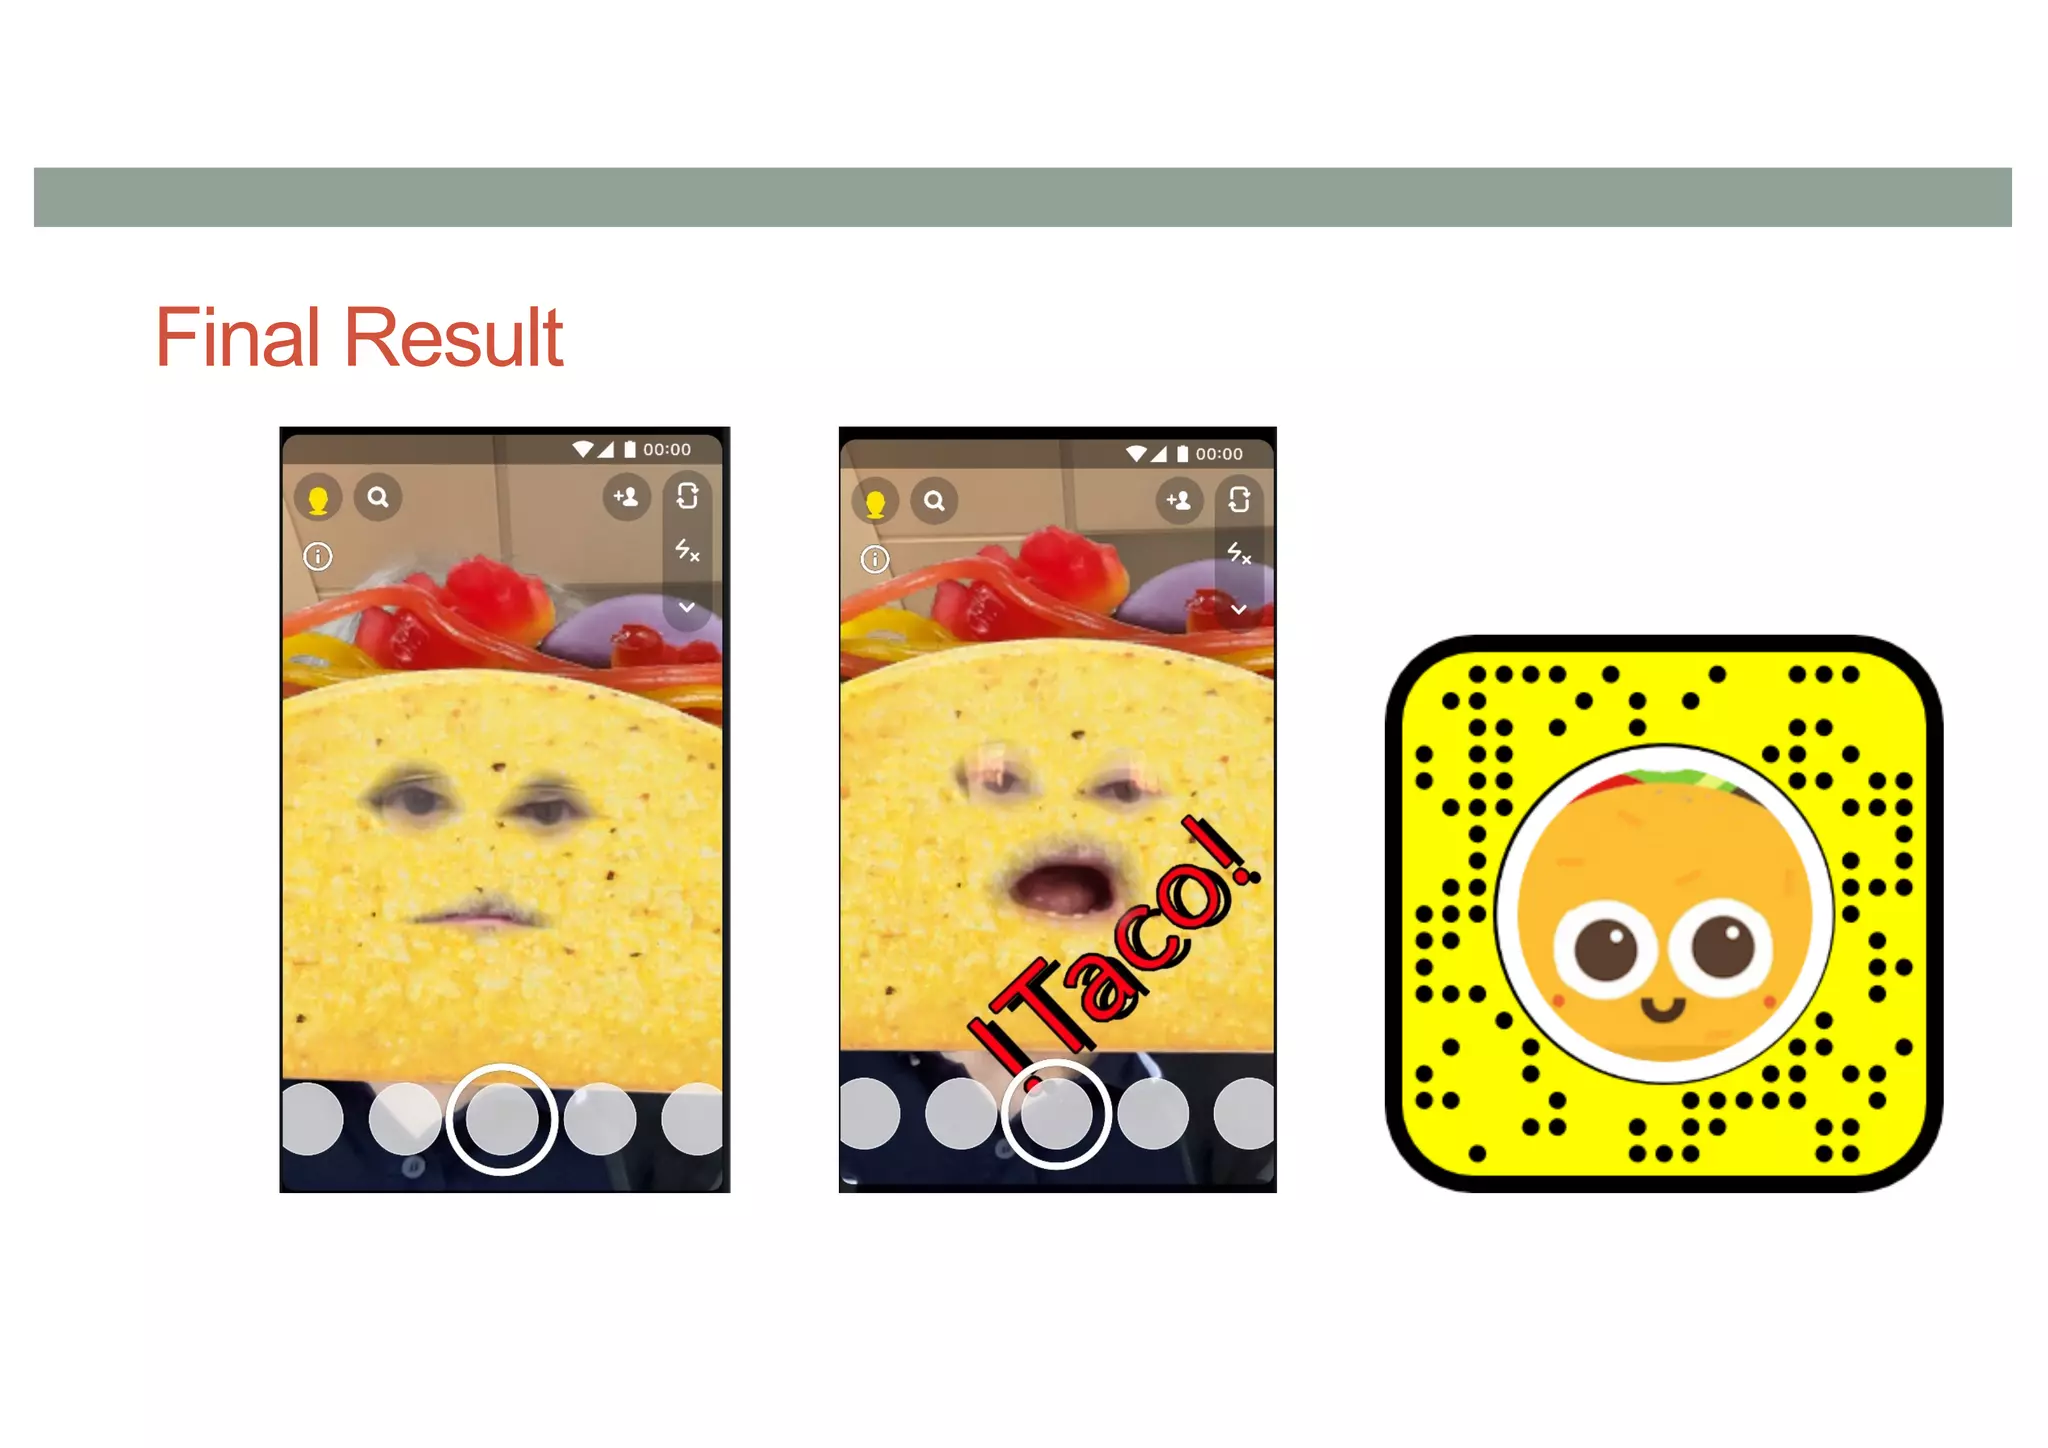
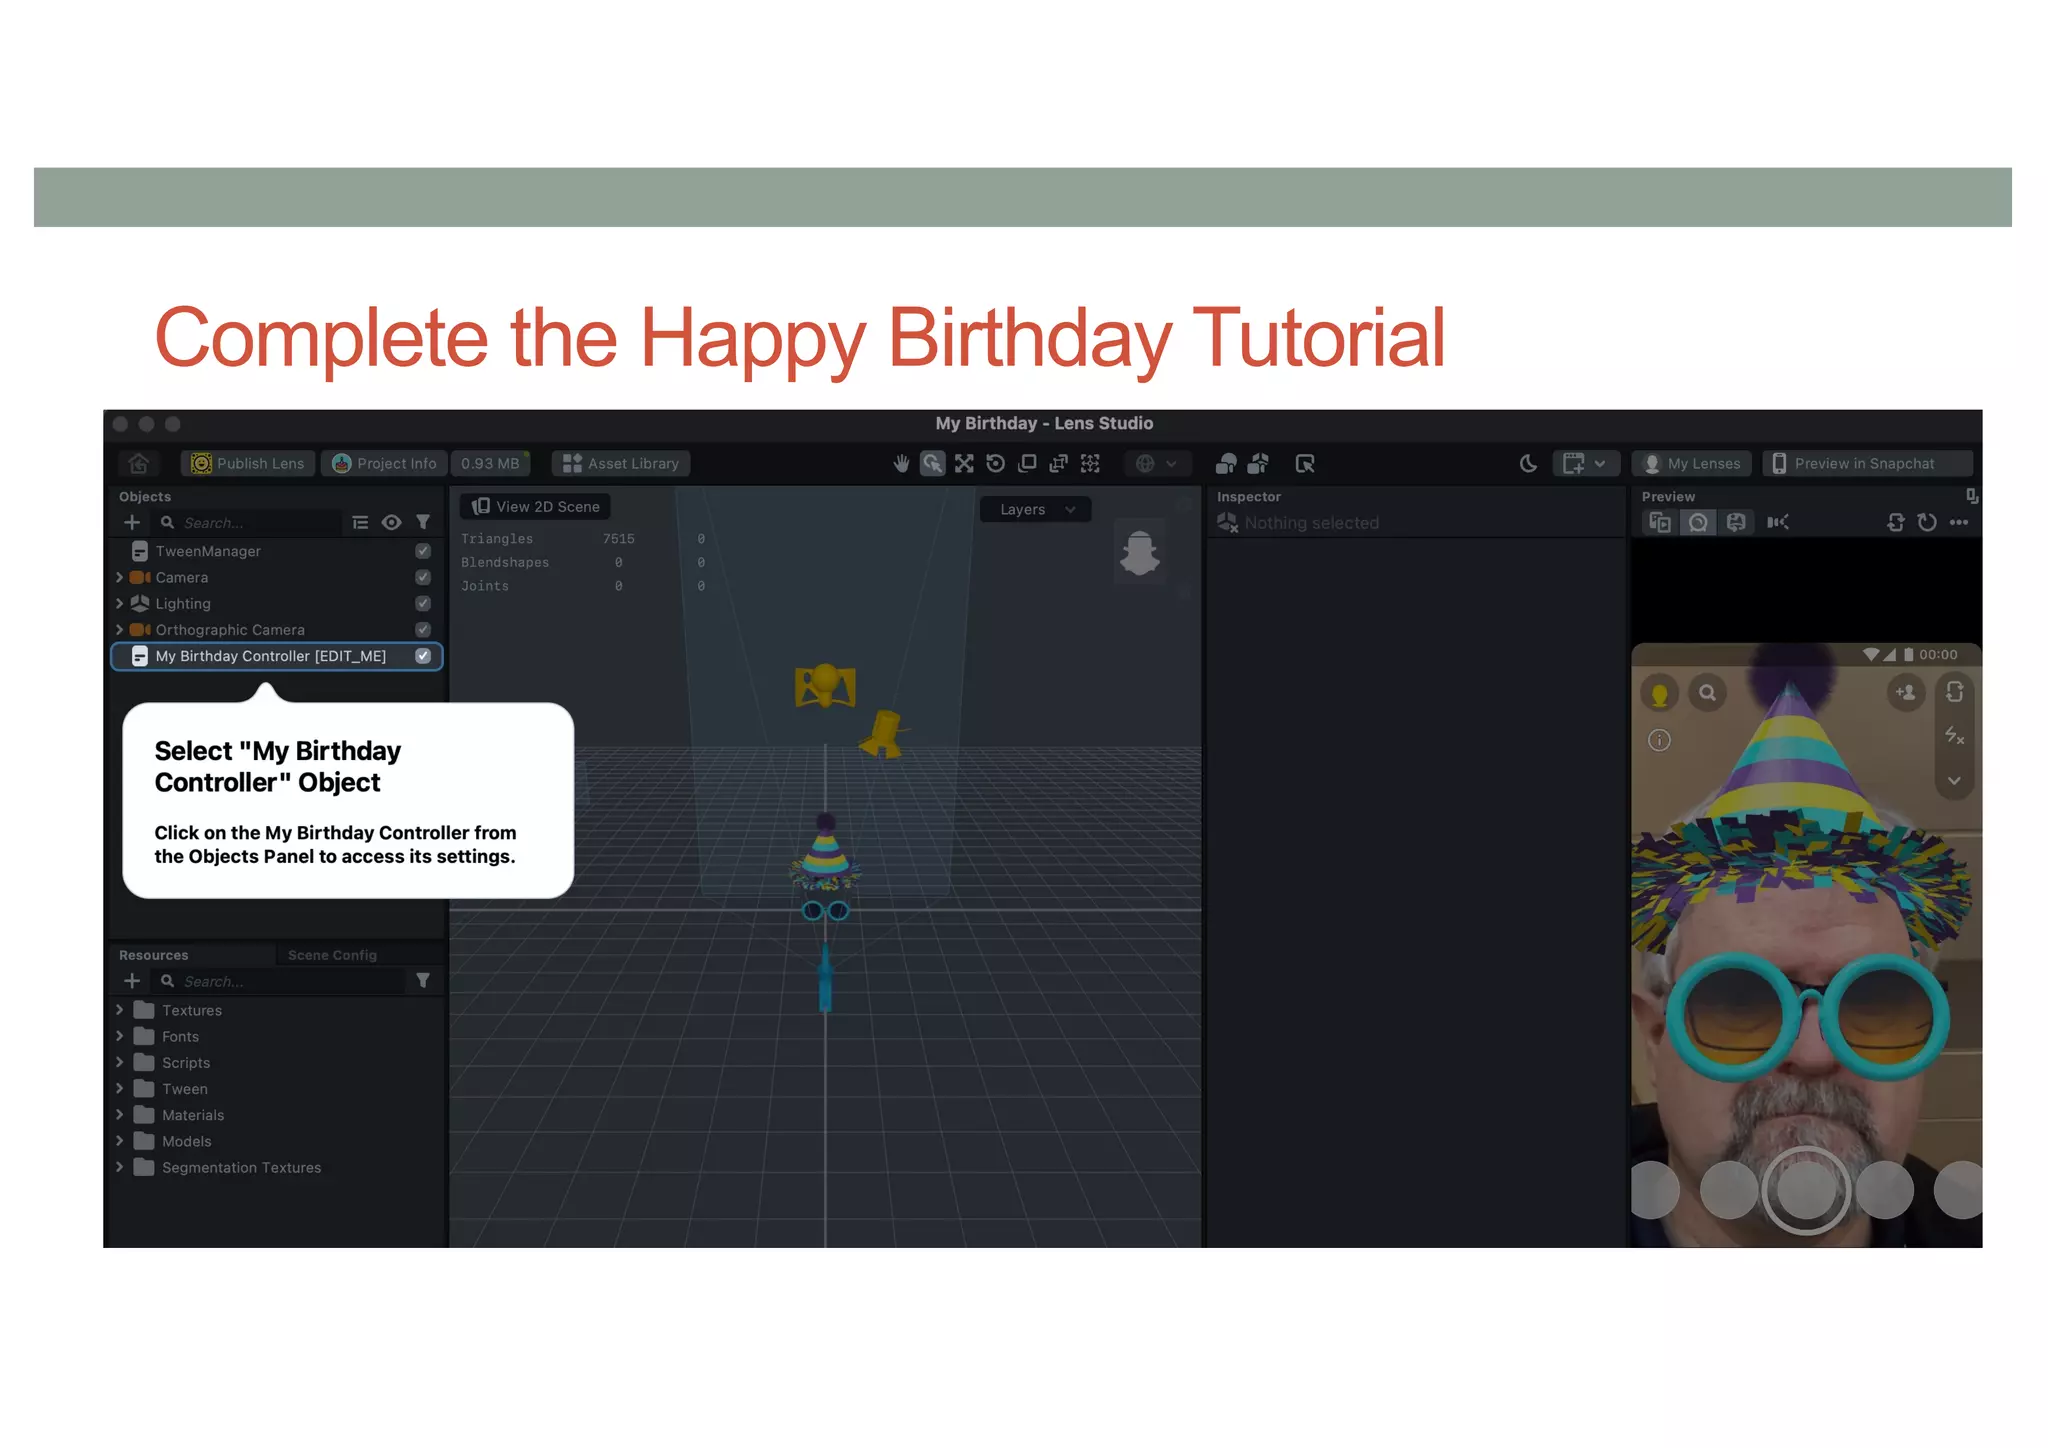
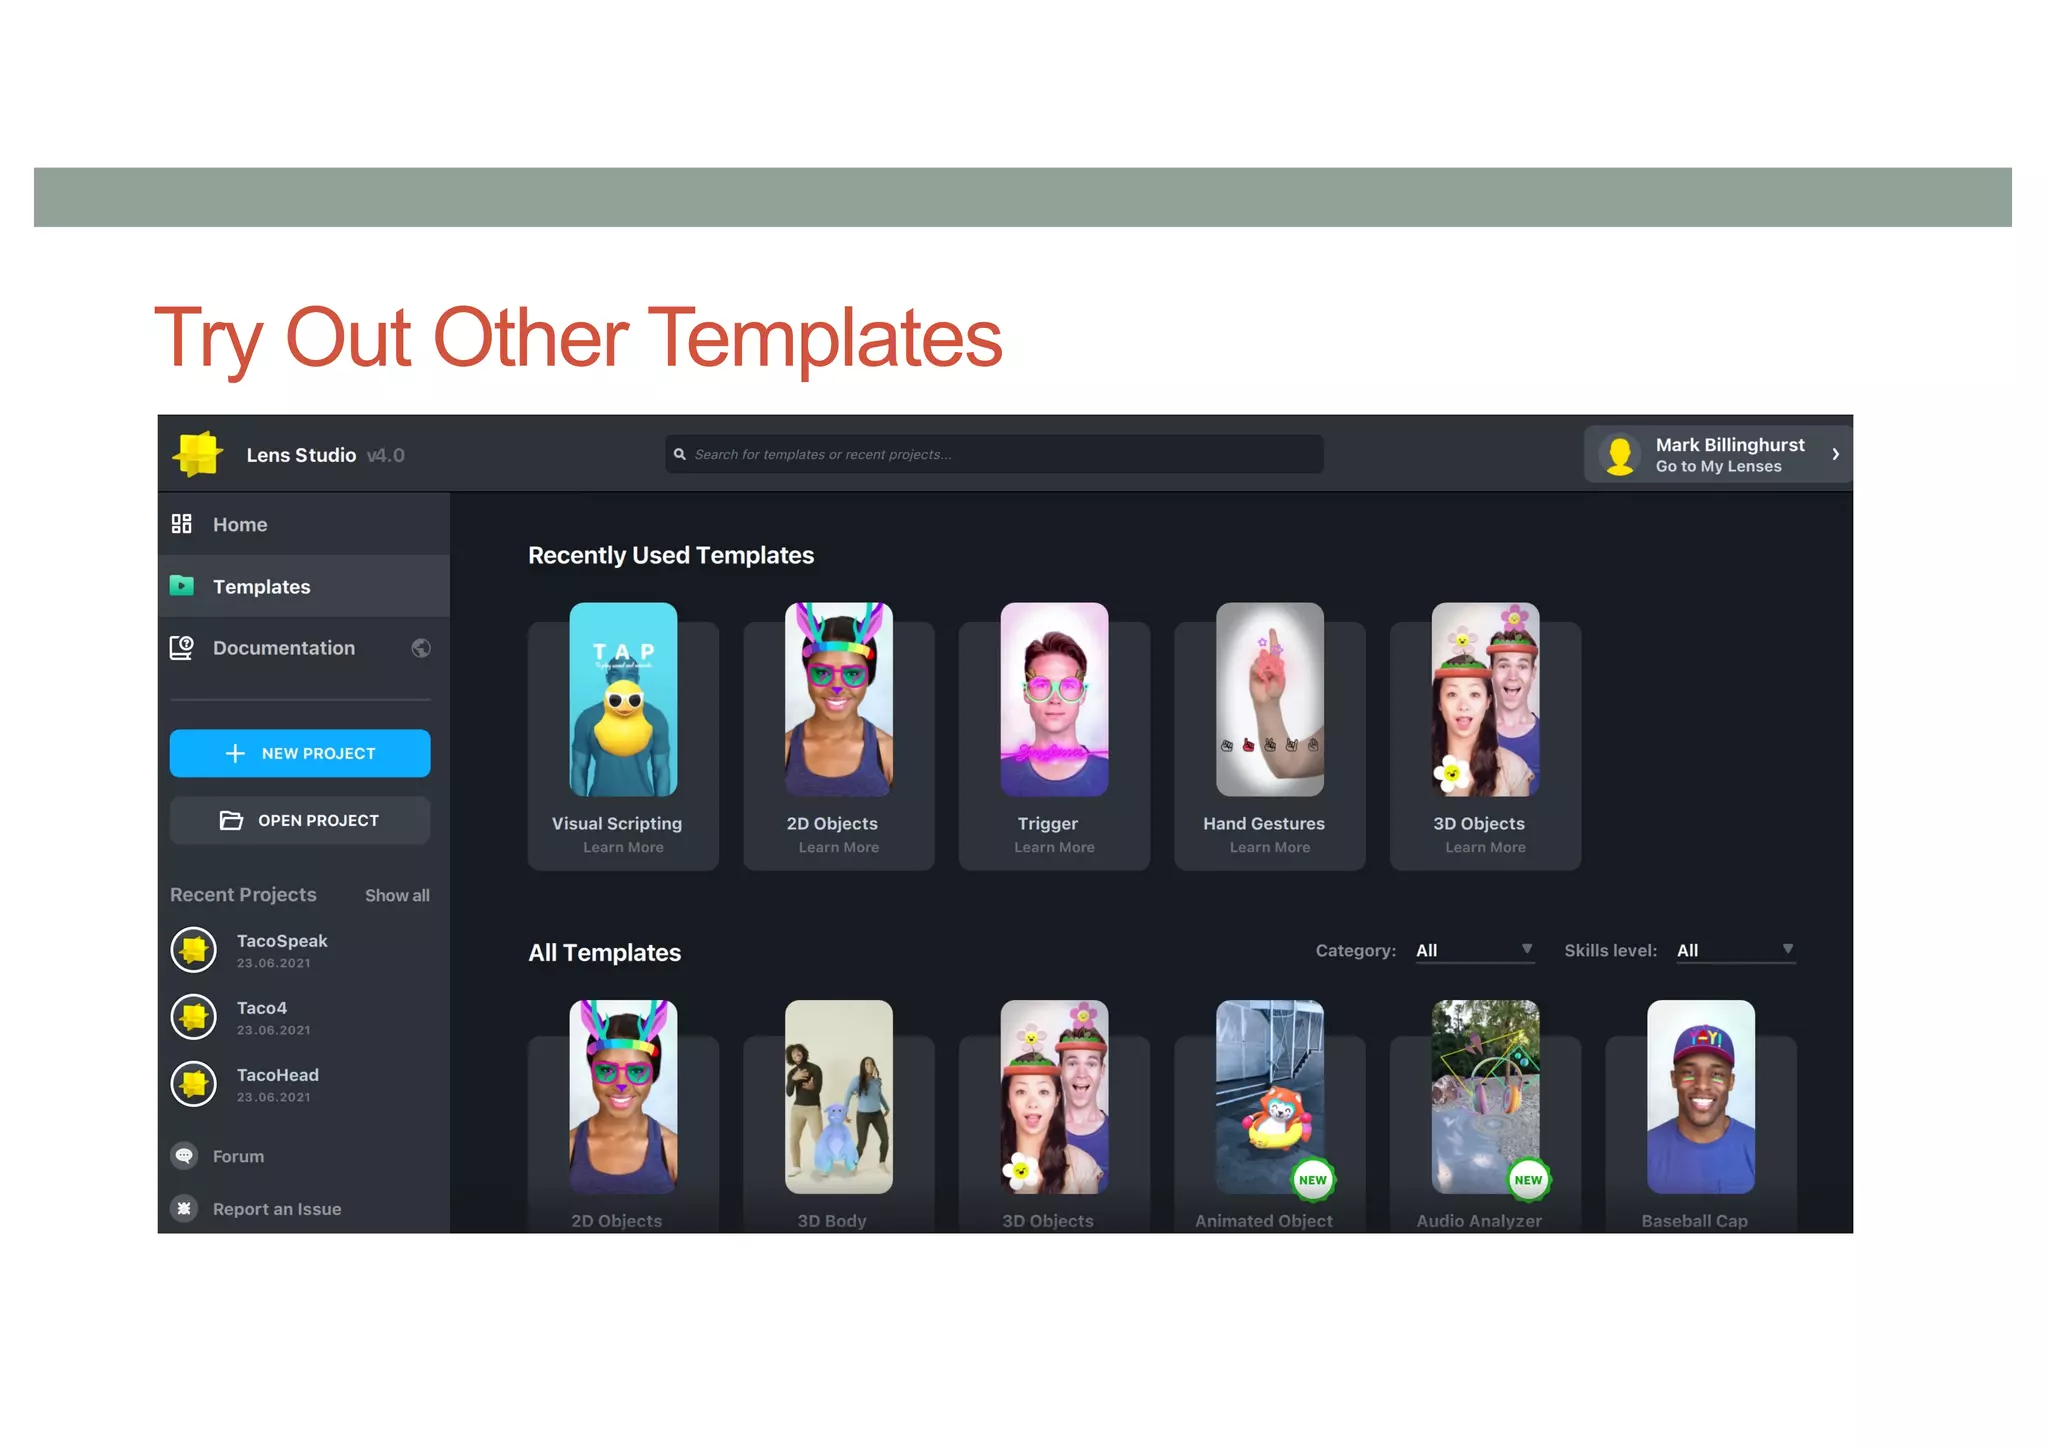
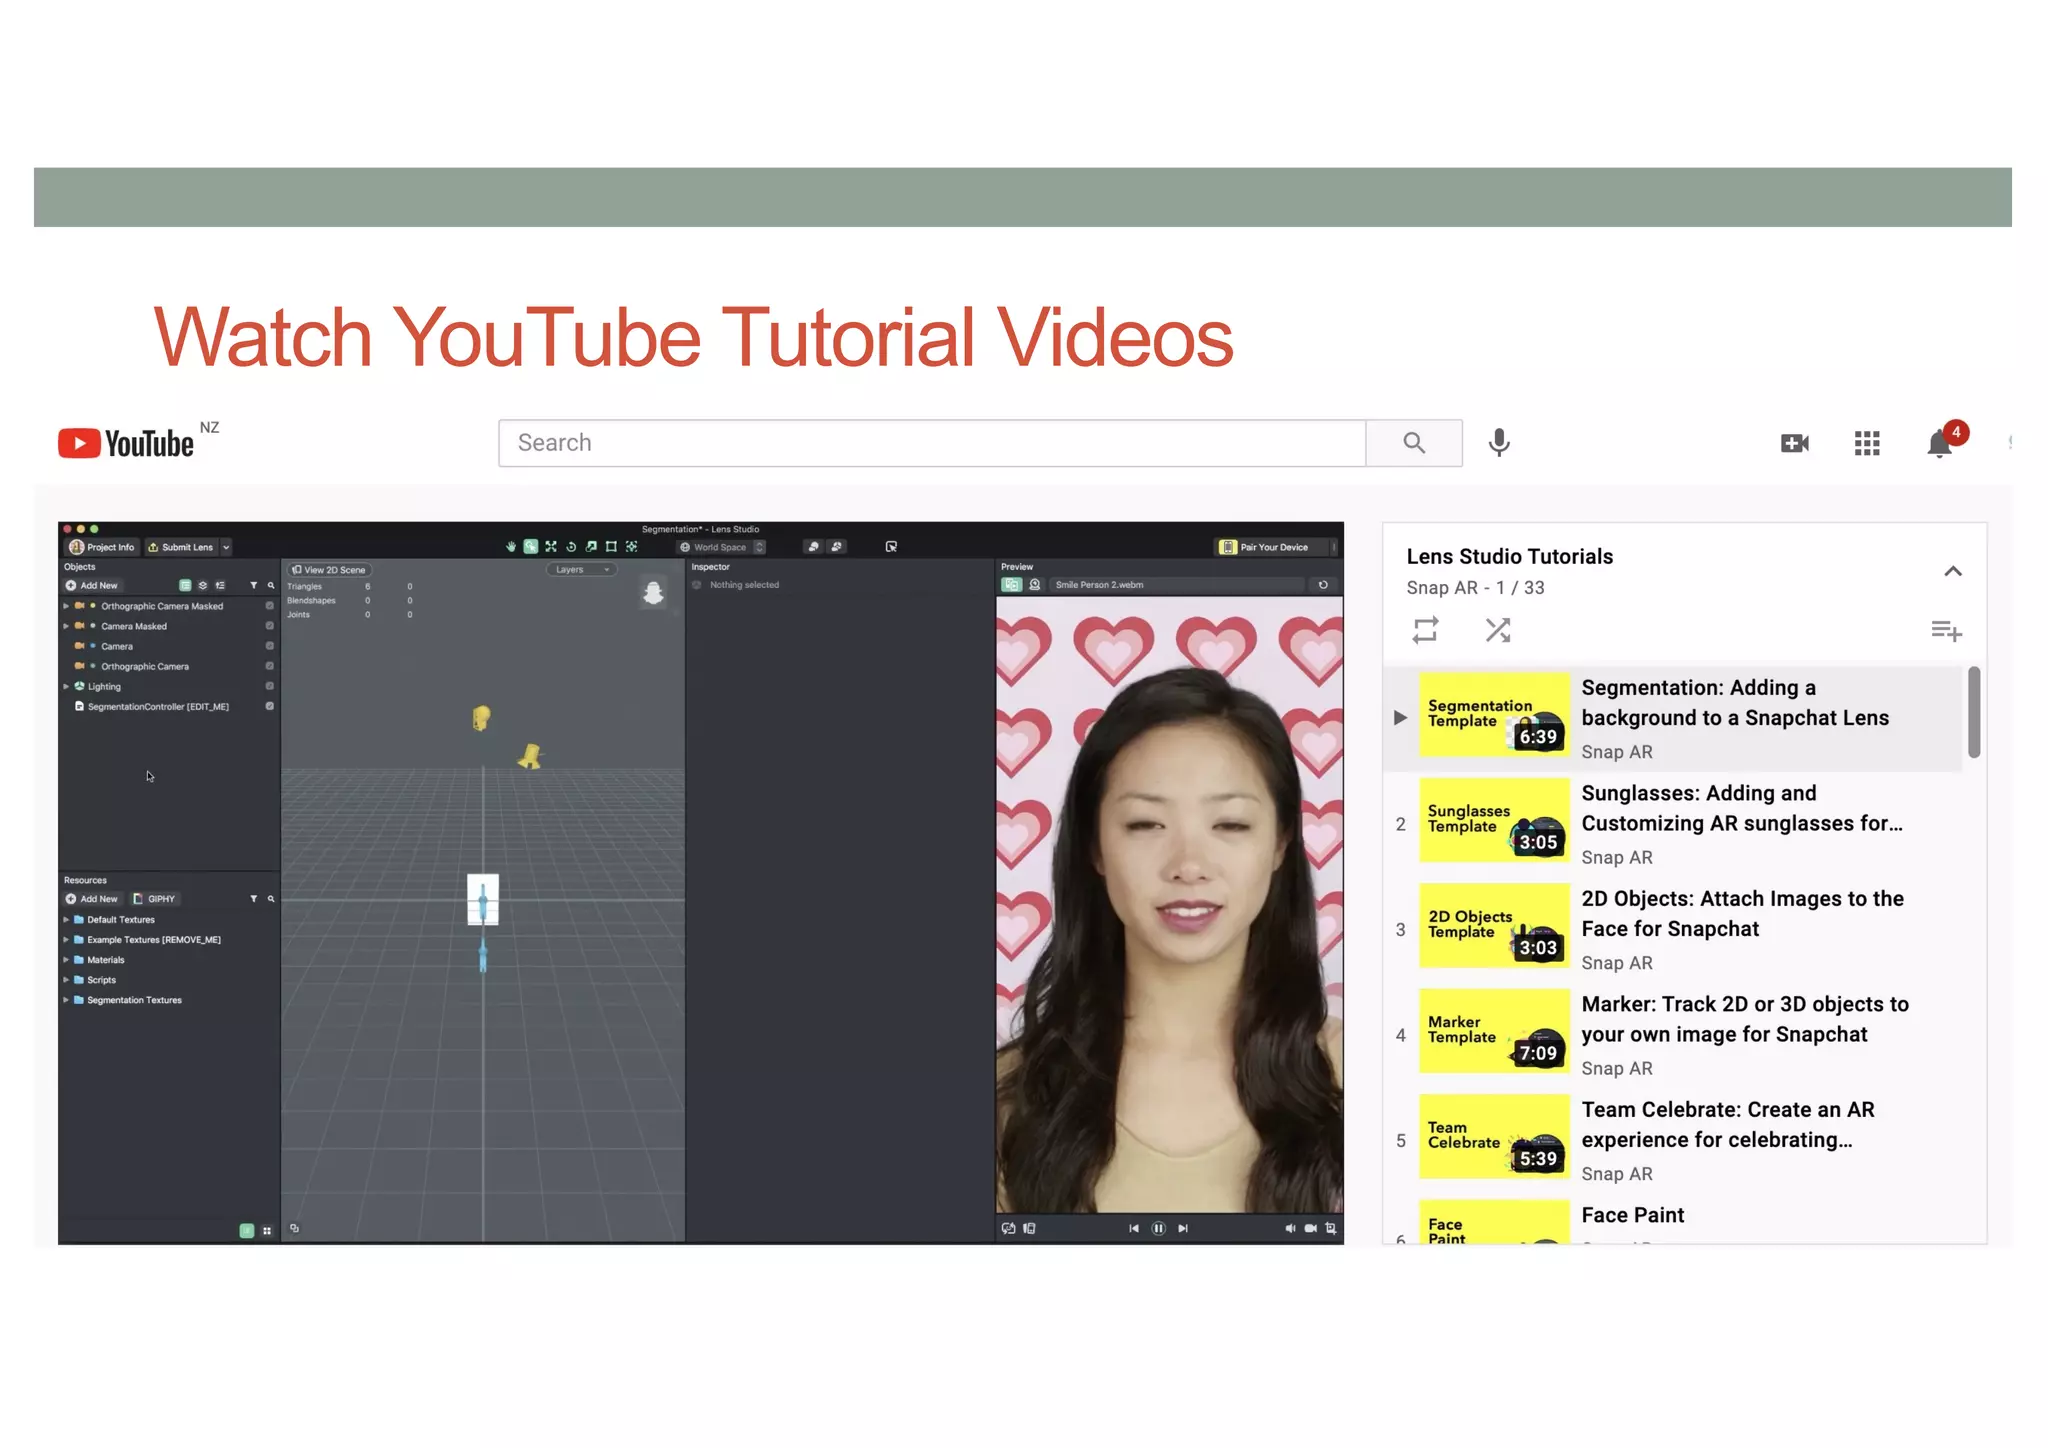
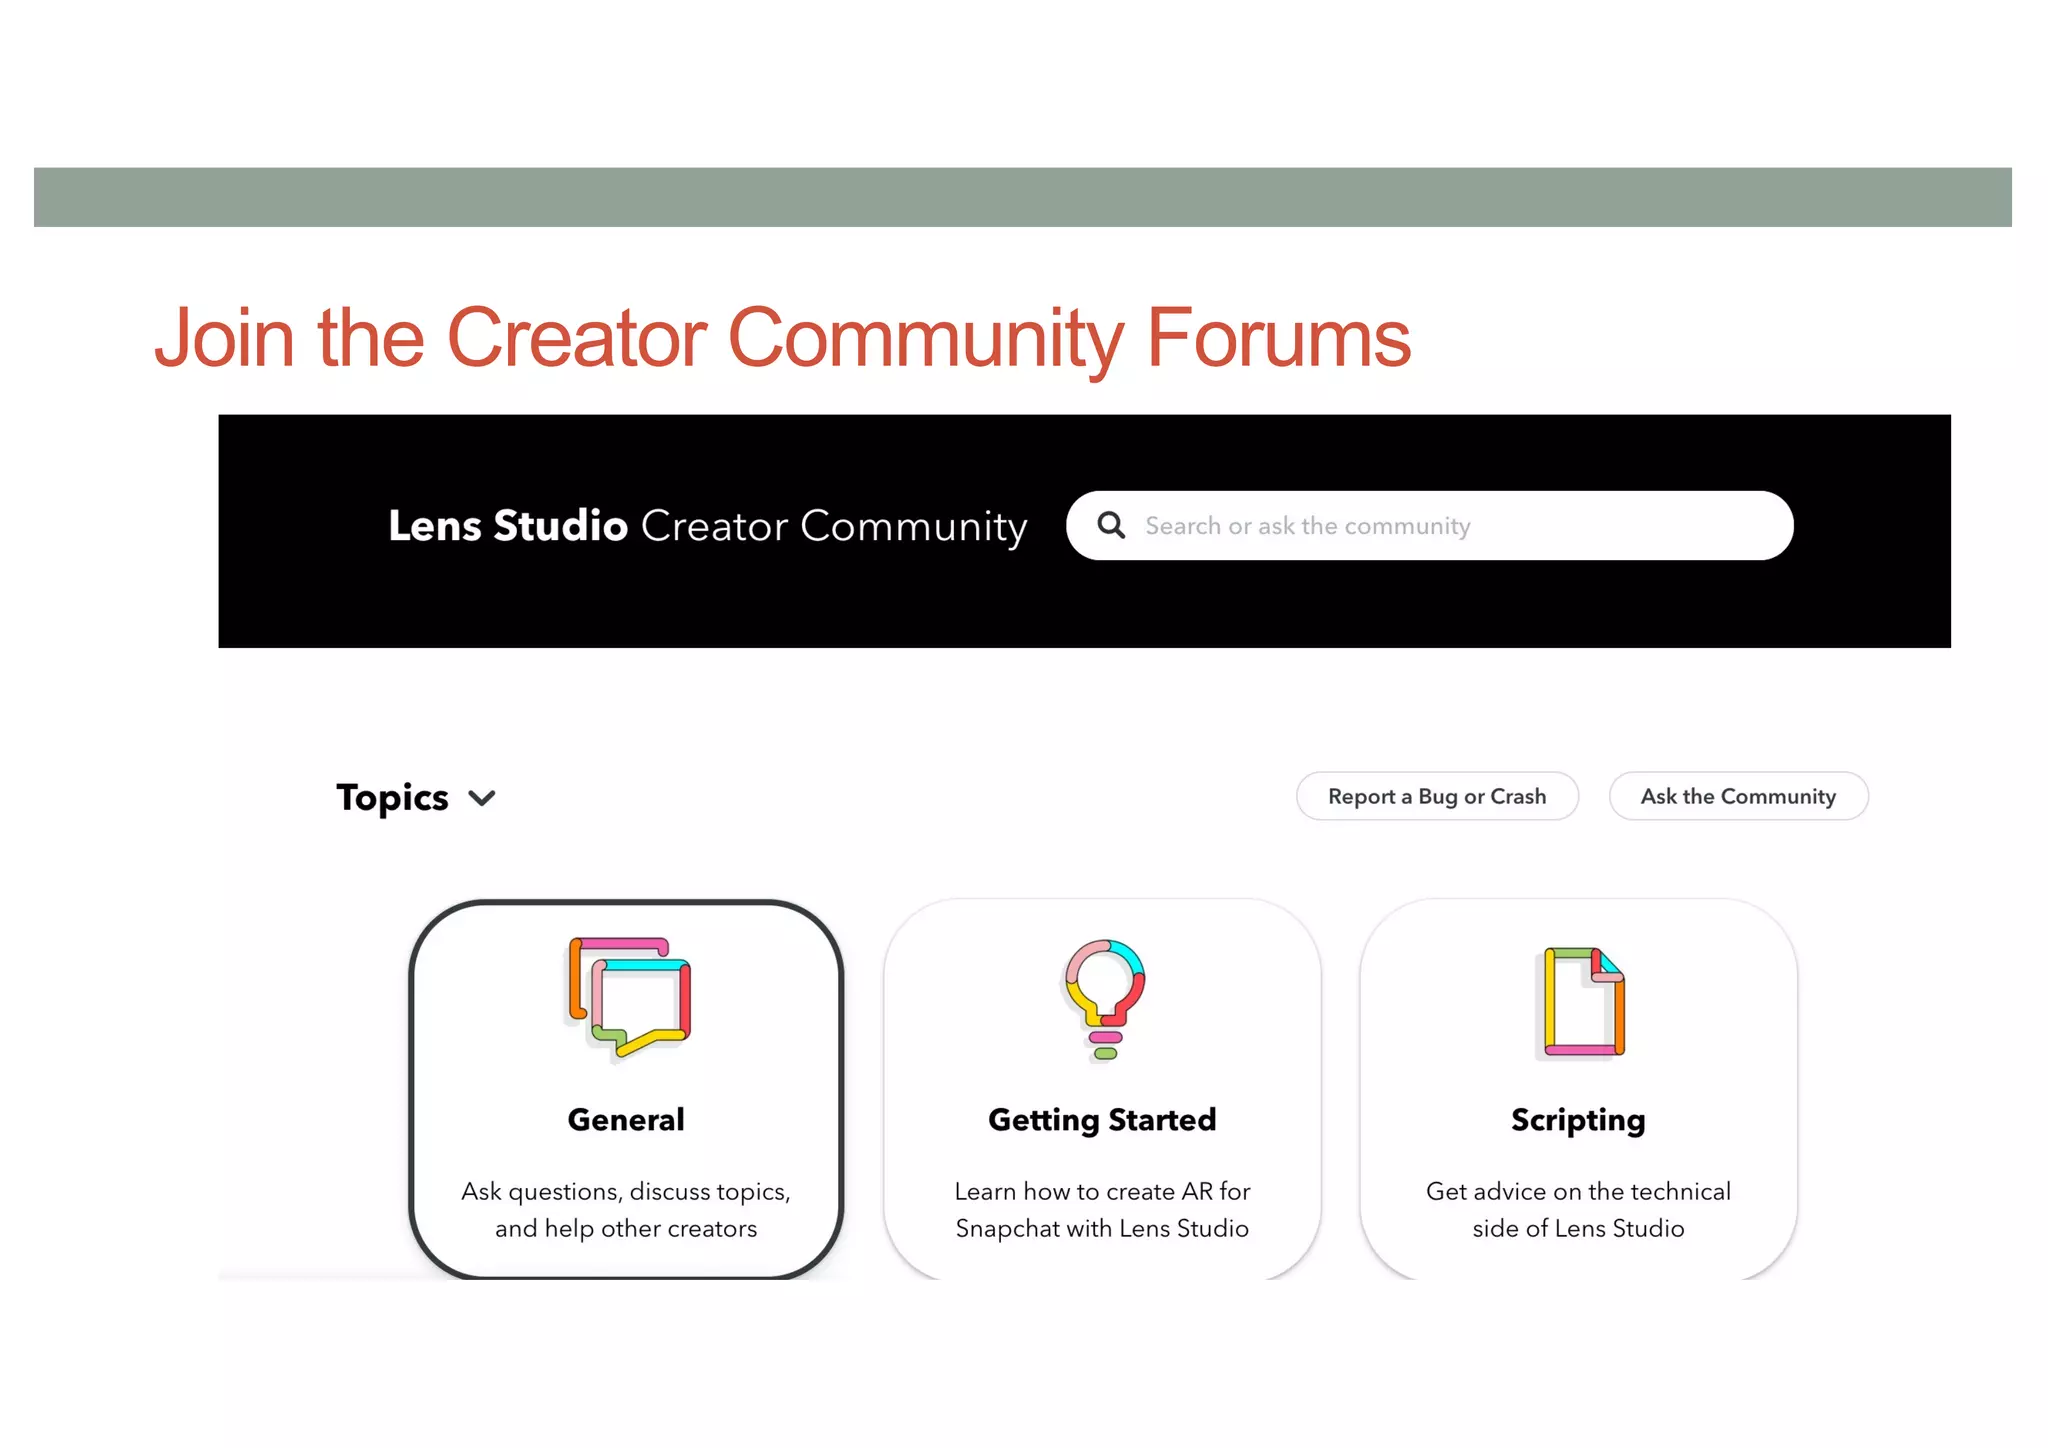
SNAP LENS STUDIO
A crash course
Mark Billinghurst
mark.billinghurst@auckland.ac.nz
https://www.youtube.com/watch?v=Qh_gOK6xDNA
2016 Superbowl Advertisement
• 30 second slot cost ~ $4.5 million USD
• Viewed by ~112 million people
2016 Tacohead
• Taco Bell mobile AR campaign
• 224 million views in one day
• $750K USD to develop
• Snapchat sponsored lens
https://www.youtube.com/watch?v=Wkysq4gvRK4
Snapchat
• Founded in 2011
• Picture based social media application
• Over 280 million daily users (5/21)
• >4 billion pictures send everyday (2020)
• 82% of US teens use Snapchat once a month
• $2.5 Billion revenue in 2020
Snapchat Lenses
• Introduced in 2015 (Snap acquired Looksery)
• Add AR content to live camera view
• Use face detection/tracking
• In 2017 AR “World Lenses” introduced
• Virtual content fixed in space
Lens Examples
https://www.youtube.com/watch?v=PN76vow1TUc
World Lens
https://www.youtube.com/watch?v=K6x44v8prFA
Making Snap Lenses
• Lens Studio (2018)
• Visual authoring tool
• https://lensstudio.snapchat.com/
Setting Up
• Go to https://www.snapchat.com/
• Install Snapchat on mobile phone
• Create an account
• Download and install Lens Studio
• https://lensstudio.snapchat.com/
Lens Studio
EXAMPLE - TACOHEAD
Process
1. Add taco image to resources
2. Add Face Image to scene objects
3. Set face image texture to taco
4. Resize taco image
5. Add Face Inset for mouth
6. Add 2 Face Insets for eyes
7. Publish lens
8. Done
1. Add Resource
• Find Taco image with transparent background
• Download to local machine
• Drag into the resources area
2. Add Face Image to Scene
• Hit ‘+’ to add object to scene
• Search for Face Image
• Add to scene
• Select Head Binding
• View inspector
• Attach to point Face Center
3. Set Face Image to Taco
• Select Image 1
• Open inspector
• Click and drag taco image from
resources into texture slot
4. Resize Taco Image
• Select Image1
• Open Transform in inspector
• Set x, y scale values to 120.0, 120.0
5. Add Mouth Face Inset
• Add face inset to scene
• Select Face Inset 1
• In inspector make sure Face
Region is set to Mouth
• Select Face Inset Binding 1
• In inspector, in Head Binding set
Attach To Point to Mouth Center
• Rename Face Inset Binding to
Mouth Face Inset
6. Add Left and Right Eye Insets
• Add Face Inset to scene
• Select Face Inset
• Set Face Region in Face inset to Left Eye
• Select Face Inset Binding
• Set Head Binding Attach to Point to Left Eyeball
• Rename Face inset binding to Left Eyeball
• Repeat for Right Eyeball
Project Demo
7. Publish Lens
• Click Publish Lens button
• Fill in project information
• Complete submission on web
8. Done
• Wait for Snapchat lenses website review
• Share Snap code with friends
ADDING BEHAVIOURS
Methods for Adding Interaction
• Drag and drop
• Simple behaviours
• Using object components
• Visual Scripting
• Node based
• Coding
• Javascript
Adding Taco Behaviour
• When mouth open !Taco! text appears
• Key Elements
• Taco Text
• Text positioning
• Text material/colour
• Mouth open detection
• Mouth close detection
Key Steps
1. Create text object
• Attach to face, set font size, colour
2. Create Scene Manager object
3. Create Visual Script and add to Scene Manager
4. Add nodes to visual script
• Mouth open/closed, text input, set text nodes
5. Done
1. Create Text Object
• Create text object in Object list
• Drag to be under head binding object
• Attaches to head video
• Open text object inspector
• Type in sample text
• Set text properties
• Font size, colour, drop shadow, etc.
• Position text
2. Add Object Manger
• Add Scene Object to object list
• Place at top level
• Rename as ObjectManager
3. Add Visual Script
• Add Visual Script to Resources
• Add script component to ObjectManager
• Set VisualScript to ObjectManager script
4. Creating Visual Script
• Node based visual programming
• Basic workflow
• Open script graph editor
• Double click on Visual Script
• Load up needed nodes
• Wire nodes together
• Set parameters
• Test logic
Load Nodes
• Right click in script graph editor, or hit tab
• Search for key terms (e.g. Mouth)
• Needed Nodes
• MouthOpenEvent – detect when mouth open
• MouthCloseEvent – delect when mouth closed
• InputText – set the text object value
• SetText – set text string value
• Important: Delete text in TacoTex object
Nodes
• Delete OnAwake, UpdateEvent nodes – not needed
Specifying InputText Object
• To associate TacoText object with InputText node
• Select Manager Object script and check inspector
• Drag TacoText object into empty Text input field
Arrange Nodes in Visual Script
• Duplicate SetText Node
• Set SetText values
• Select node, enter text value in variables view
• “!TACO!” in one node, “ “ in the other
Wire Nodes Together
• Output from MouthEvent nodes
to trigger of setText nodes
• setText nodes to InputText node
• Note: impossible to connect
incompatible nodes
Final Result
NEXT STEPS
Complete the Happy Birthday Tutorial
Try Out Other Templates
Watch YouTube Tutorial Videos
Work Through Tutorial Guides
Join the Creator Community Forums
Questions?
www.empathiccomputing.org
@marknb00
mark.billinghurst@auckland.ac.nz

Snap Lens Tutorial

  • 1.
    SNAP LENS STUDIO Acrash course Mark Billinghurst mark.billinghurst@auckland.ac.nz
  • 2.
  • 3.
    2016 Superbowl Advertisement •30 second slot cost ~ $4.5 million USD • Viewed by ~112 million people
  • 4.
    2016 Tacohead • TacoBell mobile AR campaign • 224 million views in one day • $750K USD to develop • Snapchat sponsored lens https://www.youtube.com/watch?v=Wkysq4gvRK4
  • 5.
    Snapchat • Founded in2011 • Picture based social media application • Over 280 million daily users (5/21) • >4 billion pictures send everyday (2020) • 82% of US teens use Snapchat once a month • $2.5 Billion revenue in 2020
  • 6.
    Snapchat Lenses • Introducedin 2015 (Snap acquired Looksery) • Add AR content to live camera view • Use face detection/tracking • In 2017 AR “World Lenses” introduced • Virtual content fixed in space
  • 7.
  • 8.
  • 9.
    Making Snap Lenses •Lens Studio (2018) • Visual authoring tool • https://lensstudio.snapchat.com/
  • 10.
    Setting Up • Goto https://www.snapchat.com/ • Install Snapchat on mobile phone • Create an account • Download and install Lens Studio • https://lensstudio.snapchat.com/
  • 11.
  • 13.
  • 14.
    Process 1. Add tacoimage to resources 2. Add Face Image to scene objects 3. Set face image texture to taco 4. Resize taco image 5. Add Face Inset for mouth 6. Add 2 Face Insets for eyes 7. Publish lens 8. Done
  • 15.
    1. Add Resource •Find Taco image with transparent background • Download to local machine • Drag into the resources area
  • 17.
    2. Add FaceImage to Scene • Hit ‘+’ to add object to scene • Search for Face Image • Add to scene • Select Head Binding • View inspector • Attach to point Face Center
  • 18.
    3. Set FaceImage to Taco • Select Image 1 • Open inspector • Click and drag taco image from resources into texture slot
  • 20.
    4. Resize TacoImage • Select Image1 • Open Transform in inspector • Set x, y scale values to 120.0, 120.0
  • 21.
    5. Add MouthFace Inset • Add face inset to scene • Select Face Inset 1 • In inspector make sure Face Region is set to Mouth • Select Face Inset Binding 1 • In inspector, in Head Binding set Attach To Point to Mouth Center • Rename Face Inset Binding to Mouth Face Inset
  • 22.
    6. Add Leftand Right Eye Insets • Add Face Inset to scene • Select Face Inset • Set Face Region in Face inset to Left Eye • Select Face Inset Binding • Set Head Binding Attach to Point to Left Eyeball • Rename Face inset binding to Left Eyeball • Repeat for Right Eyeball
  • 23.
  • 24.
    7. Publish Lens •Click Publish Lens button • Fill in project information • Complete submission on web
  • 25.
    8. Done • Waitfor Snapchat lenses website review • Share Snap code with friends
  • 26.
  • 27.
    Methods for AddingInteraction • Drag and drop • Simple behaviours • Using object components • Visual Scripting • Node based • Coding • Javascript
  • 28.
    Adding Taco Behaviour •When mouth open !Taco! text appears • Key Elements • Taco Text • Text positioning • Text material/colour • Mouth open detection • Mouth close detection
  • 29.
    Key Steps 1. Createtext object • Attach to face, set font size, colour 2. Create Scene Manager object 3. Create Visual Script and add to Scene Manager 4. Add nodes to visual script • Mouth open/closed, text input, set text nodes 5. Done
  • 30.
    1. Create TextObject • Create text object in Object list • Drag to be under head binding object • Attaches to head video • Open text object inspector • Type in sample text • Set text properties • Font size, colour, drop shadow, etc. • Position text
  • 31.
    2. Add ObjectManger • Add Scene Object to object list • Place at top level • Rename as ObjectManager
  • 32.
    3. Add VisualScript • Add Visual Script to Resources • Add script component to ObjectManager • Set VisualScript to ObjectManager script
  • 33.
    4. Creating VisualScript • Node based visual programming • Basic workflow • Open script graph editor • Double click on Visual Script • Load up needed nodes • Wire nodes together • Set parameters • Test logic
  • 34.
    Load Nodes • Rightclick in script graph editor, or hit tab • Search for key terms (e.g. Mouth) • Needed Nodes • MouthOpenEvent – detect when mouth open • MouthCloseEvent – delect when mouth closed • InputText – set the text object value • SetText – set text string value • Important: Delete text in TacoTex object
  • 35.
    Nodes • Delete OnAwake,UpdateEvent nodes – not needed
  • 36.
    Specifying InputText Object •To associate TacoText object with InputText node • Select Manager Object script and check inspector • Drag TacoText object into empty Text input field
  • 37.
    Arrange Nodes inVisual Script • Duplicate SetText Node • Set SetText values • Select node, enter text value in variables view • “!TACO!” in one node, “ “ in the other
  • 38.
    Wire Nodes Together •Output from MouthEvent nodes to trigger of setText nodes • setText nodes to InputText node • Note: impossible to connect incompatible nodes
  • 39.
  • 40.
  • 41.
    Complete the HappyBirthday Tutorial
  • 42.
    Try Out OtherTemplates
  • 43.
  • 44.
  • 45.
    Join the CreatorCommunity Forums
  • 46.
  • 47.