Recommended
PDF
BMP活用による SDN時代のオーバレイNW監視手法の提案
PDF
RouterBOARD with OpenFlow
PDF
PDF
PPT
PDF
PDF
Technical report for IPv6 Routing w/ bgp4+
PDF
PPTX
PDF
KEY
PDF
Lagopus as open flow hybrid switch 実践編
PDF
PDF
Lagopusで試すL3ルーティング + α (Lagopusの設定方法いろいろ)
PDF
Technical report for IPv6 Routing w/ bgp4+ (part2)
PDF
NetBSD/evbarm on Raspberry Pi
PDF
ODP
Xen4.0 and vt-d Network Performance Benchmark
KEY
PDF
PDF
Mastodonインスタンスをセットアップできるスタートアップスクリプトについて
PDF
PDF
PDF
PDF
Lagopus & NFV with Vhost (Tremaday#9)
PDF
PDF
技適なBluetooth GNSS/GPSレシーバーをRaspberryPiで作りたい
PDF
PDF
PDF
More Related Content
PDF
BMP活用による SDN時代のオーバレイNW監視手法の提案
PDF
RouterBOARD with OpenFlow
PDF
PDF
PPT
PDF
PDF
Technical report for IPv6 Routing w/ bgp4+
PDF
What's hot
PPTX
PDF
KEY
PDF
Lagopus as open flow hybrid switch 実践編
PDF
PDF
Lagopusで試すL3ルーティング + α (Lagopusの設定方法いろいろ)
PDF
Technical report for IPv6 Routing w/ bgp4+ (part2)
PDF
NetBSD/evbarm on Raspberry Pi
PDF
ODP
Xen4.0 and vt-d Network Performance Benchmark
KEY
PDF
PDF
Mastodonインスタンスをセットアップできるスタートアップスクリプトについて
PDF
PDF
PDF
PDF
Lagopus & NFV with Vhost (Tremaday#9)
PDF
PDF
技適なBluetooth GNSS/GPSレシーバーをRaspberryPiで作りたい
PDF
Similar to SDN Lab環境でのRobotFramework実践活用
PDF
PDF
PPTX
Project calico introduction - OpenStack最新情報セミナー 2017年7月
PPTX
ネットワークエンジニアのための Puppet / Chef
PDF
余ったPCをルータに変える、ソフトウェアルータ「SEIL/x86」
PDF
Personal Cloud Automation
PPTX
WAN SDN 実践入門! ~ OpenDayLightのPCEP/BGPに触れてみる ~
PDF
how to defend DNS authoritative server against DNS WaterTorture
PDF
PDF
PDF
PPTX
pipework - Advanced Docker Networking
PDF
PPTX
PDF
PPTX
PDF
PPTX
SCUGJ第19回勉強会:RASGWとなにかでつないでみた
PPTX
Visualizenetworktraffic 20181108
PPTX
ネットワーク機器のAPIあれこれ入門�(NetOpsCoding#2)
More from Toshiki Tsuboi
PDF
PDF
RyuBGPSpeakerを活用したOpenFlow簡易ルータを試してみた
PDF
InterAS MPLS-VPN with RyuBgp
PDF
PDF
Evaluation of OpenFlow in RB750GL
PDF
Echo server implementation for Python
PDF
PDF
PDF
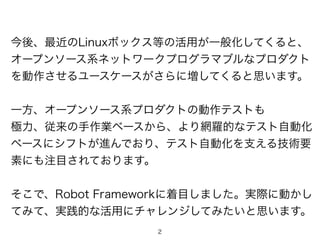
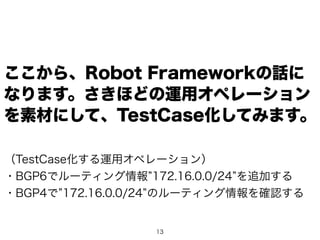
SDN Lab環境でのRobotFramework実践活用 1. 2. 3. 3
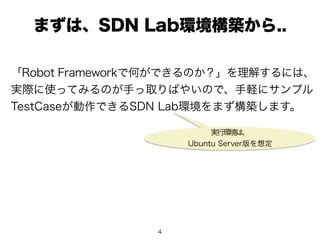
Robot Framework is a generic test automation framework for
acceptance testing and acceptance test-driven development
(ATDD). It has easy-to-use tabular test data syntax and utilizes
the keyword-driven testing approach. Its testing capabilities
can be extended by test libraries implemented either with
Python or Java, and users can create new keywords from
existing ones using the same syntax that is used for creating
test cases.
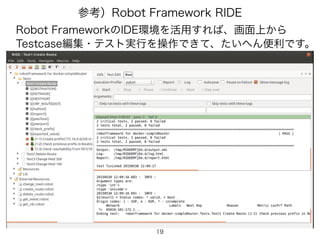
Robot Frameworkとは..
引用元: https://code.google.com/p/robotframework/
4. 5. 5
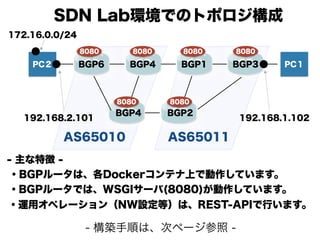
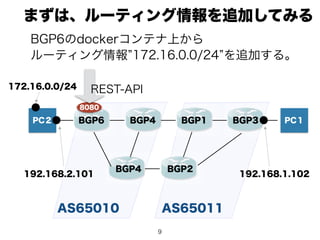
PC2 PC1
AS65010 AS65011
BGP6 BGP4
BGP4
BGP1
BGP2
BGP3
192.168.2.101 192.168.1.102
172.16.0.0/24
SDN Lab環境でのトポロジ構成
・BGPルータは、各Dockerコンテナ上で動作しています。
- 主な特徴 -
・運用オペレーション(NW設定等)は、REST-APIで行います。
・BGPルータでは、WSGIサーバ(8080)が動作しています。
8080 8080 8080 8080
80808080
- 構築手順は、次ページ参照 -
6. 6
$
git
clone
https://github.com/ttsubo/docker-‐simpleRouter.git
$
cd
docker-‐simpleRouter
$
git
checkout
TestAutomation
$
git
branch
*
TestAutomation
master
1. docker-simpleRouterを入手する
$
./simpleRouter.sh
install
2. dockerをインストールする
3. 再度ログイン後に、dockerバージョンを確認する
$
docker
version
$
docker
pull
ttsubo/simple-‐router:latest
$
docker
pull
ttsubo/pc-‐term:latest
$
docker
pull
ttsubo/test-‐server:latest
$
docker
images
4. Dockerイメージを入手する
$
sudo
pip
install
robotframework
$
sudo
pip
install
robotframework-‐requests
$
sudo
pip
install
robotframework-‐sshlibrary
$
sudo
pip
install
requests
5. Robot Frameworkパッケージ関係を入手する
$
./simpleRouter.sh
start
6. simpleRouterプログラムを起動する
$
docker
ps
7. Dockerコンテナの起動状況を確認する
→ 約5分程度したら起動完了
7. 7
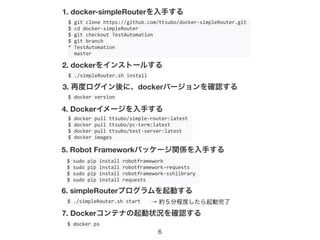
$
docker
ps
CONTAINER
ID
IMAGE
COMMAND
…
PORTS
NAMES
3b455cf31971
ttsubo/test-server:latest
"/bin/bash"
…
0.0.0.0:10080->8080/tcp
TestServer
b0bd88248ee8
ttsubo/simple-router:latest
"/bin/bash"
…
0.0.0.0:8086->8080/tcp
BGP6
daa2d1ba484b
ttsubo/simple-router:latest
"/bin/bash"
…
0.0.0.0:8085->8080/tcp
BGP5
f7e0ea2b9a5b
ttsubo/simple-router:latest
"/bin/bash"
…
0.0.0.0:8084->8080/tcp
BGP4
35dfe5046507
ttsubo/simple-router:latest
"/bin/bash"
…
0.0.0.0:8083->8080/tcp
BGP3
e9b9c5b95857
ttsubo/simple-router:latest
"/bin/bash"
…
0.0.0.0:8082->8080/tcp
BGP2
120a454e6ac3
ttsubo/simple-router:latest
"/bin/bash"
…
0.0.0.0:8081->8080/tcp
BGP1
13c062d72e11
ttsubo/pc-term:latest
"/bin/bash"
…
pc2
3e4eaf915abd
ttsubo/pc-term:latest
"/bin/bash"
…
pc1
Ubuntu母艦より、Dockerコンテナ上で動作しているBGPルータの
WSGIサーバ(8080)にREST経由でアクセスするには、青文字のポート
番号を使用します
注意事項:
外部からWSGIサーバにアクセスするには?
8. 9. 10. 10
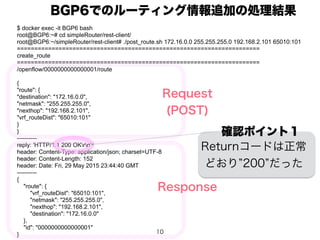
$ docker exec -it BGP6 bash
root@BGP6:~# cd simpleRouter/rest-client/
root@BGP6:~/simpleRouter/rest-client# ./post_route.sh 172.16.0.0 255.255.255.0 192.168.2.101 65010:101
======================================================================
create_route
======================================================================
/openflow/0000000000000001/route
{
"route": {
"destination": "172.16.0.0",
"netmask": "255.255.255.0",
"nexthop": "192.168.2.101",
"vrf_routeDist": "65010:101"
}
}
----------
reply: 'HTTP/1.1 200 OKrn'
header: Content-Type: application/json; charset=UTF-8
header: Content-Length: 152
header: Date: Fri, 29 May 2015 23:44:40 GMT
----------
{
"route": {
"vrf_routeDist": "65010:101",
"netmask": "255.255.255.0",
"nexthop": "192.168.2.101",
"destination": "172.16.0.0"
},
"id": "0000000000000001"
}
BGP6でのルーティング情報追加の処理結果
Request
(POST)
Response
確認ポイント1
Returnコードは正常
どおり 200 だった
11. 12. 12
$ docker exec -it BGP4 bash
root@BGP4:~# cd simpleRouter/rest-client/
root@BGP4:~/simpleRouter/rest-client# ./get_rib_kai.sh
======================================================================
get_rib
======================================================================
/openflow/0000000000000001/rib
----------
reply: 'HTTP/1.1 200 OKrn'
header: Content-Type: application/json; charset=UTF-8
header: Content-Length: 560
header: Date: Sat, 30 May 2015 00:00:19 GMT
----------
{
"rib": "Status codes: * valid, > bestnOrigin codes: i - IGP, e - EGP, ? - incompleten
Network Labels Next Hop Reason Metric LocPrf Pathn
*> 65010:101:172.16.0.0/24 [601] 192.168.107.101 Only Path 100 ?n
*> 65010:101:192.168.2.101/32 [600] 192.168.107.101 Only Path 100 ?n
*> 65010:101:192.168.1.102/32 [300] 192.168.101.102 Only Path 100 65011 ?n”,
"id": "0000000000000001",
"time": "2015/05/30 00:00:19"
}
Request(GET)
Response
BGP4でのルーティング情報確認の処理結果
確認ポイント2
さきほど追加した
ルーティング情報が
確かに含まれていた
13. 14. 14
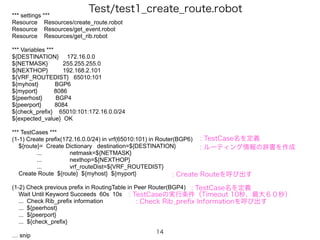
*** settings ***
Resource Resources/create_route.robot
Resource Resources/get_event.robot
Resource Resources/get_rib.robot
*** Variables ***
${DESTINATION} 172.16.0.0
${NETMASK} 255.255.255.0
${NEXTHOP} 192.168.2.101
${VRF_ROUTEDIST} 65010:101
${myhost} BGP6
${myport} 8086
${peerhost} BGP4
${peerport} 8084
${check_prefix} 65010:101:172.16.0.0/24
${expected_value} OK
*** TestCases ***
(1-1) Create prefix(172.16.0.0/24) in vrf(65010:101) in Router(BGP6)
${route}= Create Dictionary destination=${DESTINATION}
... netmask=${NETMASK}
... nexthop=${NEXTHOP}
... vrf_routeDist=${VRF_ROUTEDIST}
Create Route ${route} ${myhost} ${myport}
(1-2) Check previous prefix in RoutingTable in Peer Router(BGP4)
Wait Until Keyword Succeeds 60s 10s
... Check Rib_prefix information
... ${peerhost}
... ${peerport}
... ${check_prefix}
… snip
Test/test1_create_route.robot
: TestCase名を定義
: ルーティング情報の辞書を作成
: Create Routeを呼び出す
: TestCase名を定義
: Check Rib_prefix Informationを呼び出す
: TestCase終了の判定条件(Timeout 10秒、最大60秒)
15. 15
*** settings ***
Library Lib.conversions
Library RequestsLibrary
Library Collections
*** Keywords ***
Create Route
[Arguments] ${route} ${host} ${port}
${headers}= Create Dictionary Content-Type=application/json
Create Session ${host} http://127.0.0.1:${port} ${headers}
${data}= Create Dictionary route=${route}
${data}= Get Json From Dict ${data}
${result} = Post ${host} /openflow/0000000000000001/route ${data}
Log ${result.status_code}
Log ${result.json()['route']}
Should Be Equal As Strings ${result.status_code} 200
Resources/create_route.robot
確認ポイント1
Returnコードは正常どおり
200 か否かを判定する
: 引数パラメータを定義
: httpのhead情報を定義
: httpのURIを定義
: POSTメソッドの入力データに整形する
: POSTメソッド実行
: 処理結果をログ化
: 処理結果の判定
{"route": {
"destination": "172.16.0.0",
"netmask": "255.255.255.0",
"nexthop": "192.168.2.101",
"vrf_routeDist": "65010:101"
}}
入力データ完成形
16. 16
*** settings ***
Library RequestsLibrary
Library Collections
*** Keywords ***
Get Rib
[Arguments] ${host} ${port}
${headers}= Create Dictionary Content-Type=application/json
Create Session ${host} http://127.0.0.1:${port} ${headers}
${result} = Get Request ${host} /openflow/0000000000000001/rib
Log ${result.status_code}
Log ${result.json()['rib']}
Should Be Equal As Strings ${result.status_code} 200
[return] ${result.json()['rib']}
Check Rib_med information
[Arguments] ${host} ${port} ${check_med}
${result}= Get Rib ${host} ${port}
Should Contain ${result} ${check_med}
Check Rib_prefix information
[Arguments] ${host} ${port} ${check_prefix}
${result}= Get Rib ${host} ${port}
Should Contain ${result} ${check_prefix}
Check Rib_no_prefix information
[Arguments] ${host} ${port} ${check_prefix}
${result}= Get Rib ${host} ${port}
Should Not Contain ${result} ${check_prefix}
Resources/get_rib.robot
確認ポイント2
さきほど追加したルーティング情報
が含まれているか否かを判定する
: 処理結果の判定
: GETメソッド実行
: 引数パラメータを定義
: 処理結果をログ化
: Get Ribを呼び出す
: 引数パラメータを定義
: httpのhead情報を定義
: httpのURIを定義
: 呼び出し元に処理結果を戻す
: 処理結果の判定
17. 17
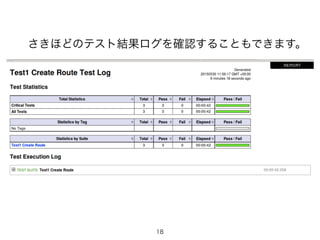
test1_create_route.robot
を実行してみる
$ cd Robot_Framework/
$ pybot Tests/test1_create_route.robot
==============================================================================
Test1 Create Route
==============================================================================
(1-1) Create prefix(172.16.0.0/24) in vrf(65010:101) in Router(BGP6) | PASS |
------------------------------------------------------------------------------
(1-2) Check previous prefix in RoutingTable in Peer Router(BGP4) | PASS |
------------------------------------------------------------------------------
(1-3) check reachability from pc1(192.168.1.102) to pc2(172.16.0.101) | PASS |
------------------------------------------------------------------------------
Test1 Create Route | PASS |
3 critical tests, 3 passed, 0 failed
3 tests total, 3 passed, 0 failed
==============================================================================
Output: /home/tsubo/devel/docker-simpleRouter/Robot_Framework/output.xml
Log: /home/tsubo/devel/docker-simpleRouter/Robot_Framework/log.html
Report: /home/tsubo/devel/docker-simpleRouter/Robot_Framework/report.html
コマンドラインからTestcaseを実行して、
テスト結果が「良好」になりました。
18. 19. 20.


![12
$ docker exec -it BGP4 bash
root@BGP4:~# cd simpleRouter/rest-client/
root@BGP4:~/simpleRouter/rest-client# ./get_rib_kai.sh
======================================================================
get_rib
======================================================================
/openflow/0000000000000001/rib
----------
reply: 'HTTP/1.1 200 OKrn'
header: Content-Type: application/json; charset=UTF-8
header: Content-Length: 560
header: Date: Sat, 30 May 2015 00:00:19 GMT
----------
{
"rib": "Status codes: * valid, > bestnOrigin codes: i - IGP, e - EGP, ? - incompleten
Network Labels Next Hop Reason Metric LocPrf Pathn
*> 65010:101:172.16.0.0/24 [601] 192.168.107.101 Only Path 100 ?n
*> 65010:101:192.168.2.101/32 [600] 192.168.107.101 Only Path 100 ?n
*> 65010:101:192.168.1.102/32 [300] 192.168.101.102 Only Path 100 65011 ?n”,
"id": "0000000000000001",
"time": "2015/05/30 00:00:19"
}
Request(GET)
Response
BGP4でのルーティング情報確認の処理結果
確認ポイント2
さきほど追加した
ルーティング情報が
確かに含まれていた](https://image.slidesharecdn.com/robotframeworkinsdnlabs-150530062657-lva1-app6891/85/SDN-Lab-RobotFramework-12-320.jpg)
![15
*** settings ***
Library Lib.conversions
Library RequestsLibrary
Library Collections
*** Keywords ***
Create Route
[Arguments] ${route} ${host} ${port}
${headers}= Create Dictionary Content-Type=application/json
Create Session ${host} http://127.0.0.1:${port} ${headers}
${data}= Create Dictionary route=${route}
${data}= Get Json From Dict ${data}
${result} = Post ${host} /openflow/0000000000000001/route ${data}
Log ${result.status_code}
Log ${result.json()['route']}
Should Be Equal As Strings ${result.status_code} 200
Resources/create_route.robot
確認ポイント1
Returnコードは正常どおり
200 か否かを判定する
: 引数パラメータを定義
: httpのhead情報を定義
: httpのURIを定義
: POSTメソッドの入力データに整形する
: POSTメソッド実行
: 処理結果をログ化
: 処理結果の判定
{"route": {
"destination": "172.16.0.0",
"netmask": "255.255.255.0",
"nexthop": "192.168.2.101",
"vrf_routeDist": "65010:101"
}}
入力データ完成形](https://image.slidesharecdn.com/robotframeworkinsdnlabs-150530062657-lva1-app6891/85/SDN-Lab-RobotFramework-15-320.jpg)
![16
*** settings ***
Library RequestsLibrary
Library Collections
*** Keywords ***
Get Rib
[Arguments] ${host} ${port}
${headers}= Create Dictionary Content-Type=application/json
Create Session ${host} http://127.0.0.1:${port} ${headers}
${result} = Get Request ${host} /openflow/0000000000000001/rib
Log ${result.status_code}
Log ${result.json()['rib']}
Should Be Equal As Strings ${result.status_code} 200
[return] ${result.json()['rib']}
Check Rib_med information
[Arguments] ${host} ${port} ${check_med}
${result}= Get Rib ${host} ${port}
Should Contain ${result} ${check_med}
Check Rib_prefix information
[Arguments] ${host} ${port} ${check_prefix}
${result}= Get Rib ${host} ${port}
Should Contain ${result} ${check_prefix}
Check Rib_no_prefix information
[Arguments] ${host} ${port} ${check_prefix}
${result}= Get Rib ${host} ${port}
Should Not Contain ${result} ${check_prefix}
Resources/get_rib.robot
確認ポイント2
さきほど追加したルーティング情報
が含まれているか否かを判定する
: 処理結果の判定
: GETメソッド実行
: 引数パラメータを定義
: 処理結果をログ化
: Get Ribを呼び出す
: 引数パラメータを定義
: httpのhead情報を定義
: httpのURIを定義
: 呼び出し元に処理結果を戻す
: 処理結果の判定](https://image.slidesharecdn.com/robotframeworkinsdnlabs-150530062657-lva1-app6891/85/SDN-Lab-RobotFramework-16-320.jpg)