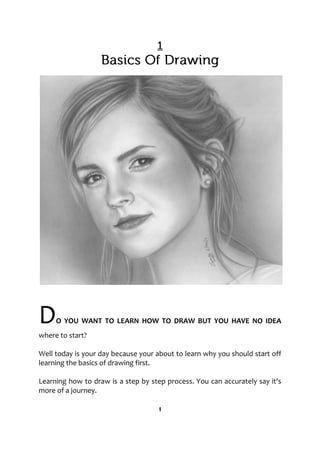
SlideShare a Scribd company logo
1. Basics Of Drawing 1
2. Drawing Effectively With Passion And Expertise 6
3. Tips On How To Draw People 8
4. How To Use Top Drawing Techniques To Be An Artist? 11
5. 3 Basic Drawing Exercises In Blind, Pure And Cross Contours 14
6. Drawing Basics - An Exercise to Practice Foreshortening 17
7. 5 Tips to Pencil Drawing Skin Tones And Textures 19
DO YOU WANT TO LEARN HOW TO DRAW BUT YOU HAVE NO IDEA
where to start?
Well today is your day because your about to learn why you should start off
learning the basics of drawing first.
Learning how to draw is a step by step process. You can accurately say it's
more of a journey.
1
2 REALISTIC PENCIL PORTRAIT DRAWING
However what you need to realize is a journey has a starting point, a
beginning, and everyone has to start from the beginning.
Many newbie artists tend to jump straight into drawing, and expect to
become proficient artists overnight.
Sadly they become quite disappointed, and frustrated when this does not
happen.
I tend to see this play out all too often because there is so much hyped up
information on the internet which leads potential artists to believe they can
become good artists in a very short period of time.
If you have been searching online for help on how to draw you have most
likely seen these types of statements?
Learn To Draw In 30 Days, Learn To Draw In 7 Easy Steps, Learn To Draw In 2
Weeks and others.
These types of hyped up quotes tend to be misleading for they give the
artist newbie a false sense of hope that they will become experts very
quickly.
This however is so far from the truth, and will clearly not be the case.
Now what we are going to do right now is go over a few pointers about the
very basics of drawing that every beginner artist should review so as to get a
realistic balanced view of the beginning process of learning how to draw.
First and foremost you have to love art itself as a whole.
Anything that has to do with art whether it be Illustration, video games,
painting, origami and overall self-expression and creativeness you should
have by now at this stage developed a natural intense love for it.
There should be no other motivating factor or reason why you should want
to become an artist.
Basics Of Drawing 3
This is how most great artists start out drawing in the beginning.
The next step you will have to take is learning how to see the world as an
artist does.
I call this step observation, and analysis.
Now what this means is an artist observes and evaluates everything he or
she sees.
This is not a conscious decision but rather an automatic instinct.
We as artists watch and study movement very closely.
How cars roll, people walk, dogs run, birds fly, and kids playing are all
subjects for us to closely analyze, and evaluate.
The phenomenon of motion is something you will need to definitely know
and understand if your planning on getting into the fields of comic books,
and animation.
Motion is also closely associated with distance, therefore becoming familiar
with perspective is something I would definitely recommend.
For example figures that are drawn closest to the viewers focus are drawn
bigger, just as figures drawn in the background are drawn smaller to appear
farther away from the gaze of the observer.
Now when it comes to physical objects around us they tend to resemble
different geometric shapes.
There are 4 basic shapes which make up the building blocks of anything with
mass and weight.
Those shapes are the circle, square, triangle and rectangle. Without these
basic shapes nothing solid could ever be formed.
4 REALISTIC PENCIL PORTRAIT DRAWING
As an absolute beginner to drawing it is essential that you familiarize
yourself with these shapes.
They will be your key to drawing anything you want.
When you attempt to draw an object try to become accustomed to analyze
its physical characteristics. In other words you will want to define its true
natural shape.
For instance take a look around your room, your computer monitor is really
a square, your wall clock a circle, and your soda can a small cylinder.
Almost everything in your environment falls into one of these basic shapes.
Use shapes to simplify the process if drawing your pieces.
This is a basic, but powerful technique you should quickly master.
Finally you want to make drawing a fun routine that you will practice
faithfully.
Drawing should become more than just a hobby for you. If I should be so
bold, it should become like an addiction.
If you could just draw everyday the same way you play video games
everyday, you would make some really big drawing improvements in no
time.
Practice drawing your household items, such as your table and chairs, your
pots, and pans, or draw all of your kitchen utensils, just start out with the
easy things first.
If you do this daily you will begin to see your skill level start to move up in a
span of 3 months to a year.
This will then build up your confidence to start drawing more complex
objects, and figures.
Do your share of reading as many drawing books as possible.
Basics Of Drawing 5
Read up on perspective, contour, shading, and proportion so as to gain an
understanding of the various qualities of objects and figures, and how they
relate to real life.
Most of all practice, practice, and practice some more and have fun drawing.
IS THERE SUCH A THING AS AN INNATE ABILITY TO DRAW WELL?
Let's probe a little to see if we can come up with some answers.
We all know there are many people with no inherent ability to draw well but
have a passion to develop their drawing skills.
6
Drawing Effectively With Passion And Expertise 7
Of course, drawing is more than getting an exact likeness in a portrait or
figure study.
Drawing as well as any other art genre is mainly about self-expression of the
subject being drawn which should be as unique as one's own handwriting.
It carries the artists' emotions and experiences, viewpoints and the ability to
transform 3D objects to flat non-dimensional surfaces that tell a story.
An audience will respond to any art form according to their education, their
experiences in life, the emotional feeling at the time of viewing the art-
which can vary considerably and, more importantly, the originality in the art
that tells one about the artist.
There are many art teachers who believe that formal training in drawing (as
in the Renaissance period) stultifies the development of originality.
This is observable in most pre-schools and the lower grades when it is
passively enforced by This Is The Correct Way To Draw A Tree.
The final aim should not be learning to observe and draw shapes and forms
accurately, but to develop a unique vision by his or her creative
interpretation while making a concise statement.
The fewer lines drawn mean a more concise drawing with pizzazz. Look at
Rembrandt's drawings for absolute economy of line.
If you can draw really well like Rafael or Rubens then it is time to throw your
guidebook in the trash can as you will no longer need guidance from any
quarter.
Don't give up the disciplines of drawing well because it has not room in
modern art but once a firm drawing skill has been developed with accuracy,
verve, simplicity of line-you can then add originality with your expertise for
an impressive audience response.
PEOPLE JUST STARTING OUT ARE PUZZLED BY THE QUESTION OF HOW
to draw people.
The form of a person dressed in clothes can be pretty complex and this goes
even more for the human body itself.
Let's assume you sit there with a charcoal and an empty sheet of drawing
paper in front of you - as well as a figure of a human with clothing.
Next, you wonder, where do I start for crying out loud?
How do I begin?
Looking at the figure, the task can seem quite daunting.
8
Tips On How To Draw People 9
So, let's start with a basic principle. Any drawing can be brought back to a
few components.
In the case of a human figure, the body can be divided into several parts.
Just ask yourself, where would the middle of the body be? The answer is
simple: at the waistline.
It's important to get the basic proportions right first, and not to add detail in
the beginning.
Only if you are sure that the proportions are about right, can you add (only
small) detail later.
You can assist that process by half closing your eyes when looking at your
model. This way, you focus on the broad shapes and not on the details.
Next, you can do some basic measuring. Take your pencil, hold it vertically
while your arm is at full length.
Then put your thumb where the feet are. Next, move the thumb position to
the waistline without taking your thumb off the pencil.
Check if the pencil's top is in line with the head's top.
If that isn't the case, then you should change the position until you find the
precise halfway point which is roughly at waist height.
After each measurement, you should make a tiny mark on your paper sheet
as a basic guideline.
The following step is to try and measure the head from the chin to the top.
The body is about seven times larger than the head.
Next, you will have to make a mark on your drawing sheet to indicate where
the bottom of the feet is.
10 REALISTIC PENCIL PORTRAIT DRAWING
Let's recap: you should now have a mark on your drawing paper where the
bottom of the feet, the waistline, the chin and the top of the head are.
Now you can review them and decide if the proportions look okay.
Look from your drawing to the figure and back again.
Do it quite fast.
You will see if it the proportions aren't exactly right. In that case, change
them.
As I said, the entire head is about one seventh of the length of the body.
These rules, by the way, should be used as a basic guideline only, not any
rule that's carved in stone.
Just look from your drawing to the figure and back again, and see what's
there. That is the key to getting the right measurements.
Next, you can make marks for other key parts of the body. Of course, there
are the legs and arms.
When the arms are relaxed, the fingers are roughly five head down and the
knees roughly six, so put marks there.
At full face, the width of the body is three heads wide. So make a line from
the crotch to the bottom where you have marked the feet.
So, now you basically know how to draw people the key thing is to keep
practicing and you will get better at it. Have fun!
DO YOU DREAM TO BECOME AN ARTIST BY PROFESSION?
Art can be of different types and you need to choose the art form which
fascinates you the most.
If you love drawing then you can surely take this up as your career or just as
your passion.
11
12 REALISTIC PENCIL PORTRAIT DRAWING
If you dream to become big in this field then you need to make sure you
follow the right tips and choose the right techniques to learn to draw.
It is always important to create a string base so that you never face any kind
of problem later on.
Pencil drawing is the basic thing that you need to learn to become a great
drawing artist.
Get into the best drawing tutorials to understand drawing better.
Art is a form of conveying your emotions and feelings. With the help of
drawing you can speak to people.
So this is meant for sensitive people and they can understand this art form
better.
For basic pencil drawing you must follow certain drawing tips.
First of all it is very much essential to stay focused. You should always try to
teach yourself to draw naturally.
This is one of the best things to produce great work.
You can become a skilled artist only if you practice and practice.
We all know that practice can make a person perfect. After a certain point of
time look back at the old drawings to measure the progress that you have
actually made.
In case of pencil drawing you must follow certain drawing techniques.
Cleanliness is one of the major qualities that your drawing must have.
If you draw with your right hand then try to draw from left to right because
this will prevent your work from getting smudged.
How To Use Top Drawing Tips To Become A Top Artiste 13
Other than this, you can even cover the already drawn areas with a white
paper to avoid contact with your hands.
When you are drawing with pencil make sure you keep away your foods as
well as drinks from it. The best drawing tips are always available with the
expert artists.
Drawing with pencil might seem to be a bit time consuming because it is
quite difficult to show the details with black and white shade.
Light and shade are 2 major aspects of using pencil for drawing.
It is also very important to choose the right kind of pencils. You can shift to
color drawing once you base has become strong.
Highlighting might seem to be a problem in case of pencil drawing but with
practice it can also become easy.
You should also avoid drawing hard surfaces.
Sharpen your pencils well so that you can draw the fine lines and create the
look required for your image.
DRAWING IS AN INTERESTING THING TO DO.
Even a lot people don't draw but they still found it appealing by just
enjoying someone's drawings.
As one of the arts, drawing nowadays has been transformed into various
modern arts such as visual graphics using electronic media.
Among all, pencil drawing is the oldest form.
Pencil drawing still has a lot of fans.
Even some people think that it is quite difficult to learn but the possibility
always works with practices.
14
3 Basic Drawing Exercises In Blind, Pure And Cross Contours 15
What you need when you decide to be good at it are practice and sense of
art.
Though at first you may find yourself so terrible in drawing with pencil but if
you follow the right exercise steps then you will be no longer an amateur.
There are basically 3 basic drawing exercises: blind contour, pure contour
and cross contour.
Each of it helps you to improve your skill until you reach a level of expertise.
Here is an advice, keep working out in every stage; don't skip it, until you're
good enough or you will go nowhere.
Blind contour, a classic exercise, is a stage where you will learn to develop
your eye-hand connection.
In this stage, you already draw an object but you don't need to make the
most perfect sketch with all the visible edges of it.
It is okay if you are only able to draw a messy sketch as long as people's eye
still recognizes what object you're drawing.
Second stage is pure contour drawing.
Advanced than the blind contour drawing exercise, this stage requires you
to draw an object with all the visible edges.
Some people call this as an outline drawing and many cartoonists usually use
this technique to do their work. It helps you to start focus to draw in details.
The last stage is called cross contour drawing exercise.
You will learn to draw a 3-dimensional object and you can begin with the
simplest object around such as glass or cube.
16 REALISTIC PENCIL PORTRAIT DRAWING
It is suggested that you show your drawing results to your friends, family or
everyone who can give you advice of what might you should fix to end with
a better ones.
Every people usually needs different time in completing all 3 stages above
but believe, the longer you need doesn't mean that you can't do better than
another people who needs shorter time.
In fact, the more practices you do the better you will be.
FORESHORTENING IS ONE OF THE KEYS TO DRAWING REALISTICALLY,
so that your drawings have a three-dimensional quality to them.
If you don't know how to do this, don't worry.
Here is an exercise to practice foreshortening, to strengthen your drawing
basics.
What's foreshortening?
It's how a shape changes the way it looks when it moves in space.
17
18 REALISTIC PENCIL PORTRAIT DRAWING
By distorting part of an object, it creates the illusion that part of it is closer
to you.
To do the exercise, find something perfectly round, but flat, like a plastic
container lid, or a CD, or a circle of paper.
Hold it flat at eye level.
Do you see how it looks like just a straight line going across?
If it's something with a little bit of thickness, you will see a very thin
rectangle in front of you.
That's the side of the circle.
Now begin to tilt it, and watch how that line changes shape. It goes from
being one line, to being a rounded shape.
See how it kind of looks like an oval, then a smashed circle?
As you turn it more and more, it looks less and less flattened, until it is
straight up and down in front of you. Now it looks like a perfect circle.
With a pen or pencil and paper, use your circle, and practice drawing it at
different angles.
Don't think of it as a circle.
Just draw what your eyes see in front of you.
Tilt it a little, then draw what you see.
Tilt it even more, and draw what you see then. Your drawings should look
different. You are drawing foreshortening!
Once you can do a circle, try something else, like a rectangle.
You can use a book or one of your folders, or a smart phone.
Drawing Basics - An Exercise to Practice Foreshortening 18
See how the corners that are farther away from your eyes appear to be
closer together than the corners that are closer to you?
Don't think about it. Just observe and draw what you see. That's part of the
trick to drawing. You need to be able to draw what you see.
How can you apply this to your drawings?
Well, if you draw a birthday cake, you could draw it like a rectangle, but to
make it look 3- dimensional, change the top of that rectangle by adding a
foreshortened circle to it instead.
Now it looks like it's round and tall.
Repeat this simple exercise to practice foreshortening and it will soon be
easy to do.
You will be able to apply your new skills to your drawings, and you will be
well on your way to mastering one of the drawing basics.
What makes skin tones and textures hard to draw is that there are no
standard characteristics.
Each subject has different textures, colors and nuances.
Though every subject is different, I have 5 tips that will help make your skin
tones and textures look more natural, realistic and effective.
Grayscale Reference Photo
If you have the means to convert your color photo reference into a
grayscale, or black and white print, this can be a great advantage.
19
20 REALISTIC PENCIL PORTRAIT DRAWING
The grayscale photo can enhance your ability to see the ranges of value you
will need to use.
These ranges could be the very darkest areas compared to the very lightest,
giving you the opportunity to identify the deepest shadows, or in contrast,
the apex of a brighter contour or curve.
Another advantage of the black and white or grayscale print is, that if you
can adjust the value, it helps if you can create an extremely light and/or an
extremely dark print.
Sometimes with a much lighter print, you can pick up more detail in the very
darkest areas.
And often, if you can make a much darker print, you can pick up many of the
slightest variations in value better in the subtle contours of the face for
instance.
Start With Dark
Something very integral to the 5-Pencil Method, is the order in which you
apply the values.
You will always want to work from dark to light if you want the best results.
Beyond the initial sketch and your refined guidelines, the darkest parts of
the face, such as in parts of the eyes and in the face's outer perimeter will be
what receives the first values.
You will lay down a light value, using your 4H, to represent those darkest
values in your reference photo or subject.
This will work very well, because that initial value will only be contrasting
with the lighter value of the paper.
5 Tips to Pencil Drawing Skin Tones And Textures 21
As you start building the darker values, through layering and using your
darker grades of pencils, it will enable you to expand out into the lighter and
lighter values of the face with the 4H pencil leading the way, as it continues
to create a foundation.
As you continue to gradually increase the darkest values by layering and
using the darker valued pencils, it will help you maintain your contrast and
balance until you are ready for your skin tones.
The procedure and the order of your values will continue building in the
same way.
It will help you as you develop the necessary contrast for the subtle values
and gradations, the textures in the skin and face, as well as the contour and
dimension.
Tapered Stroke
This stroke has a taper at both ends just as the name indicates.
This means that the line should be thinner and lighter at the beginning and
end of your stroke.
This stroke will gradually increase in value at the center, as your pencil
makes its maximum contact with the drawing surface.
This will allow you to seamlessly extend lines, creating a consistent value, as
tapered end overlaps tapered end.
The tapered stroke will allow you to create incredible detail, and bring a
realistic quality to your rendering through textures, natural shading,
shadows, and illusion.
Dark Skin Values
For darker skin tones, you might use more value, but do not use more than
you need.
22 REALISTIC PENCIL PORTRAIT DRAWING
You may still need an even darker range of value to demonstrate contour,
dimension, and depth, in another area.
You would not want a person's dark skin to be in the same value range that
you would need for a black garment, but what would you do if you had
nothing darker to use?
They could end up the same.
And, if you use a set range of value to illustrate too many areas in your
portrait, those areas would start appearing flat in relationship to each other.
So, keep your range of values relevant to what needs to be illustrated in
your portrait.
Apply your values in order of darkest to lightest.
Develop the darkest value first in all the relative areas, so that you will be
able to maintain their proper relationship with each other and you will
always have a sense of where you should stop.
This will help you maintain an appropriate contrast with the other values
ranges in your rendering.
Instead of relying on the shade of a particular skin tone, first rely on the
features that will help you designate a particular ethnic look or character
trait.
Even though the skin may be darker, don't overdo it.
Remember, be careful to use only as much value, as you need. Then you will
always have a darker value reserved to use.
Learn to discern even the slightest shift in value and range.
The wider range of values that you are able to create, the more you will be
able to capture and express.
5 Tips to Pencil Drawing Skin Tones And Textures 23
Add Depth
Depth and contour are two of the most important things that you want to
accomplish within any area or set of values you are working with.
To imply depth-whether it be a contour, or a separate dimension, contrast is
always a critical factor.
If you can see an uninterrupted range of value go in and out of a recession, it
is a contour.
Darker values should be used in the deeper shadowed areas to imply depth,
and this is where smooth transitions will be a great advantage.
Build your gradations by placing the tapered strokes side by side to create a
range of value that becomes lighter as it approaches a light source or the
apex of a contour or curve.
If there is contour that goes around and out of your sight, or disappears
behind something, you will need to create a clean edge to your value.
This will separate those dimensions and create depth in your drawings.
Though we tend to rely on darker values to imply depth, practice developing
a contour even within a very limited range of value.
Have fun drawing!

More Related Content

What's hot

How to-draw-manga-vol-29-putting-things-in-perspective
How to-draw-manga-vol-29-putting-things-in-perspectiveHow to-draw-manga-vol-29-putting-things-in-perspective
How to-draw-manga-vol-29-putting-things-in-perspective
Isshin Stark
 
Facial proportions
Facial proportionsFacial proportions
Facial proportions
Mauricio Benavides Beltran
 
Facial Proportions
Facial ProportionsFacial Proportions
Facial Proportionsmrsbauerart
 
Concept Art - Character Design
Concept Art - Character DesignConcept Art - Character Design
Concept Art - Character Designnombre thera
 
Portrait Photography for Beginners
Portrait Photography for BeginnersPortrait Photography for Beginners
Portrait Photography for Beginners
Cynthia Coons
 
High School Shape Photography Lesson
High School Shape Photography LessonHigh School Shape Photography Lesson
High School Shape Photography Lesson
Meredith Hudson
 
High School Form Photography Lesson
High School Form Photography LessonHigh School Form Photography Lesson
High School Form Photography Lesson
Meredith Hudson
 
Portraitdrawing
PortraitdrawingPortraitdrawing
Portraitdrawingcjoyce104
 
Rajesh jain hawala sharing basic drawing
Rajesh jain hawala   sharing basic drawingRajesh jain hawala   sharing basic drawing
Rajesh jain hawala sharing basic drawing
RajeshJainHawala
 
How To Draw. Sketch and Draw Anything, Anywhere
How To Draw. Sketch and Draw Anything, AnywhereHow To Draw. Sketch and Draw Anything, Anywhere
How To Draw. Sketch and Draw Anything, Anywhere
E-knowledge Library Solution
 
Introduction to Drawing
Introduction to DrawingIntroduction to Drawing
Introduction to Drawing
Janis Henderson-Hunsucker
 
Session 9 Photo Poses (Basic Photography Class)
Session 9 Photo Poses (Basic Photography Class)Session 9 Photo Poses (Basic Photography Class)
Session 9 Photo Poses (Basic Photography Class)
Jeremy Eliab
 
Introducing the Self Portrait
Introducing the Self PortraitIntroducing the Self Portrait
Introducing the Self Portrait
tracymargaret
 
20 rules of photo composition
20 rules of photo composition20 rules of photo composition
20 rules of photo composition
ManamiIshimura
 
Life drawing 3
Life drawing 3Life drawing 3
Life drawing 3
Melanie Powell
 
Lesson 6 • Portraits & Lighting
Lesson 6 • Portraits & LightingLesson 6 • Portraits & Lighting
Lesson 6 • Portraits & Lighting
Marcio Sargento
 
O segredo-do-sombreamento-realista
O segredo-do-sombreamento-realistaO segredo-do-sombreamento-realista
O segredo-do-sombreamento-realista
RDSGgomes
 

What's hot (20)

Drawing faces
Drawing facesDrawing faces
Drawing faces
 
ppt about photography
ppt about photographyppt about photography
ppt about photography
 
How to-draw-manga-vol-29-putting-things-in-perspective
How to-draw-manga-vol-29-putting-things-in-perspectiveHow to-draw-manga-vol-29-putting-things-in-perspective
How to-draw-manga-vol-29-putting-things-in-perspective
 
Facial proportions
Facial proportionsFacial proportions
Facial proportions
 
Facial Proportions
Facial ProportionsFacial Proportions
Facial Proportions
 
Concept Art - Character Design
Concept Art - Character DesignConcept Art - Character Design
Concept Art - Character Design
 
Portrait Photography for Beginners
Portrait Photography for BeginnersPortrait Photography for Beginners
Portrait Photography for Beginners
 
High School Shape Photography Lesson
High School Shape Photography LessonHigh School Shape Photography Lesson
High School Shape Photography Lesson
 
High School Form Photography Lesson
High School Form Photography LessonHigh School Form Photography Lesson
High School Form Photography Lesson
 
Portraitdrawing
PortraitdrawingPortraitdrawing
Portraitdrawing
 
Rajesh jain hawala sharing basic drawing
Rajesh jain hawala   sharing basic drawingRajesh jain hawala   sharing basic drawing
Rajesh jain hawala sharing basic drawing
 
How To Draw. Sketch and Draw Anything, Anywhere
How To Draw. Sketch and Draw Anything, AnywhereHow To Draw. Sketch and Draw Anything, Anywhere
How To Draw. Sketch and Draw Anything, Anywhere
 
Introduction to Drawing
Introduction to DrawingIntroduction to Drawing
Introduction to Drawing
 
Session 9 Photo Poses (Basic Photography Class)
Session 9 Photo Poses (Basic Photography Class)Session 9 Photo Poses (Basic Photography Class)
Session 9 Photo Poses (Basic Photography Class)
 
Introducing the Self Portrait
Introducing the Self PortraitIntroducing the Self Portrait
Introducing the Self Portrait
 
20 rules of photo composition
20 rules of photo composition20 rules of photo composition
20 rules of photo composition
 
Life drawing 3
Life drawing 3Life drawing 3
Life drawing 3
 
Lesson 6 • Portraits & Lighting
Lesson 6 • Portraits & LightingLesson 6 • Portraits & Lighting
Lesson 6 • Portraits & Lighting
 
O segredo-do-sombreamento-realista
O segredo-do-sombreamento-realistaO segredo-do-sombreamento-realista
O segredo-do-sombreamento-realista
 
Figure Drawing Basics
Figure Drawing BasicsFigure Drawing Basics
Figure Drawing Basics
 

Similar to Realistic Pencil Portrait Drawing

Start_Figure_Drawing-vfxdownload.net.pdf
Start_Figure_Drawing-vfxdownload.net.pdfStart_Figure_Drawing-vfxdownload.net.pdf
Start_Figure_Drawing-vfxdownload.net.pdf
tammsuanz
 
Portrait drawing tips
Portrait drawing tipsPortrait drawing tips
Portrait drawing tipsromanleerdam
 
How to get better at drawing
How to get better at drawingHow to get better at drawing
How to get better at drawing
06MJNakamonGaewpusri
 
10 Steps To Sketching In The Landscape
10 Steps To Sketching In The Landscape10 Steps To Sketching In The Landscape
10 Steps To Sketching In The Landscape
ulcerd
 
Vision Board How-To
Vision Board How-ToVision Board How-To
Vision Board How-To
Heather Flaherty
 
funny cartoon character draw
funny cartoon character drawfunny cartoon character draw
funny cartoon character drawsimt12
 
Anatomy Heads ebook.pdf
Anatomy Heads ebook.pdfAnatomy Heads ebook.pdf
Anatomy Heads ebook.pdf
Pablo Monteiro
 
Summer assingnment
Summer assingnment Summer assingnment
Summer assingnment
Jemima Witt
 
Ch2 first steps_in_drawing
Ch2 first steps_in_drawingCh2 first steps_in_drawing
Ch2 first steps_in_drawingrita
 
English 1 Project 1
English 1 Project 1English 1 Project 1
English 1 Project 1
Michael Chang
 
Stages of artistic development
Stages of artistic developmentStages of artistic development
Stages of artistic development
acibachhop
 
English essay
English essayEnglish essay
English essay
jygwen
 
Everson portraitdrawing
Everson portraitdrawingEverson portraitdrawing
Everson portraitdrawing
cjoyce104
 
4 tips to improve your drawing skills
4 tips to improve your drawing skills4 tips to improve your drawing skills
4 tips to improve your drawing skills
Show Flipper
 
Graphic narrative evidence task 2
Graphic narrative evidence task 2 Graphic narrative evidence task 2
Graphic narrative evidence task 2 OliviaBolt
 
Transcription howtodrawperspective
Transcription howtodrawperspectiveTranscription howtodrawperspective
Transcription howtodrawperspectivefcopruano
 
Pencil sketch art for beginners
Pencil sketch art for beginnersPencil sketch art for beginners
Pencil sketch art for beginners
pencilsketches
 
Drawing pencil sketches academy
Drawing pencil sketches academyDrawing pencil sketches academy
Drawing pencil sketches academy
pencilsketches
 
Free pencil art sketches tutorial: Drawing-pencil-sketches
Free pencil art sketches tutorial: Drawing-pencil-sketchesFree pencil art sketches tutorial: Drawing-pencil-sketches
Free pencil art sketches tutorial: Drawing-pencil-sketches
pencilsketches
 

Similar to Realistic Pencil Portrait Drawing (20)

English1
English1 English1
English1
 
Start_Figure_Drawing-vfxdownload.net.pdf
Start_Figure_Drawing-vfxdownload.net.pdfStart_Figure_Drawing-vfxdownload.net.pdf
Start_Figure_Drawing-vfxdownload.net.pdf
 
Portrait drawing tips
Portrait drawing tipsPortrait drawing tips
Portrait drawing tips
 
How to get better at drawing
How to get better at drawingHow to get better at drawing
How to get better at drawing
 
10 Steps To Sketching In The Landscape
10 Steps To Sketching In The Landscape10 Steps To Sketching In The Landscape
10 Steps To Sketching In The Landscape
 
Vision Board How-To
Vision Board How-ToVision Board How-To
Vision Board How-To
 
funny cartoon character draw
funny cartoon character drawfunny cartoon character draw
funny cartoon character draw
 
Anatomy Heads ebook.pdf
Anatomy Heads ebook.pdfAnatomy Heads ebook.pdf
Anatomy Heads ebook.pdf
 
Summer assingnment
Summer assingnment Summer assingnment
Summer assingnment
 
Ch2 first steps_in_drawing
Ch2 first steps_in_drawingCh2 first steps_in_drawing
Ch2 first steps_in_drawing
 
English 1 Project 1
English 1 Project 1English 1 Project 1
English 1 Project 1
 
Stages of artistic development
Stages of artistic developmentStages of artistic development
Stages of artistic development
 
English essay
English essayEnglish essay
English essay
 
Everson portraitdrawing
Everson portraitdrawingEverson portraitdrawing
Everson portraitdrawing
 
4 tips to improve your drawing skills
4 tips to improve your drawing skills4 tips to improve your drawing skills
4 tips to improve your drawing skills
 
Graphic narrative evidence task 2
Graphic narrative evidence task 2 Graphic narrative evidence task 2
Graphic narrative evidence task 2
 
Transcription howtodrawperspective
Transcription howtodrawperspectiveTranscription howtodrawperspective
Transcription howtodrawperspective
 
Pencil sketch art for beginners
Pencil sketch art for beginnersPencil sketch art for beginners
Pencil sketch art for beginners
 
Drawing pencil sketches academy
Drawing pencil sketches academyDrawing pencil sketches academy
Drawing pencil sketches academy
 
Free pencil art sketches tutorial: Drawing-pencil-sketches
Free pencil art sketches tutorial: Drawing-pencil-sketchesFree pencil art sketches tutorial: Drawing-pencil-sketches
Free pencil art sketches tutorial: Drawing-pencil-sketches
 

Recently uploaded

一比一原版UPenn毕业证宾夕法尼亚大学毕业证成绩单如何办理
一比一原版UPenn毕业证宾夕法尼亚大学毕业证成绩单如何办理一比一原版UPenn毕业证宾夕法尼亚大学毕业证成绩单如何办理
一比一原版UPenn毕业证宾夕法尼亚大学毕业证成绩单如何办理
beduwt
 
Memory Rental Store - The Ending(Storyboard)
Memory Rental Store - The Ending(Storyboard)Memory Rental Store - The Ending(Storyboard)
Memory Rental Store - The Ending(Storyboard)
SuryaKalyan3
 
The Legacy of Breton In A New Age by Master Terrance Lindall
The Legacy of Breton In A New Age by Master Terrance LindallThe Legacy of Breton In A New Age by Master Terrance Lindall
The Legacy of Breton In A New Age by Master Terrance Lindall
BBaez1
 
Inter-Dimensional Girl Boards Segment (Act 3)
Inter-Dimensional Girl Boards Segment (Act 3)Inter-Dimensional Girl Boards Segment (Act 3)
Inter-Dimensional Girl Boards Segment (Act 3)
CristianMestre
 
thGAP - BAbyss in Moderno!! Transgenic Human Germline Alternatives Project
thGAP - BAbyss in Moderno!!  Transgenic Human Germline Alternatives ProjectthGAP - BAbyss in Moderno!!  Transgenic Human Germline Alternatives Project
thGAP - BAbyss in Moderno!! Transgenic Human Germline Alternatives Project
Marc Dusseiller Dusjagr
 
IrishWritersCtrsPersonalEssaysMay29.pptx
IrishWritersCtrsPersonalEssaysMay29.pptxIrishWritersCtrsPersonalEssaysMay29.pptx
IrishWritersCtrsPersonalEssaysMay29.pptx
Aine Greaney Ellrott
 
acting board rough title here lolaaaaaaa
acting board rough title here lolaaaaaaaacting board rough title here lolaaaaaaa
acting board rough title here lolaaaaaaa
angelicafronda7
 
The Last Polymath: Muntadher Saleh‎‎‎‎‎‎‎‎‎‎‎‎
The Last Polymath: Muntadher Saleh‎‎‎‎‎‎‎‎‎‎‎‎The Last Polymath: Muntadher Saleh‎‎‎‎‎‎‎‎‎‎‎‎
The Last Polymath: Muntadher Saleh‎‎‎‎‎‎‎‎‎‎‎‎
iraqartsandculture
 
ART FORMS OF KERALA: TRADITIONAL AND OTHERS
ART FORMS OF KERALA: TRADITIONAL AND OTHERSART FORMS OF KERALA: TRADITIONAL AND OTHERS
ART FORMS OF KERALA: TRADITIONAL AND OTHERS
Sandhya J.Nair
 
CLASS XII- HISTORY-THEME 4-Thinkers, Bes
CLASS XII- HISTORY-THEME 4-Thinkers, BesCLASS XII- HISTORY-THEME 4-Thinkers, Bes
CLASS XII- HISTORY-THEME 4-Thinkers, Bes
aditiyad2020
 
2137ad - Characters that live in Merindol and are at the center of main stories
2137ad - Characters that live in Merindol and are at the center of main stories2137ad - Characters that live in Merindol and are at the center of main stories
2137ad - Characters that live in Merindol and are at the center of main stories
luforfor
 
Codes n Conventionss copy (2).pptx new new
Codes n Conventionss copy (2).pptx new newCodes n Conventionss copy (2).pptx new new
Codes n Conventionss copy (2).pptx new new
ZackSpencer3
 
Memory Rental Store - The Chase (Storyboard)
Memory Rental Store - The Chase (Storyboard)Memory Rental Store - The Chase (Storyboard)
Memory Rental Store - The Chase (Storyboard)
SuryaKalyan3
 
Caffeinated Pitch Bible- developed by Claire Wilson
Caffeinated Pitch Bible- developed by Claire WilsonCaffeinated Pitch Bible- developed by Claire Wilson
Caffeinated Pitch Bible- developed by Claire Wilson
ClaireWilson398082
 
一比一原版(qut毕业证)昆士兰科技大学毕业证如何办理
一比一原版(qut毕业证)昆士兰科技大学毕业证如何办理一比一原版(qut毕业证)昆士兰科技大学毕业证如何办理
一比一原版(qut毕业证)昆士兰科技大学毕业证如何办理
taqyed
 
ashokathegreat project class 12 presentation
ashokathegreat project class 12 presentationashokathegreat project class 12 presentation
ashokathegreat project class 12 presentation
aditiyad2020
 
Sundabet | Slot gacor dan terpercaya mudah menang
Sundabet | Slot gacor dan terpercaya mudah menangSundabet | Slot gacor dan terpercaya mudah menang
Sundabet | Slot gacor dan terpercaya mudah menang
Sundabet | Situs Slot gacor dan terpercaya
 
一比一原版(GU毕业证)格里菲斯大学毕业证成绩单
一比一原版(GU毕业证)格里菲斯大学毕业证成绩单一比一原版(GU毕业证)格里菲斯大学毕业证成绩单
一比一原版(GU毕业证)格里菲斯大学毕业证成绩单
zvaywau
 
一比一原版(DU毕业证)迪肯大学毕业证成绩单
一比一原版(DU毕业证)迪肯大学毕业证成绩单一比一原版(DU毕业证)迪肯大学毕业证成绩单
一比一原版(DU毕业证)迪肯大学毕业证成绩单
zvaywau
 

Recently uploaded (20)

一比一原版UPenn毕业证宾夕法尼亚大学毕业证成绩单如何办理
一比一原版UPenn毕业证宾夕法尼亚大学毕业证成绩单如何办理一比一原版UPenn毕业证宾夕法尼亚大学毕业证成绩单如何办理
一比一原版UPenn毕业证宾夕法尼亚大学毕业证成绩单如何办理
 
Memory Rental Store - The Ending(Storyboard)
Memory Rental Store - The Ending(Storyboard)Memory Rental Store - The Ending(Storyboard)
Memory Rental Store - The Ending(Storyboard)
 
The Legacy of Breton In A New Age by Master Terrance Lindall
The Legacy of Breton In A New Age by Master Terrance LindallThe Legacy of Breton In A New Age by Master Terrance Lindall
The Legacy of Breton In A New Age by Master Terrance Lindall
 
Inter-Dimensional Girl Boards Segment (Act 3)
Inter-Dimensional Girl Boards Segment (Act 3)Inter-Dimensional Girl Boards Segment (Act 3)
Inter-Dimensional Girl Boards Segment (Act 3)
 
thGAP - BAbyss in Moderno!! Transgenic Human Germline Alternatives Project
thGAP - BAbyss in Moderno!!  Transgenic Human Germline Alternatives ProjectthGAP - BAbyss in Moderno!!  Transgenic Human Germline Alternatives Project
thGAP - BAbyss in Moderno!! Transgenic Human Germline Alternatives Project
 
IrishWritersCtrsPersonalEssaysMay29.pptx
IrishWritersCtrsPersonalEssaysMay29.pptxIrishWritersCtrsPersonalEssaysMay29.pptx
IrishWritersCtrsPersonalEssaysMay29.pptx
 
acting board rough title here lolaaaaaaa
acting board rough title here lolaaaaaaaacting board rough title here lolaaaaaaa
acting board rough title here lolaaaaaaa
 
The Last Polymath: Muntadher Saleh‎‎‎‎‎‎‎‎‎‎‎‎
The Last Polymath: Muntadher Saleh‎‎‎‎‎‎‎‎‎‎‎‎The Last Polymath: Muntadher Saleh‎‎‎‎‎‎‎‎‎‎‎‎
The Last Polymath: Muntadher Saleh‎‎‎‎‎‎‎‎‎‎‎‎
 
ART FORMS OF KERALA: TRADITIONAL AND OTHERS
ART FORMS OF KERALA: TRADITIONAL AND OTHERSART FORMS OF KERALA: TRADITIONAL AND OTHERS
ART FORMS OF KERALA: TRADITIONAL AND OTHERS
 
CLASS XII- HISTORY-THEME 4-Thinkers, Bes
CLASS XII- HISTORY-THEME 4-Thinkers, BesCLASS XII- HISTORY-THEME 4-Thinkers, Bes
CLASS XII- HISTORY-THEME 4-Thinkers, Bes
 
2137ad - Characters that live in Merindol and are at the center of main stories
2137ad - Characters that live in Merindol and are at the center of main stories2137ad - Characters that live in Merindol and are at the center of main stories
2137ad - Characters that live in Merindol and are at the center of main stories
 
Codes n Conventionss copy (2).pptx new new
Codes n Conventionss copy (2).pptx new newCodes n Conventionss copy (2).pptx new new
Codes n Conventionss copy (2).pptx new new
 
Memory Rental Store - The Chase (Storyboard)
Memory Rental Store - The Chase (Storyboard)Memory Rental Store - The Chase (Storyboard)
Memory Rental Store - The Chase (Storyboard)
 
Caffeinated Pitch Bible- developed by Claire Wilson
Caffeinated Pitch Bible- developed by Claire WilsonCaffeinated Pitch Bible- developed by Claire Wilson
Caffeinated Pitch Bible- developed by Claire Wilson
 
一比一原版(qut毕业证)昆士兰科技大学毕业证如何办理
一比一原版(qut毕业证)昆士兰科技大学毕业证如何办理一比一原版(qut毕业证)昆士兰科技大学毕业证如何办理
一比一原版(qut毕业证)昆士兰科技大学毕业证如何办理
 
ashokathegreat project class 12 presentation
ashokathegreat project class 12 presentationashokathegreat project class 12 presentation
ashokathegreat project class 12 presentation
 
Sundabet | Slot gacor dan terpercaya mudah menang
Sundabet | Slot gacor dan terpercaya mudah menangSundabet | Slot gacor dan terpercaya mudah menang
Sundabet | Slot gacor dan terpercaya mudah menang
 
一比一原版(GU毕业证)格里菲斯大学毕业证成绩单
一比一原版(GU毕业证)格里菲斯大学毕业证成绩单一比一原版(GU毕业证)格里菲斯大学毕业证成绩单
一比一原版(GU毕业证)格里菲斯大学毕业证成绩单
 
一比一原版(DU毕业证)迪肯大学毕业证成绩单
一比一原版(DU毕业证)迪肯大学毕业证成绩单一比一原版(DU毕业证)迪肯大学毕业证成绩单
一比一原版(DU毕业证)迪肯大学毕业证成绩单
 
European Cybersecurity Skills Framework Role Profiles.pdf
European Cybersecurity Skills Framework Role Profiles.pdfEuropean Cybersecurity Skills Framework Role Profiles.pdf
European Cybersecurity Skills Framework Role Profiles.pdf
 

Realistic Pencil Portrait Drawing

  • 1.
  • 2. 1. Basics Of Drawing 1 2. Drawing Effectively With Passion And Expertise 6 3. Tips On How To Draw People 8 4. How To Use Top Drawing Techniques To Be An Artist? 11 5. 3 Basic Drawing Exercises In Blind, Pure And Cross Contours 14 6. Drawing Basics - An Exercise to Practice Foreshortening 17 7. 5 Tips to Pencil Drawing Skin Tones And Textures 19
  • 3. DO YOU WANT TO LEARN HOW TO DRAW BUT YOU HAVE NO IDEA where to start? Well today is your day because your about to learn why you should start off learning the basics of drawing first. Learning how to draw is a step by step process. You can accurately say it's more of a journey. 1
  • 4. 2 REALISTIC PENCIL PORTRAIT DRAWING However what you need to realize is a journey has a starting point, a beginning, and everyone has to start from the beginning. Many newbie artists tend to jump straight into drawing, and expect to become proficient artists overnight. Sadly they become quite disappointed, and frustrated when this does not happen. I tend to see this play out all too often because there is so much hyped up information on the internet which leads potential artists to believe they can become good artists in a very short period of time. If you have been searching online for help on how to draw you have most likely seen these types of statements? Learn To Draw In 30 Days, Learn To Draw In 7 Easy Steps, Learn To Draw In 2 Weeks and others. These types of hyped up quotes tend to be misleading for they give the artist newbie a false sense of hope that they will become experts very quickly. This however is so far from the truth, and will clearly not be the case. Now what we are going to do right now is go over a few pointers about the very basics of drawing that every beginner artist should review so as to get a realistic balanced view of the beginning process of learning how to draw. First and foremost you have to love art itself as a whole. Anything that has to do with art whether it be Illustration, video games, painting, origami and overall self-expression and creativeness you should have by now at this stage developed a natural intense love for it. There should be no other motivating factor or reason why you should want to become an artist.
  • 5. Basics Of Drawing 3 This is how most great artists start out drawing in the beginning. The next step you will have to take is learning how to see the world as an artist does. I call this step observation, and analysis. Now what this means is an artist observes and evaluates everything he or she sees. This is not a conscious decision but rather an automatic instinct. We as artists watch and study movement very closely. How cars roll, people walk, dogs run, birds fly, and kids playing are all subjects for us to closely analyze, and evaluate. The phenomenon of motion is something you will need to definitely know and understand if your planning on getting into the fields of comic books, and animation. Motion is also closely associated with distance, therefore becoming familiar with perspective is something I would definitely recommend. For example figures that are drawn closest to the viewers focus are drawn bigger, just as figures drawn in the background are drawn smaller to appear farther away from the gaze of the observer. Now when it comes to physical objects around us they tend to resemble different geometric shapes. There are 4 basic shapes which make up the building blocks of anything with mass and weight. Those shapes are the circle, square, triangle and rectangle. Without these basic shapes nothing solid could ever be formed.
  • 6. 4 REALISTIC PENCIL PORTRAIT DRAWING As an absolute beginner to drawing it is essential that you familiarize yourself with these shapes. They will be your key to drawing anything you want. When you attempt to draw an object try to become accustomed to analyze its physical characteristics. In other words you will want to define its true natural shape. For instance take a look around your room, your computer monitor is really a square, your wall clock a circle, and your soda can a small cylinder. Almost everything in your environment falls into one of these basic shapes. Use shapes to simplify the process if drawing your pieces. This is a basic, but powerful technique you should quickly master. Finally you want to make drawing a fun routine that you will practice faithfully. Drawing should become more than just a hobby for you. If I should be so bold, it should become like an addiction. If you could just draw everyday the same way you play video games everyday, you would make some really big drawing improvements in no time. Practice drawing your household items, such as your table and chairs, your pots, and pans, or draw all of your kitchen utensils, just start out with the easy things first. If you do this daily you will begin to see your skill level start to move up in a span of 3 months to a year. This will then build up your confidence to start drawing more complex objects, and figures. Do your share of reading as many drawing books as possible.
  • 7. Basics Of Drawing 5 Read up on perspective, contour, shading, and proportion so as to gain an understanding of the various qualities of objects and figures, and how they relate to real life. Most of all practice, practice, and practice some more and have fun drawing.
  • 8. IS THERE SUCH A THING AS AN INNATE ABILITY TO DRAW WELL? Let's probe a little to see if we can come up with some answers. We all know there are many people with no inherent ability to draw well but have a passion to develop their drawing skills. 6
  • 9. Drawing Effectively With Passion And Expertise 7 Of course, drawing is more than getting an exact likeness in a portrait or figure study. Drawing as well as any other art genre is mainly about self-expression of the subject being drawn which should be as unique as one's own handwriting. It carries the artists' emotions and experiences, viewpoints and the ability to transform 3D objects to flat non-dimensional surfaces that tell a story. An audience will respond to any art form according to their education, their experiences in life, the emotional feeling at the time of viewing the art- which can vary considerably and, more importantly, the originality in the art that tells one about the artist. There are many art teachers who believe that formal training in drawing (as in the Renaissance period) stultifies the development of originality. This is observable in most pre-schools and the lower grades when it is passively enforced by This Is The Correct Way To Draw A Tree. The final aim should not be learning to observe and draw shapes and forms accurately, but to develop a unique vision by his or her creative interpretation while making a concise statement. The fewer lines drawn mean a more concise drawing with pizzazz. Look at Rembrandt's drawings for absolute economy of line. If you can draw really well like Rafael or Rubens then it is time to throw your guidebook in the trash can as you will no longer need guidance from any quarter. Don't give up the disciplines of drawing well because it has not room in modern art but once a firm drawing skill has been developed with accuracy, verve, simplicity of line-you can then add originality with your expertise for an impressive audience response.
  • 10. PEOPLE JUST STARTING OUT ARE PUZZLED BY THE QUESTION OF HOW to draw people. The form of a person dressed in clothes can be pretty complex and this goes even more for the human body itself. Let's assume you sit there with a charcoal and an empty sheet of drawing paper in front of you - as well as a figure of a human with clothing. Next, you wonder, where do I start for crying out loud? How do I begin? Looking at the figure, the task can seem quite daunting. 8
  • 11. Tips On How To Draw People 9 So, let's start with a basic principle. Any drawing can be brought back to a few components. In the case of a human figure, the body can be divided into several parts. Just ask yourself, where would the middle of the body be? The answer is simple: at the waistline. It's important to get the basic proportions right first, and not to add detail in the beginning. Only if you are sure that the proportions are about right, can you add (only small) detail later. You can assist that process by half closing your eyes when looking at your model. This way, you focus on the broad shapes and not on the details. Next, you can do some basic measuring. Take your pencil, hold it vertically while your arm is at full length. Then put your thumb where the feet are. Next, move the thumb position to the waistline without taking your thumb off the pencil. Check if the pencil's top is in line with the head's top. If that isn't the case, then you should change the position until you find the precise halfway point which is roughly at waist height. After each measurement, you should make a tiny mark on your paper sheet as a basic guideline. The following step is to try and measure the head from the chin to the top. The body is about seven times larger than the head. Next, you will have to make a mark on your drawing sheet to indicate where the bottom of the feet is.
  • 12. 10 REALISTIC PENCIL PORTRAIT DRAWING Let's recap: you should now have a mark on your drawing paper where the bottom of the feet, the waistline, the chin and the top of the head are. Now you can review them and decide if the proportions look okay. Look from your drawing to the figure and back again. Do it quite fast. You will see if it the proportions aren't exactly right. In that case, change them. As I said, the entire head is about one seventh of the length of the body. These rules, by the way, should be used as a basic guideline only, not any rule that's carved in stone. Just look from your drawing to the figure and back again, and see what's there. That is the key to getting the right measurements. Next, you can make marks for other key parts of the body. Of course, there are the legs and arms. When the arms are relaxed, the fingers are roughly five head down and the knees roughly six, so put marks there. At full face, the width of the body is three heads wide. So make a line from the crotch to the bottom where you have marked the feet. So, now you basically know how to draw people the key thing is to keep practicing and you will get better at it. Have fun!
  • 13. DO YOU DREAM TO BECOME AN ARTIST BY PROFESSION? Art can be of different types and you need to choose the art form which fascinates you the most. If you love drawing then you can surely take this up as your career or just as your passion. 11
  • 14. 12 REALISTIC PENCIL PORTRAIT DRAWING If you dream to become big in this field then you need to make sure you follow the right tips and choose the right techniques to learn to draw. It is always important to create a string base so that you never face any kind of problem later on. Pencil drawing is the basic thing that you need to learn to become a great drawing artist. Get into the best drawing tutorials to understand drawing better. Art is a form of conveying your emotions and feelings. With the help of drawing you can speak to people. So this is meant for sensitive people and they can understand this art form better. For basic pencil drawing you must follow certain drawing tips. First of all it is very much essential to stay focused. You should always try to teach yourself to draw naturally. This is one of the best things to produce great work. You can become a skilled artist only if you practice and practice. We all know that practice can make a person perfect. After a certain point of time look back at the old drawings to measure the progress that you have actually made. In case of pencil drawing you must follow certain drawing techniques. Cleanliness is one of the major qualities that your drawing must have. If you draw with your right hand then try to draw from left to right because this will prevent your work from getting smudged.
  • 15. How To Use Top Drawing Tips To Become A Top Artiste 13 Other than this, you can even cover the already drawn areas with a white paper to avoid contact with your hands. When you are drawing with pencil make sure you keep away your foods as well as drinks from it. The best drawing tips are always available with the expert artists. Drawing with pencil might seem to be a bit time consuming because it is quite difficult to show the details with black and white shade. Light and shade are 2 major aspects of using pencil for drawing. It is also very important to choose the right kind of pencils. You can shift to color drawing once you base has become strong. Highlighting might seem to be a problem in case of pencil drawing but with practice it can also become easy. You should also avoid drawing hard surfaces. Sharpen your pencils well so that you can draw the fine lines and create the look required for your image.
  • 16. DRAWING IS AN INTERESTING THING TO DO. Even a lot people don't draw but they still found it appealing by just enjoying someone's drawings. As one of the arts, drawing nowadays has been transformed into various modern arts such as visual graphics using electronic media. Among all, pencil drawing is the oldest form. Pencil drawing still has a lot of fans. Even some people think that it is quite difficult to learn but the possibility always works with practices. 14
  • 17. 3 Basic Drawing Exercises In Blind, Pure And Cross Contours 15 What you need when you decide to be good at it are practice and sense of art. Though at first you may find yourself so terrible in drawing with pencil but if you follow the right exercise steps then you will be no longer an amateur. There are basically 3 basic drawing exercises: blind contour, pure contour and cross contour. Each of it helps you to improve your skill until you reach a level of expertise. Here is an advice, keep working out in every stage; don't skip it, until you're good enough or you will go nowhere. Blind contour, a classic exercise, is a stage where you will learn to develop your eye-hand connection. In this stage, you already draw an object but you don't need to make the most perfect sketch with all the visible edges of it. It is okay if you are only able to draw a messy sketch as long as people's eye still recognizes what object you're drawing. Second stage is pure contour drawing. Advanced than the blind contour drawing exercise, this stage requires you to draw an object with all the visible edges. Some people call this as an outline drawing and many cartoonists usually use this technique to do their work. It helps you to start focus to draw in details. The last stage is called cross contour drawing exercise. You will learn to draw a 3-dimensional object and you can begin with the simplest object around such as glass or cube.
  • 18. 16 REALISTIC PENCIL PORTRAIT DRAWING It is suggested that you show your drawing results to your friends, family or everyone who can give you advice of what might you should fix to end with a better ones. Every people usually needs different time in completing all 3 stages above but believe, the longer you need doesn't mean that you can't do better than another people who needs shorter time. In fact, the more practices you do the better you will be.
  • 19. FORESHORTENING IS ONE OF THE KEYS TO DRAWING REALISTICALLY, so that your drawings have a three-dimensional quality to them. If you don't know how to do this, don't worry. Here is an exercise to practice foreshortening, to strengthen your drawing basics. What's foreshortening? It's how a shape changes the way it looks when it moves in space. 17
  • 20. 18 REALISTIC PENCIL PORTRAIT DRAWING By distorting part of an object, it creates the illusion that part of it is closer to you. To do the exercise, find something perfectly round, but flat, like a plastic container lid, or a CD, or a circle of paper. Hold it flat at eye level. Do you see how it looks like just a straight line going across? If it's something with a little bit of thickness, you will see a very thin rectangle in front of you. That's the side of the circle. Now begin to tilt it, and watch how that line changes shape. It goes from being one line, to being a rounded shape. See how it kind of looks like an oval, then a smashed circle? As you turn it more and more, it looks less and less flattened, until it is straight up and down in front of you. Now it looks like a perfect circle. With a pen or pencil and paper, use your circle, and practice drawing it at different angles. Don't think of it as a circle. Just draw what your eyes see in front of you. Tilt it a little, then draw what you see. Tilt it even more, and draw what you see then. Your drawings should look different. You are drawing foreshortening! Once you can do a circle, try something else, like a rectangle. You can use a book or one of your folders, or a smart phone.
  • 21. Drawing Basics - An Exercise to Practice Foreshortening 18 See how the corners that are farther away from your eyes appear to be closer together than the corners that are closer to you? Don't think about it. Just observe and draw what you see. That's part of the trick to drawing. You need to be able to draw what you see. How can you apply this to your drawings? Well, if you draw a birthday cake, you could draw it like a rectangle, but to make it look 3- dimensional, change the top of that rectangle by adding a foreshortened circle to it instead. Now it looks like it's round and tall. Repeat this simple exercise to practice foreshortening and it will soon be easy to do. You will be able to apply your new skills to your drawings, and you will be well on your way to mastering one of the drawing basics.
  • 22. What makes skin tones and textures hard to draw is that there are no standard characteristics. Each subject has different textures, colors and nuances. Though every subject is different, I have 5 tips that will help make your skin tones and textures look more natural, realistic and effective. Grayscale Reference Photo If you have the means to convert your color photo reference into a grayscale, or black and white print, this can be a great advantage. 19
  • 23. 20 REALISTIC PENCIL PORTRAIT DRAWING The grayscale photo can enhance your ability to see the ranges of value you will need to use. These ranges could be the very darkest areas compared to the very lightest, giving you the opportunity to identify the deepest shadows, or in contrast, the apex of a brighter contour or curve. Another advantage of the black and white or grayscale print is, that if you can adjust the value, it helps if you can create an extremely light and/or an extremely dark print. Sometimes with a much lighter print, you can pick up more detail in the very darkest areas. And often, if you can make a much darker print, you can pick up many of the slightest variations in value better in the subtle contours of the face for instance. Start With Dark Something very integral to the 5-Pencil Method, is the order in which you apply the values. You will always want to work from dark to light if you want the best results. Beyond the initial sketch and your refined guidelines, the darkest parts of the face, such as in parts of the eyes and in the face's outer perimeter will be what receives the first values. You will lay down a light value, using your 4H, to represent those darkest values in your reference photo or subject. This will work very well, because that initial value will only be contrasting with the lighter value of the paper.
  • 24. 5 Tips to Pencil Drawing Skin Tones And Textures 21 As you start building the darker values, through layering and using your darker grades of pencils, it will enable you to expand out into the lighter and lighter values of the face with the 4H pencil leading the way, as it continues to create a foundation. As you continue to gradually increase the darkest values by layering and using the darker valued pencils, it will help you maintain your contrast and balance until you are ready for your skin tones. The procedure and the order of your values will continue building in the same way. It will help you as you develop the necessary contrast for the subtle values and gradations, the textures in the skin and face, as well as the contour and dimension. Tapered Stroke This stroke has a taper at both ends just as the name indicates. This means that the line should be thinner and lighter at the beginning and end of your stroke. This stroke will gradually increase in value at the center, as your pencil makes its maximum contact with the drawing surface. This will allow you to seamlessly extend lines, creating a consistent value, as tapered end overlaps tapered end. The tapered stroke will allow you to create incredible detail, and bring a realistic quality to your rendering through textures, natural shading, shadows, and illusion. Dark Skin Values For darker skin tones, you might use more value, but do not use more than you need.
  • 25. 22 REALISTIC PENCIL PORTRAIT DRAWING You may still need an even darker range of value to demonstrate contour, dimension, and depth, in another area. You would not want a person's dark skin to be in the same value range that you would need for a black garment, but what would you do if you had nothing darker to use? They could end up the same. And, if you use a set range of value to illustrate too many areas in your portrait, those areas would start appearing flat in relationship to each other. So, keep your range of values relevant to what needs to be illustrated in your portrait. Apply your values in order of darkest to lightest. Develop the darkest value first in all the relative areas, so that you will be able to maintain their proper relationship with each other and you will always have a sense of where you should stop. This will help you maintain an appropriate contrast with the other values ranges in your rendering. Instead of relying on the shade of a particular skin tone, first rely on the features that will help you designate a particular ethnic look or character trait. Even though the skin may be darker, don't overdo it. Remember, be careful to use only as much value, as you need. Then you will always have a darker value reserved to use. Learn to discern even the slightest shift in value and range. The wider range of values that you are able to create, the more you will be able to capture and express.
  • 26. 5 Tips to Pencil Drawing Skin Tones And Textures 23 Add Depth Depth and contour are two of the most important things that you want to accomplish within any area or set of values you are working with. To imply depth-whether it be a contour, or a separate dimension, contrast is always a critical factor. If you can see an uninterrupted range of value go in and out of a recession, it is a contour. Darker values should be used in the deeper shadowed areas to imply depth, and this is where smooth transitions will be a great advantage. Build your gradations by placing the tapered strokes side by side to create a range of value that becomes lighter as it approaches a light source or the apex of a contour or curve. If there is contour that goes around and out of your sight, or disappears behind something, you will need to create a clean edge to your value. This will separate those dimensions and create depth in your drawings. Though we tend to rely on darker values to imply depth, practice developing a contour even within a very limited range of value. Have fun drawing!