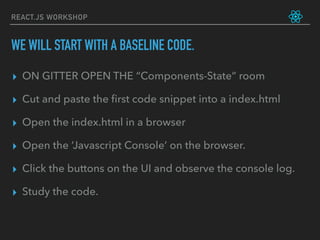
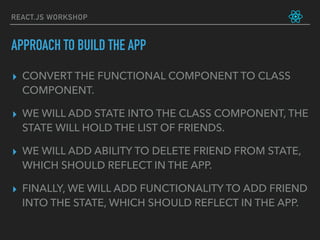
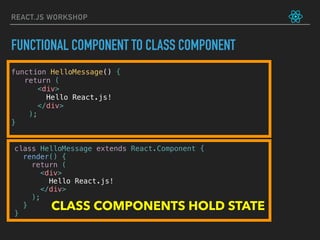
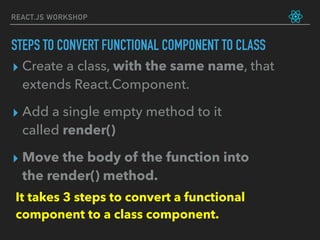
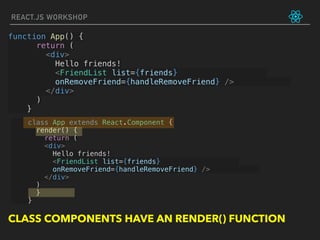
This document outlines a React.js workshop that covers the basics of React, including prerequisites like HTML, CSS, and JavaScript. It provides an overview of functional and class components, state management, and the rendering process, along with practical examples and learning objectives. The workshop also includes guidance on building a simple app with friend list management functionalities, converting functional components to class components, and integrating state handling methods.


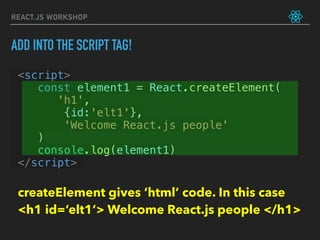


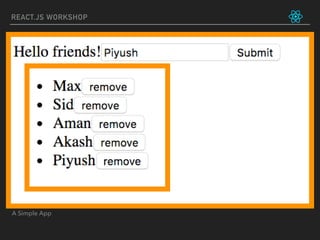
![let friends = ['Max', 'Sid', 'Aman']
function FriendList(props) {
return (
<ul>
{props.list.map((friend) => (
<li key={friend}>
{friend}
<button onClick={() => props.onRemoveFriend(friend)}> remove </button>
</li>
))}
</ul>
)
}
function handleRemoveFriend(name) {
console.log("Removing friend: ", name)
friends = friends.filter((friend) => friend != name)
console.log("The friends are: ", friends)
}
function App() {
return (
<div>
Hello friends!
<FriendList list={friends}
onRemoveFriend={handleRemoveFriend} />
</div>
)
}
ReactDOM.render(
<App/>,
document.getElementById('app')
)
REACT.JS WORKSHOP](https://image.slidesharecdn.com/react-180812162312/85/React-js-workshop-by-tech47-in-28-320.jpg)


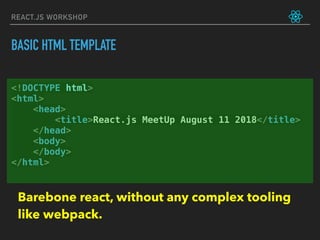
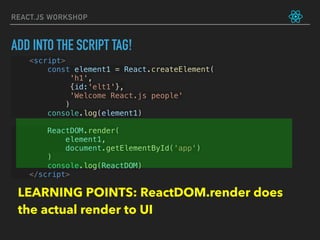
![let friends = ['Max', 'Sid', 'Aman']
class App extends React.Component {
constructor(props) {
super(props)
this.state = {
friends : ['Max', ‘Aman', 'Sid']
}
}
render() {
return (
<div>
Hello friends!
<FriendList
list={this.state.friends} />
onRemoveFriend={handleRemoveFriend} />
</div>
)
}
}
REACT.JS WORKSHOP
Step 1 of 3:
LEARNING POINTS: CONSTRUCTOR, STATE
INITIALIZATION](https://image.slidesharecdn.com/react-180812162312/85/React-js-workshop-by-tech47-in-35-320.jpg)
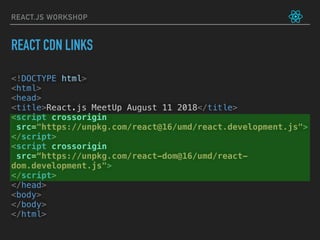
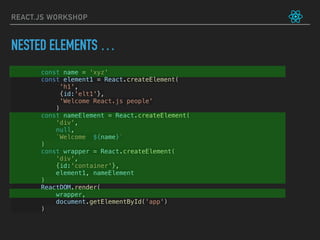
![REACT.JS WORKSHOP
function handleRemoveFriend(name) {
friends = friends.filter((friend) => friend != name)
this.setState((currentState)=> {
return {
friends: currentState.friends.filter((friend) =>
friend!= name)
}
})
}
Step 2 of 3:
setState(updater[, callback])
updater function signature:
(prevState, props) => stateChange](https://image.slidesharecdn.com/react-180812162312/85/React-js-workshop-by-tech47-in-37-320.jpg)
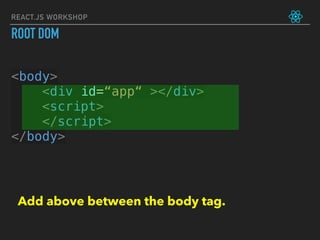
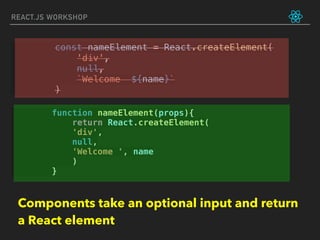
![REACT.JS WORKSHOP
constructor(props) {
super(props)
this.state = {
friends : ['Max', 'Sid', 'Aman']
}
handleRemoveFriend = handleRemoveFriend.bind(this)
}
Step 3 of 3:
LEARNING POINTS: bind this to functions!](https://image.slidesharecdn.com/react-180812162312/85/React-js-workshop-by-tech47-in-38-320.jpg)

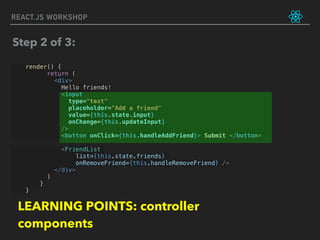
![REACT.JS WORKSHOP
updateInput(e) {
const value = e.target.value
this.setState({
input : value
})
}
handleAddFriend(){
this.setState((currentState) => {
return {
friends : currentState.friends.concat([this.state.input])
}
})
}
Step 1 of 3:](https://image.slidesharecdn.com/react-180812162312/85/React-js-workshop-by-tech47-in-40-320.jpg)
![REACT.JS WORKSHOP
constructor(props) {
super(props)
this.state = {
friends : ['Max', 'Sid', 'Aman'],
input : ""
}
this.handleRemoveFriend = this.handleRemoveFriend.bind(this)
this.handleAddFriend = this.handleAddFriend.bind(this)
this.updateInput = this.updateInput.bind(this)
}
Step 3 of 3:
LEARNING POINTS: bind this to functions!](https://image.slidesharecdn.com/react-180812162312/85/React-js-workshop-by-tech47-in-42-320.jpg)