QGIS TimeManager Heatmap Tutorial
•Download as PPTX, PDF•
0 likes•1,008 views

http://eugenesiow.github.io/sensor-data/

Recommended
More Related Content
Viewers also liked
Viewers also liked (19)
Similar to QGIS TimeManager Heatmap Tutorial
Similar to QGIS TimeManager Heatmap Tutorial (20)
More from Eugene Siow
More from Eugene Siow (12)
Recently uploaded
Recently uploaded (20)
QGIS TimeManager Heatmap Tutorial
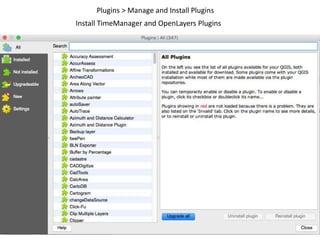
- 1. Plugins > Manage and Install Plugins Install TimeManager and OpenLayers Plugins
- 2. Web > OpenLayers Plugin > OpenStreetMap > OpenStreetMap
- 3. Sidebar > Click <Add Delimited Text Layer> Button Click Browse and choose CSV file Ensure X is Longitude and Y is Latitude Click OK
- 5. Points from the CSV should show on the map as such
- 6. Use the Zoom tool in the toolbar and drag over a region to zoom
- 7. Choose settings in the TimeManager bar at the bottom of the window Select the CSV layer (not the basemap) Select Start Time as the date(time) column in your CSV
- 8. Specify the Time format with a python time formatting
- 9. If your TimeManager is activated (as shown below, the power icon is enabled in the TimeManager bar), the number of dots shown should be those at the selected time only.
- 10. Right click the CSV layer and select Properties
- 11. Change the style to Heatmap Select a color scheme (OrRd in this case) Select to weigh points by a value, in this case, ‘Brightness’ Select layer blending mode to be Multiply
- 12. You should see a heatmap like this
- 13. Set the time frame size to the interval you want (1 week in this case) Click ‘Export Video’ in the TimeManager bar and select and output folder Click ok
- 14. You will receive a message when done A sequence of png files will be exported to the output folder you chose To combine the png files to a movie, try using ffmpeg On MacOSX with homebrew: brew install Then in the folder: ffmpeg -framerate 10 -i frame%03d.png output.mp4 An mp4 file will be exported with framerate 10