Recommended
PPTX
PYTHON-OPEEEEEEEEEEEEEEN-CV (1) kgjkg.pptx
PPTX
PYTHON-OOOOOOOOOOPPPPPPEEEEEEEEN-CV.pptx
PDF
Computer Vision Introduction and Basic OpenCV.pdf
DOCX
16 OpenCV Functions to Start your Computer Vision journey.docx
PPTX
PPT
PDF
Image Processing In Open CV. Image Processing In Open CV. Image Processing In...
PDF
Python imaging-library-overview - [cuuduongthancong.com]
PPTX
Open Computer Vision Based Image Processing
PDF
Pytorch_Deutschland_Bundesministerium_für Bildung_und_Forschung (6).pdf
PPTX
COMPUTER VISION.pptx fadsf34 da4eaedddss
PPTX
Real-Time Shape Detection Using OpenCV and Python for Geometric Object Classi...
PDF
DOCX
Open cv python tutorial for beginners 1
PDF
PPTX
Computer vision labs for improving in the subject
PPTX
New Microsoft PowerPoint Presentation.pptx
PPTX
OpenCV presentation series- part 1
PPTX
Introduction_____to______ OpenCV___.pptx
PPTX
COLOUR DETECTION MODEL PPT.pptx.........
PDF
Practical Digital Image Processing 1
PPTX
Unit 6 Image processing Libraries.[pptx]
PPTX
PDF
Human age and gender prediction management system project report.pdf
PDF
PPTX
AI UNIT 4 - SRCAS JOC.pptx enjoy this ppt
PPTX
OpenCV presentation series- part 3
PPTX
Open CV library In Python_Vahid ebrahimian.pptx
PDF
Mount File Systems using UUID and Label - RHCSA (RH134).pdf
PDF
What Is the Azure AI Foundry and Why Does It Matter for Enterprises?
More Related Content
PPTX
PYTHON-OPEEEEEEEEEEEEEEN-CV (1) kgjkg.pptx
PPTX
PYTHON-OOOOOOOOOOPPPPPPEEEEEEEEN-CV.pptx
PDF
Computer Vision Introduction and Basic OpenCV.pdf
DOCX
16 OpenCV Functions to Start your Computer Vision journey.docx
PPTX
PPT
PDF
Image Processing In Open CV. Image Processing In Open CV. Image Processing In...
PDF
Python imaging-library-overview - [cuuduongthancong.com]
Similar to introtoComputerVisionbyarefinlabibbhai.pptx
PPTX
Open Computer Vision Based Image Processing
PDF
Pytorch_Deutschland_Bundesministerium_für Bildung_und_Forschung (6).pdf
PPTX
COMPUTER VISION.pptx fadsf34 da4eaedddss
PPTX
Real-Time Shape Detection Using OpenCV and Python for Geometric Object Classi...
PDF
DOCX
Open cv python tutorial for beginners 1
PDF
PPTX
Computer vision labs for improving in the subject
PPTX
New Microsoft PowerPoint Presentation.pptx
PPTX
OpenCV presentation series- part 1
PPTX
Introduction_____to______ OpenCV___.pptx
PPTX
COLOUR DETECTION MODEL PPT.pptx.........
PDF
Practical Digital Image Processing 1
PPTX
Unit 6 Image processing Libraries.[pptx]
PPTX
PDF
Human age and gender prediction management system project report.pdf
PDF
PPTX
AI UNIT 4 - SRCAS JOC.pptx enjoy this ppt
PPTX
OpenCV presentation series- part 3
PPTX
Open CV library In Python_Vahid ebrahimian.pptx
Recently uploaded
PDF
Mount File Systems using UUID and Label - RHCSA (RH134).pdf
PDF
What Is the Azure AI Foundry and Why Does It Matter for Enterprises?
PDF
Computer-Based Training (CBT) The Backbone of Modern Technical & Defence Trai...
PDF
UiPath Automation Developer Associate Training Series 2026 - Session 2
PDF
Safer’s Picks: The 5 FME Transformers You Didn’t Know You Needed
PDF
Why Many Smart Device Platforms Fail to Scale?
PPTX
Working Session — Build a Document Understanding Automation Using an OOTB ML ...
PDF
CI CD Observability, Metrics and DORA - Shifting Left and Cleaning Up! - Febr...
PDF
From DeFi POC to Production MVP - A 12-16 Week Blueprint.pdf
PPTX
NTG - Data Center Management System Software
PPTX
TechSprint WinterHack — Top 10 Teams Pitching Session we are excited for pit...
PDF
The Emergence of Empathic XR: AWE Asia 2026 keynote
PDF
Writing GPU-Ready AI Models in Pure Java with Babylon
PPTX
Beyond the Algorithm: Designing Human-Centric Public Service with AI
PPTX
TechSprint Inauguration at SJB Institute of Technology held on 18 December 2025
PPTX
2026 SCORM Troubleshooting Rustici + dominKnow.pptx
PDF
How to build hackthon projects from ZERO!
PDF
OpenCharacter AI Reviews: Features, Plans, and Best Alternative
PDF
Poročilo odbora CIS (CH08873) za leto 2025 na letni skupščini IEEE Slovenija ...
PDF
Rustici Software: eLearning standards in the age of AI
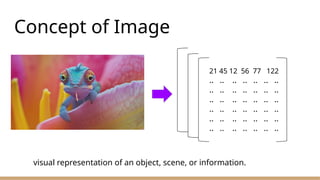
introtoComputerVisionbyarefinlabibbhai.pptx 1. 2. Concept of Image
21 45 12 56 77 122
.. .. .. .. .. .. ..
.. .. .. .. .. .. ..
.. .. .. .. .. .. ..
.. .. .. .. .. .. ..
.. .. .. .. .. .. ..
.. .. .. .. .. .. ..
visual representation of an object, scene, or information.
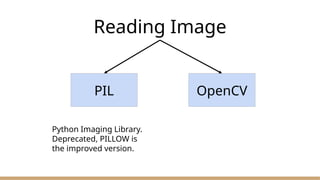
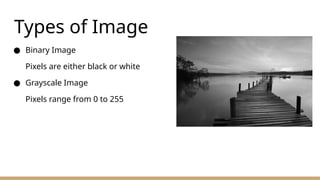
3. 4. 5. Types of Image
● Binary Image
Pixels are either black or white
● Grayscale Image
Pixels range from 0 to 255
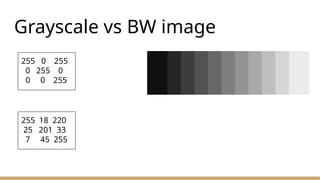
6. Grayscale vs BW image
255 0 255
0 255 0
0 0 255
255 18 220
25 201 33
7 45 255
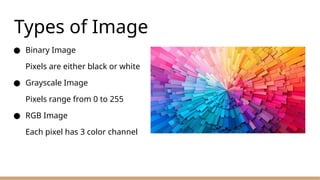
7. Types of Image
● Binary Image
Pixels are either black or white
● Grayscale Image
Pixels range from 0 to 255
● RGB Image
Each pixel has 3 color channel
8. Pixel Value
● For BW Image
img_array[120, 344] = 0 or 255 and img_array is 2D array
● For Grayscale Image
img_array[120, 344] = ranged from 0 to 255 and img_array is 2D array
● For RGB Image
img_array[120, 344] = [x, y, z] ; x, y and z ranged from 0 to 255 and
img_array is 3D array
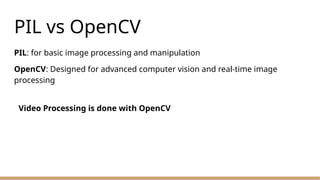
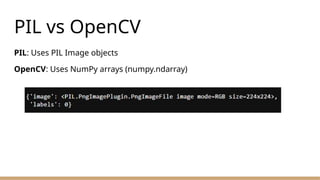
9. 10. PIL vs OpenCV
PIL: for basic image processing and manipulation
OpenCV: Designed for advanced computer vision and real-time image
processing
Video Processing is done with OpenCV
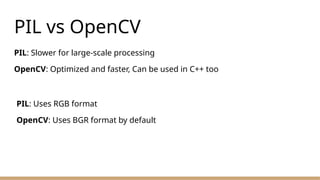
11. PIL vs OpenCV
PIL: Slower for large-scale processing
OpenCV: Optimized and faster, Can be used in C++ too
PIL: Uses RGB format
OpenCV: Uses BGR format by default
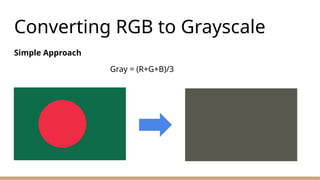
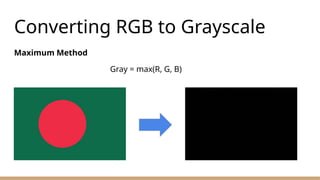
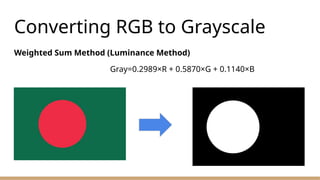
12. 13. 14. 15. Converting RGB to Grayscale
Weighted Sum Method (Luminance Method)
Gray=0.2989×R + 0.5870×G + 0.1140×B
16. 17. 18. Basic Image Operations
● Resizing
resized_image = cv2.resize(img_array, (200, 100))
● Flipping
flip_vertical = cv2.flip(image, 0)
flip_horizontal = cv2.flip(image, 1)
flip_both = cv2.flip(image, -1)
● Cropping
cropped_image = image[50:200, 100:300]
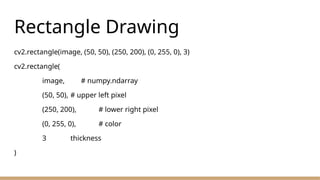
19. 20. Rectangle Drawing
cv2.rectangle(image, (50, 50), (250, 200), (0, 255, 0), 3)
cv2.rectangle(
image, # numpy.ndarray
(50, 50), # upper left pixel
(250, 200), # lower right pixel
(0, 255, 0), # color
3 thickness
)
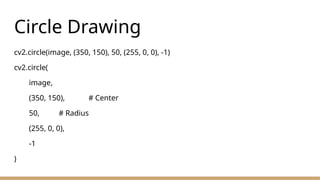
21. Circle Drawing
cv2.circle(image, (350, 150), 50, (255, 0, 0), -1)
cv2.circle(
image,
(350, 150), # Center
50, # Radius
(255, 0, 0),
-1
)
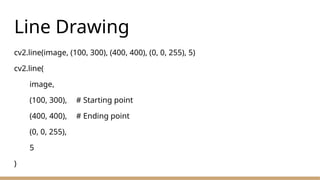
22. Line Drawing
cv2.line(image, (100, 300), (400, 400), (0, 0, 255), 5)
cv2.line(
image,
(100, 300), # Starting point
(400, 400), # Ending point
(0, 0, 255),
5
)
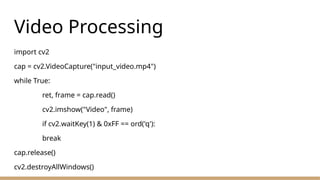
23. Video Processing
import cv2
cap = cv2.VideoCapture("input_video.mp4")
while True:
ret, frame = cap.read()
cv2.imshow("Video", frame)
if cv2.waitKey(1) & 0xFF == ord('q'):
break
cap.release()
cv2.destroyAllWindows()
24.

![Pixel Value
● For BW Image
img_array[120, 344] = 0 or 255 and img_array is 2D array
● For Grayscale Image
img_array[120, 344] = ranged from 0 to 255 and img_array is 2D array
● For RGB Image
img_array[120, 344] = [x, y, z] ; x, y and z ranged from 0 to 255 and
img_array is 3D array](https://image.slidesharecdn.com/computervision-250508192458-4de6ada6/85/introtoComputerVisionbyarefinlabibbhai-pptx-8-320.jpg)
![Basic Image Operations
● Resizing
resized_image = cv2.resize(img_array, (200, 100))
● Flipping
flip_vertical = cv2.flip(image, 0)
flip_horizontal = cv2.flip(image, 1)
flip_both = cv2.flip(image, -1)
● Cropping
cropped_image = image[50:200, 100:300]](https://image.slidesharecdn.com/computervision-250508192458-4de6ada6/85/introtoComputerVisionbyarefinlabibbhai-pptx-18-320.jpg)


![Python imaging-library-overview - [cuuduongthancong.com]](https://cdn.slidesharecdn.com/ss_thumbnails/python-imaging-library-overview-cuuduongthancong-200418085009-thumbnail.jpg?width=640&height=640&fit=bounds)


![Unit 6 Image processing Libraries.[pptx]](https://cdn.slidesharecdn.com/ss_thumbnails/unit6imageprocessinglibraries-241221110926-7ed62a13-thumbnail.jpg?width=640&height=640&fit=bounds)


