The document outlines a project assignment for building a multi-threaded web server which is due at the end of the seventh week and carries a weight of 7% of the total grade. It details the implementation process in two stages, including handling HTTP requests, responding to multiple clients simultaneously, and sending appropriate responses based on requested files. The project includes coding instructions in Java, testing of the web server with a browser, and deliverables that consist of screenshots, code, a project summary, and a Wireshark printout.
![http://host.someschool.edu:6789/index.html
If you omit ":6789," the browser will assume port 80, which
most likely will not have a server listening on it.
When the server encounters an error, it sends a response
message with the appropriate HTML source so that the error
information is displayed in the browser window.
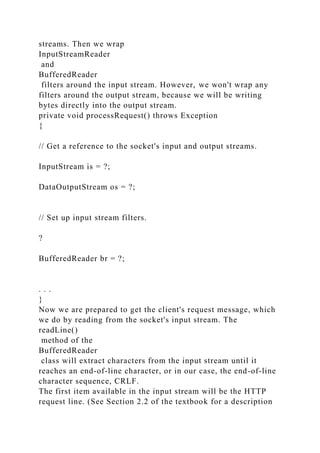
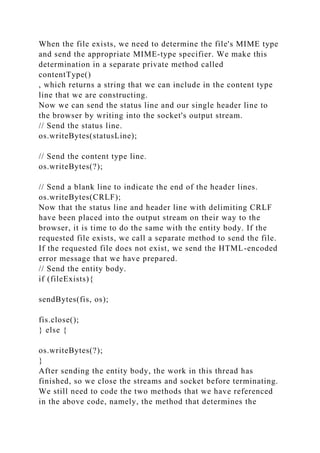
Web Server in Java: Part A
In the following steps, we will go through the code for the first
implementation of our Web server. Wherever you see "?," you
will need to supply a missing detail.
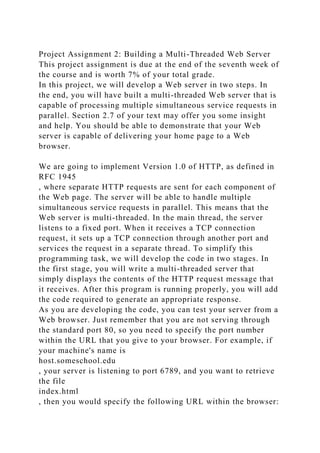
Our first implementation of the Web server will be multi-
threaded, where the processing of each incoming request will
take place inside a separate thread of execution. This allows the
server to service multiple clients in parallel, or to perform
multiple file transfers to a single client in parallel. When we
create a new thread of execution, we need to pass to the
Thread's constructor an instance of some class that implements
the
Runnable
interface. This is the reason why we define a separate class
called
HttpRequest
. The structure of the Web server is shown below:
import java.io.* ;
import java.net.* ;
import java.util.* ;
public final class WebServer
{
public static void main(String argv[]) throws Exception
{
. . .](https://image.slidesharecdn.com/projectassignment2buildingamulti-threadedwebserverthispro-221123104232-f6792e8a/85/Project-Assignment-2-Building-a-Multi-Threaded-Web-ServerThis-pro-docx-2-320.jpg)
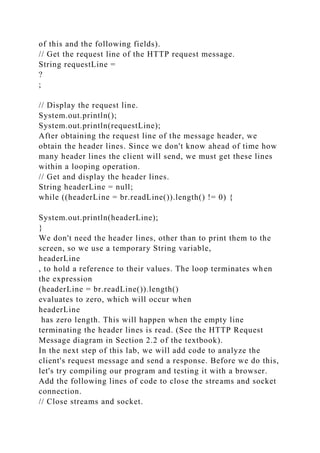
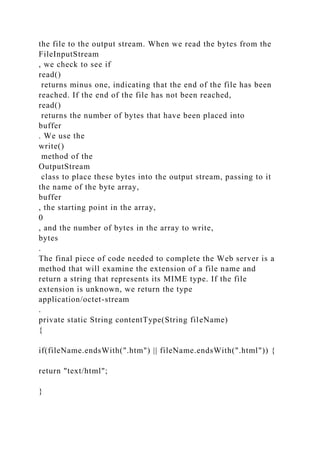
![}
}
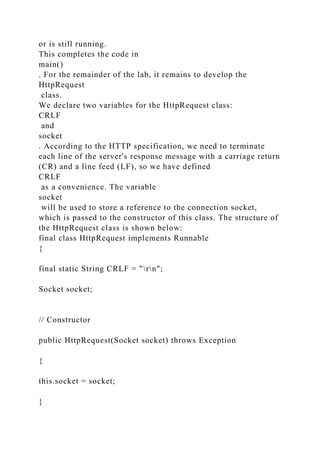
final class HttpRequest implements Runnable
{
. . .
}
Normally, Web servers process service requests that they
receive through well-known Port #80. You can choose any port
higher than 1024, but remember to use the same port number
when making requests to your Web server from your browser.
public static void main(String argv[]) throws Exception
{
// Set the port number.
int port = 6789;
. . .
}
Next, we open a socket and wait for a TCP connection request.
Since we will be servicing request messages indefinitely, we
place the listen operation inside of an infinite loop. This means
that we will have to terminate the Web server by pressing ^C on
the keyboard.
// Establish the listen socket.
?
// Process HTTP service requests in an infinite loop.
while (true) {
// Listen for a TCP connection request.](https://image.slidesharecdn.com/projectassignment2buildingamulti-threadedwebserverthispro-221123104232-f6792e8a/85/Project-Assignment-2-Building-a-Multi-Threaded-Web-ServerThis-pro-docx-3-320.jpg)


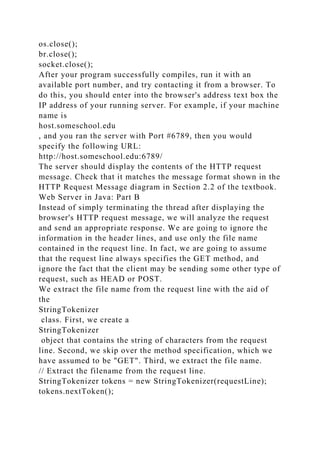

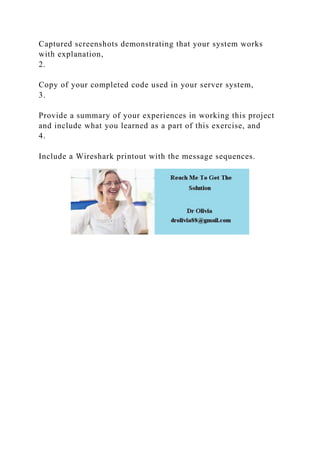
![MIME type,
contentType()
, and the method that writes the requested file onto the socket's
output stream. Let's first take a look at the code for sending the
file to the client.
private static void sendBytes(FileInputStream fis, OutputStream
os)
throws Exception
{
// Construct a 1K buffer to hold bytes on their way to the
socket.
byte[] buffer = new byte[1024];
int bytes = 0;
// Copy requested file into the socket's output stream.
while((bytes = fis.read(buffer)) != -1 ) {
os.write(buffer, 0, bytes);
}
}
Both
read()
and
write()
throw exceptions. Instead of catching these exceptions and
handling them in our code, we throw them to be handled by the
calling method.
The variable,
buffer
, is our intermediate storage space for bytes on their way from](https://image.slidesharecdn.com/projectassignment2buildingamulti-threadedwebserverthispro-221123104232-f6792e8a/85/Project-Assignment-2-Building-a-Multi-Threaded-Web-ServerThis-pro-docx-14-320.jpg)

![[Type text]ECET465Project 2Project Assignment 2 Building a Mul.docx](https://cdn.slidesharecdn.com/ss_thumbnails/typetextecet465project2projectassignment2buildingamul-221209051730-f536ee31-thumbnail.jpg?width=640&height=640&fit=bounds)