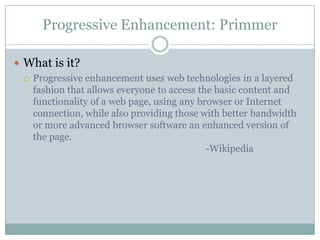
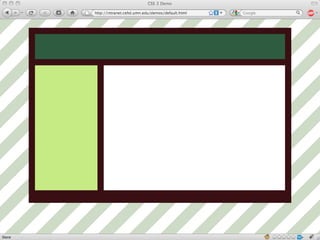
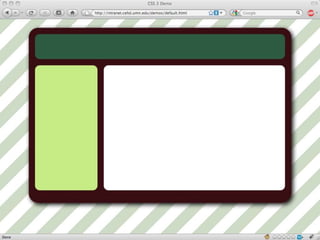
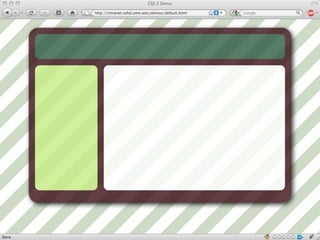
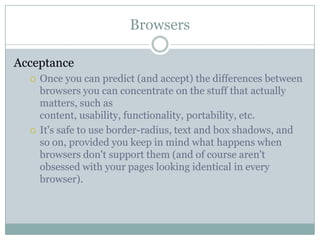
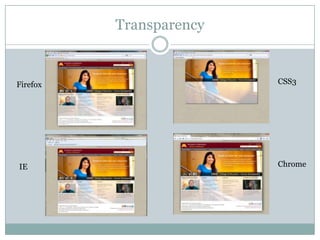
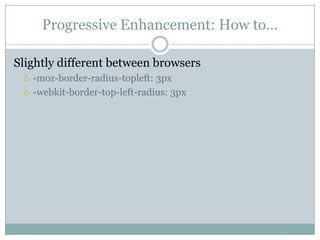
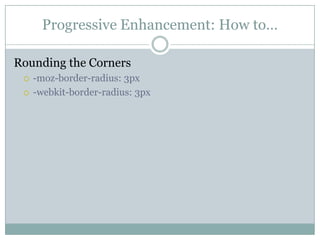
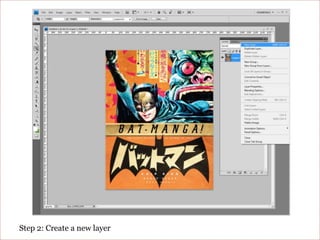
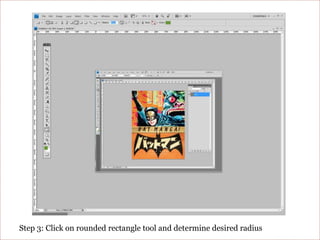
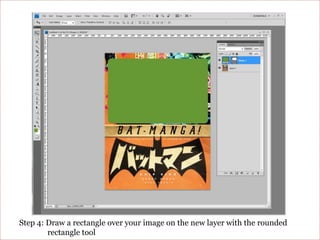
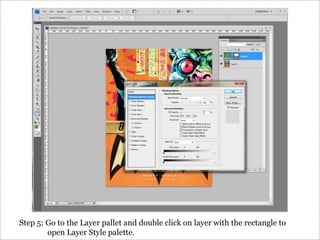
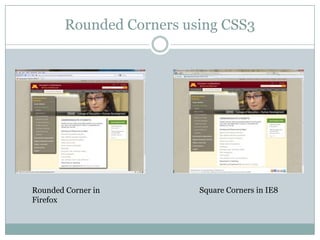
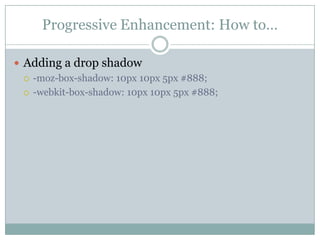
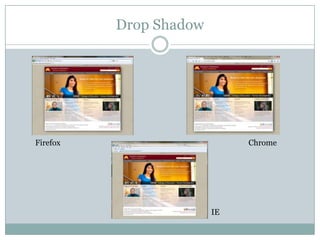
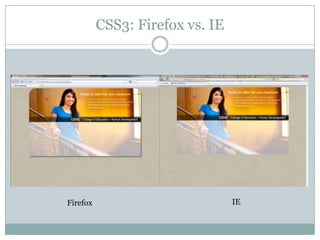
Going without Photoshop, and saving your self some time, while keeping the beauty of your site.Progressive Enhancement
Progressive EnhancementWhat is progressive enhancement?When/why use it?How to use it (the actual code)Questions
Progressive Enhancement: PrimmerWhat is it?Progressive enhancement uses web technologies in a layered fashion that allows everyone to access the basic content and functionality of a web page, using any browser or Internet connection, while also providing those with better bandwidth or more advanced browser software an enhanced version of the page.						-Wikipedia
Progressive Enhancement: Primmer“providing those with… a more advanced browser, an enhanced version of the page”
Design StrategySusan’s StrategyTo design simple, intelligent, elegant design solutions that articulate intended messageBalance between innovation and standardization Majority of users do not see the code.What the users sees, and interacts with, is what defines their experienceApplying aesthetic principles to design is not simply making the web site “prettier”Visual design should contribute to a more effective communication experience between the user and the content
Design StrategyDan’s StrategyContent organizationUser path through the siteCode compatibility across browsersViewing pages in different environmentsVisual styling is an afterthoughtThe eye candy that I put into a page to liven it up, but not my main focus.
Progressive Enhancement: PrimmerUsing CSS 3, in place of using PhotoshopSaves a lot of timeGives your more quick fine controlEx: changing opacity back and fourth and take foreverWay less complicatedNo fancy maneuvering
Progressive Enhancement: When to use it?Know your usersCEHD: Less than 50% IEFirefox users have recent versionsIE use declines every month
BrowsersAcceptanceOnce you can predict (and accept) the differences between browsers you can concentrate on the stuff that actually matters, such as content, usability, functionality, portability, etc.It's safe to use border-radius, text and box shadows, and so on, provided you keep in mind what happens when browsers don't support them (and of course aren't obsessed with your pages looking identical in every browser).
Progressive Enhancement: When to use it?Why this is importantWe work in one of the largest colleges at the UOur group manages about 200 sites, equaling thousands of pages.With around 100 people contributing content in some form.We try our best to use layouts over, but that can only get you so far.Photoshop is awesome, but it takes time.  With this many sites, that can add up.
Progressive Enhancement: How to…Progressive means… not quite done yet.-moz and –webkitMoz means…FirefoxWebkit means…Safari and ChromeAlso iphone, android, and palm
Progressive Enhancement: How to…Transparencybackground: rgba(255, 0, 0, 0.2);opacity: 0.2;PNGs
TransparencyCSS3FirefoxChromeIE
Progressive Enhancement: How to…Slightly different between browsers-moz-border-radius-topleft: 3px-webkit-border-top-left-radius: 3px
Progressive Enhancement: How to…Rounding the Corners-moz-border-radius: 3px-webkit-border-radius: 3px
Round Corners using PhotoshopStep by step
Step 1: Open image in Photoshop
Step 2: Create a new layer
Step 3: Click on rounded rectangle tool and determine desired radius
Step 4: Draw a rectangle over your image on the new layer with the rounded rectangle tool
Step 5: Go to the Layer pallet and double click on layer with the rectangle to open Layer Style palette.
Step 6: In the Advance Blending area slide the Fill Opacity down to 0%, click OK
Step 7: Go back to the Layers palette, click on Paths tab and click on the little arrow button, a drop down menu will appear, select “Make Selection”
Step 8: In the “Make Selection” area, set Feather Radius to 0 pixels, and check Anti-aliased, click OK
Step 9: Go to top menu EDIT and select Copy Merged
Step 10: Create a new document
Step 11: Go to top menu FILE and Paste.   Step 12: Go to top menu FILE and Save for Web.  Step 13: etc. etc. etc etc.
Rounded Corners using CSS3Square Corners in IE8Rounded Corner in Firefox
Progressive Enhancement: How to…Adding a drop shadow-moz-box-shadow: 10px 10px 5px #888;-webkit-box-shadow: 10px 10px 5px #888;
Drop ShadowFirefoxChromeIE
CSS3: Firefox vs. IEIEFirefox
Progressive Enhancement: SummaryIt’s time to experiment with CSS3 on production sites and use it for prototyping. Adjusting opacity and color with RGBA saves time. Using border-radius for rounding corners and adjusting roundedness and color on the fly is beneficial, while resolving design details.Come to terms with the fact that Web sites don't need to look exactly the same in every browser! Soon this not be “progressive” and you can spend your time designing and not worrying about drop shadows…..
Progressive Enhancement: SummaryThis is progressive enhancement, adding visual flair in places that support it.Soon this will not be “progressive” and you can spend your time designing and not worrying about drop shadows…
Progressive Enhancement: Learn MoreCss3.info
Progressive Enhancement: Learn Moreperishablepress.com
Progressive Enhancement: Learn Morephotoshopusersgroup.com
Progressive Enhancement: Learn MoreGoogle it!
Progressive Enhancement: Learn MoreQuestions?

Progressive Enhancement

  • 1.
    Going without Photoshop,and saving your self some time, while keeping the beauty of your site.Progressive Enhancement
  • 2.
    Progressive EnhancementWhat isprogressive enhancement?When/why use it?How to use it (the actual code)Questions
  • 3.
    Progressive Enhancement: PrimmerWhatis it?Progressive enhancement uses web technologies in a layered fashion that allows everyone to access the basic content and functionality of a web page, using any browser or Internet connection, while also providing those with better bandwidth or more advanced browser software an enhanced version of the page. -Wikipedia
  • 4.
    Progressive Enhancement: Primmer“providingthose with… a more advanced browser, an enhanced version of the page”
  • 5.
    Design StrategySusan’s StrategyTodesign simple, intelligent, elegant design solutions that articulate intended messageBalance between innovation and standardization Majority of users do not see the code.What the users sees, and interacts with, is what defines their experienceApplying aesthetic principles to design is not simply making the web site “prettier”Visual design should contribute to a more effective communication experience between the user and the content
  • 6.
    Design StrategyDan’s StrategyContentorganizationUser path through the siteCode compatibility across browsersViewing pages in different environmentsVisual styling is an afterthoughtThe eye candy that I put into a page to liven it up, but not my main focus.
  • 7.
    Progressive Enhancement: PrimmerUsingCSS 3, in place of using PhotoshopSaves a lot of timeGives your more quick fine controlEx: changing opacity back and fourth and take foreverWay less complicatedNo fancy maneuvering
  • 8.
    Progressive Enhancement: Whento use it?Know your usersCEHD: Less than 50% IEFirefox users have recent versionsIE use declines every month
  • 14.
    BrowsersAcceptanceOnce you canpredict (and accept) the differences between browsers you can concentrate on the stuff that actually matters, such as content, usability, functionality, portability, etc.It's safe to use border-radius, text and box shadows, and so on, provided you keep in mind what happens when browsers don't support them (and of course aren't obsessed with your pages looking identical in every browser).
  • 15.
    Progressive Enhancement: Whento use it?Why this is importantWe work in one of the largest colleges at the UOur group manages about 200 sites, equaling thousands of pages.With around 100 people contributing content in some form.We try our best to use layouts over, but that can only get you so far.Photoshop is awesome, but it takes time. With this many sites, that can add up.
  • 16.
    Progressive Enhancement: Howto…Progressive means… not quite done yet.-moz and –webkitMoz means…FirefoxWebkit means…Safari and ChromeAlso iphone, android, and palm
  • 17.
    Progressive Enhancement: Howto…Transparencybackground: rgba(255, 0, 0, 0.2);opacity: 0.2;PNGs
  • 18.
  • 19.
    Progressive Enhancement: Howto…Slightly different between browsers-moz-border-radius-topleft: 3px-webkit-border-top-left-radius: 3px
  • 20.
    Progressive Enhancement: Howto…Rounding the Corners-moz-border-radius: 3px-webkit-border-radius: 3px
  • 21.
    Round Corners usingPhotoshopStep by step
  • 22.
    Step 1: Openimage in Photoshop
  • 23.
    Step 2: Createa new layer
  • 24.
    Step 3: Clickon rounded rectangle tool and determine desired radius
  • 25.
    Step 4: Drawa rectangle over your image on the new layer with the rounded rectangle tool
  • 26.
    Step 5: Goto the Layer pallet and double click on layer with the rectangle to open Layer Style palette.
  • 27.
    Step 6: Inthe Advance Blending area slide the Fill Opacity down to 0%, click OK
  • 28.
    Step 7: Goback to the Layers palette, click on Paths tab and click on the little arrow button, a drop down menu will appear, select “Make Selection”
  • 29.
    Step 8: Inthe “Make Selection” area, set Feather Radius to 0 pixels, and check Anti-aliased, click OK
  • 30.
    Step 9: Goto top menu EDIT and select Copy Merged
  • 31.
    Step 10: Createa new document
  • 32.
    Step 11: Goto top menu FILE and Paste. Step 12: Go to top menu FILE and Save for Web. Step 13: etc. etc. etc etc.
  • 33.
    Rounded Corners usingCSS3Square Corners in IE8Rounded Corner in Firefox
  • 34.
    Progressive Enhancement: Howto…Adding a drop shadow-moz-box-shadow: 10px 10px 5px #888;-webkit-box-shadow: 10px 10px 5px #888;
  • 35.
  • 36.
  • 37.
    Progressive Enhancement: SummaryIt’stime to experiment with CSS3 on production sites and use it for prototyping. Adjusting opacity and color with RGBA saves time. Using border-radius for rounding corners and adjusting roundedness and color on the fly is beneficial, while resolving design details.Come to terms with the fact that Web sites don't need to look exactly the same in every browser! Soon this not be “progressive” and you can spend your time designing and not worrying about drop shadows…..
  • 38.
    Progressive Enhancement: SummaryThisis progressive enhancement, adding visual flair in places that support it.Soon this will not be “progressive” and you can spend your time designing and not worrying about drop shadows…
  • 39.
  • 40.
    Progressive Enhancement: LearnMoreperishablepress.com
  • 41.
    Progressive Enhancement: LearnMorephotoshopusersgroup.com
  • 42.
  • 43.

Editor's Notes

  • #6 Design is crucial to the users Web experience and it is my job to find a balance between innovation and standardization that merges content with aesthetics.Throughout the design process I make decisions about balancing design elements with Photoshop or CSS, when to introduce primary and secondary color pallets and decide what is the most effective way to highlight content. At this point I can see what is excessive and can be left out of the design entirely or left out due to the users browser choice.Design is not simply about making a web site “prettier” Its essential to effective communication.Design defines the hierarchy of information, creates the mood and tone, it impacts content by its subtlety, even handedness, and strength. Typically one page will have numerous “types” of information that are equally important and subtle visual treatments connects information from page to page, defining a visual hierarchy. Once the hierarchy is defined, and I know how it will OR WILL NOT be displayed in the various browsers I then decide if the element crucial and deserves consistency in all browsers….and in contrast, Dan…
  • #15 Once you can predict the differences between how the various browsers render Web pages you can spend your time focusing on effective messaging.You can make educated decisions about the best way to visually communicate. Because of how differently browsers display rounded corners, drop shadows and transparency,You can make decisions on what graphic elements are core and need dedicated time in Photoshop to craft the effect and which ones are superfluous.
  • #16 Knowing how browsers render web pages helps streamline our work load.We need to produce andspending time negotiating and finessing 1 px shadows is not always the best use of time.BECAUSE
  • #19 The bottom half of this graphic has a white transparent overlay made in Photoshop.Because the content is important I needed the text to be readable on all browsers. I could use CSS to find the right level of transparency but for visual consistency, I needed to make the design in Photoshop.This page has a carousel of photographsshot in different environments with different lighting levels and determining the level of transparency in relation to readability on each image is quick using Photoshop, I have the process down to 5 minutes per image andI think it is time well spent.Whereas rounding corners….Dan…
  • #23 Step 1: Open image in Photoshop
  • #24 Step 2: Create a new layer
  • #25 Step 3: Click on rounded rectangle tool and determine desired radius of all four corners
  • #26 Step 4: Draw a rectangle over the image on the new layer with the rounded rectangle tool, fill color doesn’t matter
  • #27 Step 5: Go to the Layer pallet and double click on layer with the rectangle to open Layer Style palette. About half way finished, now
  • #28 Step 6: In the Advance Blending area slide the Fill Opacity down to 0%, click OK
  • #29 Step 7: Go back to the Layers palette, click on Paths tab and click on the little arrow button, a drop down menu will appear, select “Make Selection”
  • #30 Step 8: In the “Make Selection” area, set Feather Radius to 0 pixels, and check Anti-aliased, click OK
  • #31 Step 9: Go to top menu EDIT and select Copy Merged
  • #32 Step 10: Go to top menu FILE and make a new document
  • #33 Step 11: Go to top menu FILE and Paste. Step 12: Go to top menu FILE and Save for Web Step 13: etc. etc. etc.These steps are for a fixed image, if you wanted the image to expand and contract depending on text
  • #37 Here is a comparison between Firefox and IE.If the image was to stand on it’s own without the text grounding the lower half, going through the drop shadow steps would be crucial but the rounded corners wouldn’t be crucial to the overall design.
  • #42 Next meeting is this Wednesday 7-9pm MCAD