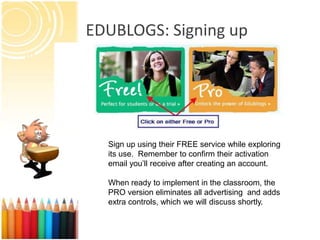
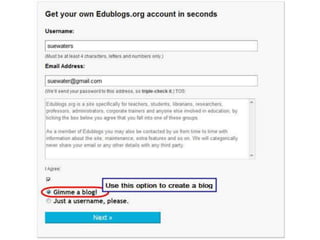
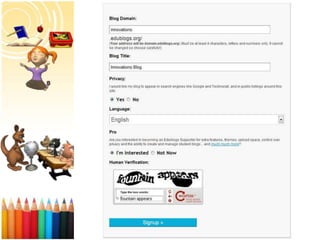
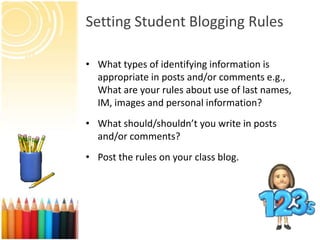
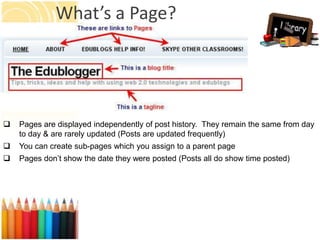
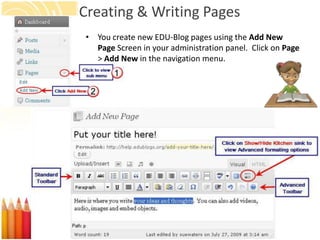
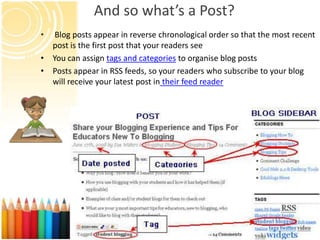
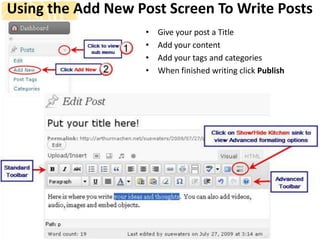
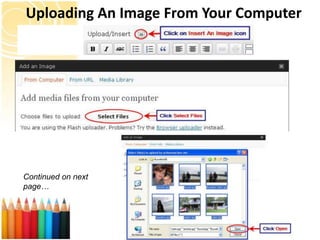
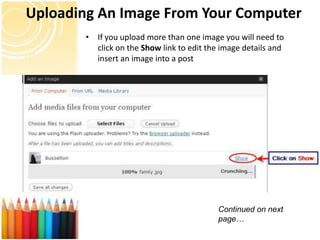
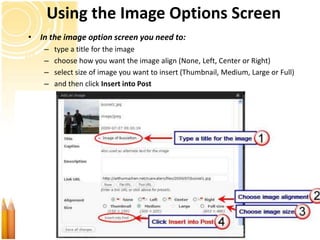
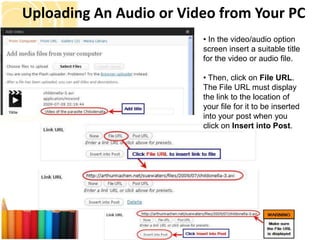
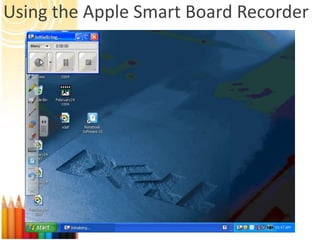
Going Wiki:
Using EDU Blogs & Smart Board
    Video in the Classroom

    Presented by: David Eisenberg
The Get-Go
• Today, we’ll be learning about EDU Blogs and Apple
  Smart Board Video. Here’s some food for thought:
   – What is Apple Smart Board video?
   – How can EDU Blogs help with teaching?
   – How do I set up an EDU Blog?
   – How do I control who and what gets posted?
   – Is it free?
Why start a class blog:
• Blogging isn’t just about writing posts; it’s about sharing
  your learning and reflecting on what you have learnt. It
  encourages students to:
    – Read each others posts
    – Interact, evaluate and comment on each others posts by
      challenging each others thoughts and views
    – Write posts in response to each others posts
EDUBLOGS: Signing up


  Sign up using their FREE service while exploring
  its use. Remember to confirm their activation
  email you’ll receive after creating an account.

  When ready to implement in the classroom, the
  PRO version eliminates all advertising and adds
  extra controls, which we will discuss shortly.
Setting Student Blogging Rules

• What types of identifying information is
  appropriate in posts and/or comments e.g.,
  What are your rules about use of last names,
  IM, images and personal information?
• What should/shouldn’t you write in posts
  and/or comments?
• Post the rules on your class blog.
Understanding Pages and Posts
What’s a Page?


   Pages are displayed independently of post history. They remain the same from day
    to day & are rarely updated (Posts are updated frequently)
   You can create sub-pages which you assign to a parent page
   Pages don’t show the date they were posted (Posts all do show time posted)
Creating & Writing Pages
 • You create new EDU-Blog pages using the Add New
   Page Screen in your administration panel. Click on Page
   > Add New in the navigation menu.
And so what’s a Post?
•  Blog posts appear in reverse chronological order so that the most recent
  post is the first post that your readers see
• You can assign tags and categories to organise blog posts
• Posts appear in RSS feeds, so your readers who subscribe to your blog
  will receive your latest post in their feed reader
Using the Add New Post Screen To Write Posts
                   •   Give your post a Title
                   •   Add your content
                   •   Add your tags and categories
                   •   When finished writing click Publish
Uploading An Image From Your Computer


Continued on next
page…
Uploading An Image From Your Computer
        • If you upload more than one image you will need to
          click on the Show link to edit the image details and
          insert an image into a post


                                            Continued on next
                                            page…
Using the Image Options Screen
• In the image option screen you need to:
    –   type a title for the image
    –   choose how you want the image align (None, Left, Center or Right)
    –   select size of image you want to insert (Thumbnail, Medium, Large or Full)
    –   and then click Insert into Post
Puma Team Blog Explained
• http://msazukas1.edublogs.org/

• Now we’ll look directly at a functional and well-
  respected blog created and used right here at
  Maplewood Middle School, the Puma Team
  Blog.

• How did they do it? What controls are they
  using? And we’ll discuss in what ways is it being
  used and in what other ways could it be if
  desired?
Uploading An Audio or Video from Your PC
                    • These are the icons you use to insert images, photo
                      galleries, videos and audio files into your posts.


Continued on next
page…


                           • The file cannot be larger than 20 MB.

                           • Allowed file formats on Edublogs Include: jpg jpeg
                           png gif doc pdf mp3 ppt wmv mp4 xls ins isf te xbk
                           notebook m4a ist kmz kes mov flp avi swf wxr xml
                           wav fjsw docx pptx xlsx xml m4v max kmz zip
Uploading An Audio or Video from Your PC


Continued on next
page…
Uploading An Audio or Video from Your PC
                         • In the video/audio option
                         screen insert a suitable title
                         for the video or audio file.

                         • Then, click on File URL.
                         The File URL must display
                         the link to the location of
                         your file for it to be inserted
                         into your post when you
                         click on Insert into Post.
Using the Apple Smart Board Recorder
Wrapping Up
• Classroom blogging is a great way to integrate
  technology with learning. The Apple Smart Board
  recorder is an option to post lessons (with both
  audio and video) on the blog for students to do work
  independently and easily in the classroom or at
  home.

Professional Development Seminar: Using Apple Smart Boards with EDU-Blogs

  • 1.
    Going Wiki: Using EDUBlogs & Smart Board Video in the Classroom Presented by: David Eisenberg
  • 2.
    The Get-Go • Today,we’ll be learning about EDU Blogs and Apple Smart Board Video. Here’s some food for thought: – What is Apple Smart Board video? – How can EDU Blogs help with teaching? – How do I set up an EDU Blog? – How do I control who and what gets posted? – Is it free?
  • 3.
    Why start aclass blog: • Blogging isn’t just about writing posts; it’s about sharing your learning and reflecting on what you have learnt. It encourages students to: – Read each others posts – Interact, evaluate and comment on each others posts by challenging each others thoughts and views – Write posts in response to each others posts
  • 4.
    EDUBLOGS: Signing up Sign up using their FREE service while exploring its use. Remember to confirm their activation email you’ll receive after creating an account. When ready to implement in the classroom, the PRO version eliminates all advertising and adds extra controls, which we will discuss shortly.
  • 7.
    Setting Student BloggingRules • What types of identifying information is appropriate in posts and/or comments e.g., What are your rules about use of last names, IM, images and personal information? • What should/shouldn’t you write in posts and/or comments? • Post the rules on your class blog.
  • 8.
  • 9.
    What’s a Page?  Pages are displayed independently of post history. They remain the same from day to day & are rarely updated (Posts are updated frequently)  You can create sub-pages which you assign to a parent page  Pages don’t show the date they were posted (Posts all do show time posted)
  • 10.
    Creating & WritingPages • You create new EDU-Blog pages using the Add New Page Screen in your administration panel. Click on Page > Add New in the navigation menu.
  • 11.
    And so what’sa Post? • Blog posts appear in reverse chronological order so that the most recent post is the first post that your readers see • You can assign tags and categories to organise blog posts • Posts appear in RSS feeds, so your readers who subscribe to your blog will receive your latest post in their feed reader
  • 12.
    Using the AddNew Post Screen To Write Posts • Give your post a Title • Add your content • Add your tags and categories • When finished writing click Publish
  • 13.
    Uploading An ImageFrom Your Computer Continued on next page…
  • 14.
    Uploading An ImageFrom Your Computer • If you upload more than one image you will need to click on the Show link to edit the image details and insert an image into a post Continued on next page…
  • 15.
    Uploading An ImageFrom Your Computer • If you upload more than one image you will need to click on the Show link to edit the image details and insert an image into a post Continued on next page…
  • 16.
    Using the ImageOptions Screen • In the image option screen you need to: – type a title for the image – choose how you want the image align (None, Left, Center or Right) – select size of image you want to insert (Thumbnail, Medium, Large or Full) – and then click Insert into Post
  • 17.
    Puma Team BlogExplained • http://msazukas1.edublogs.org/ • Now we’ll look directly at a functional and well- respected blog created and used right here at Maplewood Middle School, the Puma Team Blog. • How did they do it? What controls are they using? And we’ll discuss in what ways is it being used and in what other ways could it be if desired?
  • 18.
    Uploading An Audioor Video from Your PC • These are the icons you use to insert images, photo galleries, videos and audio files into your posts. Continued on next page… • The file cannot be larger than 20 MB. • Allowed file formats on Edublogs Include: jpg jpeg png gif doc pdf mp3 ppt wmv mp4 xls ins isf te xbk notebook m4a ist kmz kes mov flp avi swf wxr xml wav fjsw docx pptx xlsx xml m4v max kmz zip
  • 19.
    Uploading An Audioor Video from Your PC Continued on next page…
  • 20.
    Uploading An Audioor Video from Your PC • In the video/audio option screen insert a suitable title for the video or audio file. • Then, click on File URL. The File URL must display the link to the location of your file for it to be inserted into your post when you click on Insert into Post.
  • 21.
    Using the AppleSmart Board Recorder
  • 22.
    Wrapping Up • Classroomblogging is a great way to integrate technology with learning. The Apple Smart Board recorder is an option to post lessons (with both audio and video) on the blog for students to do work independently and easily in the classroom or at home.