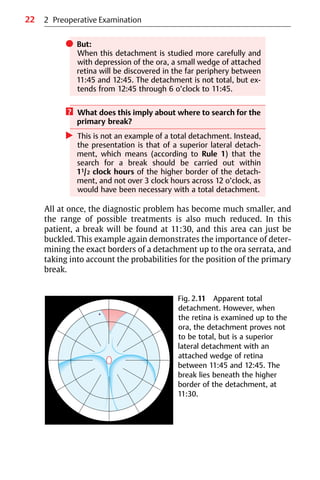
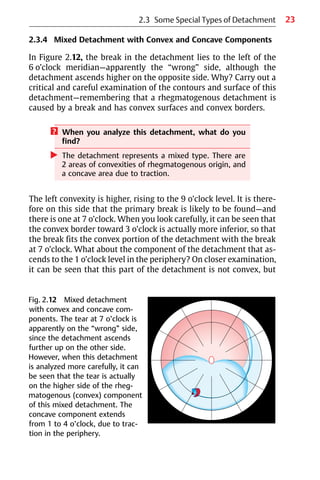
This document provides an overview of a book titled "A Practical Guide to Minimal Surgery for Retinal Detachment". The book contains information on diagnosing and treating retinal detachment using minimal invasive surgical techniques. It is written by Dr. Ingrid Kreissig, an expert in retinal surgery. The book contains several chapters that describe preoperative examination methods, differential diagnosis of retinal detachments, management of vitreous hemorrhage, techniques for finding small retinal breaks, and the use of cryosurgery. It aims to provide practical guidance to surgeons on implementing minimal surgery approaches for retinal detachment.


![IV
Library of Congress Cataloging-in-Publica-
tion Data
Kreissig, Ingrid.
A Practical Guide to Minimal Surgery
for Retinal Detachment / Ingrid Kreissig.
p. ; cm.
Includes bibliographical references and
index.
ISBN 3131110619 − ISBN 0-86577-781-0
1. Retinal detachment−Surgery. I. Title.
[DNLM: 1. Retinal Detachment−
surgery. 2. Retinal Detachment−diagno-
sis. 3. Surgical Procedures, Minimal ex-
traocular methods. WW 270 K91h
1999]
RE603.K74 1999
617.7’.35059—dc21
99-044473
Any reference to or mention of manufac-
turers or specific brand names should not be
interpreted as an endorsement or advertise-
ment for any company or product.
Some of the product names, patents, and
registered designs referred to in this book
are in fact registered trademarks or pro-
prietary names even though specific refer-
ence to this fact is not always made in the
text. Therefore, the appearance of a name
without designation as proprietary is not to
be construed as a representation by the pub-
lisher that it is in the public domain.
This book, including all parts thereof, is le-
gally protected by copyright. Any use, exploi-
tation, or commercialization outside the nar-
row limits set by copyright legislation,
without the publisher’s consent, is illegal
and liable to prosecution. This applies in par-
ticular to photostat reproduction, copying,
mimeographing or duplication of any kind,
translating, preparation of microfilms, and
electronic data processing and storage.
© 2000 Georg Thieme Verlag,
Rüdigerstrasse 14,
D-70469 Stuttgart, Germany
Thieme New York, 333 Seventh Avenue,
New York, NY 10001, USA
Typesetting by primustype R. Hurler GmbH,
D-73274 Notzingen, Germany
typeset on Textline/HerculesPro
Printed in Germany by Staudigl Druck,
Donauwörth
ISBN 3-13-111061-9 (GTV)
ISBN 0-86577-781-0 (TNY) 1 2 3 4 5 6
Important Note: Medicine is an ever-
changing science undergoing continual
development. Research and clinical ex-
perience are continually expanding our
knowledge, in particular our knowledge
of proper treatment and drug therapy.
Insofar as this book mentions any
dosage or application, readers may rest
assured that the authors, editors, and
publishers have made every effort to en-
sure that such references are in accor-
dance with the state of knowledge at the
time of production of the book.
Nevertheless, this does not involve,
imply, or express any guarantee or re-
sponsibility on the part of the publishers
in respect to any dosage instructions and
forms of application stated in the book.
Every user is requested to examine care-
fully the manufacturer’s leaflets accom-
panying each drug and to check, if nec-
essary in consultation with a physician
or specialist, whether the dosage sched-
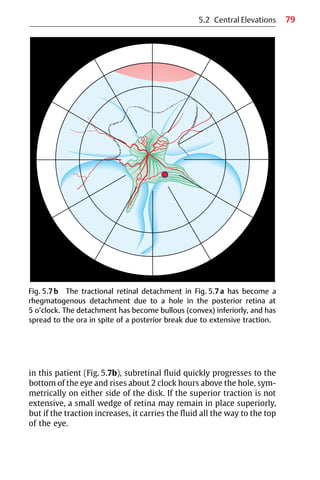
ules mentioned therein or the contrain-
dications stated by the manufacturers
differ from the statements made in the
present book. Such examination is par-
ticularly important with drugs that are
either rarely used or have been newly
released on the market. Every dosage
schedule or every form of application
used is entirely at the user’s own risk
and responsibility. The authors and pub-
lishers request every user to report to
the publishers any discrepancies or in-
accuracies noticed.](https://image.slidesharecdn.com/practicalguidetominimalsurgeryforretinaldetachmentvol-240327214459-1b0b7bb7/85/Practical-Guide-to-Surgery-for-RD-Vol-I-5-320.jpg)


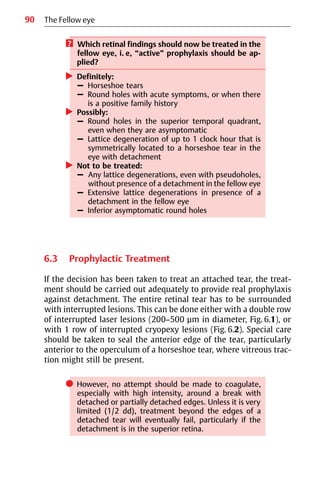
![2
1.1 Introduction
Retinal detachment is a separation of the sensory retina from the
pigment epithelium. For the patient, it is a dramatic episode that
causes a sudden loss of vision. Since Gonin [1], it has been known
that the cause of detachment is a hole in the sensory retina. Retinal
detachment occurs when fluid from the liquefied vitreous passes
through the break and detaches the sensory retina from the pig-
ment epithelium.
1.2 Vitreous Body
The vitreous body fills the vitreous cavity. It is a clear gel with a
volume of approximately 4 ml. It makes up 80% of the volume of the
eye and contains 98% water. It allows the transmission of light to the
retina, and serves to conduct nutrients to the retina and the lens.
Liquefaction of the vitreous gel takes place with aging. Lique-
faction is accompanied by a collapse of the collagen fibrillar net-
work, and induces a detachment of the posterior vitreous from the
retina. A posterior vitreous detachment is present in about 64% of
patients over the age of 70. It can also develop earlier, in a myopic
eye, an eye after injury (trauma, surgery), or after an intraocular in-
flammation. Complications secondary to separation of the vitreous
are infrequent, but when they occur at the vitreoretinal interface
they can result in various retinal disorders. The most serious form—
a rhegmatogenous retinal detachment—is described here.
1.3 Precursors of Rhegmatogenous Retinal
Detachment
Posterior vitreous detachment is usually an acute event. The patient
perceives flashes, or photopsias, caused by the vitreous pulling on
the retina as it separates. If a retinal vessel tears and bleeds, the
patient may observe ascending black spots, known as “mouches
volantes.” The drops of blood are actually falling, but the patient
perceives them as rising, since they are behind the lens. This vessel
tearing may be combined with tearing of the retina. Not all retinal
1 Rhegmatogenous Retinal Detachment](https://image.slidesharecdn.com/practicalguidetominimalsurgeryforretinaldetachmentvol-240327214459-1b0b7bb7/85/Practical-Guide-to-Surgery-for-RD-Vol-I-15-320.jpg)
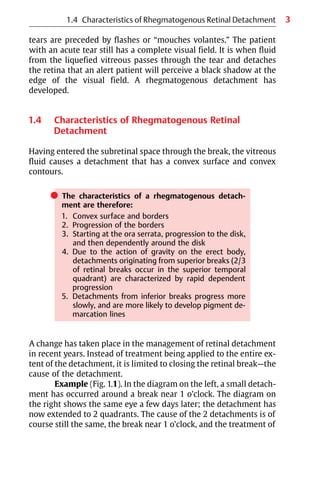
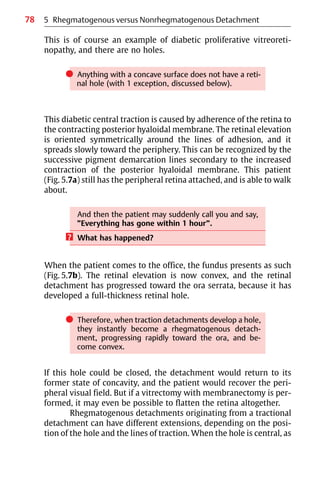
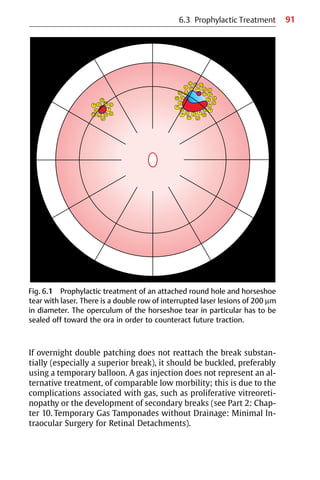
![5
the 2 detachments is the same—tamponade of the break. Figure 1.1
indicates the rationale in the treatment of these 2 detachments. The
problem, the break near 1 o’clock, is the same; the extension of the
detachment is not relevant. (As you may know, this illustration
represents the logo for our Tuebingen Detachment Courses, which
has been used in publications since 1972 [2, 3]).
This change in the treatment of detachment represents a
switch from using long circumferential buckles (cerclage) with
drainage of subretinal fluid, to treatment limited to closing the
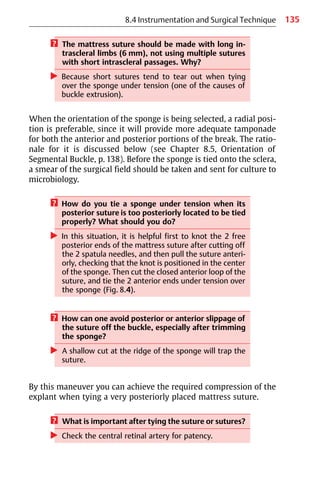
break without drainage.
쎲 This operation was made feasible by:
1. The use of elastic buckles that effectively close the
break and eliminate the need for drainage
2. Preoperative detection of all of the breaks using in-
direct ophthalmoscopy and biomicroscopy with
contact lenses, both with depression of the periph-
ery
3. Precise localization of the break at surgery.
The method known as the “nondrainage operation” is an extraocu-
lar detachment procedure. It was conceived by Custodis in 1953 [4].
Due to complications caused by the Polyviol explant available to
Custodis, as well as the necrotizing effects of diathermy, the pro-
cedure was not widely accepted.
In 1965, Lincoff recognized the rationale and benefits of the
Custodis technique, and by replacing the Polyviol plombe with a
tissue-inert silicone sponge [5] and diathermy with cryopexy [6],
the cryosurgical operation for detachment was developed. Initial
skepticism concerning the strength of the cryosurgical adhesion
was overcome by favorable results in a large series of animal experi-
ments carried out by Lincoff and Kreissig [7−9]. The transsclerally
induced cryosurgical adhesion proved to be as strong as, and more
consistent than, diathermy, and it had the advantage of not
necrotizing the sclera (as with diathermy).
This meant that a nondrainage procedure consisting solely of
suturing an elastic buckle under tension over cryopexy-treated
sclera could be achieved. The danger of impending scleral and
choroidal perforation was eliminated. This operation is a minimal
extraocular approach to the treatment of retinal detachment.
1.4 Characteristics of Rhegmatogenous Retinal Detachment](https://image.slidesharecdn.com/practicalguidetominimalsurgeryforretinaldetachmentvol-240327214459-1b0b7bb7/85/Practical-Guide-to-Surgery-for-RD-Vol-I-18-320.jpg)
![6
References
1. Gonin J. La thermoponction oblitérante des déchirures dans le décolle-
ment de la rétine. Trans Am Ophthalmol Soc 1963; 61: 545−88.
2. Kreissig I. Ultrastruktur der Kryopexie-Adhaesion in der Netz-
hautchirurgie [Postdoctoral thesis for German Habilitation degree].
Bonn: Rheinische Friedrich-Wilhelms-Universitaet, 1972.
3. Kreissig I, Lincoff H. Beitrag zur Ablatio-Chirurgie ohne Punktion.
Sitzungsbericht 125. Vers Rhein-Westf Augenaerzte 1972; 150−63.
4. Custodis E. Bedeutet die Plombenaufnaehung auf die Sklera einen
Fortschritt in der operativen Behandlung der Netzhautabloesung? Ber
Dtsch Ophthalmol Ges 1953; 58: 102−5.
5. Lincoff H, McLean J, Nano H. Cryosurgical treatment of retinal detach-
ment. [Paper presented at the 68th Annual Session of the American
Academy of Ophthalmology and Otolaryngology, New York, 1963.]
6. Lincoff H, Baras I, McLean J. Modifications to the Custodis procedure for
retinal detachment. Arch Ophthalmol 1965; 73: 160−3.
7. Lincoff H, O’Connor P, Bloch D, Nadel A, Kreissig I, Grinberg M. The cryo-
surgical adhesion, part II. Trans Am Acad Ophthalmol Otolaryngol 1970;
74: 98−107.
8. Kreissig I, Lincoff H. Mechanism of retinal attachment after cryo-
surgery. Trans Ophthalmol Soc UK 1975; 95: 148−57.
9. Kreissig I, Lincoff H. Cryosurgery of the retina. Int Ophthalmol Clin
1976; 16: 1−12.
1 Rhegmatogenous Retinal Detachment](https://image.slidesharecdn.com/practicalguidetominimalsurgeryforretinaldetachmentvol-240327214459-1b0b7bb7/85/Practical-Guide-to-Surgery-for-RD-Vol-I-19-320.jpg)

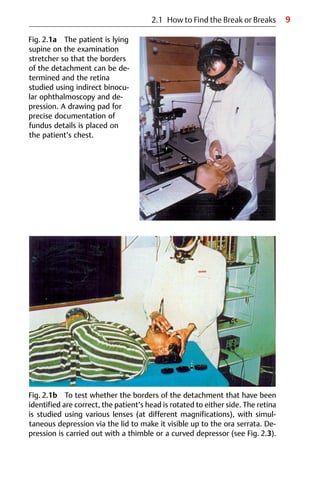
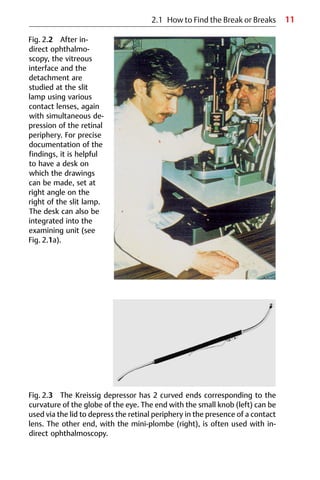
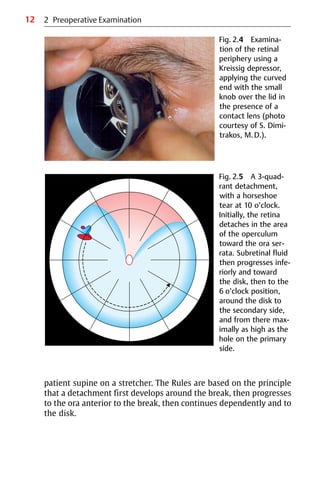
![10
be examined as well. To view the retina up to the ora, the periphery
of the retina has to be indented through the lid, using a depressor.
The next step is to examine the patient at the slit lamp
(Fig. 2.2) using various contact lenses, together with indentation of
the retinal periphery. Indentation is essential, as it allows a hole to be
distinguished from a harmless retinal lesion. The slender and slightly
curved Kreissig depressor (Fig. 2.3) is well suited for this purpose.
When it is applied in the presence of a contact lens over the lid, it pro-
vides a dynamic examination of the anterior retina (Fig. 2.4).
? How can the retinal hole be found in a pseudophakic
eye?
왘 In the presence of a secondary membrane, or precipi-
tates on the surface of the intraocular lens, or through a
pupil fixed in diameter at 4−5 mm.
The recently developed indirect wide-field contact lenses for small
pupils by Mainster, Volk, and Lincoff (see below Fig. 4.2) provide
viewing fields of 125°, 130°, and 140° (comparable to the field ob-
tained in indirect ophthalmoscopy). The indirect lens provides
enough light to overcome the interference of most lens or capsular
opacities. With these lenses, and some experience on the part of the
surgeon, it becomes possible to examine the retina anterior to the
equator, and pinpoint holes can be detected [1].
쎲 Returning to the topic of how to detect all of the
breaks preoperatively:
1. Use binocular indirect ophthalmoscopy, as well as:
2. Biomicroscopy with various contact lenses (the
Goldmann lens for phakic and aphakic eyes, and
the Mainster, Volk or Lincoff indirect contact lenses
for pseudophakic eyes); the 2 techniques com-
bined with depression of the anterior retina
3. Concentrate on searching for the primary retinal
break, and apply the Rules of how to find the pri-
mary break [2−4].
These Rules rely on the contours of a detachment. This is why it is so
important to define the correct borders of the detachment, with the
2 Preoperative Examination](https://image.slidesharecdn.com/practicalguidetominimalsurgeryforretinaldetachmentvol-240327214459-1b0b7bb7/85/Practical-Guide-to-Surgery-for-RD-Vol-I-23-320.jpg)
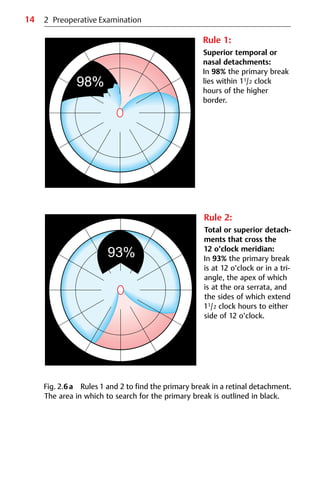
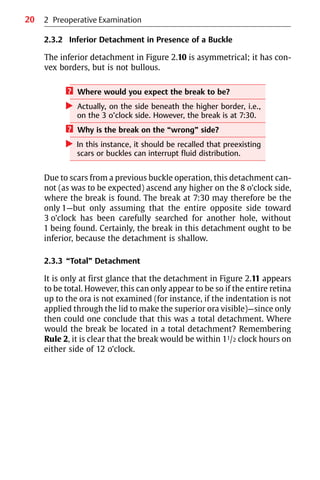
![13
쎲 The final shape of the detachment then depends on:
1. The position of the primary break and the gravity
exerted on the subretinal fluid
2. The anatomical borders, such as the disk and the
ora serrata
3. Retinal adhesions, if present—e.g., after prophylac-
tic treatment or previous detachment surgery.
2.2 The 4 Rules to Find the Primary Break
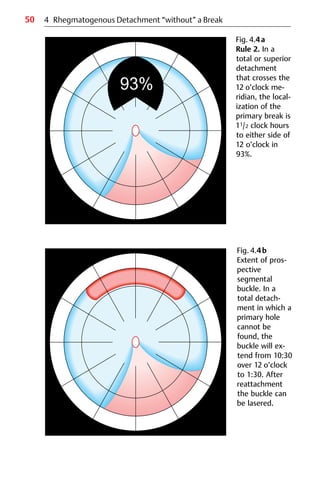
Lincoff and Gieser [2] analyzed 1000 detachments and defined
3 patterns: superior temporal or nasal detachments; total or super-
ior detachments that cross the 12 o’clock meridian; and inferior
detachments.
2.2.1 Superior Temporal or Nasal Detachments
Figure 2.5 shows a detachment with a tear at 10 o’clock. To begin
with, the horseshoe tear detaches toward the ora serrata, and the
fluid then progresses slowly, with gravity, inferiorly and toward the
disk, through the 6 o’clock meridian and then ascends around the
disk to the secondary side, to a maximum height equal to that of the
break on the primary side. Therefore:
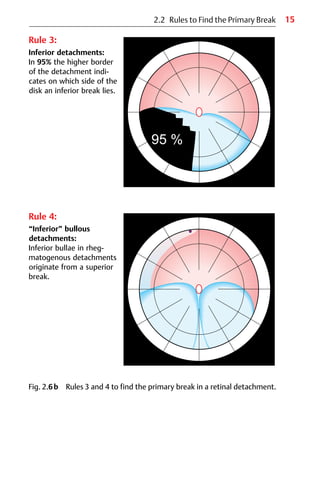
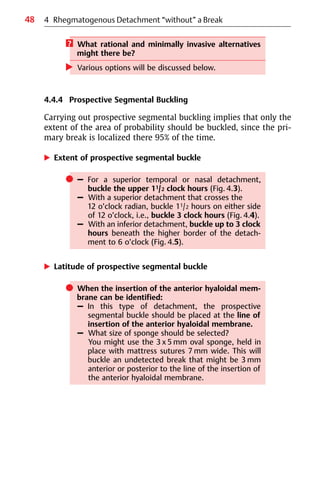
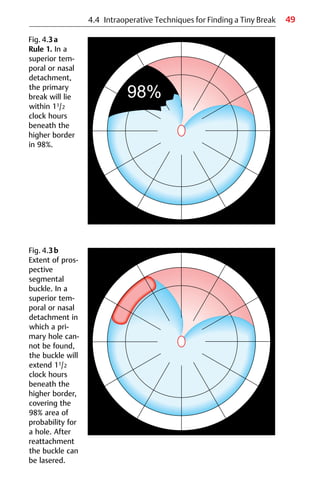
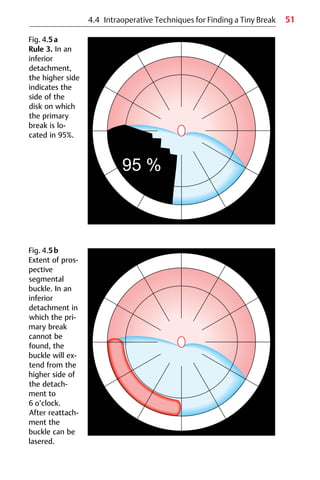
Primary Break: Rule 1
Superior temporal or nasal detachments:
The primary break that determines the shape of the
detachment lies within 11/2 clock hours beneath the
higher border of the detachment in 98%. (Fig. 2.6a).
This means that, in detachments with this configuration, a break
will be found in this area in 98% of cases. However, this does not
preclude the possibility that there is an additional break beneath it
(or on a rare occasion even above it).
2.2 Rules to Find the Primary Break](https://image.slidesharecdn.com/practicalguidetominimalsurgeryforretinaldetachmentvol-240327214459-1b0b7bb7/85/Practical-Guide-to-Surgery-for-RD-Vol-I-26-320.jpg)

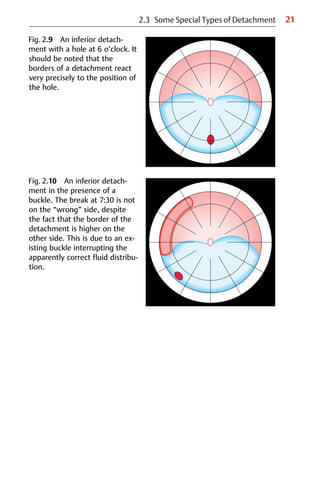


![28
3.1 Precursors of Retinal Detachment in the Presence
of Vitreous Hemorrhage
Before discussing the management of intraocular hemorrhage—de-
scribed in 1975 by Lincoff and Kreissig [1]—it may be useful first of
all to recall a few details about the precursors of retinal detachment.
The precursors can be flashes or spots, which are caused by the
detaching vitreous pulling on the retina. If a small vessel becomes
torn, the patient will perceive the drops of blood as black spots or
“mouches volantes”. At this point, the patient may still have full
visual acuity and a complete visual field.
쎲 But:
If the patient reports a sudden onset of masses of
black spots that ascended in streaks and caused a
clouding of vision, then a large retinal vessel has been
torn, and a substantial quantity of blood has been re-
leased into the retrohyaloidal space.
Tearing of a vessel can be associated with tearing of the retina, so
the retina may already have started to detach.
? What should be done?
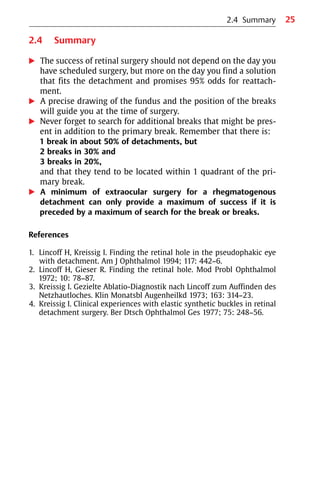
3.2 Topography of Acute “Vitreous” Hemorrhage
As long as the patient is still able to perceive a complete visual field
(even though it may be tinted red), and as long as the light projec-
tion is correct, it can be assumed that the retina is attached.
To begin with, examine the patient using indirect ophthal-
moscopy. Some retinal details may be visible. The peripheral retina
is almost always visible if the blood is still in the retrohyaloidal
space (Fig. 3.1).
쎲 But:
First examine the fellow eye to exclude other causes of
vitreous hemorrhage, such as proliferative diabetic
retinopathy or other retinal vascular disorders that can
have symptoms in both eyes.
3 Acute Rhegmatogenous Vitreous Hemorrhage](https://image.slidesharecdn.com/practicalguidetominimalsurgeryforretinaldetachmentvol-240327214459-1b0b7bb7/85/Practical-Guide-to-Surgery-for-RD-Vol-I-41-320.jpg)
![30
쎲 In the absence of vasculopathy in the other eye, it can
be assumed until proven otherwise that an acute vit-
reous hemorrhage is caused by a retinal tear [2].
If no details of the fundus are visible, even in the pe-
riphery, an examination by ultrasonography can be
carried out to answer the following questions:
? 1. Is the vitreous detached?
2. Is the retina still attached?
3. Can the flap of a tear be detected?
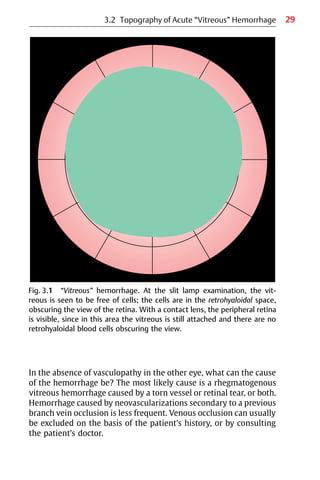
Next, examine the patient using biomicroscopy of the vitreous. If
this shows that the vitreous gel is free of blood cells, it means the
cells have collected on the posterior surface of the hyaloidal mem-
brane, and are circulating in the retrohyaloidal space (Fig. 3.2). The
retrohyaloidal space is a chamber filled with fluid (not gel), and the
movements of the eye can maintain the red blood cells within it in
suspension. There is also a weak convection current.
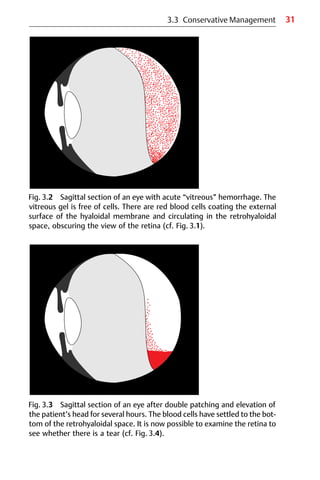
3.3 Conservative Management
? What can be done to reduce the circulation of the
blood cells that are obscuring the retina?
왘 Eye movements can be minimized by double patching
the patient. If the patient’s head is elevated at the
same time, the blood cells will settle. The treatment
can be started in the office:
Double patch the patient for several hours, and
have the patient sit upright.
Lunch can be provided. When the patches are removed at the end of
the day, the patient will be able to see you—as if by magic—since the
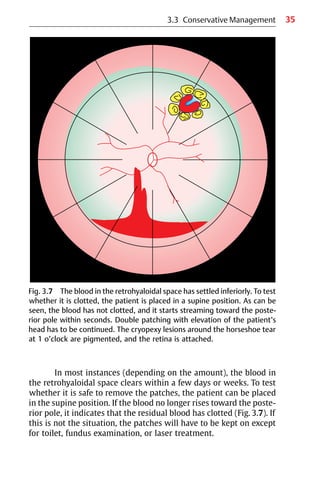
retrohyaloidal blood will have settled (Fig. 3.3). Immediately, study
the fundus using biomicroscopy to identify the cause of the hemor-
rhage. Usually, there will be a flap tear with a torn vessel crossing it
(Fig. 3.4).
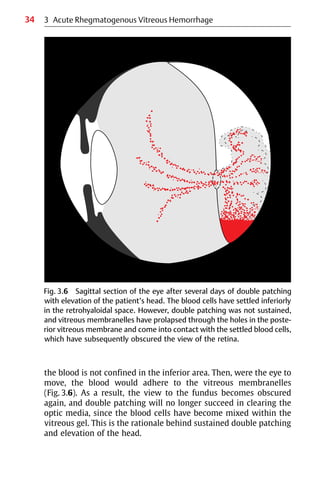
3 Acute Rhegmatogenous Vitreous Hemorrhage](https://image.slidesharecdn.com/practicalguidetominimalsurgeryforretinaldetachmentvol-240327214459-1b0b7bb7/85/Practical-Guide-to-Surgery-for-RD-Vol-I-43-320.jpg)
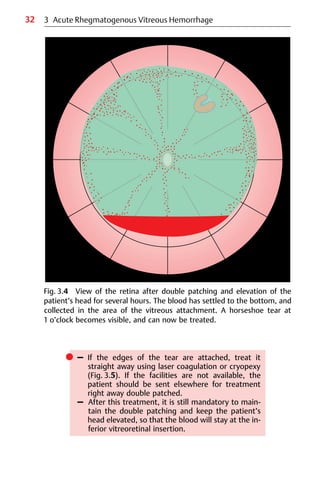
![33
3.3 Conservative Management
During the night, the patient should keep both patches on and keep
the head elevated at an angle of 30° until the blood is absorbed.
Otherwise, the blood will enter the vitreous gel through the holes
that develop in the posterior hyaloidal membrane during the fol-
lowing days. As Lincoff and Kreissig have described it [1], these
tears in the posterior hyaloidal membrane seem to start in the area
at the edge of the disk. Vitreous gel can prolapse through the holes
and come into contact with the blood in the retrohyaloidal space, if
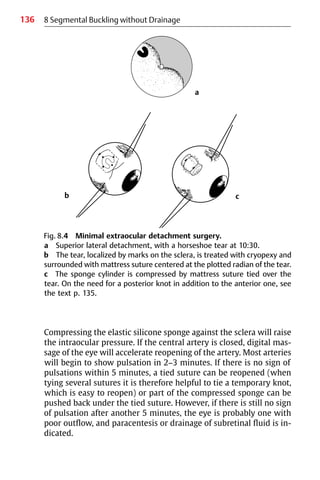
Fig. 3.5 The same patient as in Fig. 3.4, but 3 days after treatment of the
attached horseshoe tear with cryopexy. Double patching and elevation of
the patient’s head are continued, because tears in the posterior hyaloidal
membrane will develop and blood will enter the vitreous gel (see Fig. 3.6).](https://image.slidesharecdn.com/practicalguidetominimalsurgeryforretinaldetachmentvol-240327214459-1b0b7bb7/85/Practical-Guide-to-Surgery-for-RD-Vol-I-46-320.jpg)
![37
3.4 Clinical Study and Results
3.4 Clinical Study and Results
The study included 100 consecutive patients with acute vitreous
hemorrhage who underwent treatment with binocular occlusion
and elevation of the head; the results were published in 1977 [3].
Among them were 43 eyes with hemorrhage of rhegmatogenous
origin; in the remaining 57, the bleeding was due to hemorrhagic
vasculopathy.
? What is the appropriate treatment for the 43 eyes
with rhegmatogenous hemorrhage?
Should a primary vitrectomy be performed?
왘 No. Instead, double patching with elevation of the
patient’s head led to clearing in 38 eyes: 20 of them in
1 day, 15 by 4 days, and 3 by the end of 1 week (Table
3.1).
Retinal tears were found in 25 of the 38 cleared eyes, in 16 eyes the
tear was combined with a detachment. In 4 eyes, the hemorrhage
had occurred due to a bridging vessel across a horseshoe tear that
had been treated by a scleral buckle and cryopexy. No breaks were
found in the remaining 9 eyes, and the hemorrhage was presumed
to be due to pulling on a retinal vessel by the detaching vitreous.
Table 3.1 Clearing time in 38 eyes with rhegmatogenous vitreous hemor-
rhage that responded to ocular immobilization.
Etiology n Time required for clearing
(days)
1 2−4 5−7
Attached retinal tears 9 7 2 –
Tears with detachment 16 9 6 1
Bridging vessel on scleral
buckle
4 2 1 1
Posterior hyaloidal detach-
ment without retinal tear
9 2 6 1
Total 38 20 15 3](https://image.slidesharecdn.com/practicalguidetominimalsurgeryforretinaldetachmentvol-240327214459-1b0b7bb7/85/Practical-Guide-to-Surgery-for-RD-Vol-I-50-320.jpg)
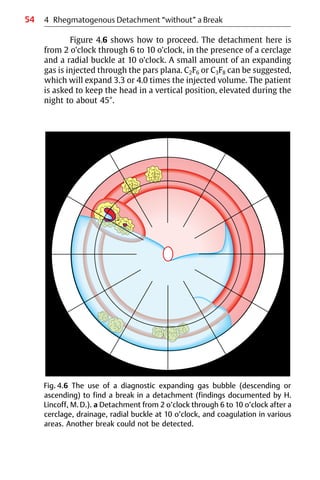
![45
4.3 Techniques for Finding a Tiny Break
4.3.1 Define the Borders of the Retinal Detachment
After the borders of the detachment have been determined, follow
the 95% Rules [1, 2], which define the area in which the primary
break is most likely to be found. For this purpose, the patient lies flat
on a stretcher and the head is tilted to either side, so that the
detachment can be assigned to 1 of the 3 types. The details of the
4 Rules, how to find the primary break, discussed above should be
recalled (see Chapter 2.2, p. 13).
4.3.2 Use Special Magnification
The break must be tiny, as it would otherwise already have been
found. The binocular biomicroscope should therefore be used, and
the slit beam with maximum illumination. For a phakic or aphakic
eye, the direct 3-mirror Goldmann contact lens [3] is still the lens of
choice for detecting the break.
? But what is the best choice in an eye with a less than
optimum pupil (4 mm in diameter), or with an in-
traocular lens?
왘 The periphery of this type of eye should be examined
using indirect techniques.
왘 Those available include:
– Biconvex +78 dpt or +90 dpt lens
– Mainster and Volk indirect wide-field contact
lenses [4]
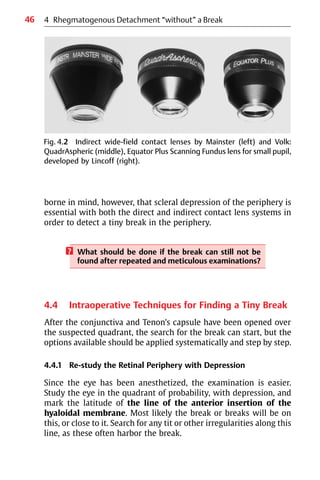
The Mainster lens has a field of 125°, the QuadrAspheric lens (Volk)
has a field of 130°, and the new Equator Plus Scanning Fundus lens
(Volk), developed by Lincoff for small pupils, has a field of 140° and
is even suitable for pupils as small as 3 mm (Fig. 4.2). With these in-
direct contact lenses, it is best to use a short beam. Admittedly, a
certain amount of experience is needed to become expert in the use
of indirect contact lenses. To visualize the periphery, the patient’s
eye has to be rotated slightly and the contact lens slightly tilted, and
with simultaneous depression the ora can usually be made visible
in a pseudophakic eye with a pupil 3−4 mm in diameter. It should be
4.3 Techniques for Finding a Tiny Break](https://image.slidesharecdn.com/practicalguidetominimalsurgeryforretinaldetachmentvol-240327214459-1b0b7bb7/85/Practical-Guide-to-Surgery-for-RD-Vol-I-58-320.jpg)
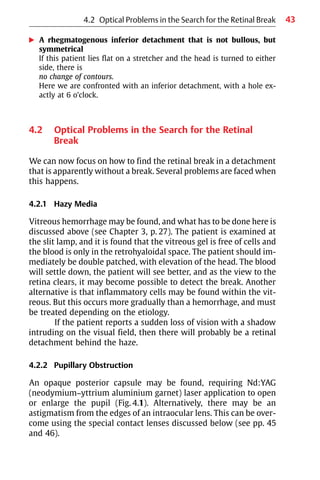
![52 4 Rhegmatogenous Detachment “without” a Break
쎲 When the insertion of the anterior hyaloidal mem-
brane cannot be identified:
– if there is a
phakic detachment, the break is most probably
13 mm from the limbus,
and the segmental buckle should be centered
there.
– If there is an
aphakic or pseudophakic detachment, the break
is most probably
12 mm from the limbus,
and the segmental buckle should be centered at
that distance.
These points are emphasized here because it was taught for many
years that aphakic eyes should be encircled, because they harbor
multiple tiny holes in the entire periphery that cannot be seen. This
proved to be incorrect [5], probably because tiny holes could not be
detected before the introduction of biomicroscopy. In addition
direct and indirect contact lenses were not yet available for the
meticulous preoperative searching with the biomicroscope that is
necessary to find these tiny breaks.
왘 Size (diameter) of prospective segmental buckle
쎲 Size of sponge cylinder to be selected when the
insertion of the anterior hyaloidal membrane is not
known:
– You can also apply a 3 x 5 mm circumferential
buckle, but in this instance it should be centered at
the preferred latitude of location of the break, i.e.,
at 13 mm from the limbus (phakic) or 12 mm
(aphakic or pseudophakic) from the limbus—the
latitude that has the best chance of harboring the
undetected break.
If the retina reattaches the next day, then the break was buckled.
쎲 It should not be forgotten that interrupted laser le-
sions must be applied over the entire length of the
prospective segmental buckle. This is to secure the
tamponaded, but “undetected” break or breaks on it.](https://image.slidesharecdn.com/practicalguidetominimalsurgeryforretinaldetachmentvol-240327214459-1b0b7bb7/85/Practical-Guide-to-Surgery-for-RD-Vol-I-65-320.jpg)
![53
4.4 Intraoperative Techniques for Finding a Tiny Break
? What should be done if the retina fails to reattach
after prospective segmental buckling?
왘 The retina should be studied using the biomicroscope
and the various contact lenses once again. What you
have learned from the unsuccessful surgery is that the
area buckled probably does not contain the break, or
all of the breaks.
? If the break can still not be found, what should be
done?
왘 – Arbitrarily extending the segmental buckle over
the circumferential length is not a good solution.
– Also, do not perform an arbitrary cerclage; this is
no better solution.
? Why?
왘 For the following reasons:
– If the periphery is re-studied with the biomicro-
scope and with various lenses with simultaneous
depression instead, there is a better chance of find-
ing the break, and it is already known where the
break is not to be found.
– In addition, a cerclage unnecessarily compromises
the vascular integrity of the eye, as demonstrated
by recent studies with Doppler sonography and an-
giography [6−10].
– The other surgical alternatives available when pros-
pective segmental buckling has failed are using a
diagnostic expanding gas bubble, or a vitrectomy
in conjunction with heavy perfluorocarbon liquids.
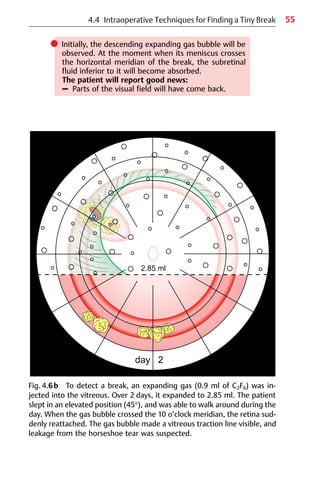
4.4.5 Diagnostic Expanding Gas Bubble (Descending or Ascending)
When the patient is in the vertical position, an expanding intraocu-
lar gas bubble will descend to the level at which the retina below
the bubble will reattach, indicating the level of the break [11]. More
details about the expanding gases used are given later (see Part 2:
Chapter 10. Temporary Gas Tamponade without Drainage: Minimal
Intraocular Surgery for Retinal Detachments).](https://image.slidesharecdn.com/practicalguidetominimalsurgeryforretinaldetachmentvol-240327214459-1b0b7bb7/85/Practical-Guide-to-Surgery-for-RD-Vol-I-66-320.jpg)
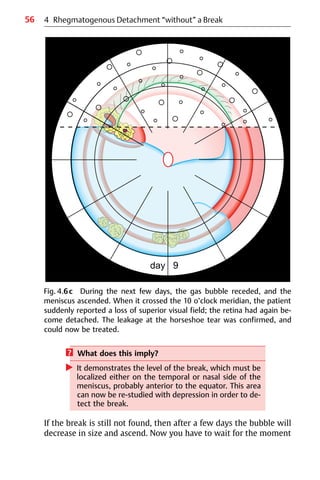
![58
Again, first of all the eye should be re-studied for the presence of a
hole. If you are again not successful, you may need to recognize your
limitations and send the patient to someone with greater expertise.
Here a last surgical resort for this type of detachment
“without” a break after the entire spectrum of diagnostic pro-
cedures and alternatives with minimal surgery has been attempted.
The subsequent surgery should be carried out by an expert in
vitreous surgery.
4.4.6 Vitrectomy in Conjunction with Heavy Perfluorocarbon
Liquids
With this technique, the first step is to try to release tractions that
may be present, and then the posterior eye is filled with heavy per-
fluorocarbon liquids [12] to detect the break using what is known as
the “schlieren” phenomenon. This sounds logical, but in clinical
practice it rarely succeeds, because the source of the schlieren for
tiny breaks is not discernible.
As a very last resort, the use of a silicone oil tamponade
might be considered after the vitrectomy. However, one should be
aware of all the secondary complications that will develop.
쎲 At this point, it should also be borne in mind that a vit-
rectomy without silicone oil injection, even in the
hands of an expert, already harbors many secondary
complications, such as the development of prolifera-
tive vitreoretinopathy (PVR) at present ranging in
frequency between 8% and 20% and new breaks with a
frequency of between 5% and 15% − resulting in a high
rate of redetachments − and the development of a
secondary cataract [13−16].
An effort should therefore be made to circumvent this last option by
all means, since at present it still harbors many short-term and
long-term complications.
Let us return now to the clinical situation.
4 Rhegmatogenous Detachment “without” a Break](https://image.slidesharecdn.com/practicalguidetominimalsurgeryforretinaldetachmentvol-240327214459-1b0b7bb7/85/Practical-Guide-to-Surgery-for-RD-Vol-I-71-320.jpg)
![59
? How often is the break not found in a rhegmato-
genous retinal detachment?
왘 According to various authors, the break will not be
found in between 1% and 5% of patients, a small pro-
portion of all the detachments seen.
Admittedly, in a pseudophakic detachment it is harder to detect the
tiny break. However, using the new indirect wide-field contact
lenses for a small pupil, as recommended by Lincoff [17], and com-
bined with simultaneous depression, it is almost always possible to
detect even tiny breaks.
4.5 Summary
When confronted with an eye in which the break has not been
found after a meticulous and repeated search, a rational approach
should be adopted to solve the problem.
왘 After the borders of the detachment have been defined,
first study the retinal periphery with depression in the area of
probability; according to the Rules, a hole should be found here
in 95%.
왘 If a break is not found in this area, re-study the area again with
depression during surgery, define the insertion of the anterior
hyaloidal membrane, and use point freezing to detect the break
in suspicious areas.
왘 If a break is still not found in the suspicious area, insert a diag-
nostic parabulbar balloon in the area.
왘 If a suspicious area is still not found, apply prospective segmen-
tal buckling and limit it to the area of probability. Place the
buckle either at the insertion of the anterior hyaloidal mem-
brane, or—depending on the state of the lens—at 13 mm or
12 mm from the limbus.
왘 As another possibility, a diagnostic expanding gas bubble can be
used to detect the meridian of the break.
왘 Never move on to maximal extraocular or intraocular surgery
merely because the problem has not yet been solved by you.
왘 Instead, keep things in perspective and bear in mind that the
break should be detected after a meticulous search except in
1%−5% of detachments.
4.5 Summary](https://image.slidesharecdn.com/practicalguidetominimalsurgeryforretinaldetachmentvol-240327214459-1b0b7bb7/85/Practical-Guide-to-Surgery-for-RD-Vol-I-72-320.jpg)


![64
We can begin by recalling
쎲 The characteristics of rhegmatogenous retinal
detachments:
1. They have convex borders and surfaces
2. They develop dependent shapes in relation to the
position of the most superior retinal break
3. They extend from ora to disk
4. They are progressive.
Detachments caused by superior breaks become bullous, and pro-
gress rapidly in a dependent direction. Detachments caused by in-
ferior breaks are not bullous, progress slowly, and can develop
pigment demarcation lines at levels of prolonged arrest.
By contrast
쎲 Nonrhegmatogenous retinal detachments:
1. Tend to be confined
2. Do not extend from ora to disk.
Lincoff and Kreissig [1] have divided these into 3 categories:
왘 Peripheral
왘 Central
왘 Dependent
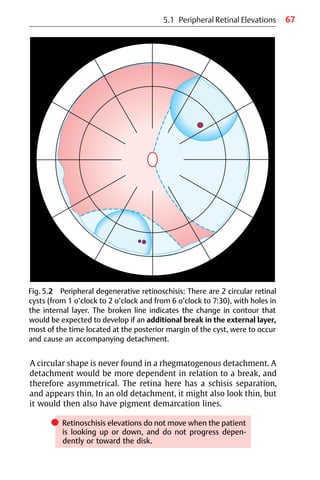
5.1 Peripheral Retinal Elevations
5.1.1 Cystoid Degeneration
Figure 5.1 shows a peripheral retinal elevation. It is easily reco-
gnized as cystoid degeneration. Why? Because cystoid elevations
can be seen in the far periphery of almost every adult patient. The
elevation has irregularly shaped borders; some areas are convex,
and others concave. The question that might arise is: Does a convex
area with “holes” possibly represent the beginning of a retinal
detachment? Look at the 2 round holes at 1:15 in Figure 5.1. Does
this mean that the patient will develop a rhegmatogenous retinal
detachment during the following days or weeks?
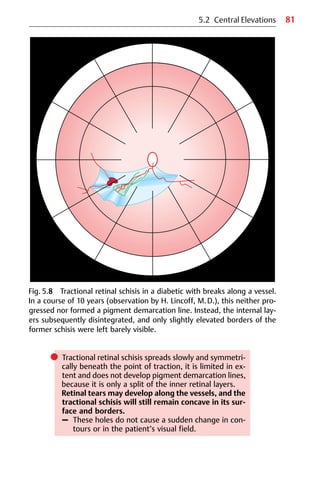
5 Rhegmatogenous versus Nonrhegmatogenous Detachment](https://image.slidesharecdn.com/practicalguidetominimalsurgeryforretinaldetachmentvol-240327214459-1b0b7bb7/85/Practical-Guide-to-Surgery-for-RD-Vol-I-77-320.jpg)
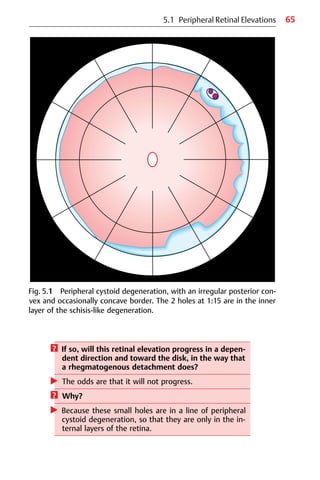
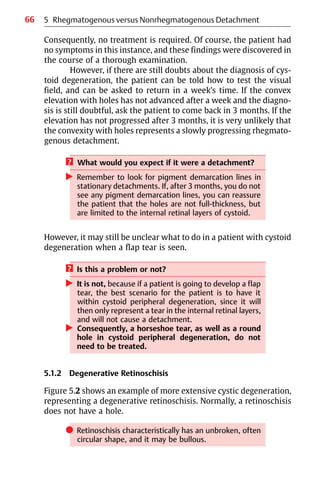
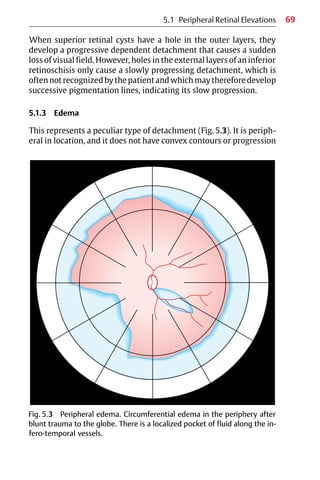
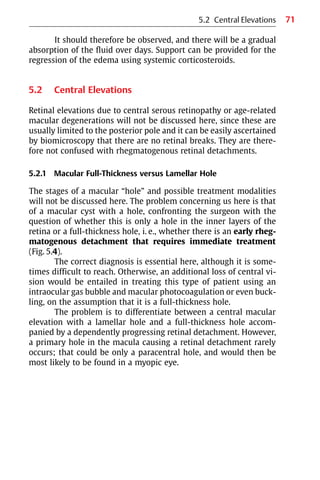
![73
In 2 series, each including 1000 detachments, of patients who un-
derwent surgery in New York [2] and in Tuebingen [3], there was
only 1 detachment in which the primary hole was close to the fovea,
i.e., paracentral, and the patient concerned was a myope.
쎲 However, when a “hole” in the macula is seen in an
old detachment extending from disk to ora, and an
anterior hole is not found, the idea of a macular hole
should be dismissed (for certain in a Caucasian popu-
lation), and instead another search should be made for
a break in the periphery.
In all detachments with a so-called “hole” in the macula, this proved
to be a secondary or degenerative hole, ascertained by retinal re-
attachment obtained by limiting the buckling to the hole in the pe-
riphery without drainage. After reattachment of the retina, these
macular “holes” are often no longer visible.
쎲 An additional factor that warrants caution in making
the wrong diagnosis of a primary macular hole caus-
ing a rhegmatogenous retinal detachment is the fact
that in old detachments, there is very unlikely an ad-
ditional macular “hole” that is full-thickness, but
rather only a lamellar hole.
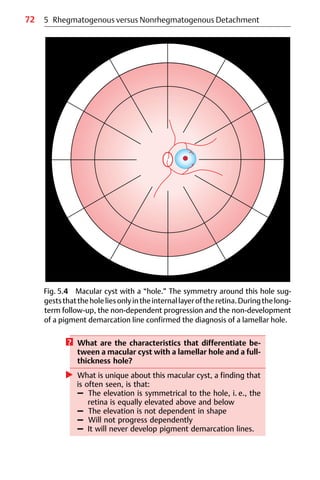
5.2.2 Ischemic Edema
The retinal elevation in Figure 5.5 has a rather peculiar appearance.
The patient presents with acute symptoms of a loss of the inferior
visual field, and this is why he or she has been referred to you as a
retinal surgeon.
쎲 During the examination, a retinal elevation with a
characteristic shape is found, i.e., with a straight
borderline going from the disk toward the macula and
equator, but not to the ora serrata.
5.2 Central Elevations](https://image.slidesharecdn.com/practicalguidetominimalsurgeryforretinaldetachmentvol-240327214459-1b0b7bb7/85/Practical-Guide-to-Surgery-for-RD-Vol-I-86-320.jpg)
![75
Fig. 5.6 Optic pit with 2 macular elevations. There is a schisis-like separa-
tion extending beyond the posterior pole and to the disk (arrows) and a
shallow smaller outer layer detachment in the center of the macula (arrow-
heads) with a hole in the outer layer.
5.2 Central Elevations
The diagnosis is therefore one of a superior retinal artery occlusion,
and the findings now being seen represent the resulting edema.
쎲 At angiography, the primarily occluded vessel would
be found to have reopened, and all that is left is the re-
sidual edema, which will remain for a couple of weeks
and mimic a flat retinal detachment.
5.2.3 Optic Pit Maculopathy
Figure 5.6 shows a special central retinal elevation that is 2-fold [4,
5]. It consists of a schisis-like elevation, and when one looks more](https://image.slidesharecdn.com/practicalguidetominimalsurgeryforretinaldetachmentvol-240327214459-1b0b7bb7/85/Practical-Guide-to-Surgery-for-RD-Vol-I-88-320.jpg)
![76
carefully, another elevation is observed underneath the first one
that is less extensive. If the fundus is examined with stereopsis, a
sort of dome can be recognized in the center, with another one of a
smaller extent underneath it.
? What is the diagnosis?
왘 It is an optic pit syndrome.
The internal layer separation, the schisis-like cyst, is hard to re-
cognize because it is extremely transparent, and it may be easier to
recognize the outer layer detachment of a lesser extent. The hole in
the center is in the external layer. These findings were recently con-
firmed by OCT (optical coherence tomography) [6].
쎲 This syndrome of an internal layer separation com-
bined with an external layer detachment is so unique
that an optic pit syndrome can be diagnosed even if
the optic pit, which is sometimes hidden in deeper lay-
ers of the optic nerve, is not visible.
There are several treatment options. An intraocular gas bubble can
be injected, and with special positioning of the patient’s head, the
schisis fluid can be massaged downward, i.e., out of the macular
area, to improve the central visual field [6]; or the condition can be
treated with vitrectomy, followed by gas injection with head posi-
tioning as well.
쎲 However, it should be borne in mind that the 2-layer
central elevation never progresses toward the ora
and there is no threat of a rhegmatogenous detach-
ment.
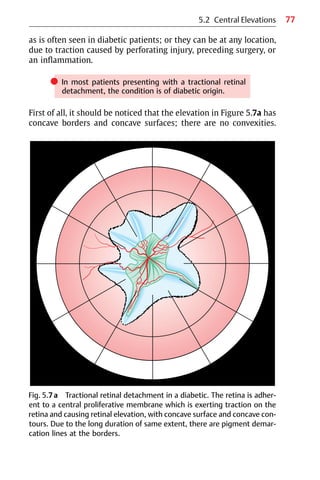
5.2.4 Tractional Retinal Detachment
These detachments are caused by vitreous traction, and are
characterized by concave borders and concave surfaces.
They can be peripheral, reflecting traction at the area of the vitreous
base or anterior to it, e.g., after a vitrectomy; or they can be central,
5 Rhegmatogenous versus Nonrhegmatogenous Detachment](https://image.slidesharecdn.com/practicalguidetominimalsurgeryforretinaldetachmentvol-240327214459-1b0b7bb7/85/Practical-Guide-to-Surgery-for-RD-Vol-I-89-320.jpg)
![82 5 Rhegmatogenous versus Nonrhegmatogenous Detachment
In spite of the tears, the surface remains concave, and this alone
provides additional reassurance that the condition is one of a retinal
schisis. Generally, it is limited in extent, because the internal layers
will disintegrate more and more; over time, the traction decreases,
and as a result this type of elevation becomes less of a problem.
5.2.6 Clinical Study
There were 200 diabetic patients with retinal elevations examined;
in 4 of 10 patients (42%), tractional schisis was present, but not
tractional detachment [7].
If vitrectomy were to be performed in tractional schisis,
therefore, the patient would not benefit much. Why? Because the
treatment would not improve the visual field significantly.
쎲 It should be borne in mind that in a diabetic eye, it is
essential to differentiate between tractional schisis
and tractional detachment, because otherwise 4 of
every 10 patients who only have tractional schisis will
be exposed to surgery that will not benefit them
significantly, except for a slight improvement if the
macula is involved.
In a classic publication, Lincoff et al [7] listed important guidelines
for this mandatory differential diagnosis prior to performing inva-
sive surgery.
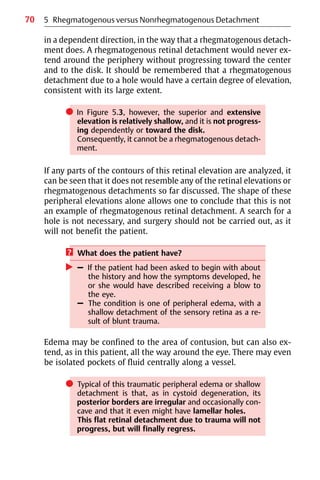
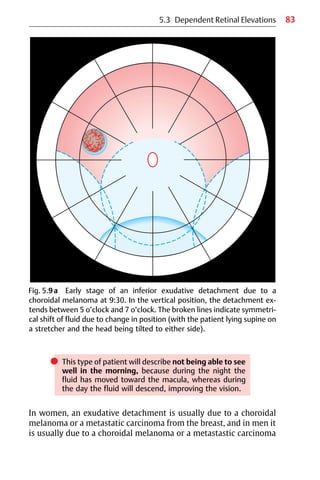
5.3 Dependent Retinal Elevations
5.3.1 Exudative Detachments
Exudative detachments of the retina occur in the presence of an in-
traocular tumor, pigment epitheliopathies or inflammatory dis-
orders, such as Harada’s disease, etc.
? What is unique about exudative detachments?
왘 They are dependent and symmetrical around
6 o’clock. If the patient is examined lying flat, the fluid
spreads posteriorly and if the patient is turned onto
one or the other side, the fluid will run up symmetri-
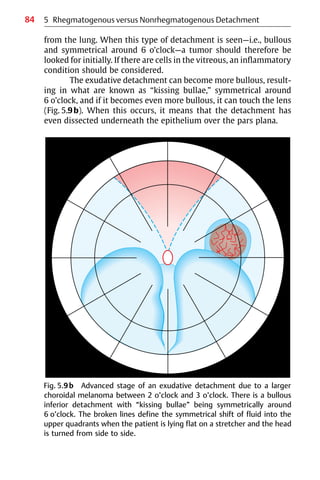
cally on either side (Fig. 5.9a).](https://image.slidesharecdn.com/practicalguidetominimalsurgeryforretinaldetachmentvol-240327214459-1b0b7bb7/85/Practical-Guide-to-Surgery-for-RD-Vol-I-95-320.jpg)


![89
? Instead, “passive” prophylaxis is advisable. What
does this mean?
왘 Explain to the patient the symptoms of a retinal
detachment (usually accompanying a posterior
vitreous detachment), and how to test for the visual
field.
Advise the patient to do this on a regular basis. If a detachment is
developing, this regular testing will allow early diagnosis before the
macula detaches.
6.2 Epidemiology
According to epidemiological studies, the prevalence of lattice
degeneration in the general population is between 5% and 10%. The
life-long risk of a retinal detachment in such eyes is about 1% [1].
However, lattice degeneration in the fellow eye of a patient with a
detachment increases the risk of a break or a detachment, and more
so if the vitreous in the fellow eye has not yet detached. Before the
patient is sent home after surgery, therefore, in addition the fellow
eye should be examined for the presence of a posterior vitreous
detachment, and this is best done using ultrasonography. If a poste-
rior vitreous detachment has not yet occurred, then in the presence
of lattice degeneration, the chances of the fellow eye developing
tears or a retinal detachment are between 10% and 25%. For such a
patient, this means that there may be a 1 in 4 chance of developing a
detachment in the fellow eye.
쎲 When detachment patients return for their follow-up
examinations, the fellow eye should therefore be ex-
amined first.
This is because, in perspective, the risk for the patient
of developing another detachment is greater in the
fellow eye than in the treated eye, especially if the
posterior vitreous has not yet detached in this eye.
6.2 Epidemiology](https://image.slidesharecdn.com/practicalguidetominimalsurgeryforretinaldetachmentvol-240327214459-1b0b7bb7/85/Practical-Guide-to-Surgery-for-RD-Vol-I-102-320.jpg)

![94
7.1 Cryosurgery in Relation to Retinal Detachment
Surgery
Retinal detachment surgery began to progress significantly after
1930, thanks to Gonin [1]. His original concept—that the cause of a
detachment is a retinal hole and that reattachment can be achieved
using diathermy-induced inflammation around the break and
drainage of subretinal fluid—improved the prognosis to such an ex-
tent that for a considerable time no one saw any need for further
change. When, in 1933−34, Deutschmann [2] and Bietti [3] reported
treatment of retinal detachment by freezing the break with solid
carbon dioxide, there was little response. The instruments for
applying diathermy were satisfactory, and the retinal adhesion
achieved was effective. Cryosurgery of the retina remained an idea
whose time had not yet come.
But things do change: 20 years later, in 1953, an extraocular
detachment technique appeared, with the introduction by Custodis
of a revolutionary technique for retinal detachment surgery [4].
쎲 The Custodis technique eliminated 3 major hazards:
1. Perforation for drainage of subretinal fluid
2. Intravitreal injection to restore volume
3. Scleral dissection to save part of the scleral wall
from diathermy necrosis.
This segmental buckle technique without drainage was made
possible by the use of an elastic explant (Polyviol), compressed pre-
cisely over the retinal hole, which had, however, been treated with
full-thickness transscleral diathermy. The technique was very
nearly abandoned—not because the procedure did not work, but be-
cause of a high rate of extraocular infection (in 6 of the 25 eyes
treated) and endophthalmitis (in 4 of the 6 infected eyes) reported
by Schepens et al in 1960 [5].
Lincoff et al [6], who adopted the Custodis operation, ex-
perienced similar complications, but much less frequently, and
were convinced of the correctness of the procedure. Lincoff there-
fore searched for ways of eliminating what he concluded were
7 Cryosurgery](https://image.slidesharecdn.com/practicalguidetominimalsurgeryforretinaldetachmentvol-240327214459-1b0b7bb7/85/Practical-Guide-to-Surgery-for-RD-Vol-I-107-320.jpg)
![95
쎲 The most likely roots of the problem with the
Custodis technique:
1. The necrotizing effects of diathermy
2. The toxic effects of Polyviol.
In1963,Lincoffandhisgroup[7]begancreatingexperimentallesions
in animal eyes using carbon dioxide applicators borrowed from der-
matology. In the same year, the Cooper−Linde Neurosurgical Unit,
which used liquid nitrogen to cool a brain probe, was developed.
Lincoff and McLean modified the device to make it suitable for the
eye, and designed a smaller and more maneuverable instrument.
This provided controlled temperatures at the end of an insulated
probe, ranging from +37 °C to −180 °C. This first liquid nitrogen in-
strument was complicated, but was excellent for research purposes
and provided extensive data. In subsequent years, the Linde instru-
mentwasreplacedbymoredependabledevicesusingcarbondioxide
or nitrous oxide gas—cryogenic agents that are easier to handle than
liquid nitrogen. Lincoff had thus identified in cryosurgery the
method he was looking for in order to retain the Custodis concept.
쎲 In addition to replacing diathermy by cryosurgery,
Lincoff exchanged the somewhat irritative Polyviol ex-
plant with an inert elastic plombe made of silicone
sponge [8].
However, this new extraocular cryosurgical detachment operation
initially still had to overcome many problems before being ac-
cepted.
? What was it about this approach that was so differ-
ent and difficult to accept?
왘 – There were doubts about whether a cryosurgically
induced adhesion would be strong enough.
Directly after the cryosurgical application, there
were no marks on the sclera, and almost no changes
in the retina were visible ophthalmoscopically.
– There were even greater doubts about whether
subretinal fluid would be absorbed postopera-
tively after a nondrainage procedure, particularly if
the break was still elevated above the buckle
during the operation.
7.1 Cryosurgery in Relation to Retinal Detachment Surgery](https://image.slidesharecdn.com/practicalguidetominimalsurgeryforretinaldetachmentvol-240327214459-1b0b7bb7/85/Practical-Guide-to-Surgery-for-RD-Vol-I-108-320.jpg)
![96
7.2 Research and Development in Cryosurgery
These doubts concerning cryosurgery can be overcome by recalling
a few facts. The primary advantage of cryosurgery was, and still is,
that it can penetrate the sclera and create a firm retinal adhesion
without damaging the scleral wall. This made feasible an important
change in detachment surgery that had been waiting in the wings:
Full-thickness scleral buckling (without lamellar dissection needed
to preserve the scleral wall when diathermy is applied) and sutur-
ing an elastic explant onto the cryopexy-treated sclera, eliminating
the need for drainage.
쎲 With the development of cryosurgery, the Custodis
technique could develop and reach its deserved
potential
With the advent of cryosurgery, many surgeons switched from the
Schepens technique, in which solid silicone structures were buried
in lamellar scleral dissections, to using a full-thickness scleral
operation [9].
It is difficult nowadays to understand why, at its inception
in the 1960s, cryosurgery (now termed cryopexy) was generally
reserved for simple detachment problems in which there was little
traction; diathermy remained the standard method of choice. The
reluctance to use cryosurgery was due to uncertainty about
whether the cryopexy-induced adhesion was strong enough. These
doubts persisted during further animal experiments by Bellows
[10], Boeke and Hollwich [11], Oosterhuis et al [12], and Toernquist
[13].
쎲 To rescue this new thermal modality for the newly
developed local buckling technique without drainage,
the cryosurgical adhesion had to be studied more
extensively in additional animal experiments.
This was done at the end of the 1960s by Lincoff and Kreissig [14, 15]
and Kreissig and Lincoff [16, 17], and the author addressed the prob-
lem in her postdoctoral thesis, The Ultrastructure of the Cryopexy Ad-
hesion in Retinal Surgery [18] in 1972. In collaboration with Bloch, a
7 Cryosurgery](https://image.slidesharecdn.com/practicalguidetominimalsurgeryforretinaldetachmentvol-240327214459-1b0b7bb7/85/Practical-Guide-to-Surgery-for-RD-Vol-I-109-320.jpg)
![97
biomathematician, extensive animal experiments were under-
taken.
쎲 Answers were sought to the following questions:
1. How does the strength of the cryopexy-induced
adhesion compare to that produced by diathermy?
2. Are there differences in the strength of adhesions
produced by light, medium, and heavy applications
of cryopexy or diathermy?
3. How many days after treatment is the maximum
adhesion obtained?
The results of this extensive research project provided conclusive
evidence capable of reassuring clinicians that cryopexy was a sui-
table alternative to the time-tested modality of diathermy.
쎲 The research done on cryosurgery represented the
premise that minimal extraocular surgery for retinal
detachment had finally become the primary treat-
ment—and during the last 25 years, it has become and
remained the method of choice.
7.2.1 Dosage of Thermal Applications
The experiments were carried out in animal eyes under ophthalmo-
scopic control. Use of a more objective quantification, such as
temperature and time, was considered but rejected, because it did
not imitate the clinical situation under investigation. After all, the
purpose was to compare the clinical entities of light, medium, and
heavy applications. All thermal lesions were applied transconjunc-
tivally in 336 eyes (168 rabbits) [18−20].
7.2 Research and Development in Cryosurgery](https://image.slidesharecdn.com/practicalguidetominimalsurgeryforretinaldetachmentvol-240327214459-1b0b7bb7/85/Practical-Guide-to-Surgery-for-RD-Vol-I-110-320.jpg)
![98
쎲 Dosage of cryosurgery
– Light cryosurgical application:
Freezing caused the choroid to blanch. After re-
moval of the cryoprobe, the lesion was hardly per-
ceptible.
– Medium cryosurgical application:
Freezing was sustained until the retina first turned
white. With removal of the cryoprobe, the white in
the retina faded, leaving a faint gray area repre-
senting intraretinal edema.
– Heavy cryosurgical application:
Freezing was sustained for 3 seconds after the
retina first turned white. When the probe was re-
moved, an opaque lesion persisted.
쎲 Dosage of diathermy
– A light application of diathermy caused the faintest
gray response in the retina.
– The medium application was stopped when the
retina turned white.
– In the heavy lesion, the application was continued
for 3 seconds after the retina turned white.
7.2.2 Adhesive Strength of Thermal Lesions
As it was known from earlier experiments [15] that the normal retina
will tear when subjected to a force of 300 mg, the thermal lesions
were placed at the ends of the myelinated fibers to allow pulling
with the myelinated bundle on the retinal adhesion. The myelinated
bundle itself was able to withstand a force of 1850 mg. All 640
thermal lesions (2 in each rabbit eye) were tested at various time
intervals with a pulling experiment, as demonstrated in Figure 7.1.
There were 328 diathermy and 312 cryopexy lesions.
왘 Cryosurgical lesions
The lesions after cryosurgery increased in strength with the inten-
sity of the application. There were 3 distinct levels of adhesive
strength, corresponding to the light, medium, and heavy applica-
tions.
7 Cryosurgery](https://image.slidesharecdn.com/practicalguidetominimalsurgeryforretinaldetachmentvol-240327214459-1b0b7bb7/85/Practical-Guide-to-Surgery-for-RD-Vol-I-111-320.jpg)
![99
쎲 Adhesive strength of crysurgical lesions:
– A light lesion resisted an average pull of 300 mg
– A medium lesion 575 mg
– A heavy lesion 1175 mg (Fig. 7.2)
왘 Diathermy lesions
No such stratification was observed with diathermy. The adhesive
strength shows a range of 50−1550 mg, but there is poor correlation
with the intensity of application. A light diathermy application was
sometimes able to yield a strong adhesion. The average adhesive
strength of the diathermy lesions, regardless of whether the appli-
cation was light, medium, or heavy, was capable of resisting a pull of
approximately 500 mg—a range approaching that of a medium
cryosurgical lesion (Fig. 7.2).
7.2.3 Development of Adhesive Strength over Time
Cryosurgical adhesions increased rapidly in strength after the 2nd
day; diathermy lesions increased in strength after the 4th day.
Fig. 7.1 Flat preparation of a rabbit retina. Lesions (L, pointing to the en-
circled lesion) have been placed at the peripheral ends of myelinated fibers.
The proximal ends have been severed at the disc and grasped with a silk su-
ture in preparation for pulling [from ref. 21].
7.2 Research and Development in Cryosurgery](https://image.slidesharecdn.com/practicalguidetominimalsurgeryforretinaldetachmentvol-240327214459-1b0b7bb7/85/Practical-Guide-to-Surgery-for-RD-Vol-I-112-320.jpg)
![100
a
c
e f
b
d
7
Cryosurgery
Fig. 7.2 Graphs of the relative adhesiveness of cryopexy and diathermy. Solid dots represent lesions, and circled points re-
present joined points (days of maximum adhesion) of the 2 straight lines fitted to the data. The value for the average
adhesiveness in each group is represented by a triangle. The abscissa represents the time in days between application and
detachment, and the ordinate represents milligrams of force required to separate the lesion [from ref. 21.]
a−c Cryopexy: light (a), medium (b), and heavy (c) applications.
d−f Diathermy: light (d), medium (e), and heavy (f) applications.](https://image.slidesharecdn.com/practicalguidetominimalsurgeryforretinaldetachmentvol-240327214459-1b0b7bb7/85/Practical-Guide-to-Surgery-for-RD-Vol-I-113-320.jpg)
![103
mal experiment was carried out [18]. For this purpose, 136 light,
medium, and heavy cryosurgical lesions were made in 68 rabbit
eyes. The lesions were made under ophthalmoscopic control with
the Linde instrument, set at −30 °C. The same criteria for the
3 different intensities of application were used as in the previous
animal experiments. The cryosurgical applications were placed at
the end of the nerve fibers, resulting in 2 lesions for each animal
eye. The animals were sacrificed at various intervals, ranging from
4 days to 3 years. The different types of lesion—light, medium, and
heavy—were studied using electron microscopy.
쎲 At least 3 different anatomical patterns could be
discerned [16, 18], which were characterized as:
1. Interdigital
2. Desmosomal
3. Infiltrative
Retinal neuroepithelium has a remarkable ability to recover after
cryosurgical injury (Fig. 7.3). The pattern of the healed lesion de-
pends on the depth of thermal necrosis initiated by the cryosurgical
application and whether the basement membranes are interrupted.
If the retina is necrosed by freezing to the level of the outer
limiting membrane (Fig. 7.4), but the outer nuclei survive, the rods
regenerate and again interdigitate with the villi of regenerated
pigment epithelium (Figs. 7.5, 7.6). This new union, if pulled on, is
stronger than the natural intraretinal adhesion.
If the thermal injury of cryosurgery penetrates to the nerve
fiber layer, the outer nuclei and the rods do not regenerate. Adhesion
develops between regenerating pigment epithelium without villous
processes and processes of Mueller’s cells. The adhesion is desmo-
somal—the densities representing desmosomes are easily reco-
gnized—betweenthesmoothmembranesoftheneuroepithelialcells
of the sensory retina and pigment epithelium (Fig. 7.7).
7.2 Research and Development in Cryosurgery](https://image.slidesharecdn.com/practicalguidetominimalsurgeryforretinaldetachmentvol-240327214459-1b0b7bb7/85/Practical-Guide-to-Surgery-for-RD-Vol-I-116-320.jpg)
![104
OLM
ON
BM
R
P
mac
7 Cryosurgery
Fig. 7.3 A section of normal retina demonstrating the penetration of cryogenic
necrosis (represented by columns) to the outer limiting membrane after a
light application (L); to the nerve fiber layer after a medium application (M);
and to the internal limiting membrane after a heavy application (H).
Fig. 7.4 The retina 4 days after light cryopexy. The section shows retinal
necrosis to the level of the outer limiting membrane (OLM); the outer nu-
clei (ON), above, look normal. The basement membrane (BM) of the pig-
ment epithelium (P) survives. There are large numbers of macrophages
(mac) above. The photoreceptor elements (R) are necrotic [from ref. 18].](https://image.slidesharecdn.com/practicalguidetominimalsurgeryforretinaldetachmentvol-240327214459-1b0b7bb7/85/Practical-Guide-to-Surgery-for-RD-Vol-I-117-320.jpg)
![105
Fig. 7.5 The retina 14 days after light cryopexy. The section shows recovery
of the photoreceptor elements. The inner segments (IS) and outer seg-
ments (OS) are again in parallel columns, interdigitating with the pigment
epithelium (P). A large macrophage (mac) among the outer segments is
the most striking evidence of previous injury. The basement membrane
(BM) of the pigment epithelium is intact. ON = outer nuclei [from ref. 18].
7.2 Research and Development in Cryosurgery
Fig. 7.6 The retina 14 days after light cryopexy. The electron micrograph of
the outer segments (OS) shows rods interdigitating with villi of pigment
epithelium (PE). The outer segment discs are again in horizontal order. IS =
inner segment [from ref. 14].](https://image.slidesharecdn.com/practicalguidetominimalsurgeryforretinaldetachmentvol-240327214459-1b0b7bb7/85/Practical-Guide-to-Surgery-for-RD-Vol-I-118-320.jpg)
![106
Fig. 7.8 The retina 28 days after medium cryopexy. The electron micrograph
shows undifferentiated neuroepithelial cells (Nep) of retina, which are con-
nected to each other by desmosomes (double arrow), spread along the
basement membrane (Ib), and are attached to it with hemidesmosome-like
structures (single arrows).
7 Cryosurgery
Fig. 7.7 The retina 28 days after medium cryopexy. The electron micrograph
shows desmosomal connection (arrows) between smooth membranes of
adjacent neuroepithelial cells, i.e., the less specialized neuroepithelium
(Nep) without finger processes and the new pigment epithelium (nP)
without villous processes; lb = lamina basalis of pigment epithelium [from
ref. 16].](https://image.slidesharecdn.com/practicalguidetominimalsurgeryforretinaldetachmentvol-240327214459-1b0b7bb7/85/Practical-Guide-to-Surgery-for-RD-Vol-I-119-320.jpg)
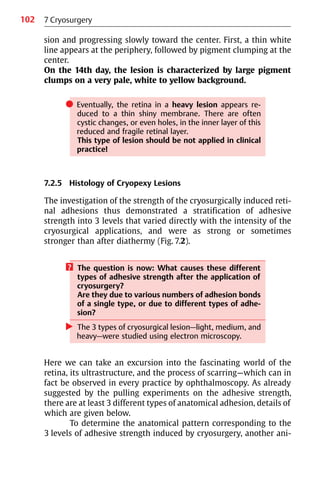
![107
Fig. 7.9 The retina and Bruch’s membrane 2 years after heavy cryopexy. The
electron micrograph shows a chorioretinal scar by infiltration. The thermal in-
jury necrosed the basement membrane of the pigment epithelium (lb =
lamina basalis). As a result regenerating retinal neuroepithelium (Nep) infil-
trated the collagen lamellae (Col) of Bruch’s membrane, crossed the level of
elastic lamina (el), and penetrated into the adjacent choroid. Fc = fibrocyte.
7.2 Research and Development in Cryosurgery
? What does this tight desmosomal adhesion remind
you of? Where else in the eye would you find such a
strong adhesion?
왘 Analogous epithelial relationships are found over the
ciliary body.
If the recovery of pigment epithelium is delayed, undifferentiated
neuroepithelial cells of the retina may even spread directly along
the basement membrane and attach to it, with structures resem-
bling hemidesmosomes (Fig. 7.8). The residual retina is then a thin
band of neuroepithelium between the inner limiting membrane
and the basement membrane of pigment epithelium.
Finally, if the thermal injury by cryosurgery is severe enough
to necrose the basement membrane of pigment epithelium, surviv-
ing neuroepithelium may infiltrate the collagen lamellae of Bruch’s
membrane [20] and cause a chorioretinal scar (Figs. 7.9, 7.10).](https://image.slidesharecdn.com/practicalguidetominimalsurgeryforretinaldetachmentvol-240327214459-1b0b7bb7/85/Practical-Guide-to-Surgery-for-RD-Vol-I-120-320.jpg)
![109
왘 Infiltrative or chorioretinal adhesion, in which processes of
Mueller’s cells infiltrate the collagen lamellae of Bruch’s mem-
brane, yielding a very strong adhesion with a thin and fragile re-
tina [21].
These different ultrastructures of the cryosurgical adhesion result
in different adhesive strengths.
? Which aspects are most important to the clinician?
왘 The following answers were obtained to the above
questions posed concerning cryosurgery:
1. There is a difference in the strength of the adhe-
sions produced by light, medium, and heavy ap-
plications of cryosurgery, but not of diathermy.
2. The strength of the cryosurgical adhesion is pre-
dictable, and can be controlled by ophthalmo-
scopic observation during application; this is not
true of diathermy.
3. The adhesive strength of the cryosurgical adhe-
sion continues to increase for 12 days, up to:
쐌 300 mg for the light cryopexy application
쐌 575 mg for the medium application
쐌 1175 mg for the heavy application
7.3 Remodeling of the Cryosurgical Adhesion over
Time
쎲 The further question arises of whether changes in the
structure of the cryosurgical adhesion take place over
time, and if so, whether this has clinical implications.
– The ultrastructure of adhesions therefore needs to
be studied over time.
It should be recalled here that the maximum adhesion obtained by
the medium cryopexy application at 12 days is mediated by
depolarized cells [22]. However, repolarization of the pigment
epithelium begins as early as 1 month.
7.3 Remodeling of the Cryosurgical Adhesion over Time](https://image.slidesharecdn.com/practicalguidetominimalsurgeryforretinaldetachmentvol-240327214459-1b0b7bb7/85/Practical-Guide-to-Surgery-for-RD-Vol-I-122-320.jpg)
![111
Fig. 7.12 At 20 months, remodeling of the interface between pigment
epithelial cells (P) and Mueller’s cells (M) has resulted in exclusively inter-
villous adhesion, which is occurring between the long villous processes (aP)
of the pigment epithelium and the shorter villi of Mueller’s cells, which are
finger-like (f). An outer limiting membrane (arrows) is differentiated by the
Mueller’s cells with characteristic junctions. Close to the basement mem-
brane of the pigment epithelium are numerous mitochondria (m). B =
Bruch’s membrane. [from ref. 17]
왘 From 2 months to 3 years
The cells continue prolonged remodeling of their relationship. The
blunt cell apposition of adjacent pigment epithelium and processes
of Mueller’s cells are progressively transformed into an interdigitat-
ing villous architecture (Fig. 7.12). The retinal pigment epithelial
7.3 Remodeling of the Cryosurgical Adhesion over Time](https://image.slidesharecdn.com/practicalguidetominimalsurgeryforretinaldetachmentvol-240327214459-1b0b7bb7/85/Practical-Guide-to-Surgery-for-RD-Vol-I-124-320.jpg)
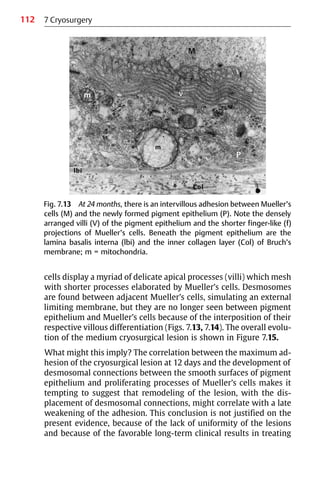
![113
Fig. 7.14 At 30 months, desmosomes (D) are formed only between adja-
cent Mueller’s cells (M). The thin long villi (V) of pigment epithelium (PE)
contrast with the short finger-like villi (arrow) of Mueller’s cells. Thicker fin-
ger-like processes (f) represent processes of histiocyte. B = Bruch’s mem-
brane.
detached breaks with cryosurgery and only a temporary balloon
buckle [23].
In addition, it should be pointed out that the cryosurgical
application causes deeper and more profound necrosis of tissue at
the center of the lesion than in the periphery [15]. Remodeling with
villous proliferation is therefore limited to those areas in the adhe-
sion in which pigment epithelium has regenerated and recovered
Bruch’s membrane. However, at the center of lesions produced by
moderate applications of cryopexy, there are areas in which the pig-
ment epithelium fails to re-cover Bruch’s membrane before
Mueller’s cell processes come into contact with it. In these areas,
Mueller’s cell processes secrete a basement membrane and adhere
7.3 Remodeling of the Cryosurgical Adhesion over Time](https://image.slidesharecdn.com/practicalguidetominimalsurgeryforretinaldetachmentvol-240327214459-1b0b7bb7/85/Practical-Guide-to-Surgery-for-RD-Vol-I-126-320.jpg)
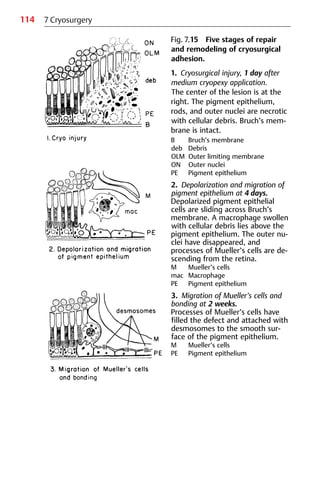
![115
4. Repolarization at 4 weeks.
The pigment epithelium re-
polarizes. Basal infoldings are pre-
sent. Disoriented villous processes
appear at the lateral edges.
M Mueller’s cells
PE Pigment epithelium
to it with hemidesmosomes [20]. At some points, the surface of
Bruch’s membrane is penetrated by processes of Mueller’s cells;
these processes distribute in the collagen lamellae of the mem-
brane. There is no evidence of late remodeling in these areas.
쎲 Even after 3 years, the hemidesmosomal attach-
ments of Mueller’s cell processes and their infiltrations
of Bruch’s membrane between the collagen lamellae
appear to be unchanged.
In morphological terms, therefore, there is no evi-
dence to suggest any weakening of the adhesions.
7.3 Remodeling of the Cryosurgical Adhesion over Time
5. Remodeling of the intercellular
bond at 2 months.
Villi of pigment epithelium re-
orient to the apex of cell and inter-
digitate with short processes from
Mueller’s cell processes that pro-
trude through restructured outer
limiting membrane (cf. Figs. 7.12,
7.13) [slightly modified from
ref. 22].
OLM Outer limiting membrane
PE Pigment epithelium](https://image.slidesharecdn.com/practicalguidetominimalsurgeryforretinaldetachmentvol-240327214459-1b0b7bb7/85/Practical-Guide-to-Surgery-for-RD-Vol-I-128-320.jpg)
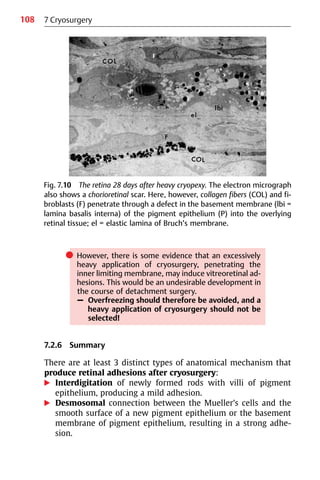
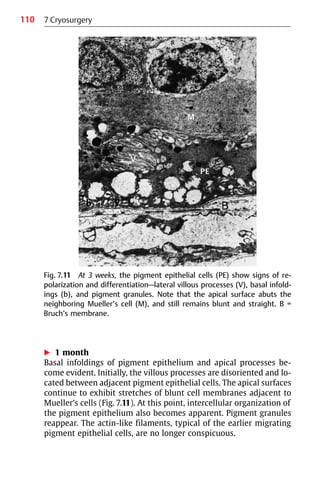
![116
7.4 Basic Information for the Detachment Surgeon
from Thermal Experiments
We return here to clinical work from the above excursion into the
fields of research and electron microscopy. The experiments con-
firm the clinical impression that cryosurgery produces an adhesion
sufficient for the treatment of retinal detachment.
쎲 Reservations concerning the reliability of the cryosur-
gical adhesion in patients with retinal detachment
with much traction are not justified.
The adhesiveness of cryosurgical lesions varies directly with the in-
tensity of the application. In addition, it is possible for the detach-
ment surgeon to select the intensity of the cryosurgical lesion under
ophthalmoscopic control and to predetermine the subsequent
adhesiveness. With cryosurgical lesions, one therefore has an abili-
ty to select the appropriate application for various problems in reti-
nal detachment surgery [17, 24].
쎲 In clinical practice, the following selection of a cryo-
surgical application is advisable:
– A light application for prophylactic treatment of
round holes and areas of degeneration
– A medium application for operculated tears and
holes in manifest detachments
– Heavy applications are to be avoided, because the
residual retina is fragile and subject to tearing if re-
detachment should occur
By contrast, as will be recalled, it was not possible with diathermy
to produce lesions of a preselected strength by monitoring the
applications ophthalmoscopically.
The availability of this information about the rapid increase
in the adhesive strength of the cryosurgical adhesion encouraged us
25 years ago to introduce earlier mobilization of retinal detachment
patients, with discharge after a few days and a return to full activity
at the end of the second week.
7 Cryosurgery](https://image.slidesharecdn.com/practicalguidetominimalsurgeryforretinaldetachmentvol-240327214459-1b0b7bb7/85/Practical-Guide-to-Surgery-for-RD-Vol-I-129-320.jpg)
![117
쎲 Information about the strength of the cryosurgical ad-
hesion at 7 days provided a basis for leaving a scleral
buckle only temporarily at the eye when treating a
detachment with a balloon buckle (see Part 2: Chap-
ter 9. Temporary Balloon Buckle without Drainage)
[24].
In this special procedure, the balloon is removed after 1 week.
? Is there no risk of redetachment when the tem-
porary buckle is removed after 1 week?
왘 No, due to the certainty that at that time the cryosur-
gical adhesion has become already 4 times stronger
than the natural intraretinal adhesion.
If cryosurgery had not been developed, the detachment operation
described in the following Chapter, involving a minimal extraocular
approach, would not have become possible. Cryosurgery allows ap-
propriately designed surgery. When it is applied adequately, there
are considerable benefits for the retina and the patient; however,
the eye can also be harmed due to overfreezing, jeopardizing the
prognosis of the detachment operation. The variety of retinal scars
resulting after various thermal injuries should be borne in mind
when treating a detachment, and this information should serve to
guide cryosurgery.
쎲 As a guideline, if you are in doubt about how much
cryosurgery to apply (i.e., which intensity), it is bet-
ter to steer toward less—and this is true of laser
coagulation as well.
A few details can be given here concerning the clinical use of cryo-
surgery before we go on to the topic of minimal extraocular surgery
for retinal detachment (that besides using cryosurgery applies elas-
tic buckles to allow nondrainage of subretinal fluid) in the next
Chapter.
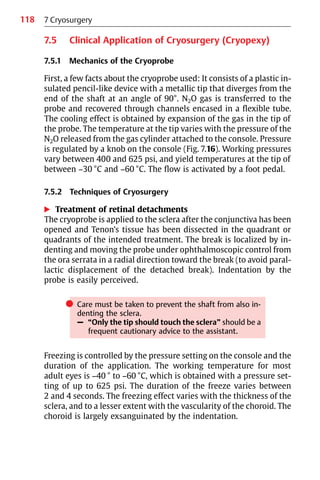
7.4 Basic Information for the Detachment Surgeon](https://image.slidesharecdn.com/practicalguidetominimalsurgeryforretinaldetachmentvol-240327214459-1b0b7bb7/85/Practical-Guide-to-Surgery-for-RD-Vol-I-130-320.jpg)
![123
References
1. Gonin J. La thermoponction oblitérante des déchirures dans le dé-
collement de la rétine. Ann Oculist (Paris) 1931;168: 1−29.
2. Deutschmann R. Ueber zwei Verfahren bei Behandlung der Netzhaut-
abloesung (eines davon der Diathermie scheinbar entgegengesetzt)
nebst Bemerkungen zur Genese des Netzhautrisses zur Entstehung
der Abloesung. Klin Monatsbl Augenheilkd 1933; 91: 450−6.
3. Bietti G. Criocausticazioni episclerali come mezzo di terapia nel dis-
tacco retinico. Bol Ocul 1934; 13: 576−612.
4. Custodis E. Bedeutet die Plombenaufnaehung auf die Sklera einen
Fortschritt in der operativen Behandlung der Netzhautabloesung? Ber
Dtsch Ophthalmol Ges 1953; 58: 102−5.
5. Schepens C, Okamura I, Brockhurst R, Regan C. Scleral buckling pro-
cedures, 5: synthetic sutures and silicone implants. Arch Ophthalmol
1960; 64: 868−81.
6. Lincoff H, McLean J, Nano H. “Scleral abscess”, 1: a complication of re-
tinal detachment buckling procedures. Arch Ophthalmol 1965; 74:
641−8.
7. Lincoff H, McLean J, Nano H. Cryosurgical treatment of retinal detach-
ment. [Paper presented at the 68th Annual Session of the American
Academy of Ophthalmology and Otolaryngology, New York, 1963].
8. Lincoff H, McLean J. Modifications to the Custodis procedure, 2: a new
silicone implant for large tears. Am J Ophthalmol 1967; 64: 877−9.
9. McPherson A, Girard L. Cryosurgery in the prophylaxis and manage-
ment of retinal detachment. Mod Probl Ophthalmol 1967; 5: 381.
10. Bellows J. The application of cryogenic techniques in ophthalmology.
Am J Ophthalmol 1964; 57: 29.
11. Boeke W, Hollwich F. Zur Kryochirurgie am Auge. Ber Dtsch Ophthal-
mol Ges 1965; 67: 212−7.
12. Oosterhuis J, Brihaye M, De Haan A. A comparative study of experi-
mental transscleral cryocoagulation by solid carbon dioxide and dia-
thermocoagulation of the retina. Invest Ophthalmol 1968; 156: 38−74.
13. Toernquist R. Cryosurgery for retinal detachment. Acta Ophthalmol
1968; 46: 529−34.
14. Lincoff H, Kreissig I. The anatomy of the cryosurgical adhesion. XXI.
Conc. Ophthalmol. Mexicana Acta 1970; 1: 406−18.
15. Lincoff H, Kreissig I. The mechanism of the cryosurgical adhesion, 4.
Am J Ophthalmol 1971; 71: 674−89.
16. Kreissig I, Lincoff H. Ultrastruktur der Kryopexieadhaesion [Ultra-
structure of cryopexy adhesion]. In: Fanta H, Jaeger W, eds. Die Pro-
phylaxe der idiopathischen Netzhautabhebung.(editors:) Munich: J.F.
Bergmann, 1971:191−205.
17. Kreissig I, Lincoff H. Animal experiments about retinal scarring.
Graefes Arch Clin Exp Ophthalmol 1974; 190: 165−82.
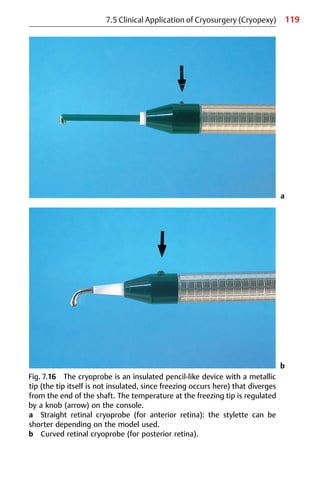
7.5 Clinical Application of Cryosurgery (Cryopexy)](https://image.slidesharecdn.com/practicalguidetominimalsurgeryforretinaldetachmentvol-240327214459-1b0b7bb7/85/Practical-Guide-to-Surgery-for-RD-Vol-I-136-320.jpg)
![124 7 Cryosurgery
18. Kreissig I. The Ultrastructure of the Cryopexy Adhesion in Retinal
Surgery (Ultrastruktur der Kryopexie-Adhaesion in der Netz-
hautchirurgie) [Postdoctoral thesis for German Habilitation degree].
Bonn: Rheinische Friedrich-Wilhelms-Universitaet, 1972.
19. Kreissig I, Lincoff H. Mechanism of retinal attachment after cryo-
surgery. Trans Ophthalmol Soc UK 1975; 95: 148−57.
20. Kreissig I, Lincoff H. Bruch’s membrane and its structural changes after
cryopexy. Klin Monatsbl Augenheilkd 1974; 164: 71−89.
21. Kreissig I, Lincoff H. Cryosurgery of the retina. Int Ophthalmol Clin
1976; 16: 63−81.
22. Lincoff H, Kreissig I, Jakobiec F, Iwamoto T. Remodeling of the cryosur-
gical adhesion. Arch Ophthalmol 1981; 99: 1845−9.
23. Kreissig I, Lincoff H. Treating detachments with a temporary balloon
buckle without fixating sutures and without drainage. Int Ophthalmol
Clin 1992; 32: 43−60.
24. Kreissig I. Kryopexie in der Netzhautchirurgie. Augenspiegel 1995; 41:
28−39.](https://image.slidesharecdn.com/practicalguidetominimalsurgeryforretinaldetachmentvol-240327214459-1b0b7bb7/85/Practical-Guide-to-Surgery-for-RD-Vol-I-137-320.jpg)
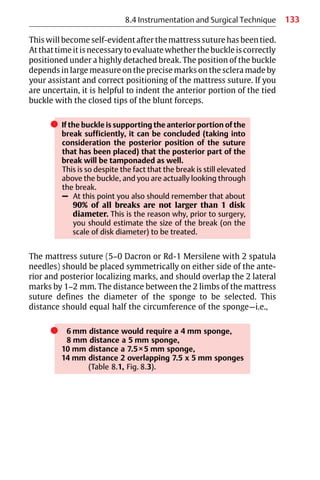
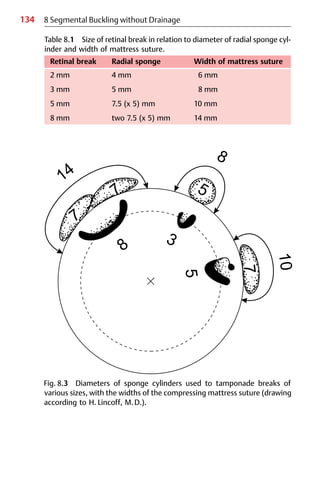
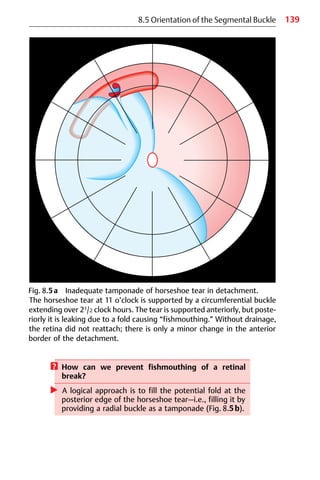
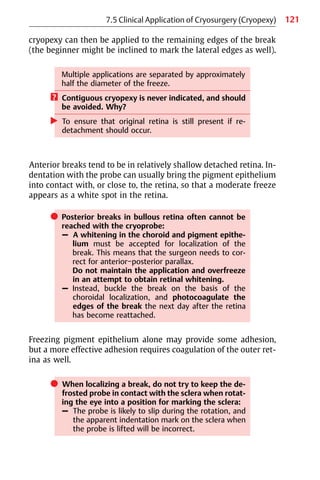
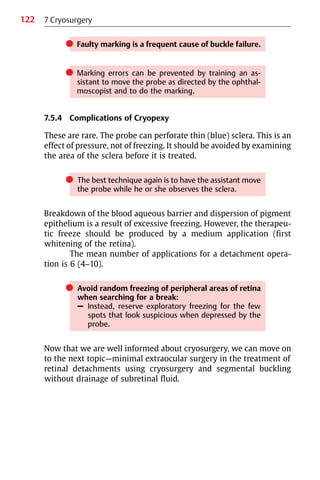
![140 8 Segmental Buckling without Drainage
? What are the advantages of a radial buckle [1]?
왘 A radially orientated buckle (Fig. 8.6):
1. Places the entire break on the ridge of the buckle
2. Counteracts fishmouthing of the break, i.e., the
risk of posterior leakage
3. Provides optimal support for the operculum, i.e.,
counteracts future vitreous traction with the risk of
anterior leakage.
Fig. 8.5b Adequate tamponade of horseshoe tear in detachment of
Fig. 8.5a. The tear at 11 o’clock is supported in this instance by a radial
buckle that provides adequate tamponade of the horseshoe tear—i.e.,
anteriorly and posteriorly. The horseshoe tear is positioned on the ridge of
the buckle, and the retina reattached completely without drainage.](https://image.slidesharecdn.com/practicalguidetominimalsurgeryforretinaldetachmentvol-240327214459-1b0b7bb7/85/Practical-Guide-to-Surgery-for-RD-Vol-I-153-320.jpg)
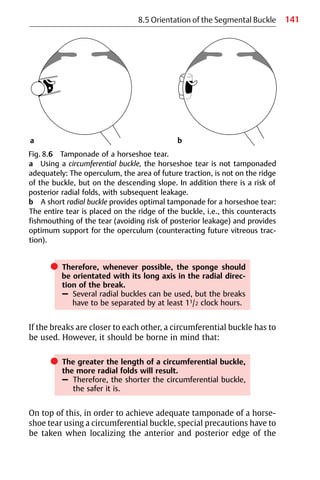
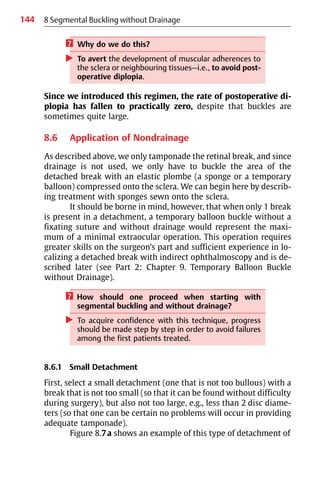
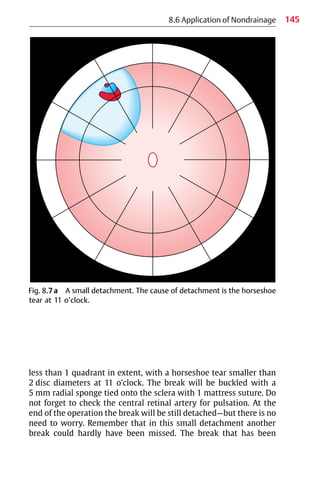
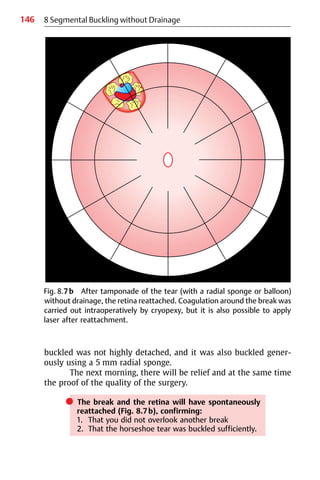
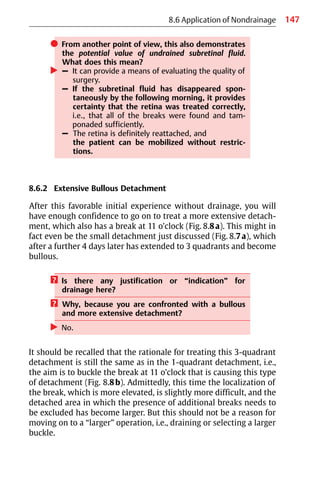
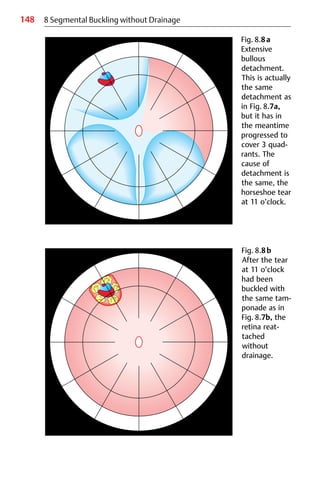
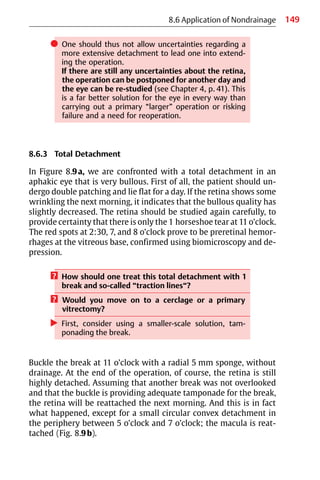
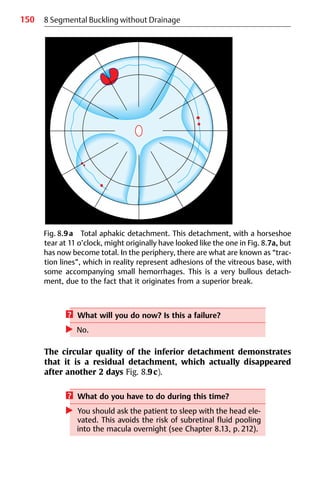
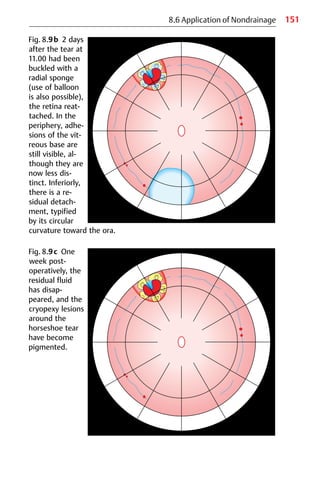
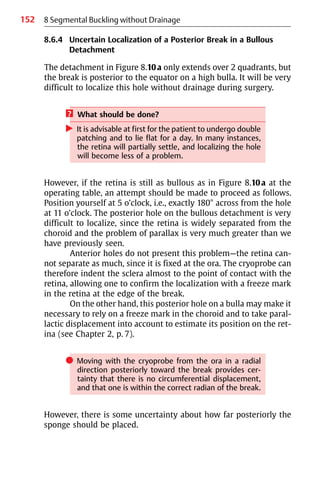
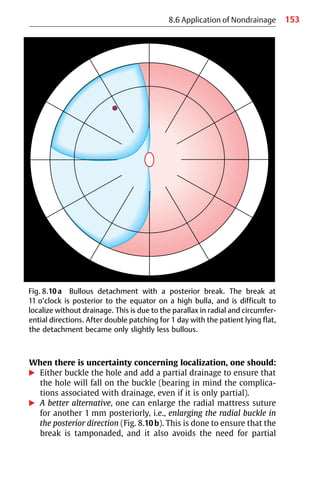
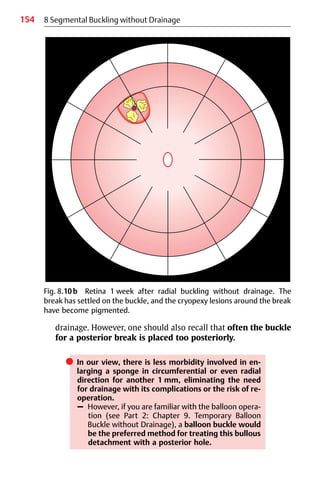
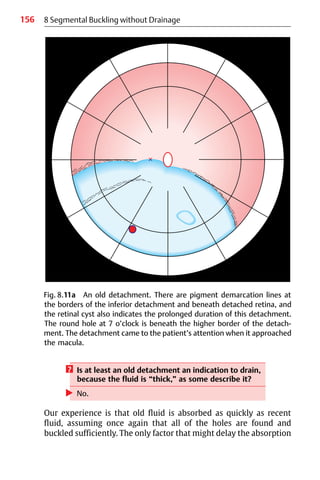
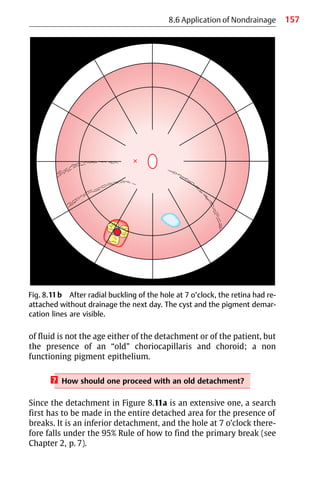
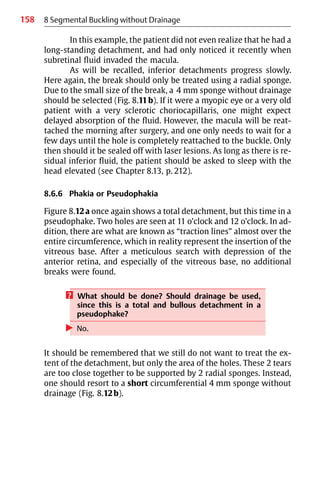
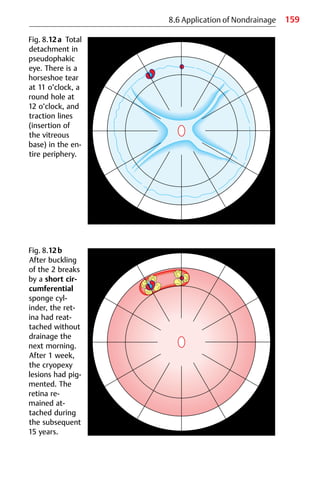
![161
8.6 Application of Nondrainage
development of proliferative vitreoretinopathy (PVR), secondary
breaks or redetachment. By contrast, comparable long-term results
after primary vitrectomy are still lacking, and will not be available
for another decade. However, the above-mentioned complications
have developed after vitrectomy and that was already after 6−18
months.
8.6.7 Reoperation
? In such a complex eye, why not move on to
drainage, cerclage, a gas injection or a primary vit-
rectomy? Because this time it involves a reopera-
tion, which is more difficult?
왘 No. One should restrain oneself and first consider
what the minimal solution might be for solving this
complex problem without provoking proliferative
vitreoretinopathy by a larger or more invasive
approach.
Eyes on which a reoperation has to be performed are frequently
congested, and it must be accepted that perforation for drainage
carries a greater than average risk of hemorrhage. The most satis-
factory method of treatment, and the one with the least morbidity,
in this situation is therefore also to find the hole that is leaking and
causing failure (see Part 2: Chapter 14. Reoperation of Retinal
Detachments without Drainage).
쎲 The tendency to move on to a “larger” procedure just
because it is the second operation has little merit, and
involves greater disadvantages for the eye to be re-
operated on.
쎲 – In addition, the retina will not reattach and remain
attached merely because drainage has been car-
ried out.
– It will only reattach and remain attached because
the cause of failure has been found, which in 45% is
due to another break and in 31% due to an inade-
quate tamponade, as may be recalled [2].](https://image.slidesharecdn.com/practicalguidetominimalsurgeryforretinaldetachmentvol-240327214459-1b0b7bb7/85/Practical-Guide-to-Surgery-for-RD-Vol-I-174-320.jpg)
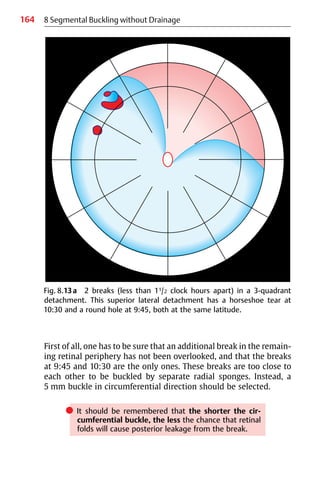
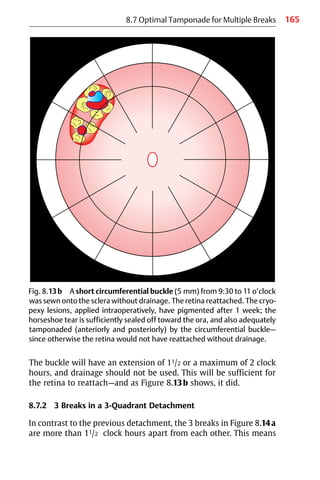
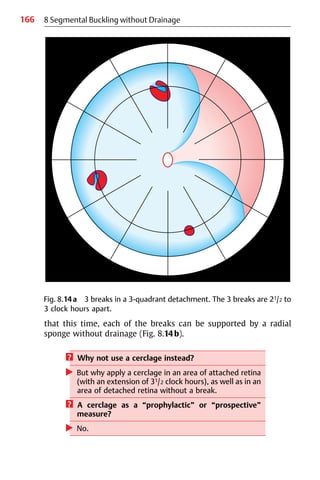
![167
8.7 Optimal Tamponade for Multiple Breaks
In this situation, the minimal extraocular approach would consist of
an individual radial tamponade for every break, which at the same
time represents an optimal tamponade for the horseshoe tears,
with optimal long-term results [3].
8.7.3 Multiple Breaks in a 11/2-Quadrant Detachment
The detachment with multiple breaks in Figure 8.15a is certainly
not an indication for using a cerclage—all the more so since 21/2
Fig. 8.14b The 3 breaks were tamponaded by 3 radial sponge cylinders
without drainage. Cryopexy was applied intraoperatively, and the retina re-
attached. Special care was taken to seal off sufficiently the operculum of
the 2 horseshoe tears, where future vitreous traction might be exerted.
The retina remained attached during a 14-year follow-up period.](https://image.slidesharecdn.com/practicalguidetominimalsurgeryforretinaldetachmentvol-240327214459-1b0b7bb7/85/Practical-Guide-to-Surgery-for-RD-Vol-I-180-320.jpg)
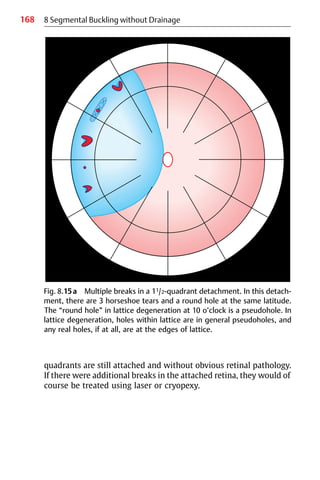

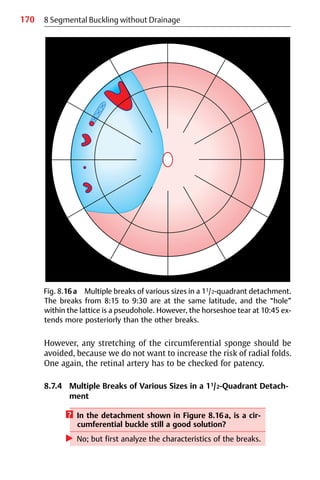
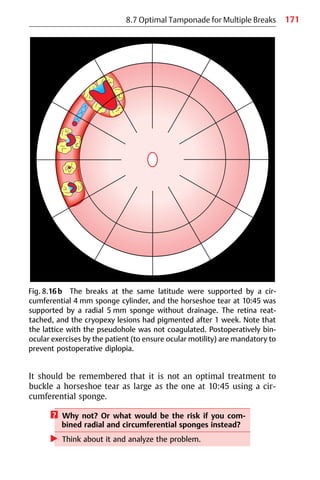
![173
8.7 Optimal Tamponade for Multiple Breaks
However, in spite of these multiple breaks, there is still no indica-
tion to extend the buckling to a cerclage or to proceed to a primary
vitrectomy, which at present still harbors the risk of cataract, ante-
rior proliferative vitreoretinopathy, new breaks, or glaucoma [4−7].
8.7.5 1 Break in a 3-Quadrant Detachment with Moderate
Proliferative Vitreoretinopathy
Figure 8.17a shows a detachment with starfolds in 1 quadrant. Ana-
lyze the contours carefully; they are convex in spite of the prolifera-
tive vitreoretinopathy. This means we are still confronted with a
rhegmatogenous detachment. The starfolds are not too posteriorly
located, and are definitely 11/2 clock hours away from the break to
be buckled.
? Is this an indication for a primary vitrectomy with
membrane peeling and an internal tamponade?
Or a cerclage?
왘 At the first attempt, certainly not.
Now let us return to the surgical problem. We have confirmed that
the situation is a rhegmatogenous detachment with convex
borders—i.e., the break at 1:30 has to be tamponaded. Therefore:
? Why not try buckling this break first?
왘 Support the hole at 1:30 using a radial sponge with
cryopexy (Fig. 8.17b).
? Will you carry out drainage?
왘 No.
? Why not?
왘 An eye with proliferative vitreoretinopathy (PVR) at
this stage is in a vulnerable condition, i.e., in limbo,
and can easily progress to a more severe stage of PVR.
We know that a breakdown of the blood aqueous barrier will pro-
voke or induce progression of PVR.](https://image.slidesharecdn.com/practicalguidetominimalsurgeryforretinaldetachmentvol-240327214459-1b0b7bb7/85/Practical-Guide-to-Surgery-for-RD-Vol-I-186-320.jpg)

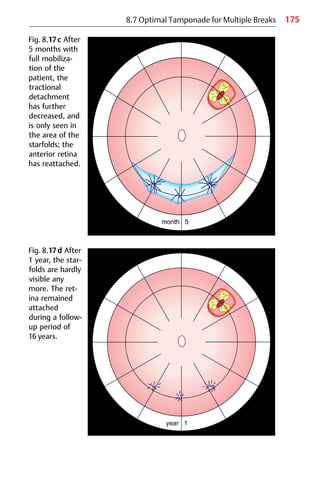
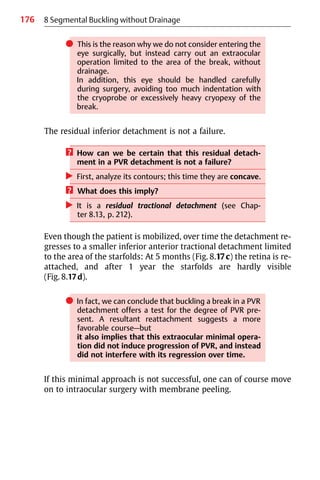
![177
8.7 Optimal Tamponade for Multiple Breaks
8.7.6 Group of Breaks in a 3-Quadrant Detachment with
Moderate Proliferative Vitreoretinopathy
Figure 8.18a shows a PVR detachment with starfolds in 2 quadrants
and a group of several breaks. The problem here is slightly more
complex.
? Will you move on to a primary vitrectomy with an
intraocular tamponade or to a cerclage this time?
왘 No; instead, first try segmental buckling of the group
of breaks without drainage.
Of course, the entire extent of the 3-quadrant detachment has to be
searched for additional breaks. The retina has been indented and
visualized up to the ora. The patient has been studied several times
both by yourself and even by your associate. There is definitely only
this group of breaks at 1:30. Since additional breaks have not been
found, this group of breaks is buckled using a 7 mm radial sponge,
without drainage.
? Why not support the starfolds by an additional cir-
cumferential buckle or a prospective cerclage?
왘 This is because starfolds will either progress, in which
situation one should move on to a vitrectomy,
or—especially, if the eye was not traumatized too
much by the surgery—they will regress over time.
As is seen from the follow-up, this is what in fact happened. The in-
ferior residual tractional detachment regressed over a period of
2 months (Fig. 8.18b), and after 1 year only dry starfolds were
visible.
The operation described above was carried out using local
anesthesia. Applying extraocular minimal surgery, there was no risk
of the patient subsequently developing a secondary cataract, ante-
rior vitreoretinal proliferation, glaucoma, or other complications
accompanying a primary vitrectomy [4−7]. Not applying a cerclage
also means that the circulation of the retina and choroid is not
jeopardized, as reported in recent publications after a cerclage](https://image.slidesharecdn.com/practicalguidetominimalsurgeryforretinaldetachmentvol-240327214459-1b0b7bb7/85/Practical-Guide-to-Surgery-for-RD-Vol-I-190-320.jpg)
![178 8 Segmental Buckling without Drainage
Fig. 8.18a A group of breaks in a 3-quadrant PVR detachment of mod-
erate degree. The breaks are between 1 o’clock and 2 o’clock, with adjoin-
ing starfolds from 2:30 to 6 o’clock posterior to the equator. No additional
hole was found between 10 o’clock over 12 to 1 o’clock.
[8−13]. In addition, when using minimal extraocular surgery re-
gained visual function will not deteriorate during the long-term fol-
low-up in comparison to the fellow eye [3].](https://image.slidesharecdn.com/practicalguidetominimalsurgeryforretinaldetachmentvol-240327214459-1b0b7bb7/85/Practical-Guide-to-Surgery-for-RD-Vol-I-191-320.jpg)
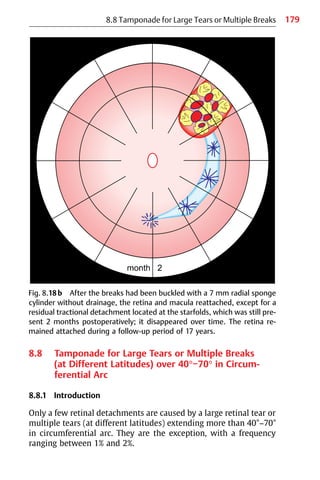
![180 8 Segmental Buckling without Drainage
If a tear is larger than 40°, it exceeds the limits of radial buck-
ling with sponge cylinders, because 2 of the largest sponges, 7.5 mm
ovals, will close only a 40° tear.
? More than 2 sponges sutured side by side are not
feasible. Why?
왘 Because the span of the mattress suture is too long to
provide adequate compression.
Buckling with a circumferential explant or a cerclage will result in
radial folds known as “fishmouthing,” causing posterior leakage
from the tear. The same is true for constellations of retinal tears that
together span a circumference of more than 40°−70°.
? Why is a combination of a radial and circumferential
sponge not suitable as a tamponade?
왘 – Because one of the breaks will be positioned at the
junction of the buckles, so that it will not be suffi-
ciently tamponaded, resulting in leakage.
– Consequently, a constellation of multiple breaks at
different latitudes with a circumferential arc of
more than 40°−70° that are too closely spaced for
separate buckles should be treated as a single large
tear.
An alternative treatment would be an internal tamponade
using an expanding gas, but the gas technique fails to counteract
substantial traction, if present, beyond the duration of the bubble in
the eye, and will therefore involve a significant rate of redetach-
ment (see Part 2: Chapter 10. Temporary Gas Tamponade without
Drainage).
Another alternative would be a primary vitrectomy—an ele-
gant technique, but one that at present is still associated with seri-
ous complications. Early complications are already apparent, and
the long-term results are still pending [5, 6].
A further alternative, and one that even represents an ex-
traocular approach, would be a scleral pouch.](https://image.slidesharecdn.com/practicalguidetominimalsurgeryforretinaldetachmentvol-240327214459-1b0b7bb7/85/Practical-Guide-to-Surgery-for-RD-Vol-I-193-320.jpg)
![181
8.8 Tamponade for Large Tears or Multiple Breaks
8.8.2 Scleral Pouch
It was first described by Paufique in 1965 [14], using donor sclera
and fascia lata as filling.
? Which problems with the original pouch operation
had to be overcome?
왘 – Drainage of subretinal fluid was necessary.
– The pouch of donor sclera, when filled, increased in
size toward the conjunctiva, resulting in a large ex-
ternal buckle known as a “rucksack,” but not pro-
viding deep indentation of the globe.
– Using the nontransparent donor sclera, it was diffi-
cult to cut a pouch that was large enough, but not
too small, to cover the localizing scleral marks.
– In addition, even distribution of fascia lata or sili-
cone pellets (which we began to use) within the
pouch was not possible, due to lack of visual con-
trol.
– As a result, the indentation at the fundus appeared
uneven, and therefore did not provide optimal
tamponade.
To circumvent these problems, in 1978 instead a Dacron-rein-
forced silicone sheeting as pouch material was developed by
Lincoff and Kreissig [15]. The elastic sheeting is 0.5 mm thick, and
the Dacron mesh has a tricot twist to preserve its elasticity. The
mesh is completely embedded in the silicone sheeting, so that the
surfaces are smooth. Importantly, the sheeting is relatively trans-
parent in spite of the mesh, so that even distribution of the stuffing
can be monitored. This new silicone pouch is stuffed with silicone
pellets, obtained by dicing a cylinder of silicone sponge into cubes
of 2 mm on each side (Fig. 8.19).
8.8.3 Clinical Study
The study described here was intended to answer the following
question:](https://image.slidesharecdn.com/practicalguidetominimalsurgeryforretinaldetachmentvol-240327214459-1b0b7bb7/85/Practical-Guide-to-Surgery-for-RD-Vol-I-194-320.jpg)
![182
? How often is a pouch operation likely to be indi-
cated in a series of consecutive detachments?
왘 The indication is extremely rare, ranging at around 1%.
In 2000 consecutive detachments (1000 treated by Prof. Lincoff in
New York and 1000 by our group [16]) the indication for a pouch
was given in 20 eyes (1%).
쎲 The indications for the pouch operation are as fol-
lows:
– The retinal tear subtends a circumferential arc of
more than 40°−70° (Fig. 8.20).
– There are 2 or more large horseshoe tears closely
spaced, which together span more than 40°−70° in
circumferential arc (Fig. 8.21).
– There are multiple tears, large and small, closely
spaced, but at different latitudes, which together
have a circumferential arc of more than 40°−70°
(Fig. 8.22).
8 Segmental Buckling without Drainage
Fig. 8.19 Materials for the silicone pouch. Left: silicone sponge pellets cut
from a 7.5 mm sponge cylinder. Right: Dacron-reinforced silicone sheeting;
it is transparent in spite of the Dacron mesh, which is completely
embedded in the silicone sheet so that the surfaces are smooth.](https://image.slidesharecdn.com/practicalguidetominimalsurgeryforretinaldetachmentvol-240327214459-1b0b7bb7/85/Practical-Guide-to-Surgery-for-RD-Vol-I-195-320.jpg)
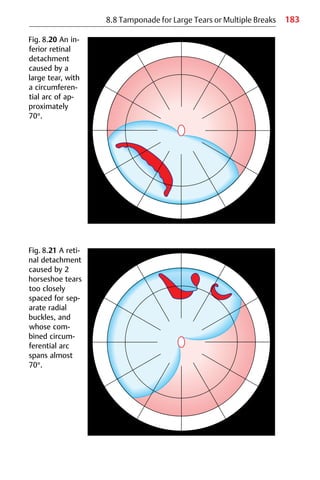
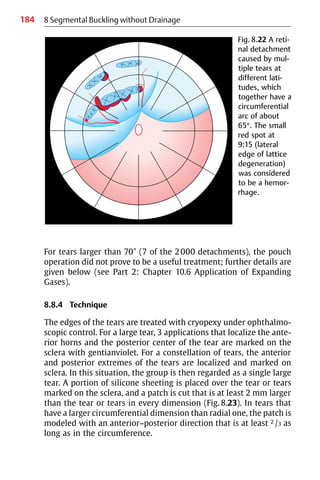
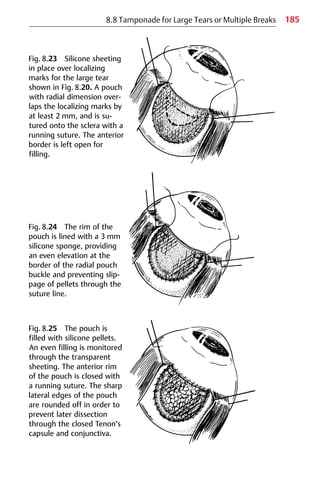
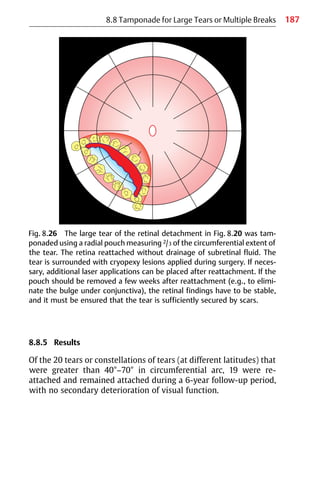
![188 8 Segmental Buckling without Drainage
? Another question that might arise: Is there with the
availability today of vitrectomy [17] and expanding
gases [18, 19], still an indication for the pouch
operation?
왘 Due to the 2 procedures mentioned (which involve in-
traocular surgery), there are fewer indications for the
extraocular pouch operation, but it does still have a
place for selected detachments.
쎲 The indication for a pouch operation might be given:
– Ifanexpandinggascannotbeusedbecausethelarge
tear or the constellation of tears is located inferiorly
– If there is substantial vitreous traction, and one
wishes to avoid a primary vitrectomy in presence of
a clear lens.
This is because, at present, vitrectomy is still associated with seri-
ous complications (cataract, PVR, or secondary breaks)—in contrast
to the pouch operation, which can therefore still be the one of
choice. This is all the more relevant in young patients, as favorable
long-term results are already available for the extraocular pouch
operation, i.e., there will be no late deterioration of visual function
due to secondary complications.
쎲 An indication for a pouch operation may therefore be
present if the large tear or group of tears are located
inferiorly (Fig. 8.26), or if one wishes to select, for a
young patient, a procedure with known long-term re-
sults, which are favorable for the pouch operation.
Or if the difficult tear or tears are located superiorly and an expand-
ing gas operation seems not feasible (glaucoma, no compliance of
patient) one could also consider a pouch operation.
? Why?
왘 Because this procedure is extraocular. However, this
statement might be qualified by adding that one can
always try to use the pouch only as a temporary
buckle, i.e., one can remove it by all means after a few
weeks—of course, only on the premise that the tears
are sufficiently sealed off with scars, and that the reti-
nal findings have stabilized.](https://image.slidesharecdn.com/practicalguidetominimalsurgeryforretinaldetachmentvol-240327214459-1b0b7bb7/85/Practical-Guide-to-Surgery-for-RD-Vol-I-201-320.jpg)
![190 8 Segmental Buckling without Drainage
쎲 However, the pouch operation is time-consuming,
but (and this is all that counts) it works. Above, all:
1. It allows nondrainage of subretinal fluid.
2. It has a reattachment rate of 95%, as good as that
of the sponge operation.
3. Last but not least, it provides favorable long-term
results in relation to visual function.
8.9 Tears over 70° in Circumferential Arc
Tears larger than 70° are fortunately infrequent. In a series of 2000
consecutive detachments, they occurred in 0.4%. These large horse-
shoe tears are actually known as “giant tears.” They are difficult to
correct with external buckling, and if this is intended, they can only
be buckled circumferentially.
? Why only circumferentially?
왘 – Because the posterior edge of a radial pouch ex-
tending more than 70° in circumference would in-
trude on the posterior pole.
– Instead, a circumferential buckle would have to be
selected; however, as one might expect, this
would be prone to fishmouthing, resulting in
failure [20] (Fig. 8.27).
Fig. 8.27 The retina of a giant
tear (150°) is seen here under
compression using a circumfer-
ential buckle. The posterior
edge of the tear is compressed,
resulting in several radial folds
and a large fold causing fish-
mouthing, with subsequent
leakage.](https://image.slidesharecdn.com/practicalguidetominimalsurgeryforretinaldetachmentvol-240327214459-1b0b7bb7/85/Practical-Guide-to-Surgery-for-RD-Vol-I-203-320.jpg)
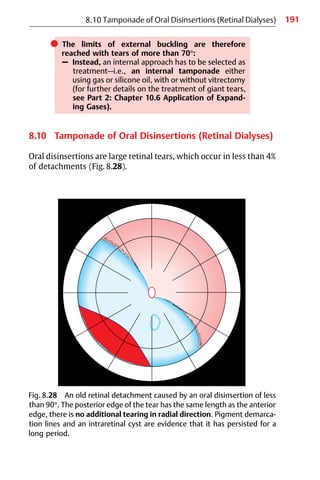
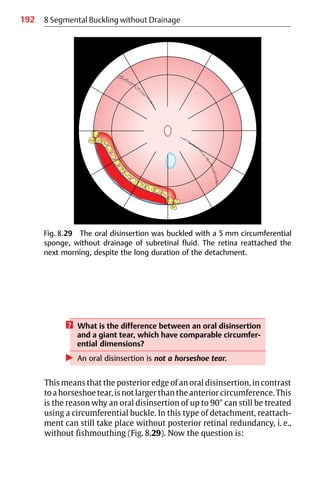
![193
? What is the rate of reattachment of oral disinsertions
when circumferential buckling is used as treatment?
Arenotfailurestobeexpected,simplybecauseofthe
use of a circumferential buckle?
왘 The answer, perhaps unexpectedly, is: No.
As reported by Nadel et al [21], the reattachment rate is in a range
reaching 100%. (One might speculate that in order to achieve a sur-
gical success rate of 100%, one would simply have to concentrate on
treating only oral disinsertions. However, this is unfortunately not
possible, since you would have to wait several years to obtain a sub-
stantial number of these selected detachments, with their
frequency being less than 4%.)
? Where exactly should the circumferential buckle be
placed for treatment?
The cryoprobe must first of all be used to localize the 2 lateral
borders of the oral disinsertion. This is easy, as there is no parallax.
An additional freeze is then applied on either side within untorn
retina, and also in the pars plana here. This is to counteract future
additional tearing. The entire posterior circumference of the oral
disinsertion is then treated with transscleral cryopexy, under oph-
thalmoscopic monitoring. The most posterior lesion is marked on
the sclera. Additional marks are placed with gentianviolet on the
line toward the ora.
쎲 To each of these localizing marks, 2 mm are added
posteriorly, and the circumferential mattress sutures
are centered around these more posteriorly posi-
tioned marks.
An oral disinsertion extending for 11/2 clock hours can be treated
with a 4 mm sponge (if the buckle is correctly centered), but in one
of more than 11/2−3 clock hours (90° in extent)—especially when there
is a great deal of dislocation of the edge in posterior direction—the
tear should be buckled with a 5 mm full-thickness sponge cylinder,
again without drainage of course (Fig. 8.29).
8.10 Tamponade of Oral Disinsertions (Retinal Dialyses)](https://image.slidesharecdn.com/practicalguidetominimalsurgeryforretinaldetachmentvol-240327214459-1b0b7bb7/85/Practical-Guide-to-Surgery-for-RD-Vol-I-206-320.jpg)
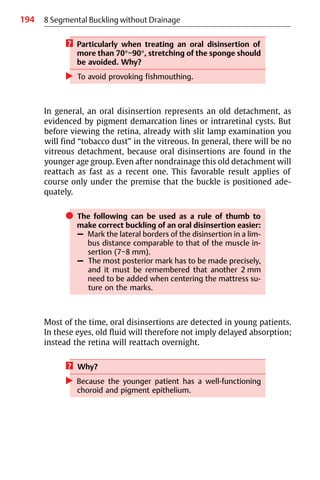
![195
8.11 Application of Cerclage
Another question that might arise is:
? Why are the surgical results of an oral disinsertion
detachment so favorable in comparison to those of
giant tears?
왘 Because (as will be remembered) the posterior edge
of the tear is not longer than its anterior edge.
? What does this imply?
왘 In an oral disinsertion, there has been no additional
radial tearing.
However, there is radial tearing in a giant tear, which
in fact represents a giant horseshoe tear, and it is pre-
cisely this radial tearing that causes problems when
being buckled circumferentially.
8.11 Application of Cerclage
The cerclage was developed by Schepens et al [22], based on earlier
work by Arruga [23]. It is an operation in which surgery (indenta-
tion) is carried out on the entire circumference of the eye.
? Why is this maximum operation still in use?
왘 As mentioned earlier, the primary intention in this
procedure was “to wall away uncertainties in the
periphery.”
This was justified at a time when modern techniques for meticulous
preoperative study of the retinal periphery were not available. This
situation changed when binocular indirect ophthalmoscopy with
scleral depression [22] and biomicroscopy with various direct and
indirect contact lenses [24−28] as well using depression became
fully integrated into the armamentarium of preoperative diagnostic
techniques. Another intention underlying cerclage became invalid
due to the nondrainage technique, which eliminates the need to
compensate for lost intraocular volume by encirclement.](https://image.slidesharecdn.com/practicalguidetominimalsurgeryforretinaldetachmentvol-240327214459-1b0b7bb7/85/Practical-Guide-to-Surgery-for-RD-Vol-I-208-320.jpg)
![196 8 Segmental Buckling without Drainage
? So why is cerclage still given consideration?
왘 The reason is that some surgeons believe they are car-
rying out a maximum operation with a cerclage, and
incorrectly assume that they will also have a maximum
of success.
This reflects a mistaken conviction, dating from almost 30 years
ago, that one can create a “new ora serrata”, i.e., a new fixating edge
for the retina, thus excluding all of the doubtful areas (undetected
breaks) in the periphery. The idea behind this operation was that a
cerclage would fulfill this task and provide a prophylactic measure
against future breaks. A subsequent clinical study invalidated this
assumption.
쎲 The rate of redetachment after minimal buckling in
the absence of a cerclage was not higher during a
long-term follow-up period of 15 years [3].
A 3rd reason for applying a cerclage is also becoming less and less
significant—i.e., to counteract a severe vitreous traction in a PVR
detachment. In patients with this condition, the frequency of which
lies in the range of less than 2%−5%, expert vitrectomy with mem-
brane peeling has replaced the need for a cerclage.
? In the state of art today, are there any indications
left for applying a cerclage, then?
왘 Almost none when treating a rhegmatogenous
detachment.
It should be recalled that a cerclage is not indicated or justified
merely because the surgeon has not invested sufficient time in a
meticulous preoperative study of the detachment.
쎲 Consequently, the less one studies and learns about
the details of the detachment, the larger the opera-
tion has to be in order to cover “unknown” possibili-
ties (in a kind of polypragmasy policy).
– It is better to study than to over-operate or re-
operate on an eye.](https://image.slidesharecdn.com/practicalguidetominimalsurgeryforretinaldetachmentvol-240327214459-1b0b7bb7/85/Practical-Guide-to-Surgery-for-RD-Vol-I-209-320.jpg)
![197
8.11 Application of Cerclage
쎲 Even a pseudophakic detachment with a secondary
cataract is not per se a justification for performing a
cerclage or a primary vitrectomy.
쎲 Instead, one should play on the full orchestra of in-
direct techniques for fundus examination (indirect
binocular ophthalmoscopy and indirect contact lenses
[28]) with depression. Give this analytic approach a
chance to solve the problem of such a pseudophakic
detachment, and spend as much time as needed on it.
? Are there any indications still remaining for using a
cerclage in the late 1990s?
왘 The only indication remaining for a cerclage is a rare
one (less than 1%−2%):
– In an initially successful buckle that failed due to
increasing traction.
After the switch from cerclage with drainage to minimal buckling
without drainage, in a series of 1000 rhegmatogenous detachments
operated on between 1970 and 1977 using segmental sponges
without drainage, a cerclage was still applied in 4% of the first 500
patients [29].
? Why in the early 1970s still a cerclage in 4%?
왘 The use of cerclage in these detachments was due to
what were still regarded “uncertainties in the periph-
ery” (in fact, these were merely our own “uncertain-
ties”) and due to the assumption that “there must be
traction” (as we had concluded).
However, this approach changed in a subsequent series of
107 detachments operated on between August 1979 and January
1980. At that time, none of the eyes underwent a cerclage opera-
tion [30].](https://image.slidesharecdn.com/practicalguidetominimalsurgeryforretinaldetachmentvol-240327214459-1b0b7bb7/85/Practical-Guide-to-Surgery-for-RD-Vol-I-210-320.jpg)
![198
? However, if a cerclage is still applied for selected
detachments, what aspects need to be taken into
account?
왘 One should try to constrict not more than 10%, as
this is sufficient to elevate the buckle (by about
1 mm), and this will not jeopardize the prognosis for
the eye.
? But how do you obtain a 10% constriction with a
cerclage?
왘 – To begin with, it should be recalled that the aver-
age adult eye has a circumference of 77 mm and an
outside equatorial diameter of 22 mm [31].
Therefore:
– For a 10% constriction, the elastic band has to be
shortened by 7 mm
(if drainage is used, the circumference must be
measured beforehand).
– For a 15% constriction, the band
has to be shortened by 12 mm.
? What about myopic eyes?
왘 A myopic eye with an equatorial diameter of 25 mm
requires only an additional 1 mm shortening for each
10% constriction.
As you might recall, the variation in ocular size can be largely
neglected, since the change in circumferential shortening in the 10%
to 15% range of constriction is small.
쎲 But you have to expect radial folds due to the
decreased circumference of the eye, i.e., as a result
of constriction by the cerclage (Fig. 8.30).
8 Segmental Buckling without Drainage](https://image.slidesharecdn.com/practicalguidetominimalsurgeryforretinaldetachmentvol-240327214459-1b0b7bb7/85/Practical-Guide-to-Surgery-for-RD-Vol-I-211-320.jpg)
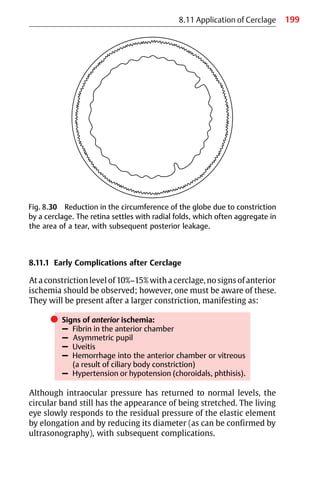
![200
8.11.2 Late Complications after Cerclage
The most important late complication after cerclage is posterior
ischemia (Fig. 8.31).
쎲 Signs of posterior ischemia:
– Constricted visual field and diminished electroreti-
nogram [10]
– Decreased retinal and choroidal blood flow [8−12]
– Reduction in 2-point discrimination [13]
– Pigmentary dystrophy and diminished retinal sen-
sitivity in comparison to the fellow eye as observed
by Lincoff (he now cuts all the encircling elements
of eyes treated in patients sent to his office [2])
Elongation of the eye
Scleral erosion (be aware of diathermy).
8 Segmental Buckling without Drainage
Fig. 8.31 Late complications after cerclage. Left: Normal globe. Right:
Deformed globe after cerclage (25% constriction). The living eye re-
sponded to the residual pressure of the elastic element by elongation
(myopization) and reduction of its diameter. In this situation, there is a risk
of decreased blood circulation (retinal and choroidal), subsequent
decrease of regained visual function, and even scleral erosion.](https://image.slidesharecdn.com/practicalguidetominimalsurgeryforretinaldetachmentvol-240327214459-1b0b7bb7/85/Practical-Guide-to-Surgery-for-RD-Vol-I-213-320.jpg)
![201
8.11 Application of Cerclage
8.11.3 Conclusions
It should be realized that spending sufficient time preoperatively on
diagnostic procedures to identify the break or breaks is a more
favorable approach for the eye than performing a larger operation,
such as a cerclage, which will not be capable of finding the missed
breaks either. If, after meticulous study and thoughtful considera-
tion, one still decides to use a cerclage, one should be rigid about the
percentage of constriction to be allowed.
쎲 Guaranteed close follow-up of the patient with a cer-
clage must be ensured, and one must decide early
enough to cut the band (visual function!).
If use of a cerclage is selected only in order to compensate for the
lost volume, e.g., due to an accidental puncture, then instead either
use a temporary catgut cerclage, which will in addition elevate the
buckle at no risk, or insert a parabalbar balloon and inflate it as
needed, or—preferably—inject a bubble of Xenon [32], a gas with a
half-life of only 6 hours, which avoids inducing a cellular reaction in
the vitreous (reducing the risk of subsequent PVR).
? If there are multiple breaks in a 3-quadrant detach-
ment (1 break in each quadrant), should one carry
out a “prophylactic” cerclage (Fig. 8.32)?
왘 As discussed on Optimal Tamponade for Multiple
Breaks, p. 163, the answer here is: No.
? Another question that arises is whether one should
apply a cerclage over an area of attached retina.
왘 Again, the answer is: No.
It is better instead to select individual radial buckles, which at the
same time represent a) an optimal tamponade for the tears and
b) an extraocular minimal approach, not associated with the late
complications reported after cerclage due to constriction.
쎲 Thus, when treating a detachment that is not total,
one should not include attached retina in the buckle—
i.e., a cerclage should not be applied in such patients.](https://image.slidesharecdn.com/practicalguidetominimalsurgeryforretinaldetachmentvol-240327214459-1b0b7bb7/85/Practical-Guide-to-Surgery-for-RD-Vol-I-214-320.jpg)
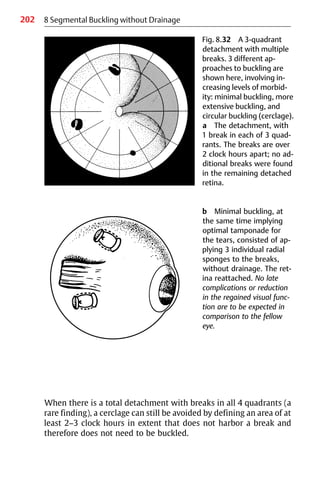
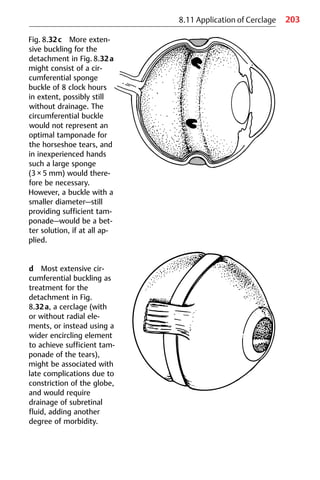
![204 8 Segmental Buckling without Drainage
? Why is a circumferential buckle of 10 clock hours
in extent preferable to a closed circumferential
buckle, i.e., a cerclage?
왘 To avoid the risk of the complications reported after
using a cerclage [31].
Bearing all of this in mind, and as one’s experience in segmental
buckling without drainage grows, it will soon be realized that al-
most all rhegmatogenous detachments can be treated primarily
with extraocular minimal buckling.
쎲 It is only in rare instances that a cerclage (less than
1%−2%) or a primary vitrectomy (2%−5%) will be a
useful approach:
– Over 90% of detachments can be treated with mini-
mal extraocular surgery, and in these patients the
eye and its regained visual function are not at risk
in the longer term [3].
8.12 Retinal Detachment: An Emergency
During the last 60 years, retinal detachment surgery has concen-
trated primarily on anatomical reattachment. The rate of reattach-
ment rose from 40% in the 1930s to over 90% (up to 99%) in the
1990s—a considerable success in the context of surgical techniques.
쎲 However, reattachment is one thing, and visual
function is another—all the more so today, when life
expectancy has risen tremendously, making post-
operative long-term visual function all the more im-
portant.
In 1967, one of the author’s patients stated:
“Well, doctor, you and your colleagues are always saying that
my retina is fine and the surgery was successful” (one should
never use the word “successful” with a patient!) “but, to tell
you the truth, I don’t think the retina is fine—I can’t see, and I
cannot read.”](https://image.slidesharecdn.com/practicalguidetominimalsurgeryforretinaldetachmentvol-240327214459-1b0b7bb7/85/Practical-Guide-to-Surgery-for-RD-Vol-I-217-320.jpg)
![205
8.12 Retinal Detachment: An Emergency
The patient’s words were very true; and from then on,
patients with a reattached retina were always asked in detail about
the quantity and quality of the visual function regained. There were
considerable differences among them with regard to the amount of
visual acuity and the quality of color vision, and there were com-
plaints about “not seeing print clearly.”
Since 1967, the author has focused her studies on this prob-
lem, initially with the support of Prof. H. K. Mueller in Bonn, and
thereafter encouraged by Prof. H. Lincoff in New York, during
several years of training there. Today, everyone would undoubtedly
agree that a 100% reattachment of the retina and macula does not
necessarily imply a 100% return of visual function.
Reattachment of the retina implies recovery of peripheral vi-
sion, but does not in itself guarantee a complete recovery of macular
function. It will be recalled that the macula is privileged in having
the densest arrangement of cones, and once this area becomes
detached, multiple forms of damage, some of which may even be
permanent, will result.
Between 1970 and 1973 we made the following observation.
If a macula was detached for several weeks, visual acuity ranged
only between 20/100 and 20/200, despite reattachment.
쎲 For this reason, we postulated in 1974 that the follow-
ing forms of retinal detachment should be declared
to be emergencies [33, 34]:
– An acute bullous detachment approaching the
macula
– A detachment with a partially or completely
detached macula
? What does an emergency in retinal detachment
surgery mean?
왘 A rhegmatogenous detachment that is declared to be
an emergency requiring hospitalization becomes a
surgical emergency the moment the diagnostic
problems are solved, i.e., as soon as the break or
breaks are found.](https://image.slidesharecdn.com/practicalguidetominimalsurgeryforretinaldetachmentvol-240327214459-1b0b7bb7/85/Practical-Guide-to-Surgery-for-RD-Vol-I-218-320.jpg)
![206 8 Segmental Buckling without Drainage
8.12.1 Clinical Study
To analyze the preoperative factors influencing postoperative visual
function, a prospective analysis was carried out in 266 retinal
detachments, operated on between October 1976 and July 1978. In
all of the patients preoperative and postoperative macular function
was tested for qualitative and quantitative responses [35−37]. The
retina was reattached in these patients using cryopexy and an ex-
traocular minimal technique—i.e., a sponge sewn onto the sclera in
the area of the break or breaks without drainage of subretinal fluid.
When it was found that the preoperative state of the macula
will affect postoperative function, 5 categories of retinal detach-
ments were defined preoperatively (Table 8.2). Groups II−V refer to
4 different states of macular detachment, involving different ex-
tents (groups II and III) and different heights (groups III, IV, and V).
8.12.1.1 Visual Function
The following visual functions were tested: Visual acuity, light-
difference threshold, color vision, and metamorphopsia at different
times after surgery. Group I, with preoperatively attached macula,
served as a control group, as it was capable of showing the effect of
the operating procedure on macular function and defining the time
necessary for postoperative recovery, which ranged between less
than 1 week and 1 month.
Table 8.2 The 266 retinal detachments were divided preoperatively into
5 groups on the basis of the extent of the detachment in the posterior pole.
Group Extent of retinal detachment n
I Macula attached 70
II Partial detachment of the macula 28
III Total detachment of the macula 23
IV Total detachment of the macula and
partial detachment of the retina around
the disk
99
V Total detachment of the macula and
the retina around the disk 46](https://image.slidesharecdn.com/practicalguidetominimalsurgeryforretinaldetachmentvol-240327214459-1b0b7bb7/85/Practical-Guide-to-Surgery-for-RD-Vol-I-219-320.jpg)
![207
8.12 Retinal Detachment: An Emergency
왘 Visual acuity
This was tested with the Idem projector with decimal division. Sig-
nificant differences were found in the postoperative changes among
groups II−V, with the 4 different states of macular detachment
yielding statistically different visual acuities. On the basis of the
196 patients with preoperatively detached macula of various
degrees, the
쎲 Postsurgical visual acuity showed a mean of:
20/30 in group II
20/40 in group III
20/50 in group IV
20/60 in group V [35, 36]
쎲 These results tended to confirm that:
– The extent and height of the macular detach-
ment
affect postsurgical visual acuity.
It was also found that the postsurgical visual acuity is influenced by:
쎲 – The duration of the macular detachment:
The time within 1 week appeared to be critical
for macular recovery.
If the macula was detached for less than 1 week, the resultant visual
acuity was optimal, and substantially better than if the duration of
detachment was longer than 1 week.
Macular recovery after a 6-month to 1-year detachment only
differed slightly from the recovery after 2 weeks.
When the postoperative visual acuities of all 196 patients
with detached macula were analyzed for recovery at 2 months and
1 year, a rapid increase in visual acuity was found within the first
2 months in all of the groups, followed by a lesser increase up to
1 year.
The mean visual acuity in all 4 degrees of macular detachment
was better after 1 year than after 2 months.](https://image.slidesharecdn.com/practicalguidetominimalsurgeryforretinaldetachmentvol-240327214459-1b0b7bb7/85/Practical-Guide-to-Surgery-for-RD-Vol-I-220-320.jpg)
![209
8.12 Retinal Detachment: An Emergency
왘 Light-difference threshold
The light-difference threshold was tested as the second postopera-
tive parameter of macular function [35, 36]. The results confirmed
the validity of the presurgical grouping of macular detachment—i.e.,
its extent and height. In addition, they confirmed that the duration
of macular detachment, the age of the patient, and the degree of
myopia influenced the postsurgical recovery of function—findings
already confirmed in relation to postoperative visual acuity.
왘 Color vision
Postoperative disturbances in color vision were described by Gail-
lard [38], François and Verries [39], and others. In our series of
patients, color vision was tested using the Farnsworth panel
d-15 test [37]. Three months after retinal reattachment, half of the
patients had defective color vision; in the majority of patients, it
was a trito-disturbance. When the patients were divided into 3 age
groups—those under 40 years, 40−60 years, and over 60 years—the
disturbances in color vision were found to be most prominent in the
oldest age group. When patients under 60 were compared with
those over 60 years of age, a significantly larger number of postsur-
gical disturbances in color vision were found in the age group over
60 years.
쎲 Color vision recovered more slowly and less
completely than visual acuity. After 3 months, only
1 in 2 patients were found to have normal color vi-
sion, and only those under the age of 60.
A correlation was found between postsurgical color vision distur-
bances and visual acuity after macular reattachment. Patients with
postoperative color vision disturbances had a mean visual acuity of
20/100. Patients without disturbances had a mean visual acuity of
20/40. A color vision deficiency was present in every patient whose
visual acuity was below 20/100.
쎲 Conversely, no color vision deficiency was present
when the visual acuity was above 20/30.](https://image.slidesharecdn.com/practicalguidetominimalsurgeryforretinaldetachmentvol-240327214459-1b0b7bb7/85/Practical-Guide-to-Surgery-for-RD-Vol-I-222-320.jpg)
![210
왘 Metamorphopsia
Metamorphopsia was tested using the Amsler chart. The distur-
bances manifested as distortion and blurring of the lines in the Am-
sler chart. The lines of the grid appeared to the patient “as if they
had been drawn by hand” [35, 36].
쎲 Postsurgical metamorphopsia occurred in all
patients with a previous macular detachment, this
time independently of age, and it was still present
at the end of 1 year.
Metamorphopsia could be detected even when
visual acuity of 20/20 and normal color vision had
been recovered.
8.12.1.2 Conclusions
Of the 4 visual functions tested after macular reattachment:
쎲 Metamorphopsia represented the most sensitive in-
dicator of an episode of previous macular detach-
ment. Metamorphopsia can be regarded as a
“scar in the Amsler grid.”
Metamorphopsia therefore represents a kind of memory of a pre-
vious macular detachment, and this was even true for patients in
whom there was partial involvement of the macula (Fig. 8.33)—i.e.,
there was a sector-shaped metamorphopsia in the presence of fully
recovered visual acuity without detectable color vision distur-
bances (Farnsworth panel d-15 test).
Visual acuity improved in all patients immediately after
macular reattachment and increased rapidly for 3 months, but
thereafter it was slow and minimal. The recovery of color vision
took place later than that of visual acuity and was less frequent,
only being found in patients under the age of 60.
8 Segmental Buckling without Drainage](https://image.slidesharecdn.com/practicalguidetominimalsurgeryforretinaldetachmentvol-240327214459-1b0b7bb7/85/Practical-Guide-to-Surgery-for-RD-Vol-I-223-320.jpg)
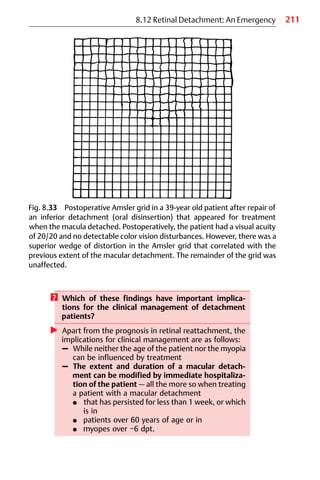
![212
쎲 Binocular patching and bed rest to reduce the
height and extent of the macular detachment, and
carrying out surgical repair at the earliest moment
for reattaching the macula, therefore seem appro-
priate.
쎲 All of this provides justification for the requirement
[33, 34] that some retinal detachments should be
assigned:
– Emergency status on entering the hospital and
should receive
– Priority position on the operating schedule the
moment the diagnostic problem of the detach-
ment is solved.
8.13 Residual Retinal Detachment after Nondrainage
Operation
? What should be done if there is residual fluid after a
nondrainage operation the day after surgery?
First, the preoperative diagnostic procedures and surgery should be
reconsidered. One may still be convinced that all of the breaks were
found and sufficiently buckled; however, the next morning the
retina is still partially detached [40].
? What went wrong? Is this a failure?
왘 No, not necessarily. But a differential diagnosis of the
fluid is needed first.
? What will the guidelines be?
As already practiced in a primary detachment, the quality of its sur-
face and contours should also be analyzed in this residual detach-
ment. Listed below are the various types of a residual detachment
that must be considered [41].
8 Segmental Buckling without Drainage](https://image.slidesharecdn.com/practicalguidetominimalsurgeryforretinaldetachmentvol-240327214459-1b0b7bb7/85/Practical-Guide-to-Surgery-for-RD-Vol-I-225-320.jpg)
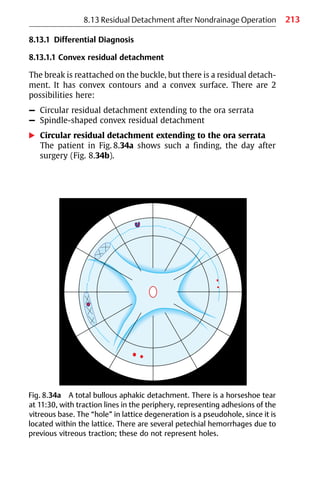

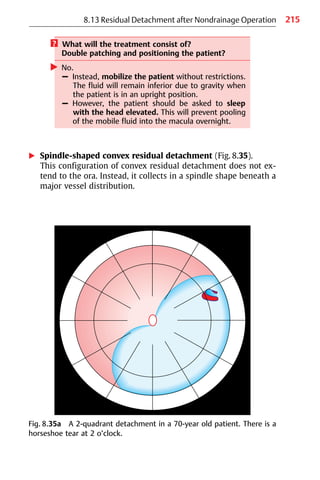
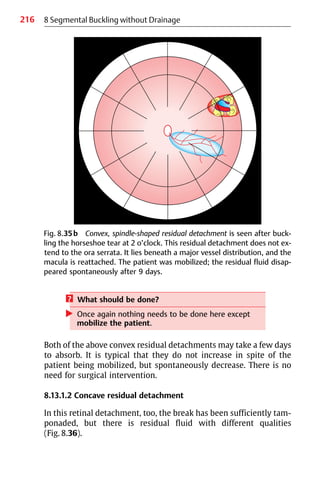
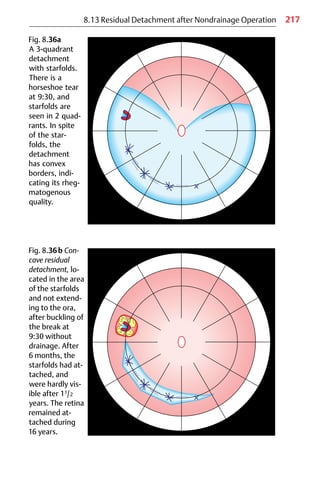


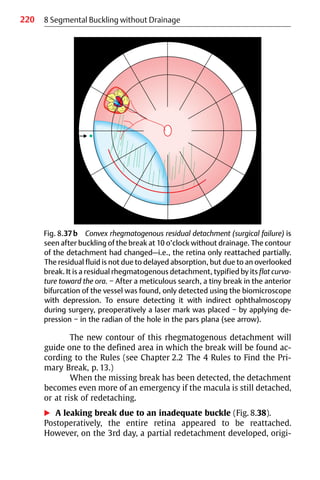
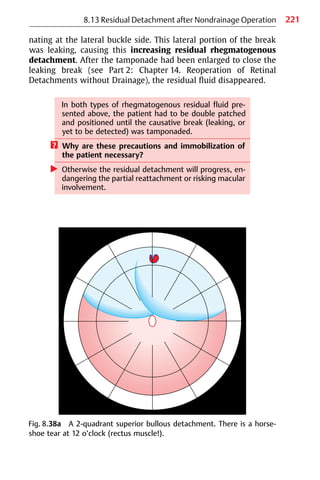
![222 8 Segmental Buckling without Drainage
Fig. 8.38b Convex rhegmatogenous residual detachment (surgical failure),
due to lateral leakage from a break after an inadequate radial buckle of the
tear at 12 o’clock. Here again, the contour of the detachment had changed,
and the retina only partially reattached. The residual fluid is not due to
delayed absorption, but due to leakage of an inadequately tamponaded
tear. The residual rhegmatogenous detachment is within its previous ex-
tent, and extends to the ora. After the tear was sufficiently tamponaded, the
residual detachment disappeared.
8.13.2 Clinical Study
There were 107 primary rhegmatogenous detachments, in which
surgery was carried out with segmental buckling and without
drainage (sponge or balloon) in the area of the break or breaks and
which were analyzed with regard to the frequency of postoperative
residual detachments [30]. After the primary operation, the retina
was completely reattached in 99 eyes, partially reattached in 4, and
detached in a further 4 eyes.
? How often was residual fluid present the day after
surgery?](https://image.slidesharecdn.com/practicalguidetominimalsurgeryforretinaldetachmentvol-240327214459-1b0b7bb7/85/Practical-Guide-to-Surgery-for-RD-Vol-I-235-320.jpg)
![223
8.13 Residual Detachment after Nondrainage Operation
In this series of 107 detachments treated without drainage, post-
operative fluid represented an operative failure in 4 eyes (3.7%), and
it was a residual detachment that disappeared over time in 34 eyes
[41]. The differential diagnosis of the nonrhegmatogenous residual
fluid in these 34 eyes identified 17 instances of convex residual
fluid, and 17 of concave residual detachment.
? How long did it take for the residual nonrhegmato-
genous (convex or concave) detachments to disap-
pear?
In 17 eyes it disappeared after 1−3 days, in 9 after 4 days to 1 month,
in 6 eyes after 2−3 months, and in 2 eyes after 4 or 6 months (Table
8.3). In some patients with a concave residual detachment (recall
that there were 16 eyes with preoperative PVR grades C1 or C2), the
starfolds finally disappeared, and were hardly visible at all after
several years.
8.13.3 Summary
When carrying out detachment surgery without drainage, one has
to be aware that parts of the retina will still be detached in some
patients on the 1st day after surgery.
At this point, it is important to distinguish between delayed absorp-
tion and surgical failure:
왘 Convex residual detachment, caused by delayed absorption, is
more likely to be found in a pseudophakic eye, in the presence of
choroidals, in a highly myopic eye, or in the presence of atrophic
Table 8.3 Delayed absorption (n = 34) after segmental buckling without
drainage in 107 retinal detachments.
Complete postoperative reattachment n
1−3 days 17
4 days−1 month 9
2−3 months 6
4−6 months 2](https://image.slidesharecdn.com/practicalguidetominimalsurgeryforretinaldetachmentvol-240327214459-1b0b7bb7/85/Practical-Guide-to-Surgery-for-RD-Vol-I-236-320.jpg)
![226 8 Segmental Buckling without Drainage
? Why, once the eye is perforated, should one not
drain all the way, but instead only partially?
왘 This is in order to reduce the complications of
complete drainage and to have subretinal fluid left.
? Why?
왘 Because when the retina is reattached the next morn-
ing, it will be known for certain that all of the breaks
have been buckled sufficiently.
Now it will be recalled, complications can be avoided by:
– Performing well-monitored cryosurgery—or, if too much
coagulation is needed, completing it postoperatively by laser
coagulations when the retina is reattached.
– Avoiding drainage.
? Which complications are still associated with the
extraocular minimal buckling operation [42]?
왘 These are extraocular and in connection with the
buckle:
– Sponge extrusion/infection, in less than 1% [30]
(see Chapter 8.4, p. 128).
– Diplopia (under 1% since special care is taken in
postoperative ocular motility training (see Chapter
8.5, p. 138).
A clinical study was carried out in 1900 patients who underwent
surgery with segmental buckling and without drainage between
1970 and 1977, with 900 patients treated in New York and 1000 by
the author’s group [43, 44]. The only differences between the 2 in-
stitutions were that our group’s patients were also treated post-
operatively in addition with 4000000 units of penicillin daily for
5 days; local antibiotics were given in New York for 1 week, and in
our series for 3 weeks.
There were no statistically significant differences between the
2 groups of patients treated with or without systemic antibiotics.
In this study, using the Lincoff sponge I [43, 44], the infection rate
was at 2,7%.](https://image.slidesharecdn.com/practicalguidetominimalsurgeryforretinaldetachmentvol-240327214459-1b0b7bb7/85/Practical-Guide-to-Surgery-for-RD-Vol-I-239-320.jpg)
![227
8.14 Complications
쎲 Whereas in a later study in which the
Lincoff sponge II [30] was used instead, the infec-
tion rate fell to under 1%.
8.14.1 Early Signs of Buckle Infection
쎲 These occur within the 1st week, and are due to
virulent organisms, such as
Staphylococcus aureus and Proteus mirabilis.
The symptoms are:
– Sudden deep pain in the eye.
This can be confirmed by locating the pain in the area of the in-
fected buckle, which is done by using a Q-tip over the lid to
depress the eye, first in an unbuckled area and then in the
buckled one. Touching the latter area will inflict severe pain, and
great care should therefore be taken.
– Sudden increase in postoperative chemosis.
– A hemorrhage or whitish mass (with an appearance like a
heavy laser or cryopexy lesion), or an accumulation of white
cells over the buckle.
– A subconjunctival hemorrhagic mass. This may not be visible
when a very posterior buckle has been used.
– Some days later, a fistula with hemorrhagic or purulent secre-
tion.
8.14.2 Late Signs of Buckle Infection
쎲 These arise after months to years, and are caused by
Staphylococcus epidermidis.
The symptoms are:
– Pain
– Fistula
– Subconjunctival hemorrhage due to a granuloma (Fig. 8.39).](https://image.slidesharecdn.com/practicalguidetominimalsurgeryforretinaldetachmentvol-240327214459-1b0b7bb7/85/Practical-Guide-to-Surgery-for-RD-Vol-I-240-320.jpg)
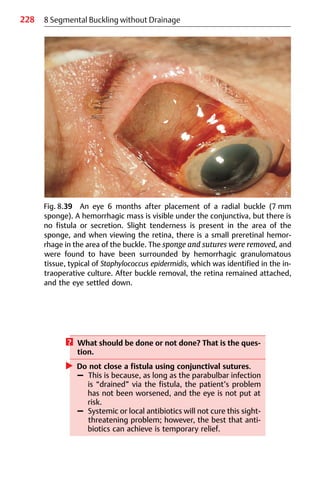
![229
8.14 Complications
쎲 Instead, remove the explant with sutures immedi-
ately (on an emergency basis in a patient with an
early infection).
– Prior to surgery, check the break to see whether
additional laser lesions might be needed.
– Intraoperatively, before rinsing the operative field
with an antibiotic solution, be sure to take a smear
and send it for culture and antibiogram.
As soon as the infected buckle is removed, the orbit will become
sterile after 2−3 days, even without antibiotics [45]. However, if
there are any early manifestations of infection, additional systemic
antibiotics can be prescribed for 3 days, postoperatively.
With regard to Staphylococcus epidermidis, our belief is that
it only acts as a pathogen in the presence of silicone explants. This
observation has recently been supported by similar experiences
with implantation of other silicone structures—e.g., in joint replace-
ment, mamma prostheses, and heart valve replacement.
After removal of the infected buckle with sutures, the eye
will settle down, and the retina will remain attached—but only if
the supported break was sealed off sufficiently. In the few patients
in whom explants have had to be removed, the retina remained at-
tached [29].
? What should one do if the retina redetaches after
removal of the buckle?
왘 Double patch the patient for 2 days to prevent a pro-
gression of the detachment into the macula. After 3
days, the break can be re-buckled without the threat
of re-infection.
? What are the predisposing factors for buckle infec-
tion?
In our series of 1900 patients, it was found that infection occurred
in eyes with multiple sponges and long circumferentials, as well as
in those in which a reoperation was necessary [44].](https://image.slidesharecdn.com/practicalguidetominimalsurgeryforretinaldetachmentvol-240327214459-1b0b7bb7/85/Practical-Guide-to-Surgery-for-RD-Vol-I-242-320.jpg)

![231
However, it does imply that the intrascleral sutures have been
placed too superficially, or that the bites of the suture were too
short, tearing out through the sclera when tied under tension over
the elastic buckle. If this bulge disturbs the patient, the buckle can
be removed, but only for cosmetic reasons. It should be checked
again beforehand, however, that the break (having been treated)
has been sealed off sufficiently.
In addition, one should bear in mind the following axioms
when planning a reoperation or even when treating “easy” detach-
ments:
쎲 There is no such thing as minor surgery;
there are only minor surgeons.
쎲 There is no such thing as surgery without complica-
tions.
These may be unexpectedly critical-sounding statements, but
30 years of experience in surgery have proved their value. The
reader might wish to recall these 2 principles when assessing the
indications for surgery (hopefully never marginal ones) in his or her
patients.
8.15 Anatomical Results and Reasons for Failure
8.15.1 Introduction
We have concentrated here on how to reattach the retina using a
minimal extraocular approach—i.e., using segmental buckling
without drainage, cerclage, or additional vitrectomy. What are the
results of treatment using this approach?
쎲 The questions that arise are:
1. Does this minimal extraocular surgery result in
more frequent reoperations?
2. Does the rate of redetachments increase due to the
absence of a prophylactic cerclage?
Two clinical studies were undertaken to answer these questions
[29, 30].
8.15 Anatomical Results and Reasons for Failure](https://image.slidesharecdn.com/practicalguidetominimalsurgeryforretinaldetachmentvol-240327214459-1b0b7bb7/85/Practical-Guide-to-Surgery-for-RD-Vol-I-244-320.jpg)
![232
8.15.2 First Clinical Study
In the 1st study [29], 1000 consecutive retinal detachments were
treated between 1970 and 1977 with cryosurgery, segmental buck-
ling (Lincoff sponge I) and without drainage. As may be recalled (see
Chapter 8.6, p. 144), the use of nondrainage procedures increased
from 80% in the first 100 patients to 99% after more experience was
gained, with an average of 93% in all of the 1000 detachments.
왘 Patients
The characteristics of the detachments treated included: 18% of the
eyes were aphakic, 5% had a perforating injury, 5% had blunt
trauma, 5% involved oral disinsertion, and 1.2% represented giant
tears.
왘 Operation
Surgery consisted of transscleral cryopexy at a medium level (see
Chapter 7, p. 93), segmental buckles in 96%, and cerclage was still
used in 4%.
? Why was cerclage still used in 4%?
왘 – Due to initially persistent uncertainties about the
use of segmental buckling
– Due to our interpretation “it must be circular trac-
tion.”
The change from cerclage to segmental buckling evolved over
several years. In the first 100 detachments, a cerclage was still ap-
plied in 9%, but subsequently—as greater confidence in the minimal
procedure was gained—it was indicated less and less often, ulti-
mately dropping to 0% in the last 200 detachments. The segmental
buckles used consisted of: Radials in 55% (53% sponges and 2%
scleral pouches); radials combined with circumferentials in 13%;
and segmental circumferentials in 28% (Fig. 8.41).
8 Segmental Buckling without Drainage](https://image.slidesharecdn.com/practicalguidetominimalsurgeryforretinaldetachmentvol-240327214459-1b0b7bb7/85/Practical-Guide-to-Surgery-for-RD-Vol-I-245-320.jpg)
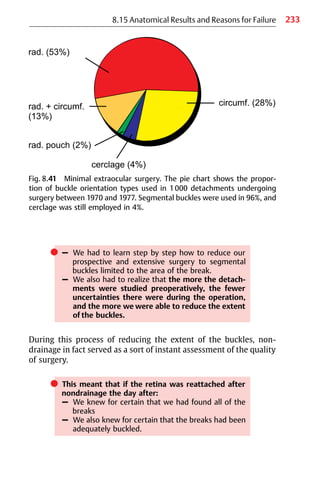
![234 8 Segmental Buckling without Drainage
왘 Results and reasons for failure
The retina was reattached in 83% of detachments after a single
operation. The reasons for primary failure in the remaining 17% are
listed in Table 8.4.
? What type of procedure would you select for re-
operation in these patients? At least a larger opera-
tion?
왘 No.
? Is a cerclage or vitrectomy now justified?
왘 No.
Instead, since your chances will be 8 in 10, recalling earlier reports
[46]:
– One should search for the missing break to be buckled
– Or one might have to correct an insufficient tamponade.
Both of these procedures can again imply a minimal extraocular ap-
proach.
? Is repeating the minimal extraocular approach
justified in a reoperation?
왘 Let me explain this to you.
Table 8.4 Reasons for primary failure (17%) after minimal extraocular
surgery for retinal detachment (1st clinical study; n=1000 detachments).
Cause %
Another hole 4.7
Inadequate buckle 2.7
PVR 6.3
Giant tear or perforating injury 2.3
No hole 1.0
PVR: proliferative vitreoretinopathy](https://image.slidesharecdn.com/practicalguidetominimalsurgeryforretinaldetachmentvol-240327214459-1b0b7bb7/85/Practical-Guide-to-Surgery-for-RD-Vol-I-247-320.jpg)
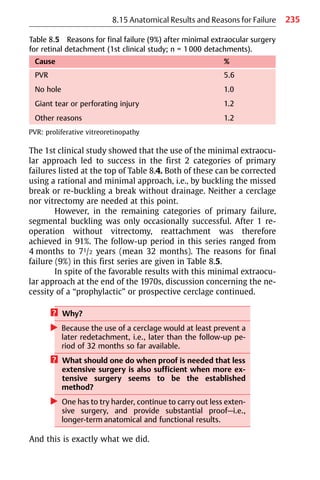
![236
8.15.3 Second Clinical Study
As we were convinced that this minimal extraocular procedure was
a rational and valid approach, a 2nd clinical study was started in
1979, this time on a prospective basis and with a follow-up period
of 15 years [30,3].
쎲 This prospective study was intended to provide
answers to the open questions that remained:
1. Does cryopexy induce proliferative vitreoreti-
nopathy (PVR)?
2. During a longer-term follow-up period of 15 years,
does the rate of redetachment increase in the ab-
sence of a “prophylactic” cerclage?
3. Does the postoperative vision deteriorate in com-
parison to the fellow eye during a 15-year follow-up
period?
왘 Patients
Between August 1979 and January 1980, 107 primary rhegmato-
genous detachments were treated with segmental buckling and
without drainage. Forty-six eyes had a total or 3-quadrant detach-
ment, 43 had multiple breaks, 21 were aphakic, 1 was pseudo-
phakic, and 16 eyes had preoperative PVR grade C1 or C2 (Table 8.6).
Eyes with perforating injuries or giant tears were excluded from
this series. This cohort of patients represented a mixture of easier as
well as more complex detachments typically seen in a retinal
detachment practice. Thirty-five patients died between 6 months
and 15 years postoperatively, but the condition of their retinas at
death was known. The follow-up period for the remaining
72 patients is 15 years.
왘 Operation
The operation was the same as in the 1st study—cryosurgery under
ophthalmoscopic control to the edges of the break or breaks, and
use of a sponge (Lincoff sponge II) or a temporary balloon (Lincoff-
Kreissig balloon) to buckle the break. The size of the sponge was
limited to the area of the break (Fig. 8.42): 76 eyes had radially
oriented plombes (7 of them were a balloon, just introduced in
8 Segmental Buckling without Drainage](https://image.slidesharecdn.com/practicalguidetominimalsurgeryforretinaldetachmentvol-240327214459-1b0b7bb7/85/Practical-Guide-to-Surgery-for-RD-Vol-I-249-320.jpg)
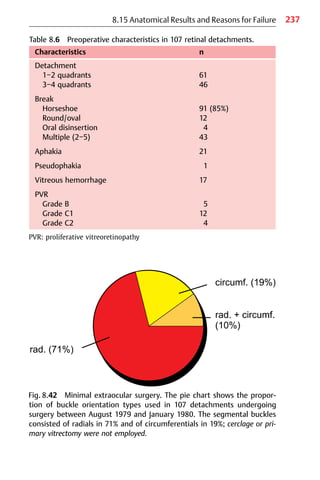
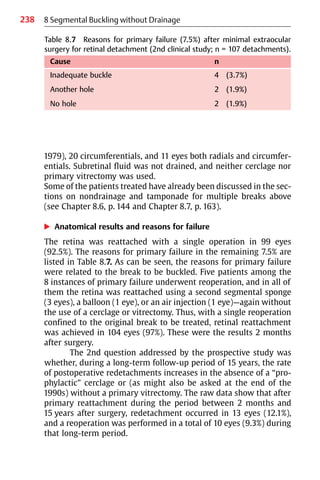
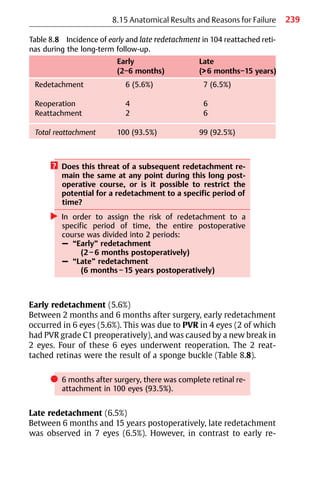
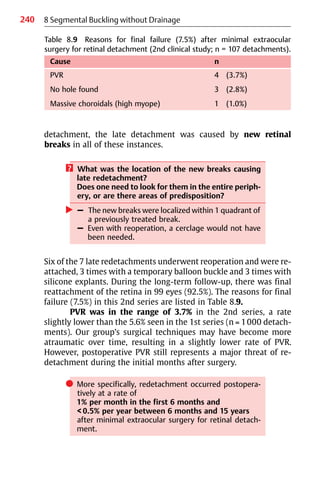
![241
쎲 We can now sum up the answers derived from the
study to the first 2 questions addressed above:
1. The rate of PVR was 3.7%, which is relatively low.
2. During a longer-term follow-up period of 15 years,
the rate of redetachment did not increase in the
absence of a “prophylactic” cerclage.
These long-term results provide no support for the use of a prospec-
tive cerclage in the prevention of late redetachment. The rate of re-
detachment was even lower than that in a comparable series by
Toernquist and Toernquist [47], in which a cerclage was used.
8.15.4 Summary
Minimal extraocular surgery using segmental sponges or a tem-
porary balloon in combination with cryopexy and without drainage
of subretinal fluid provides favorable early and long-term results.
The low rate of reoperation, at less than 1% per year during a period
of 15 years postoperatively, also provides support for the following
practices:
왘 Meticulous preoperative searching for the retinal break or
breaks.
왘 Precise localization and tamponade of the detached break or
breaks at the operating table.
왘 Atraumatic surgical technique with low morbidity, resulting in a
low rate of secondary PVR and subsequent redetachment.
쎲 During the follow-up period of 15 years, only
1 of the total of 107 eyes needed 2 reoperations.
It should be borne in mind, however, that the results of retinal
detachment surgery are only proportional to what one has invested,
i.e., what one has worked for.
쎲 Only after:
– A maximum of preoperative retinal study
can surgery be reduced to
– A minimal approach while still ensuring
– A maximum of retinal reattachment
with favorable long-term visual results.
8.15 Anatomical Results and Reasons for Failure](https://image.slidesharecdn.com/practicalguidetominimalsurgeryforretinaldetachmentvol-240327214459-1b0b7bb7/85/Practical-Guide-to-Surgery-for-RD-Vol-I-254-320.jpg)
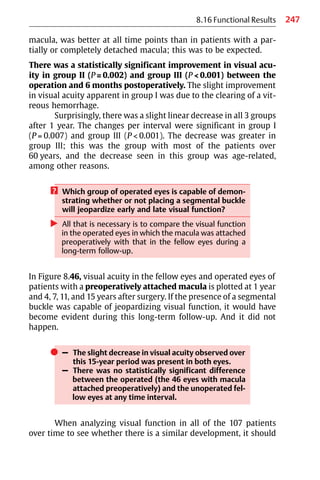
![248 8 Segmental Buckling without Drainage
Fig. 8.46 Unoperated fellow eyes (top) and operated eyes (bottom)
during the long-term follow-up: Mean visual acuity in patients with a pre-
operatively attached macula (group I, n = 46), 1−15 years after treatment
with minimal extraocular surgery (segmental buckling without drainage).
The number of patients alive fell from 46 to 36 during the study period. The
vertical bars represent standard error. During the study period of 15 years,
the difference in the decrease of visual acuity in the 2 groups was not signifi-
cant at any interval.
first be borne in mind that all of the patients aged a further 15 years
during the period of study. Some data from Slataper may help to
elucidate the problem of aging and decrease of visual function [48].
Slataper plotted the visual acuity in 17 349 eyes of normal in-
dividuals as a function of age (Fig. 8.47).](https://image.slidesharecdn.com/practicalguidetominimalsurgeryforretinaldetachmentvol-240327214459-1b0b7bb7/85/Practical-Guide-to-Surgery-for-RD-Vol-I-261-320.jpg)
![249
8.16 Functional Results
쎲 The curve shows 3 phases:
– Increase of visual acuity in childhood
– Stability during middle age
– Decrease beginning at the age of 60.
Most of the patients in our own study were older than 60 years prior
to surgery. The declining part of Slataper’s curve corresponds pre-
cisely to the decrease in visual acuity observed in our 107 patients,
both in the fellow eyes and the eyes in which surgery was carried
out. In the Snellen chart, this decrease occurs at a level of 0.07 line
per year (Fig. 8.48). The mean visual acuity of the fellow eyes was
20/25 after 1 year and 20/30 after 15 years; and in the operated eyes
the figure was 20/30 at 1 year and 20/40 after 15 years.
쎲 There was no statistically significant difference in
the postoperative decrease at any time between the
2 curves for all of the operated eyes with a detach-
ment and the fellow eyes.
Fig. 8.47 Visual acuity as a function of age in 17 349 individuals, replotted
from the cross-sectional study by Slataper [48]. After the age of 60 years,
there is a continuous decrease in visual acuity (0.07 line per year in the
Snellen chart).](https://image.slidesharecdn.com/practicalguidetominimalsurgeryforretinaldetachmentvol-240327214459-1b0b7bb7/85/Practical-Guide-to-Surgery-for-RD-Vol-I-262-320.jpg)
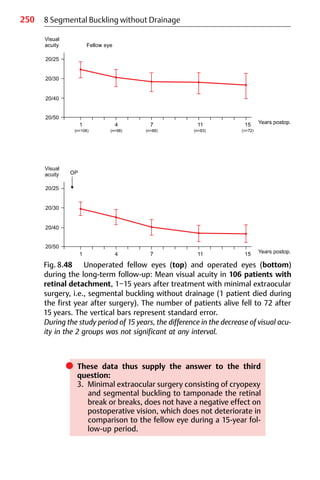
![251
8.17 Conclusion
8.17 Conclusion
Minimal extraocular surgery consists of cryosurgery and segmental
buckling to tamponade the break or breaks without drainage. In the
treatment of retinal detachment, this procedure is feasible in more
than 90% of patients; the retina is reattached in over 90% of detach-
ments, and remains attached over a period of up to 15 years. The
rate of redetachment requiring reoperation is less than 1% per year
during the long-term follow-up.
쎲 Since surgery is minimal, the resulting complications
are minimal, and long-term visual function is con-
sequently not jeopardized due to secondary complica-
tions in comparison to the fellow eye.
These long-term results with minimal surgery support our philoso-
phy:
쎲 Less surgery to start with means better sight at the
end. There is a better prognosis for the operated eye
and its long-term visual function.
쎲 Another of our principles of treatment is:
– To reattach a retina,
2 small operations are better than 1 large one.
These 2 statements may be difficult to accept, but in the meantime
strong evidence has accumulated that a larger operation (particu-
larly involving a cerclage) can reduce retinal and choroidal blood
flow. These findings were reported in the early 1980s by Dobbie [8],
Diddie and Ernest [9], Yoshida et al [10], and later confirmed by
Scheider and Korabjelnikoff [11].
The long-term visual results after segmental buckling are a
challenge to those who still practice cerclage in eyes with detach-
ments to review their data and compare the long-term functional
results of cerclage-operated eyes with vision in the fellow eye in a
long-term follow-up study. The same applies to those who treat
detachments using primary vitrectomy.](https://image.slidesharecdn.com/practicalguidetominimalsurgeryforretinaldetachmentvol-240327214459-1b0b7bb7/85/Practical-Guide-to-Surgery-for-RD-Vol-I-264-320.jpg)
![253
8.18 Retinal Detachments with PVR
cause of failure, including the use of various drugs or complex surgi-
cal procedures. However, a unique method of treatment has not
been developed yet.
쎲 One major difficulty that did develop, however, is that
a universally valid standard classification of PVR has
not been available on which to base comparisons of
the results obtained with the various methods of
treatment used by various researchers or clinicians.
This problem was recognized at the end of the 1970s, and in 1983
the Retina Society Terminology Committee [49] published a stand-
Fig. 8.49 A proliferative vitreoretinopathy (PVR) detachment with a full-
thickness retinal starfold.](https://image.slidesharecdn.com/practicalguidetominimalsurgeryforretinaldetachmentvol-240327214459-1b0b7bb7/85/Practical-Guide-to-Surgery-for-RD-Vol-I-266-320.jpg)
![254 8 Segmental Buckling without Drainage
ard classification of proliferative vitreoretinopathy. This replaced a
variety of terms then in use, such as “massive vitreous retraction,”
“massive preretinal retraction,” and “massive periretinal prolifera-
tion.” The 1983 classification subdivided PVR into 4 grades of sever-
ity; it is pragmatic and easy to use, and was therefore accepted at
once and widely used during the 1980s and 1990s, forming the basis
for many clinical reports.
In 1991, another, “updated” classification of PVR was pub-
lished [50], which is more complex and more difficult to under-
stand and to apply. Consequently, the older classification is still
used by many surgeons even today; both classifications will be dis-
cussed here.
왘 Original classification of PVR (Table 8.11)
In the 1983 classification, PVR was divided into 4 different
grades of severity:
A = minimal, B = moderate,
C = marked, D = massive.
As mentioned above, this classification of PVR was accepted
without delay and applied in everyday clinical practice. It provided
a way of evaluating different grades of PVR detachment, and made it
possible for the first time to compare alternative treatments and
their results.
However, after vitrectomy was integrated into the spectrum of
treatment modalities, the development of anterior PVR became
prominent,
and there was a need for a different classification that integrated
anterior PVR and differentiated between various types of PVR.
왘 Updated classification of PVR (Table 8.12, Fig. 8.50)
The new classification was published in 1991. It contains a detailed
description of posterior and anterior PVR contractions, which are
divided into 5 types: Focal, diffuse, subretinal, circumferential, and
anterior with displacement of the retina.
The extent of PVR is more precisely defined, not merely into
1−4 quadrants, but into 1−12 clock hours.](https://image.slidesharecdn.com/practicalguidetominimalsurgeryforretinaldetachmentvol-240327214459-1b0b7bb7/85/Practical-Guide-to-Surgery-for-RD-Vol-I-267-320.jpg)
![255
Table 8.11 Original 1983 classification of proliferative vitreoretinopathy
(PVR) [49].
Grade A (minimal) Vitreous haze, vitreous pigment clumps
Grade B (moderate) Wrinkling of the inner retinal surface, rolled
edge of retinal break, retinal stiffness, vessel
tortuosity
Grade C (marked) Full-thickness fixed retinal folds in
1−3 quadrants:
C1 1 quadrant
C2 2 quadrants
C3 3 quadrants
Grade D (massive) Fixed retinal folds in 4 quadrants and
3 different configurations of funnel shape:
D1 Wide funnel shape
D2 Narrow funnel shape
D3 Closed funnel shape (optic nerve head not
visible)
8.18 Retinal Detachments with PVR
Table 8.12 Updated 1991 classification of proliferative vitreoretinopathy
(PVR) [50].
Grade A Vitreous haze, vitreous pigment clumps
Grade B Wrinkling of the inner retinal surface, rolled edge
of retinal break, retinal stiffness, vessel tortuosity
Grade C
Location PVR contractions are divided into:
CA Anterior contractions
CP Posterior contractions
Extent Extent of PVR contractions is denoted in numbers
of clock hours, ranging from 1−12:
CA1−12 Anterior contractions of 1−12 clock hours
CP1−12 Posterior contractions of 1−12 clock hours
Type PVR contractions are divided into 5 types:
Type 1 Focal contraction (starfold) X
Type 2 Diffuse contraction (group of starfolds) X X X
Type 3 Subretinal proliferation — —
Type 4 Circumferential contraction xxxx
앖 앖
Type 5 Anterior displacement by contraction xxxx](https://image.slidesharecdn.com/practicalguidetominimalsurgeryforretinaldetachmentvol-240327214459-1b0b7bb7/85/Practical-Guide-to-Surgery-for-RD-Vol-I-268-320.jpg)
![256
? How would you proceed when documenting the
PVR in a detachment using the updated and more
specific PVR classification of 1991?
In this new classification, grades A and B of PVR are the same as in
the older classification, but grade C has been entirely altered and
enlarged. Grade D has been eliminated.
8 Segmental Buckling without Drainage
Fig. 8.50 Retinal diagram depicting the various types of full-thickness re-
tinal folding, as published by Machemer et al [50].
Type 1 Focal contraction (starfold) X
Type 2 Diffuse contraction (group of starfolds) X X X
Type 3 Subretinal proliferation — — —
Type 4 Circumferential contraction xxxx
앖앖
Type 5 Anterior displacement by contraction xxxx](https://image.slidesharecdn.com/practicalguidetominimalsurgeryforretinaldetachmentvol-240327214459-1b0b7bb7/85/Practical-Guide-to-Surgery-for-RD-Vol-I-269-320.jpg)
![258
cerclage developed to become the treatment of choice. However, in
parallel with this, the technology of vitrectomy has been refined
and its indications enlarged since the mid-1980s.
쎲 The controversy concerns the issues:
– Up to which grade of PVR should buckling first be
tried?
– What are the long-term results with minimal buck-
ling when cerclage or vitrectomy are not added?
As will be recalled, PVR is still the most important cause of surgical
failure in the treatment of rhegmatogenous retinal detachment
[51]. In a series of 107 consecutive detachments treated with cryo-
surgery, segmental buckling and without drainage as mentioned
above, postoperative PVR grade C or D, causing final failure,
developed in 3.7% [30]. In another series of 500 uncomplicated
detachments that were treated with cryosurgery, a temporary bal-
loon buckle and without drainage, the rate was at 0.2% [52].
However, although the treatment of PVR detachment is still
controversial, there is one issue on which everyone would agree
today:
쎲 PVR represents a cascade of biological over-reac-
tions. The aim of any treatment should therefore
be:
– To intercept this biological process
– To prevent it from progressing
– And even more so, to encourage it to regress.
? How can the continuum of PVR be intercepted?
왘 Use atraumatic surgery, which should be:
– Minimal
– Extraocular
This is in order to avoid the breakdown of the blood
aqueous barrier.
8 Segmental Buckling without Drainage](https://image.slidesharecdn.com/practicalguidetominimalsurgeryforretinaldetachmentvol-240327214459-1b0b7bb7/85/Practical-Guide-to-Surgery-for-RD-Vol-I-271-320.jpg)
![260 8 Segmental Buckling without Drainage
If the answers to these questions were in the affirmative, it would
imply that for a PVR detachment of grade B or C, a first attempt
using segmental buckling should be considered instead of a larger
primary surgical intervention, such as a vitrectomy or a cerclage.
왘 Patients
A prospective study was carried out in 72 retinal detachments com-
plicated by PVR grades B and C. The patients included were re-
cruited from 695 consecutive patients with detachment who un-
derwent surgery in Tuebingen between 1979 and 1982, before vit-
rectomy became a routine treatment for moderate PVR, and the fol-
low-up period was 11 to 131/2 years.
PVR was classified according to the Retina Society Terminology then
available, which specifies grades B, C, and D [49]. However, in 1979
we had already differentiated between posterior (pPVR) and ante-
rior (aPVR) PVR findings with regard to starfolds and traction lines.
Follow-up examinations were carried out at 1 month, 2, 3, and
6 months and thereafter at 1-year intervals after surgery. The study
was concluded in July 1993. For patients still alive, the follow-up
ranged between 11 and 131/2 years. Thirty-one patients (43%) died
between 6 and 143 months after surgery, so that the mean follow-
up time for all operated patients was 71/2 years.
There were 22 detachments with PVR grade B and 50 with grade C;
38 eyes had PVR grade C1, 11 had grade C2, and 1 eye had C3 (Ta-
ble 8.13). Preoperative characteristics of the 72 PVR detachments
included: 14 patients with myopia of between −2 dpt and −10 dpt
and 1 patient with −22 dpt. Aphakia was present in 15 eyes, a mod-
erate vitreous hemorrhage in 6, and a choroidal effusion in 2. In
1 eye there was a macular pucker, and in another 1 a pseudophakia.
Preoperative extent of the detachment, state of the macula, and
type of retinal tears to be treated are summarized in Table 8.14. A
horseshoe tear was present in 48 eyes, an oval or round hole in 22,
and in 2 detachments no hole could be found, despite a meticulous
and repeated search for the break.
왘 Operation
The operation consisted of cryopexy and segmental buckling (n = 68
eyes) or a temporary balloon (n = 4 eyes). Diagnostic freezing of the](https://image.slidesharecdn.com/practicalguidetominimalsurgeryforretinaldetachmentvol-240327214459-1b0b7bb7/85/Practical-Guide-to-Surgery-for-RD-Vol-I-273-320.jpg)
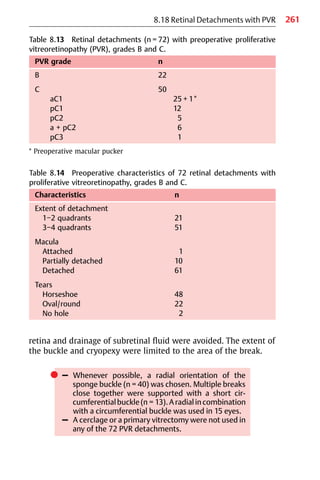
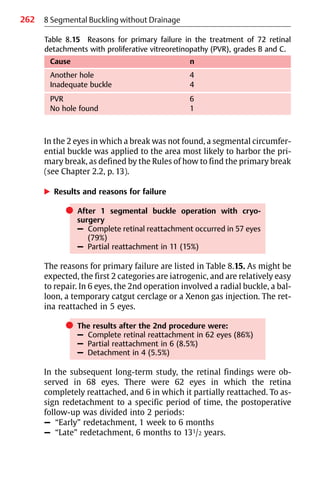

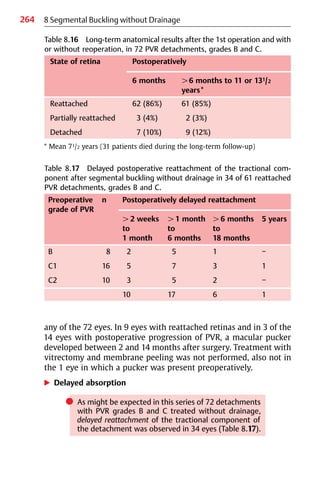

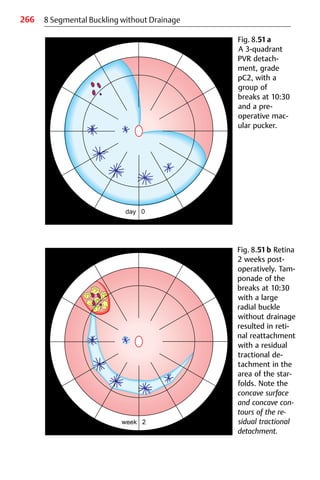
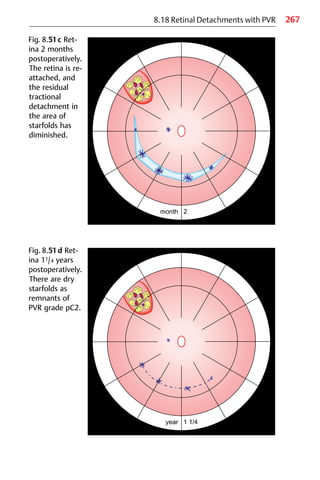
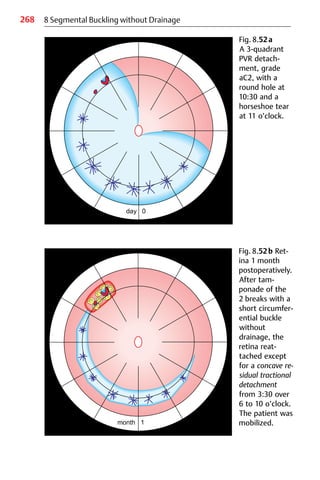
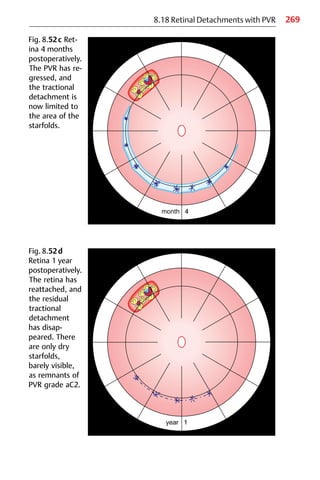
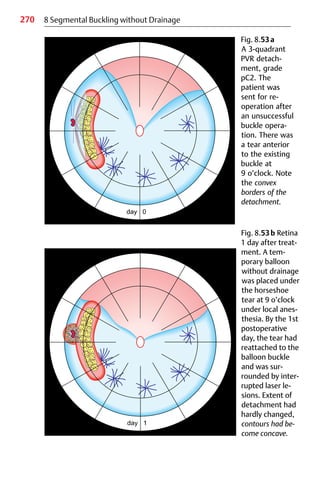
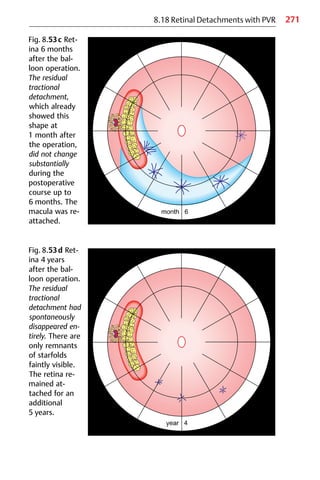
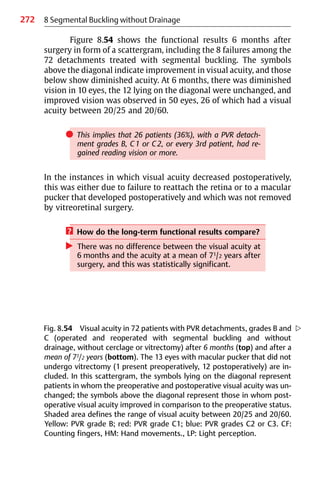
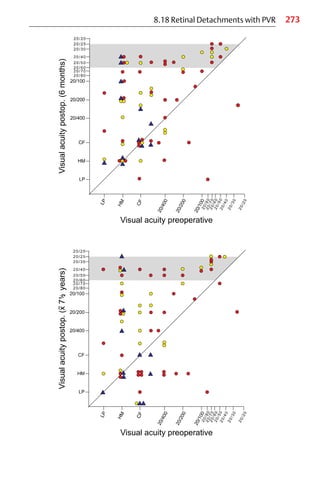
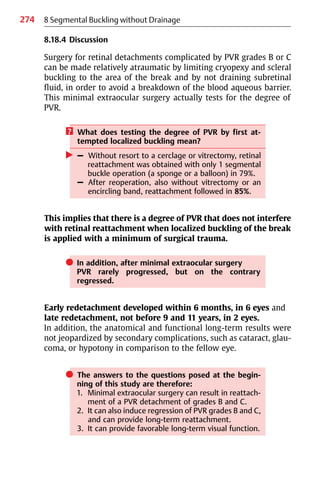
![275
8.18 Retinal Detachments with PVR
? A further question arising might be:
How would the functional results compare to a
similar series of PVR detachments in which reopera-
tion consisted of vitrectomy with vitreoretinal
surgery?
왘 When the results of the treatment of grade B and C1
PVR detachments (n = 60) in the present study were
compared with a similar series (n = 66) reported by
Chang et al [53], in which the initial operation con-
sisted of segmental buckling as in the present study,
but vitrectomy was used in selected cases (10.6%) at
reoperation.
– There was no significant difference in the anatomi-
cal results after 6 months (Fig. 8.55).
– Unexpectedly, there was also no significant differ-
ence in the functional results (Fig. 8.56).
It may be recalled here that the 8 macular puckers in our group’s
series of 60 eyes with grade B and C1 PVR detachments were not
operated on with vitreoretinal surgery.
Fig. 8.55 Anatomical results, 6 months postoperatively, in 126 PVR detach-
ments, grades B and C1, treated by Kreissig et al (n = 60) using segmental
buckling without drainage in both the primary operation and also for re-
operation; and by Chang et al [53] (n = 66) using segmental buckling as the
primary operation and additional vitrectomy with vitreoretinal surgery
(10.6%) for reoperation. There were no statistically significant differences
(Fisher’s exact test, P = 0.10) between the results of the 2 series after
6 months.](https://image.slidesharecdn.com/practicalguidetominimalsurgeryforretinaldetachmentvol-240327214459-1b0b7bb7/85/Practical-Guide-to-Surgery-for-RD-Vol-I-288-320.jpg)
![276 8 Segmental Buckling without Drainage
Fig. 8.56 Functional results, 6 months postoperatively, in 126 PVR detach-
ments, grades B and C1, treated by Kreissig et al (n = 60) using segmental
buckling without drainage in both the primary operation and also for re-
operation; and by Chang et al [53] (n = 66) using segmental buckling as
the primary operation and additional vitrectomy with vitreoretinal surgery
(10.6%) for reoperation. There were no statistically significant differences
(Student’s t-test, P = 0.083) between the 2 series after 6 months. The Kreis-
sig series includes 8 eyes with macular pucker in which vitreoretinal
surgery was not performed.
쎲 There was no statistically significant difference in the
functional results, but complications were less
frequent and there was less morbidity in the eyes
treated without vitrectomy.
? What does this small, but prospective long-term
study of 72 PVR detachments of moderate degree,
treated with minimal extraocular surgery, tell us?
왘 – The most critical period for redetachment is
during the first 6 months after surgery.
– The threat of redetachment is reduced if PVR is not
provoked into progression by traumatic surgery.
– If the retina is still attached 6 months postopera-
tively, there is little risk of redetachment in sub-
sequent years.
– The critical period for PVR progression is already
over after 6 months.](https://image.slidesharecdn.com/practicalguidetominimalsurgeryforretinaldetachmentvol-240327214459-1b0b7bb7/85/Practical-Guide-to-Surgery-for-RD-Vol-I-289-320.jpg)
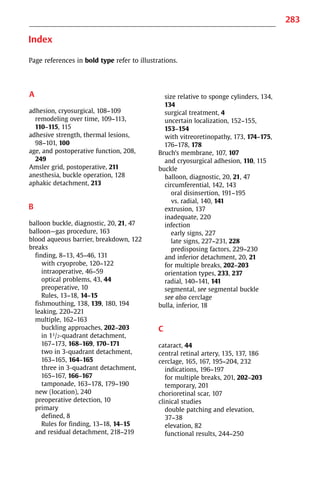


![Acute visual loss [Compatibility Mode].pdf](https://cdn.slidesharecdn.com/ss_thumbnails/acutevisuallosscompatibilitymode-220808143729-7342aaf9-thumbnail.jpg?width=640&height=640&fit=bounds)


