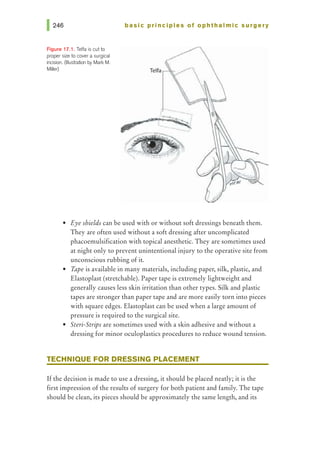
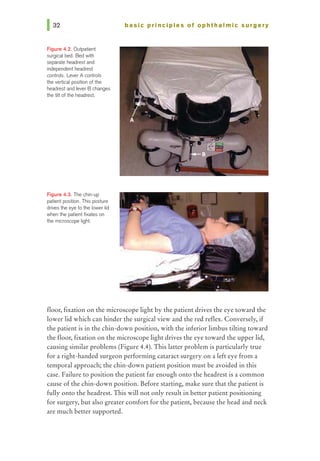
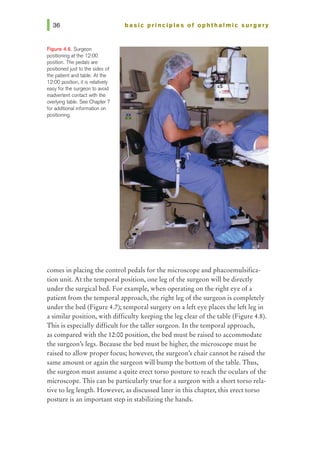
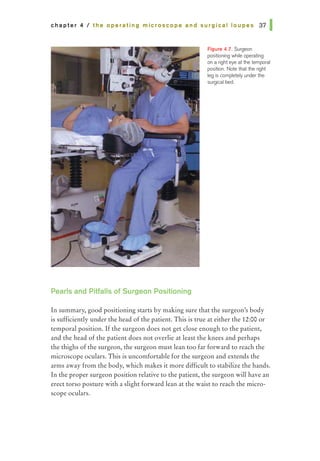
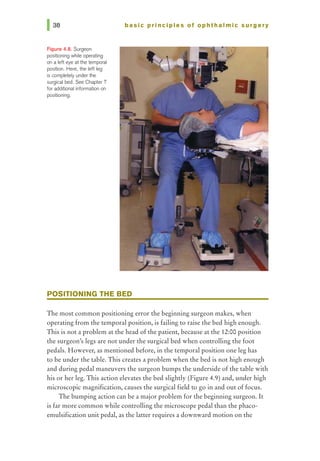
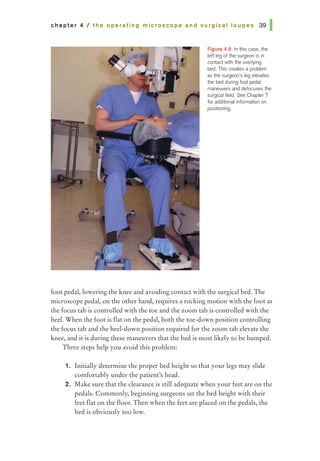
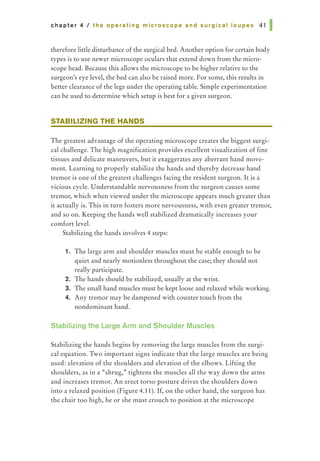
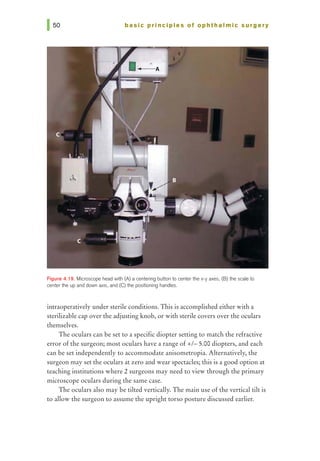
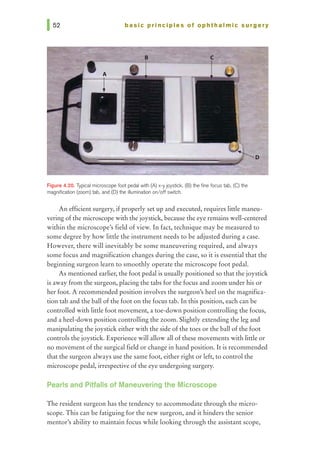
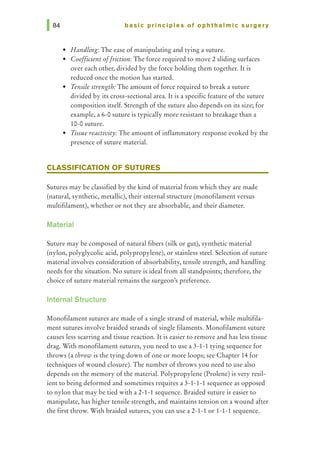
This document provides an overview of basic principles of ophthalmic surgery. It discusses patient selection and factors affecting surgical risk, preparation of the patient in the office and operating room, and preparation of the surgeon. Key points include obtaining informed consent, assessing medical clearance, communicating with staff, and ensuring patient comfort. Proper familiarization with the planned procedure and understanding instrumentation, setup, and potential complications is important for surgeon preparation.


![a~ AMERICAN ACAOE M¥
'-!!)' OF 0PHTHALMOLOG¥
·t~,.·l:.w f,fl, t, ~S<!Otfli"lt
P.O. Box 7424
San Francisco, CA 94120-7424
ClinicalEducation Secretaries
GregozyL. Skuta,MD,SmiorSecretary
for ClinictdEdt~cation
Louis B. Cantor, MD, Secretary
for OphthalmicKnO'UJkdgt
Committeefor ResidentEducation
TaraUhler, MD, Chflir
RichardM. Ahuja,MD
Pratap Challa, MD
Karl C. Golnik, MD
Richard A. Harper, MD
Jean Hausheer, MD
Natalie C. Kerr, MD
Andrew G. Lee. MD
MichaelMahr,MD
ScottK. Schultz,MD
BhavnaP. Sheth. MD
PeterA. Quiros,MD
Nicholas Volpe, MD
Jake (Evan) L. Waxman, MD
Laura L. Wayman, MD
AcademyStaff
Richard A.Zorah, Viet President,
OphthalmicKnowkdgt,
ClinicalEdllc:ation Division
HalStraus, DirectorofPublicAtions
KimberlyTorgerson, PHblicatiom
Editor
D.JeanRay, Proti.IU:tion MtJnager
Denise Evenson, Design
DebraMarchi, CCOA,
Admmiswlltif.leAssistant
TheAcademyprovides this materialfor educationalpurposes ouly. Itis DOt
intended to represent the onlyorbestmcthoclorproc:cdureineverycase, nor to
replacea physician'sownjudgmentorgive specificadvicefor case management.
Including allindications,contraindications, side effects,andaltemative agentsfor
uchdrug ortreatmentis beyond the scopeofthismaterial. Allinformationand rec-
ommendations shouldbeverified,priorto use, withcurrentinfonnationincludedin
the manufacturen' pacls.ageinserts or other independentsoun:es, and consideredin
lightofthepatient's condition andhistory. Reference to certaindrugs,instruments,
and otherproducts inthis publicationismadefor illustrativepurposes onlyandis
notintendedtoconstitutean endorsement ofsuch. Somematerials mayinclude in-
formation onapplicatiOIIS thatare notconsideredcommunitystandard,thatreflect
indications notincludedinapproved FDA labeling,orthat are approvedforuse
onlyinrestrictedresearchsettings.TheFDAhasstatedthatitistheresponsibilityof
thephysicianto determine theFDA status ofeachdrugordevice heorshewishesto
use, and to use themwithappropriate patientconsentincompliancewithapplicable
law.TheAcademyspecificallydisclaims anyandallliabilityfor injuryorotherdam-
ages ofany kind, from negligence orotherwise,for any and allclaims thatmay arise
from theuse ofany recommendationsorotherinformationcontainedherein.
RnanclalDisclosures
Theaudwrs,reviewers,andconsultantsdisclose thefollowing financial relationships.
AnthonyJ.Aldaw, MD: (C) A1lergan;(S) NationalEyeInstitute; (C, L)lnspiR
Pharmaceuticals.PratapChalla,MD: (0)AERIEPharmaceuticals; (S) NationalE~
Institute.GiorgioDoriD,PhD:(E) ~ride.; Corp.James P.DUIUit MD: (C) Alcon
Laboratories,Allerg:m. StevenJ.Gcddc.MD: (L) Lummis. Karl C.Golaik.MD:
(C) AlconLaboratories.Aa1eyaK.oreishi, MD: (C) BauschLomb Surgical,(L)lnspiR
Pharmaceuticals.PaulD.LaDpr.MD: (S) AlconLaboratories.AndreuLauer,MD:
(S)GluoSmithKiine, NationalEyeInstitute.Jc:DDifc:rLee,MD: (C) AlconLaboratories,
BauschLombSurgicalJayM.l.u•tbader,MD: (S)AlconLaboratories; (0) LCAVISion.
DmitryPyab:bky,MD; (C) Allergan.JcmatbanD.Walker,MD:(S) Rcgeneron. DIMdK..
Wallaa:,MD,MPH:(C).Ailerr;an; (L) AlconLaboratories;(S) NationalEyeInstitute,
Researchto PreventBlind.ness. EdwardJ.W1adif,MD:(S) Lion&EyeFoundation.
Thefollowing contributorsstate that theyhave nosignibcant6nancialinterestor
otherrelationship withthe manufacturerofany commercialproductdiscussedintheir
contributionsto this moduleorwiththe manufacturerofanycompetingcommercial
product: MariaM Aaron; MD;RichardM. Ahuja, MD; KeithD. Carte~; MD;Madhuri
Chilakapati,MD;JackA. Cohen,MD,FACS; OscarA. Cruz, MD;J. PaulDiecken.
MD;RobertB. Dinn, MD; Richard A. Harper, MD;Jean Hausheer, MD;EricR. Ho!%,
MD; NatalieC.Ken;MD;AnnaS. K.itzmann, MD;AndrewG. Lee,MD;Yunhee
Lee,MD,MPH;MichaelMahr,MD;JeffreyL.Man., MD; CaseyMic.kler,MD;Frank
Moya,MD;Thomas A.Oetting,MS, MD; Arti Panehal,MD; EnsaK.. Pillow,MD;
PeterA. Quiros, MD;ScottK.Schula,MD;BhavnaP. Sheth,MD;ScottC.Sigler,MD;
TaraUhler,MD; NicholasJ.Volpe,MD;Jake (Evan) L. Waxman,MD; LauraL.Way-
man,MD;SandraM. Woolley,PhD,CPE;Norman A Zabriskie,MD.
C = Consultantfee, paidadvisory boardsorfeesfor attendingameeting.E =Employed
byacommercialentity.L = Lecturefees (honoraria), travelfeesorreimbursement.when
speakingat theinvitati011 ofacommercialSpoDIJO& 0 = EquityO'WllerWp/stoc.koptions.
S=Grantsupportforthe past year(allsources)andallsourcesusedfor thisprojectif
this form isan updatefora specifictalkormanuscriptwith no time limitation.
CopyrightC 2006, 2011 AmericanAcademyofOphthalmolo~. All rights reserved.
Library ofCongress Cataloging-in-PublicationData
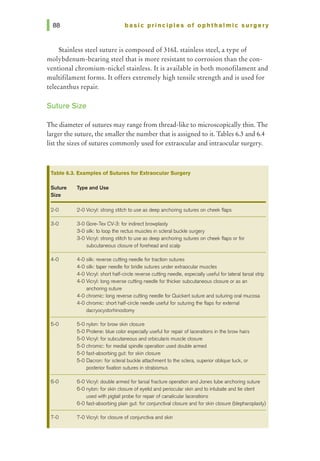
Basic principles ofophthalmic surgeryI Thomas A. Oetting, executive editor.
--2nd ed.
p.;cm.
Includes bibliographical references andindex.
ISBN 978-1-61525-231-2
1. Eye--Surgery. I. Oetting,ThomasA. ll. AmericanAcademyofOphthalmology.
[DNLM: 1. Ophthalmologic Surgical Procedures. 2. EyeDiseases-..,urgery.
WW168]
RE80.B37 2011
617.7'1--dc22 2011012735
Printed in the United States ofAmerica.
14 13 12 11 1 2 34](https://image.slidesharecdn.com/basicprinciplesofophthalmicsurgery-240327213407-1c4f0816/85/Basic-Principles-of-Ophthalmic-Surgery-4-320.jpg)


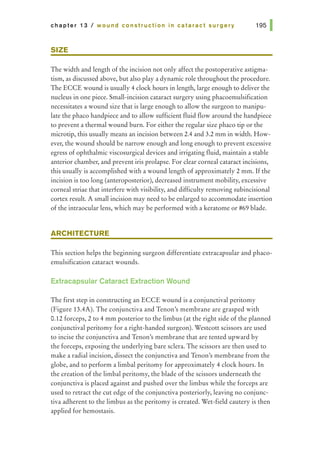
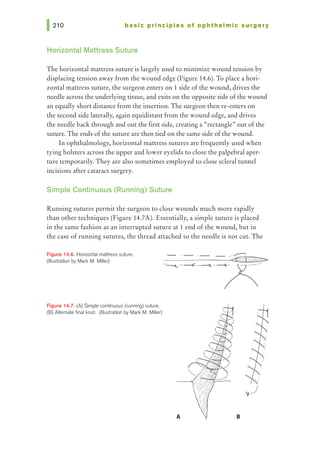
![chapter 1 I patient selection
Ocular Conditions
Specific ocular conditions should also be considered to ensure proper prepa-
ration for surgery. While Table 1.1 lists many of these, some require special
consideration.
Corneal Diseases
Epithelial, stromal, or endothelial disease can all complicate cataract surgery
either by obscuring proper visualization during the procedure or by contrib-
uting to postoperative corneal edema following the surgery. If possible, such
concerns should be addressed prior to or during cataract surgery to provide
the best possible surgical outcomes.
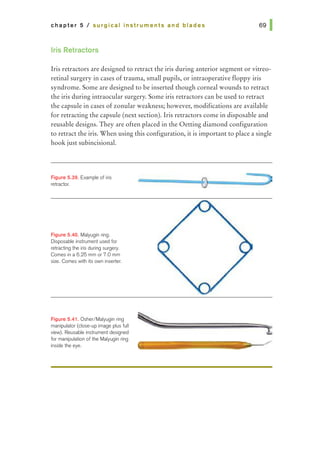
Iris Abnormalities
Any conditions causing poor pupillary dilation (eg, pseudoexfoliation, pos-
terior synechiae, or medications causing intraoperative floppy iris syndrome
[IFIS]) should be noted preoperatively so that they may be addressed, helping
to avoid difficulty with nucleus removal or iris prolapse. Specifically, surgeons
should inquire about the use of systemic a.-1 blockers for the treatment of
urinary symptoms associated with benign prostate hypertrophy. Treatment
options to consider include iris retractors, pupil expansion rings, or viscoelastic
agents that mechanically hold the pupil in position.
Lens Concerns
Extremely dense nuclei, subluxed lens, or phacodonesis can create challenges
during cataract surgery. Proper planning regarding technique (ie, conversion to
extracapsular cataract surgery, posterior approach to cataract removal, place-
ment of capsular tension ring) can prevent intraoperative complications.
ETHICAL CONSIDERATIONS
Informed Consent
Chapter 2 reviews the details of the informed consent process. With regard to
patient selection, however, 3 primary issues apply:
1. The surgeon has the responsibility to determine whether a patient is
able to understand the nature of the procedure and potential risks,
and then to make an autonomous decision whether to proceed. If
the patient is unable to do so, or if uncertainty exists about his or her](https://image.slidesharecdn.com/basicprinciplesofophthalmicsurgery-240327213407-1c4f0816/85/Basic-Principles-of-Ophthalmic-Surgery-23-320.jpg)
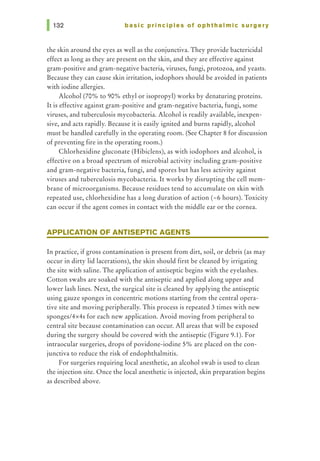
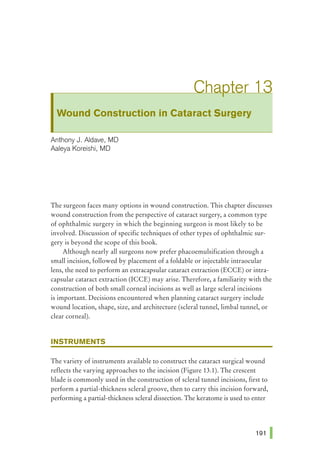
![basic principles of ophthalmic surgery
2. List at least 3 features that a preoperative medical evaluation should
address.
3. The decision to recommend cataract surgery includes consideration of
which of the following factors? (list all that apply)
a. Coexistent macular disease
b. Patient's visual requirements
c. Coexistent corneal disease
d. Family history of macular degeneration
For preferred responses to these questions, see pages 267-268.
SUGGESTED READING
American Academy of Ophthalmology. Communications to the Public
[Advisory Opinion of the Code of Ethics]. San Francisco: American
Academy of Ophthalmology; 2010.
American Academy of Ophthalmology. Ethical Ophthalmologist Series [online
courses]. San Francisco: American Academy of Ophthalmology; 2010.
American Academy of Ophthalmology. Informed Consent [Advisory
Opinion of the Code of Ethics]. San Francisco: American Academy of
Ophthalmology; 2008.
Buratto L, Barboni P, Firrinicieli R. Developments in cataract surgery. In:
Buratto L, Werner L, Zanini M, et al, eds. Phacoemulsification. Principles
and Techniques. 2nd ed. Thorofare, NJ: Slack; 2003.
Durfee DA, ed. Ethics and the American Academy of Ophthalmology. In: The
Profession ofOphthalmology: Practice Management, Ethics, and Advocacy.
San Francisco: American Academy of Ophthalmology; 2010:186-197.
Feldman MA. The ophthalmic patient: medical assessment and management.
In: Gottsch JD, Stark WJ, Goldberg MF, eds. Rob & Smith's Operative
Surgery: Ophthalmic Surgery. 5th ed. New York: Oxford University Press;
1999.
Reiser SJ, Dyck AJ, Curran WJ, eds. Ethics in Medicine: Historical Perspectives
and Contemporary Concerns. Cambridge: MIT Press; 1982.](https://image.slidesharecdn.com/basicprinciplesofophthalmicsurgery-240327213407-1c4f0816/85/Basic-Principles-of-Ophthalmic-Surgery-26-320.jpg)
![chapter 2 I preparation of the patient
Dajani AS, Taubert KA, Wilson W, et al. Prevention of bacterial endocarditis:
recommendations by the American Heart Association. ]AMA.
1997;277:1794-1801.
Durfee DA, ed. Ethics in ophthalmology. In: The Profession ofOphthalmology.
San Francisco: American Academy of Ophthalmology; 2010;174-252.
Kearon C, Hirsh J. Management of anticoagulation before and after elective
surgery. N Englj Med. 1997;336:1506-1511.
Liesegang TJ. Perioperative antibiotic prophylaxis in cataract surgery. Cornea.
1999;18:383-402.](https://image.slidesharecdn.com/basicprinciplesofophthalmicsurgery-240327213407-1c4f0816/85/Basic-Principles-of-Ophthalmic-Surgery-33-320.jpg)

![chapter 3 I preparation of the surgeon
Durfee DA, ed. Ethics in ophthalmology. In: The Profession ofOphthalmology.
2nd ed. San Francisco: American Academy of Ophthalmology; 2010:174-252.
Elman MJ, SugarJ, Fiscella R, et al. The effect of propranolol versus placebo on
resident surgical performance. Trans Am Ophthalmol Soc. 1998;96:283-294.
Girou E, Loyeau S, Legrand P, et al. Efficacy of handrubbing with alcohol
based solution versus standard handwashing with antiseptic soap:
randomized clinical trial. BM]. 2002;325:362-367.
Holmes JM, Toleikis SC, Jay WM. The effect of arm exercise and ocular
massage on postural hand tremor. Ann Ophthalmol 1992;24:156-158.
Humayun MU, Rader RS, Pieramici DJ, et al. Quantitative measurement of
the effects of caffeine and propranolol on surgeon hand tremor. Arch
Ophthalmol. 1997;115:371-374.
Lubahn JD, Dickson BG, Cooney TE. Effect of timolol versus a postural
orthotic on hand tremor during microsurgery. Microsurgery.
2002;22:273-276.
Miirbe D, Hiittenbrink KB, Zahnert T, et al. Tremor in otosurgery: influence
of physical strain on hand steadiness. Otol Neurotol. 2001;22:672-677.
O'Shaughnessy M, O'Malley VP, Corbett G, et al. Optimum duration of
surgical scrub-time. Br] Surg. 1991;78:685--686.
Parienti JJ, Thibon P, Heller R, et al. Handrubbing with an aqueous alcoholic
solution versus traditional surgical hand-scrubbing and 30-day surgical site
infection rates: a randomized equivalence study.]AMA. 2002;288:722-727.
SamkoffJS, Jacques CH. A review of studies concerning effects of
sleep deprivation and fatigue on residents' performance. Acad Med.
1991;66:687-693.
Weinger MB, Ancoli-Israel S. Sleep deprivation and clinical performance.
]AMA. 2002;287:955-957.](https://image.slidesharecdn.com/basicprinciplesofophthalmicsurgery-240327213407-1c4f0816/85/Basic-Principles-of-Ophthalmic-Surgery-41-320.jpg)


![chapter 5 I surgical instruments and blades
SELF-ASSESSMENT TEST
1. Match scissor type with use {list all correct matches):
a. Vannas: suture cutting
b. Corneoscleral: cataract wound
c. Westcott tenotomy: microscopic tenotomy
d. Stevens tenotomy: microscopic tenotomy
2. Match forceps type with use (list all correct matches):
a. Castroviejo 0.12 mm forceps, toothed: corneoscleral tissue
b. Castroviejo 0.12 mm forceps, toothed: fine suture tying
c. Jeweler forceps: suture removal
d. Kelman-McPherson forceps: intraocular lens manipulation
e. Colibri 0.12 mm forceps: corneal transplantation
3. Match instrument with use {list all correct matches):
a. Kuglen hook: iris manipulation
b. Cyclodialysis spatula: sweeping anterior chamber
c. Lens loop: cataract extraction
d. Corneal trephine: excising corneal tissue
4. Match blade with use (list all correct matches):
a. Keratome: phacoemulsification
b. Scleral blade# 57: scleral flap creation
c. Scleral blade # 69: extracapsular cataract incisions
d. Stab knife ("supersharp blade"): anterior chamber entry
For preferred responses to these questions, see pages 267-268.
SUGGESTED READING
About the diamond configuration to retract the iris: T.A. Oetting, L.C. Omphroy.
Modified technique using flexible iris retractors in clear corneal cataract
surgery.] Cataract Refract Surg. 2002;28:596-598.
About the pigtail probe: GraffJM, Allen R. Canalicular laceration-dog bite:
5 y.o. WF presenting with dog bite to left side of face. EyeRounds.org.
http://webeye.ophth.uiowa.edu/eyeforum/cases/case26.htm [access date
February 25, 2011].
About the capsular tension ring: Angunawela RI. Little B. Fish-tail technique for
capsular tension ring insertion.] Cataract Refract Surg. 2007;33:767-769.](https://image.slidesharecdn.com/basicprinciplesofophthalmicsurgery-240327213407-1c4f0816/85/Basic-Principles-of-Ophthalmic-Surgery-97-320.jpg)


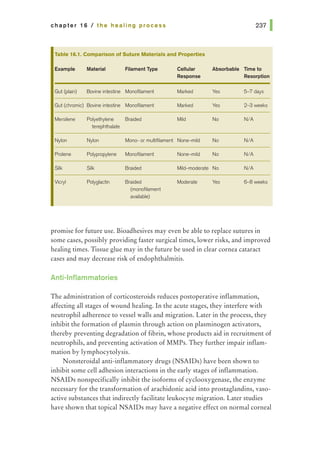
![basic principles of ophthalmic surgery
2. While working on the computer, which of the following is incorrect?
a. If you are using the computer only for a short time, it is acceptable
to twist your trunk so that your arms and legs are not aligned above
one another.
b. The chair height should be adjustable and you should sit back in the
chair and use the backrest.
c. The monitor should be positioned directly in front of your eyes, at
or slightly below the eye height, with the monitor extended an arm's
length away.
d. Place your feet flat on the floor and avoid putting your feet behind
your knees.
3. As a resident, what is the relevancy of understanding ergonomic issues?
a. Survey studies have reported that about 50% of ophthalmologists
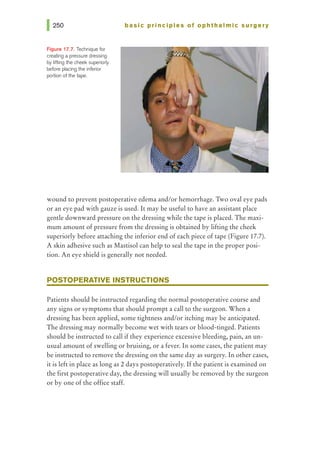
experience or suffer from work-related musculoskeletal disorders.
b. The costs of lost work time due to musculoskeletal disorders can be
significant for the doctor, patients, and the employer.
c. There are some steps one can take to help prevent work-related
musculoskeletal disorders.
d. All of the above.
For preferred responses to these questions, see pages 267-268.
SUGGESTED READING
Ang BO, Monnier A, Harms-Ringdahl K. Neck/shoulder exercise for neck pain
in air force helicopter pilots. Spine. 2009;34:E544-E551.
Board of Certified Professional Ergonomists. Bylaws. www.BCPE.org [accessed
February 15, 2011].
Bongers PM, Kremer AM, ter Laak J. Are psychosocial factors, risk factors for
symptoms and signs of the shoulder, elbow or hand/wrist? a review of the
epidemiological literature. Am]Ind Med. 2002;41:315-342.
Centers for Disease Control and Prevention. Ergonomics and musculoskeletal
disorders. www.cdc.gov/nioshltopics/ergonomics [accessed February 15, 2011].
Chams H, Mohammadi SF, Moayyeri A. Frequency and assortment of self-
reported occupational complaints among Iranian ophthalmologists: a
preliminary survey. MedGenMed. 2004;6:1.
Chengalur SN, Rodgers SH, Bernard TE. Kodak's Ergonomic Design for People
at Work. 2nd ed. Hoboken, NJ: John Wiley & Sons; 2003.](https://image.slidesharecdn.com/basicprinciplesofophthalmicsurgery-240327213407-1c4f0816/85/Basic-Principles-of-Ophthalmic-Surgery-128-320.jpg)
![chapter 7 I the importance of ergonomics
DaCosta BR, Vieira ER. Stretching to reduce work-related musculoskeletal
disorders: a systematic review.] Rehabil Med. 2008;40:321-328.
Dhimitri KC, McGwin G Jr, McNeal SF, et al. Symptoms of musculoskeletal
disorders in ophthalmologists. Am] Ophthalmol. 2005;139:179-181.
Gundewall B, Liljeqvist M, Hansson, T. Primary prevention of back symptoms
and absence from work. A prospective randomized study among hospital
employees. Spine. 1993;18:587-594.
MarxJL, Wertz FD, and Dhimitri KC. Work-related musculoskeletal disorders
in ophthalmologists. Tech Ophthalmol. 2005;3:54-61.
National Institute for Occupational Safety and Health. Elements ofErgonomics
Programs. A Primer Based on Workplace Evaluations ofMusculoskeletal
Disorders. U.S. Department of Health and Human Services CDC DHHS
(NIOSH) Publication No. 97-117.1997.
Occupational Safety & Health Administration. Ergonomics. www.osha.gov/
SLTC/ergonomics [accessed March 1, 2011].
Roach L. Ergonomics, part one: is the job you love a pain in the neck? EyeNet.
www.aao.org/publications/eyenet/200907/practice_perf.cfm [accessed
March 1, 2011].
Roach L. Seven risk factors for injury, and seven solutions: ergonomics, part two.
EyeNet. www.aao.org/aao/publications/eyenet/200909/practice_perf.cfm
[accessed March 1, 2011].
Silverstein B, Clark R. Interventions to reduce work-related musculoskeletal
disorders.] Electromyogr Kinesiol. 2004;14:135-152.
U.S. Department of Labor, Occupational Safety & Health Administration
(OSHA). eTools: Computer Workstation. www.osha.gov/SLTC/etools/
computerworkstations/index.html [accessed March 1, 2011].
U.S. Department of Labor. OSHA proposed rule 64:65768-66078 29 CFR
1910.900. November 14,2000. www.osha.gov/pls/oshaweb/owadisp.
show_document?p_table=FEDERAL_REGISTER&p_id=16305
[accessed March 1, 2011].
U.S. Department of Labor. OSHA Final rule 29 CFR Part 1910. Ergonomics
program. www.osha.gov/pls/oshaweb/owadisp.show_document?p_
table=FEDERAL_REGISTER&p_id=16515 [accessed March 1, 2011].](https://image.slidesharecdn.com/basicprinciplesofophthalmicsurgery-240327213407-1c4f0816/85/Basic-Principles-of-Ophthalmic-Surgery-129-320.jpg)


![chapter 8 I patient safety issues
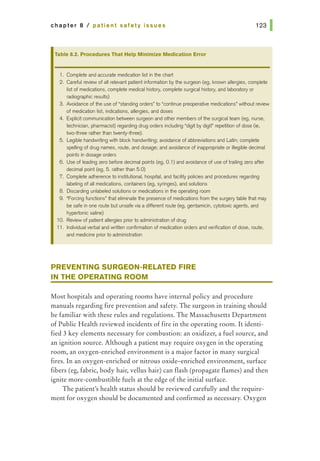
3. Common sources of medication error include (list all that apply)
a. Use of standing preoperative or postoperative orders without
physician review of patient allergies, potential drug interactions, or
duplication of medications
b. Miscommunication between surgeon and other members of the
surgical team (eg, nurse, technician, and pharmacist) regarding
drug orders
c. Patient self-medication in the operating room
d. Illegible handwriting, confusing letters, or incomprehensible verbal
order
e. Confusion between drugs with similar sounding or similar written
names or packaging
4. Combustible substances that may ignite in the operating room include
(list all that apply)
a. Surgical drapes and material
b. Anesthesia masks and tubes
c. Operating room ointments, solvents, and solutions
d. The patient's hair
For preferred responses to these questions, see pages 267-268.
SUGGESTED READING
American Academy of Ophthalmology. Recommendations ofthe American
Academy ofOphthalmology Wrong-Site Task Force. 2008. http://one.aao.
org/CE/PracticeGuidelines/Patient.aspx. Accessed January 25, 2011.
American Academy of Orthopaedic Surgeons and American Association of
Orthopaedic Surgeons. Wrong-Site Surgery [Information Statement].
2010. http://www.aaos.org/about/papers/advistmt/1015.asp. Accessed
January 26, 2011.
American Academy of Orthopaedic Surgeons. Report ofthe Task Force on
Wrong-Site Surgery. Rosemont, IL: American Academy of Orthopaedic
Surgeons; 1998.
Brandt RW. Daily safety for you and your patient. AORN]. 1972;16:64-67.
Brick DC. Risk management lessons from a review of 168 cataract surgery
claims. Surv Ophthalmol. 1999;43:356-360.](https://image.slidesharecdn.com/basicprinciplesofophthalmicsurgery-240327213407-1c4f0816/85/Basic-Principles-of-Ophthalmic-Surgery-143-320.jpg)
![basic principles of ophthalmic surgery
Courtright P, Paton K, McCarthy JM, et al. An epidemiologic investigation of
unexpected refractive errors following cataract surgery. Can] Ophthalmol.
1998;33:210-215.
ECRI. Fire hazard created by misuse of Duraprep solution. Health Devices.
1998;28:286.
ECRI. Fires during surgery of the head and neck area. Health Devices.
1979;9:50-52.
ECRI. Fires from oxygen use during head and neck surgery. Health Devices.
1995;24:155-157.
ECRI. The patient is on fire! A surgical fires primer. Health Devices.
1992;21:19-34.
Ellis JH. Faulty A-scan readings present potential liability. ARGUS 1994.
From OMIC Publication Archives. http://www.omic.com/resources/
risk_man/deskref/clinical/21.cfm. Accessed January 25, 2011.
Institute of Medicine. To Err Is Human: Building a Safer Health System.
Washington, DC: National Academies Press; 2000.
Joint Commission on Accreditation of Healthcare Organizations. Lessons
Learned: Wrong Site Surgery. Sentinel Event Alert [serial online].
August 28, 1998;6. Follow-up alert December 5, 2001. http://www.
jointcommission.org/sentinel_event_alert_issue_6_lessons_learned_
wrong_site_surgery/. Accessed January 26, 2011.
Kohnen S. Postoperative refractive error resulting from incorrectly labeled
intraocular lens power.] Cataract Refract Surg. 2000;26:777-778.
Massachusetts Department of Public Health. Health care quality safety alert:
Preventing operating room fires during surgery. 2002. http://www.mass.
gov/Eeohhs2/docs/dph/quality/healthcare/hospital_alerts_or_fires.pdf.
Accessed January 26, 2011.
Minimizing Medication Errors: Communication about Drug Orders [Patient
Safety Bulletin]. A Joint Statement of the American Academy of
Ophthalmology, the American Society of Ophthalmic Registered Nurses
and the American Association of Eye and Ear Hospitals; 2005. http://one.
aao.org/CE/PracticeGuidelines/Patient.aspx. Accessed January 26, 2011.
Morris R. Wrong power IOL inserted during cataract surgery [serial online].
OMIC Digest. 2000:11. http://www.omic.com/resources/risk_man/
deskref/closedclaim/35.cfm. Accessed January 26, 2011.](https://image.slidesharecdn.com/basicprinciplesofophthalmicsurgery-240327213407-1c4f0816/85/Basic-Principles-of-Ophthalmic-Surgery-144-320.jpg)
![chapter 8 I patient safety issues
Murphy EK. Liability for incorrect intraoperative medications. AORN].
1989;50:1106-1108.
National Patient Safety Foundation. Agenda for Research and Development
in Patient Safety. 2000. http://www.npsf.org/pdf/r/researchagenda.pdf.
Accessed January 26, 2011.
Norrby N, Grossman L, Geraghty E, et al. Accuracy in determining intraocular
lens dioptric power assessed by interlaboratory tests.J Cataract Refract
Surg. 1996;22:983-993.
Olsen T, Olesen H. IOL power mislabeling. Acta Ophthalmol (Copenh).
1993;71:99-102.
Olsen T. Sources of error in intraocular lens power calculation.] Cataract
Refrac Surg. 1992;18:125-129.
Smith HE. The incidence of liability claims in ophthalmology as compared
with other specialties. Ophthalmology. 1990;97:1376--1378.](https://image.slidesharecdn.com/basicprinciplesofophthalmicsurgery-240327213407-1c4f0816/85/Basic-Principles-of-Ophthalmic-Surgery-145-320.jpg)


![basic principles of ophthalmic surgery
4. The sterile field typically includes (list all that apply)
a. The area between the surgeon's waist and shoulders
b. The microscope base
c. The surgical field
d. The underside of the operating table, if above the waist
e. All of the above
5. In intraocular surgeries, the current accepted practice to reduce the rate
of endophthalmitis is
a. Preoperative lash trimming
b. Preoperative saline irrigation
c. Preoperative topical antibiotics
d. Preoperative povidone-iodine
For preferred responses to these questions, see pages 267-268.
SUGGESTED READING
Brunicardi CF, Andersen DK, Billiar TR, et al. Schwartz's Principles ofSurgery.
9th ed. New York: McGraw-Hill Professional; 2009.
Buzard K, Liapis S. Prevention of endophthalmitis.] Cataract Refract Surg.
2004;30:1953-1959.
Ciulla TA, Starr MB, Masket S. Bacterial endophthalmitis prophylaxis for
cataract surgery: an evidence-based update. Ophthalmology. 2002;109:13-26.
Mangram AJ, Horan TC, Pearson ML, et al. Guideline for prevention of
surgical site infection, 1999. Centers for Disease Control and Prevention
(CDC) Hospital Infection Control Practices Advisory Committee. Infect
Control Hosp EpidemioL 1999;20:250-278.
Phillips N. Berry and Kohn's Operating Room Technique. 10th ed. StLouis:
Mosby; 2003.
Phippen MI,Wells MP. Patient Care During Operative and Invasive Procedures.
Philadelphia: Saunders; 2000.
Speaker MG, MenikoffJA. Prophylaxis of endophthalmitis with topical
povidone-iodine. Ophthalmology. 1991;98:1769-1775.](https://image.slidesharecdn.com/basicprinciplesofophthalmicsurgery-240327213407-1c4f0816/85/Basic-Principles-of-Ophthalmic-Surgery-156-320.jpg)

![basic principles of ophthalmic surgery
4. Which of the following would make a patient a poor candidate for
topical anesthesia? (list all that apply)
a. Demented
b. Deaf
c. Strong blink reflex
d. All of the above
5. Which of the following patients should have their ocular procedure
performed under general anesthesia? (list all that apply)
a. 6-month-old infant undergoing strabismus surgery
b. 50-year-old man undergoing a lengthy vitreoretinal procedure
c. 72-year-old woman undergoing cataract surgery after her prior
surgery was cancelled due to a retrobulbar hemorrhage during the
retrobulbar block
d. All of the above
6. During general anesthesia, nitrous oxide should be discontinued at least
20 minutes before injection of C3
F8
or SF6
gas into the vitreous cavity.
(true or false)
7. It is best to avoid a retrobulbar block in highly myopic eyes with a long
axial length. (true or false)
For preferred responses to these questions, see pages 267-268.
SUGGESTED READING
Ahn JC, Stanley JA. Subarachnoid injection as a complication of retrobulbar
anesthesia. Am] Ophthalmol. 1987;103:225-230.
Britton B, Hervey R, Kasten K, et al. Intraocular irritation evaluation of
benzalkonium chloride in rabbits. Ophthalmic Surg. 1976;7:46-55.
Donlon JV. Anesthesia for ophthalmic surgery. In: Albert DM, Jakobiec
FA, et al, eds. Principles and Practice ofOphthalmology. Philadelphia:
Saunders; 1994: v 5, chap 231.
Duker JS, BelmontJB, Benson WE, et al. Inadvertent globe perforations
during retrobulbar and peribulbar anesthesia. Patient characteristics,
surgical management, and visual outcome. Ophthalmology.
1991;98:519-526.](https://image.slidesharecdn.com/basicprinciplesofophthalmicsurgery-240327213407-1c4f0816/85/Basic-Principles-of-Ophthalmic-Surgery-176-320.jpg)
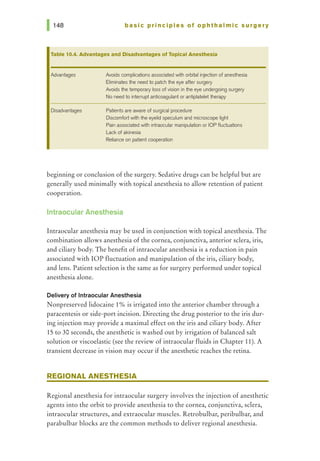
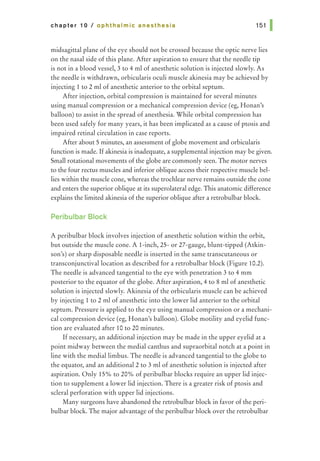
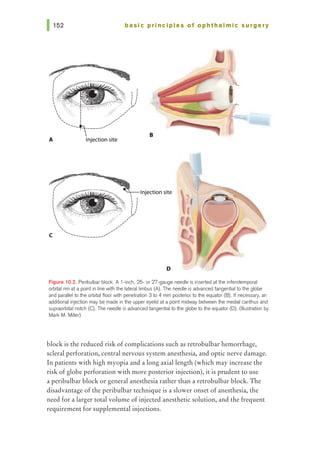
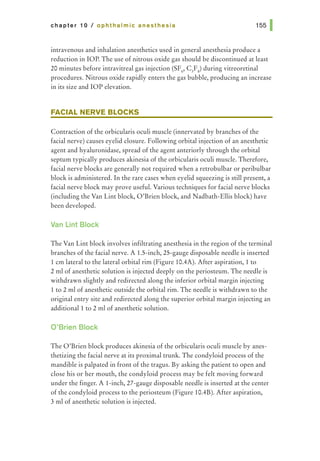
![chapter 10 I ophthalmic anesthesia 161 1
Fanning GL. Monitored sedation for ophthalmic surgery. In: Kumar CM,
Dodds C, Fanning GL, eds. Ophthalmic Anesthesia. Lisse, Netherlands:
Swets & Zeitlinger; 2002: chap 8.
Fraser SG, Siriwadena D, Jamieson H, et al. Indicators of patient suitability for
topical anesthesia.] Cataract Refract Surg. 1997;23:781-783.
Hamilton RC, Gimbel HV, Strunin L. Regional anaesthesia for 12,000 cataract
extraction and intraocular lens implantation procedures. CanJAnaesth.
1988;35:615-623.
Katsev DA, Drews RC, Rose BT. An anatomic study of retrobulbar needle
path length. Ophthalmology. 1989;96:1221-1224.
Lynch S, Wolf GL, Berlin I. General anesthesia for cataract surgery: a comparative
review of 2217 consecutive cases. Anesth Analg. 1974;53:909-913.
Morgan CM, Schatz H, Vine AK, et al. Ocular complications associated with
retrobulbar injections. Ophthalmology. 1988;95:660-665.
NicollJM, Acharya PA, Ahlen K, et al. Central nervous system complications
after 6000 retrobulbar blocks. Anesth Analg. 1987;66:1298-1302.
Rainin EA, Carlson BM. Postoperative diplopia and ptosis. A clinical
hypothesis based on the myotoxicity of local anesthetics. Arch
Ophthalmol. 1985;103:1337-1339.
Rosenthal KJ. Deep, topical, nerve-block anesthesia.] Cataract Refract Surg.
1995;21:499-503.
Stead SW, Miller KM. Anesthesia for ophthalmic surgery. In: Spaeth GL, ed.
Ophthalmic Surgery: Principles and Practice. Philadelphia: Saunders; 2003:
chap 2.
Unsold R, Stanley JA, DeGroot J. The CT-topography of retrobulbar
anesthesia. Anatomic-clinical correlation of complications and suggestion
of a modified technique. Albrecht von Graefes Arch Klin Exp Ophthalmol.
1981;217:125-136.](https://image.slidesharecdn.com/basicprinciplesofophthalmicsurgery-240327213407-1c4f0816/85/Basic-Principles-of-Ophthalmic-Surgery-177-320.jpg)


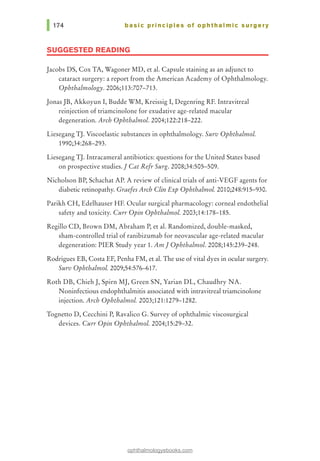
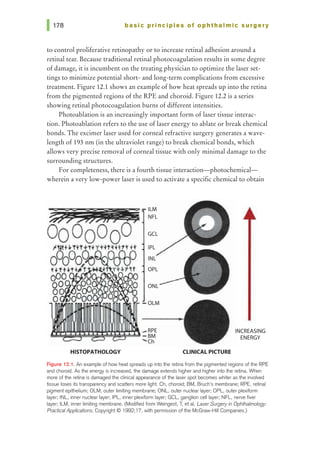
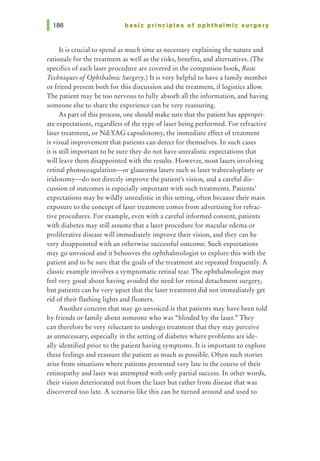
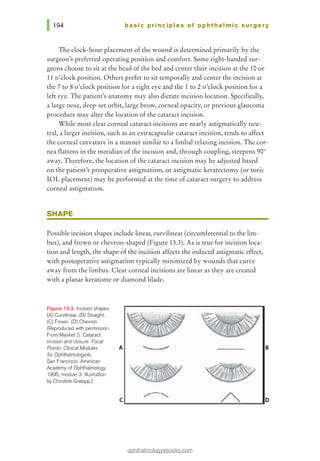

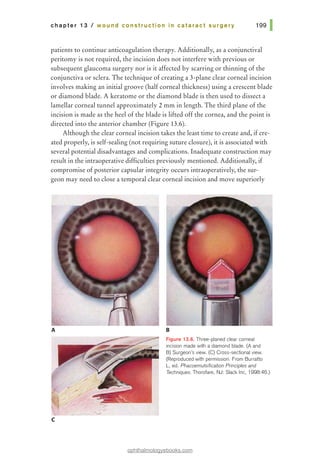

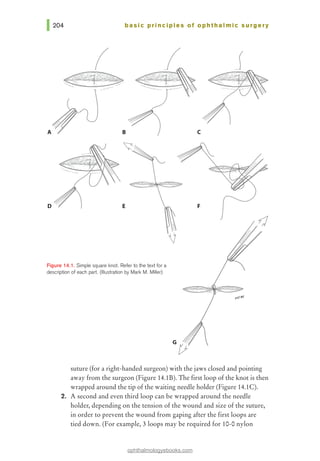
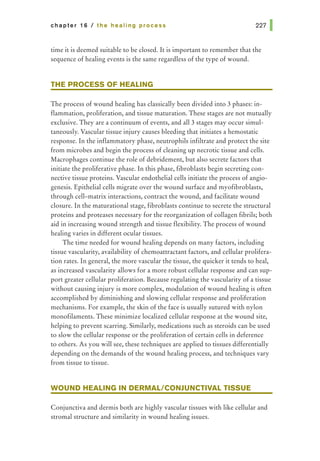
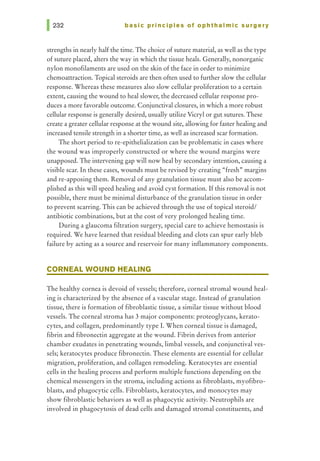
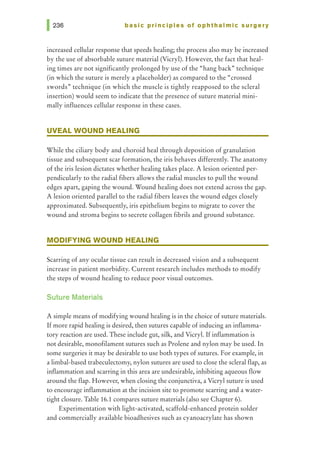
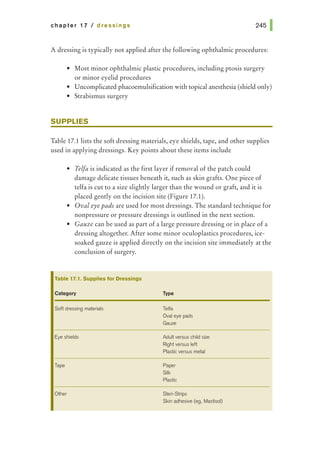
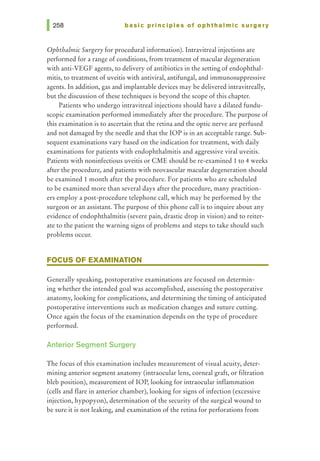
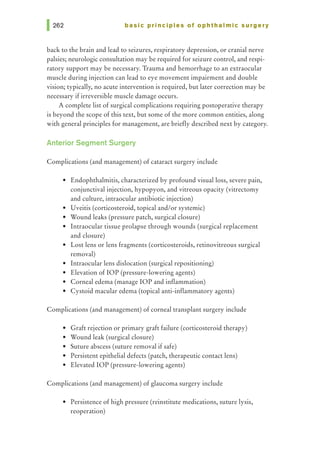
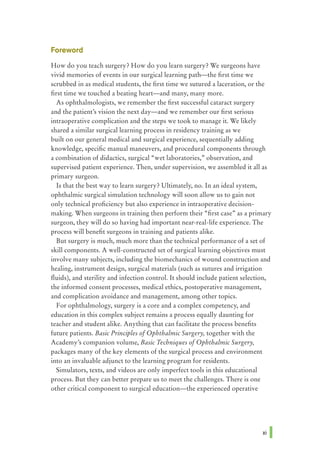
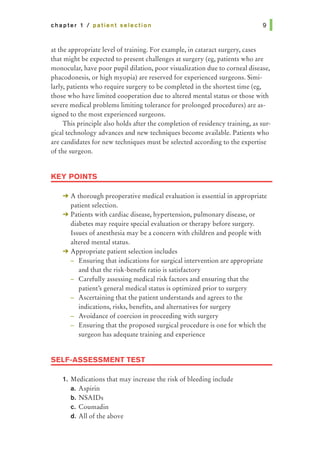
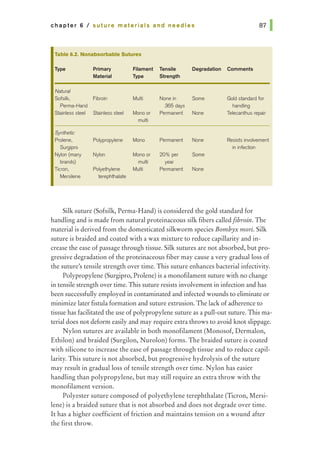
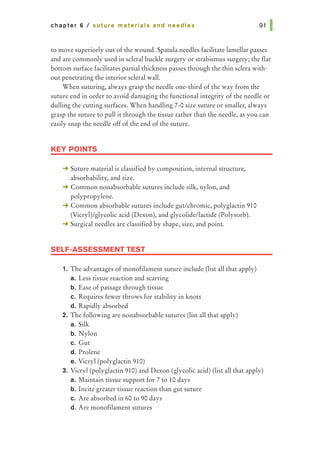
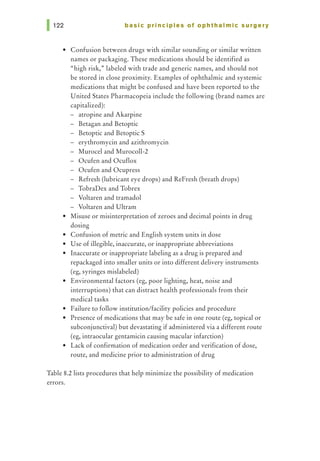
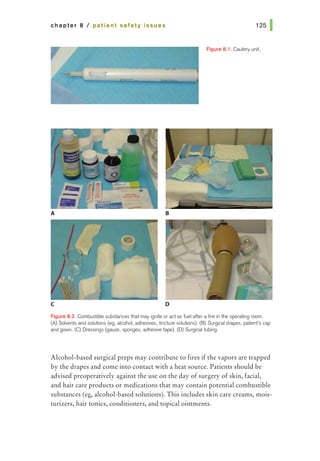
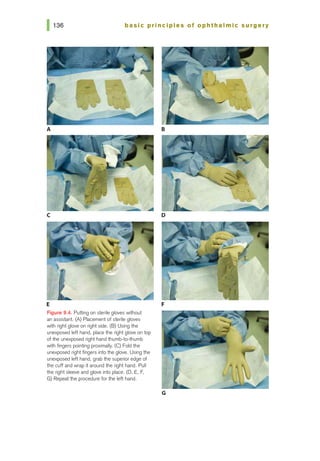
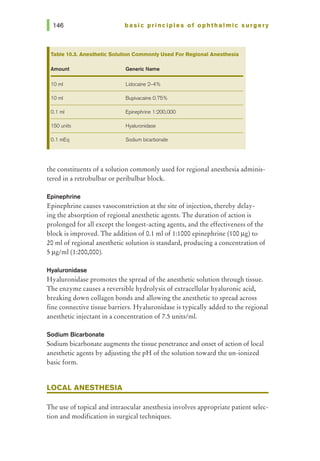
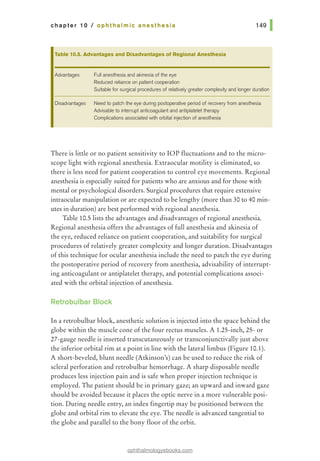
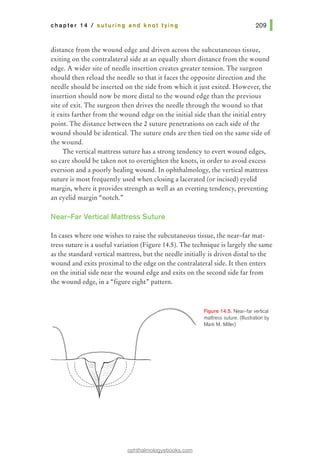
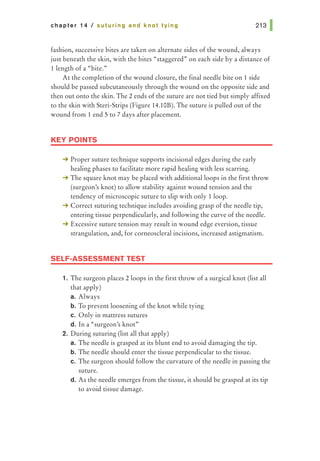
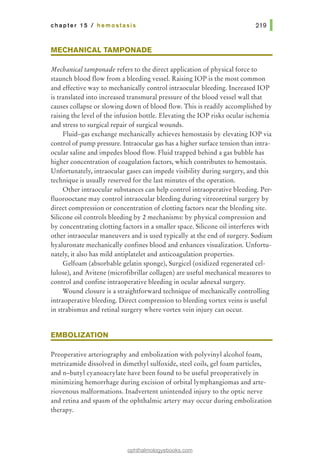
![Figure 14.3. Simple interrupted
suture. (Illustration by Mark M.
Miller)
basic principles of ophthalmic surgery
1/2 1/2
r--------------------v-------------------~
:
1
___ ]1!____ :1 ~ I
I 1 II I
11 1 II I
II I II I
II 1 II I
~ " I
~~
'
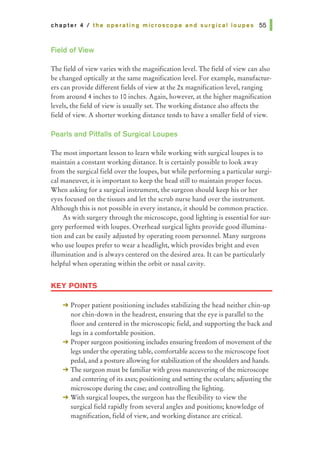
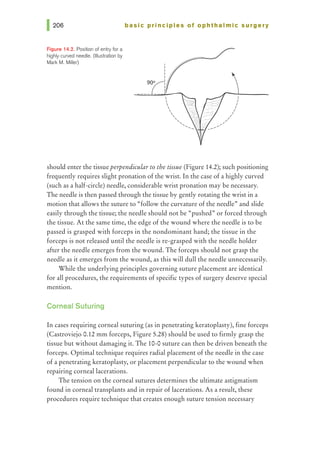
tissue at the opposite side of the wound. Care should be taken to pass the
needle at equal depths on both sides of the wound and equidistant from both
sides of the wound edge (Figure 14.3). The needle can be passed across the
wound in 1 bite or, if the pass is difficult, the needle can be re-grasped after
passing through the initial side of the wound and passed through the opposite
side of the wound in a second bite. Square knots are then placed and the ends
of the suture are cut; when wound closure is complete, the knots are rotated to
the same side of the wound.
Enough interrupted sutures are placed to create adequate strength for secure
wound closure. Generally, the first suture is placed in the center of the wound,
and each subsequent suture splits the remaining open portion of the wound in
half until closure is achieved.
Vertical Mattress Suture
When greater support is needed to close a wound, vertical mattress su-
tures may be employed (Figure 14.4). The needle should be inserted a short
Figure 14.4. (A) Vertical mattress
sutures may be used to close a
wound when greater support is
needed. (B) The suture ends are
tied on the same side of the wound.
(Illustration by Mark M. Miller)
B
.
I
'
'' ' ..........___
----.........
/
"
I
/
I
I
I](https://image.slidesharecdn.com/basicprinciplesofophthalmicsurgery-240327213407-1c4f0816/85/Basic-Principles-of-Ophthalmic-Surgery-224-320.jpg)

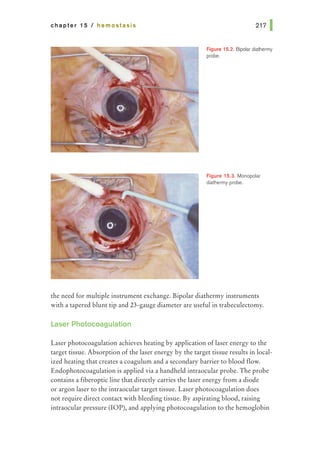

![chapter 15 I hemostasis
Jordan DR, Anderson RL. Carbon dioxide laser therapy for conjunctival
lymphangioma. Ophthalmic Surg. 1987;18:728-730.
221 1
Kim SH, Cho YS, Choi YJ. Intraocular hemocoagulase in human vitrectomy.
]pnJ Ophthalmol. 1994;38:49-55.
Leone CR Jr. Gelfoam-thrombin dacryocystorhinostomy stent. AmJ
Ophthalmol. 1982;94:412-413.
Mannis MJ, Sweet E, Landers MB, et al. Uses of thrombin in ocular surgery.
Arch Ophthalmol. 1988;106:251-253.
Maxwell DP Jr, Orlick ME, Diamond JG. Intermittent intraocular thrombin as
an adjunct to vitrectomy. Ophthalmic Surg. 1989;20:108-111.
Rothkoff L, Biedner B, Shoham K. Bilateral cataract extraction in classic
haemophilia with retrobulbar anaesthesia and peripheral iridectomy.
Br] Ophthalmol. 1977;61:765-766.
Shields BM. Evaluation of a tapered, blunt, bipolar cautery tip for
trabeculectomy. Ophthalmic Surg. 1994;25:54-56.
Verdoorn C, Hendrikse F. Intraocular human thrombin infusion in diabetic
vitrectomies. Ophthalmic Surg. 1989;20:278-279.
Wesley JR, Wesley RE. A study of the lethal effects of intravenous injection of
thrombin in rabbits. Ann Ophthalmol. 1990;22:457-459.
Wesley RE. Techniques in Ophthalmic Plastic Surgery. New York: John Wiley
& Sons; 1986:231.](https://image.slidesharecdn.com/basicprinciplesofophthalmicsurgery-240327213407-1c4f0816/85/Basic-Principles-of-Ophthalmic-Surgery-237-320.jpg)