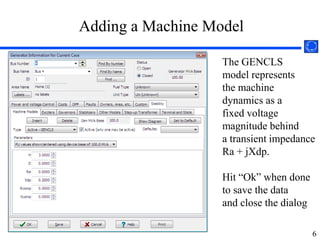
Quick Start for Using PowerWorld Simulator with Transient StabilityThomas J. OverbyeFox Family Professor of Electrical and Computer EngUniversity of Illinois at Urbana-Champaignoverbye@illinois.eduJamie WeberPowerWorld Corporationweber@powerworld.com
OverviewThe purpose of these slides are to provide a quick introduction to the new PowerWorld Simulator transient stability capabilities.
The slides are designed for people who already know how to use PowerWorld Simulator for power flow studies, and also have at least some familiarity with transient stability
To get users up to speed on PowerWorld Simulator's basic, non-transient stability functions, we have made free on-line training videos and slides available athttp://www.powerworld.com/services/webtraining.asp2
GoalThe goal of these slides is to give you a quick introduction to the new transient stability function in PowerWorld Simulator
The training philosophy is “learning by doing”
The slides do not provide a comprehensive description of all the PowerWorld Simulator transient stability capabilities, nor do they provide comprehensive coverage of the transient stability problem.
Slides are designed for use with the version 15 beta
This is not the final version 15 release, so bug reports and feature enhancements are encourage (see last slide for details) 3
From Power Flow to Transient StabilityWith PowerWorld Simulator a power flow case can be quickly transformed into a transient stability case
This requires the addition of at least one dynamic model
PowerWorld Simulator supports more than one hundred different dynamic models.  These slides cover just a few of them
Default values are provided for most models allowing easy experimentation
Creating a new transient stability case from a power flow case would usually only be done for training/academic purposes; for commercial studies the dynamic models from existing datasets would be used.  Use the application button and select “Load Transient Stability Data” to load in an existing dataset.4
First Example CaseOpen the case Example_13_4_NoModels
Add a dynamic generator model to an existing “no model” power flow case by:
In run mode, right-click on the generator symbol for bus 4, then select “Generator Information Dialog” from the local menu
This displays the Generator Information Dialog, select the “Stability” tab to view the transient stability models; none are initially defined.
Select the “Machine models” tab to enter a dynamic machine model for the generator at bus 4.  Click “Insert” to enter a machine model.  From the Model Type list select GENCLS, which represents a simple “Classical” machine model.  Use the default values.  Values are per unit using the generator MVA base.5
Adding a Machine ModelThe GENCLS model representsthe machinedynamics as afixed voltagemagnitude behinda transient impedanceRa + jXdp.Hit “Ok” when done to save the data and close the dialog6
Transient Stability Form OverviewMost of the PowerWorld Simulator transient stability functionality is accessed using the Transient Stability Analysis form.  To view this form, from the ribbon select “Add Ons”, “Transient Stability”
Key pages of form for quick start examples (listed under “Select Step”)
Simulation page: Used for specifying the starting and ending time for the simulation, the time step, defining the transient stability fault (contingency) events, and running the simulation
Options: Various options associated with transient stability
Result Storage: Used to specify the fields to save and where
Plots: Used to plot results
Results: Used to view the results (actual numbers, not plots)7
Transient Stability Analysis Form8
Infinite Bus ModelingBefore doing our first transient stability run, it is useful to discuss the concept of an infinite bus.  An infinite bus is assumed to have a fixed voltage magnitude and angle; hence its frequency is also fixed at the nominal value.
In real systems infinite buses obviously do not exist, but they can be a useful concept when learning about transient stability.
By default PowerWorld Simulator does NOT treat the slack bus as an infinite bus, but does provide this as an option.
For this first example we will use the option to treat the slack bus as an infinite bus.  To do this select “Options” from the “Select Step” list.  This displays the option page.  Select the “Power System Model” tab, and then set Infinite Bus Modeling to “Model the power flow slack bus(es) as infinite buses” if it is not already set to do so.  9
Transient Stability Analysis Options PagePowerSystemModel PageInfiniteBusModelingThis page is also used to specify the nominal system frequency10
Specifying the Fault EventTo specify the transient stability contingency go back to the “Simulation” page and click on the “Insert Elements” button.  This displays the Transient Stability Contingency Element Dialog, which is used to specify the events that occur during the transient stability study.
The event for this example will be a self-clearing, balanced 3-phase, solid (no impedance) fault at bus 1, starting at time = 1.00 seconds, and clearing at time = 1.05 seconds.
For the first action just choose all the defaults and select “Insert.”  Insert will add the action but not close the dialog.
For the second action simply change the Time to 1.05 seconds, and change the Type to “Clear Fault.”  Select “OK,” which saves the action and closes the dialog.  11
Inserting Transient Stability Contingency ElementsClick toinsertnewelementsSummaryof allelementsin contingencyand time ofactionRight click hereAnd select “show dialog”To reopen this Dialog boxAvailable element type will vary with different objects12
Determining the Results to View AfterwardFor large cases, transient stability solutions can generate huge amounts of data.  PowerWorld Simulator provides easy ways to choose which fields to save for later viewing.  These choices can be made on the “Result Storage” page.
For this example we’ll save the generator 4 rotor angle, speed, MW terminal power and Mvar terminal power.
From the “Result Storage” page, select the generator tab and double click on the specified fields to set their values to “Yes”. 13
Result Storage PageResultStoragePageGeneratorTabDouble Click on Fields (which sets them to yes) to Store Their Values14
Saving Changes and Doing First SimulationThe last step before doing the run is to specify an ending time for the simulation, and a time step.
Go to the “Simulation” page, verify that the end time is 5.0 seconds, and that the Time Step is 0.5 cycles
PowerWorld Simulator allows the time step to be specified in either seconds or cycles, with 0.5 cycles recommended.
Before doing your first simulation, save all the changes made so far by using the main PowerWorld Simulator Ribbon, select “Save Case As” with a name of “Example_13_4_WithCLSModel_ReadyToRun”
Click on “Run Transient Stability” to solve.15
Running the Transient Stability SimulationClickto runthe specifiedcontingencyOnce the contingency runs the “Results” page may be opened16
Transient Stability ResultsOnce the transient stability run finishes, the “Results” page provides both a minimum/maximum summary of values from the simulation, and time step values for the fields selected to view.
The Time Values and Minimum/Maximum Values tabs display standard PowerWorld Simulator case information displays, so the results can easily be transferred to other programs (such as Excel) by right-clicking on a field and selecting “Copy/Paste/Send”  17
Results: Minimum/Maximum ValuesMinimumand maximumvalues areavailablefor allgeneratorsand buses18
Time Value ResultsLots ofoptionsareavailablefor showingand filteringthe results.  By default the results are shown for each time step.  Results can be savedsaved every “n” timesteps using an option on the Options, General page19
Quickly Plotting ResultsTime value results can be quickly plotted by using the standard case information display plotting capability.
Right-click on the desired column
Select Plot Columns
Use the Column Plot Dialog to customize the results.
Right-click on the plot to save, copy or print it.
More comprehensive plotting capability is provided using the Transient Stability “Plots” page; this will be discussed later.   20
Generator 4 Rotor Angle Column PlotChange line color hereAnd re-plot by clickinghereStarting the event at t = 1.0 seconds allows for verification of an initially stable operating point.  The small angle oscillation indicates the system is stable, although undamped.   21
Changing the CasePowerWorld Simulator allows for easy modification of the study system.  As a next example we will duplicate example 13.4 from earlier editions of the Glover/Sarma Power System Analysis and Design Book.
Back on the one-line, right-click on the generator and use the Stability/Machine models page to change the Xdp field from 0.2 to 0.3 per unit.
On the Transient Stability Simulation page, change the contingency to be a solid three phase fault at Bus 3, cleared by opening both the line between buses 1 and 3 and the line between buses 2 and 3 at time = 1.34 seconds. 22
Changing the Case: Setting up Contingency ElementsChange object type to AC Line/Transformer, select the right line,and change the element type to “Open”.
Changing the Case: Setting up Contingency ElementsContingency Elements displays should eventually look like this.  Note fault is at bus 3, not at bus 1.24
Glover/Sarma Example 13.4 Case: Generator 4 Rotor Angle Plot - On the Verge of InstabilityResulting plot should look like this.25
More Realistic Generator ModelsWhile the classical model is widely used in academic settings because of its simplicity, it is not recommended for actual power system studies.

PowerWorld 15. Transient Stability Quickstart

  • 1.
    Quick Start forUsing PowerWorld Simulator with Transient StabilityThomas J. OverbyeFox Family Professor of Electrical and Computer EngUniversity of Illinois at Urbana-Champaignoverbye@illinois.eduJamie WeberPowerWorld Corporationweber@powerworld.com
  • 2.
    OverviewThe purpose ofthese slides are to provide a quick introduction to the new PowerWorld Simulator transient stability capabilities.
  • 3.
    The slides aredesigned for people who already know how to use PowerWorld Simulator for power flow studies, and also have at least some familiarity with transient stability
  • 4.
    To get usersup to speed on PowerWorld Simulator's basic, non-transient stability functions, we have made free on-line training videos and slides available athttp://www.powerworld.com/services/webtraining.asp2
  • 5.
    GoalThe goal ofthese slides is to give you a quick introduction to the new transient stability function in PowerWorld Simulator
  • 6.
    The training philosophyis “learning by doing”
  • 7.
    The slides donot provide a comprehensive description of all the PowerWorld Simulator transient stability capabilities, nor do they provide comprehensive coverage of the transient stability problem.
  • 8.
    Slides are designedfor use with the version 15 beta
  • 9.
    This is notthe final version 15 release, so bug reports and feature enhancements are encourage (see last slide for details) 3
  • 10.
    From Power Flowto Transient StabilityWith PowerWorld Simulator a power flow case can be quickly transformed into a transient stability case
  • 11.
    This requires theaddition of at least one dynamic model
  • 12.
    PowerWorld Simulator supportsmore than one hundred different dynamic models. These slides cover just a few of them
  • 13.
    Default values areprovided for most models allowing easy experimentation
  • 14.
    Creating a newtransient stability case from a power flow case would usually only be done for training/academic purposes; for commercial studies the dynamic models from existing datasets would be used. Use the application button and select “Load Transient Stability Data” to load in an existing dataset.4
  • 15.
    First Example CaseOpenthe case Example_13_4_NoModels
  • 16.
    Add a dynamicgenerator model to an existing “no model” power flow case by:
  • 17.
    In run mode,right-click on the generator symbol for bus 4, then select “Generator Information Dialog” from the local menu
  • 18.
    This displays theGenerator Information Dialog, select the “Stability” tab to view the transient stability models; none are initially defined.
  • 19.
    Select the “Machinemodels” tab to enter a dynamic machine model for the generator at bus 4. Click “Insert” to enter a machine model. From the Model Type list select GENCLS, which represents a simple “Classical” machine model. Use the default values. Values are per unit using the generator MVA base.5
  • 20.
    Adding a MachineModelThe GENCLS model representsthe machinedynamics as afixed voltagemagnitude behinda transient impedanceRa + jXdp.Hit “Ok” when done to save the data and close the dialog6
  • 21.
    Transient Stability FormOverviewMost of the PowerWorld Simulator transient stability functionality is accessed using the Transient Stability Analysis form. To view this form, from the ribbon select “Add Ons”, “Transient Stability”
  • 22.
    Key pages ofform for quick start examples (listed under “Select Step”)
  • 23.
    Simulation page: Usedfor specifying the starting and ending time for the simulation, the time step, defining the transient stability fault (contingency) events, and running the simulation
  • 24.
    Options: Various optionsassociated with transient stability
  • 25.
    Result Storage: Usedto specify the fields to save and where
  • 26.
    Plots: Used toplot results
  • 27.
    Results: Used toview the results (actual numbers, not plots)7
  • 28.
  • 29.
    Infinite Bus ModelingBeforedoing our first transient stability run, it is useful to discuss the concept of an infinite bus. An infinite bus is assumed to have a fixed voltage magnitude and angle; hence its frequency is also fixed at the nominal value.
  • 30.
    In real systemsinfinite buses obviously do not exist, but they can be a useful concept when learning about transient stability.
  • 31.
    By default PowerWorldSimulator does NOT treat the slack bus as an infinite bus, but does provide this as an option.
  • 32.
    For this firstexample we will use the option to treat the slack bus as an infinite bus. To do this select “Options” from the “Select Step” list. This displays the option page. Select the “Power System Model” tab, and then set Infinite Bus Modeling to “Model the power flow slack bus(es) as infinite buses” if it is not already set to do so. 9
  • 33.
    Transient Stability AnalysisOptions PagePowerSystemModel PageInfiniteBusModelingThis page is also used to specify the nominal system frequency10
  • 34.
    Specifying the FaultEventTo specify the transient stability contingency go back to the “Simulation” page and click on the “Insert Elements” button. This displays the Transient Stability Contingency Element Dialog, which is used to specify the events that occur during the transient stability study.
  • 35.
    The event forthis example will be a self-clearing, balanced 3-phase, solid (no impedance) fault at bus 1, starting at time = 1.00 seconds, and clearing at time = 1.05 seconds.
  • 36.
    For the firstaction just choose all the defaults and select “Insert.” Insert will add the action but not close the dialog.
  • 37.
    For the secondaction simply change the Time to 1.05 seconds, and change the Type to “Clear Fault.” Select “OK,” which saves the action and closes the dialog. 11
  • 38.
    Inserting Transient StabilityContingency ElementsClick toinsertnewelementsSummaryof allelementsin contingencyand time ofactionRight click hereAnd select “show dialog”To reopen this Dialog boxAvailable element type will vary with different objects12
  • 39.
    Determining the Resultsto View AfterwardFor large cases, transient stability solutions can generate huge amounts of data. PowerWorld Simulator provides easy ways to choose which fields to save for later viewing. These choices can be made on the “Result Storage” page.
  • 40.
    For this examplewe’ll save the generator 4 rotor angle, speed, MW terminal power and Mvar terminal power.
  • 41.
    From the “ResultStorage” page, select the generator tab and double click on the specified fields to set their values to “Yes”. 13
  • 42.
    Result Storage PageResultStoragePageGeneratorTabDoubleClick on Fields (which sets them to yes) to Store Their Values14
  • 43.
    Saving Changes andDoing First SimulationThe last step before doing the run is to specify an ending time for the simulation, and a time step.
  • 44.
    Go to the“Simulation” page, verify that the end time is 5.0 seconds, and that the Time Step is 0.5 cycles
  • 45.
    PowerWorld Simulator allowsthe time step to be specified in either seconds or cycles, with 0.5 cycles recommended.
  • 46.
    Before doing yourfirst simulation, save all the changes made so far by using the main PowerWorld Simulator Ribbon, select “Save Case As” with a name of “Example_13_4_WithCLSModel_ReadyToRun”
  • 47.
    Click on “RunTransient Stability” to solve.15
  • 48.
    Running the TransientStability SimulationClickto runthe specifiedcontingencyOnce the contingency runs the “Results” page may be opened16
  • 49.
    Transient Stability ResultsOncethe transient stability run finishes, the “Results” page provides both a minimum/maximum summary of values from the simulation, and time step values for the fields selected to view.
  • 50.
    The Time Valuesand Minimum/Maximum Values tabs display standard PowerWorld Simulator case information displays, so the results can easily be transferred to other programs (such as Excel) by right-clicking on a field and selecting “Copy/Paste/Send” 17
  • 51.
    Results: Minimum/Maximum ValuesMinimumandmaximumvalues areavailablefor allgeneratorsand buses18
  • 52.
    Time Value ResultsLotsofoptionsareavailablefor showingand filteringthe results. By default the results are shown for each time step. Results can be savedsaved every “n” timesteps using an option on the Options, General page19
  • 53.
    Quickly Plotting ResultsTimevalue results can be quickly plotted by using the standard case information display plotting capability.
  • 54.
    Right-click on thedesired column
  • 55.
  • 56.
    Use the ColumnPlot Dialog to customize the results.
  • 57.
    Right-click on theplot to save, copy or print it.
  • 58.
    More comprehensive plottingcapability is provided using the Transient Stability “Plots” page; this will be discussed later. 20
  • 59.
    Generator 4 RotorAngle Column PlotChange line color hereAnd re-plot by clickinghereStarting the event at t = 1.0 seconds allows for verification of an initially stable operating point. The small angle oscillation indicates the system is stable, although undamped. 21
  • 60.
    Changing the CasePowerWorldSimulator allows for easy modification of the study system. As a next example we will duplicate example 13.4 from earlier editions of the Glover/Sarma Power System Analysis and Design Book.
  • 61.
    Back on theone-line, right-click on the generator and use the Stability/Machine models page to change the Xdp field from 0.2 to 0.3 per unit.
  • 62.
    On the TransientStability Simulation page, change the contingency to be a solid three phase fault at Bus 3, cleared by opening both the line between buses 1 and 3 and the line between buses 2 and 3 at time = 1.34 seconds. 22
  • 63.
    Changing the Case:Setting up Contingency ElementsChange object type to AC Line/Transformer, select the right line,and change the element type to “Open”.
  • 64.
    Changing the Case:Setting up Contingency ElementsContingency Elements displays should eventually look like this. Note fault is at bus 3, not at bus 1.24
  • 65.
    Glover/Sarma Example 13.4Case: Generator 4 Rotor Angle Plot - On the Verge of InstabilityResulting plot should look like this.25
  • 66.
    More Realistic GeneratorModelsWhile the classical model is widely used in academic settings because of its simplicity, it is not recommended for actual power system studies.