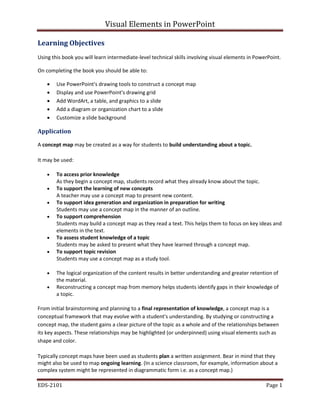
1. Visual Elements in PowerPoint
EDS-2101 Page 1
Learning Objectives
Using this book you will learn intermediate-level technical skills involving visual elements in PowerPoint.
On completing the book you should be able to:
īˇ Use PowerPoint's drawing tools to construct a concept map
īˇ Display and use PowerPoint's drawing grid
īˇ Add WordArt, a table, and graphics to a slide
īˇ Add a diagram or organization chart to a slide
īˇ Customize a slide background
Application
A concept map may be created as a way for students to build understanding about a topic.
It may be used:
īˇ To access prior knowledge
As they begin a concept map, students record what they already know about the topic.
īˇ To support the learning of new concepts
A teacher may use a concept map to present new content.
īˇ To support idea generation and organization in preparation for writing
Students may use a concept map in the manner of an outline.
īˇ To support comprehension
Students may build a concept map as they read a text. This helps them to focus on key ideas and
elements in the text.
īˇ To assess student knowledge of a topic
Students may be asked to present what they have learned through a concept map.
īˇ To support topic revision
Students may use a concept map as a study tool.
īˇ The logical organization of the content results in better understanding and greater retention of
the material.
īˇ Reconstructing a concept map from memory helps students identify gaps in their knowledge of
a topic.
From initial brainstorming and planning to a final representation of knowledge, a concept map is a
conceptual framework that may evolve with a student's understanding. By studying or constructing a
concept map, the student gains a clear picture of the topic as a whole and of the relationships between
its key aspects. These relationships may be highlighted (or underpinned) using visual elements such as
shape and color.
Typically concept maps have been used as students plan a written assignment. Bear in mind that they
might also be used to map ongoing learning. (In a science classroom, for example, information about a
complex system might be represented in diagrammatic form i.e. as a concept map.)
2. Visual Elements in PowerPoint
EDS-2101 Page 2
As students learn more about a topic, they may add to their original concept map, addressing new
understandings with new diagram components.
A concept map is typically prepared as part of the process of developing an information product. The
student decides how best to convey his / her knowledge then applies design principles to maximize
communication.
Scenario
Mr. Allen's class is undertaking a course in recycling. In preparation for creating an information
presentation, students construct a concept map about the recycling of waste products.
Note: The example used in this book is generic and easily understood. As you work through the book,
focus on understanding the technical skills involved. Also, and very important, choose colors
(background and font) and other visual elements that are readable, hence making the slide show
accessible to a wider audience. Soon after, consider the possible curriculum applications relevant to
your subject area.
Create a Concept Map
Concept Map
A concept map allows a student to visually organize information. In its simplest form, it is made up of
shapes, lines and text. Two examples are pictured below.
3. Visual Elements in PowerPoint
EDS-2101 Page 3
Getting Started
1. Start PowerPoint
2. Save your presentation as âVisualElements_FN_LN.pptxâ (FN is your first name, LN is your last
name)
Grid and Guides
You are going to use the drawing grid to make it easy to align shapes. To activate the drawing grid:
1. On the View tab, in the Show/Hide group, make sure that Gridlines is checked.
2. You want objects to align themselves with the grid. To enable this:
3. On the Home tab, in the Drawing group, click Arrange, then Align, then Grid Settings
4. In the Grid and Guides dialog box, in the Snap to section, make sure that Snap objects to grid and
Snap objects to other objects is checked.
5. Click OK.
4. Visual Elements in PowerPoint
EDS-2101 Page 4
If you choose to view the grid on the screen, the slide will look like this:
Shapes
Draw a Shape
You are going to draw the first shape of your concept map.
First change your layout
1. On the Home tab, choose Layout, then Choose Blank
2. On the Home tab in the Drawing group, click the More down arrow, then click the Diamond shape.
3. Click and drag to draw the diamond on the slide.
Tip: To maintain a shape's proportions while resizing it, on the keyboard, hold down Shift and drag a
corner sizing handle.
Format a Shape
1. Select the diamond.
5. Visual Elements in PowerPoint
EDS-2101 Page 5
2. On the Format tab, in the Shape Styles group, click the More down arrow, then choose a visual
style.
Customize Visual Style
You can customize the visual style of the shape by using the Shape Fill, Shape Outline, and Shape
Effects drop-down arrows.
Shape Text
Add Text to the Shape
1. Select the shape.
2. Type the text Waste Materials.
1. Select a Fill Color other than blue
2. Select a Line Color other than blue
3. Select a 2 1/4 pt. Line Weight
4. Add a Shadow.
6. Visual Elements in PowerPoint
EDS-2101 Page 6
3. Resize the shape as necessary.
Format the Text
1. Select the text.
2. From the Home tab, in the Font group, explore the font options - style, size, and color in order to
increase its readability.
3. Select font size 24 pt
Second Shape
Add a second shape to the drawing grid. This shape will be subordinate to the first shape in the concept
map but should be the same color just a bit smaller.
1. In the new shape, insert the text Recyclable.
2. Format this shape as desired. Consider how the subject matter relates to that of the first shape, and
format it accordingly. Change the color, line weight and adding a shadow
Connect Two Shapes
Add Connectors
Although they look the same, connectors function in a different way than simple lines. When a
connector line is attached between two objects, the connector will remain attached to the objects even
if objects are moved to different positions in the slide. To add a connector:
1. On the Home tab, in the Drawing group, click the down arrow, then click a line connector.
More
7. Visual Elements in PowerPoint
EDS-2101 Page 7
2. Hover the pointer over the diamond. 'Connector sites' appear as red circles on the perimeter of the
text box.
3. Click the connector site of your choice.
4. Move the pointer to the second shape and click the connector site of your choice. These two shapes
will now be linked.
Relationship Labels
Labels are often used in concept maps to help clarify the relationships between individual items. These
labels are created using text boxes.
On the Insert tab, in the Text group, click Text Box.
1. Click and drag to draw a text box on top of the connector.
2. In the text box, type the relationship between the two concepts, for example, Can Be.
Format a Text Box
1. With the text box selected:
8. Visual Elements in PowerPoint
EDS-2101 Page 8
2. On the Format tab, in the Shape Styles group, click the Shape Fill drop-down arrow and choose
White.
3. Click the Shape Outline drop-down arrow and choose No Outline.
4. On the Home tab, in the Font group, click the Font Color drop-down arrow and choose a color.
Other Shapes
There are other shapes that can be used in your concept map.
Rotate Objects and Shadows
More Formatting
There are a number of other ways in which you may format the shapes within your concept map. These
are mentioned in as much as they may make the diagram more appealing. They will not, however,
contribute substantially to the meaning of the diagram.
9. Visual Elements in PowerPoint
EDS-2101 Page 9
Rotate Objects
1. Insert another shape. This time a Trapezoid.
2. Select the shape.
3. Position the pointer over the green rotation handle and drag.
Shape Effects
1. Select the shape.
2. On the Format tab, in the Shape Styles group, click the Shape Effects drop-down arrow and explore
the options. Add (3) shape effects to this shape.
Concept Map Complete
1. Explore the shapes menu. Add, format, label and link (3) more shapes with connector lines and
labels in your concept map. (Total = 6)
2. Consider words like Biodegradable, Reduce, Composting, etc. Use this site
http://www.epa.gov/solidwaste/conserve/tools/localgov/benefits/index.htm as a resource.
3. Save your Work
Note: You may use the elements of shape and color to express relationships between items on the map
(i.e. to show that they are part of the same thread, or to represent a common level of information).
10. Visual Elements in PowerPoint
EDS-2101 Page 10
Insert WordArt
WordArt is a series of ready-made text objects to which you can apply additional formatting options.
Let's start by creating a WordArt heading for the title.
1. Add a new blank slide. Home > New Slide > Blank
2. On the Insert tab, in the Text group, click the WordArt down arrow, then choose a visual style.
3. Click on the graphic to enlarge.
4. Type a heading.
Resize the WordArt
1. Select the WordArt
2. On the Home tab, in the Font group, click the Font Size drop-down arrow, then click a size
3. Drag the heading toward the top of the slide
11. Visual Elements in PowerPoint
EDS-2101 Page 11
Customize the WordArt heading
Revise the Heading
1. Consider the following: Is your WordArt readable? Is it too big or too small?
2. Make any modifications
3. Copy and paste the Word Art from Slide 2 to Slide 1
4. Change the title to Home Recyclables
Tables
Add a Table
Tables may be added to a PowerPoint slide in order to present listed or numerical information clearly
and concisely. To add and format a table:
1. Return to the second slide. It should be blank
2. Change this Layout to Title Slide
3. Title this slide âAccessing our Futureâ
4. On the Insert tab, in the Tables group, click the Table down arrow, then choose a 3x4 table.
5. To resize the table, click on one of the corner handles and drag.
Format the Table
To format the entire table at once:
12. Visual Elements in PowerPoint
EDS-2101 Page 12
1. Click inside the table.
2. On the Design tab, in the Table Styles group, click the More arrow, then choose a visual style.
To customize the table formatting:
On the Design tab, in the Table Styles group, explore the Shading, Borders, and
Effects options.
Entering data into the table
1. Enter the following information and title the slide appropriately.
Statewide Waste Characterization
Type 2009 % 2012 %
Paper 36.7 37.2
Plastic 15.8 16.9
Food Scraps 12 9
Other 9.7 7.2
Metal 7.4 8.0
Rubber, Leather and Textiles 5.6 6.6
Wood 4.4 5.4
Glass 5.7 6
Yard Trimmings 2.7 3.7
Tip: Adjust the rows appropriately. Hover your pointer over the column border to move left or right.
Tip: When you reach the end of your table, press the tab key to enter another row.
13. Visual Elements in PowerPoint
EDS-2101 Page 13
Slide Layout
Insert a new slide
1. Insert a new Two Content Slide
2. Move it to the slide 2 position
3. Title it âBenefits of Recycling.â
4. Go to http://www.epa.gov/solidwaste/conserve/tools/localgov/benefits/index.htm and list (5)
benefits to recycling to the first content placeholder
5. Insert a photo in the second placeholder by following the directions below
Graphics: Photos
Insert a Graphic: Photos
Graphics can deepen a student's understanding of the information presented. You may use a graphic file
on your local machine or an image from the Clip Art gallery. This may be a photo downloaded from the
Internet (with permission), a scanned photo or a photo taken with a digital camera.
1. Create an image file by finding and saving an appropriate photograph on your computer.
2. On the Insert tab, in the Illustrations group, click Picture.
3. Use the Insert Picture dialog box to navigate to the folder in which the picture is stored.
4. Select the file name then click the Insert button.
Resize a Graphic
1. With the graphic selected, click on one of the corner handles and drag.
14. Visual Elements in PowerPoint
EDS-2101 Page 14
2. To deselect the graphic, click the slide background.
3. Place your graphic appropriately on the page. You may have to move and/or resize your title and
name.
Insert a new slide
1. Insert a blank Title Slide
2. Move it to the Slide 1 position
3. Title your presentation with catchy title promoting Recycling
4. Insert your name and date in the placeholders (Always write out the date. For example: March 25,
2014)
Graphics: Clip Art
Insert a Graphic: Clip Art on the Title slide (Slide 1)
1. To insert a Clip Art graphic:
2. On the Insert tab, in the Illustrations group, click Clip Art.
3. In the Clip Art task pane, in the Search for: text entry box, type the category (or subject) for which
you wish to search. In this case, type: recycle
4. Click Go
5. In the preview box, scroll through the thumbnail images and click the image that you want to insert.
6. Close the Clip Art task pane.
7. Resize the image if necessary.
15. Visual Elements in PowerPoint
EDS-2101 Page 15
Insert a new slide
1. Insert a Title Only slide
2. Move it to the last slide position
SmartArt (Diagraming)
Choose and Insert a Diagram
1. On the Insert tab, in the Illustrations group, click SmartArt.
In the Choose a SmartArt Graphic dialog box, click through the list of SmartArt graphic types. The name
of the diagram will be displayed together with a suggested usage for the diagram type. Each diagram is
designed for a different purpose.
2. Click the diagram type that most clearly fits your purpose and illustrates your ideas, then click OK.
Modify the Diagram
When the SmartArt is selected, click the Design tab. This tab can be used to customize the elements and
formatting of the diagram.
16. Visual Elements in PowerPoint
EDS-2101 Page 16
Add and Delete Elements
1. On the Design tab, in the Create Graphic group, click Add Shape.
2. To delete an element, select the element, then on the keyboard, press Delete.
Format the Diagram
1. On the Design tab, in the SmartArt Styles group, experiment with the visual styles.
Slide Backgrounds
Design Themes
There are two ways to format the background of a slide or a group of slides in PowerPoint. The first is by
using a design theme. A design theme contains a set of design elements for a presentation. This includes
background design and color schemes, types and sizes of fonts and bullets, etc. A design theme helps
you to give your PowerPoint presentation a professional appearance.
17. Visual Elements in PowerPoint
EDS-2101 Page 17
2. On the Design tab, in the Themes group, click the More down arrow, then choose a theme.
To change the design theme color scheme:
3. On the Design tab, in the Themes group, click the
Colors down arrow, then choose a color scheme.
Background Only
The second way to format a slide background is to do
it without applying a design theme.
On the Design tab, in the Background group, click the
Background Styles down arrow, then choose a visual style.
18. Visual Elements in PowerPoint
EDS-2101 Page 18
Your slide show should look similar to the one below. All slides should have a Design Theme applied
First Slide
Layout: Title
Attributes:
īˇ Title
īˇ Clip Art
īˇ Student Name
īˇ Date
Second Slide
Layout: Two-Content
Attributes:
īˇ Bulleted List
īˇ Photograph
19. Visual Elements in PowerPoint
EDS-2101 Page 19
Third Slide
Layout: Blank
Attributes
īˇ Shapes
īˇ Connector lines
īˇ Rotated objects
īˇ Shape Effects: Shadow
īˇ Clip Art
Fourth Side
Layout: Title Only
Attributes:
īˇ Table and Data
īˇ Table Styles
īˇ Resized columns
Fifth Slide
Layout: Title Only
Attributes:
īˇ Smart Art
īˇ Smart Art Styles and color
īˇ Text promoting Recycling