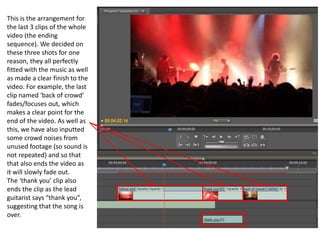
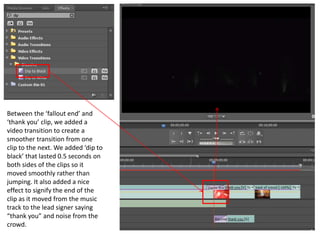
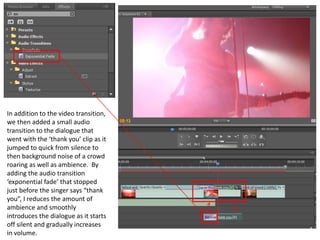
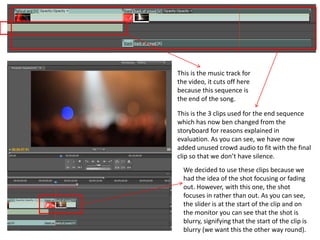
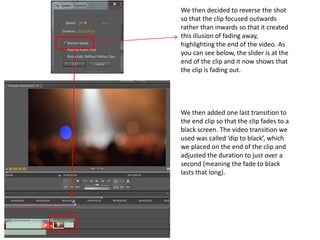
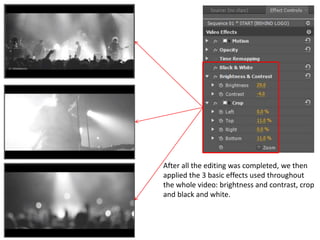
Ending Sequence
This is the arrangement for
the last 3 clips of the whole
video (the ending
sequence). We decided on
these three shots for one
reason, they all perfectly
fitted with the music as well
as made a clear finish to the
video. For example, the last
clip named ‘back of crowd’
fades/focuses out, which
makes a clear point for the
end of the video. As well as
this, we have also inputted
some crowd noises from
unused footage (so sound is
not repeated) and so that
that also ends the video as
it will slowly fade out.
The ‘thank you’ clip also
ends the clip as the lead
guitarist says “thank you”,
suggesting that the song is
over.
Between the ‘fallout end’ and
‘thank you’ clip, we added a
video transition to create a
smoother transition from one
clip to the next. We added ‘dip to
black’ that lasted 0.5 seconds on
both sides of the clips so it
moved smoothly rather than
jumping. It also added a nice
effect to signify the end of the
clip as it moved from the music
track to the lead signer saying
“thank you” and noise from the
crowd.
In addition to the video transition,
we then added a small audio
transition to the dialogue that
went with the ‘thank you’ clip as it
jumped to quick from silence to
then background noise of a crowd
roaring as well as ambience. By
adding the audio transition
‘exponential fade’ that stopped
just before the singer says “thank
you”, I reduces the amount of
ambience and smoothly
introduces the dialogue as it starts
off silent and gradually increases
in volume.
This is the music track for
the video, it cuts off here
because this sequence is
the end of the song.
This is the 3 clips used for the end sequence
which has now ben changed from the
storyboard for reasons explained in
evaluation. As you can see, we have now
added unused crowd audio to fit with the final
clip so that we don’t have silence.
We decided to use these clips because we
had the idea of the shot focusing or fading
out. However, with this one, the shot
focuses in rather than out. As you can see,
the slider is at the start of the clip and on
the monitor you can see that the shot is
blurry, signifying that the start of the clip is
blurry (we want this the other way round).
We then decided to reverse the shot
so that the clip focused outwards
rather than inwards so that it created
this illusion of fading away,
highlighting the end of the video. As
you can see below, the slider is at the
end of the clip and it now shows that
the clip is fading out.
We then added one last transition to
the end clip so that the clip fades to a
black screen. The video transition we
used was called ‘dip to black’, which
we placed on the end of the clip and
adjusted the duration to just over a
second (meaning the fade to black
lasts that long).
After all the editing was completed, we then
applied the 3 basic effects used throughout
the whole video: brightness and contrast, crop
and black and white.
End of Video

Post production (end)

  • 1.
  • 2.
    This is thearrangement for the last 3 clips of the whole video (the ending sequence). We decided on these three shots for one reason, they all perfectly fitted with the music as well as made a clear finish to the video. For example, the last clip named ‘back of crowd’ fades/focuses out, which makes a clear point for the end of the video. As well as this, we have also inputted some crowd noises from unused footage (so sound is not repeated) and so that that also ends the video as it will slowly fade out. The ‘thank you’ clip also ends the clip as the lead guitarist says “thank you”, suggesting that the song is over.
  • 3.
    Between the ‘falloutend’ and ‘thank you’ clip, we added a video transition to create a smoother transition from one clip to the next. We added ‘dip to black’ that lasted 0.5 seconds on both sides of the clips so it moved smoothly rather than jumping. It also added a nice effect to signify the end of the clip as it moved from the music track to the lead signer saying “thank you” and noise from the crowd.
  • 4.
    In addition tothe video transition, we then added a small audio transition to the dialogue that went with the ‘thank you’ clip as it jumped to quick from silence to then background noise of a crowd roaring as well as ambience. By adding the audio transition ‘exponential fade’ that stopped just before the singer says “thank you”, I reduces the amount of ambience and smoothly introduces the dialogue as it starts off silent and gradually increases in volume.
  • 5.
    This is themusic track for the video, it cuts off here because this sequence is the end of the song. This is the 3 clips used for the end sequence which has now ben changed from the storyboard for reasons explained in evaluation. As you can see, we have now added unused crowd audio to fit with the final clip so that we don’t have silence. We decided to use these clips because we had the idea of the shot focusing or fading out. However, with this one, the shot focuses in rather than out. As you can see, the slider is at the start of the clip and on the monitor you can see that the shot is blurry, signifying that the start of the clip is blurry (we want this the other way round).
  • 6.
    We then decidedto reverse the shot so that the clip focused outwards rather than inwards so that it created this illusion of fading away, highlighting the end of the video. As you can see below, the slider is at the end of the clip and it now shows that the clip is fading out. We then added one last transition to the end clip so that the clip fades to a black screen. The video transition we used was called ‘dip to black’, which we placed on the end of the clip and adjusted the duration to just over a second (meaning the fade to black lasts that long).
  • 7.
    After all theediting was completed, we then applied the 3 basic effects used throughout the whole video: brightness and contrast, crop and black and white.
  • 8.