Download to read offline


![9
Lesson 2:
Getting Loopy
In this lesson, we're going to dive right in and create some simple yet useful pages using PHP and MySQL.
Let's start by displaying the database we created yesterday, but with a little more panache.
First, let's query our database using the following code.
<html>
<body>
<?php
$db = mysql_connect("localhost", "root");
mysql_select_db("mydb",$db);
$result = mysql_query("SELECT * FROM employees",$db);
echo "<table border=1>n";
echo "<tr><td>Name</td><td>Position</tr>n";
while ($myrow = mysql_fetch_row($result)) {
printf("<tr><td>%s %s</td><td>%s</td></tr>n", $myrow[1], $myrow[2],
$myrow[3]);
}
echo "</table>n";
?>
</body>
</html>
You probably noticed that we introduced a couple of new features here. Most obvious is the while() loop.
The loop says that as long as there are new rows of data to be grabbed (using the mysql_fetch_row()
function), assign that row to the $myrow variable. Then execute the instructions between the curly
brackets ({}). Take a look for a second, and this should make sense.
The mysql_fetch_row() function bears a closer look. One small problem with mysql_fetch_row() is that it
returns an array that supports only numeric references to the individual fields. So the first field is referred
to as 0, the second as 1, and so on. With complex queries this can become something of a nightmare.
Now let's examine the loop in more detail. The first few lines you'll recognize from the example in Lesson 1.
Then in the while() loop we fetch a row from the result and assign it to the array $myrow. Then we print
the contents of the array on the screen with the printf function. After that it loops around again, and
another row is assigned to $myrow. It will do this until it runs out of rows to grab.
The great thing about a while() loop is that if your query returns no records, you won't get an error
message. The first time through there won't be any data to assign to $myrow, and the program will just
move on.
But if the query returns no data, we have no way of letting the user know, and we should probably provide
some sort of message. This is possible, so let's do it.](https://image.slidesharecdn.com/php-mysql-tutorial-en-140904073426-phpapp01/85/Php-mysql-tutorial-en-9-320.jpg)
![Stay Informed
Take a look at this script.
<html>
<body>
<?php
$db = mysql_connect("localhost", "root");
mysql_select_db("mydb",$db);
$result = mysql_query("SELECT * FROM employees",$db);
if ($myrow = mysql_fetch_array($result)) {
echo "<table border=1>n";
echo "<tr><td>Name</td><td>Position</td></tr>n";
do {
10
printf("<tr><td>%s %s</td><td>%s</tr>n", $myrow["first"], $myrow["last"],
$myrow["address"]);
} while ($myrow = mysql_fetch_array($result));
echo "</table>n";
} else {
echo "Sorry, no records were found!";
}
?>
</body>
</html>
There are a number of new features introduced here, but they're quite simple. First, there's the
mysql_fetch_array() function. This is exactly the same as mysql_fetch_row() with one nice exception:
Using this function, we can refer to fields by their names (such as $myrow["first"]) rather than their
numbers. This should save us some headaches. We've also introduced a do/while loop and an if-else
statement.
The if-else statement says that if we can assign a row to $myrow, then continue; otherwise skip to the
else section and do what's in there.
The do/while loop is a variation of the while() loop we used on the last page. We need the do/while loop
here for a very good reason: With the initial if statement, we assigned the first row returned by the query
to the variable $myrow. If at this point we executed a regular while statement (such as while ($myrow =
mysql_fetch_row($result)), we'd be kicking the first record out of the variable and replacing it with the
second record. But the do/while loop lets us test the condition after the code has been run once. So
there's no chance of us accidentally skipping a row.
Finally, if there are no records returned at all, the statements contained in the else{} portion will be
executed. To see this portion in action, change the SQL statement to SELECT * FROM employees WHERE
id=6 or something else that will return no records.
Now let's extend this looping and if-else code to make one fancy-schmancy page. You're going to love it.](https://image.slidesharecdn.com/php-mysql-tutorial-en-140904073426-phpapp01/85/Php-mysql-tutorial-en-10-320.jpg)
![Link Intelligently
We're going to take that looping power we just learned and use it in a more practical example. But before
we proceed here, you should know how to work with forms, the querystring, and the GET and POST
methods. Jay covered this not long ago, so go take a look at his article if this is unfamiliar to you.
Right now I'm going to work with the querystring. As you should know, there are three ways to get
information into the querystring. The first is to use the GET method in a form. The second is to type the
information into the URL on your browser. And third, you can embed a querystring in a standard link. Just
make the anchor tag look something like this: <a href="http://my_machine/mypage.php3?id=1">. We're
going to use this technique right now.
First off, lets query our database again and list the employee names. Look at the following script. Much of
this should look pretty familiar by now.
<html>
<body>
<?php
$db = mysql_connect("localhost", "root");
mysql_select_db("mydb",$db);
$result = mysql_query("SELECT * FROM employees",$db);
if ($myrow = mysql_fetch_array($result)) {
do {
printf("<a href="%s?id=%s">%s %s</a><br>n", $PHP_SELF, $myrow["id"],
$myrow["first"], $myrow["last"]);
} while ($myrow = mysql_fetch_array($result));
} else {
echo "Sorry, no records were found!";
}
?>
</body>
</html>
Everything's about the same except the printf function, so let's look at it in some detail.
First notice that each quotation mark is preceeded by a backslash. The backslash tells PHP to display the
character following it, rather than treat it as part of the code. Also note the use of the variable
$PHP_SELF. This variable, which stores the script's name and location, is passed along with every PHP
page. It's helpful here because we just want this file to call itself. Using $PHP_SELF, we can be sure that
will happen, even if the file is moved to another directory - or even another machine.
As I just mentioned, these links will recall the page. On the second time through, however, some
information will be added to the querystring.
PHP does a nifty thing when it sees a name=value pair in the querystring. It automatically creates a
variable with the name and value the querystring indicated. This feature allows us to test if it's the first or
second time through this page. All we have to do is ask PHP if the variable $id exists.
Once I know the answer to that question, I can display a different set of information the second time
through. Here's how:
<html>
<body>
<?php
$db = mysql_connect("localhost", "root");
mysql_select_db("mydb",$db);
// display individual record
if ($id) {
$result = mysql_query("SELECT * FROM employees WHERE id=$id",$db);
$myrow = mysql_fetch_array($result);
11](https://image.slidesharecdn.com/php-mysql-tutorial-en-140904073426-phpapp01/85/Php-mysql-tutorial-en-11-320.jpg)
![printf("First name: %sn<br>", $myrow["first"]);
printf("Last name: %sn<br>", $myrow["last"]);
printf("Address: %sn<br>", $myrow["address"]);
printf("Position: %sn<br>", $myrow["position"]);
} else {
// show employee list
$result = mysql_query("SELECT * FROM employees",$db);
if ($myrow = mysql_fetch_array($result)) {
// display list if there are records to display
do {
12
printf("<a href="%s?id=%s">%s %s</a><br>n", $PHP_SELF, $myrow["id"],
$myrow["first"], $myrow["last"]);
} while ($myrow = mysql_fetch_array($result));
} else {
// no records to display
echo "Sorry, no records were found!";
}
}
?>
</body>
</html>
This code is getting complex now, so I've started to use comments to keep track of what's going on. You
can use // to make a single-line comment or /* and */ to start and end a large comment block.
And there we have it: your first truly useful PHP/MySQL script! Now let's take a look at how to plug forms
into it and send information back into the database.](https://image.slidesharecdn.com/php-mysql-tutorial-en-140904073426-phpapp01/85/Php-mysql-tutorial-en-12-320.jpg)

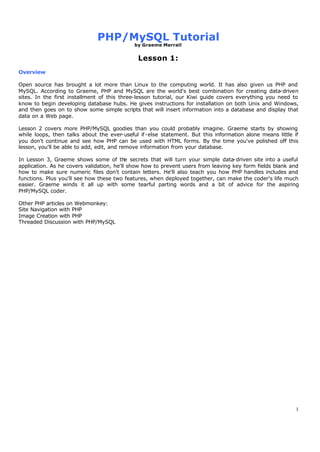
![Make the Forms Smarter
Throughout this tutorial, I've been loading the SQL statement into a variable ($sql) before firing the query
at the database with mysql_query(). This is useful for debugging. If something goes wrong, you can always
echo the SQL to the screen to examine it for mistakes.
We already know how to get data into the database. Now let's try modifying records that are already in
the database. Editing data combines two elements we've already seen: displaying data on the screen and
sending data back to the database via form input. However, editing is slightly different in that we have to
show the appropriate data in the form.
First, let's recycle the code from Lesson 1 to display the employee names on our page. But this time
through, we're going to populate our form with employee information. It should look a little like this:
<html>
<body>
<?php
$db = mysql_connect("localhost", "root");
mysql_select_db("mydb",$db);
if ($id) {
// query the DB
$sql = "SELECT * FROM employees WHERE id=$id";
$result = mysql_query($sql);
$myrow = mysql_fetch_array($result);
?>
<form method="post" action="<?php echo $PHP_SELF?>">
<input type=hidden name="id" value="<?php echo $myrow["id"] ?>">
First name:<input type="Text" name="first" value="<?php echo $myrow["first"] ?>"><br>
Last name:<input type="Text" name="last" value="<?php echo $myrow["last"] ?>"><br>
Address:<input type="Text" name="address" value="<?php echo $myrow["address"] ?>"><br>
Position:<input type="Text" name="position" value="<?php echo $myrow["position"] ?>"><br>
<input type="Submit" name="submit" value="Enter information">
</form>
<?php
} else {
// display list of employees
$result = mysql_query("SELECT * FROM employees",$db);
while ($myrow = mysql_fetch_array($result)) {
printf("<a href="%s?id=%s">%s %s</a><br>n", $PHP_SELF, $myrow["id"],
$myrow["first"], $myrow["last"]);
}
}
?>
</body>
</html>
We just echoed the field information into the value attribute of the each element, which was fairly easy.
Let's build on this a little more. We will add the ability to send the edited code back to the database.
Again, we're going to use the Submit button to test whether we need to process the form input. Also note
the slightly different SQL statement we use.
<html>
<body>
<?php
$db = mysql_connect("localhost", "root");
mysql_select_db("mydb",$db);
if ($id) {
if ($submit) {
$sql = "UPDATE employees SET first='$first',last='$last',address='$address',position='$position'
15
WHERE id=$id";](https://image.slidesharecdn.com/php-mysql-tutorial-en-140904073426-phpapp01/85/Php-mysql-tutorial-en-15-320.jpg)
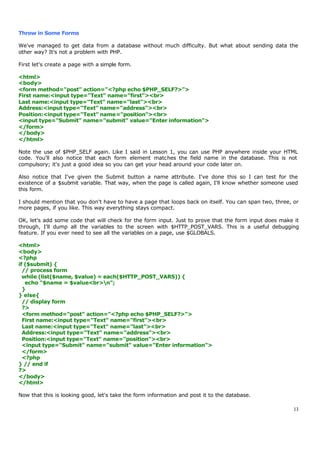
![$result = mysql_query($sql);
echo "Thank you! Information updated.n";
} else {
// query the DB
$sql = "SELECT * FROM employees WHERE id=$id";
$result = mysql_query($sql);
$myrow = mysql_fetch_array($result);
?>
<form method="post" action="<?php echo $PHP_SELF?>">
<input type=hidden name="id" value="<?php echo $myrow["id"] ?>">
First name:<input type="Text" name="first" value="<?php echo $myrow["first"] ?>"><br>
Last name:<input type="Text" name="last" value="<?php echo $myrow["last"] ?>"><br>
Address:<input type="Text" name="address" value="<?php echo $myrow["address"]
?>"><br>
16
Position:<input type="Text" name="position" value="<?php echo $myrow["position"]
?>"><br>
<input type="Submit" name="submit" value="Enter information">
</form>
<?php
}
} else {
// display list of employees
$result = mysql_query("SELECT * FROM employees",$db);
while ($myrow = mysql_fetch_array($result)) {
printf("<a href="%s?id=%s">%s %s</a><br>n", $PHP_SELF, $myrow["id"],
$myrow["first"], $myrow["last"]);
}
}
?>
</body>
</html>
And that's that. We've managed to combine most of the features we've seen into one script. You can also
see how we've used an if() statement inside another if() statement to check for multiple conditions. It's
time to put it all together and make one killer script.](https://image.slidesharecdn.com/php-mysql-tutorial-en-140904073426-phpapp01/85/Php-mysql-tutorial-en-16-320.jpg)
![All Together Now
We'll finish up this lesson by putting everything into a single page that can add, edit, and remove entries
from the database. It's an extension of what we've covered so far and makes for a good review. Let's take
a look.
<html>
<body>
<?php
$db = mysql_connect("localhost", "root");
mysql_select_db("mydb",$db);
if ($submit) {
// here if no ID then adding else we're editing
if ($id) {
$sql = "UPDATE employees SET first='$first',last='$last',address='$address',position='$position'
17
WHERE id=$id";
} else {
$sql = "INSERT INTO employees (first,last,address,position) VALUES
('$first','$last','$address','$position')";
}
// run SQL against the DB
$result = mysql_query($sql);
echo "Record updated/edited!<p>";
} elseif ($delete) {
// delete a record
$sql = "DELETE FROM employees WHERE id=$id";
$result = mysql_query($sql);
echo "$sql Record deleted!<p>";
} else {
// this part happens if we don't press submit
if (!$id) {
// print the list if there is not editing
$result = mysql_query("SELECT * FROM employees",$db);
while ($myrow = mysql_fetch_array($result)) {
printf("<a href="%s?id=%s">%s %s</a> n", $PHP_SELF, $myrow["id"], $myrow["first"],
$myrow["last"]);
printf("<a href="%s?id=%s&delete=yes">(DELETE)</a><br>", $PHP_SELF,
$myrow["id"]);
}
}
?>
<P>
<a href="<?php echo $PHP_SELF?>">ADD A RECORD</a>
<P>
<form method="post" action="<?php echo $PHP_SELF?>">
<?php
if ($id) {
// editing so select a record
$sql = "SELECT * FROM employees WHERE id=$id";
$result = mysql_query($sql);
$myrow = mysql_fetch_array($result);
$id = $myrow["id"];
$first = $myrow["first"];
$last = $myrow["last"];
$address = $myrow["address"];
$position = $myrow["position"];
// print the id for editing
?>
<input type=hidden name="id" value="<?php echo $id ?>">
<?php](https://image.slidesharecdn.com/php-mysql-tutorial-en-140904073426-phpapp01/85/Php-mysql-tutorial-en-17-320.jpg)


![$title = "Hello World";
include("header.inc");
$result = mysql_query("SELECT * FROM employees",$db);
echo "<table border=1>n";
echo "<tr><td>Name</td><td>Position</tr>n";
while ($myrow = mysql_fetch_row($result)) {
20
printf("<tr><td>%s %s</td><td>%s</tr>n", $myrow[1], $myrow[2], $myrow[3]);
}
echo "</table>n";
include("footer.inc");
?>
See what happens? The include files are tossed into the main file and then the whole thing is executed by
PHP. Notice how the variable $title was defined before header.inc is referenced. Its value is made available
to the code in header.inc; hence, the title of the page is changed. You can now use header.inc across all
your PHP pages, and all you'll have to do is change the value of $title from page to page.
Using a combination of includes, HTML, conditional statements, and loops, you can create complex
variations from page to page with an absolute minimum of code. Includes become especially useful when
used with functions, as we'll see down the road.
On to the exciting world of data validation.](https://image.slidesharecdn.com/php-mysql-tutorial-en-140904073426-phpapp01/85/Php-mysql-tutorial-en-20-320.jpg)


![Not-So-Simple Validation
Let's talk a bit about using regular expressions with the ereg() and eregi() functions. As I said earlier, these
can be either quite complex or very simple, depending on what you need.
Using regular expressions, you can examine a string and intelligently search for patterns and variations to
see whether they match the criteria you set. The most common of these involves checking whether an
email address is valid (although, of course, there's no fail-safe way of doing this).
Rather than delve into the mysteries of regular expressions, I'll provide some examples. You can use the
same form we created on the previous page - just paste in the lines below to see how they work.
First, let's make sure that text only has been entered into a form element. This regular expression tests
true if the user has entered one or more lowercase characters, from a to z. No numbers are allowed:
if (!ereg("[a-Z]", $first) || !ereg("[a-Z]", $last)) {
Now, let's extend this expression to check whether the string is four to six characters in length. Using
[[:alpha:]] is an easy way to check for valid alphabetic characters. The numbers in the braces check for
the number of occurrences. And note that the ^ and $ indicate the beginning and end of the string.
if (!ereg("^[[:alpha:]]{4,6}$", $first) || !ereg("^[[:alpha:]]{4,6}$", $last)) {
Finally, let's build a regular expression that will check an email address' validity. There's been plenty of
discussion about the effectiveness of checking for email addresses in this way. Nothing's completely
foolproof, but what I have below works pretty well.
I took this gem from the PHP mailing list. It's a great resource - use it. And yes, this is as scary as it looks.
f (!ereg('^[-!#$%&'*+./0-9=?A-Z^_`a-z{|}~]+'.
'@'.
'[-!#$%&'*+/0-9=?A-Z^_`a-z{|}~]+.'.
'[-!#$%&'*+./0-9=?A-Z^_`a-z{|}~]+$', $last)) {
Don't spend too much time looking at this. Just move on to the next page.
23](https://image.slidesharecdn.com/php-mysql-tutorial-en-140904073426-phpapp01/85/Php-mysql-tutorial-en-23-320.jpg)


This document provides instructions for installing PHP and MySQL to create basic database-driven websites. It covers downloading and compiling MySQL from source on Unix systems, and includes instructions for installing precompiled versions on Windows. It also covers downloading and compiling PHP from source on Unix, with options for compiling as an Apache module or CGI binary. The document includes examples of simple PHP scripts to output "Hello World" and connect to a MySQL database. It aims to provide all the necessary information to get started with basic PHP/MySQL development.