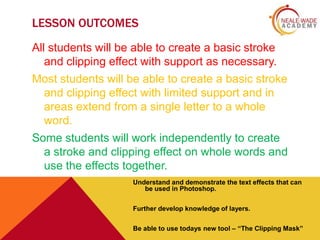
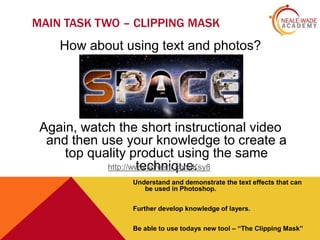
BEHAVIOUR FOR LEARNING

• Be an ACTIVE learner
• Be willing and ready to learn
• Behave positively
• Treat everyone with respect
• Always try your best.
Are you Ready for Learning?
Neale Wade Way – logbooks on the desk,
correct uniform, no phones or ipods out.
OBJECTIVES
Understand how to use and demonstrate the
text effects that can be used in Photoshop.
Further develop knowledge of layers.
Be able to use todays new tool –
“The Clipping Mask”
Understand and demonstrate the text effects that can
be used in Photoshop.
Further develop knowledge of layers.
Be able to use todays new tool – “The Clipping Mask”
LESSON OUTCOMES
All students will be able to create a basic stroke
and clipping effect with support as necessary.
Most students will be able to create a basic stroke
and clipping effect with limited support and in
areas extend from a single letter to a whole
word.

Some students will work independently to create
a stroke and clipping effect on whole words and
use the effects together.
Understand and demonstrate the text effects that can
be used in Photoshop.
Further develop knowledge of layers.
Be able to use todays new tool – “The Clipping Mask”
STARTER
So far we have created a collage and head swops in
Photoshop using a number of tools and techniques.

There are eight questions on the following slide.
For one minute you will think by yourself on the
answers, then you will share with your partner for a
minute to come up with some answers and then we
will feed back to the class.
Understand and demonstrate the text effects that can
be used in Photoshop.
Further develop knowledge of layers.
Be able to use todays new tool – “The Clipping Mask”
QUESTIONS
1) What does this tool do? Can you name it?

2) What does this tool do? Can you name it?
3) What does this tool do? Can you name it?

4) What does the “Stroke Layer Effect” create in
Photoshop?
5) Can you explain what layers are? How have we used
layers usefully so far in Photoshop?
6) What effect does the clipping layer mask have?
MAIN TASK ONE – TEXT EFFECTS
It’s not all about the Photos!
Watch the short demonstration video and then make
your own cool and funky text effect in Photoshop.

http://www.screenr.com/ssy8
Understand and demonstrate the text effects that can
be used in Photoshop.
Further develop knowledge of layers.
Be able to use todays new tool – “The Clipping Mask”
MINI PLENARY
We are going to briefly look back at the
questions from the starter, which questions
can you now answer that you weren’t able
to at the start of the lesson?
Have you therefore made progress against
the lesson objectives?
Understand and demonstrate the text effects that can
be used in Photoshop.
Further develop knowledge of layers.
Be able to use todays new tool – “The Clipping Mask”
QUESTIONS
1) What does this tool do? Can you name it?

2) What does this tool do? Can you name it?
3) What does this tool do? Can you name it?

4) What does the “Stroke Layer Effect” create in
Photoshop?
5) Can you explain what layers are? How have we used
layers usefully so far in Photoshop?
6) What effect does the clipping layer mask have?
MAIN TASK TWO – CLIPPING MASK

How about using text and photos?

Again, watch the short instructional video
and then use your knowledge to create a
top quality product using the same
http://www.screenr.com/Ksy8
technique.
Understand and demonstrate the text effects that can
be used in Photoshop.
Further develop knowledge of layers.
Be able to use todays new tool – “The Clipping Mask”
PLENARY – EXIT CARD
Three statements to complete:
1) Today I should have learnt …..
2) Two things I learnt today are …..
3) A layer in Photoshop is ……

Understand and demonstrate the text effects that can
be used in Photoshop.
Further develop knowledge of layers.
Be able to use todays new tool – “The Clipping Mask”

Photoshop Lesson 3

  • 2.
    BEHAVIOUR FOR LEARNING •Be an ACTIVE learner • Be willing and ready to learn • Behave positively • Treat everyone with respect • Always try your best. Are you Ready for Learning? Neale Wade Way – logbooks on the desk, correct uniform, no phones or ipods out.
  • 3.
    OBJECTIVES Understand how touse and demonstrate the text effects that can be used in Photoshop. Further develop knowledge of layers. Be able to use todays new tool – “The Clipping Mask” Understand and demonstrate the text effects that can be used in Photoshop. Further develop knowledge of layers. Be able to use todays new tool – “The Clipping Mask”
  • 4.
    LESSON OUTCOMES All studentswill be able to create a basic stroke and clipping effect with support as necessary. Most students will be able to create a basic stroke and clipping effect with limited support and in areas extend from a single letter to a whole word. Some students will work independently to create a stroke and clipping effect on whole words and use the effects together. Understand and demonstrate the text effects that can be used in Photoshop. Further develop knowledge of layers. Be able to use todays new tool – “The Clipping Mask”
  • 5.
    STARTER So far wehave created a collage and head swops in Photoshop using a number of tools and techniques. There are eight questions on the following slide. For one minute you will think by yourself on the answers, then you will share with your partner for a minute to come up with some answers and then we will feed back to the class. Understand and demonstrate the text effects that can be used in Photoshop. Further develop knowledge of layers. Be able to use todays new tool – “The Clipping Mask”
  • 6.
    QUESTIONS 1) What doesthis tool do? Can you name it? 2) What does this tool do? Can you name it? 3) What does this tool do? Can you name it? 4) What does the “Stroke Layer Effect” create in Photoshop? 5) Can you explain what layers are? How have we used layers usefully so far in Photoshop? 6) What effect does the clipping layer mask have?
  • 7.
    MAIN TASK ONE– TEXT EFFECTS It’s not all about the Photos! Watch the short demonstration video and then make your own cool and funky text effect in Photoshop. http://www.screenr.com/ssy8 Understand and demonstrate the text effects that can be used in Photoshop. Further develop knowledge of layers. Be able to use todays new tool – “The Clipping Mask”
  • 8.
    MINI PLENARY We aregoing to briefly look back at the questions from the starter, which questions can you now answer that you weren’t able to at the start of the lesson? Have you therefore made progress against the lesson objectives? Understand and demonstrate the text effects that can be used in Photoshop. Further develop knowledge of layers. Be able to use todays new tool – “The Clipping Mask”
  • 9.
    QUESTIONS 1) What doesthis tool do? Can you name it? 2) What does this tool do? Can you name it? 3) What does this tool do? Can you name it? 4) What does the “Stroke Layer Effect” create in Photoshop? 5) Can you explain what layers are? How have we used layers usefully so far in Photoshop? 6) What effect does the clipping layer mask have?
  • 10.
    MAIN TASK TWO– CLIPPING MASK How about using text and photos? Again, watch the short instructional video and then use your knowledge to create a top quality product using the same http://www.screenr.com/Ksy8 technique. Understand and demonstrate the text effects that can be used in Photoshop. Further develop knowledge of layers. Be able to use todays new tool – “The Clipping Mask”
  • 11.
    PLENARY – EXITCARD Three statements to complete: 1) Today I should have learnt ….. 2) Two things I learnt today are ….. 3) A layer in Photoshop is …… Understand and demonstrate the text effects that can be used in Photoshop. Further develop knowledge of layers. Be able to use todays new tool – “The Clipping Mask”