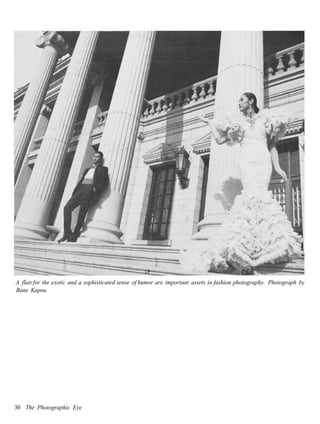
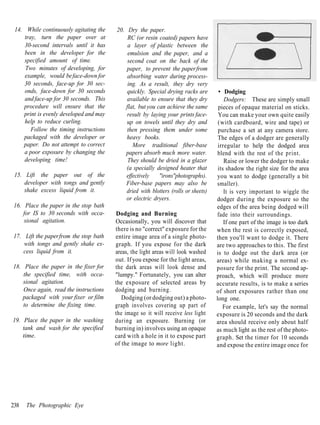
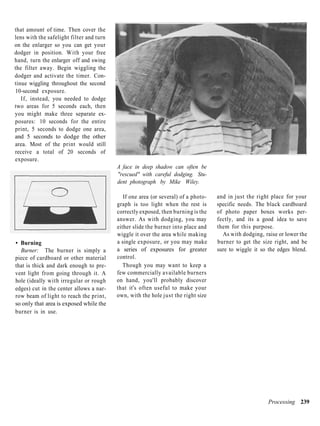
Downloaded 155 times


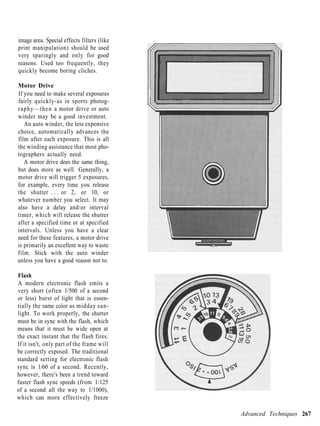


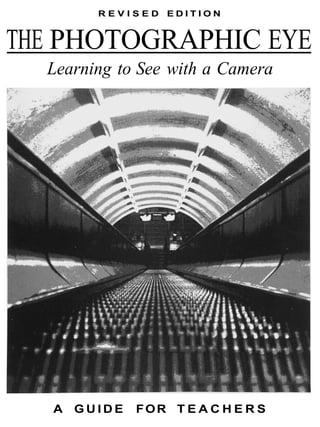


![Photograph Evaluation
Name Period
Assignment
Assignment Requirements
Print Size Choice of Subject
correct meets assignment
incorrect does not meet assignment
Printing Technique
Contrast Print Quality
good good, clean print C fingerprints
I highlights/whites not light enough D dust on negative D tong marks
1 J highlights/whites too light G scratches on negative D uneven developing
. i shadows/blacks not dark enough D air bubbles in processing D incomplete fixing
shadows/blacks too dark . i water spots on negative D etc:
[ . dented emulsion
Print Exposure D negative reversed Reprint and submit again
D good D paper is fogged
D over-exposed (too dark) chemical stains
LJ under-exposed (too light)
D needs dodging:
LJ needs burning:
Composition
Center of Interest Depth of Field Focus
D adequate effective i ] sharp
strong i~l acceptable ' almost sharp
missing D too shallow: [ poorly focused
. should be in focus D effective use of selective or soft focus
Cropping D too deep: D camera shake
LJ effective should not be in focus , moving subject
LJ reposition to correct tilted IH effective use of blurred motion
horizon l i n e
iZ crop tighter:
:
I cropped too tight:
L3 change to vertical format
D change to horizontal format
Originality
Choice of Subject Point of View Comments:
compelling LJ common
D interesting D unusual Work on:
L~J adequate
:'.". dllll
Grade D Please mount this print Extra Credit](https://image.slidesharecdn.com/12835048-120507133229-phpapp01/85/Photo-eye-339-320.jpg)


1) Photography emerged through centuries of experimentation and gradual discoveries, with the basic chemistry established by the late 18th century. 2) The first permanent camera images were produced in the 1820s by Joseph Niepce, with Louis Daguerre later developing the daguerreotype process. 3) William Henry Fox Talbot invented the calotype process in the 1830s, enabling negatives and multiple prints. Frederick Scott Archer introduced the wet-plate collodion process in the 1850s.


