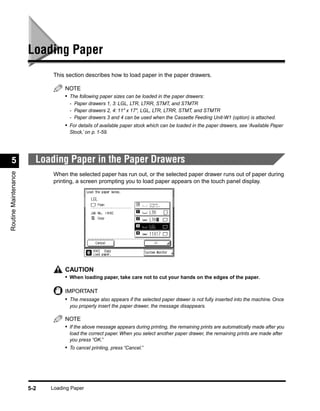
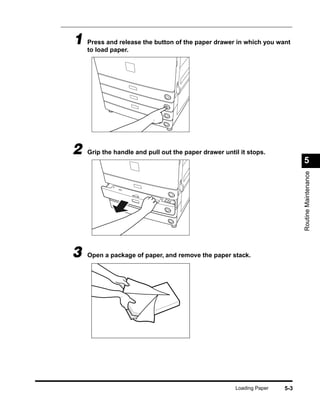
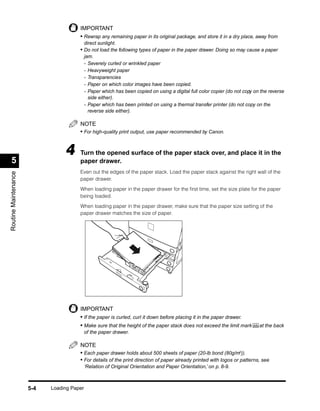
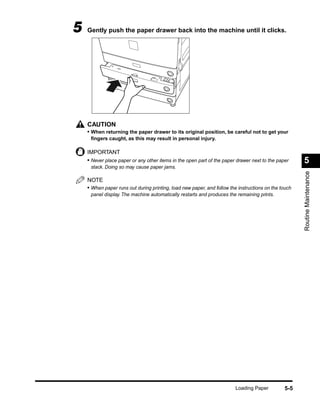
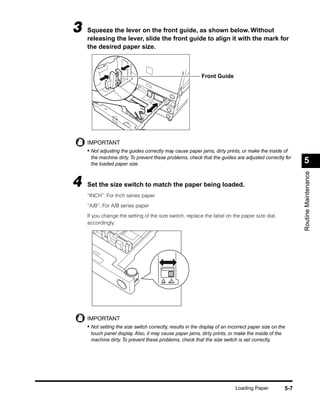
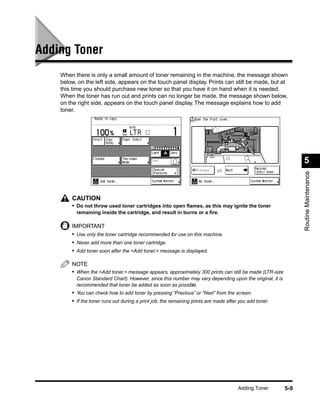
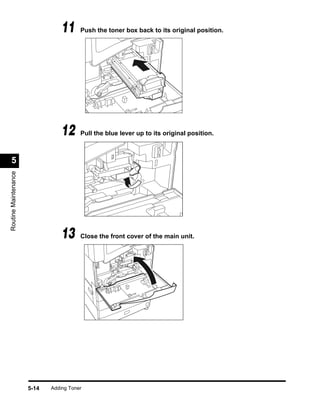
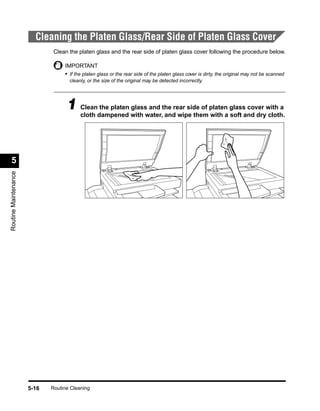
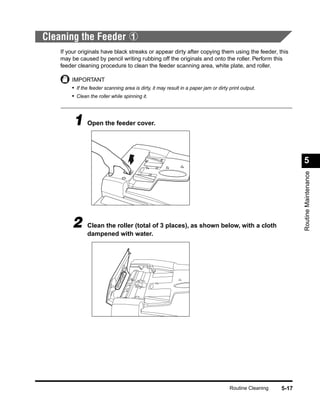
Routine Maintenance                                                                                                                            5
                                                                                                                                           CHAPTER

 This chapter describes how to load paper, add toner, and perform routine cleaning.


   Loading Paper . . . . . . . . . . . . . . . . . . . . . . . . . . . . . . . . . . . . . . . . . . . . . . . . . . . . . . . . . 5-2
        Loading Paper in the Paper Drawers . . . . . . . . . . . . . . . . . . . . . . . . . . . . . . . . . . . . . . . . . . . . . .5-2
        Adjusting a Paper Drawer to Hold a Different Paper Size . . . . . . . . . . . . . . . . . . . . . . . . . . . . . .5-6
   Adding Toner. . . . . . . . . . . . . . . . . . . . . . . . . . . . . . . . . . . . . . . . . . . . . . . . . . . . . . . . . . . 5-9
   Routine Cleaning . . . . . . . . . . . . . . . . . . . . . . . . . . . . . . . . . . . . . . . . . . . . . . . . . . . . . . 5-15
        Cleaning the Platen Glass/Rear Side of Platen Glass Cover . . . . . . . . . . . . . . . . . . . . . . . . . . .5-16
        Cleaning the Feeder 1 . . . . . . . . . . . . . . . . . . . . . . . . . . . . . . . . . . . . . . . . . . . . . . . . . . . . . . .5-17
        Cleaning the Feeder 2 . . . . . . . . . . . . . . . . . . . . . . . . . . . . . . . . . . . . . . . . . . . . . . . . . . . . . . .5-20
        Roller Cleaning . . . . . . . . . . . . . . . . . . . . . . . . . . . . . . . . . . . . . . . . . . . . . . . . . . . . . . . . . . . . . .5-21
   Consumables and Options . . . . . . . . . . . . . . . . . . . . . . . . . . . . . . . . . . . . . . . . . . . . . . . 5-23
        Consumables . . . . . . . . . . . . . . . . . . . . . . . . . . . . . . . . . . . . . . . . . . . . . . . . . . . . . . . . . . . . . . .5-23
        Options . . . . . . . . . . . . . . . . . . . . . . . . . . . . . . . . . . . . . . . . . . . . . . . . . . . . . . . . . . . . . . . . . . . .5-25


                                                                                                                                                              5-1
Loading Paper
                            This section describes how to load paper in the paper drawers.

                                 NOTE
                                 • The following paper sizes can be loaded in the paper drawers:
                                   - Paper drawers 1, 3: LGL, LTR, LTRR, STMT, and STMTR
                                   - Paper drawers 2, 4: 11" x 17", LGL, LTR, LTRR, STMT, and STMTR
                                   - Paper drawers 3 and 4 can be used when the Cassette Feeding Unit-W1 (option) is attached.
                                 • For details of available paper stock which can be loaded in the paper drawers, see ‘Available Paper
                                   Stock,’ on p. 1-59.


  5                     Loading Paper in the Paper Drawers
Routine Maintenance


                            When the selected paper has run out, or the selected paper drawer runs out of paper during
                            printing, a screen prompting you to load paper appears on the touch panel display.


                                 CAUTION
                                 • When loading paper, take care not to cut your hands on the edges of the paper.

                                 IMPORTANT
                                 • The message also appears if the selected paper drawer is not fully inserted into the machine. Once
                                   you properly insert the paper drawer, the message disappears.

                                 NOTE
                                 • If the above message appears during printing, the remaining prints are automatically made after you
                                   load the correct paper. When you select another paper drawer, the remaining prints are made after
                                   you press “OK.”
                                 • To cancel printing, press “Cancel.”


                      5-2   Loading Paper
1 Press and release the button of the paper drawer in which you want
  to load paper.


2   Grip the handle and pull out the paper drawer until it stops.
                                                                            5


                                                                            Routine Maintenance
3   Open a package of paper, and remove the paper stack.


                                                      Loading Paper   5-3
IMPORTANT
                                       • Rewrap any remaining paper in its original package, and store it in a dry place, away from
                                            direct sunlight.
                                       • Do not load the following types of paper in the paper drawer. Doing so may cause a paper
                                            jam.
                                            - Severely curled or wrinkled paper
                                            - Heavyweight paper
                                            - Transparencies
                                            - Paper on which color images have been copied.
                                            - Paper which has been copied on using a digital full color copier (do not copy on the reverse
                                              side either).
                                            - Paper which has been printed on using a thermal transfer printer (do not copy on the
                                              reverse side either).

                                       NOTE
                                       • For high-quality print output, use paper recommended by Canon.


                                 4     Turn the opened surface of the paper stack over, and place it in the
  5                                    paper drawer.
                                       Even out the edges of the paper stack. Load the paper stack against the right wall of the
Routine Maintenance


                                       paper drawer.

                                       When loading paper in the paper drawer for the first time, set the size plate for the paper
                                       being loaded.

                                       When loading paper in the paper drawer, make sure that the paper size setting of the
                                       paper drawer matches the size of paper.


                                       IMPORTANT
                                       • If the paper is curled, curl it down before placing it in the paper drawer.
                                       • Make sure that the height of the paper stack does not exceed the limit mark          at the back
                                            of the paper drawer.

                                       NOTE
                                       • Each paper drawer holds about 500 sheets of paper (20-lb bond (80g/m2)).
                                       • For details of the print direction of paper already printed with logos or patterns, see
                                            ‘Relation of Original Orientation and Paper Orientation,’ on p. 8-9.


                      5-4   Loading Paper
5   Gently push the paper drawer back into the machine until it clicks.


    CAUTION
    • When returning the paper drawer to its original position, be careful not to get your
     fingers caught, as this may result in personal injury.

    IMPORTANT
    • Never place paper or any other items in the open part of the paper drawer next to the paper     5
     stack. Doing so may cause paper jams.


                                                                                                      Routine Maintenance
    NOTE
    • When paper runs out during printing, load new paper, and follow the instructions on the touch
     panel display. The machine automatically restarts and produces the remaining prints.


                                                                         Loading Paper         5-5
Adjusting a Paper Drawer to Hold a Different Paper Size
                            If you want to load a new paper size in a paper drawer, follow the procedure described below
                            to adjust the paper drawer guides.

                                 NOTE
                                 • The following paper sizes can be loaded in the paper drawers:
                                   - Paper drawers 1, 3: LGL, LTR, LTRR, STMT, and STMTR
                                   - Paper drawers 2, 4: 11"x17", LGL, LTR, LTRR, STMT, and STMTR
                                   - Paper drawers 3 and 4 can be used when the Cassette Feeding Unit-W1 (option) is attached.


                                  1 Pull out the paper drawer, and remove all the loaded paper.

  5
Routine Maintenance


                                 2     Squeeze the lever on the left guide, as shown below. Without
                                       releasing the lever, slide the left guide to align it with the mark for
                                       the desired paper size.


                                                                                           Left Guide


                      5-6   Loading Paper
3   Squeeze the lever on the front guide, as shown below. Without
    releasing the lever, slide the front guide to align it with the mark for
    the desired paper size.


                                                            Front Guide


    IMPORTANT
    • Not adjusting the guides correctly may cause paper jams, dirty prints, or make the inside of
     the machine dirty. To prevent these problems, check that the guides are adjusted correctly for
     the loaded paper size.                                                                               5


                                                                                                          Routine Maintenance
4   Set the size switch to match the paper being loaded.
    “INCH”: For Inch series paper

    “A/B”: For A/B series paper

    If you change the setting of the size switch, replace the label on the paper size dial,
    accordingly.


                                        A/B   INCH


    IMPORTANT
    • Not setting the size switch correctly, results in the display of an incorrect paper size on the
     touch panel display. Also, it may cause paper jams, dirty prints, or make the inside of the
     machine dirty. To prevent these problems, check that the size switch is set correctly.


                                                                            Loading Paper           5-7
5     Set the paper size dial, located on the right side of the paper drawer,
                                       to match the paper being loaded.


                                                                                   STMT R
                                                                                    STM
                                                                                    LTR
                                                                              LT
                                                                                R


                                                                                       T
                                                                            LGL R
                                                                            11X17

                                                                              U4

                                       IMPORTANT
                                       • Not setting the paper size dial correctly, results in the display of an incorrect paper size on the
                                            touch panel display. Also, it may cause paper jams, dirty prints, or make the inside of the
                                            machine dirty. To prevent these problems, check that the paper size dial is set correctly.
  5
                                 6
Routine Maintenance


                                       Change the paper drawer’s size plate, so that it matches the new
                                       paper size being loaded.


                      5-8   Loading Paper
Adding Toner
    When there is only a small amount of toner remaining in the machine, the message shown
    below, on the left side, appears on the touch panel display. Prints can still be made, but at
    this time you should purchase new toner so that you have it on hand when it is needed.
    When the toner has run out and prints can no longer be made, the message shown below,
    on the right side, appears on the touch panel display. The message explains how to add
    toner.


                                                                                                                5


                                                                                                                Routine Maintenance
        CAUTION
        • Do not throw used toner cartridges into open flames, as this may ignite the toner
          remaining inside the cartridge, and result in burns or a fire.

        IMPORTANT
        • Use only the toner cartridge recommended for use on this machine.
        • Never add more than one toner cartridge.
        • Add toner soon after the <Add toner.> message is displayed.

        NOTE
        • When the <Add toner.> message appears, approximately 300 prints can still be made (LTR-size
          Canon Standard Chart). However, since this number may vary depending upon the original, it is
          recommended that toner be added as soon as possible.
        • You can check how to add toner by pressing “Previous” or “Next” from the screen.
        • If the toner runs out during a print job, the remaining prints are made after you add toner.


                                                                                       Adding Toner       5-9
1 Open the front cover of the main unit.


                                  2     Pull the blue lever down.


  5
Routine Maintenance


                                  3     Grip the blue handle on the toner box. Pull out the toner box until it
                                        stops.


                      5-10   Adding Toner
4   Hold the new toner cartridge in your hands, as shown below, and
    rock it several times to the left and right.


5   Place the toner cartridge on the toner box, as shown below, and
    push it in as far as possible.

                                                                                           5


                                                                                           Routine Maintenance
6   Push the toner cartridge down, to lock it in place on the toner box.
    Make sure that the black cartridge knob protrudes towards you.


                                                                     Adding Toner   5-11
7     Pull the black cartridge knob, until the stop sign appears.


                                  8     Lightly tap the top of the toner cartridge to cause the toner to empty
                                        into the toner box.


  5
Routine Maintenance


                                  9     Push the black toner box handle back to its original position.


                                        The toner cartridge will be pushed in, along with the toner box.


                      5-12   Adding Toner
Make sure the toner cartridge comes loose from the toner box when you push the black
     handle back to the position indicated by the arrows.


10   Remove the empty toner cartridge from the toner box.


                                                                                              5


                                                                                              Routine Maintenance
     WARNING
     • Do not throw used toner cartridges into open flames, as this may ignite the toner
      remaining inside the cartridge, and result in burns or a fire.

     CAUTION
     • When removing a used toner cartridge from the toner box, remove the cartridge
      carefully, to prevent toner from scattering and entering your eyes or mouth. If toner
      enters your eyes or mouth, wash them immediately with cold water and consult a
      physician.


                                                                      Adding Toner     5-13
11     Push the toner box back to its original position.


                                 12     Pull the blue lever up to its original position.


  5
Routine Maintenance


                                 13     Close the front cover of the main unit.


                      5-14   Adding Toner
Routine Cleaning
    If the original is not copied clearly, clean the following parts of the machine. For high-quality
    output, we recommend cleaning these parts once a month.
       • Platen glass
       • Rear side of the platen glass
       • Feeder scanning area
       • White plate, roller

        WARNING
        • When cleaning the machine, first turn off the main power switch and unplug the power
          plug. Failure to do so may result in a fire or electrical shock.
        • Do not use alcohol, benzene, paint thinner, or other solvents for cleaning. Doing so might
          result in plastic parts becoming deformed.                                                    5


                                                                                                        Routine Maintenance
        CAUTION
        • Unplug the power plug from the outlet at least once a year, and clean the plug’s metal pins
          and the area surrounding them to ensure all dust is removed. If dust accumulates in this
          area, it may result in a fire.
        • Do not dampen the cloth too much, as this may damage the original or break the machine.


                                                                            Routine Cleaning     5-15
Cleaning the Platen Glass/Rear Side of Platen Glass Cover
                              Clean the platen glass and the rear side of platen glass cover following the procedure below.

                                  IMPORTANT
                                  • If the platen glass or the rear side of the platen glass cover is dirty, the original may not be scanned
                                    cleanly, or the size of the original may be detected incorrectly.


                                   1 Cleandampened with water,the rear side of platena glassand drywith a
                                     cloth
                                           the platen glass and
                                                                and wipe them with soft
                                                                                             cover
                                                                                                   cloth.


  5
Routine Maintenance


                      5-16   Routine Cleaning
Cleaning the Feeder 1
    If your originals have black streaks or appear dirty after copying them using the feeder, this
    may be caused by pencil writing rubbing off the originals and onto the roller. Perform this
    feeder cleaning procedure to clean the feeder scanning area, white plate, and roller.

        IMPORTANT
        • If the feeder scanning area is dirty, it may result in a paper jam or dirty print output.
        • Clean the roller while spinning it.


         1 Open the feeder cover.

                                                                                                                5


                                                                                                                Routine Maintenance
        2      Clean the roller (total of 3 places), as shown below, with a cloth
               dampened with water.


                                                                                      Routine Cleaning   5-17
3      Open the middle cover, holding the knob in the front.


                                  4      Clean the transparent plastic part of the middle cover with a cloth
                                         dampened with water.


  5
Routine Maintenance


                                  5      Close the middle cover.


                                         CAUTION
                                         • When closing the cover, be careful not to get your fingers caught, as this may result
                                          in personal injury.


                      5-18   Routine Cleaning
6   Close the feeder cover.


    CAUTION
    • When closing the cover, be careful not to get your fingers caught, as this may result
     in personal injury.


7   Open the feeder.                                                                         5


                                                                                             Routine Maintenance
8   Clean the feeder scanning area (platen glass) and the metal part
    located next to the rubber roller, with a cloth dampened with water.


                                                                Routine Cleaning     5-19
9      Close the feeder.


                        Cleaning the Feeder 2
                              You can also clean the roller by repeatedly feeding blank paper sheets through the feeder.
  5
                                  NOTE
Routine Maintenance


                                  • “Adjustment/Cleaning” is made up of several screens. Select the desired item by pressing “ ▼” or
                                    “▲.”
                                  • When “ ▼” or “▲” shoud be pressed, the indications           is displayed in this manual.
                                  • It takes about 20 seconds to clean the feeder.


                                   1 Call up the desired screen as follows:
                                                (Additional Functions)


                                  2      Place 10 blank paper sheets in the feeder, and press “Start.”


                                         To cancel the feeder cleaning, press “Cancel.”


                      5-20   Routine Cleaning
While the feeder is being cleaned, the screen below appears.


         3     Press “Done.”
               Repeat this procedure.

               The display returns to the Basic Features screen.


                                                                                                              5
Roller Cleaning


                                                                                                              Routine Maintenance
    If dirt appears on printed paper, clean the roller in the main unit as the need arises.

        NOTE
        • “Adjustment/Cleaning” is made up of several screens. Select the desired item by pressing “ ▼” or
          “▲.”
        • When “ ▼” or “▲” should be pressed, the indications           is displayed in this manual.
        • It takes about 15 seconds to clean the roller.


         1 Call up the desired screen as follows:
                    (Additional Functions)


                                                                                Routine Cleaning       5-21
2      Press “Start.”


                                         To cancel Roller Cleaning, press “Cancel.”

                                         While the roller is being cleaned, the screen below appears.


  5
Routine Maintenance


                                  3      Press “Done.”
                                         Repeat this procedure.

                                         The display returns to the Basic Features screen.


                      5-22   Routine Cleaning
Consumables and Options
    The following consumables and accessories are available from Canon. For details, consult
    your service representative.
    We recommend that you order paper stock and toner from your service representative before
    you run out of them.


 Consumables
    ■ Paper Stock
      In addition to plain paper (11" x 17", LGL, LTR, and STMT), transparencies (dedicated to
      this machine), labels and other types of paper stock are available. For details, consult your
      service representative.
                                                                                                                    5


                                                                                                                    Routine Maintenance
        CAUTION
        • Do not store paper in places exposed to open flames, as this may cause the paper to
          ignite and result in burns or a fire.

        IMPORTANT
        • For high-quality print output, use paper recommended by Canon.
        • To prevent moisture build-up, store any remaining paper tightly wrapped in its original package.


                                                                       Consumables and Options               5-23
■ Black Toner
                               When the <Add toner.> message appears on the touch panel display, add toner which has
                               been approved for use with this machine.


                                  WARNING
                                  • Never dispose of waste toner in a fire or incinerator. Doing so may result in an explosion.

                                  CAUTION
  5                               • Do not store toner cartridges in places exposed to open flames, as this may cause the
                                    toner to ignite and result in burns or a fire.
Routine Maintenance


                                  IMPORTANT
                                  • Store toner cartridges in a cool location, away from direct sunlight.
                                    - The recommended storage conditions are: temperature below 86°F, and humidity below 80%.

                             ■ Genuine Supplies


                                Canon has developed and manufactured parts, supplies, and GPR-6 Toner specifically for
                                use in this machine. For superior print quality, we recommend that you use Canon-
                                GENUINE brand parts, supplies, and GPR-6 Toner in this machine. Ask your authorized
                                Canon dealer or service provider for Canon-GENUINE brand parts, supplies, and GPR-6
                                Toner.


                      5-24   Consumables and Options
■ Stamp Cartridge
     This ink cartridge is used to stamp originals when they are sent. (For the Fax function.)


Options
   ■ Cassette-U1                                                                                      5
     You can adjust this cassette to suit the paper size you want to load. (See ‘Adjusting a


                                                                                                      Routine Maintenance
     Paper Drawer to Hold a Different Paper Size,’ on p. 5-6)
     -Available locations: paper drawer 2 and 4
     -Available paper sizes: 11"x17", LGL, LTR, LTRR, STMT, and STMTR


                                                               Consumables and Options         5-25
■ Cassette-V1
                               You can adjust this cassette to suit the paper size you want to load. (See ‘Adjusting a
                               Paper Drawer to Hold a Different Paper Size,’ on p. 5-6)
                                -Locations to set: paper drawer 1 and 3
                                -Available paper sizes: LGL, LTR, LTRR, STMT, and STMTR


  5
Routine Maintenance


                      5-26   Consumables and Options

Photocopier Routine Maintenance

  • 1.
    Routine Maintenance 5 CHAPTER This chapter describes how to load paper, add toner, and perform routine cleaning. Loading Paper . . . . . . . . . . . . . . . . . . . . . . . . . . . . . . . . . . . . . . . . . . . . . . . . . . . . . . . . . 5-2 Loading Paper in the Paper Drawers . . . . . . . . . . . . . . . . . . . . . . . . . . . . . . . . . . . . . . . . . . . . . .5-2 Adjusting a Paper Drawer to Hold a Different Paper Size . . . . . . . . . . . . . . . . . . . . . . . . . . . . . .5-6 Adding Toner. . . . . . . . . . . . . . . . . . . . . . . . . . . . . . . . . . . . . . . . . . . . . . . . . . . . . . . . . . . 5-9 Routine Cleaning . . . . . . . . . . . . . . . . . . . . . . . . . . . . . . . . . . . . . . . . . . . . . . . . . . . . . . 5-15 Cleaning the Platen Glass/Rear Side of Platen Glass Cover . . . . . . . . . . . . . . . . . . . . . . . . . . .5-16 Cleaning the Feeder 1 . . . . . . . . . . . . . . . . . . . . . . . . . . . . . . . . . . . . . . . . . . . . . . . . . . . . . . .5-17 Cleaning the Feeder 2 . . . . . . . . . . . . . . . . . . . . . . . . . . . . . . . . . . . . . . . . . . . . . . . . . . . . . . .5-20 Roller Cleaning . . . . . . . . . . . . . . . . . . . . . . . . . . . . . . . . . . . . . . . . . . . . . . . . . . . . . . . . . . . . . .5-21 Consumables and Options . . . . . . . . . . . . . . . . . . . . . . . . . . . . . . . . . . . . . . . . . . . . . . . 5-23 Consumables . . . . . . . . . . . . . . . . . . . . . . . . . . . . . . . . . . . . . . . . . . . . . . . . . . . . . . . . . . . . . . .5-23 Options . . . . . . . . . . . . . . . . . . . . . . . . . . . . . . . . . . . . . . . . . . . . . . . . . . . . . . . . . . . . . . . . . . . .5-25 5-1
  • 2.
    Loading Paper This section describes how to load paper in the paper drawers. NOTE • The following paper sizes can be loaded in the paper drawers: - Paper drawers 1, 3: LGL, LTR, LTRR, STMT, and STMTR - Paper drawers 2, 4: 11" x 17", LGL, LTR, LTRR, STMT, and STMTR - Paper drawers 3 and 4 can be used when the Cassette Feeding Unit-W1 (option) is attached. • For details of available paper stock which can be loaded in the paper drawers, see ‘Available Paper Stock,’ on p. 1-59. 5 Loading Paper in the Paper Drawers Routine Maintenance When the selected paper has run out, or the selected paper drawer runs out of paper during printing, a screen prompting you to load paper appears on the touch panel display. CAUTION • When loading paper, take care not to cut your hands on the edges of the paper. IMPORTANT • The message also appears if the selected paper drawer is not fully inserted into the machine. Once you properly insert the paper drawer, the message disappears. NOTE • If the above message appears during printing, the remaining prints are automatically made after you load the correct paper. When you select another paper drawer, the remaining prints are made after you press “OK.” • To cancel printing, press “Cancel.” 5-2 Loading Paper
  • 3.
    1 Press andrelease the button of the paper drawer in which you want to load paper. 2 Grip the handle and pull out the paper drawer until it stops. 5 Routine Maintenance 3 Open a package of paper, and remove the paper stack. Loading Paper 5-3
  • 4.
    IMPORTANT • Rewrap any remaining paper in its original package, and store it in a dry place, away from direct sunlight. • Do not load the following types of paper in the paper drawer. Doing so may cause a paper jam. - Severely curled or wrinkled paper - Heavyweight paper - Transparencies - Paper on which color images have been copied. - Paper which has been copied on using a digital full color copier (do not copy on the reverse side either). - Paper which has been printed on using a thermal transfer printer (do not copy on the reverse side either). NOTE • For high-quality print output, use paper recommended by Canon. 4 Turn the opened surface of the paper stack over, and place it in the 5 paper drawer. Even out the edges of the paper stack. Load the paper stack against the right wall of the Routine Maintenance paper drawer. When loading paper in the paper drawer for the first time, set the size plate for the paper being loaded. When loading paper in the paper drawer, make sure that the paper size setting of the paper drawer matches the size of paper. IMPORTANT • If the paper is curled, curl it down before placing it in the paper drawer. • Make sure that the height of the paper stack does not exceed the limit mark at the back of the paper drawer. NOTE • Each paper drawer holds about 500 sheets of paper (20-lb bond (80g/m2)). • For details of the print direction of paper already printed with logos or patterns, see ‘Relation of Original Orientation and Paper Orientation,’ on p. 8-9. 5-4 Loading Paper
  • 5.
    5 Gently push the paper drawer back into the machine until it clicks. CAUTION • When returning the paper drawer to its original position, be careful not to get your fingers caught, as this may result in personal injury. IMPORTANT • Never place paper or any other items in the open part of the paper drawer next to the paper 5 stack. Doing so may cause paper jams. Routine Maintenance NOTE • When paper runs out during printing, load new paper, and follow the instructions on the touch panel display. The machine automatically restarts and produces the remaining prints. Loading Paper 5-5
  • 6.
    Adjusting a PaperDrawer to Hold a Different Paper Size If you want to load a new paper size in a paper drawer, follow the procedure described below to adjust the paper drawer guides. NOTE • The following paper sizes can be loaded in the paper drawers: - Paper drawers 1, 3: LGL, LTR, LTRR, STMT, and STMTR - Paper drawers 2, 4: 11"x17", LGL, LTR, LTRR, STMT, and STMTR - Paper drawers 3 and 4 can be used when the Cassette Feeding Unit-W1 (option) is attached. 1 Pull out the paper drawer, and remove all the loaded paper. 5 Routine Maintenance 2 Squeeze the lever on the left guide, as shown below. Without releasing the lever, slide the left guide to align it with the mark for the desired paper size. Left Guide 5-6 Loading Paper
  • 7.
    3 Squeeze the lever on the front guide, as shown below. Without releasing the lever, slide the front guide to align it with the mark for the desired paper size. Front Guide IMPORTANT • Not adjusting the guides correctly may cause paper jams, dirty prints, or make the inside of the machine dirty. To prevent these problems, check that the guides are adjusted correctly for the loaded paper size. 5 Routine Maintenance 4 Set the size switch to match the paper being loaded. “INCH”: For Inch series paper “A/B”: For A/B series paper If you change the setting of the size switch, replace the label on the paper size dial, accordingly. A/B INCH IMPORTANT • Not setting the size switch correctly, results in the display of an incorrect paper size on the touch panel display. Also, it may cause paper jams, dirty prints, or make the inside of the machine dirty. To prevent these problems, check that the size switch is set correctly. Loading Paper 5-7
  • 8.
    5 Set the paper size dial, located on the right side of the paper drawer, to match the paper being loaded. STMT R STM LTR LT R T LGL R 11X17 U4 IMPORTANT • Not setting the paper size dial correctly, results in the display of an incorrect paper size on the touch panel display. Also, it may cause paper jams, dirty prints, or make the inside of the machine dirty. To prevent these problems, check that the paper size dial is set correctly. 5 6 Routine Maintenance Change the paper drawer’s size plate, so that it matches the new paper size being loaded. 5-8 Loading Paper
  • 9.
    Adding Toner When there is only a small amount of toner remaining in the machine, the message shown below, on the left side, appears on the touch panel display. Prints can still be made, but at this time you should purchase new toner so that you have it on hand when it is needed. When the toner has run out and prints can no longer be made, the message shown below, on the right side, appears on the touch panel display. The message explains how to add toner. 5 Routine Maintenance CAUTION • Do not throw used toner cartridges into open flames, as this may ignite the toner remaining inside the cartridge, and result in burns or a fire. IMPORTANT • Use only the toner cartridge recommended for use on this machine. • Never add more than one toner cartridge. • Add toner soon after the <Add toner.> message is displayed. NOTE • When the <Add toner.> message appears, approximately 300 prints can still be made (LTR-size Canon Standard Chart). However, since this number may vary depending upon the original, it is recommended that toner be added as soon as possible. • You can check how to add toner by pressing “Previous” or “Next” from the screen. • If the toner runs out during a print job, the remaining prints are made after you add toner. Adding Toner 5-9
  • 10.
    1 Open thefront cover of the main unit. 2 Pull the blue lever down. 5 Routine Maintenance 3 Grip the blue handle on the toner box. Pull out the toner box until it stops. 5-10 Adding Toner
  • 11.
    4 Hold the new toner cartridge in your hands, as shown below, and rock it several times to the left and right. 5 Place the toner cartridge on the toner box, as shown below, and push it in as far as possible. 5 Routine Maintenance 6 Push the toner cartridge down, to lock it in place on the toner box. Make sure that the black cartridge knob protrudes towards you. Adding Toner 5-11
  • 12.
    7 Pull the black cartridge knob, until the stop sign appears. 8 Lightly tap the top of the toner cartridge to cause the toner to empty into the toner box. 5 Routine Maintenance 9 Push the black toner box handle back to its original position. The toner cartridge will be pushed in, along with the toner box. 5-12 Adding Toner
  • 13.
    Make sure thetoner cartridge comes loose from the toner box when you push the black handle back to the position indicated by the arrows. 10 Remove the empty toner cartridge from the toner box. 5 Routine Maintenance WARNING • Do not throw used toner cartridges into open flames, as this may ignite the toner remaining inside the cartridge, and result in burns or a fire. CAUTION • When removing a used toner cartridge from the toner box, remove the cartridge carefully, to prevent toner from scattering and entering your eyes or mouth. If toner enters your eyes or mouth, wash them immediately with cold water and consult a physician. Adding Toner 5-13
  • 14.
    11 Push the toner box back to its original position. 12 Pull the blue lever up to its original position. 5 Routine Maintenance 13 Close the front cover of the main unit. 5-14 Adding Toner
  • 15.
    Routine Cleaning If the original is not copied clearly, clean the following parts of the machine. For high-quality output, we recommend cleaning these parts once a month. • Platen glass • Rear side of the platen glass • Feeder scanning area • White plate, roller WARNING • When cleaning the machine, first turn off the main power switch and unplug the power plug. Failure to do so may result in a fire or electrical shock. • Do not use alcohol, benzene, paint thinner, or other solvents for cleaning. Doing so might result in plastic parts becoming deformed. 5 Routine Maintenance CAUTION • Unplug the power plug from the outlet at least once a year, and clean the plug’s metal pins and the area surrounding them to ensure all dust is removed. If dust accumulates in this area, it may result in a fire. • Do not dampen the cloth too much, as this may damage the original or break the machine. Routine Cleaning 5-15
  • 16.
    Cleaning the PlatenGlass/Rear Side of Platen Glass Cover Clean the platen glass and the rear side of platen glass cover following the procedure below. IMPORTANT • If the platen glass or the rear side of the platen glass cover is dirty, the original may not be scanned cleanly, or the size of the original may be detected incorrectly. 1 Cleandampened with water,the rear side of platena glassand drywith a cloth the platen glass and and wipe them with soft cover cloth. 5 Routine Maintenance 5-16 Routine Cleaning
  • 17.
    Cleaning the Feeder1 If your originals have black streaks or appear dirty after copying them using the feeder, this may be caused by pencil writing rubbing off the originals and onto the roller. Perform this feeder cleaning procedure to clean the feeder scanning area, white plate, and roller. IMPORTANT • If the feeder scanning area is dirty, it may result in a paper jam or dirty print output. • Clean the roller while spinning it. 1 Open the feeder cover. 5 Routine Maintenance 2 Clean the roller (total of 3 places), as shown below, with a cloth dampened with water. Routine Cleaning 5-17
  • 18.
    3 Open the middle cover, holding the knob in the front. 4 Clean the transparent plastic part of the middle cover with a cloth dampened with water. 5 Routine Maintenance 5 Close the middle cover. CAUTION • When closing the cover, be careful not to get your fingers caught, as this may result in personal injury. 5-18 Routine Cleaning
  • 19.
    6 Close the feeder cover. CAUTION • When closing the cover, be careful not to get your fingers caught, as this may result in personal injury. 7 Open the feeder. 5 Routine Maintenance 8 Clean the feeder scanning area (platen glass) and the metal part located next to the rubber roller, with a cloth dampened with water. Routine Cleaning 5-19
  • 20.
    9 Close the feeder. Cleaning the Feeder 2 You can also clean the roller by repeatedly feeding blank paper sheets through the feeder. 5 NOTE Routine Maintenance • “Adjustment/Cleaning” is made up of several screens. Select the desired item by pressing “ ▼” or “▲.” • When “ ▼” or “▲” shoud be pressed, the indications is displayed in this manual. • It takes about 20 seconds to clean the feeder. 1 Call up the desired screen as follows: (Additional Functions) 2 Place 10 blank paper sheets in the feeder, and press “Start.” To cancel the feeder cleaning, press “Cancel.” 5-20 Routine Cleaning
  • 21.
    While the feederis being cleaned, the screen below appears. 3 Press “Done.” Repeat this procedure. The display returns to the Basic Features screen. 5 Roller Cleaning Routine Maintenance If dirt appears on printed paper, clean the roller in the main unit as the need arises. NOTE • “Adjustment/Cleaning” is made up of several screens. Select the desired item by pressing “ ▼” or “▲.” • When “ ▼” or “▲” should be pressed, the indications is displayed in this manual. • It takes about 15 seconds to clean the roller. 1 Call up the desired screen as follows: (Additional Functions) Routine Cleaning 5-21
  • 22.
    2 Press “Start.” To cancel Roller Cleaning, press “Cancel.” While the roller is being cleaned, the screen below appears. 5 Routine Maintenance 3 Press “Done.” Repeat this procedure. The display returns to the Basic Features screen. 5-22 Routine Cleaning
  • 23.
    Consumables and Options The following consumables and accessories are available from Canon. For details, consult your service representative. We recommend that you order paper stock and toner from your service representative before you run out of them. Consumables ■ Paper Stock In addition to plain paper (11" x 17", LGL, LTR, and STMT), transparencies (dedicated to this machine), labels and other types of paper stock are available. For details, consult your service representative. 5 Routine Maintenance CAUTION • Do not store paper in places exposed to open flames, as this may cause the paper to ignite and result in burns or a fire. IMPORTANT • For high-quality print output, use paper recommended by Canon. • To prevent moisture build-up, store any remaining paper tightly wrapped in its original package. Consumables and Options 5-23
  • 24.
    ■ Black Toner When the <Add toner.> message appears on the touch panel display, add toner which has been approved for use with this machine. WARNING • Never dispose of waste toner in a fire or incinerator. Doing so may result in an explosion. CAUTION 5 • Do not store toner cartridges in places exposed to open flames, as this may cause the toner to ignite and result in burns or a fire. Routine Maintenance IMPORTANT • Store toner cartridges in a cool location, away from direct sunlight. - The recommended storage conditions are: temperature below 86°F, and humidity below 80%. ■ Genuine Supplies Canon has developed and manufactured parts, supplies, and GPR-6 Toner specifically for use in this machine. For superior print quality, we recommend that you use Canon- GENUINE brand parts, supplies, and GPR-6 Toner in this machine. Ask your authorized Canon dealer or service provider for Canon-GENUINE brand parts, supplies, and GPR-6 Toner. 5-24 Consumables and Options
  • 25.
    ■ Stamp Cartridge This ink cartridge is used to stamp originals when they are sent. (For the Fax function.) Options ■ Cassette-U1 5 You can adjust this cassette to suit the paper size you want to load. (See ‘Adjusting a Routine Maintenance Paper Drawer to Hold a Different Paper Size,’ on p. 5-6) -Available locations: paper drawer 2 and 4 -Available paper sizes: 11"x17", LGL, LTR, LTRR, STMT, and STMTR Consumables and Options 5-25
  • 26.
    ■ Cassette-V1 You can adjust this cassette to suit the paper size you want to load. (See ‘Adjusting a Paper Drawer to Hold a Different Paper Size,’ on p. 5-6) -Locations to set: paper drawer 1 and 3 -Available paper sizes: LGL, LTR, LTRR, STMT, and STMTR 5 Routine Maintenance 5-26 Consumables and Options