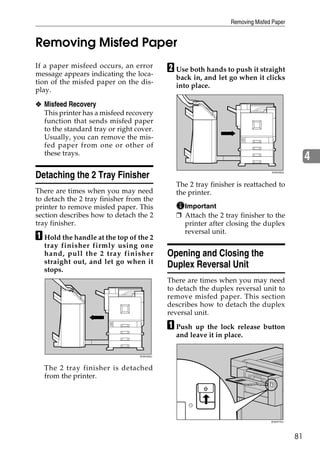
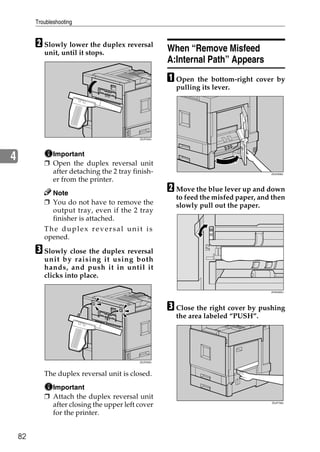
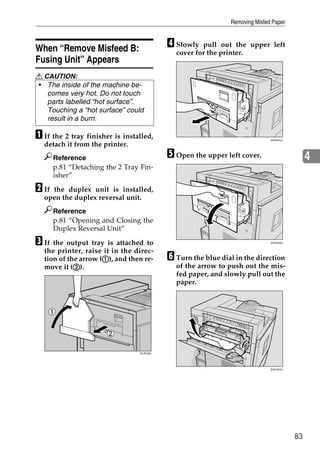
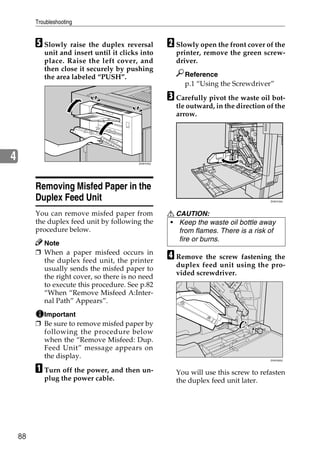
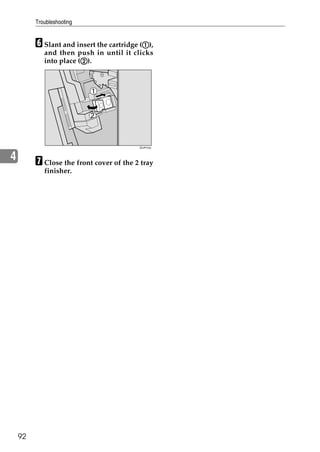
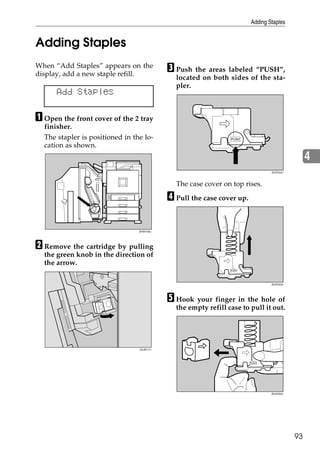
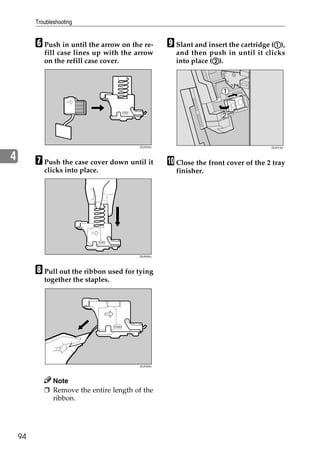
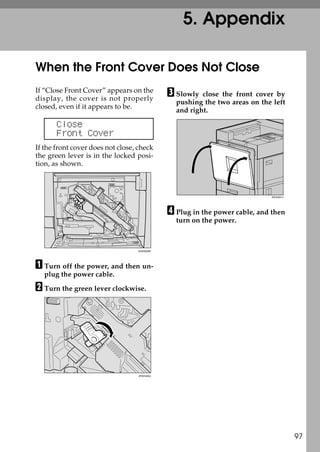
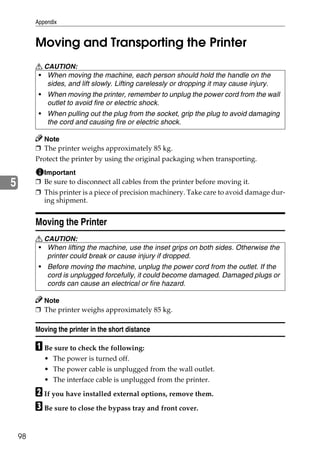
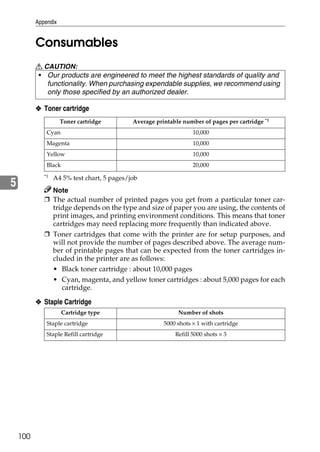
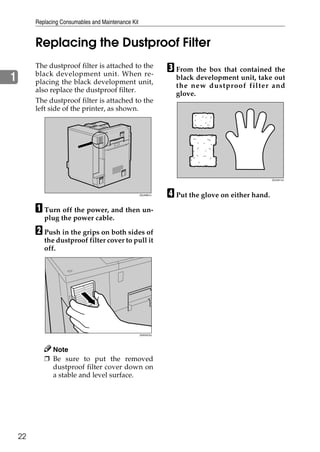
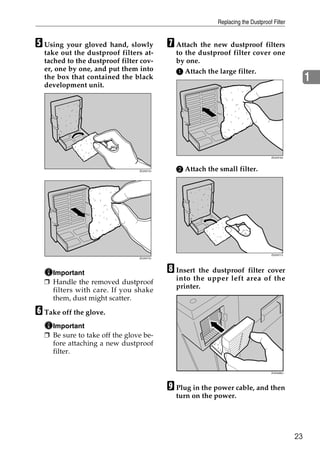
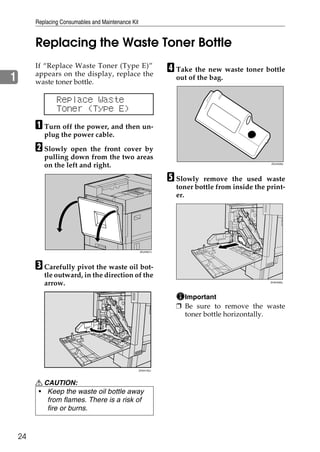
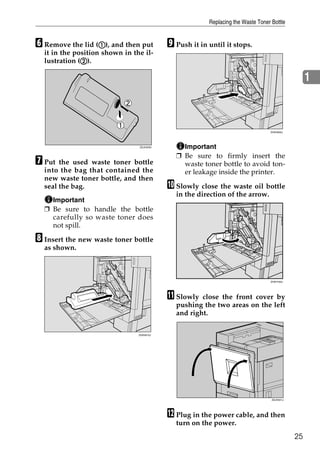
This document provides instructions for replacing various consumables and maintenance parts for a printer, including:
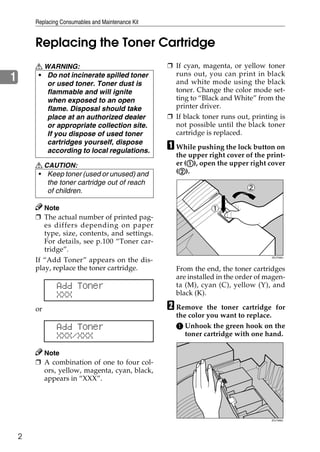
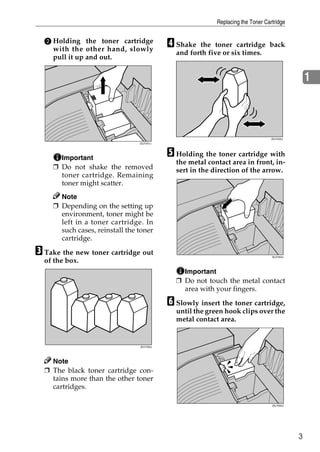
1. The toner cartridge. Instructions are provided to open the printer cover, remove the used cartridge, insert the new cartridge, and close the cover.
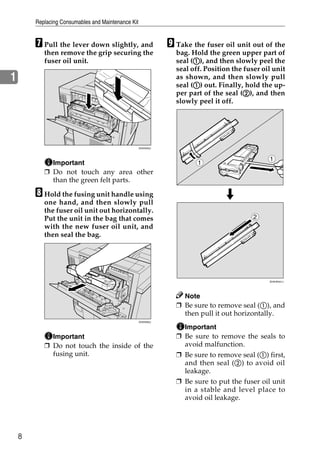
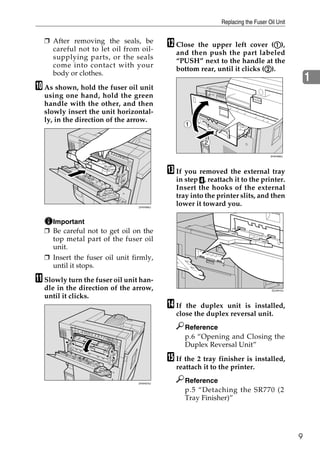
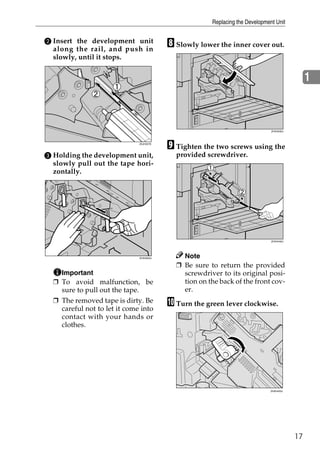
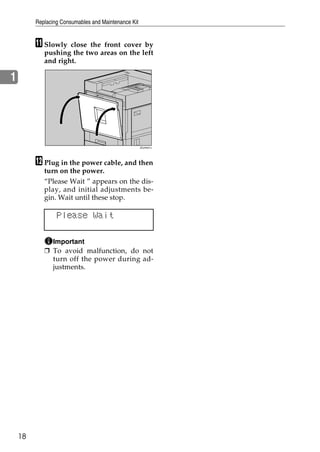
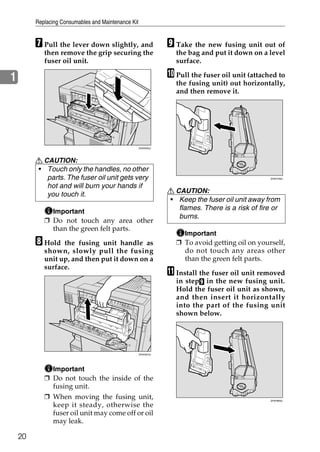
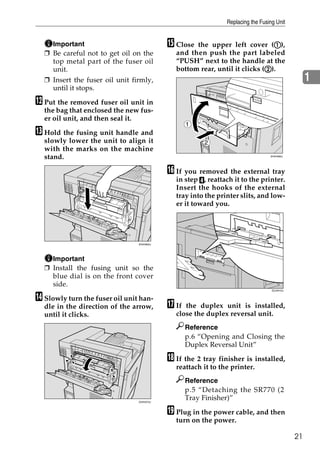
2. The fuser oil unit. Steps include detaching external parts of the printer, pulling out the used unit, inserting the new unit, and reattaching external parts.
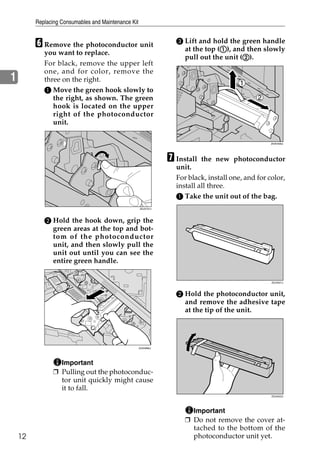
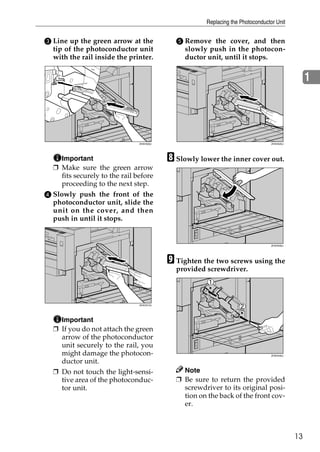
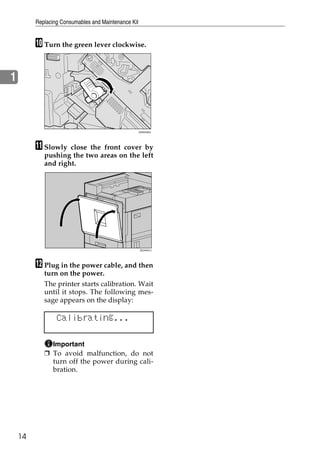
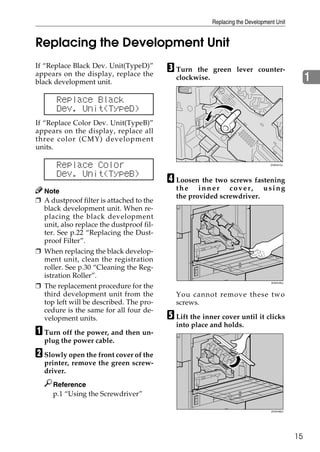
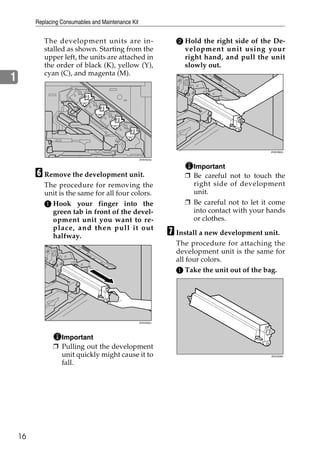
3. The photoconductor unit. The procedure involves opening covers, pulling out the used unit, inserting the new unit, and closing covers. Precautions are provided to avoid touching certain parts.


![Paper Recommendations
Paper Recommendations
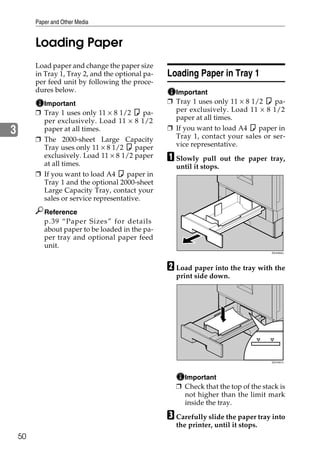
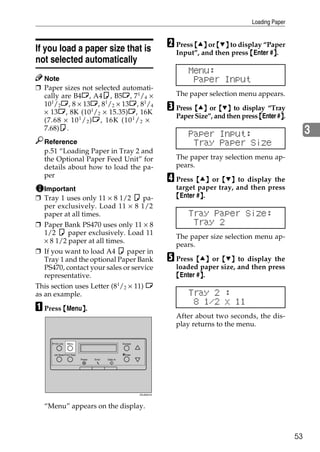
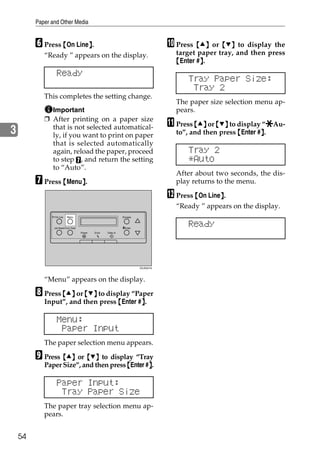
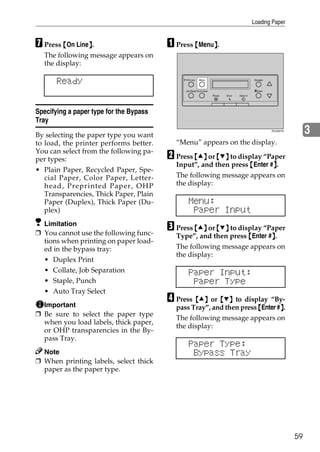
Loading Paper
Important
❒ Do not use ink-jet printer paper because it may stick to the fusing unit and
cause a paper misfeed.
❒ When printing on OHP transparencies that have a print side, load them with
the print side over on the bypass tray. Not taking this precaution may cause
them to stick to the fusing unit and cause misfeeds.
3
❒ Print quality cannot be guaranteed if recommended paper is not used. For de-
tails about recommended paper, contact your sales or service representative.
❒ Do not use paper that has already been printed onto by other printers.
Storing Paper
• Paper should always be stored properly. Improperly storing paper might re-
sult in poor print quality, paper misfeeds, or printer damage. Recommenda-
tions are as follows:
• Avoid storing paper in humid areas.
• Avoid exposing paper to direct sunlight.
• Store paper on a flat surface.
• Keep open reams of paper in the packaging it came in.
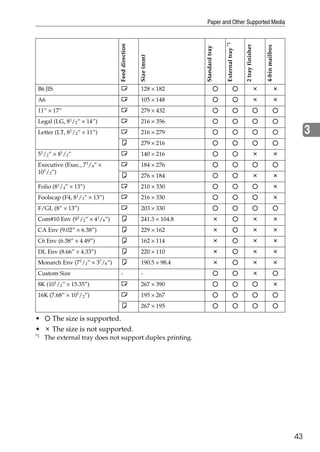
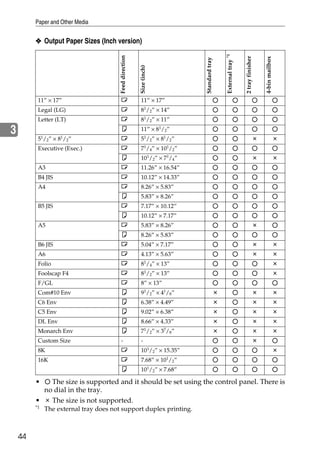
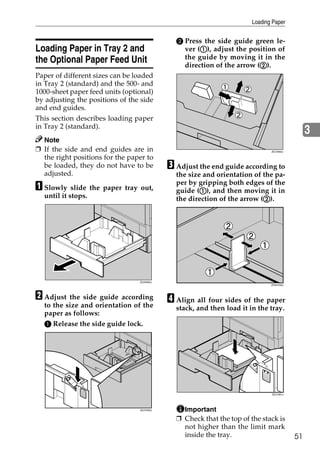
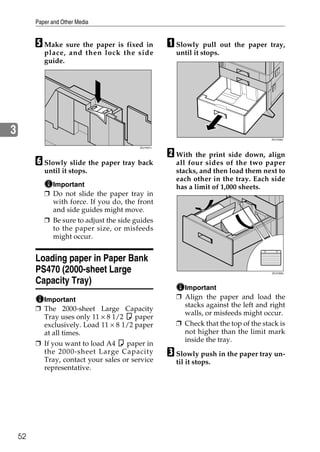
Types of Paper and Other Media
❖ Plain Paper
• Tray 1/2 can hold up to 500 sheets.
Paper Feed Unit Type 3800C (500×1) can hold up to 500 sheets.
Paper Feed Unit Type 3800C (500×2) can hold up to 1000 sheets.
Paper Bank PS470 can hold up to 2000 sheets.
Check that the top of the stack is not higher than the limit mark inside the
tray.
• The bypass tray can accommodate sheets 90-305 mm wide and 148-457
mm long. However, the paper size must be set using the control panel.
When using the RPCS printer driver, sheets of up to 1260 mm in length can
be set.
• When printing on the reverse side of plain paper that is already printed on,
you should load it on the bypass tray and select [Plain (Duplex Backside)]
from [Paper Type:] using the printer driver.
45](https://image.slidesharecdn.com/cl700020printer20maintenance20guide-100918120509-phpapp02/85/Cl7000-20-printer-20maintenance-20guide-51-320.jpg)
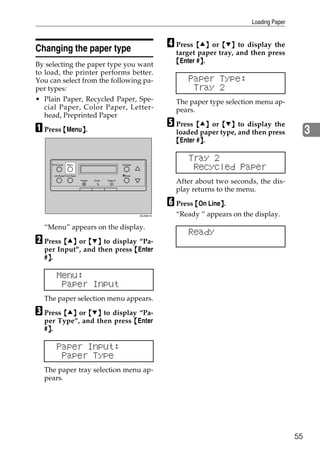
![Paper and Other Media
❖ Thick Paper
• Use the bypass tray
• The bypass tray can hold up to 135 kg (163 g/m2) of paper weight. Print
quality on thicker paper cannot be guaranteed.
• Check that the top of the stack is not higher than the limit mark inside the tray.
• When printing on thick paper, select thick paper mode using the printer
driver.
• When printing on the reverse side of plain paper that is already printed on,
you should load it on the bypass tray and select [Thick (Duplex Backside)]
from [Paper Type:] using the printer driver.
3
Note
❒ The number of sheets that can be set may vary depending on paper
thickness and type.
❖ OHP transparencies
• When printing on OHP transparencies, use the bypass tray.
• Load OHP transparencies on the tray with the print side over, otherwise
they may stick to the fusing unit and cause a misfeed.
• Remove unused OHP transparencies from the bypass tray after you are
finished printing. They may stick together if left in the tray.
• When printing on OHP transparencies, you should select the OHP trans-
parency mode using the printer driver.
• Check that the top of the stack is not higher than the limit mark inside the tray.
• When printing multiple OHP transparencies, remove each sheet from the tray
one by one before the next is printed out, or select [Slip Sheet] in the printer
driver. For details about using “Slip Sheet”, see the printer driver Help.
❖ Envelopes
Important
❒ Only envelopes A and B as shown below are supported.
Supported *1
Supported *1
Not supported
*1
Misfeeds might also occur when using envelopes A and B depending on the
length and shape of the flaps.
46](https://image.slidesharecdn.com/cl700020printer20maintenance20guide-100918120509-phpapp02/85/Cl7000-20-printer-20maintenance-20guide-52-320.jpg)
![Paper Recommendations
• When printing on envelopes, use the bypass tray, and select [Thick Paper]
as the paper type on the Paper Input menu on the control panel.
See p.59 “Specifying a paper type for the Bypass Tray”.
• Specifications for envelopes are as follows:
Metric version Inch version
2
Weight 72 - 90 g/m 19 - 24 lb
Recommended weight 72 g/m 2, 114 × 162 mm 24 lb, 37/8” × 71/2”
and size (C6 Env) (Monarch)
• You can load up to 10 envelopes (72 - 92 g/m2, 19 - 24 lb) in the bypass tray
at the same time, without compressing them. Check the envelopes are not 3
damp, and the top of the stack is not higher than the limit mark on the side
guide.
• Check the print side is facing up when loading onto the bypass tray.
• When loading envelopes, be sure to unfold the flaps and position them op-
posite to the paper feed direction.
• Make the printer driver setting for rotating the print image by 180 degrees.
For details, see the printer driver Help.
• Check there is no air in the envelopes before loading.
• To get better print quality, it is recommended that you set the right, left,
top, and bottom print margin, to at least 15 mm (0.6”) each.
• Do not print on both sides of envelopes.
• Load only one size and type of envelope at a time.
• Before loading envelopes, flatten leading edges (the side going into the
printer) by pressing a pencil or ruler across them.
• Before loading envelopes, check they are rectangular in shape.
• Supported sizes for envelopes are listed on p.39 “Paper and Other Media”.
47](https://image.slidesharecdn.com/cl700020printer20maintenance20guide-100918120509-phpapp02/85/Cl7000-20-printer-20maintenance-20guide-53-320.jpg)

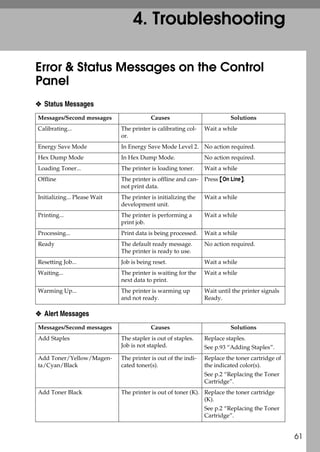
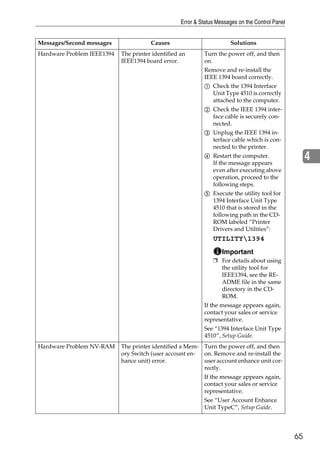
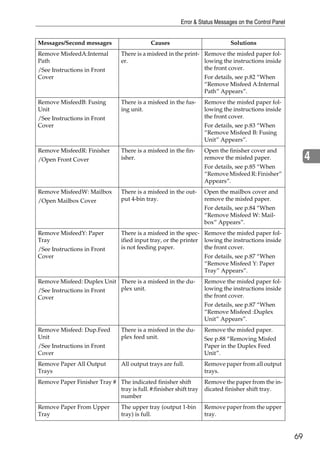
![Troubleshooting
Messages/Second messages Causes Solutions
Add Toner Cyan The printer is out of toner (C). Replace the toner cartridge
(C).
See p.2 “Replacing the Toner
Cartridge”.
Add Toner Magenta The printer is out of toner (M). Replace the toner cartridge
(M).
See p.2 “Replacing the Toner
Cartridge”.
Add Toner Yellow The printer is out of toner (Y). Replace the toner cartridge
(Y).
See p.2 “Replacing the Toner
Cartridge”.
4 Call Service: EC Power Off On A communication error sent Turn the power off and then
from the engine to the control- on. If the message appears
/If Error Reoccur Call Service
ler. again, contact your sales or
service representative.
Change Setting Tray # The paper size and type set- Load {paper size and type} pa-
/Paper Size: Paper Type: ting in the tray differs from per in the selected feed direc-
that of actual paper size and tion into the tray, and then
type in the tray. change the paper size and
type using the control panel.
Or, press {Form Feed}, and
}
then select the tray using the
control panel.
Or, press {Job Reset} to cancel
}
the print job.
Cannot check An attempt to check the radio To check the radio signal, se-
Signal in Ad hoc signal was made while the lect Infrastructure in the com-
communication mode was set munication mode settings.
to [Ad hoc] in the interface set-
tings.
Close Duplex Unit Cover The cover for the duplex unit Close the cover for the duplex
is open. unit.
Close Finisher Front Cover The front cover for the finisher Close the front cover for the
is open. finisher.
Close Right Cover The upper right cover (the Close the upper right cover.
cover for the toner cartridge)
is open.
Close Finisher Upper Cover The finisher upper cover is Close the upper cover for the
open. finisher.
Close Finisher Upper Cover The paper entrance cover for Close the upper entrance cov-
the finisher is open. er for the finisher.
Close Front Cover The front cover is open. Close the front cover for the
printer.
62](https://image.slidesharecdn.com/cl700020printer20maintenance20guide-100918120509-phpapp02/85/Cl7000-20-printer-20maintenance-20guide-68-320.jpg)
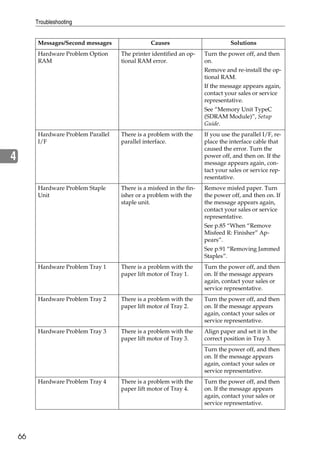
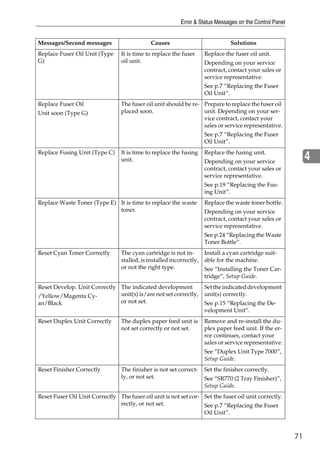
![Error & Status Messages on the Control Panel
Messages/Second messages Causes Solutions
Close Lower Right Cover The right cover for the paper Close the right cover for the
feed table/Large Capacity paper feed table/Large Ca-
Tray is open. pacity Tray.
Close Mailbox Cover The cover for the 4-bin mail- Close the cover for the 4-bin
box is open. mailbox tray.
Close Right Cover The right cover is open. Close the right cover.
Close Upper Left Cover The upper left cover (the cov- Close the upper left cover.
er for the fusing unit) is open.
DHCP assigned An attempt to change the IP Make the change after setting
Cannot change address, subnet mask or gate- DHCP to [Off].
way address was made while
DHCP was set to [On].
Driver Setting Error (Memo- The printer identified a down- Verify paper memory size is 4
ry) load error. This error may oc- specified with the driver set-
cur when the installed ting.
memory amount is less than
the driver setting.
Duplex Cancelled The setting of Duplex Print (a) To print the image correct-
has been cancelled. ly, add memory to the printer.
(b) Be sure to use the correct
paper.
Error: Enter 10 or 26 charac- An ID with an invalid number Enter the correct number of
ters of digits was entered for the digits for the WEP key.
WEP key.
Error:Tray 1 Reset The Job There is a problem with the Reset the job, and then turn
/Then Power OffOn current specified tray. The job the printer Off, then back On.
cannot be processed.
Error:Tray 1 Form Feed The printer identified the fail- Apply Form Feed from anoth-
/Or Job Reset Then Power Of- ure of the indicated paper er tray or cancel the job, and
fOn tray. The job is not printed. then switch your printer Off,
then back On. If the error con-
tinues, contact your sales or
service representative.
Exceeded Max. Pages (Col- The printer identified a colla- Add extra RAM.
late) tion page overflow error.
Install the optional hard disk
drive.
Exceeded Max. Stored Files The maximum number of Delete stored files.
stored files has been exceeded
during Sample Print of
Locked Print.
Exceeded Max. Stored Pages The maximum number of Reduce the number of pages
pages has been exceeded dur- to print.
ing Sample Print of Locked
Print
63](https://image.slidesharecdn.com/cl700020printer20maintenance20guide-100918120509-phpapp02/85/Cl7000-20-printer-20maintenance-20guide-69-320.jpg)
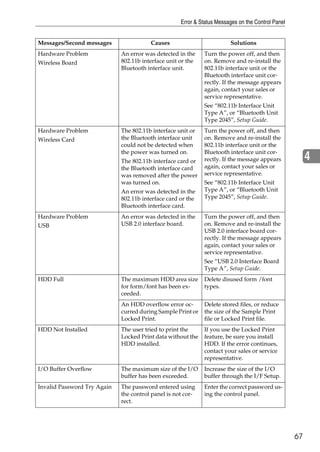


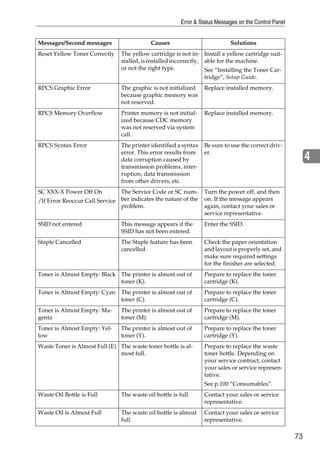
![Printer Does Not Print
Possible cause Solutions
Is the Data In indicator If it is not blinking or lit, data is not being received.
blinking or lit after starting
the print job? ❖ If the printer is connected to the computer using the in-
terface cable
Make sure the following printer port settings are correct:
• For parallel port connection, port LPT1 or LPT2 should be
set.
• For IEEE 1394 (SCSI print) port connection, port 1394_00(n)
*1
should be set.
*1
(n) is the number of printers connected.
• Windows 95/98/Me
A Click [Start], point to [Settings], and then click [Printers].
B Click to select the printer icon. Next, on the [File] menu,
click [Properties]. 4
C Click the [Details] tab.
D Check the [Print to the following port] box to confirm that
the correct port is selected.
• Windows 2000
A Click [Start], point to [Settings], and then click [Printers].
B Click to select the icon of the printer. Next, on the [File]
menu, click [Properties].
C Click the [Port] tab.
D Check the [Print to the following port] box to confirm the
correct port is selected.
• Windows XP
A Access the [Printers and Faxes] window from [Start] on
the taskbar.
B Click to select the icon of the printer. Next, on the [File]
menu, click [Properties].
C Click the [Port] tab.
D Check the [Print to the following port(s).] box to confirm
that the correct port is selected.
• Windows NT 4.0
A Click [Start], point to [Settings], and then click [Printers].
B Click to select the icon of the printer. Next, on the [File]
menu, click [Properties].
C Click the [Port] tab.
D Check the [Print to the following port] box to confirm the
correct port is selected.
❖ Network Connection
Contact your network administrator.
75](https://image.slidesharecdn.com/cl700020printer20maintenance20guide-100918120509-phpapp02/85/Cl7000-20-printer-20maintenance-20guide-81-320.jpg)
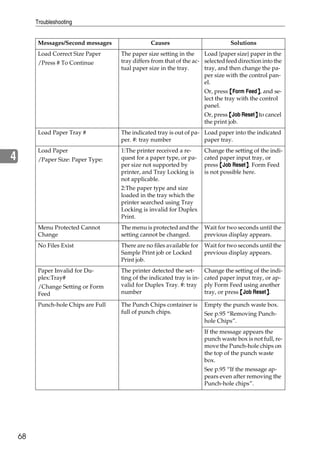
![Other Printing Problems
Other Printing Problems
Problem Possible causes and solutions
Black areas and lines are printed • PCL 5c/PostScript 3
with an unnatural hue. Select [CMY+K] for Gray Reproduction in the printer driv-
er's [Advanced] dialog box under the [Print Quality] tab.
• RPCS
Select [CMY+K] for Gray Reproduction under the [Image
Adjustments] tab in the printer driver's [Change Use Setting]
dialog box.
Color documents are printed in The printer driver is not set up for color printing.
black and white. • PCL 5c/PostScript 3
Select [Color] for the Color/Black and White under the
printer driver's [Setup] tab. 4
• RPCS
Select [Color] for the Color/Black and White under the
printer driver's [Print Settings] tab.
For details, see the printer driver Help.
Some applications normally print color text as black and
white.
Fine dot pattern does not print. • PCL 5c/PostScript 3
Change the [Dithering] setting in the [Advanced] dialog box
under the printer driver's [Print Quality] tab.
• RPCS
Change the [Dithering] setting under the [Image Adjust-
ments] tab in the [Change User Settings] dialog box under
the [Print Quality] tab in the printer properties dialog box.
For details, see the printer driver Help.
Images are cut off, or excess You might be printing on paper that is smaller than the size
pages are printed. selected in the application. Use paper the same size as that
selected in the application. If you cannot load paper of the
correct size, use the reduction function to reduce the image,
and then print.
See the printer driver Help.
77](https://image.slidesharecdn.com/cl700020printer20maintenance20guide-100918120509-phpapp02/85/Cl7000-20-printer-20maintenance-20guide-83-320.jpg)
![Troubleshooting
Problem Possible causes and solutions
It takes too much time to com- Photographs and other data-rich pages take a long time for
plete the print job. the printer to process, so simply wait when printing such da-
ta.
Changing the following settings may help speed up printing.
• PCL 5c
Select [600 dpi] as the Resolution under the [Print Quality]
tab in the printer properties dialog box.
• PostScript 3
Select [1200 dpi] or [600 dpi] as the Resolution under the
[Print Quality] tab in the printer properties dialog box.
Select [Fast] as the Gradation under the [Print Quality] tab
in the printer properties dialog box.
Select [Post Script(optimize for speed)] as the PostScript 3
output format under the [PostScript] tab in the printer
4 properties dialog box.
• RPCS
× ×
Select [1200×600 dpi] or [600×600 dpi] as the Resolution un-
der the [Image Adjustments] tab in the [Change User Settings]
dialog box in the printer dialog box.
Select [Speed] Print priority under the [Print Quality] tab in
the printer properties dialog box.
For details, see the printer driver Help.
The data is so large or complex that it takes time to process.
If the Data In indicator is blinking, data processing is in
progress. Just wait until it resumes.
If the “Warming Up... ” message appears on the display, the
printer is warming up. Wait a while
Note
❒ To maintain optimum quality, color adjustment is regu-
larly executed during or after printing. Even if printing is
not specified, color adjustment is sometimes executed au-
tomatically while the power is on.
It takes too much time to resume The data is so large or complex that it takes time to process.
printing. If the Data In indicator is blinking, data processing is in
progress. Just wait until it resumes.
The printer might be in Energy Saver mode. In this mode, the
printer has to warm up before printing can start, and this
takes time. To change how long it takes before the printer
goes into Energy Saver mode or to disable Energy Saver
mode, configure Energy Saver 1 or Energy Saver 2 in the Sys-
tem menu.
Multiple pages are fed through Paper misfeeds occur frequently when the paper feed roller
the printer at once. is dirty. Contact your sales or service representative to re-
place the paper feed roller.
78](https://image.slidesharecdn.com/cl700020printer20maintenance20guide-100918120509-phpapp02/85/Cl7000-20-printer-20maintenance-20guide-84-320.jpg)
![Other Printing Problems
Problem Possible causes and solutions
Output are not delivered to the When using the bypass tray, the size selected on the display
selected tray you require. might be different from actual paper size. Select the correct
paper size.
See p.39 “Paper and Other Supported Media”.
If you are using a Windows operating system, printer driver
settings override those set using the control panel. Set the de-
sired output tray using the printer driver.
See the printer driver Help.
Paper misfeeds occur frequent- Check the side guide of the paper tray is locked.
ly. See p.39 “Paper and Other Supported Media”.
Paper size and feed direction of paper in the Bypass Tray
might not be the same as those selected using the control
panel. Check the settings on the control panel, and load pa-
per of the correct size and feed direction.
4
See p.39 “Paper and Other Supported Media”.
Check the paper guide of the paper tray is attached properly.
Solid areas, lines, or text are • PCL 5c/PostScript 3
shiny or glossy when printed as Select [K(Black)] for Gray Reproduction in the printer
a mixture of cyan, magenta, yel- driver's [Advanced] dialog box under the [Print Quality] tab.
low. • RPCS
Select [K(Black)] for Gray Reproduction under the [Image
Adjustments] tab in the printer driver's [Change Use Setting]
dialog box.
Solid lines are printed as broken • PCL 5c/PostScript 3
lines. Change the [Dithering] setting in the [Advanced] dialog box
under the printer driver's [Print Quality] tab.
• RPCS
Change the [Dithering] setting under the [Image Adjust-
ments] tab in the [Change User Settings] dialog box, under
the [Print Quality] tab in the printer properties dialog box.
For details, see the printer driver Help.
Some parts of the print image Make the image density darker.
are not clear. To adjust image density, press {Menu} on the control panel,
}
and then select Image Density from the Maintenance menu.
The color of the printout is dif- Toner based color settings under the printer driver produce
ferent from the color on the unexpected printout colors.
computer display.
Changing color settings using the printer driver produces
unexpected printout colors.
See the printer driver Help.
The image is printed in the The feed direction you selected and the feed direction select-
wrong orientation. ed in Option Setup of the RPCS printer driver may be con-
flicting. Make the proper settings.
79](https://image.slidesharecdn.com/cl700020printer20maintenance20guide-100918120509-phpapp02/85/Cl7000-20-printer-20maintenance-20guide-85-320.jpg)