This document provides an introduction and overview of getting started with PhoneGap development. It discusses installing the necessary tools including Node.js, PhoneGap, and the Android SDK. It describes two methods for creating a PhoneGap project - using the PhoneGap command line tools or Eclipse IDE. The document emphasizes that the sample app will be developed specifically for Android, though PhoneGap allows building apps for multiple platforms from the same codebase.


![1. Introduction
This book is going to teach you how to get started with mobile app development using the
PhoneGap platform. We’ll essentially rebuild, from scratch, a basic yet fully-functional app that
really exists! It’s called Japxlate and can be found here in the Google Play Store. The app is a
Japanese dictionary that you can search - even if offline. Not to worry though, we won’t get
bogged down in the nitty gritty of Japanese linguistics. We’ll focus on setting up, building and
finally deploying the app. You’ll laugh, you’ll cry, you’ll sick a little bit in the back of your throat,
but the journey will definitely be worth it…
This is version 1.0 of the book, first published February 2015 (v0.9 first published
January 2014)
Latest source code for the app is at https://github.com/danielrhodeswarp/japxlate-
android
This book was written using PhoneGap v3.1.0, but has been updated to cover anything
new or different in v3.3.0
1.1 Conventions used in the text
A command that you need to type on the Linux command line will look like:
you@yours$ somewhere]$ some linux command to type
Code (of any type - CSS, HTML or JavaScript) that you need to type in will look like:
//does the cursor have random fractals?
function checkRandomFractals()
{
return something.or.other;
}
HTML elements will be referred to like:
<elementname>
Code fragments, variable names, method names etc will look like:](https://image.slidesharecdn.com/phonegapbydissection-150226151804-conversion-gate01/85/PhoneGap-by-Dissection-6-320.jpg)
![4. Getting started
There are two routes we can go down to get started with PhoneGap development. Both routes
require the Android SDK to be installed so let’s do that first. The easiest way to install the Android
SDK is to install the Android Developer Tools (or ADT) bundle. This bundle installs the Android
SDK and Eclipse IDE configured for Android (native) development.
Right, let’s install the Android Developer Tools. The easy peasy way is to download and install
the “ADT Bundle for Linux” from http://developer.android.com/sdk/index.html which should be
worry free.
If you’re already using Eclipse IDE, you can simply download the Android Developer Tools
plugin for it at http://developer.android.com/tools/index.html
..
About IDEs
You aren’t forced to use Eclipse IDE for Android development, though it does make a lot of
things easier as it supports direct deploy to an actual Android device and it has a virtual device
manager for deploying to emulated Android devices.
Myself, I didn’t like the way that Eclipse was opening - and highlighting - the various
frontend source files for the app (though I don’t doubt that this is configurable in the options
somewhere!). There’s also the fact that it doesn’t speak PhoneGap. I found myself cutting the
code in NetBeans IDE and checking in with Eclipse every now and again to deploy to the actual
device (Ctrl-F11) or to check console.log() messages in LogCat.
Netbeans IDE v7.4 dropped just before I finished this tutorial and interestingly that seems to
have PhoneGap (well, Cordova) support built in! Definitely worth a look.
Bizarrely, I found that regardless of the IDE used, I often had to deploy to the device twice
in order to have it truly updated. This happened whenever a resource file was updated, ie.
JavaScript or HTML or CSS. I notice this doesn’t happen when Java sources are edited which
indicates some kind of caching issue. I still haven’t got to the bottom of this particular mystery.
4.1 The cool new way
OK, now we can install PhoneGap itself. For some strange reason that I can’t figure out (I’m
guessing it’s just for package management) it requires NodeJS so go to http://nodejs.org and
install it. Then, as we see at http://phonegap.com/install we simply do (on the command line):
you@yours$ somewhere]$ sudo npm install -g phonegap](https://image.slidesharecdn.com/phonegapbydissection-150226151804-conversion-gate01/85/PhoneGap-by-Dissection-10-320.jpg)
![Getting started 6
This installs the PhoneGap binaries and commands globally on our system. After that, let’s
actually create the PhoneGap project where we’ll put all of our lovely code for the app. There
are two slightly different syntaxes for this:
you@yours$ somewhere]$ phonegap create --name "Japxlate" --id "com.drappenheimer.japxla
te" japxlate
or
you@yours$ somewhere]$ phonegap create japxlate com.drappenheimer.japxlate "Japxlate"
This will create a PhoneGap project folder structure for building the same code to many
different device targets (Android or iOS etc). "Japxlate" is the name of our app (in quotes).
com.drappenheimer.japxlate is our app’s reverse domain name identifier. All Android apps
have a unique identifier like this. japxlate is our desired folder name for the project. We then
want to do:
you@yours$ somewhere]$ cd japxlate
you@yours$ japxlate]$ phonegap run android
Which will detect your Android SDK and try to run the app on the currently connected device
(or configured virtual machine). If no Android SDK is found or present, it will try to deploy the
app to your account on the PhoneGap remote cloud build environment - which is just out of
beta at time of writing. But you’ll more than likely need an extra bit of setup to get this run
android command to work. Specifically you’ll need to add a couple of folders from the Android
SDK install to your PATH. The gory details are at http://docs.phonegap.com/en/edge/guide_-
platforms_android_index.md.html#Android%20Platform%20Guide, but how I did it was to add
the following lines to my ∼/.bashrc file:
export ANDROID_SDK_HOME=/wherever/you/installed/it/adt-bundle-linux-x86_64-20130729/sdk
export PATH=${PATH}:${ANDROID_SDK_HOME}/platform-tools:${ANDROID_SDK_HOME}/tools
As well as this I personally needed the Java development libraries to be installed.
If the run android command still doesn’t work after all this configuration, double check your
Android SDK Manager which you can reach from the Eclipse IDE.
Note that this run command is a shortcut for the build followed by install commands. If you
don’t want to actually run your PhoneGap app from the command line, you need to at least build
it which is like this:
you@yours$ japxlate]$ phonegap build android
This will create a PROJECTROOT/platforms/android folder with skeleton source files for our app
in it. And importantly the project files for this to be pickupable as an Android project in Eclipse
IDE.](https://image.slidesharecdn.com/phonegapbydissection-150226151804-conversion-gate01/85/PhoneGap-by-Dissection-11-320.jpg)
![Getting started 7
..
How many mobile platforms does it take to
change a lightbulb?
You might be wondering now, if PhoneGap is supposed to be this amazing tool that lets us
write the same app code for multiple mobile platforms, why would we want to dive straight in
to the /platforms/android folder? How is that going to work on, say, iOS?
The answer is simple, PhoneGap is indeed a tool where the same app code can be compiled
for multiple mobile platforms, but - in a nutshell - we are cheating and taking a shortcut! This
tutorial is rather simplified and focuses solely on Android. This is why we dive right in at
/platforms/android.
If your app needs to work on multiple mobile platforms - as most apps do - then you should
really create your app’s code in PROJECTROOT/www, specifying any platform-specific customisa-
tions in PROJECTROOT/merges, then debug each time for your platforms with the build, install
and run commands. The excellent blog post at http://devgirl.org/2013/09/05/phonegap-3-0-
stuff-you-should-know/ explains this very well.
Like the run command, the build command will also fallback to the remote cloud build
environment. You can disable this fallback with the command phonegap local build android.
Right, so now you’ve at least built your app on the command line. You might even have run it
from the command line! Going forward with this tutorial, let’s plug the skeleton code we’ve just
built into our Eclipse IDE as an Android project. Follow these steps:
1. Click File ⇒ New ⇒ Project
2. Select Android ⇒ Android Project from Existing Code (note there’s also a sample native
project in there!)
3. Browse to PROJECTROOT/platforms/android folder (actually just PROJECTROOT seems to
also work)
4. Click OK
5. You’ll get an “Import Projects” dialogue now with the project details that you can confirm
/ change and then click Finish
..
Keeping your PhoneGap up-to-date
Installing PhoneGap via NodeJS has the nice advantage that you can keep your PhoneGap
version up-to-date by running this command:
you@yours$ somewhere]$ sudo npm update -g phonegap](https://image.slidesharecdn.com/phonegapbydissection-150226151804-conversion-gate01/85/PhoneGap-by-Dissection-12-320.jpg)

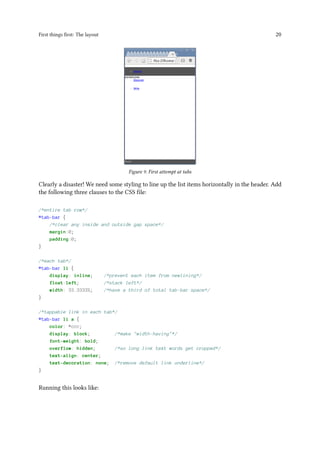
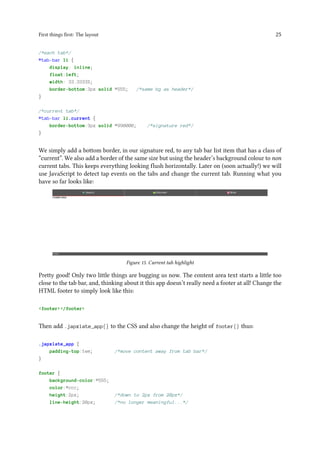
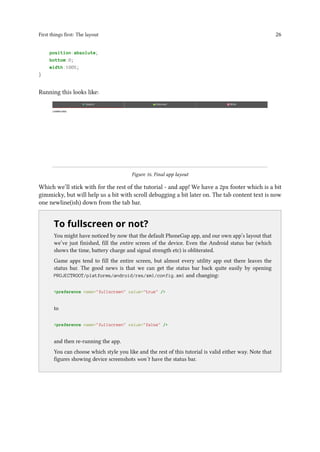
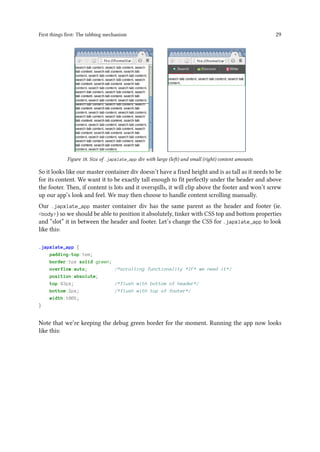
![First things first: The layout 23
density of the device display, they might be too tiny and hard to make out or really massive and
Legoish. But we’ll use them for simplicity.
One alternative would be to use a vector format - such as SVG - for the icons which stores the
image such that it can be scaled up or down without losing information. Another new trend is to
have the browser load something called an icon font. This is like a normal font but where each
character is an icon (remember Wingdings?!). This has the advantage that the icons are sizeable
just like any other text. Also they can be bolded or italicised. But they can only be of one colour.
Go ahead and put all of the PNG icons in assets/www/img (though we won’t use all of them).
Let’s reference some of these icons in our tab markup, change <header> in index.html to look
like this:
<header>
<ul id="tab-bar">
<li>
<a href="#search"><img src="img/search.png"> Search</a>
</li>
<li>
<a href="#discover"><img src="img/chat-bubble.png"> Discover</a>
</li>
<li>
<a href="#write"><img src="img/file.png"> Write</a>
</li>
</ul>
</header>
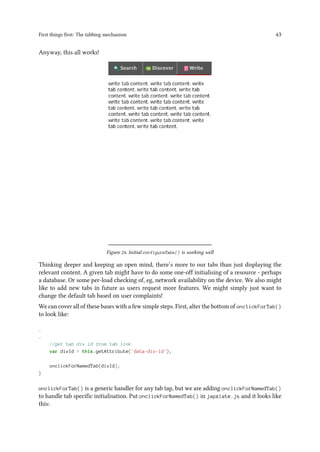
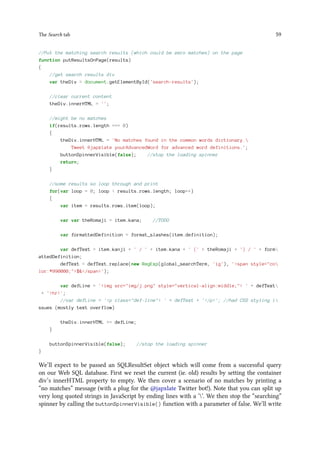
Note the space after the image and before the link text. Running this gives:
Figure 13. Icons we sourced are way too big
Woah, those icons are pretty big eh? The icons are a mix of square, tall or wide, but they all have
a biggest side of about 128 pixels. That’s clearly way too big for us here. Let’s use GIMP to resize
search.png, chat-bubble.png and file.png to have a biggest side of 16px - the same as our app
font size (in index.css) [NOTETOSELF double check this]. So go ahead and make those changes
and overwrite the original icon files. While you’re at it, do the same for paste.png because we’ll
be using that later on. (Feel free to trash the other icon files from assets/www/img as we won’t](https://image.slidesharecdn.com/phonegapbydissection-150226151804-conversion-gate01/85/PhoneGap-by-Dissection-28-320.jpg)
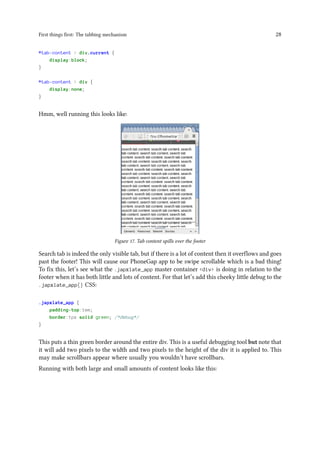
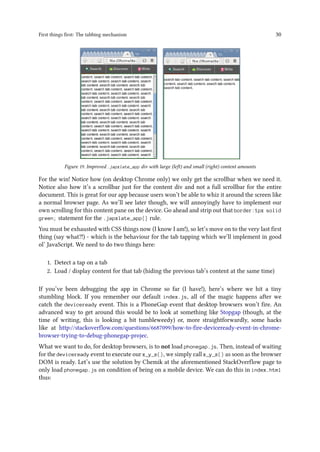
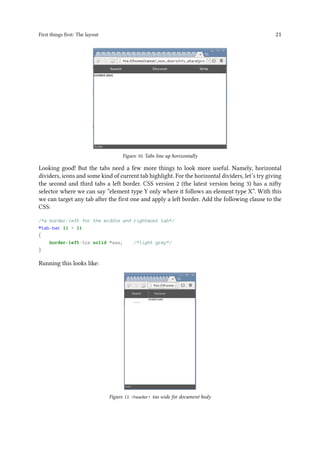
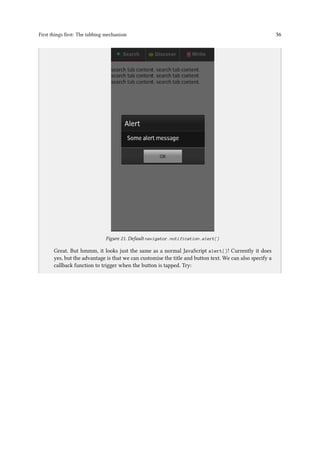
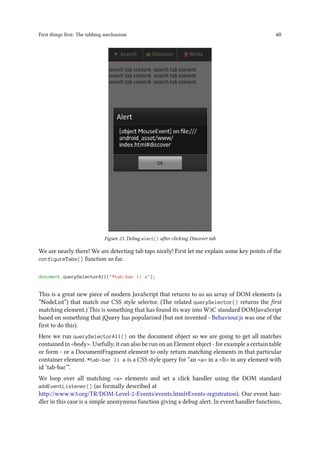
![First things first: The tabbing mechanism 33
..
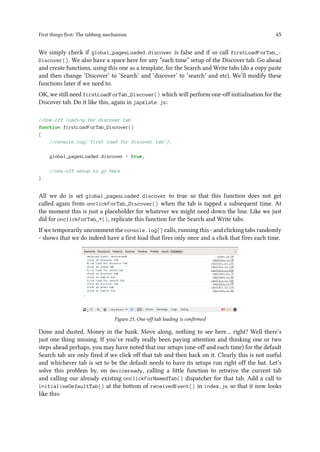
navigator.notification.alert(message, alertCallback, [title], [buttonName]);
So let’s try that. Stick navigator.notification.alert('Some alert message', null); in the
receivedEvent() function that we were just tinkering with. Running this (which obviously
won’t work in desktop Chrome) gives a spurious error in LogCat:
Figure 20. Error when attempting navigator.notification.alert()
What’s going on? Well, it turns out that “As of version 3.0, Cordova implements device-level
APIs as plugins”. We have to install whichever APIs we want in our project. This removes
bloat as, previously, all APIs came pre-installed in every PhoneGap project. I actually found
this to be a bit mysterious and poorly documented (I found myself mashing up a mix of info
from Cordova docs and PhoneGap docs). But here’s how to add a particular plugin to your
PhoneGap project. Go to anywhere in your project folder structure on the command line and:](https://image.slidesharecdn.com/phonegapbydissection-150226151804-conversion-gate01/85/PhoneGap-by-Dissection-38-320.jpg)
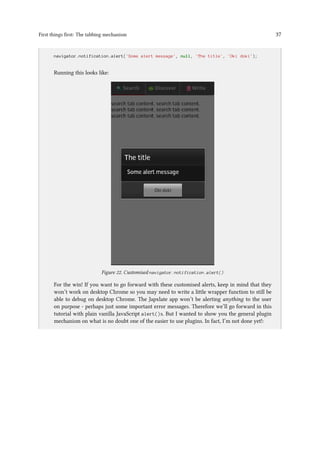
![First things first: The tabbing mechanism 34
..
you@yours$ japxlate]$ phonegap local plugin add https://git-wip-us.apache.org/repos/asf
/cordova-plugin-dialogs.git
From PhoneGap v3.3.0 you can simply type phonegap local plugin add
org.apache.cordova.dialogs
Which should echo:](https://image.slidesharecdn.com/phonegapbydissection-150226151804-conversion-gate01/85/PhoneGap-by-Dissection-39-320.jpg)
![First things first: The tabbing mechanism 35
..
[phonegap] adding the plugin: https://git-wip-us.apache.org/repos/asf/cordova-plugin-di
alogs.git
[phonegap] successfully added the plugin
(Note that you won’t need to run this command, and you won’t get the above error, if you’ve
gone down The fiddly older way as that bundles all plugins into your project).
You’ll get the relevant URL from the docs for whichever plugin at the “API Reference” section at
http://docs.phonegap.com/en/3.1.0/ (PhoneGap has a good list of core and 3rd party plugins at
https://build.phonegap.com/plugins but the installation instructions for each one are seemingly
out-of-date and mention tinkering with XML config files which we don’t need to do after
running the above command.) The above command has downloaded the source for the plugin
and put it in /assets/www/plugins (in this case in org.apache.cordova.dialogs)
but diff on v3.3.0 etc.
It has also added references to the plugin in /assets/www/cordova_plugins.js - a file which
has been there from the start but just as a placeholder stub. The phonegap.js that we include
in our index.html actually also includes cordova_plugins.js so after running the above
command, we have all we need to start using navigator.notification.alert()! Try it again!
It works!:](https://image.slidesharecdn.com/phonegapbydissection-150226151804-conversion-gate01/85/PhoneGap-by-Dissection-40-320.jpg)
![First things first: The tabbing mechanism 38
..
you@yours$ japxlate]$ phonegap local plugin list
[phonegap] org.apache.cordova.dialogs
This command lists all plugins installed in the current project.
you@yours$ japxlate]$ phonegap local plugin remove org.apache.cordova.dialogs
[phonegap] removing the plugin: org.apache.cordova.dialogs
[phonegap] successfully removed the plugin
This command removes the specified plugin from the current project. You specify the plugin
by its reverse-DNS identifier. You can find these out by issuing the above “list” command.
There are plugins to access the mobile device’s camera, accelerometer, phone contacts and
many more. Using these plugins is how we make a full fat mobile app and not just a simple
website-in-a-box.
PhoneGap v3.3.0 also has “Plugman” which is another way of working with plugins.
Plugman lets you add or remove plugins for one specific platform, whereas the above
method will add or remove plugins globally to any and all platforms used in the project.
Please see http://docs.phonegap.com/en/3.3.0/plugin_ref_plugman.md.html.
We’ve just been able to simulate our deviceready event on desktop Chrome for debugging and
we are ready to get our tab taps working. receivedEvent() in index.js is where the magic
happens because by the time we reach there, the device is ready (and the browser DOM is ready
as we’ve put JavaScript includes at the bottom of our HTML). But let’s not go down the route of
stuffing all of our JavaScript in index.js. Let’s go modular - right from the start. Create a new
JavaScript file called:
japxlate.js
in /assets/www/js
and include it from index.html thus:
<script type="text/javascript" src="js/japxlate.js"></script>
<script type="text/javascript" src="js/index.js"></script>
<script type="text/javascript">
app.initialize();
</script>
Put a function called configureTabs() in the newly created japxlate.js thus:](https://image.slidesharecdn.com/phonegapbydissection-150226151804-conversion-gate01/85/PhoneGap-by-Dissection-43-320.jpg)

![First things first: The tabbing mechanism 42
{
return false;
}
lastTab.parentNode.className = ''; //undisplay
this.parentNode.className = 'current';
//---------------------------
//-----content div display logic---
var lastDiv = document.querySelector('div.current');
lastDiv.className = ''; //undisplay
var matchingDiv = this.getAttribute('data-div-id');
var thisDiv = document.getElementById(matchingDiv);
thisDiv.className = 'current';
//-----------
//get tab div id from tab link
var divId = this.getAttribute('data-div-id');
}
Let’s go through this code, which looks fiddly at first, but basically tinkers with CSS class names
such that things turn on and off as we want.
The first thing we do is the DOM standard preventDefault() which prevents the browser’s
default action for the event from triggering. The default browser action for clicking on a link is
to:
1. Change URL in address bar to that of link target
2. Add new URL to browsing history
3. Load new URL
As our links are simply triggers to load tabs and not proper links, we don’t want any of these
steps to happen. Step [2] is especially annoying. If we don’t call preventDefault() for our tab
taps, if we open our app and click on the tabs ten times, we will have to use the device’s BACK
button ten times to exit the app!
Next we use querySelector() to get the single current tab link. Because ‘this’ in our click handler
will be the clicked element, we can do a check to see if this is the same as the previous current
tab. And if so, do a “no operation” (NOP). We then manipulate classnames to activate only the
clicked tab.
Similarly, we use querySelector() to get the currently active content <div>. We activate the
content <div> for the clicked tab by retreiving data-div-id from the clicked <a> and using that
to get the correct div.](https://image.slidesharecdn.com/phonegapbydissection-150226151804-conversion-gate01/85/PhoneGap-by-Dissection-47-320.jpg)
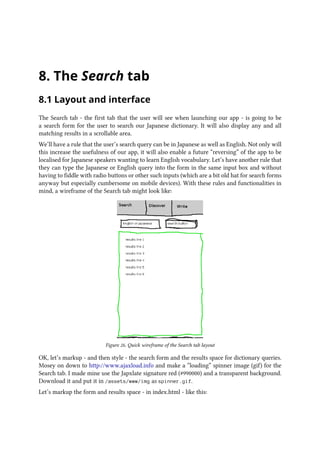
![The Search tab 48
<div id="search" class="current">
<button type="button" id="search-button" style="float:right; width:45%; margin-righ
t:1%;">
<img src="img/search.png">
Search
<img id="button-spinner" src="img/spinner.gif" style="visibility:hidden;">
</button>
<input type="text" id="search-query" placeholder="Japanese or English" size="40"
style="width:45%; margin-left:1%;">
<br>
<span id="loading-text">
[Loading core dictionary. This takes a while the first time.
<img src="img/spinner.gif">]
</span>
<div id="results-wrapper">
<div id="search-results">
You can search by kanji, hiragana, katakana, English or romaji!
</div>
</div>
</div>
We float our search button right (which means that in the markup it has to come before things on
the same line that would be visually to the left of it) but make it 1% (of total width) away from the
edge for nice appearance. We reuse search.png as a button icon. We also include the spinner.gif
that we just created but default it to visibility:hidden. Why not just display:none? Because
with visibility:hidden, it is hidden but still takes up space in the layout flow. This means the
layout won’t “jump” when we make it appear. We’ll switch this image’s visibility on and off
programmatically.
Then we’ve got our text input which uses the new HTML5 placeholder attribute to present a
hint or instruction to the user about what kind of entry it expects. The text input is also 45% wide
with an edge spacing of 1%.
Why not just make both 50%? Because then they will touch in the middle which will end in tears
with big fingers on a small display!
We then have a “this will take a while” message and spinner that we will remove after one-off
setup is complete.
Finally we have a container for our search results - <div id=”search-results”> - which displays a
default search hint. We also have a wrapper for the search results container - <div id=”results-
wrapper”> - which is going to be the scroll viewport for search results. These two divs need the
following styles in index.css:](https://image.slidesharecdn.com/phonegapbydissection-150226151804-conversion-gate01/85/PhoneGap-by-Dissection-53-320.jpg)
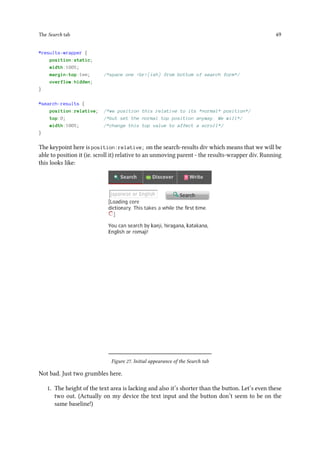
![The Search tab 50
2. Icon for search is screwy again - let’s fix that like we fixed the tab icons.
In index.css, change the existing:
a img
{
vertical-align:middle; /*make more sensible relative to text baseline*/
}
to:
a img, button img
{
vertical-align:middle; /*make more sensible relative to text baseline*/
}
Which covers (2). To fix (1), add this to index.css:
input[type="text"], button {
height:30px;
margin:0;
}
Running looks like this:](https://image.slidesharecdn.com/phonegapbydissection-150226151804-conversion-gate01/85/PhoneGap-by-Dissection-55-320.jpg)

![The Search tab 54
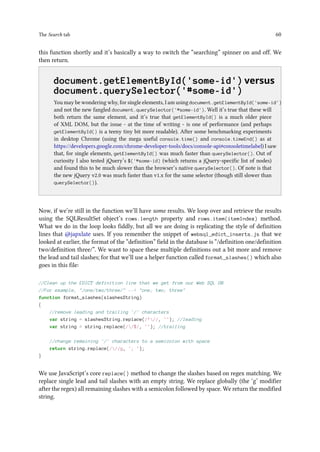
//Check if "edict" table exists and has records
function checkDB(tx)
{
//console.log('checkDB()');
tx.executeSql('SELECT COUNT(id) AS count FROM edict', [], successCheckDB, errorChec
kDB);
}
We call executeSql() on the received SQLTransaction object which needs at least an SQL query
as its first argument (and parameter values as the 2nd parameter if the query in the first argument
uses parameter binding), but can optionally take both a success and failure callback as 3rd and
4th parameter respectively. Here we run a very simple query to get the count of rows - by id
- in the edict table. This query will throw an error if the edict table does not exist (but not if
it exists and is empty which is a condition we will knowingly ignore for this simple app). We
don’t use parameter binding in this query so we provide an empty array as the 2nd parameter
simply because we need to “get” to the 3rd and 4th parameters. We specify an error and a success
callback. Should the query fail we can assume that the table does not exist and therefore needs
to be created and populated. Let’s look at the success callback first as it’s simpler and only has
to clear the “database loading” message:
//Callback for if checkDB() succeeds - ie. "edict" table present and full
//SO clear the "database loading" message
function successCheckDB(tx, results)
{
//console.log('edict already loaded');
document.getElementById('loading-text').innerHTML = '';
}
Pretty easy and not worth explaining other than to point out that the callback function receives
an SQLTransaction and an SQLResultSet object respectively.
Let’s get started on the error callback:
//Callback for if checkDB() fails - ie. no "edict" table
//SO create it and fill it
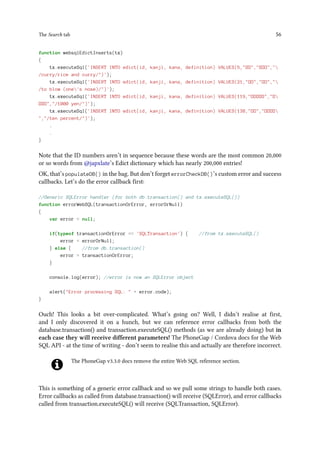
function errorCheckDB(transaction, error)
{
console.log('edict table not exist - will create and fill');
//here we need to do something to fill the table
}
This code so far will run without errors (but don’t forget include websql_core.js from
index.html (above the japxlate.js include)) but won’t do anything useful. It will get to the
“edict table not exist - will create and fill” log message and then stop. In the error callback, we
need to run another transaction on the Japxlate database which will load all the dictionary data
we need. Change errorCheckDB() to look like this:](https://image.slidesharecdn.com/phonegapbydissection-150226151804-conversion-gate01/85/PhoneGap-by-Dissection-59-320.jpg)

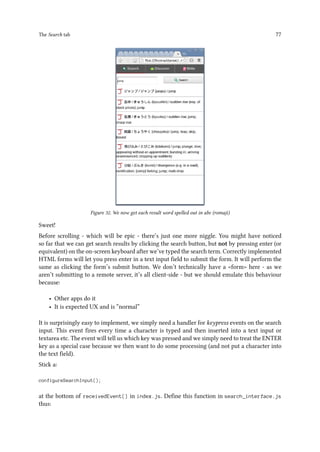
![The Search tab 63
..
Why two search querying routes?
We could get away with not detecting the input query’s language by having this kind of logic:
“Assume the query is English, do a search, if no results then assume it’s Japanese
and search again”
Which has two problems. We have to make an assumption about how our app is being mostly
used. (Admittedly we could change the assumption if we find out it’s wrong.) Another problem
is performance - we may be searching unnecessarily.
A very simple, and linguistically incorrect!, way to do this is to see if we have multibyte
characters in our query string or not. We’ve set our HTML page to be UTF-8. UTF-8 is interesting
because it’s a flavour of Unicode that’s backwards compatible with good ol’ ASCII. ASCII can
be utf-8, but so can Japanese! But ASCII won’t set the right bits in each byte to be considered
a multibyte stream. Something we can use to our advantage is that for ASCII, the length of a
string in bytes will also be the length of that string in characters. For multibyte utf-8 strings, this
will not be the case and the byte length will be greater than the character length.
Let’s implement an is_mb() (“mb” meaning “multibyte”) check using this knowledge. Keeping
things modular, and realising that we are going to need functions soon for Japanese language
handling, make a new file in /assets/www/js called linguistics.js. Add is_mb() thus:
//Does the given utf8 string have multibyte characters or not?
function is_mb(utf8String)
{
return utf8String.length != mb_bytelen(utf8String);
}
Here we compare a string’s length in characters (using the length property - JavaScript operates
internally with utf-16 unicode) with its length in bytes. mb_bytelen() is the key function
here that we need to write. It will give us the byte length for a utf8 string. Put it also in
linguistics.js:
//Get length in BYTES of a utf8 string
function mb_bytelen(utf8String)
{
//Matches only the 10.. bytes that are non-initial characters
//in a multi-byte sequence.
var m = encodeURIComponent(utf8String).match(/%[89ABab]/g);
return utf8String.length + (m ? m.length : 0);
}
In utf-8, everything is a sequence of bytes. For an ASCII character, one byte is the full sequence
- that byte is the character. But it allows for multibyte characters by the initial byte in](https://image.slidesharecdn.com/phonegapbydissection-150226151804-conversion-gate01/85/PhoneGap-by-Dissection-68-320.jpg)
![The Search tab 64
that character’s sequence of bytes setting a special bit. This special bit tells the browser (or
programming language or text editor etc) that “there’s more to come!” and the browser adds
the remaining bytes in the sequence to get the full value for that character. The remaning bytes
also set a special bit so the browser knows when that particular character has all of its bytes read.
For the gory details please see http://en.wikipedia.org/wiki/UTF-8.
So what we are doing in mb_bytelen() is adding the length of the string in characters to the
count of non-initial character sequence bytes. This will give us the total byte length for any utf8
string - containing multibyte characters or not!
OK, is_mb() is one important tool for our database querying logic in the bag. Using it, let’s think
more about our query logic with some pseudocode:
if(is_mb(searchTerm)) {
//searchTerm is Japanese (or at least multibyte)
//
//[1] exact kanji match
//[2] exact kana match
} else {
//searchTerm is English or, as last resort, romaji
//
//[1] exact definition match
//[2] partial definition match
//[3] exact romaji match (on kana field)
}
So, if we detect multibyte characters in the search term, we assume it is Japanese and try to
match it exactly against, first, the kanji field of the words in our database. Then, if that produces
no results, we try to match it exactly against the kana field. This priority order is realistic because
kanji (Chinese idiogrammic characters) are the “correct” way to write a Japanese word. The kana
is just the way to pronounce those Chinese characters. Though note that some words are kana
only and don’t hava a kanji.
We assume that the search term is in English if it contains no multibyte characters. Then we
focus on the definition field of our database. Remember that definition entries look like this:
/uncertain/vague/ambiguous/
Multiple definitions are separated by slashes. So our most relevant results (query [1] of the
English route) would be to find the search term exactly as one of these definitions. A search
for “vague” would match the above definition, for example. If that produces no results, we query
for partial matches of the search term in these definitions. For example a search for “director”
will match a definition of /company director/board member/. Finally, if we still have no
results, we can take a gamble and assume that the user has entered a term in romaji (which
is Japanese written in abc like “sayonara” or “moshimoshi”). For this we’ll have to convert the
search term into phonetic kana and query for a matching kana field. So this one needs a bit more
work programmatically.
Note that if we go down the Japanese route, and get no results at the end, we don’t then proceed
down the English route (and vice-versa).](https://image.slidesharecdn.com/phonegapbydissection-150226151804-conversion-gate01/85/PhoneGap-by-Dissection-69-320.jpg)
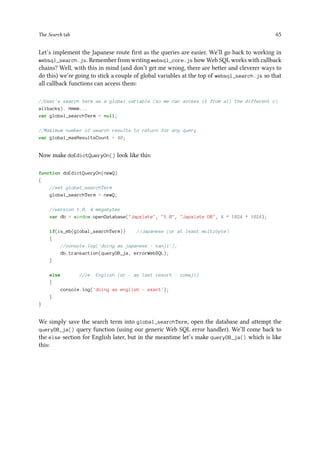
![The Search tab 66
//Search edict for an exact kanji match
function queryDB_ja(tx)
{
var safeQ = global_searchTerm;
//use placeholders (so we don't need to escape the query)
tx.executeSql(SELECT * FROM edict WHERE kanji = ? LIMIT + global_maxResultsCount
, [safeQ], successQueryDB_ja, errorWebSQL);
}
We accept an SQLTransaction object - as per the Web SQL specification - and call it tx for short.
We use tx.executeSql() to run a very simple SQL query on the edict table; Matching the kanji
field exactly to the search term. Note how we get the search term from the global variable we
defined earlier.
In the SQL query, we have kanji = ?, the question mark is a placeholder for parameter (or
value) binding. We then specify the value to be bound to this placeholder in the 2nd argument to
tx.executeSql(), in this case safeQ. Why do this? Why not just query for kanji = ' + safeQ
+ ', ie. literally. Well because, this way, if the entered search term contains single quotes or
slashes or anything that Web SQL considers “special”, the SQL query will break and result in
errors. When we use parameter binding, Web SQL is going to escape the parameter value for
us so that we are safe from dodgy characters accidentally breaking our SQL (or malicious “SQL
injection” attacks). You can try this a little later if you like to see how wrong it can go!
So we query with a success callback of successQueryDB_ja() and our all-purpose error handler.
Note that successQueryDB_ja() will be called if the executeSql() query is valid and executes
- which means even if zero results are returned. So successQueryDB_ja() is going to look like
this:
//Callback for if queryDB_ja() did not error (which includes zero results)
//Print kanji matches if we have any ELSE try kana matches
function successQueryDB_ja(tx, results)
{
if(results.rows.length == 0) //no kanji matches - try kana matches
{
//console.log('no ja kanji matches');
//version 1.0, 4 megabytes
var db = window.openDatabase(Japxlate, 1.0, Japxlate DB, 4 * 1024 * 1024);
db.transaction(queryDB_ja_kana, errorWebSQL);
}
else
{
putResultsOnPage(results);
}
}](https://image.slidesharecdn.com/phonegapbydissection-150226151804-conversion-gate01/85/PhoneGap-by-Dissection-71-320.jpg)
![The Search tab 67
We receive the SQLTransaction and an SQLResultSet. We check the rows.length property of
the resultset to see if we got any matches or not. If we have no matches then we open the DB
again and run a different query function on it, namely queryDB_ja_kana() which is going to
search for kana matches against the search term. If we have any matches, we simply call our
putResultsOnPage() function (that we made previously in search_interface.js) and pass it
the resultset. Then we are done with this particular query route. OK, we still need to implement
queryDB_ja_kana(), which - yes you’ve guessed it - is almost identical to queryDB_ja() but
using the kana field:
//Search edict for an exact kana match
function queryDB_ja_kana(tx)
{
var safeQ = global_searchTerm;
//use placeholders (so we don't need to escape the query)
tx.executeSql(SELECT * FROM edict WHERE kana = ? LIMIT + global_maxResultsCount,
[safeQ], successQueryDB_ja_kana, errorWebSQL);
}
We simply print out any and all results that we might have.
We are now ready to give this Japanese query route a test drive! First, include the new JavaScript
files we’ve made at the bottom of index.html so that it looks like this:
.
.
script type=text/javascript src=js/linguistics.js/script
script type=text/javascript src=js/search_interface.js/script
script type=text/javascript src=js/websql_edict_inserts.js/script
script type=text/javascript src=js/websql_core.js/script
script type=text/javascript src=js/websql_search.js/script
script type=text/javascript src=js/japxlate.js/script
script type=text/javascript src=js/index.js/script
script type=text/javascript
app.initialize();
/script
.
.
Run it! Enter an English search term and click the search button. You’ll get a console message of
“doing as english - exact”, and the spinner will start to spin and not stop! We’ve obviously not
finished the English query route yet.
Let’s check if it is really searching for any entered Japanese terms. Go ahead and copy some
random text from http://www.yahoo.co.jp and paste it into our app’s search box. Click search.
You’ll probably get the “no matches found” message (unless you got really lucky!). OK, so that’s
working. What about an actual match? Open up the websql_edict_inserts.js file and copy any](https://image.slidesharecdn.com/phonegapbydissection-150226151804-conversion-gate01/85/PhoneGap-by-Dissection-72-320.jpg)
![The Search tab 68
kanji or kana INSERT value. Search for this on the app and you should get the corresponding
definition. Nice!
This is pretty awesome right now. It’s beginning to feel like a useful, working app! OK, before
the very final thing we need to implement for searching (I’ll let you guess what you think it is
;-)) let’s tackle that English searching route. Go back to the else clause in doEdictQueryOn() (in
websql_search.js) and edit it to actually do something:
.
.
if(is_mb(global_searchTerm)) //Japanese (or at least multibyte)
{
//console.log('doing as japanese - kanji');
db.transaction(queryDB_ja, errorWebSQL);
}
else //ie. English (or - as last resort - romaji)
{
console.log('doing as english - exact');
db.transaction(queryDB_en, errorWebSQL);
}
.
.
We do what we do for Japanese just with a different query function called queryDB_en() which
is going to do step [1] of our English route and is like this:
//Search edict for an exact English match
function queryDB_en(tx)
{
var safeQ = global_searchTerm;
//use placeholders (so we don't need to escape the query)
tx.executeSql(SELECT * FROM edict WHERE definition LIKE ? LIMIT + global_maxResu
ltsCount, ['%/' + safeQ + '/%'], successQueryDB_en, errorWebSQL);
}
Here we query the definition field of our edict table and note how we use the LIKE operator
and not, as with the Japanese route queries, the ‘=’ operator. LIKE allows us to use wildcard
characters which allows us to do a fuzzier search. We need that functionality here as we are
trying to match only one of each database row’s many definitions (separated by ‘/’).
What’s going on with our 2nd argument where we have to specify the value for parameter
binding? Well, we basically build a LIKE condition that will match, completely, safeQ as ANY
one of the definition entries - first one, last one or any of the middle ones. ‘%’ is the SQL wildcard
meaning “match anything” and actually it will match zero characters if applicable too! With a
definition of:
/one/two/three/](https://image.slidesharecdn.com/phonegapbydissection-150226151804-conversion-gate01/85/PhoneGap-by-Dissection-73-320.jpg)
![The Search tab 69
then the same format of condition like: ‘%/one/%’, ‘%/two/%’, ‘%/three/%’ will match each corre-
sponding definition respectively. We simply build this pattern and put it in the 2nd argument.
We use the general error handler again and the success handler is successQueryDB_en():
//Callback for if queryDB_en() did not error (which includes zero results)
//Print exact matches if we have any ELSE try partial matches
function successQueryDB_en(tx, results)
{
if(results.rows.length == 0) //no exact matches - try partial matches
{
//console.log('no en exact matches');
//version 1.0, 4 megabytes
var db = window.openDatabase(Japxlate, 1.0, Japxlate DB, 4 * 1024 * 1024);
db.transaction(queryDB_en_partial, errorWebSQL);
}
else
{
putResultsOnPage(results);
}
}
This is cut from the same mould as successQueryDB_en() that we’ve just done. If we have
no results from exact matching, we move on to step [2] which is partial matches by calling
queryDB_en_partial():
//Search edict for a partial English match
function queryDB_en_partial(tx)
{
var safeQ = global_searchTerm;
//use placeholders (so we don't need to escape the query)
tx.executeSql(SELECT * FROM edict WHERE definition LIKE ? LIMIT + global_maxResu
ltsCount, ['%' + safeQ + '%'], successQueryDB_en_partial, errorWebSQL);
}
This is very very similar to queryDB_en(), but the important difference is in the LIKE condition.
We do not use slashes here which means we are not locked down to an exact match and will
match any definition list where the user’s search term appears. For example, searching for “user
interface” will match a definiton of:
/graphical user interface/GUI/
The success callback here is successQueryDB_en_partial() which is going to trigger the final
step [3] of English searching, or display results from this step [2].
It is in the same shape as the other success callbacks so far:](https://image.slidesharecdn.com/phonegapbydissection-150226151804-conversion-gate01/85/PhoneGap-by-Dissection-74-320.jpg)
![The Search tab 70
//Callback for if queryDB_en_partial() did not error (which includes zero results)
//Print partial matches if we have any ELSE try romaji matches
function successQueryDB_en_partial(tx, results)
{
if(results.rows.length == 0) //no partial matches - try as romaji
{
//console.log('no en partial matches');
//version 1.0, 4 megabytes
var db = window.openDatabase(Japxlate, 1.0, Japxlate DB, 4 * 1024 * 1024);
db.transaction(queryDB_en_romaji, errorWebSQL);
}
else
{
putResultsOnPage(results);
}
}
We do step [3] - if we need to - by calling queryDB_en_romaji(). This is going to be the fiddly step
that we mentioned earlier as it will need to convert search terms like “sayonara” or “moshimoshi”
into phonetic Japanese kana so we can then search the database. queryDB_en_romaji() is like
this:
//Search edict for a romaji match
function queryDB_en_romaji(tx)
{
var safeQ = global_searchTerm;
var safeQKana = romaji_to_hira(global_searchTerm);
//use placeholders (so we don't need to escape the query)
tx.executeSql(SELECT * FROM edict WHERE kana LIKE ? LIMIT + global_maxResultsCou
nt, [safeQKana], successQueryDB_en_romaji, errorWebSQL);
}
We convert the search term into hiragana (which is one of the Japanese phonetic scripts and the
most common one used in the kana field of our table) via romaji_to_hira() which we implement
very soon. The query is straightforward, but don’t forget to implement the success callback of
successQueryDB_en_romaji() which is a carbon copy of successQueryDB_ja_kana() but with
a different name.
So we’ve come to a bit of a dead-end as we need to implement the romaji_to_hira() script
conversion function. Well, I know from the experience of building the @japxlate bot - and
Mapanese - that we can cover almost all cases of Japanese – English script conversion by
simple string replacement operations. For example, we have a table of all Japanese characters
and then a corresponding table of English spellings for those characters. Then we can convert
Japanese script to English and vice versa.](https://image.slidesharecdn.com/phonegapbydissection-150226151804-conversion-gate01/85/PhoneGap-by-Dissection-75-320.jpg)
![The Search tab 71
JavaScript has a builtin String.replace() method, but it works by replacing the first (or all)
matching regexes in the string with the supplied replacement value. We can’t give it a list of
targets and a list of corresponding replacements. We want something a little easier to use, and
so we’re going to go deep down and dirty with some advanced JavaScript. We are going to
prototype a new method onto the String object which means we can add a new method to the
String class ONCE and it is available to any variable of type string in JavaScript! Let’s put this in
linguistics.js (we’ll get back to database querying when we’ve got the language conversion
all done and dusted). OK, code first explanations second:
//Here we use prototyping to add a method to the String class to give
//us the equivalent of PHP's str_replace()
String.prototype.str_replace = function(find, replace)
{
var replaceString = this;
var regex;
for (var i = 0; i find.length; i++) {
regex = new RegExp(find[i], g);
replaceString = replaceString.replace(regex, replace[i]);
}
return replaceString;
};
‘String’ is JavaScript’s object name for character strings. Any variable - or literal - that’s a string
will be of object type ‘String’. That’s how we can run .replace() and .match() and things
like that on any JavaScript string - because they are all String objects and the String object has
prototypes of those methods.
So the syntax to prototype a new method into the String object is:
String.prototype.newMethodName = function(any, args, you, need){code; to; do; stuff;};
We name the method “str_replace” (in honour of PHP ;-)) and define it as a function accepting
two parameters; find and replace - both of which are character arrays.
In a prototype method, the context of ‘this’ will refer to the object on which the method was
called. For example, if calling myStringVariable.str_replace(), then in the str_replace()
protoype, ‘this’ will be myStringVariable.
We save the string in replaceString. We then loop over each item in the find array and globally
(the ‘g’ modifier) replace any occurrences of it with the corresponding character in the replace
array. So yes, the find and replace arrays need to have the same number of items in them which
we don’t explicitly police here.
Before we write romaji_to_hira(), we need the character tables that our String.str_-
replace() will operate on. I won’t dwell on these too much, and it’s best to simply paste these
in to your code as a black box - this isn’t a linguistics course! Though the variable names and
comments will help if you want to read through it. Stick these at the top of linguistics.js:](https://image.slidesharecdn.com/phonegapbydissection-150226151804-conversion-gate01/85/PhoneGap-by-Dissection-76-320.jpg)
![The Search tab 72
//----character tables----------------------------------------------------------
//All single character hiragana (in biggest first order)
var coreHiragana =
[
'', '', '', '', '',
'', '', '', '', '',
'', '', '', '', '',
'', '', '', '', '',
'', '', '', '', '',
'', '', '', '', '',
'', '', '', '', '',
'', '', '', '', '',
'', '', '', '', '',
'', '', '', '', '',
'', '', '', '', '',
'', '', '',
'', '', '', '', '',
'', '', '', '',
'', '',
'', '', '', '', '',
'', '', '',
'', '', '', '', '',
];
//All single character katakana (in biggest first order)
var coreKatakana =
[
'', '', '', '', '',
'', '', '', '', '',
'', '', '', '', '',
'', '', '', '', '',
'', '', '', '', '',
'', '', '', '', '',
'', '', '', '', '',
'', '', '', '', '',
'', '', '', '', '',
'', '', '', '', '',
'', '', '', '', '',
'', '', '',
'', '', '', '', '',
'', '', '', '',
'', '',
'', '', '', '', '',
'', '', '',
'', '', '', '', '',
];
//Transliterations of coreHiragana](https://image.slidesharecdn.com/phonegapbydissection-150226151804-conversion-gate01/85/PhoneGap-by-Dissection-77-320.jpg)
![The Search tab 73
var coreRomaji =
[
'ga', 'gi', 'gu', 'ge', 'go',
'za', 'ji', 'zu', 'ze', 'zo',
'da', 'di', 'du', 'de', 'do',
'ba', 'bi', 'bu', 'be', 'bo',
'pa', 'pi', 'pu', 'pe', 'po',
'ka', 'ki', 'ku', 'ke', 'ko',
'sa', 'shi', 'su', 'se', 'so',
'ta', 'chi', 'tsu', 'te', 'to',
'na', 'ni', 'nu', 'ne', 'no',
'ha', 'hi', 'fu', 'he', 'ho',
'ma', 'mi', 'mu', 'me', 'mo',
'ya', 'yu', 'yo',
'ra', 'ri', 'ru', 're', 'ro',
'wa', 'wi', 'we', 'wo',
'n', '', //preserve chiisai tsu
'a', 'i', 'u', 'e', 'o',
'ya', 'yu', 'yo',
'a', 'i', 'u', 'e', 'o',
];
//All combination katakana
var comboKatakana =
[
'', '', '', '',
'', '', '', '',
'', '', '', '',
'', '', '',
'', '', '',
'', '',
'', '', '',
'', '', '',
'', '', '',
'', '', '',
'', '', '',
'', '', '',
'', '', '', '',
'', '', '',
'', '', '', '',
'',
''
];
//Transliterations of comboKatakana
var comboRomaji =
[
'cha', 'chu', 'che', 'cho',
'sha', 'shu', 'she', 'sho',](https://image.slidesharecdn.com/phonegapbydissection-150226151804-conversion-gate01/85/PhoneGap-by-Dissection-78-320.jpg)
![The Search tab 74
'ja', 'ju', 'je', 'jo',
'kya', 'kyu', 'kyo',
'gya', 'gyu', 'gyo',
'ryu', 'ryo',
'mya', 'myu', 'myo',
'hya', 'hyu', 'hyo',
'nya', 'nyu', 'nyo',
'bya', 'byu', 'byo',
'pya', 'pyu', 'pyo',
'dya', 'dyu', 'dyo',
'fa', 'fi', 'fe', 'fo',
'wi', 'we', 'wo',
'va', 'vi', 've', 'vo',
'ti',
'di'
];
//----/end character tables-----------------------------------------------------
The “combo” tables represent larger Japanese phonics that are written with two characters. We
need to search and replace these first in order to prevent splitting any of them up by searching
and replacing single characters first.
Note that we don’t define a “comboHiragana” table because we can get that by computing
comboKatakana.str_replace(coreKatakana, coreHiragana); if we need to.
romaji_to_hira() is going to now look like this:
//Convert romaji to hiragana
function romaji_to_hira(romajiString)
{
//replace combos first
var katakana = romajiString
.str_replace(comboRomaji, comboKatakana)
.str_replace(coreRomaji, coreKatakana);
//force hiragana
return kata_to_hira(katakana);
}
We accept a string in romaji (abc) and then run String.str_replace() on it twice using a
technique called chaining. We replace combo characters first and then single characters. We
now have a converted string in katakana, but as the function name implies we want to return
hiragana. We return the katakana as modified by kata_to_hira() which we implement, again
in linguistics.js, thus:](https://image.slidesharecdn.com/phonegapbydissection-150226151804-conversion-gate01/85/PhoneGap-by-Dissection-79-320.jpg)

![The Search tab 76
//Convert kana (hira or kata) to romaji
function kana_to_romaji(kanaString)
{
//force katakana
var kata = hira_to_kata(kanaString);
//transliterate
var withChiisaiTsu = kata.str_replace(comboKatakana, comboRomaji)
.str_replace(coreKatakana, coreRomaji);
//fix any remaining chiisai tsu's
//before 'chi' (make tchi)
var romaji = withChiisaiTsu.replace(/chi/g, 'tchi');
//before anything else (double the consonant)
romaji = romaji.replace(/([a-z]{1})/g, $1$1);
//TODO katakana style '' (which might actually be '-' in the input string)
romaji = romaji.replace(/([^0-9])[-]([^0-9])/g, $1$2);
romaji = romaji.replace(/([a-z]{1})/g, $1$1);
return romaji;
}
Again it’s best to think of this as a black box, but what it’s doing is the opposite of romaji_-
to_hira() but with some extra cleanup steps at the end. Searching for anything now has romaji
(abc) in brackets on each result line:](https://image.slidesharecdn.com/phonegapbydissection-150226151804-conversion-gate01/85/PhoneGap-by-Dissection-81-320.jpg)

![The Search tab 82
//Touchstart event handler for search results div - initiates touch scrolling
function touchstartForSearchResults(event)
{
//console.log('touchstart');
touchobj = event.changedTouches[0]; //reference *first* touch point
startVerticalDragScrolling(this, touchobj.clientY);
event.preventDefault(); //prevent default tap behavior
}
//Touchmove event handler for search results div - performs touch scrolling
function touchmoveForSearchResults(event)
{
//console.log('touchmove');
touchobj = event.changedTouches[0]; //reference first touch point for this event
doVerticalDragScrolling(this, touchobj.clientY);
event.preventDefault();
}
Well we don’t do much in these handler functions themselves, other than call soon-to-be-written
helper functions and then preventing the default action for the touch event in question. We
bundle away scroller functionality into helper functions to keep things nice and generic which
will help us later when we go back and get scrolling working with the mouse. As the default
behaviour for dragging a finger over some text would be to select that text, we prevent this
default.
The key point here is how to use the touch event that we receive. Touch events contain a
changedTouches property which is an array of touch objects. Each touch object in the array
represents a single touch directly involved in this event. Which for touchstart means all the
fingers that hit the screen, and for touchmove means all the fingers that moved.
As we don’t need or want to do anything fancy with multi touch gestures on Japxlate, we can
simply access .changedTouches[0] and ignore the rest. There will always be at least one touch
object in changedTouches[0], and there may or may not be more.
We pass the clientY property of our touch object to our helper functions. As the first argument,
we also pass ‘this’, which if you remember for event handler functions means the element that
the event triggered on - in this case the search results div.
See http://www.javascriptkit.com/javatutors/touchevents.shtml for more about touch events in
JavaScript.](https://image.slidesharecdn.com/phonegapbydissection-150226151804-conversion-gate01/85/PhoneGap-by-Dissection-87-320.jpg)
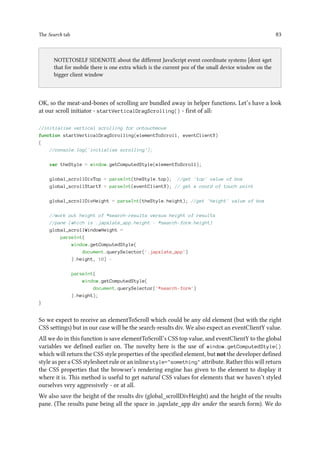
![The Search tab 84
this so we can work out if we actually need to scroll at all! Note that to get the height of the
results pane, we subtract the height of the search form from the total height of .japxlate_app. We
get the height of the search form by getting the height of the #search-form wrapper div which
we need to implement in index.html thus:
div id=search class=current
div id=search-form
button type=button id=search-button style=float:right; width:45%; margin-
right:1%;
img src=img/search.png
Search
img id=button-spinner src=img/spinner.gif style=visibility:hidden;
/button
input type=text id=search-query placeholder=Japanese or English size=40
style=width:45%; margin-left:1%;
br
span id=loading-text
[Loading core dictionary. This takes a while the first time.
img src=img/spinner.gif]
/span
/div
div id=results-wrapper
.
.
/div
.
.
/div
That’s the initiator, now on the the actual scroller which is, of course, going to be a bit more
complex. We need to use the global values we just saved to work out how far we’ve scrolled and
then move the results div accordingly. We also should check if we need to do any scrolling at all
- there might be no overflow of content!
A first bash looks like this:
//do vertical scrolling for ontouchmove
function doVerticalDragScrolling(elementToScroll, eventClientY)
{
//console.log('do scrolling');
//if height of results content is less than height of results pane,
//we have no content overflow and so don't need to scroll
if(global_scrollDivHeight global_scrollWindowHeight)
{
console.log('no overflow');
return;
}](https://image.slidesharecdn.com/phonegapbydissection-150226151804-conversion-gate01/85/PhoneGap-by-Dissection-89-320.jpg)
![The Search tab 86
return;
}
//calculate distance travelled by touch point
var distance = parseInt(eventClientY) - global_scrollStartY;
//new CSS top for elementToScroll
var newTop = global_scrollDivTop + distance;
//disallow scrolling bottom of content higher than bottom of results pane
//(using height of results pane)
if(newTop ((0 - global_scrollDivHeight) + global_scrollWindowHeight))
{
console.log('top cushion');
return; //return false??
}
//disallow scrolling top of content lower than top of results pane
if(newTop 0)
{
console.log('bottom cushion');
return; //return false?
}
//set the new top value for the div we are moving
elementToScroll.style.top = newTop + 'px';
}
(The changes are the two if clauses before the final elementToScroll.style.top.) To stop the
top of the results going lower than the top of the results pane, we simply prevent the results
div’s top property from going higher than zero. To prevent the bottom of the results from going
higher than the bottom of the results pane, we have to prevent the top value from going less than
negative(results height + results pane height). If the height of the results is 1000 pixels, and we
set the results div top to -1000 pixels, this will put the bottom of the results right at the top of
the results pane. From this state, adding, to top, the height of the results div will put the bottom
of the results at the bottom of the results pane. This is the minimum height we enforce here.
[NOTETOSELF the height of the results div.(?)]
Run this on your device and you’ll see that scrolling is “locked” and behaves more like native
Android.
Great, just one more problem which you might already be thinking about. Run the app and search
for “it’s” which produces lots of results. Scroll right to the bottom of the results. No problems
there. But then do a search that only gives a few results like “gas”. Eh? Where are the results?
Well, when you scrolled to the bottom of the results for “it’s” you moved the top value of the
search results div to quite a high negative number. This means that the top of the div is very
high up on the page, probably higher that the top of the screen! When you search again, the
div is still up there and a short amount of content will be obscured and not “reach down” to
the visible results pane. Clearly we need to reset the search result div’s top on every display of](https://image.slidesharecdn.com/phonegapbydissection-150226151804-conversion-gate01/85/PhoneGap-by-Dissection-91-320.jpg)
![The Search tab 88
//Mousedown event handler for search results div - initiates simulated touch scrolling
function mousedownForSearchResults(event)
{
//console.log('mousedown event on scrollable');
global_mouseButtonDown = true; //set global
startVerticalDragScrolling(this, event.clientY);
event.preventDefault(); //prevent default click behaviour (ie. select text or whate
ver)
}
//Mousemove event handler for search results div - performs simulated touch scrolling
function mousemoveForSearchResults(event)
{
//console.log('mousemove event on scrollable');
if(!global_mouseButtonDown)
{
return false; //do nothing if the mouse button isn't pressed down
//false is ok to return?
}
doVerticalDragScrolling(this, event.clientY);
event.preventDefault();
}
//Mouseup event handler for search results div
function mouseupForSearchResults(event)
{
//console.log('mouseup event on scrollable');
global_mouseButtonDown = false;
event.preventDefault(); //need?
}
We simply recycle our existing scrolling helpers. The biggest difference is we need to track if
the mouse button is down or not as we don’t want to scroll on a mousemove when the mouse
button isn’t down.
[NOTETOSELF mention using libraries for mobile touch scrolling etc]
[NOTETOSELF and the android webkit hack that you found]](https://image.slidesharecdn.com/phonegapbydissection-150226151804-conversion-gate01/85/PhoneGap-by-Dissection-93-320.jpg)

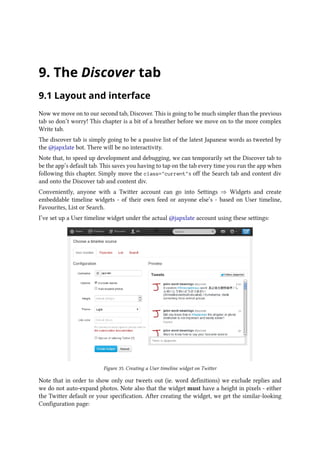
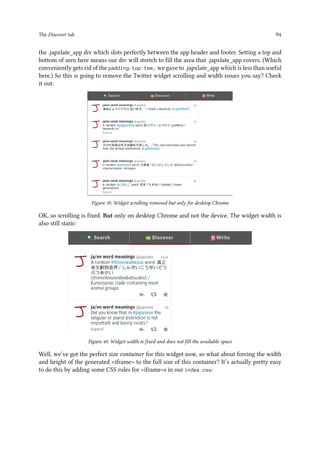
![The Discover tab 91
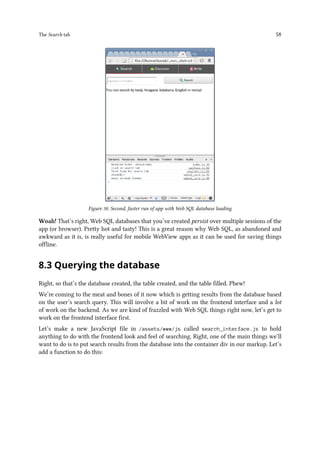
Figure 36. Configuring a User timeline widget on Twitter
This tells us that we can embed the widget anywhere we want by using this code snippet:
a class=twitter-timeline href=https://twitter.com/japxlate data-widget-id=3786306
91635728384Tweets by @japxlate/a
script!function(d,s,id){var js,fjs=d.getElementsByTagName(s)[0],p=/^http:/.test(d.loc
ation)?'http':'https';if(!d.getElementById(id)){js=d.createElement(s);js.id=id;js.src=p
+://platform.twitter.com/widgets.js;fjs.parentNode.insertBefore(js,fjs);}}(document,
script,twitter-wjs);/script
Which is a stylised a element followed by some arcane looking JavaScript which actually
creates, programatically, a script tag with the appropriate JavaScript from Twitter to turn the
a element into the correct widget. Clever!
Let’s go ahead and stick this in the HTML for our Discover tab and see what happens. Make the
Discover tab in index.html look like this:
div id=discover class=current
a class=twitter-timeline href=https://twitter.com/japxlate data-widget-id=378
630691635728384
Tweets by @japxlate (network connection required) img src=img/spinner.gif
/a
script!function(d,s,id){var js,fjs=d.getElementsByTagName(s)[0],p=/^http:/.test(d
.location)?'http':'https';if(!d.getElementById(id)){js=d.createElement(s);js.id=id;js.s
rc=p+://platform.twitter.com/widgets.js;fjs.parentNode.insertBefore(js,fjs);}}(docume
nt,script,twitter-wjs);/script
/div](https://image.slidesharecdn.com/phonegapbydissection-150226151804-conversion-gate01/85/PhoneGap-by-Dissection-96-320.jpg)

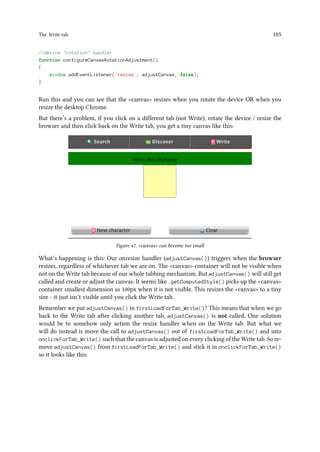
![The Write tab 100
Better!
10.2 Filling the screen
Hmmm, but Android devices come in all shapes and sizes. What to do about the size of the
canvas? We would want, ideally, the biggest square (Japanese characters tend to be rather
squareish) that would fit on the screen at that time - for portrait or lanscape.
We’ll take an approach like this:
1. Put the two buttons at the bottom of the screen
2. Make a containing div for the canvas that fills 100% of its available width and height
(the height under “Write this character” and above the buttons, then the full width of the
screen)
3. Set the size of the canvas to be the biggest square that will fit in this container. Centred in
the container
4. When the device is rotated, we will have to resize the canvas to be the biggest square in
the newly created container size
OK, tackling [1] and [2] first, we need a new layout. We are going to do the same thing we did
for the app’s header, content and footer; position them absolutely relative to parent. But this time
the parent will be our .japxlate_app div. Edit the write div in index.html to look like this:
div id=write class=current
p id=write-introWrite this character: span style=font-size:2em; id=char-to-
write/span
span id=char-explanation/span
/p
div id=write-canvas-container
!--canvas id=paper width=300 height=300/canvas--
/div
div id=write-buttons
button type=button id=canvas-clear style=width:45%; margin-right:1%; floa
t:right;
img src=img/paste.png Clear
/button
button type=button id=canvas-new style=width:45%; margin-left:1%;
img src=img/file.png New character
/button
/div
/div
We’ve given the intro paragraph an id. We’ve commmented the canvas out for the time being
but we’ve put it in a container div of #write-canvas-container. The buttons have also been placed
in a containing div of #write-buttons. Now we need to position and size these elements such that
the intro paragraph will be right at the top, the buttons will be right at the bottom, and the canvas
container will fill all the space inbetween. Add these CSS rules to index.css:](https://image.slidesharecdn.com/phonegapbydissection-150226151804-conversion-gate01/85/PhoneGap-by-Dissection-105-320.jpg)
![The Write tab 101
#write-intro {
position:absolute;
top:0; /*absolute top of .japxlate_app*/
height:40px; /*make arbitrarily big enough for our 2em character*/
width:100%;
margin-bottom:0; /*so #write-canvas-container is flush*/
margin-top:10px; /*so we aren't directly under the navigation tabs*/
text-align:center; /*centre text horizontally*/
/*background-color:green;*/
}
#write-canvas-container {
position:absolute;
top:50px; /*make flush with #write-intro*/
bottom:40px; /*stop 40px up from the botton of .japxlate_app*/
width:100%;
}
#write-buttons {
position:absolute;
bottom:0; /*absolute bottom of .japxlate_app*/
height:40px; /*make flush with bottom of #write-canvas-container*/
width:100%;
}
We simply make write-intro and write-buttons a little bit bigger than they need to be, and set
canvas container to fill the remaining space. We set margin-top of #write-intro to 10px so that
the intro paragraph text is not too close to the tabs and so that we know the top of #write-
canvas-container is 50px. We have previously set padding-top of .japxlate_app to 1em but this is
obliterated with the position:absolute and top:0 of #write-intro. (So yes, we’ve set a default
top padding of 1em on .japxlate_app but only used it in the Search tab as we positioned over it
on the Discover tab and this tab!). If you like you can confirm the size and shape of these divs
by setting a different background-color in each of the CSS rules and then changing the size of
desktop Chrome or rotating your device.
For [3] we need to programatically get the dimensions of #write-canvas-container, work out
the biggest square that will fit in those dimensions (possibly trimming a bit off so our canvas
isn’t too close to the buttons etc), and then dynamically add the appropriate canvas element into
#write-canvas-container - centreing it.
For [4] we need to catch a device rotation event and then do the steps for [3] again.
Create a file called canvas.js in assets/www/js. Include this JavaScipt file from the bottom of
index.html (above the include for index.js).
We are going to implement a function in canvas.js called adjustCanvas() which will be our
step [3]. adjustCanvas() looks like this:](https://image.slidesharecdn.com/phonegapbydissection-150226151804-conversion-gate01/85/PhoneGap-by-Dissection-106-320.jpg)
![The Write tab 103
Wow, this is our longest piece of JavaScript so far. With the first two lines we get the container
element for the canvas, and its style. We then save the width and height of the container.
We get the smallest dimension of the container (which will be the squared size of our canvas) by
assuming the container is portrait shaped. If container height is less than container width, we say
it is landscape shaped. (A perfectly square container will be covered by the portrait assumption
which will be fine as any of its side measurements is fine to use in that case.) We then put an
imaginary frame around the canvas of 15 pixels so that the bottom of the canvas is not flush
with our buttons.
Thinking ahead to step [4], it would be nice if this function to set up the canvas initially could
also be used to adjust the canvas for a device rotate. We tackle this with the concept of “first
time”. Basically, if the function is happening for the first time - ie. the canvas does not exist -
then it must create the canvas. If not the first time then it simply needs to alter the existing
canvas. We action this by:
var firstTime = !document.getElementById('paper');
Which relies on document.getElementById('someId') returning boolean false if an element
with the id of someId does not exist on the page. So we get or create the canvas ele-
ment and set its size to the smallest dimension of the container. Minus our frame gap of
course. The first time around we have to insert the created canvas element into the DOM
(document.createElement('elementname'); creates the element in memory only) which we do
with container.appendChild(canvas);.
Go ahead and delete the line:
canvas.style.position = 'relative';
and put that in the canvas{} rule in index.css as that makes more sense.
Next, mosey on over to firstLoadForTab_Write() in japxlate.js and add a call to
adjustCanvas() thus:
function firstLoadForTab_Write()
{
console.log('first load for write tab');
adjustCanvas(); //create canvas element of correct size
global_pagesLoaded.write = true;
}
Remember firstLoadForTab_Write() is our one-off initialiser for the Write tab and so running
the app now looks like:](https://image.slidesharecdn.com/phonegapbydissection-150226151804-conversion-gate01/85/PhoneGap-by-Dissection-108-320.jpg)
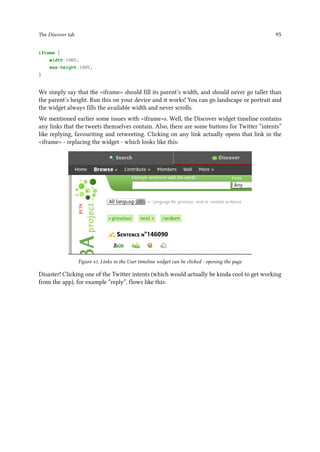
![The Write tab 104
Figure 46. canvas now fills available space
Pretty good! You can test that the canvas fills the available space by closing the page, resizing
the browser and loading the page again (desktop Chrome) or closing the app, rotating your phone,
reopening the app (device).
OK, that was actually the easy bit! Our next step is [4] and this is a bit fiddly as we need to figure
out how to detect a device rotation.
Well, the proper way is to catch the “orientationchange” event (of the window object) with a
handler. (Interestingly there is no PhoneGap API to do this.) Orientationchange will fire for
each and every orientation change of the device. And then in that handler you can use the
window.orientation property to work out the device orientation. Window.orientation will be 0
meaning portrait, 90 meaning landscape (top of phone pointing right) or -90 meaning landscape
(top of phone pointing left). These values represent the number of degrees the phone has been
rotated from the resting - or zero - position which is portrait. Android does not allow the screen
to be rotated upside-down and so there is no 180 value (phones only?).
As you would expect, our desktop Chrome browser doesn’t support the orientationchange event.
(You can try to spin your monitor around but don’t blame me if you wreck anything!). Keeping
our spirit of making the app work as an app and in the desktop Chrome, we are going to do
something a little different. (Although orientationchange is the “correct” way to do it.)
The closest thing to orientationchange on a desktop browser, and something that will also work
on our WebView browser, is the “resize” event of the window object. This event fires for every
resize - big or small - of the browser window. This includes the resize that our device will do to
the WebView when we rotate the device.
OK, let’s get the ball rolling (or should that be rotating? LOL). Stick a call to
configureCanvasRotationAdjustment(); at the bottom of receivedEvent() in index.js. We
define this function in canvas.js:](https://image.slidesharecdn.com/phonegapbydissection-150226151804-conversion-gate01/85/PhoneGap-by-Dissection-109-320.jpg)
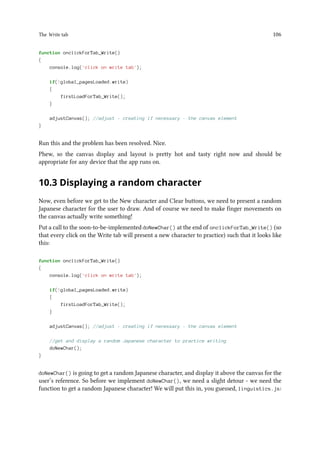
![The Write tab 107
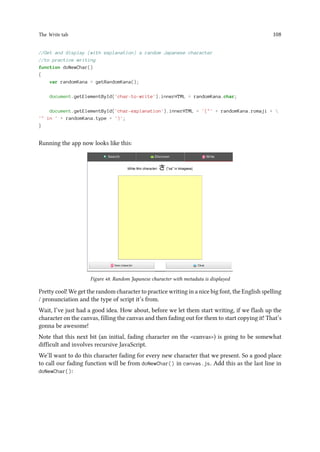
//return a random (non-chiisai, non-obsolete) hiragana or katakana
//RETURNs object like {char:'', romaji:'ku', type:'hiragana'}
function getRandomKana()
{
//indices to ignore from coreHiragana:
//64,65,68,=74
//so this is indices of coreHiragana of chars that we WANT to practice
//(ie. not chiisai or obsolete):
var coreIndices =
[
0, 1, 2, 3, 4, 5, 6, 7, 8, 9,
10, 11, 12, 13, 14, 15, 16, 17, 18, 19,
20, 21, 22, 23, 24, 25, 26, 27, 28, 29,
30, 31, 32, 33, 34, 35, 36, 37, 38, 39,
40, 41, 42, 43, 44, 45, 46, 47, 48, 49,
50, 51, 52, 53, 54, 55, 56, 57, 58, 59,
60, 61, 62, 63, 66, 67, 69, 70, 71, 72,
73
];
//get one of above indices at random
var index = coreIndices[Math.floor(Math.random() * coreIndices.length)];
//default to hiragana...
var char = coreHiragana[index]; //use our random index
var type = 'hiragana';
//...but have a 50% chance of returning katakana
if(Math.random() 0.50)
{
char = hira_to_kata(char);
type = 'katakana';
}
//return a useful object
return {char:char, romaji:kana_to_romaji(char), type:type};
}
This again might be something that’s best ignored and treated as a black box, but basically we
cherry pick a phonetic character from coreHiragana based on some desired indices (to give us a
full size and non-obsolete character). We then convert that character into katakana 50% of the
time. We return an object with the character itself and some metadata.
Let’s use this function in doNewChar() which we define in canvas.js:](https://image.slidesharecdn.com/phonegapbydissection-150226151804-conversion-gate01/85/PhoneGap-by-Dissection-112-320.jpg)


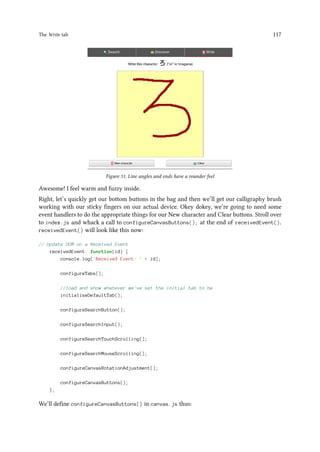
![The Write tab 118
//New character and Clear buttons
function configureCanvasButtons()
{
document.getElementById('canvas-clear').addEventListener('click', clearCanvas, fals
e);
document.getElementById('canvas-new').addEventListener('click', doNewChar, false);
}
And that’s it! The Clear button simply calls our existing clearCanvas() function, and the New
character button simply calls our existing doNewChar() function. Try it! The write tab is much
more fun now!
Right, the remaining matter is the important one of getting drawing to work with finger moves
on the device itself. We are happy with how it works in desktop Chrome now so let’s move
forward and think about the device. We isolated the doDrawOnCanvas() function and it is ready
to accept canvas coordinates from any event, not just mouse events.
Just like with search results scrolling, the events in question are touchstart, touchmove and
touchend. These will somewhat correlate with the mousedown, mousemove and mouseup
handlers (respectively) that we’ve just implemented.
In initialiseCanvas() in canvas.js, go ahead and insert these three lines to add our touch
event handlers. Insert them after the mouse event handlers:
//touch dragging for writing pad
global_canvasElement.addEventListener('touchstart', touchstartForCanvas, false);
global_canvasElement.addEventListener('touchmove', touchmoveForCanvas, false);
global_canvasElement.addEventListener('touchend', touchendForCanvas, false);
Great, now let’s define these handlers; again in canvas.js:
//Touchstart event handler for canvas
function touchstartForCanvas(event)
{
//console.log('touchstart event on canvas');
event.preventDefault();
}
//Touchmove event handler for canvas - draw on canvas
function touchmoveForCanvas(event)
{
var touchobj = event.changedTouches[0]; //reference first touch point for this event
//where, in canvas space, has been touched?
var x, y;
x = touchobj.offsetX;
y = touchobj.offsetY;](https://image.slidesharecdn.com/phonegapbydissection-150226151804-conversion-gate01/85/PhoneGap-by-Dissection-123-320.jpg)
![The Write tab 120
y += obj.offsetTop;
obj = obj.offsetParent;
}
while(obj);
}
return {'x':x, 'y':y};
};
We accept a DOM element in obj. We start the x and y values - our offset - at zero. Then, if we
have an .offsetparent on obj (if not then it is body and will have no parent) we loop (at least
once) cumulatively adding .offsetLeft to x and .offsetTop to y. We loop as long as there is a parent
up the chain. We return the coordinates in a little object.
Right, with this we can go back and fix touchmoveForCanvas(). Edit touchmoveForCanvas() to
look like this:
function touchmoveForCanvas(event)
{
var touchobj = event.changedTouches[0]; //reference first touch point for this event
//where, in canvas space, has been touched?
var x, y;
var canvasOffset = getPosition(global_canvasElement); //why no offset x and y for
if it's a touch event? :-(
x = touchobj.screenX - canvasOffset.x;
y = touchobj.screenY - canvasOffset.y;
doDrawOnCanvas(x, y);
}
Run this on your device. It works!
OMG, we’ve nailed it, we’ve finished all the tabs! Crack open the beers at this point ;-)
Just two more easy things. Let’s have a splashscreen that displays while we are waiting for the
app to start. Also, we’re going to need something other than PhoneGap’s default launcher icon!
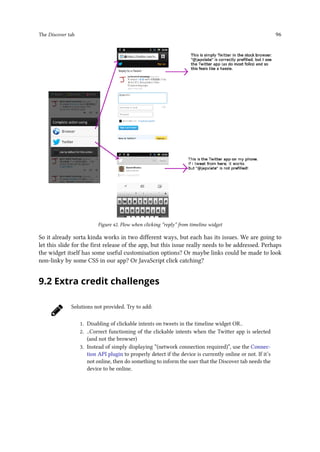
10.5 Extra credit challenges
Solutions not provided.
Easy
Prevent the current character from being displayed again when clicking the New
character button](https://image.slidesharecdn.com/phonegapbydissection-150226151804-conversion-gate01/85/PhoneGap-by-Dissection-125-320.jpg)
![The Write tab 121
Medium
The way we have centred the big fading character on the canvas is slightly ridiculous.
Use the canvas API to properly centre the character on the canvas [NOTETOSELF
find the good link for this]
Difficult
Technically what we are doing here for finger doodling is following the mouse or finger and,
underneath it, creating a multi-sectional line. We aren’t actually simply placing a pixel under
the mouse or finger. Now, the effect is the same so it mostly doesn’t matter, but there is a side
effect of doing it this way which is that, on the device, if you draw a very quick semi-circle, for
example, it will end up looking like this:
Figure 52. Imperfect lines can be created
Re-engineer finger doodling to use HTML5 canvas’s pixel manipulation API and see
if that solves this problem. http://beej.us/blog/data/html5s-canvas-2-pixel is a useful
reference here (though a few years old now)](https://image.slidesharecdn.com/phonegapbydissection-150226151804-conversion-gate01/85/PhoneGap-by-Dissection-126-320.jpg)
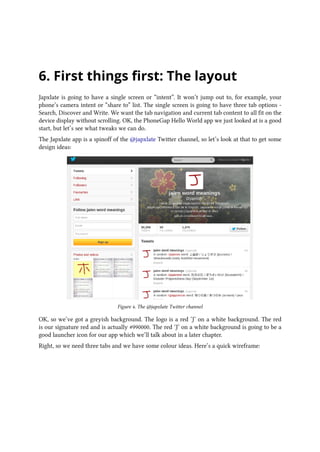
![11. Splash screen
To kill the dragon, turn to page 84. To hide in the tunnel, keep reading. LOL that was an interactive
fiction reference, because this entire chapter is optional. Why? Well it’s about implementing a
splash screen which is a contentious issue in the world of Android apps. (It also involves fiddling
with our app’s Java sources which is a bit advanced for this book.)
A splash screen is displayed after tapping an app’s launcher icon. They tend to fill the screen and
disappear after a delay and / or when the app is ready. Plenty of apps don’t have one. Most big
name games have one as those apps can take a while to load. Small utility apps (which is what
Japxlate is) seem to mostly not have one.
Why is this contentious? Well, the thinking is that they form a barrier to using the app. But they
are something to look at when larger apps are loading which could be useful.
So make up your own mind (http://cyrilmottier.com/2012/05/03/splash-screens-are-evil-dont-
use-them is useful) and skip this chapter if you feel Japxlate doesn’t need a splash screen. If
you think it does need one - or just want to see how it generally works - then please read on.
Hopefully only the first time while the Web SQL database is created, but our app may take a while
to start, and we also want to have some branding. So, we will have a splash screen. PhoneGap
exposes splash screen control in the “Splashscreen” API. This needs to be installed as a plugin
which can be done like this:
you@yours$ japxlate]$ phonegap local plugin add https://git-wip-us.apache.org/repos/asf
/cordova-plugin-splashscreen.git
From PhoneGap v3.3.0 you can simply type phonegap local plugin add
org.apache.cordova.splashscreen
Under the hood, this command will do a few things for you:
• Add feature name=SplashScreen to res/xml/config.xml
• Put SplashScreen.java in newly created /src/org/apache/cordova/splashscreen folder
(so this is an example of a plugin that will add to the native Java sources)
• Put the plugin in /assets/www/plugins/
• Add references to the plugin in /assets/www/cordova_plugins.js
Because of the new Plugman, PhoneGap v3.3.0 instead puts the plugin in
PROJECTROOT/plugins](https://image.slidesharecdn.com/phonegapbydissection-150226151804-conversion-gate01/85/PhoneGap-by-Dissection-127-320.jpg)
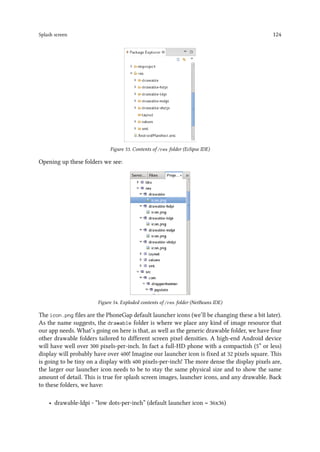
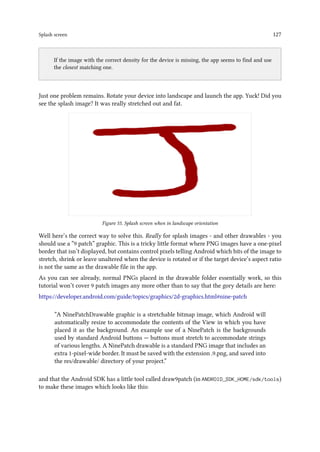
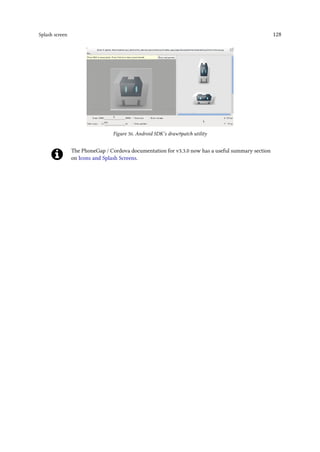
![13. Submitting to Google Play
[NOTETOSELF expand on this section]
This topic deserves - and has - whole books and tutorials dedicated to it. [NOTETOSELF some
links would be nice] We’ll cover it in a whistle-stop fashion. To publish your app on the Play
Store, follow these steps:
1. Open PROJECTROOT/AndroidManifest.xml and change android:debuggable=true to
android:debuggable=false
2. In Eclipse IDE, right-click on the Project and select Android Tools ⇒ Export Signed
Application Package
3. Follow the steps (choosing “create new keystore”) and be sure to save the keystore file and
password, and the alias password, in your favourite secure place for future reference
4. The final step creates an .apk file in the location you specify. This is what we will upload
to google.
5. You will need to attach an Android Developer account to an already existing vanilla Google
account. Do this by logging into Google with your vanilla account first, then signing up
as an Android developer at https://play.google.com/apps/publish/signup.
6. You’ll need a credit or debit card handy as there is a one-off registration fee of $25.
7. Upload the .apk file to your shiny new Developer account, set the title, description and
screenshots (you also need a 512px x 512px hi-res icon) and Bob’s your uncle!](https://image.slidesharecdn.com/phonegapbydissection-150226151804-conversion-gate01/85/PhoneGap-by-Dissection-135-320.jpg)
![14. That’s all folks!
[NOTETOSELF this is going to be a wrapping up chat. talk about the app’s pros and cons,
PhoneGap pros and cons. And talk about what they need to do and research going forward with
their app development. strongly recommend libraries like Sencha Touch, jQuery Mobile and
iScroll especially as doing scrolling from scratch took me more than 50% of total development
time which is ridiculous!]
TODO useful references](https://image.slidesharecdn.com/phonegapbydissection-150226151804-conversion-gate01/85/PhoneGap-by-Dissection-136-320.jpg)


![[2015/2016] Apache Cordova](https://cdn.slidesharecdn.com/ss_thumbnails/05cordova-160401161537-thumbnail.jpg?width=640&height=640&fit=bounds)


![谷歌留痕技术教程[ 𝙩𝙤𝙥 𝟮𝟯𝟯. 𝙘 𝙤𝙢 ]](https://cdn.slidesharecdn.com/ss_thumbnails/top233-260130173900-2eb784f9-thumbnail.jpg?width=640&height=640&fit=bounds)


