Part 37 exchange server - recipient configuration - delegates - restriction -www.key4_vip.info
•
0 likes•162 views


Recommended
More Related Content
What's hot
Viewers also liked
Viewers also liked (18)
Similar to Part 37 exchange server - recipient configuration - delegates - restriction -www.key4_vip.info
Similar to Part 37 exchange server - recipient configuration - delegates - restriction -www.key4_vip.info (12)
More from laonap166
More from laonap166 (20)
Part 37 exchange server - recipient configuration - delegates - restriction -www.key4_vip.info
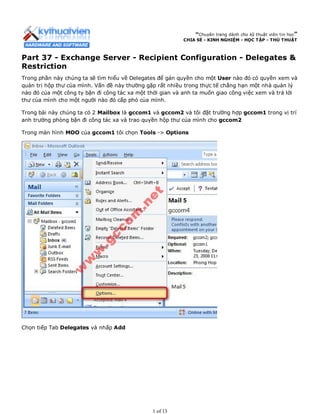
- 1. “Chuyên trang dành cho kỹ thuật viên tin học” CHIA SẺ - KINH NGHIỆM - HỌC TẬP - THỦ THUẬT Part 37 - Exchange Server - Recipient Configuration - Delegates & Restriction Trong phần này chúng ta sẽ tìm hiểu về Delegates để gán quyền cho một User nào đó có quyền xem và quản trị hộp thư của mình. Vấn đề này thường gặp rất nhiều trong thực tế chẳng hạn một nhà quản lý nào đó của một công ty bận đi công tác xa một thời gian và anh ta muốn giao công việc xem và trả lời thư của mình cho một người nào đó cấp phó của mình. Trong bài này chúng ta có 2 Mailbox là gccom1 và gccom2 và tôi đặt trường hợp gccom1 trong vị trí anh trưởng phòng bận đi công tác xa và trao quyền hộp thư của mình cho gccom2 Trong màn hình MOO của gccom1 tôi chọn Tools -> Options Chọn tiếp Tab Delegates và nhấp Add 1 of 13
- 2. Vì gccom1 muốn gán quyền cho gccom2 nên trong cửa sổ Add User tôi chọn gccom2 Trong màn hình Delegate Permission bạn có thể tùy chỉnh quyền hạn của User mà mình sẽ gán quyền trong này tôi chỉ gán cho User gccom2 chỉ có quyền xem và gởi thư mà thôi. Chọn tiếp mục Automatically send a message to delegate summarizing these permissions để gởi Email thông báo đến gccom2 về quyền hạn vừa được gán cho User này 2 of 13
- 3. Màn hình sau khi Delegate hoàn tất Trong hộp thư của gccom2 sẽ nhận được một Email thông báo rằng gccom1 đã gán quyền quản lý hộp thư của mình cho gccom2 3 of 13
- 4. Để xem được thư của gccom1 tại màn hình MOO của gccom2 ta chọn File -> Open -> Other User's Folder... Chọn gccom1 và click OK Bây giờ trong màn hình Inbox của gccom2 sẽ hiển thị các Email của gccom1 (bạn chú ý dòng gccom1- Inbox phía trên) 4 of 13
- 5. Bây giờ giả sử gccom2 có nhu cầu gởi email cho gccom3 và gccom4 nhưng với tư cách là gccom1 nên tạo màn hình Message chọn Tab Options và chọn Show From Tiếp đến nhập email của gccom1 vào ô From Tại màn hình Inbox của gccom3 và gccom4 đã thấy Email của gccom1 gởi cho truy nhiên trong này có ghi rõ gccom2 on behalf of gccom1 hay nói nôm na là Email này được gởi bởi gccom2 và được ủy quyền từ gccom1 5 of 13
- 6. Bây giờ ta sẽ tìm hiểu về Message Delivery Restriction để ngăn cấm việc nhận mail từ một User khác. Ví dụ trong này tôi sẽ ngăn cấm gccom1 nhận mail từ gccom4 nên tại màn hình Recipient Configuration nhập phải vào gccom1 chọn Properties Trong màn hình Properties chọn Tab Mail Flow Settings chọn Message Delivery Restrictions 6 of 13
- 7. Trong phần Reject messages from chọn Senders in the following list và add gccom4 vào Bây giờ trong MOO của gccom4 tôi sẽ gởi một Mail mới với Subject là Mail 7 cho gccom1 7 of 13
- 8. Ngay lập tức gcom4 sẽ nhận một Email phản hồi từ Exchange Server thông báo là email này không thể gởi được Bây giờ ta sẽ giới hạn không cho gccom1 gởi và nhận Mail có dung lượng quá lớn nên trong màn hình Properties của Mailbox gccom1 chọn Tab Mail Flow Settings chọn Message Size Restrictions 8 of 13
- 9. Trong phần Sending message size tôi nhập giá trị là 1024 và trong Receiving message size tôi nhập là 2048. Nghĩa là gccom1 không thể gởi email có dung lượng quá 1Mb và không thể nhận Mail có dung lượng quá 5Mb Bây giờ tại gccom2 tôi gởi một Mail mới cho gccom1 và Attach một file có dung lượng khoảng 6Mb Ngay lập tức gccom2 sẽ nhận được một mail phản hồi từ Exchange Server thông báo rằng email hông 9 of 13
- 10. thể gởi đến gccom1 vì có dung lượng vượt quá giới hạn của gccom1 Như vậy nếu ta tùy chỉnh các giới hạn Message Size Restrictions thì User này không thể gởi cho User kia một Email có dung lượng vượt quá giá trị cho phép của User kia nhưng bù lại có thể gởi hàng ngàn email có dung lượng nhỏ hơn giá trị cho phép. Như vậy vấn đề phát sinh là hộp thư của một user có thể lên đến hàng GB (mà mặc định Exchange cho phép một Mailbox có dung lượng tối đa là 2.4Gb) như thế với một mô hình công ty lớn đến vài trăm nhân viên dung lượng đĩa cứng mà ta dùng để lưu email của các User là quá lớn. Chính vì thế yêu cầu đặt ra ta phải giới hạn dung lượng lưu trữ của các Mailbox nhằm tiết kiệm không gian ổ cứng. Trở lại màn hình Properties của Mailbox gccom1 chọn Tab Mailbox Settings chọn Storage Quotas 10 of 13
- 11. Bỏ mục chọn Use mailbox database defaults đi và nhập các giá trị: - Issue warning at (KB) 1024 : Bật nhắc nhở xóa bớt Email cho User khi hộp thư có dung lượng vượt quá 1Mb, tuy nhiên vẫn được phép tiếp tục gởi và nhận thư. - Prohibit send at (KB) 2048 : Ngăn cấm User này gởi thư đi khi dung lượng hộp thư vượt quá 2Mb, nhưng vẫn được phép nhận thư về. - Prohibit send and receive at (KB) 3072 : Ngăn cấm mọi công việc gởi và nhận thư khi dung lượng hộp thư vượt quá 3Mb. Tuy nhiên việc này sẽ nảy sinh ra một bất cập chính là khi dung lượng Mailbox của một User nào đó chưa vượt quá giới hạn cho phép thì nó vẫn được phép nhận một Mail có dung lượng lớn hơn dung lượng cho phép của nó Bằng chứng là tại gccom2 tôi sẽ gởi một Email có dung lượng khoảng 6Mb cho gccom1 11 of 13
- 12. Và nhận thấy gccom1 vẫn nhận được Email này rất tốt, tuy nhiên từ đó trở đi User này sẽ không được gởi và nhận mail nữa vì dung lượng hộp thư đã vượt quá giới hạn cho phép. Như vậy nhờ tính năng này mà các User có thể lợi dung để gởi cho nhau các Email có dung lượng cực lớn. Chính vì thế chúng ta cần kết hợp giữa Storage Quotas và Message Size Restrictions để ngăn chặn việc này. 12 of 13
- 13. OK mình vừa trình bày xong phần Delegates & Restriction in Recipient Configuration của Exchange Server 2007 trong 70-236 của MCSA. Công ty TNHH đầu tư phát triển tin học GC Com Chuyên trang kỹ thuật máy vi tính cho kỹ thuật viên tin học Điện thoại: (073) - 3.511.373 - 6.274.294 Website: http://www.gccom.net 13 of 13