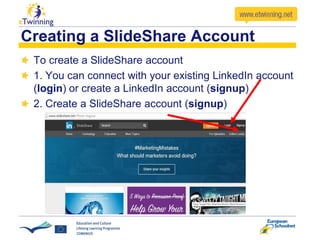
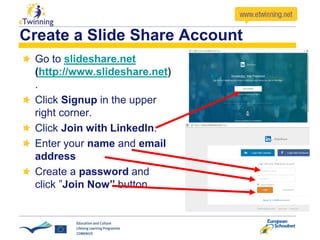
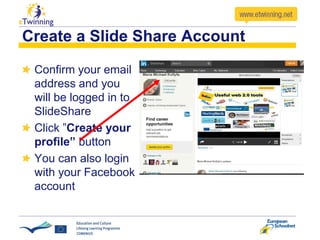
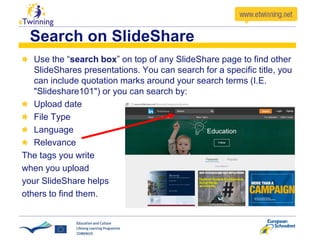
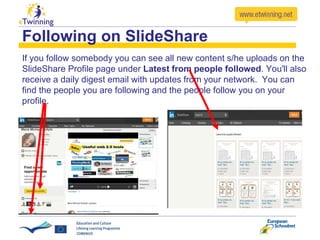
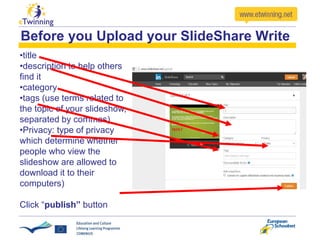
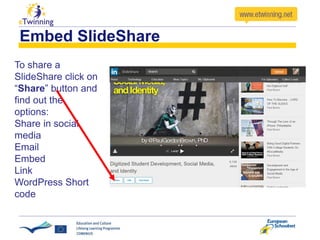
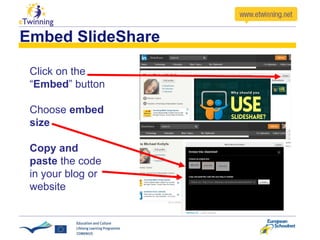
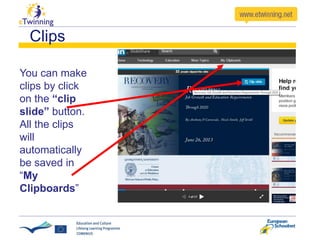
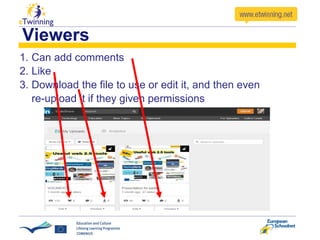
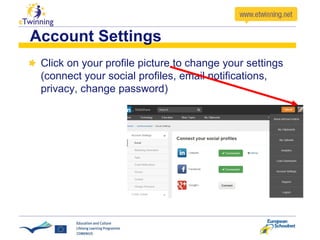
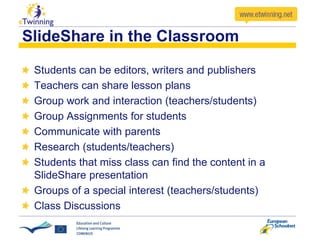
PRESENTATION WITH SlideShare
http://www.slideshare.net
USEFUL WEB 2.0 TOOLS
By Maria Michael Kollyfa
E Twinning Ambassador Cyprus
24 February 2016
What is SlideShare?
LinkedIn SlideShare is a Web 2.00 tool. It is a site
designed for professionals who wish
• to share their thoughts and ideas and
• to explore other presenters’ content across the
internet.
It contains presentations, infographics, documents, and
videos categorised in subjects.
SlideShare allows users to share files such as PDF,
DOC, PPT, and Keynote (maximum size 100MB) and
embed theirs or others slideshows on a blog or on a
website.
Advantages of SlideShare?
• It is free
• It is accessible anywhere
• It expands your professional presence
• It fosters your reputation globally
• It cultivates more professional opportunities globally
• It helps you to reach and engage a global audience
• It supports collaboration
• It allows to get and give feedback (write comments
on others’ SlideShares)
• It helps you to find experts, writers, researchers
• It enhances learning
Contents
It contains numerous topics of interest, like:
• Business
• Entertainment
• Technology
• Health
• Travel
• Education
• …
To create a SlideShare account
1. You can connect with your existing LinkedIn account
(login) or create a LinkedIn account (signup)
2. Create a SlideShare account (signup)
Creating a SlideShare Account
Create a Slide Share Account
Go to slideshare.net
(http://www.slideshare.net)
.
Click Signup in the upper
right corner.
Click Join with LinkedIn.
Enter your name and email
address
Create a password and
click ”Join Now” button.
Create a Slide Share Account
Confirm your email
address and you
will be logged in to
SlideShare
Click ”Create your
profile” button
You can also login
with your Facebook
account
Search on SlideShare
Use the “search box” on top of any SlideShare page to find other
SlideShares presentations. You can search for a specific title, you
can include quotation marks around your search terms (I.E.
"Slideshare101") or you can search by:
Upload date
File Type
Language
Relevance
The tags you write
when you upload
your SlideShare helps
others to find them.
Following a group/subject
You can click
on “Follow”
button to
follow a
group or a
topic that
interests
you.
Following on SlideShare
If you follow somebody you can see all new content s/he uploads on the
SlideShare Profile page under Latest from people followed. You'll also
receive a daily digest email with updates from your network. You can
find the people you are following and the people follow you on your
profile.
1.Navigate to their SlideShare account by typing
www.slideshare.net/USERNAME in your browser.
2.Click the ”Follow” button.
Following somebody on SlideShare
Unfollowing on SlideShare
1.Navigate to their SlideShare account, by
typing www.slideshare.net/USERNAME in
your browser
2.Click the “Unfollow” button.
Watch a SlideShare
Double click on a
SlideShare
Play it by using the
controls at the bottom of
the slide display screen,
Maximise the display
screen by clicking “full” in
the lower right hand
corner of the display
screen.
Upload your SlideShow
1. Click on SlideShare’s “Upload button”
2. Click on “Browse and Select” and select the file
you want to upload, or drag and drop your file.
Before you Upload your SlideShare Write
•title
•description to help others
find it
•category
•tags (use terms related to
the topic of your slideshow,
separated by commas)
•Privacy: type of privacy
which determine whether
people who view the
slideshow are allowed to
download it to their
computers)
Click “publish” button
Privacy
1. You can share your
SlideShare with
everyone (Public)
2. You can make your
SlideShare Private
3. You can share it only
with specified
contacts, by sharing
the SlideShare link with
them
Upload - Preview your presentation.
Before you upload your Slideshare you
have the option
• to preview it
• to share the SlideShow with friends via
social media by clicking on the buttons
at the bottom.
Embed SlideShare
To share a
SlideShare click on
“Share” button and
find out the
options:
Share in social
media
Email
Embed
Link
WordPress Short
code
Embed SlideShare
Click on the
“Embed” button
Choose embed
size
Copy and
paste the code
in your blog or
website
Clips
You can make
clips by click
on the “clip
slide” button.
All the clips
will
automatically
be saved in
“My
Clipboards”
Viewers
1. Can add comments
2. Like
3. Download the file to use or edit it, and then even
re-upload it if they given permissions
Analytics of your SlideShare
You can easily
find out the
number of views
and from which
state are the
viewers, the
dates of views,
etc.
Account Settings
Click on your profile picture to change your settings
(connect your social profiles, email notifications,
privacy, change password)
SlideShare in the Classroom
Students can be editors, writers and publishers
Teachers can share lesson plans
Group work and interaction (teachers/students)
Group Assignments for students
Communicate with parents
Research (students/teachers)
Students that miss class can find the content in a
SlideShare presentation
Groups of a special interest (teachers/students)
Class Discussions
THANK YOU FOR YOUR ATTENTION!
Maria Michael Kollyfa
eTwinning Ambassador – Cyprus
mariakollyfa@gmail.com

SLIDESHARE PRESENTATION

  • 2.
    PRESENTATION WITH SlideShare http://www.slideshare.net USEFULWEB 2.0 TOOLS By Maria Michael Kollyfa E Twinning Ambassador Cyprus 24 February 2016
  • 3.
    What is SlideShare? LinkedInSlideShare is a Web 2.00 tool. It is a site designed for professionals who wish • to share their thoughts and ideas and • to explore other presenters’ content across the internet. It contains presentations, infographics, documents, and videos categorised in subjects. SlideShare allows users to share files such as PDF, DOC, PPT, and Keynote (maximum size 100MB) and embed theirs or others slideshows on a blog or on a website.
  • 4.
    Advantages of SlideShare? •It is free • It is accessible anywhere • It expands your professional presence • It fosters your reputation globally • It cultivates more professional opportunities globally • It helps you to reach and engage a global audience • It supports collaboration • It allows to get and give feedback (write comments on others’ SlideShares) • It helps you to find experts, writers, researchers • It enhances learning
  • 5.
    Contents It contains numeroustopics of interest, like: • Business • Entertainment • Technology • Health • Travel • Education • …
  • 6.
    To create aSlideShare account 1. You can connect with your existing LinkedIn account (login) or create a LinkedIn account (signup) 2. Create a SlideShare account (signup) Creating a SlideShare Account
  • 7.
    Create a SlideShare Account Go to slideshare.net (http://www.slideshare.net) . Click Signup in the upper right corner. Click Join with LinkedIn. Enter your name and email address Create a password and click ”Join Now” button.
  • 8.
    Create a SlideShare Account Confirm your email address and you will be logged in to SlideShare Click ”Create your profile” button You can also login with your Facebook account
  • 9.
    Search on SlideShare Usethe “search box” on top of any SlideShare page to find other SlideShares presentations. You can search for a specific title, you can include quotation marks around your search terms (I.E. "Slideshare101") or you can search by: Upload date File Type Language Relevance The tags you write when you upload your SlideShare helps others to find them.
  • 10.
    Following a group/subject Youcan click on “Follow” button to follow a group or a topic that interests you.
  • 11.
    Following on SlideShare Ifyou follow somebody you can see all new content s/he uploads on the SlideShare Profile page under Latest from people followed. You'll also receive a daily digest email with updates from your network. You can find the people you are following and the people follow you on your profile.
  • 12.
    1.Navigate to theirSlideShare account by typing www.slideshare.net/USERNAME in your browser. 2.Click the ”Follow” button. Following somebody on SlideShare
  • 13.
    Unfollowing on SlideShare 1.Navigateto their SlideShare account, by typing www.slideshare.net/USERNAME in your browser 2.Click the “Unfollow” button.
  • 14.
    Watch a SlideShare Doubleclick on a SlideShare Play it by using the controls at the bottom of the slide display screen, Maximise the display screen by clicking “full” in the lower right hand corner of the display screen.
  • 15.
    Upload your SlideShow 1.Click on SlideShare’s “Upload button” 2. Click on “Browse and Select” and select the file you want to upload, or drag and drop your file.
  • 16.
    Before you Uploadyour SlideShare Write •title •description to help others find it •category •tags (use terms related to the topic of your slideshow, separated by commas) •Privacy: type of privacy which determine whether people who view the slideshow are allowed to download it to their computers) Click “publish” button
  • 17.
    Privacy 1. You canshare your SlideShare with everyone (Public) 2. You can make your SlideShare Private 3. You can share it only with specified contacts, by sharing the SlideShare link with them
  • 18.
    Upload - Previewyour presentation. Before you upload your Slideshare you have the option • to preview it • to share the SlideShow with friends via social media by clicking on the buttons at the bottom.
  • 19.
    Embed SlideShare To sharea SlideShare click on “Share” button and find out the options: Share in social media Email Embed Link WordPress Short code
  • 20.
    Embed SlideShare Click onthe “Embed” button Choose embed size Copy and paste the code in your blog or website
  • 21.
    Clips You can make clipsby click on the “clip slide” button. All the clips will automatically be saved in “My Clipboards”
  • 22.
    Viewers 1. Can addcomments 2. Like 3. Download the file to use or edit it, and then even re-upload it if they given permissions
  • 23.
    Analytics of yourSlideShare You can easily find out the number of views and from which state are the viewers, the dates of views, etc.
  • 24.
    Account Settings Click onyour profile picture to change your settings (connect your social profiles, email notifications, privacy, change password)
  • 25.
    SlideShare in theClassroom Students can be editors, writers and publishers Teachers can share lesson plans Group work and interaction (teachers/students) Group Assignments for students Communicate with parents Research (students/teachers) Students that miss class can find the content in a SlideShare presentation Groups of a special interest (teachers/students) Class Discussions
  • 26.
    THANK YOU FORYOUR ATTENTION! Maria Michael Kollyfa eTwinning Ambassador – Cyprus mariakollyfa@gmail.com